Integrate BrowserStack App Automate with Azure Pipelines
Integrate your Appium tests with Azure Pipelines or Visual Studio Team Services (VSTS)
Introduction
Azure Pipelines formerly known as Visual Studio Team Services(VSTS) is a Microsoft product. Azure Pipelines is a Continuous Integration (CI) server, which automates the build and deploy process of your native apps. By running your Appium test suite in Azure Pipelines, you also automate testing as part of the build process. Add BrowserStack to the mix, and your native apps can be tested across 3000+ real devices. BrowserStack lets you integrate your Appium tests with Azure Pipelines using an extension that connects the CI server to the BrowserStack Appium Grid.
Use the BrowserStack Azure Pipelines extension to:
- Configure your BrowserStack credentials.
- Configure the App Uploader
- Set up and tear down the BrowserStack Local binary for testing internal, development and staging environments.
- Embed BrowserStack test results in your job results.
Prerequisites
You need the following set up before you begin.
- Azure Pipelines account
- BrowserStack account
Installing Azure Pipelines Extension
To run your tests with Azure Pipelines on BrowserStack, you will first need to install our extension. Before installing the plugin, ensure you have the necessary privileges to administer the installation.
-
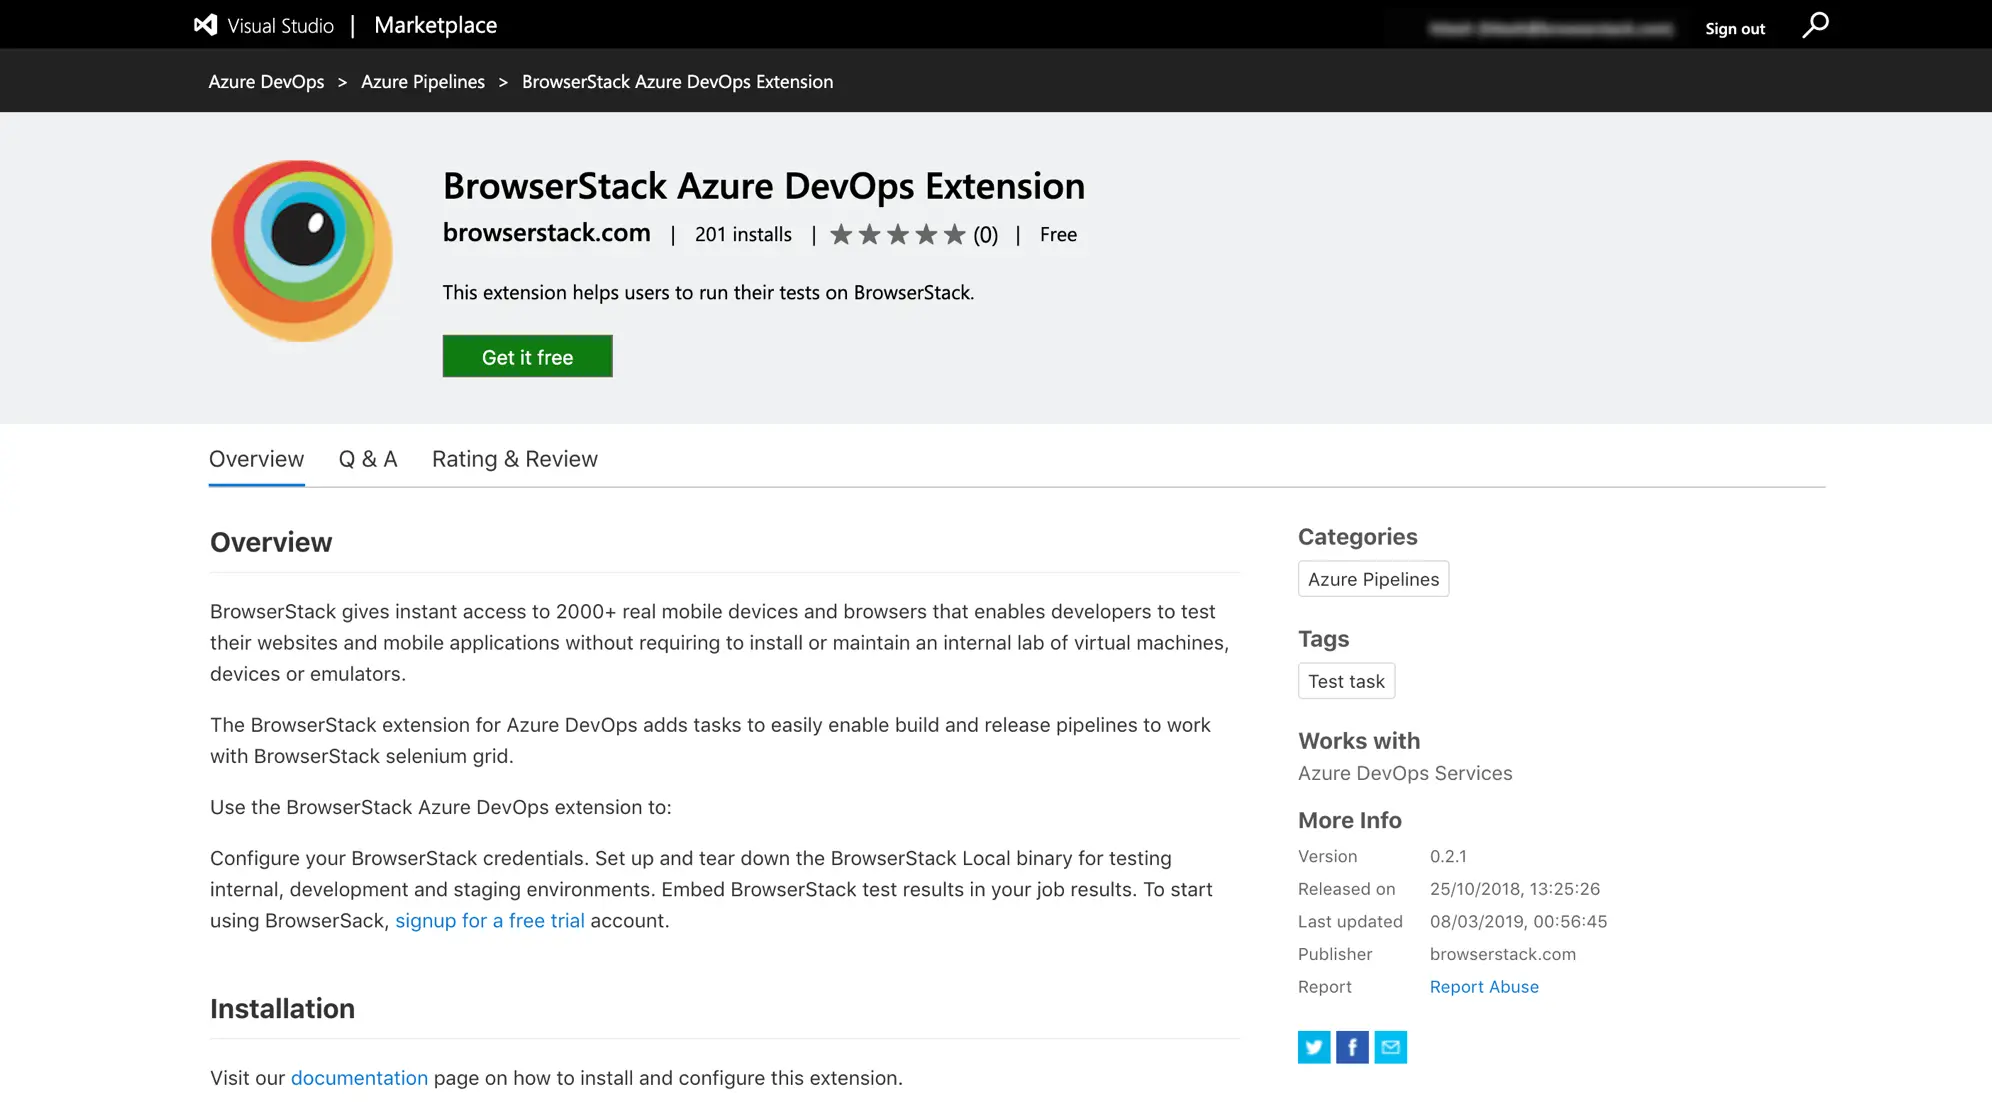
Go to the BrowserStack extension page.
-
Click on Get it free. It will redirect to the installation page.
-
Use the drop-down Select an Azure Pipelines organization to select your organization. Click Install.
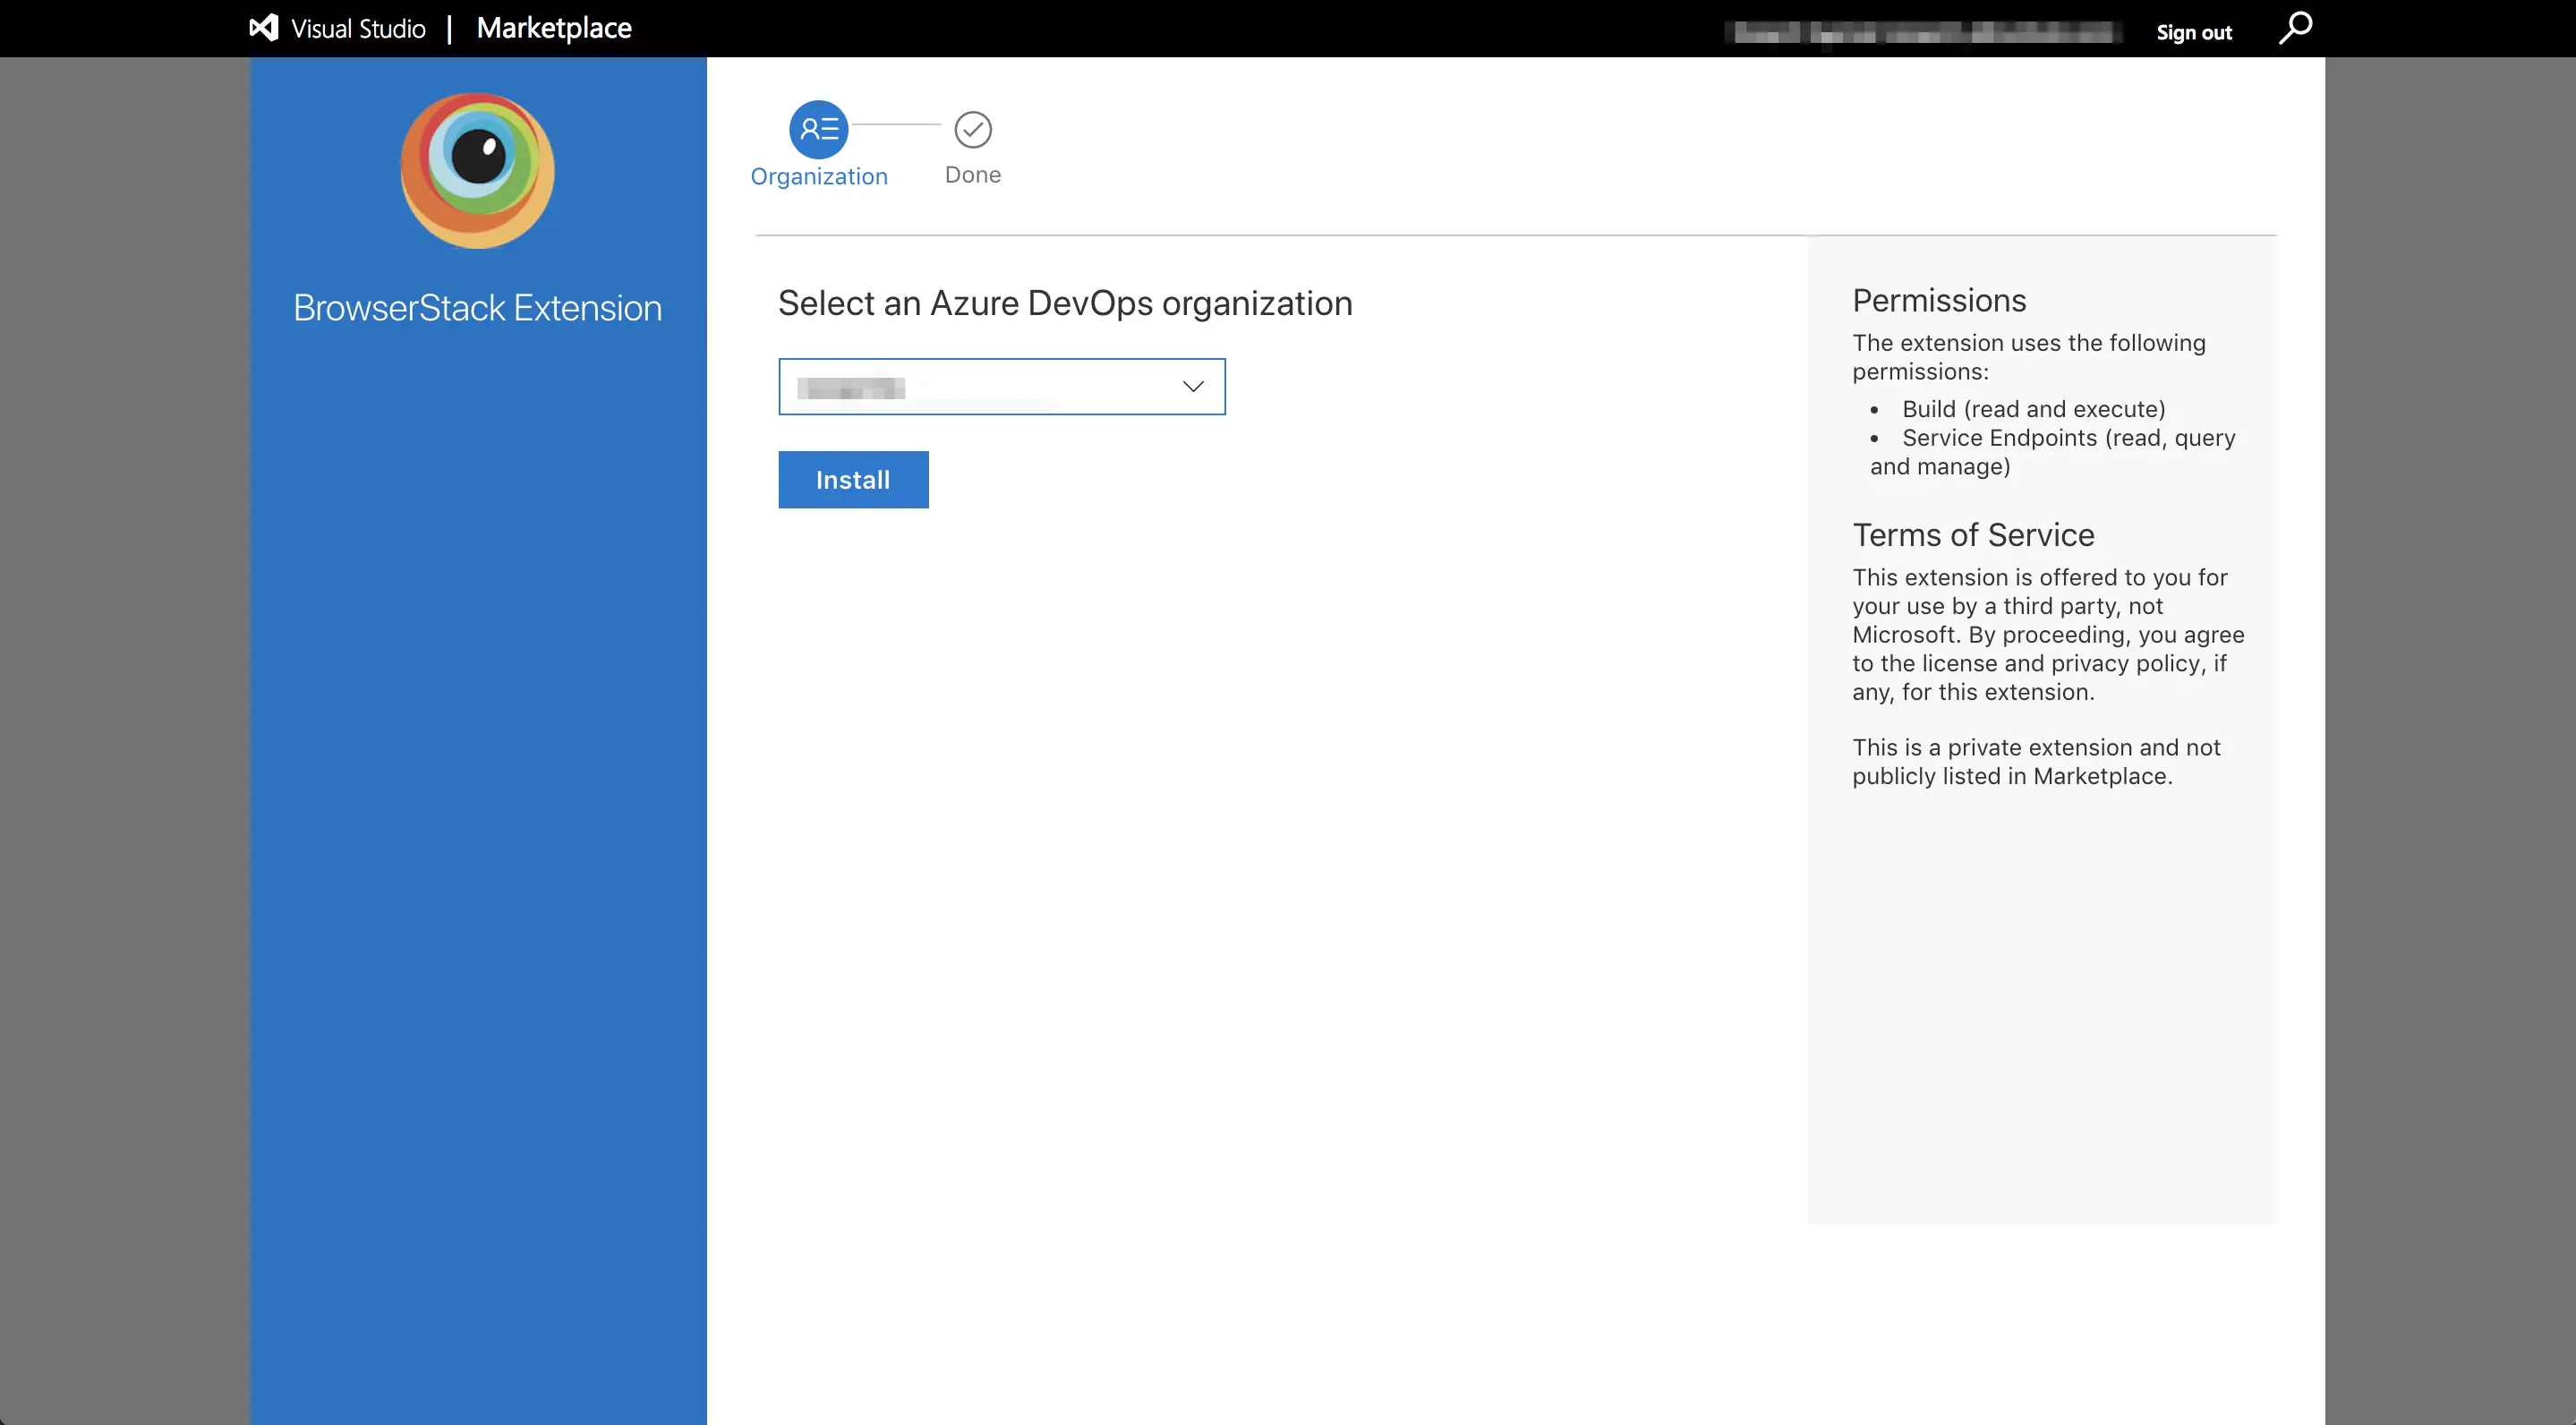
This completes the extension installation.
Configuring Build Pipeline
Once you have installed the extension, you can configure a build pipeline by editing an existing pipeline or creating a new one. There is a slightly different process of integrating with BrowserStack depending on the type of pipeline editing option you are using in Azure as given below:
- Using the YAML based pipeline editor
- Using the classic pipeline editor in Azure
If you already have a YAML based pipeline or want to create a new one, then you can integrate the BrowserStack extension using the steps as shown below:
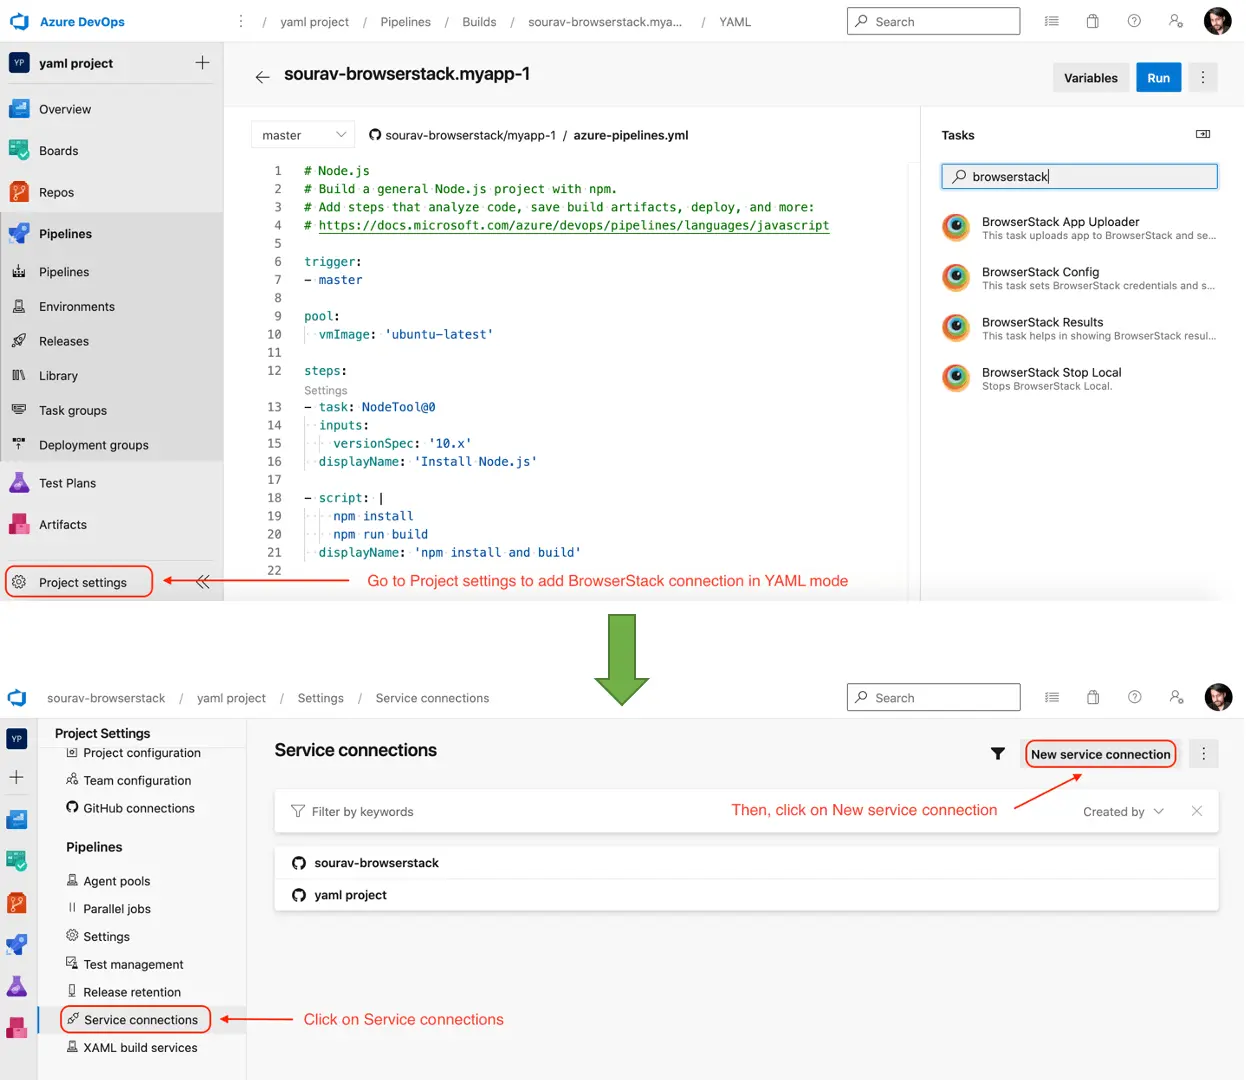
-
Open the project and add a new service connection for connecting with the BrowserStack cloud. Go to Project settings > Service connections > New service connection as shown below:
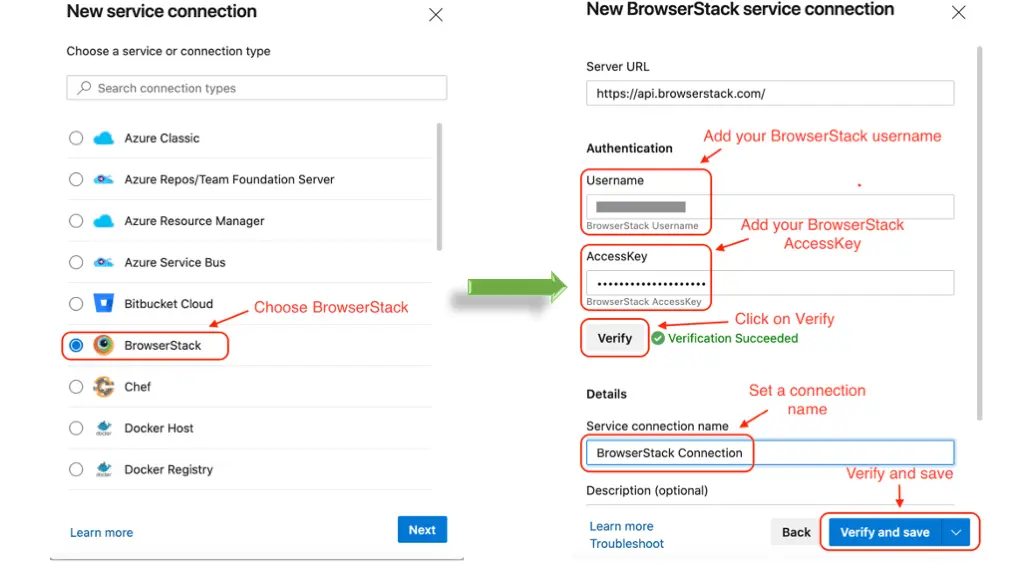
-
Select BrowserStack from the list, add your credentials (you can find them in account settings), give a name to the connection and save it, as shown in the image below:
-
Use the BrowserStack service connection to connect to the BrowserStack cloud using the BrowserStack Config task from the right task pane in the YAML edit window as shown in the image below:
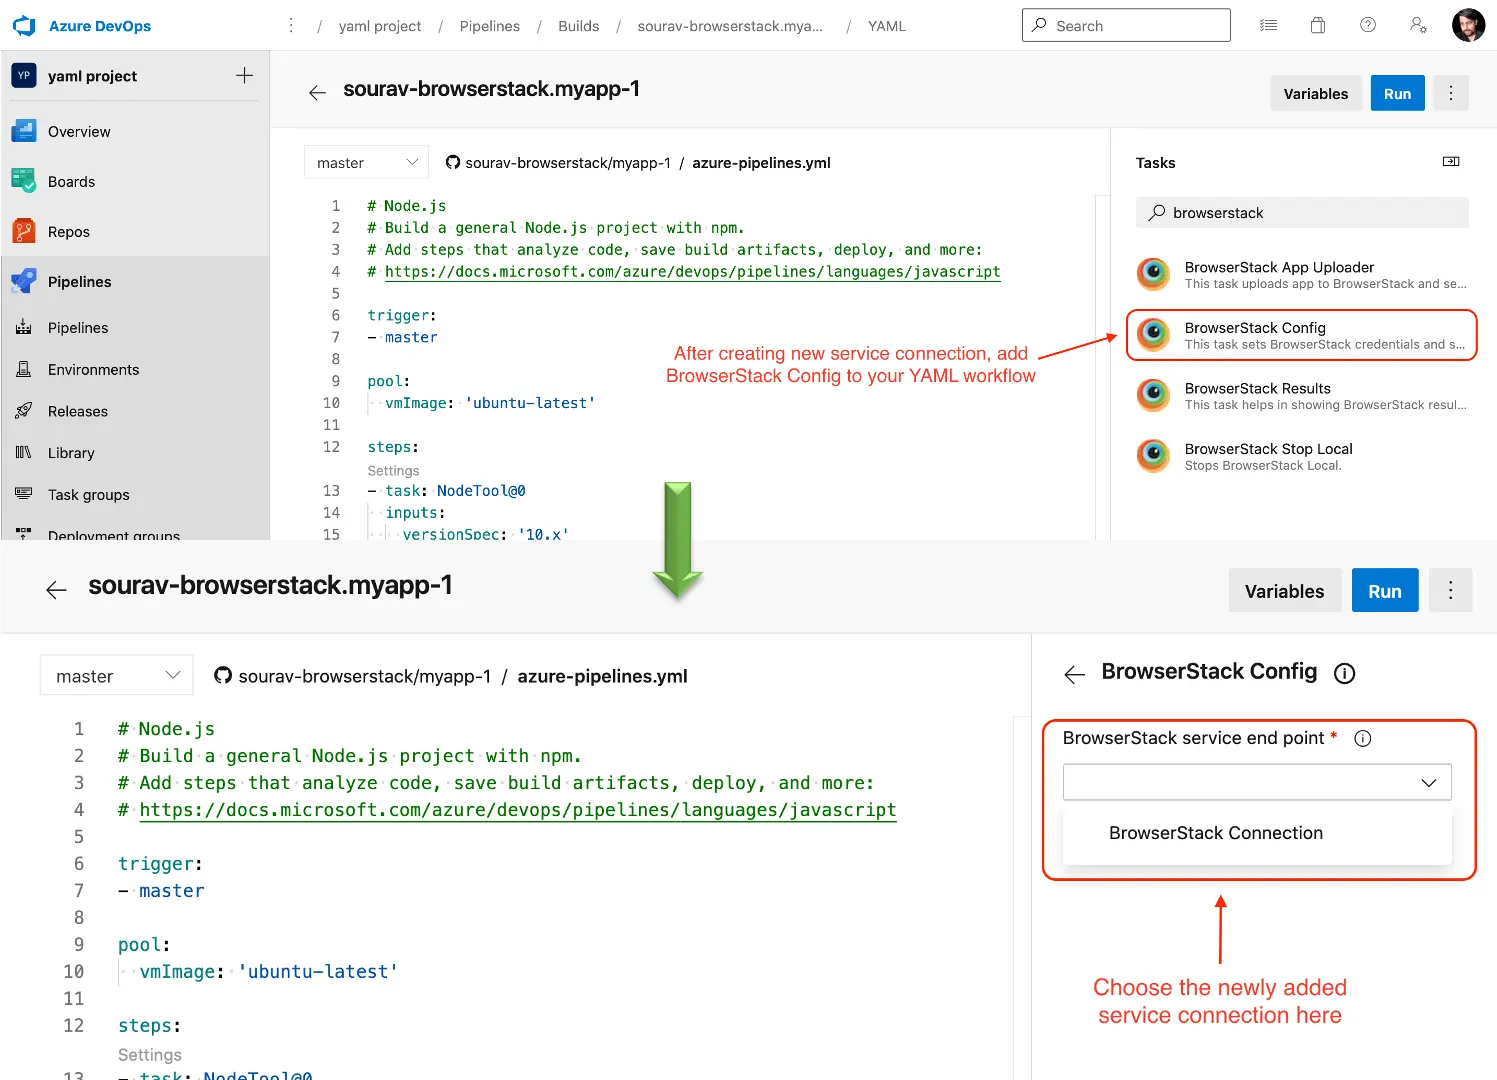
-
You can choose to use BrowserStack Local which allows you to test web applications hosted on private, development, and internal servers, while adding the BrowserStack Config task. Writing test script with local testing capability usage is explained in this section.
-
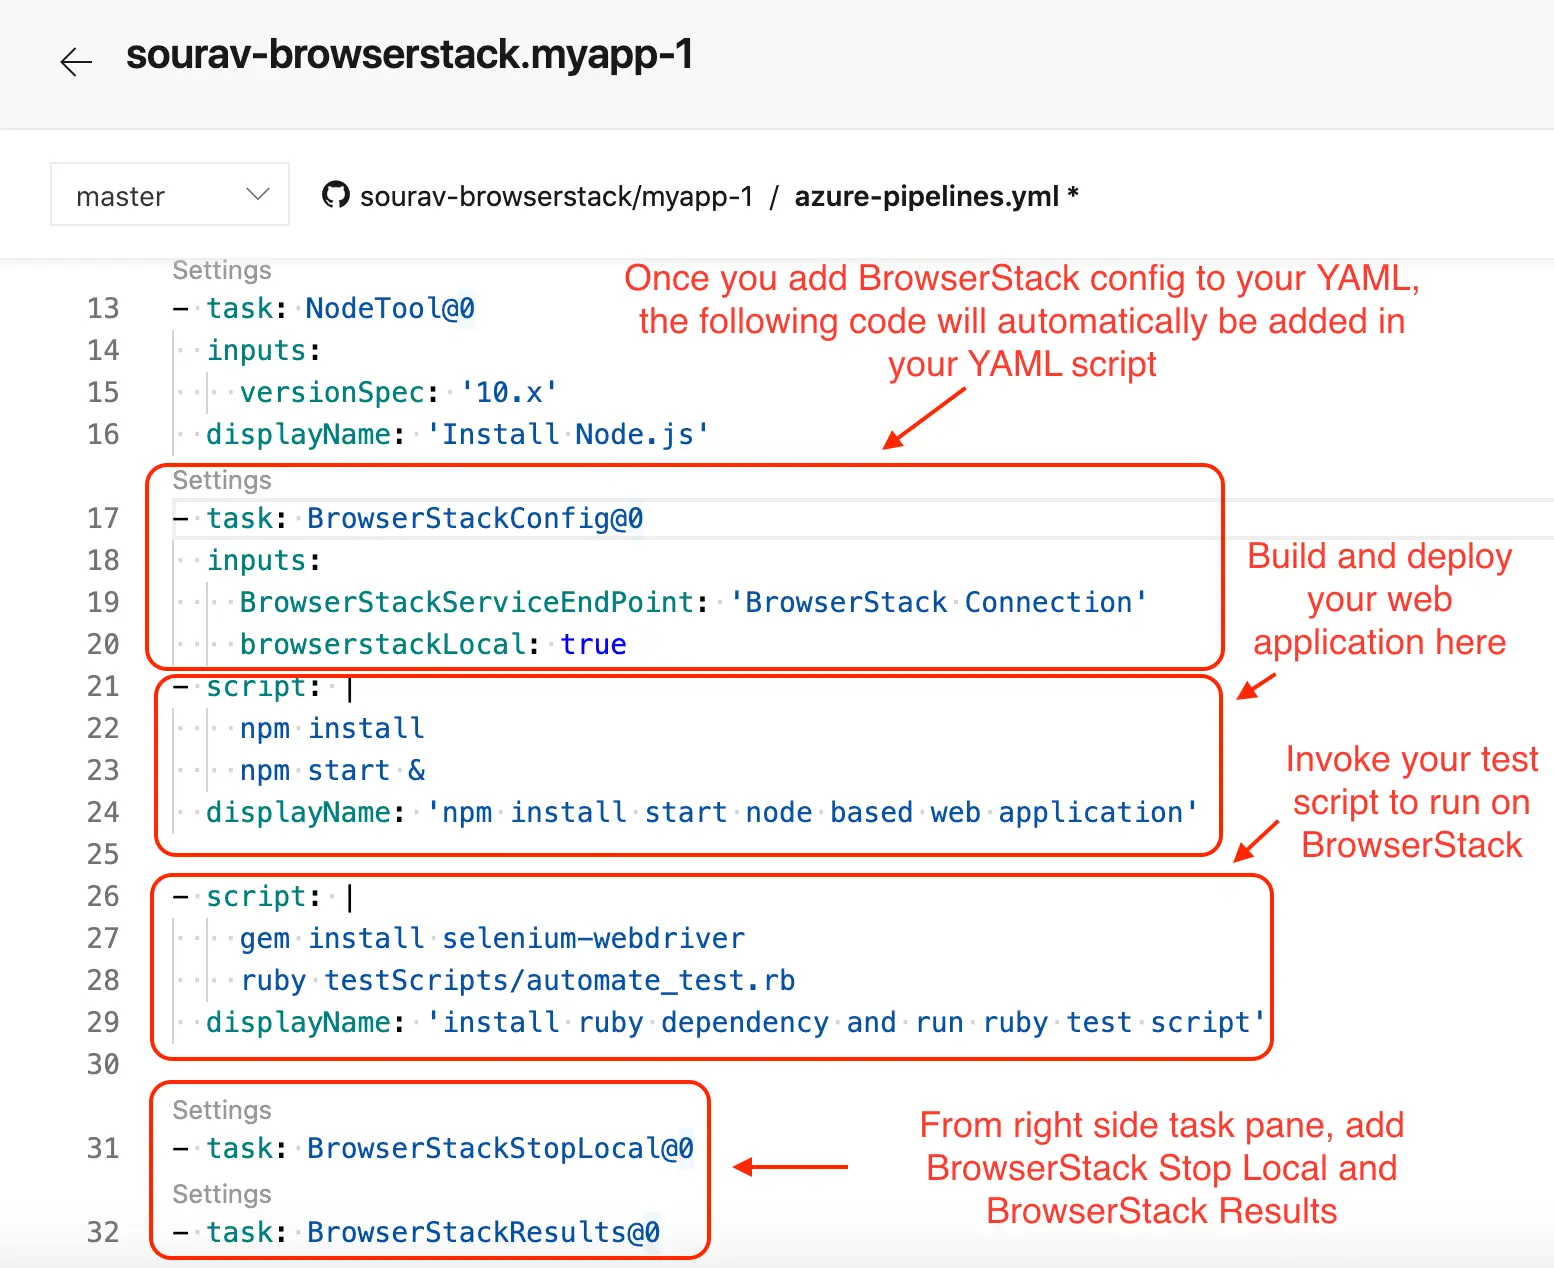
Similarly, if you have enabled BrowserStack Local, you have to add the task BrowserStack Stop Local from the right-side task pane, in your YAML workflow once the test script execution is done (See sample YAML screenshot below).
-
You can also add the BrowserStack Results task in your YAML workflow from the right-side task pane. Finally, your workflow will look somewhat similar to the workflow as shown below:
Follow the steps outlined below to integrate with BrowserStack using the classic pipeline editor in Azure:
-
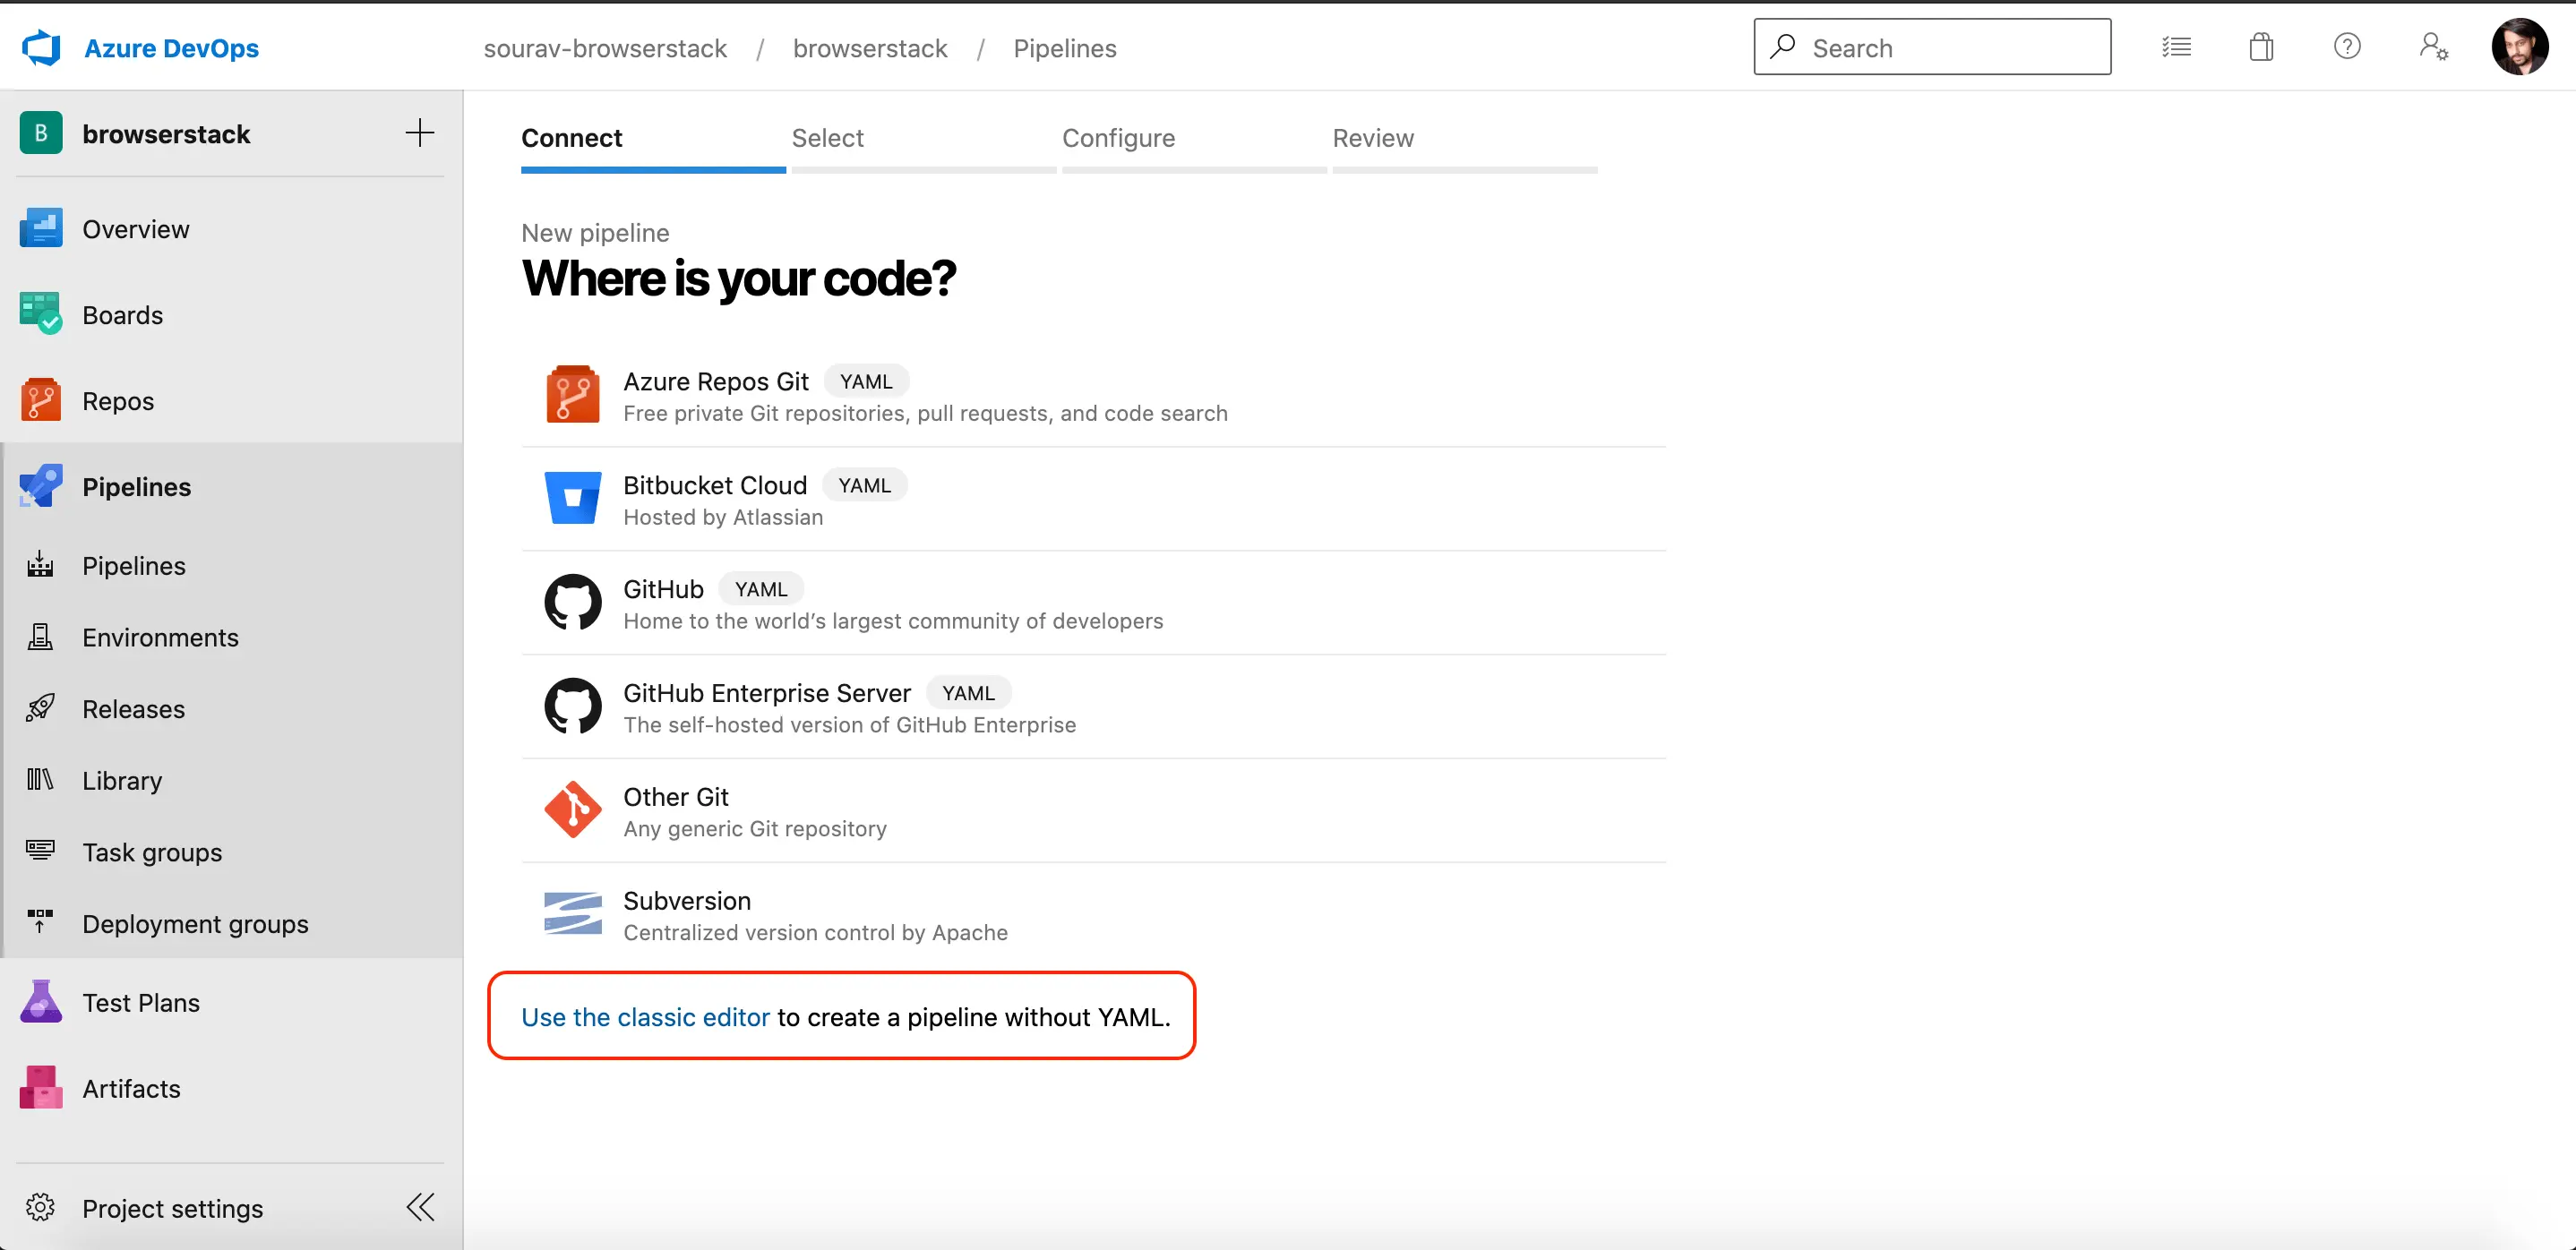
Select your organization, project and click on Pipelines.
-
If you want to create a new pipeline using the classic pipeline editor option, you can do so by selecting the “Use the classic editor” option as shown below:
-
Select Agent job 1(it is a job name, it could be different if you are editing an existing job) and click on the + icon. Type browserstack in the search box.
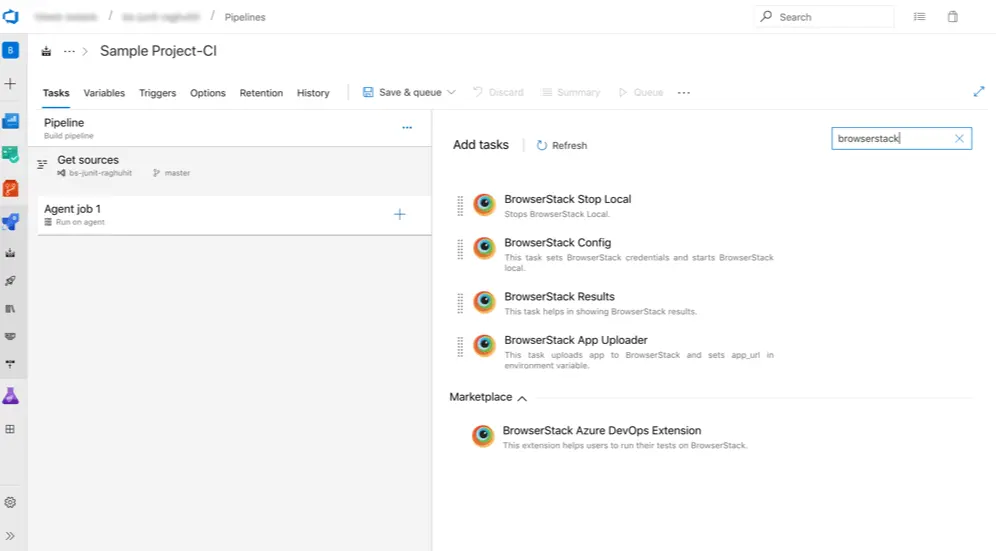
-
Hover on BrowserStack Config and click on the Add button.
-
Select BrowserStack configuration setup click on the NEW button to set up BrowserStack credentials.
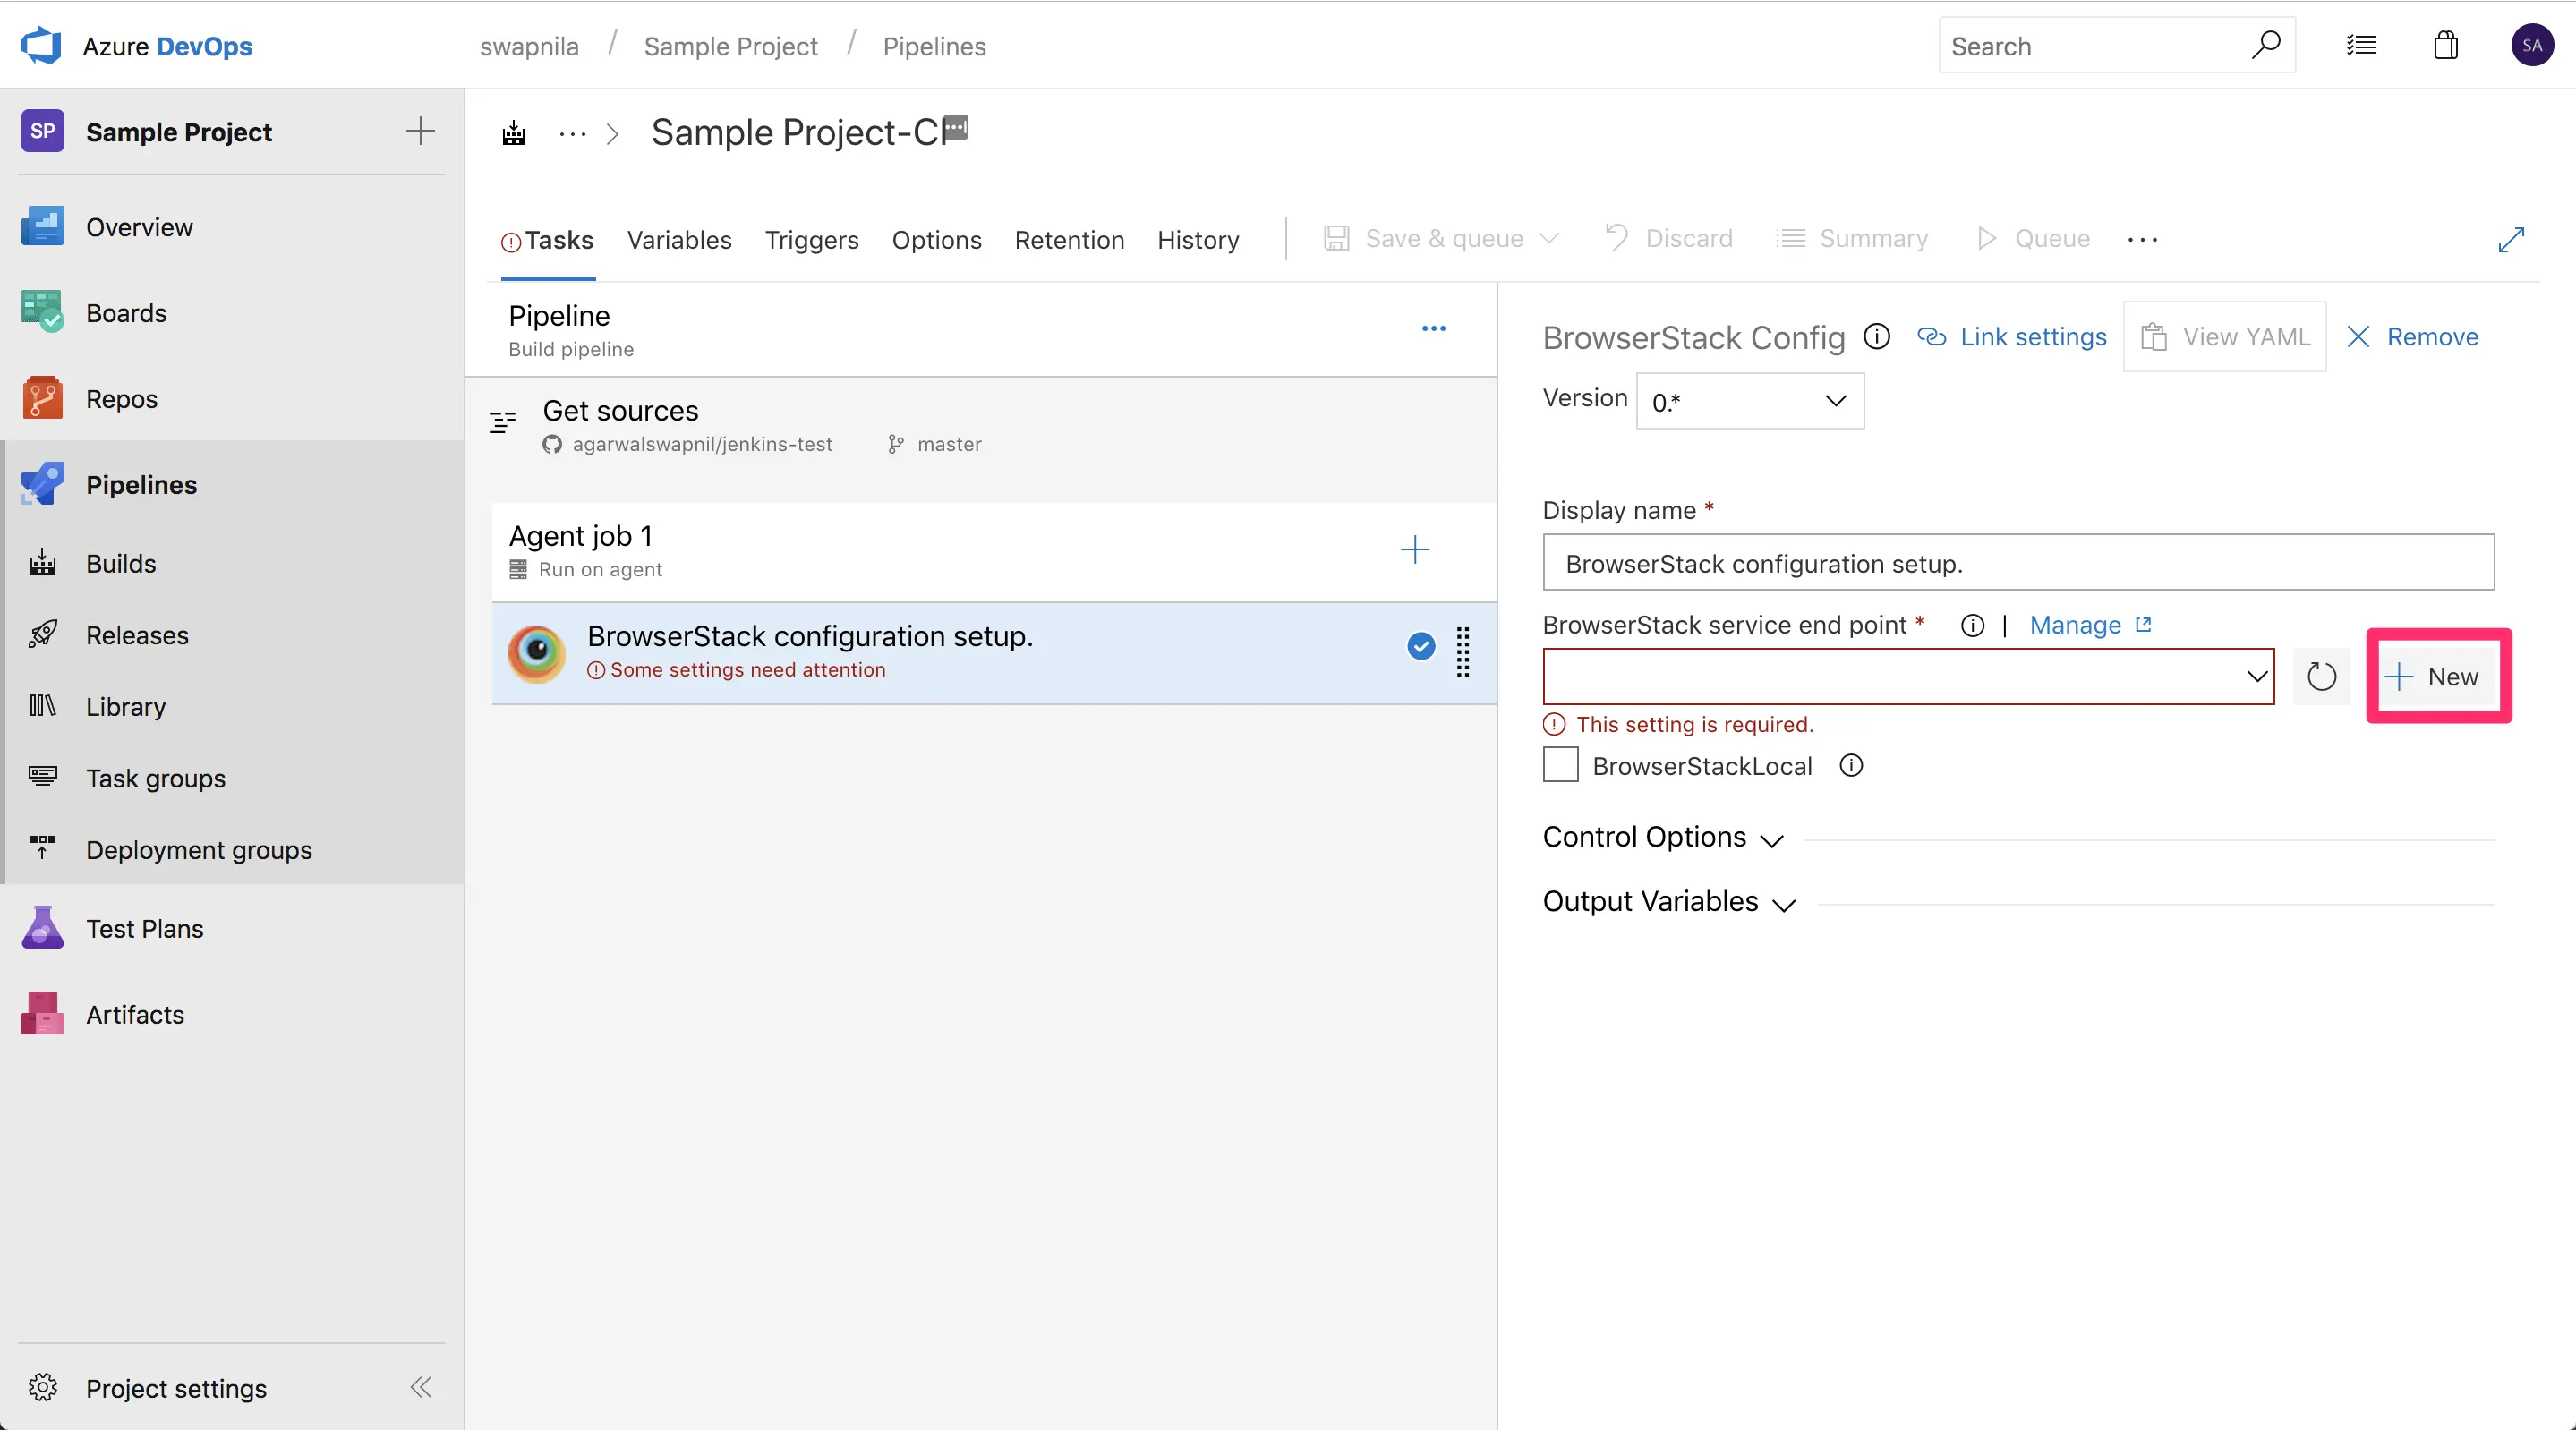
-
In the popup, enter a name in Connection name field. Enter your BrowserStack Username and AccessKey. You can get your credentials from the app automate dashboard page. Use the Verify connection button to verify the connection.
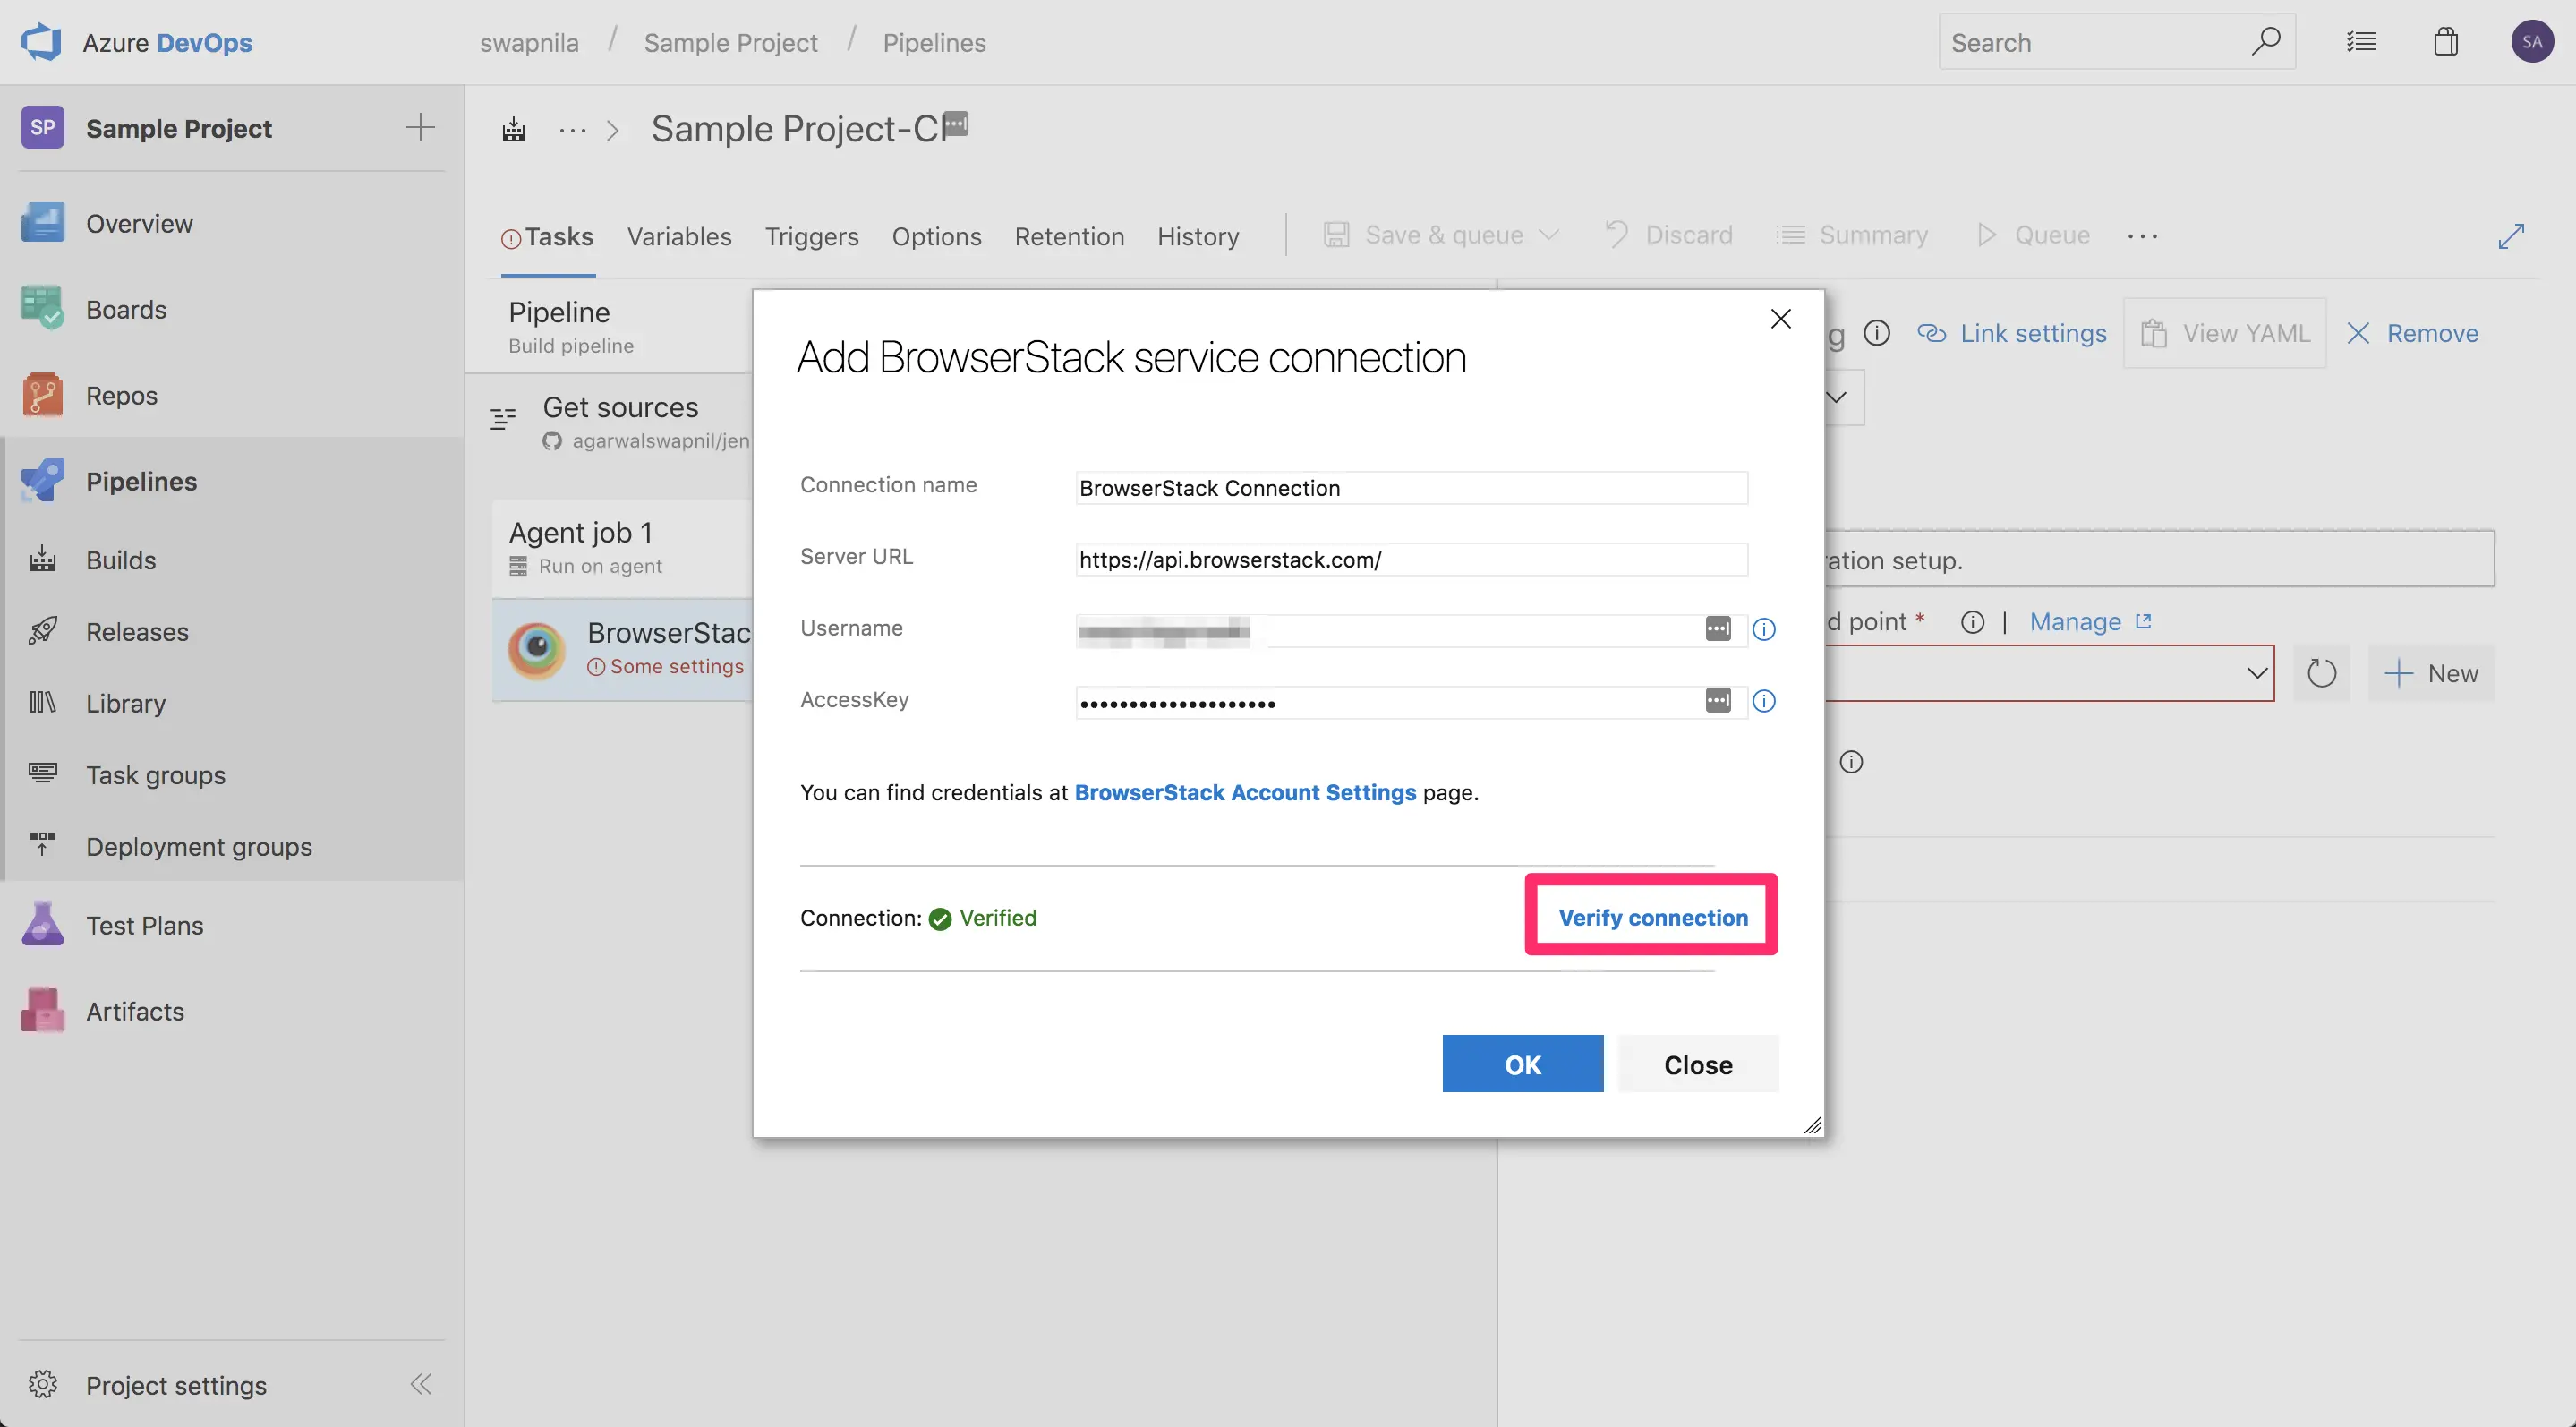
-
Click OK to save the connection.
Configuring App Uploader
BrowserStack Azure Pipelines extension allows you to upload your app to the BrowserStack servers.
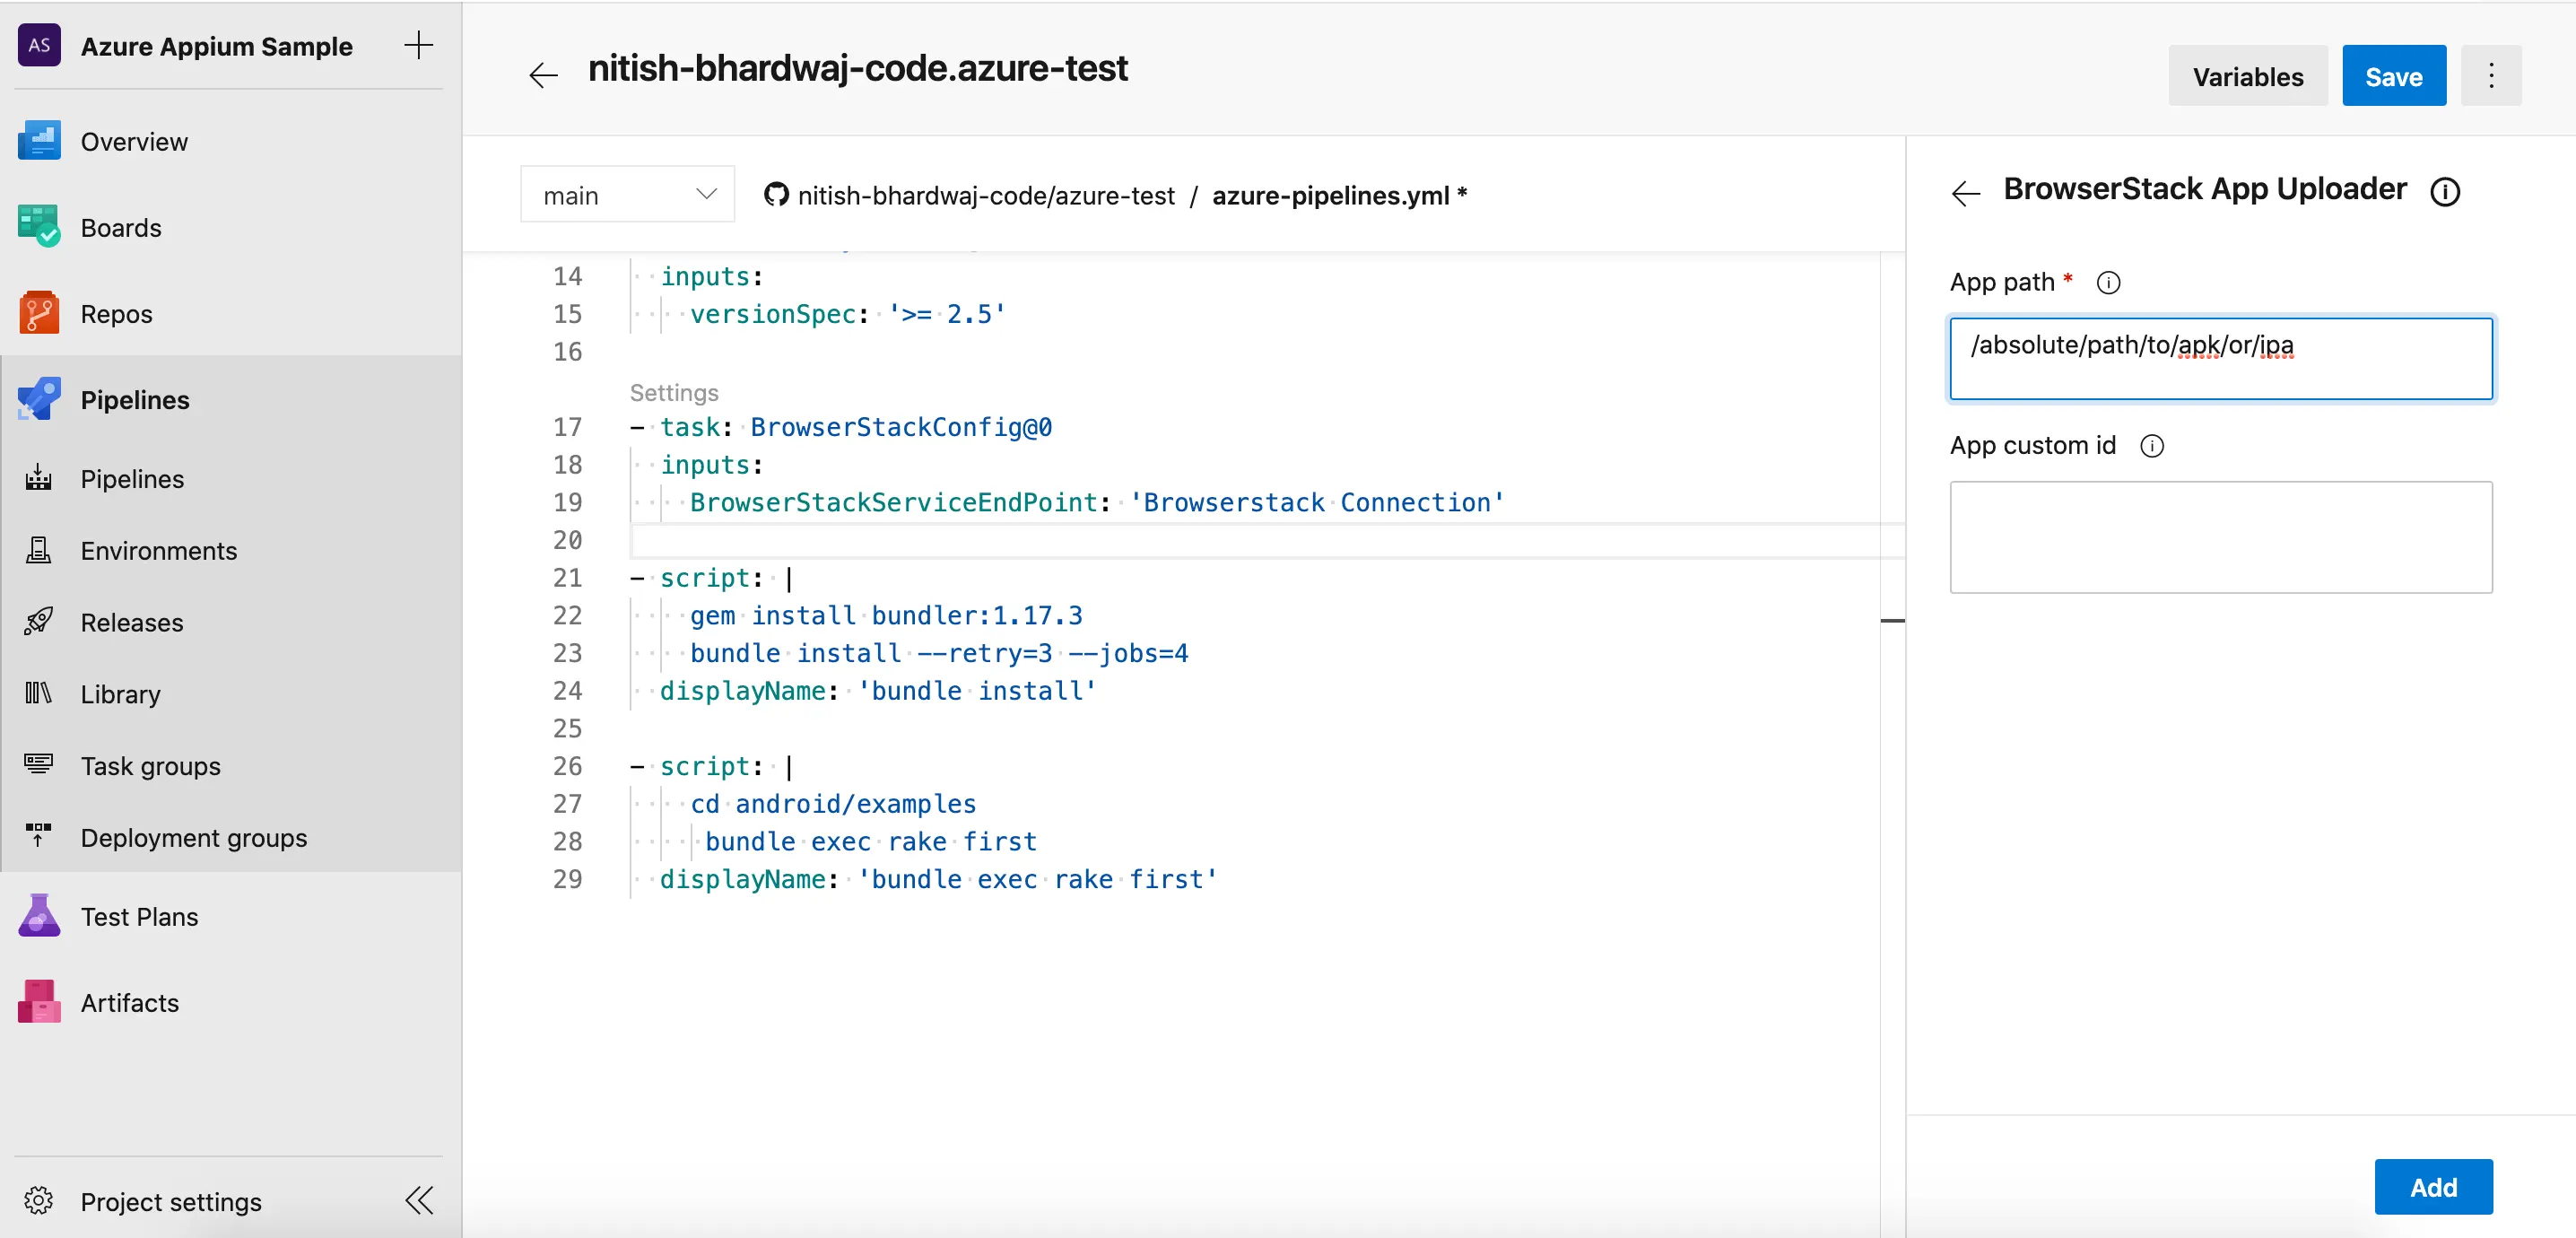
Select the BrowserStack App Uploader task from the right task pane in the YAML edit window. This will set the BROWSERSTACK_APP_ID environment variable with the App Id returned as a response after the app upload.
If you would like to set a custom identifier for your uploaded app, set the ‘App custom id’ value. In this case the BROWSERSTACK_APP_ID environment variable will be set to the custom id you provided. Custom Id is optional.
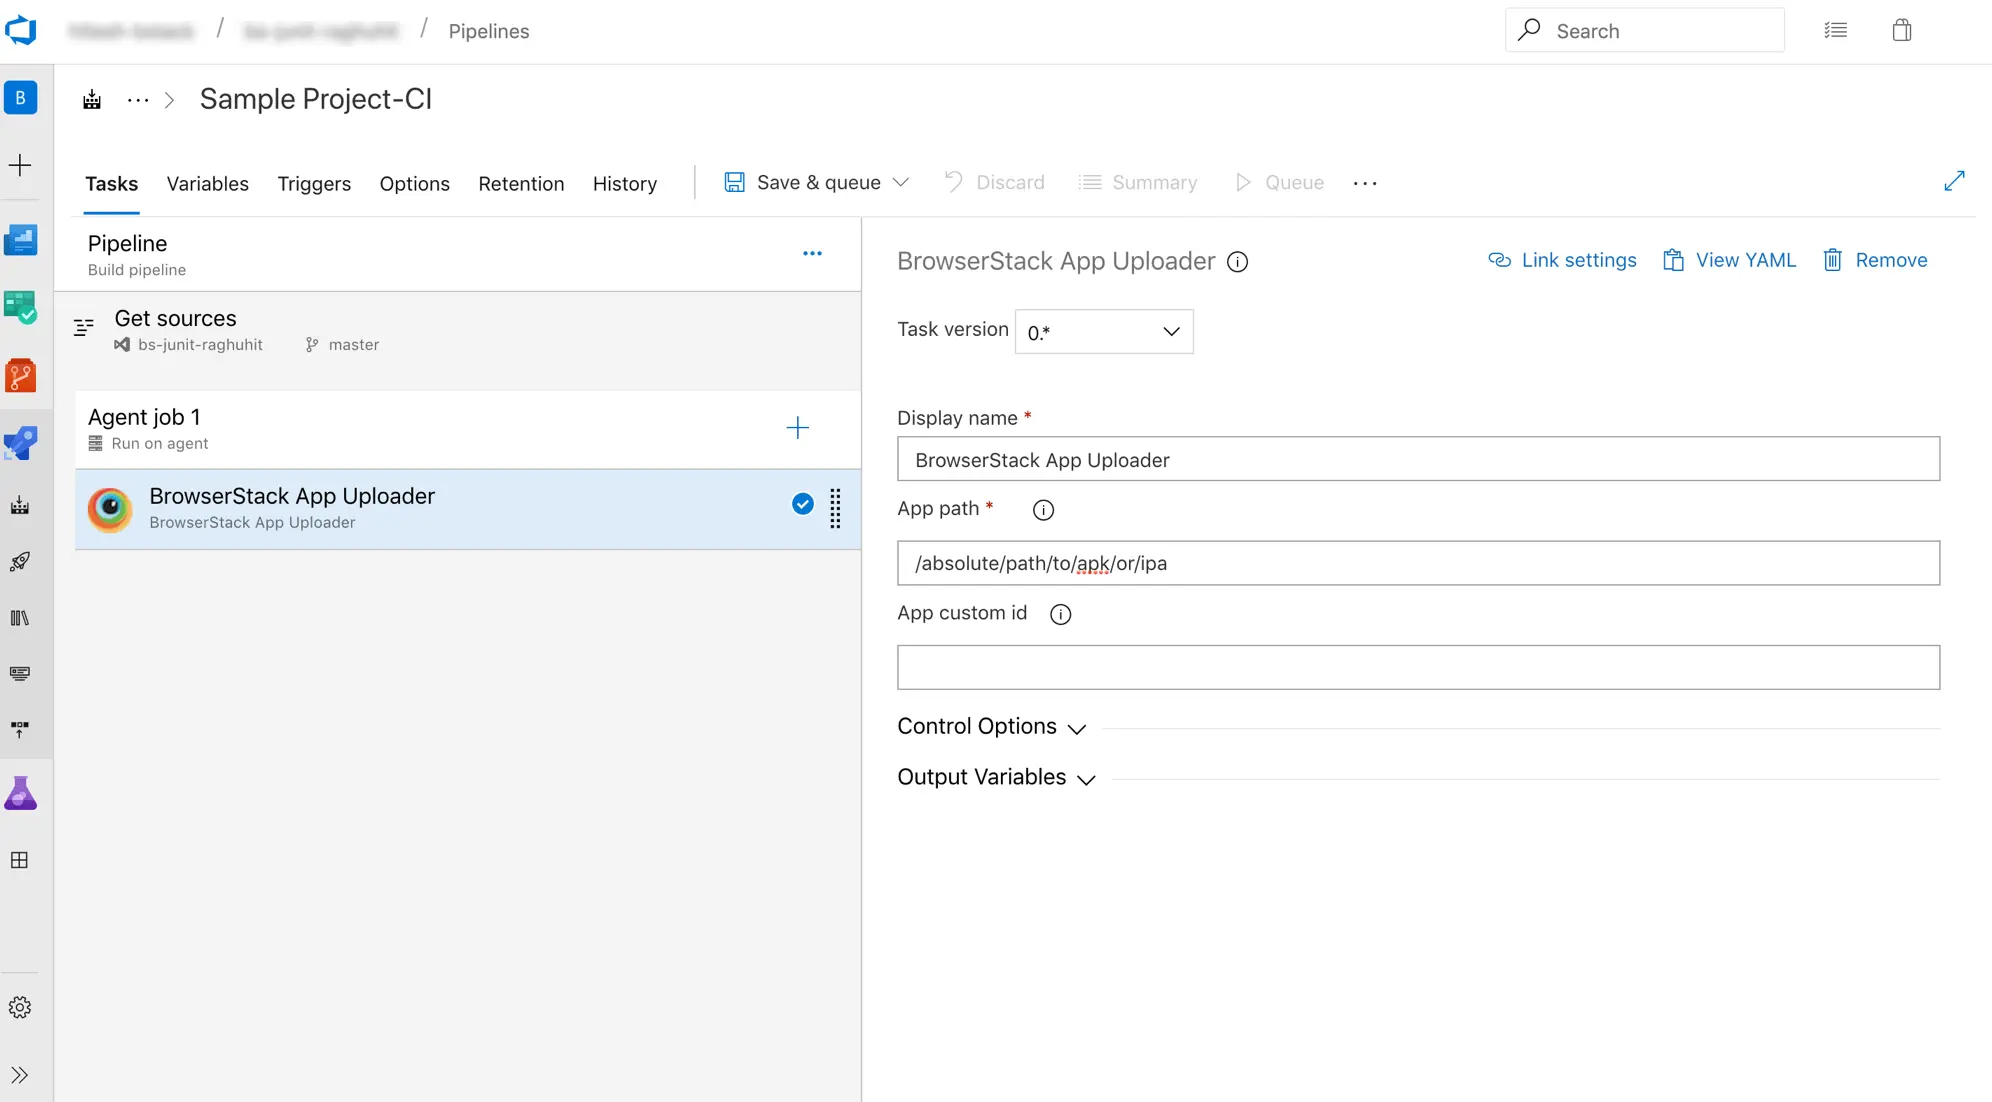
Follow the below steps to upload app from your local machine to the BrowserStack servers.
-
Select BrowserStack App Uploader and update the App path to point the app location on your local machine. This will set the
BROWSERSTACK_APP_IDenvironment variable with the App Id returned as a response after the app upload. -
If you would like to set a custom identifier for your uploaded app, set the ‘App custom id’ value. In this case the
BROWSERSTACK_APP_IDenvironment variable will be set to the custom id you provided. Custom Id is optional.
Configuring BrowserStack Local
BrowserStack Local Testing allows you to test apps that retrieve data from servers on your local machine, CI/CD machines/nodes, and other private network configurations.
Starting BrowserStack Local
To enable BrowserStack Local follow these steps:
-
Under BrowserStack configuration step, click on the checkmark next to BrowserStackLocal.
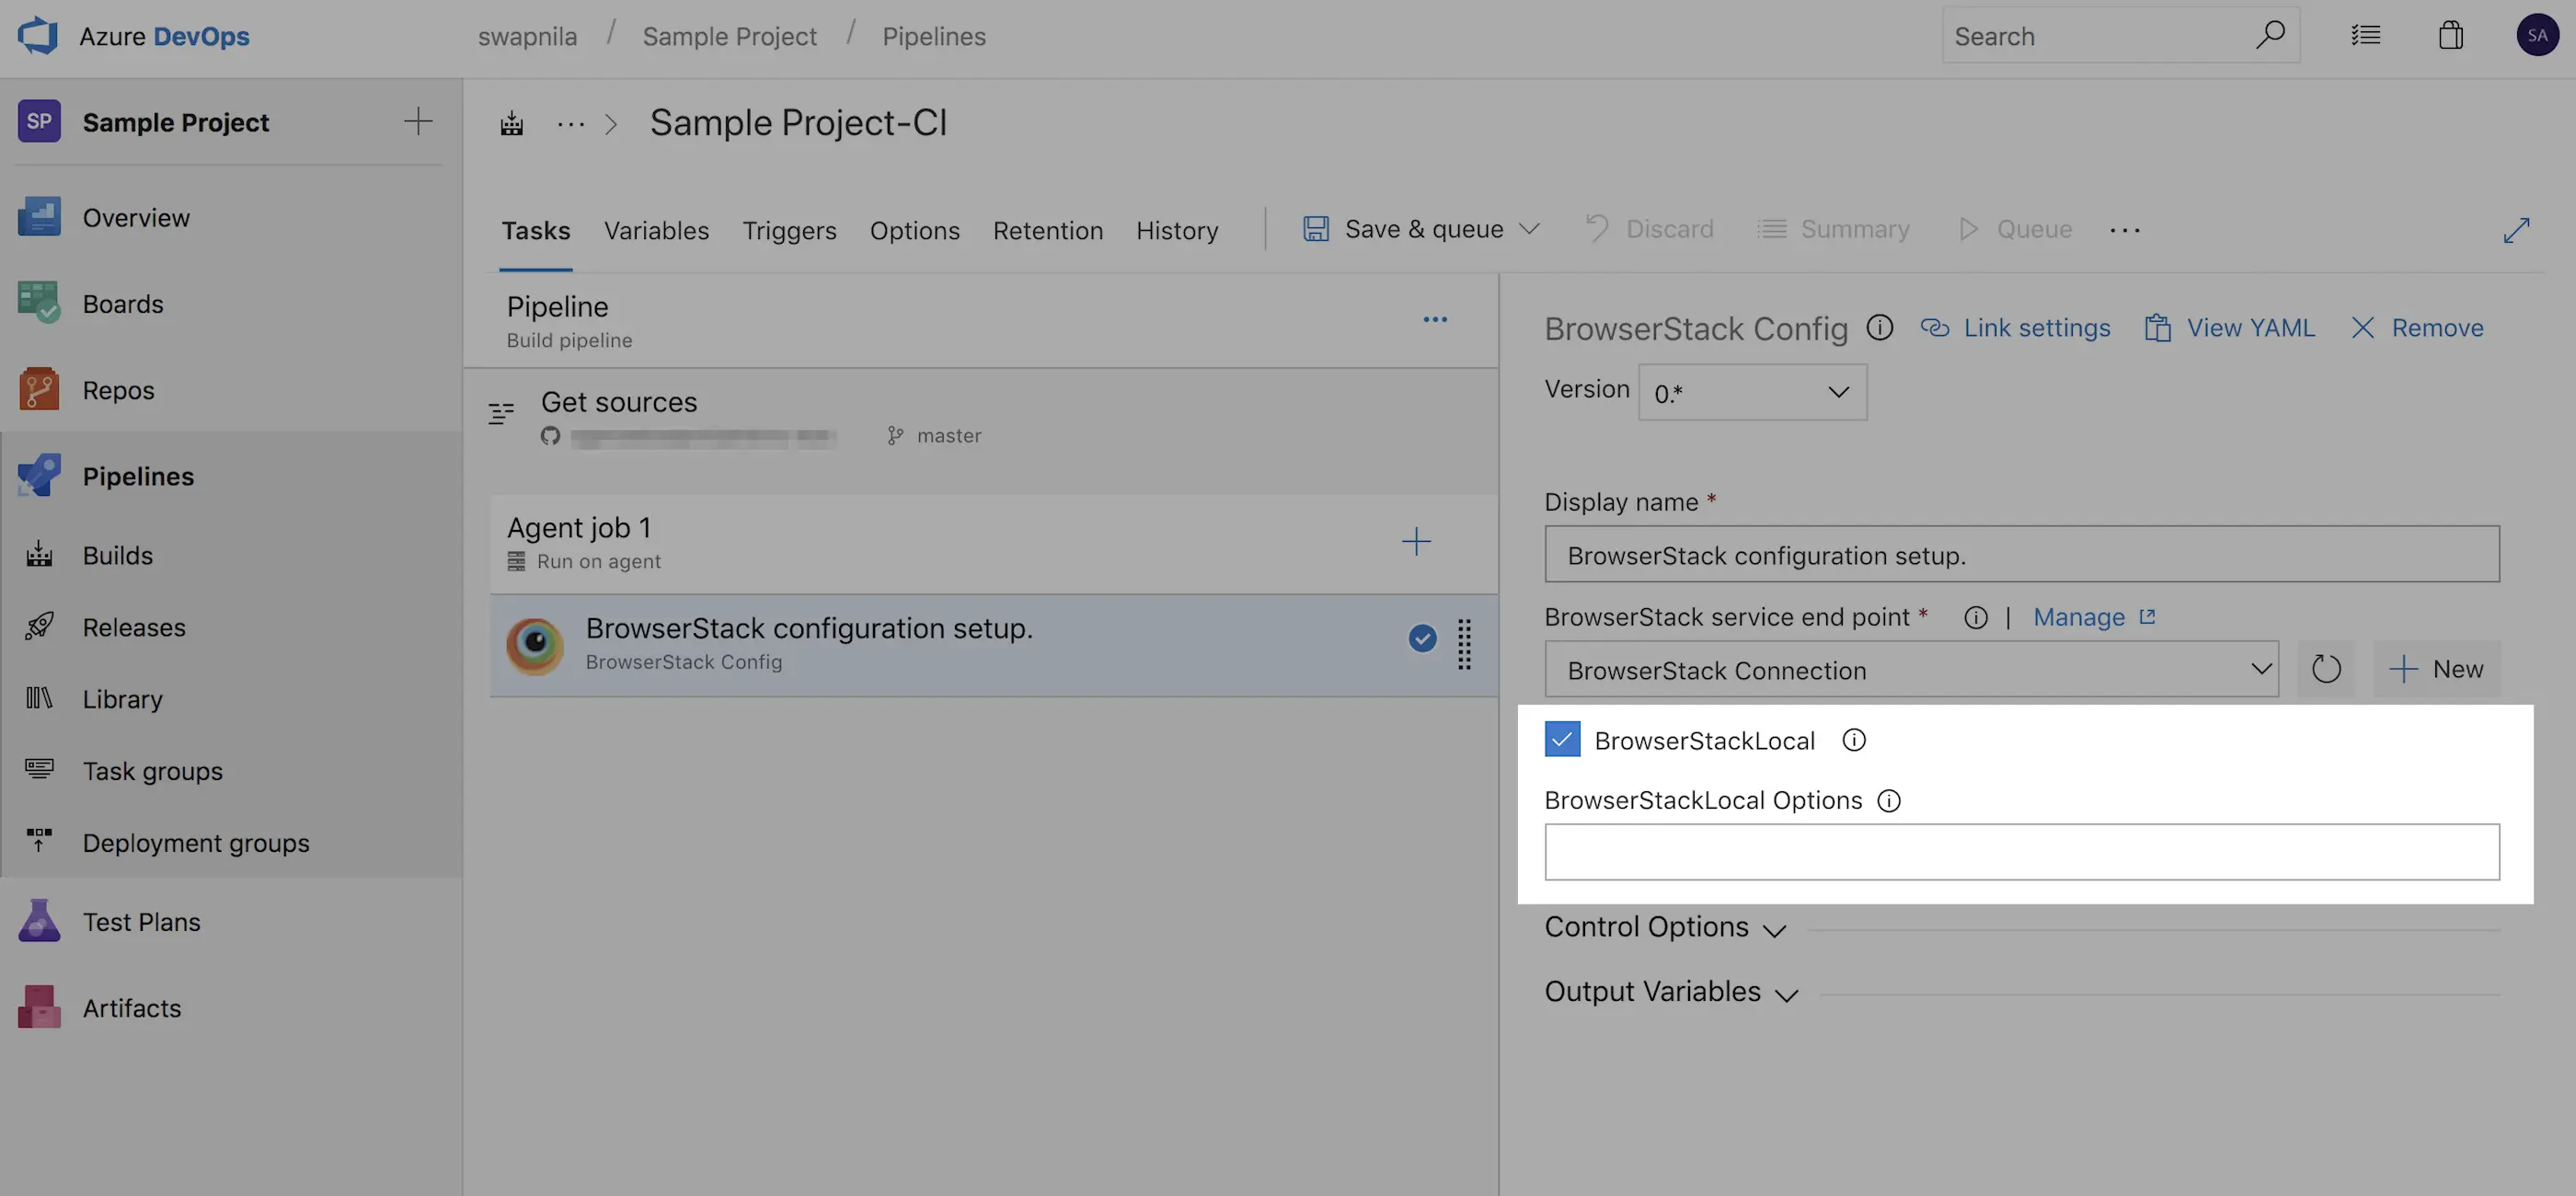
-
Use BrowserStack Local Options to set any additional configuration options when running the binary.
For example to enable verbose logging and to force local, in the BrowserStack Local Options, pass:
{"verbose": true, "forceLocal": true}The full list of options available in local testing modifiers.
Please use camel case in local modifier options, for example, use
logFileinstead of--log-file
Stopping BrowserStack Local
Please note that stopping BrowserStack Local is only required if you enabled Local in the above step.
To stop BrowserStack Local follow these steps:
-
Select Agent job 1 and click on the + icon. Type browserstack in the search box.
-
Hover on BrowserStack Stop Local and click on the Add button.
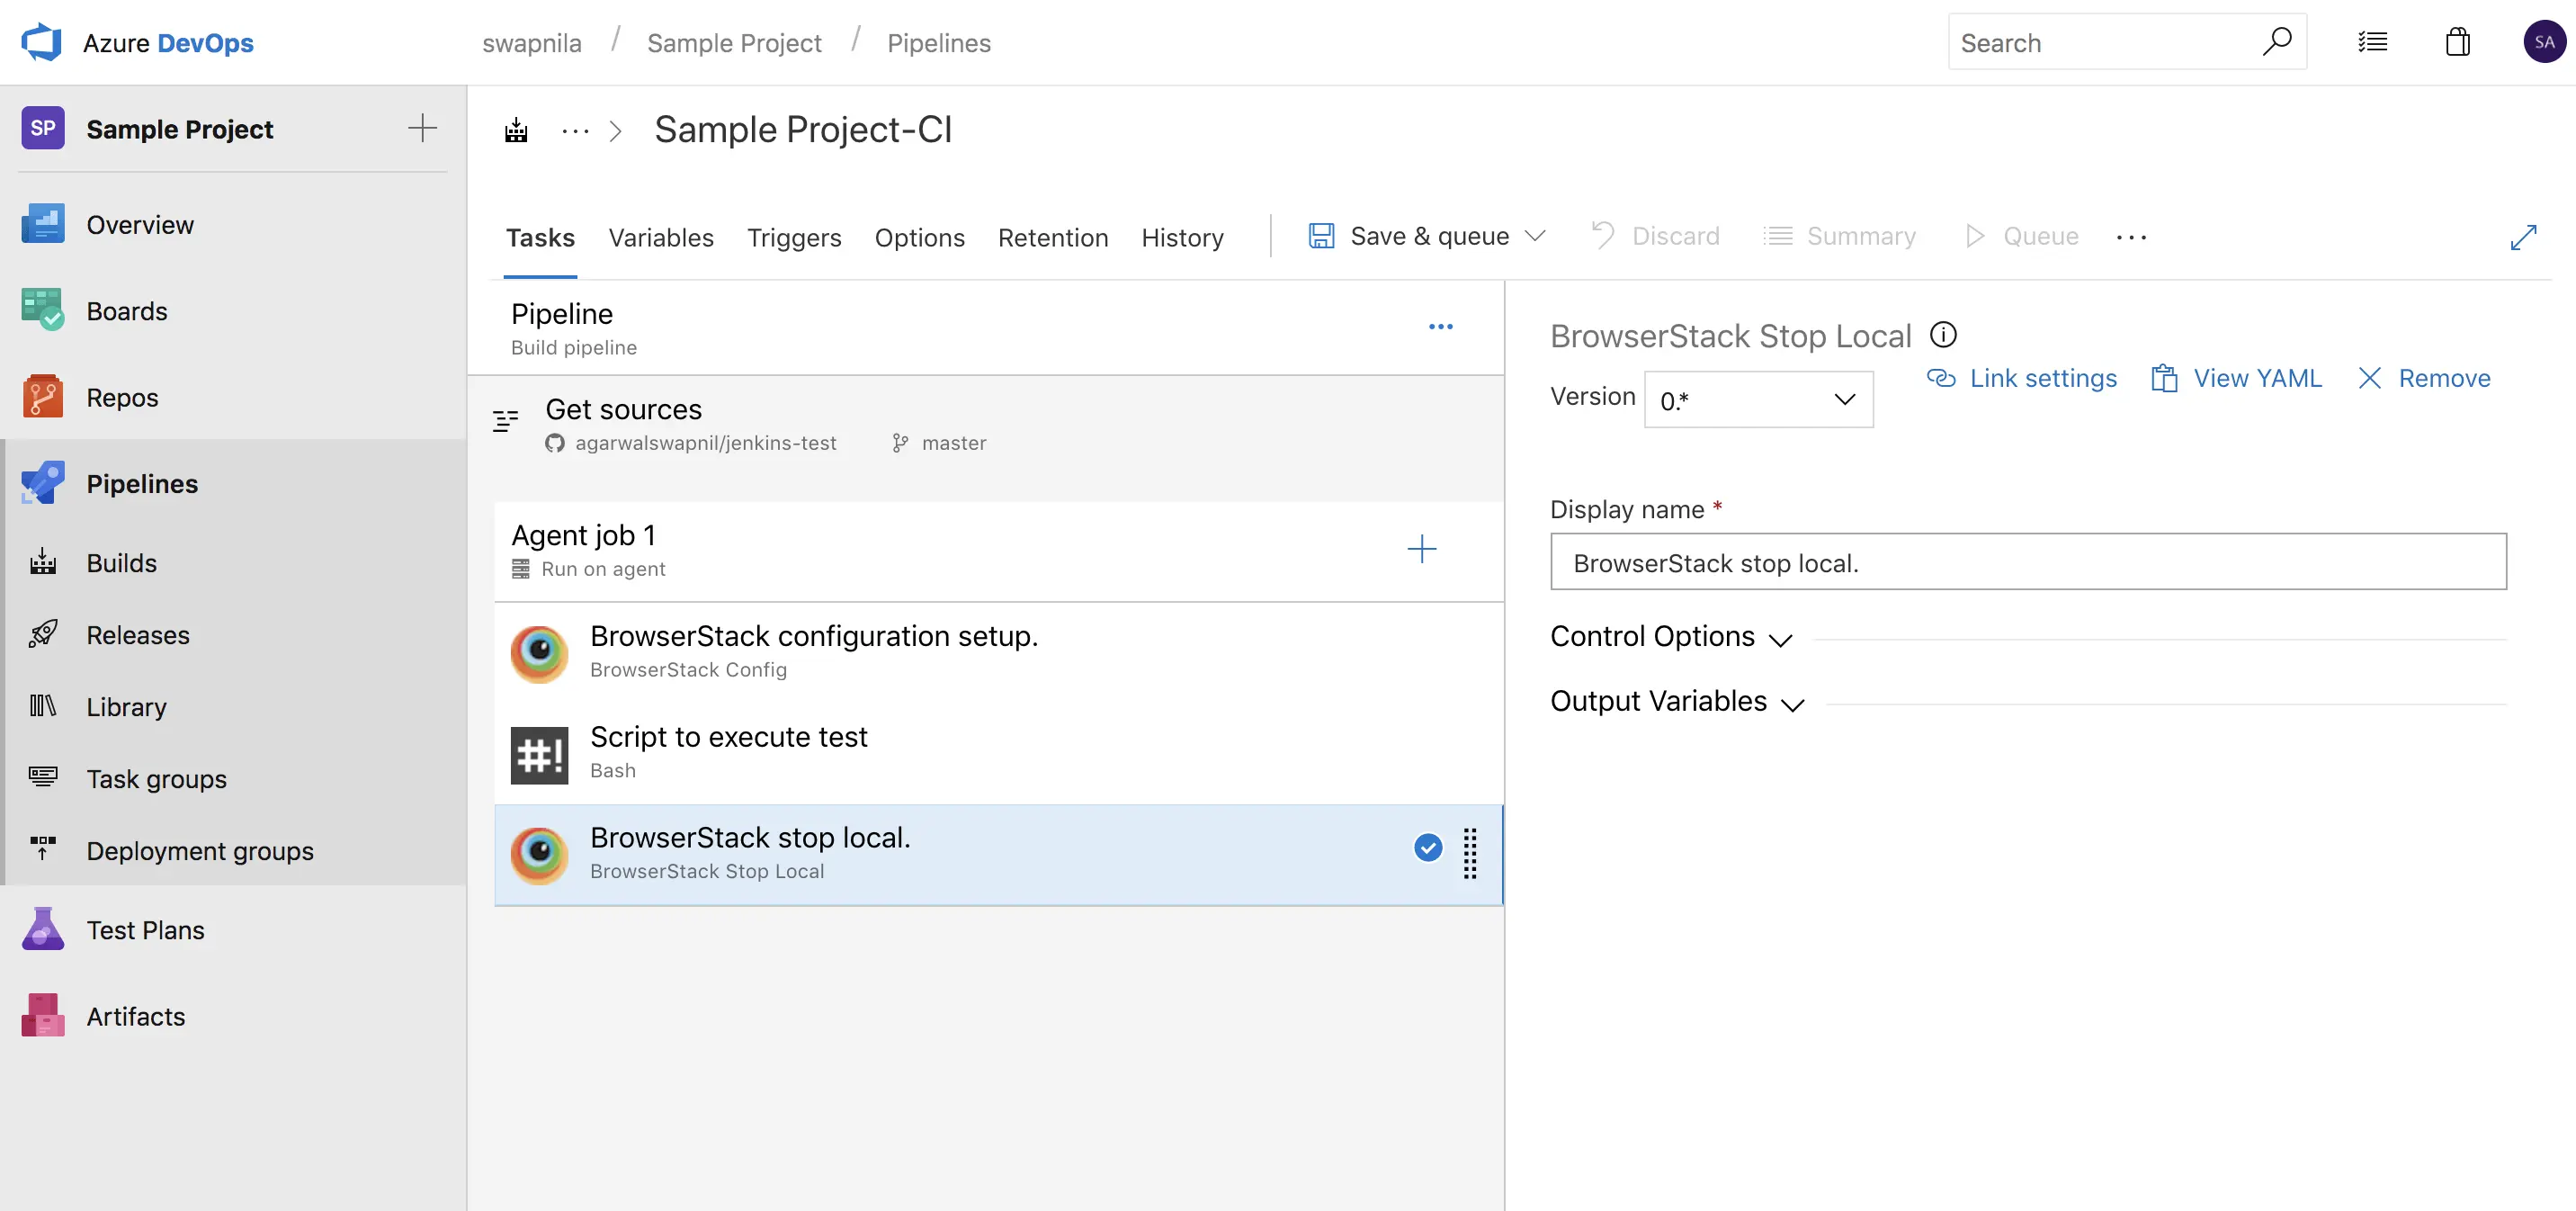
- This task will stop the BrowserStack Local.
- Stop Local should only be called after the script which runs the test cases.
Run Tests
The BrowserStack Azure Pipelines extension sets the following environment variables:
BROWSERSTACK_USERNAME
BROWSERSTACK_ACCESS_KEY
BROWSERSTACK_LOCAL
BROWSERSTACK_LOCAL_IDENTIFIER
BROWSERSTACK_APP_ID
Use these environment variables to set the DesiredCapabilities in your tests. For example:
String userName = System.getenv("BROWSERSTACK_USERNAME");
String accessKey = System.getenv("BROWSERSTACK_ACCESS_KEY");
String browserstackLocal = System.getenv("BROWSERSTACK_LOCAL");
String browserstackLocalIdentifier = System.getenv("BROWSERSTACK_LOCAL_IDENTIFIER");
String app = System.getenv("BROWSERSTACK_APP_ID");

public static void main(String args[]) throws MalformedURLException, InterruptedException {
    DesiredCapabilities caps = new DesiredCapabilities();
    caps.setCapability("device", "Samsung Galaxy S8");
    caps.setCapability("app", app);
    caps.setCapability("browserstack.local", browserstackLocal);
    caps.setCapability("browserstack.localIdentifier", browserstackLocalIdentifier);
}

driver = new AndroidDriver(new URL("https://"+userName+":"+accessKey+"@hub-cloud.browserstack.com/wd/hub", caps);
userName = process.env.BROWSERSTACK_USERNAME
accessKey = process.env.BROWSERSTACK_ACCESS_KEY
browserstackLocal = process.env.BROWSERSTACK_LOCAL
browserstackLocalIdentifier = process.env.BROWSERSTACK_LOCAL_IDENTIFIER
app = process.env.BROWSERSTACK_APP_ID

var capabilities = {
    "browserstack.user" : userName,
    "browserstack.key" : accessKey,
    "app" : app,
    "device" : "Samsung Galaxy S8",
    "browserstack.local" : browserstackLocal,
    "browserstack.localIdentifier" : browserstackLocalIdentifier
}

driver = wd.promiseRemote("https://hub-cloud.browserstack.com/wd/hub");

driver
  .init(capabilities)
  //Write your code here
  .fin(function() { return driver.quit(); })
  .done();
userName = Environment.GetEnvironmentVariable("BROWSERSTACK_USERNAME");
accessKey = Environment.GetEnvironmentVariable("BROWSERSTACK_ACCESS_KEY");
browserstackLocal = Environment.GetEnvironmentVariable("BROWSERSTACK_LOCAL");
browserstackLocalIdentifier = Environment.GetEnvironmentVariable("BROWSERSTACK_LOCAL_IDENTIFIER");
app = Environment.GetEnvironmentVariable("BROWSERSTACK_APP_ID");

DesiredCapabilities caps = new DesiredCapabilities();
caps.SetCapability("browserstack.user", userName);
caps.SetCapability("browserstack.key", accessKey);
caps.SetCapability("app", app);
caps.SetCapability("device", "Samsung Galaxy S8");
caps.SetCapability("browserstack.local", browserstackLocal);
caps.SetCapability("browserstack.localIdentifier", browserstackLocalIdentifier);

AndroidDriver driver = new AndroidDriver(new Uri("https://hub-cloud.browserstack.com/wd/hub"), caps);
user_name = os.getenv("BROWSERSTACK_USERNAME")
access_key = os.getenv("BROWSERSTACK_ACCESS_KEY")
browserstack_local = os.getenv("BROWSERSTACK_LOCAL")
browserstack_local_identifier = os.getenv("BROWSERSTACK_LOCAL_IDENTIFIER")
app = os.getenv("BROWSERSTACK_APP_ID")

desired_cap = {
    'browserstack.user': user_name,
    'browserstack.key': access_key,
    'device': 'Samsung Galaxy S8',
    'app': app,
    'browserstack.local': browserstack_local,
    'browserstack.localIdentifier': browserstack_local_identifier
}

driver = webdriver.Remote("https://" + user_name + ":" + access_key + "@hub-cloud.browserstack.com/wd/hub", desired_cap)
user_name = os.getenv("BROWSERSTACK_USERNAME")
access_key = os.getenv("BROWSERSTACK_ACCESS_KEY")
browserstack_local = os.getenv("BROWSERSTACK_LOCAL")
browserstack_local_identifier = os.getenv("BROWSERSTACK_LOCAL_IDENTIFIER")
app = os.getenv("BROWSERSTACK_APP_ID")

desired_cap = {
 'app': app,
 'device': 'Samsung Galaxy S8',
 'browserstack.local': browserstack_local,
 'browserstack.localIdentifier': browserstack_local_identifier
}

driver = webdriver.Remote("https://"+user_name+":"+access_key+"@hub-cloud.browserstack.com/wd/hub", desired_cap)
user_name = ENV["BROWSERSTACK_USERNAME"]
access_key = ENV["BROWSERSTACK_ACCESS_KEY"]
browserstack_local = ENV["BROWSERSTACK_LOCAL"]
browserstack_local_identifier = ENV["BROWSERSTACK_LOCAL_IDENTIFIER"]
app = ENV["BROWSERSTACK_APP_ID"]

desired_caps = {
	'device': 'Samsung Galaxy S8',
    'app': app,
    'browserstack.local': browserstack_local,
    'browserstack.localIdentifier': browserstack_local_identifier
}


appium_driver = Appium::Driver.new({
    'caps' => desired_caps,
    'appium_lib' => {
        :server_url => "https://#{user_name}:#{access_key}@hub-cloud.browserstack.com/wd/hub"
    }}, true)
Note: You must pass browserstack.local and browserstack.localIdentifier capabilities to test on your local development servers.
Generating test reports
The BrowserStack Azure Pipelines extension enables you to embed the test results from BrowserStack into Azure Pipelines. We currently support viewing test reports in Azure Pipelines with a select set of languages and frameworks, which are Java with JUnit/TestNG, and Node with Protractor and WebdriverIO. The sections below describe how to configure your project to generate BrowserStack test reports.
Java - TestNG and JUnit
Follow the below steps to generate test reports.
A prerequisite for embedding test reports is that the Java project must be built with Maven and use either TestNG or JUnit for testing.
To configure your project:
- Add the following dependencies to your
pom.xmlfile:
<dependency>
    <groupId>com.browserstack</groupId>
    <artifactId>automate-testassist</artifactId>
    <version>1.1.0</version>
</dependency>
- Add the following repositories to your
pom.xmlfile:
<repositories>
  <repository>
    <id>sonatype-nexus-snapshots</id>
    <url>https://oss.sonatype.org/content/repositories/snapshots</url>
  </repository>
</repositories>
<pluginRepositories>
  <pluginRepository>
   <id>sonatype-nexus-snapshots</id>
      <url>https://oss.sonatype.org/content/repositories/snapshots</url>
  </pluginRepository>
</pluginRepositories>
- Add the following plugins to your
pom.xmlfile:
<build>
    <plugins>
      <plugin>
        <groupId>com.browserstack</groupId>
        <artifactId>automate-maven-plugin</artifactId>
        <version>1.1.0</version>
        <configuration>
            <source>${jdk.source.version}</source>
            <target>${jdk.target.version}</target>
            <complianceLevel>${jdk.source.version}</complianceLevel>
        </configuration>
        <executions>
          <execution>
            <goals>
              <goal>test-compile</goal>
            </goals>
          </execution>
        </executions>
      </plugin>
    </plugins>
</build>
You must define the Maven properties, jdk.source.version and jdk.target.version to match the Java versions of your project.
To configure WebdriverIO project, add wdio-browserstack-reporter as a dependency in your package.json file.
{
  "dependencies": {
    "wdio-browserstack-reporter": "~0.1.1"
  }
Add browserstack as a reporter in your conf file.
// wdio.conf.js
module.exports = {
    // ...
    reporters: ['browserstack'],
    reporterOptions: {
        browserstack: {
            outputDir: './'
        }
    },
    // ...
};
outputDir(optional): Defines a directory location for storing browserstack report files. See the GitHub respository link for more details.
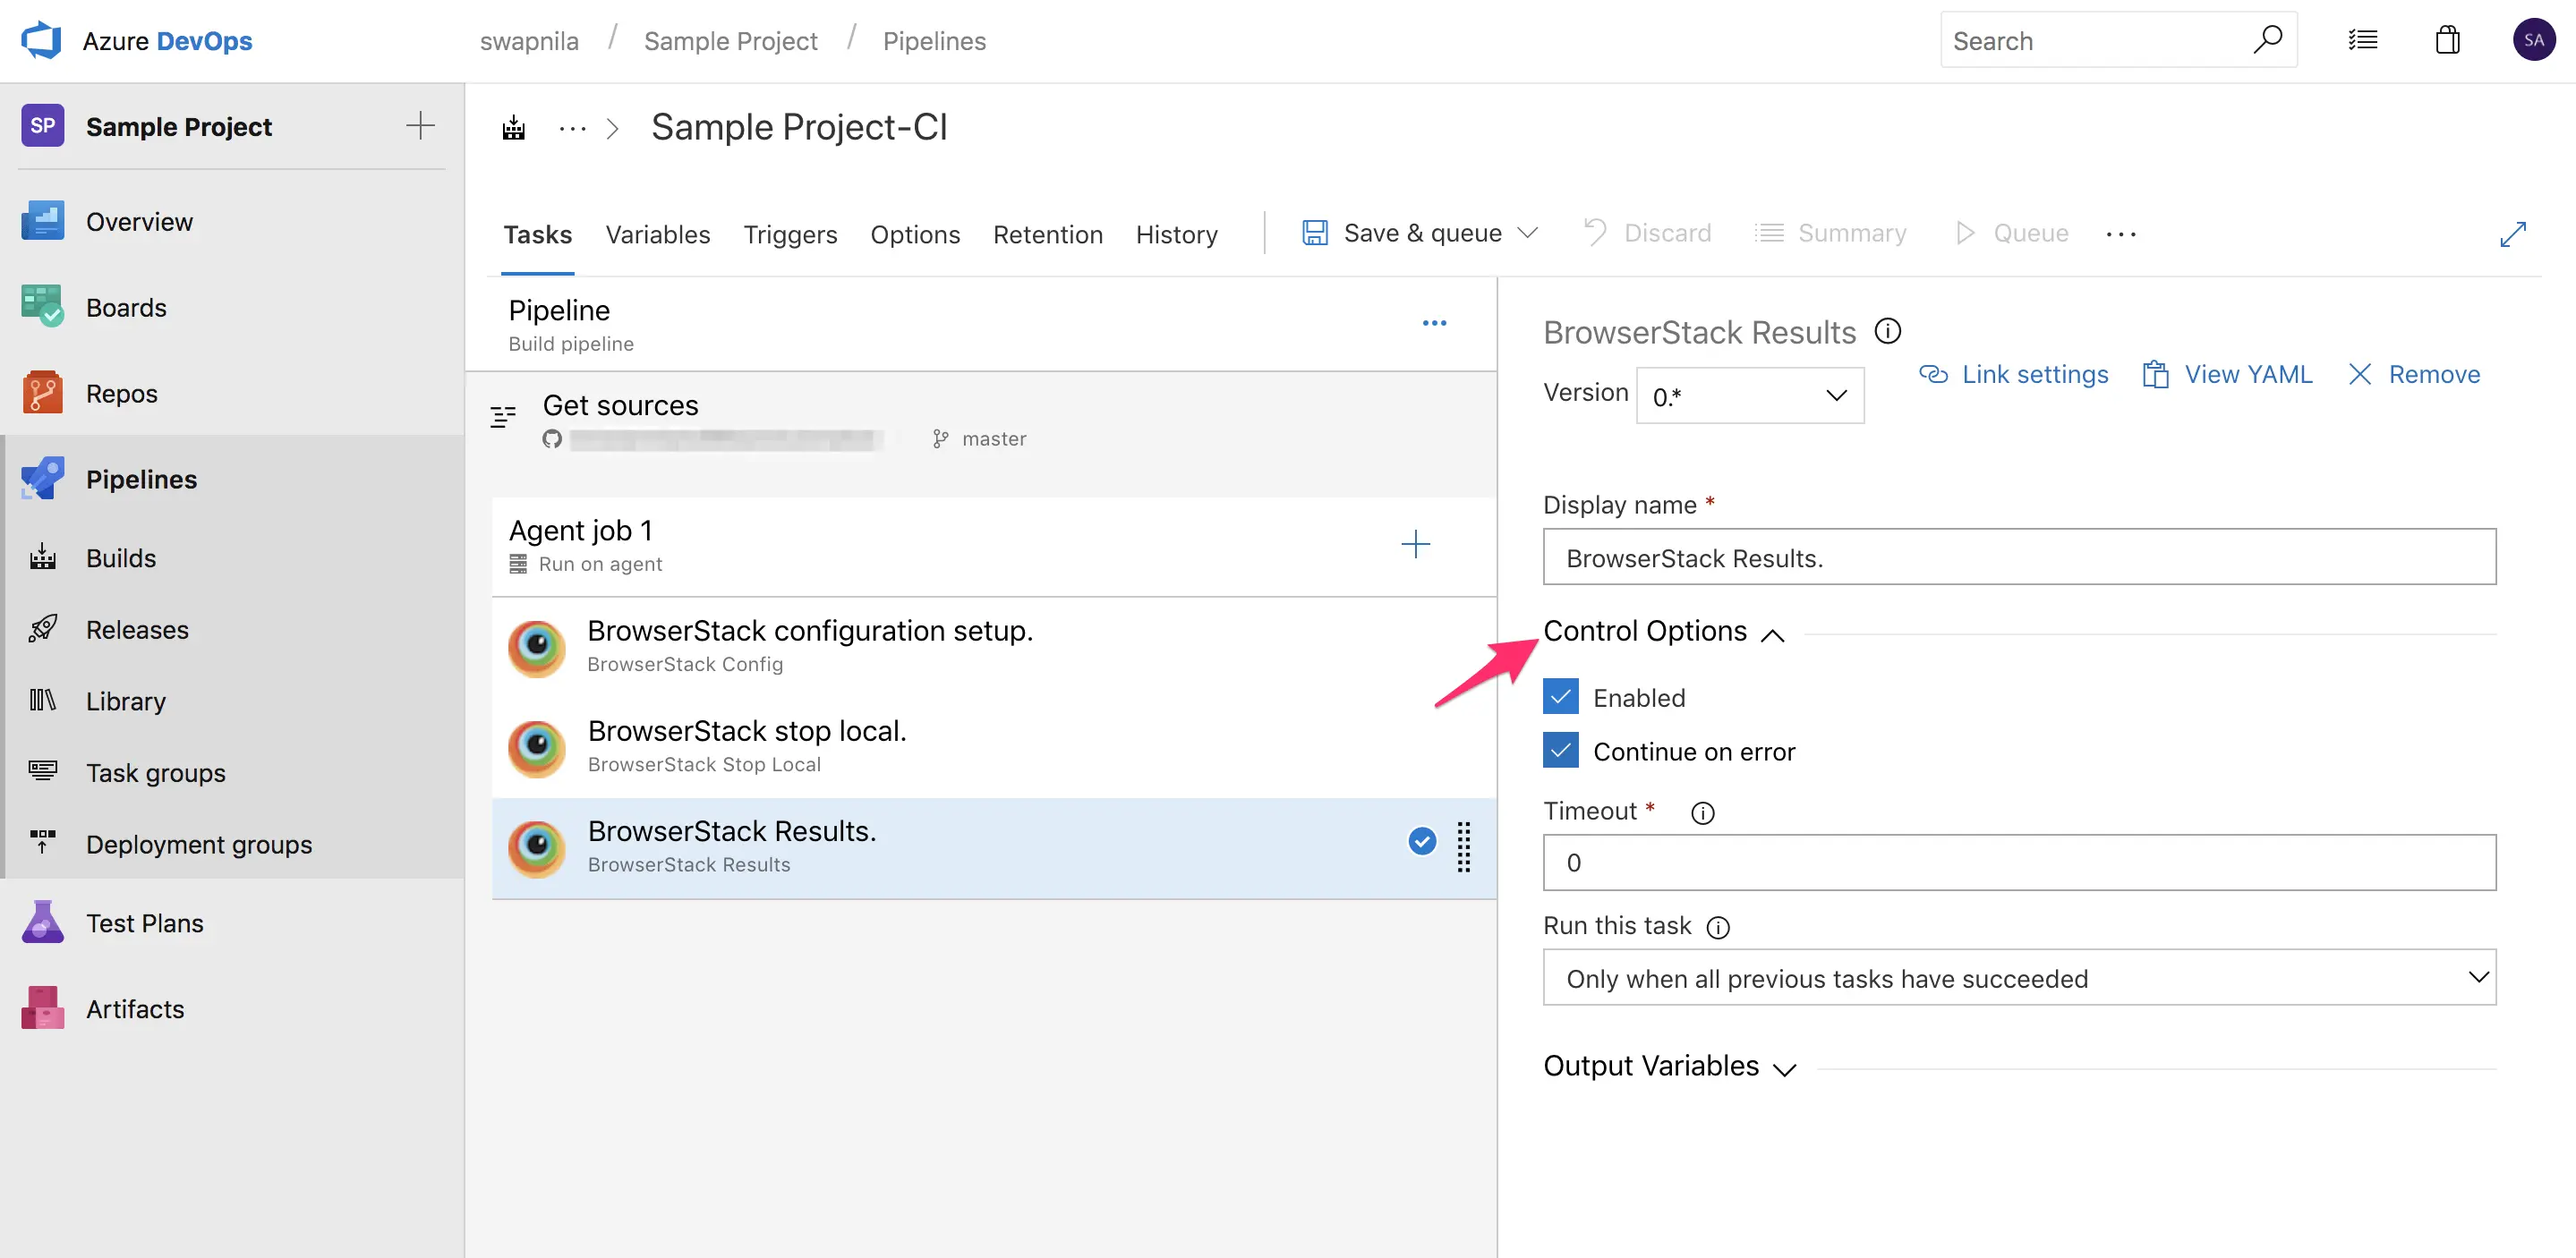
Embedding test reports
Once you have completed the above steps, you can configure your Azure Pipelines setup to embed all the BrowserStack Appium reports and logs.
-
Select Agent job 1 and click on the + icon. Type browserstack in the search box.
-
Hover on BrowserStack Results and click on the Add button. Click on Control Options and enable Continue on error.
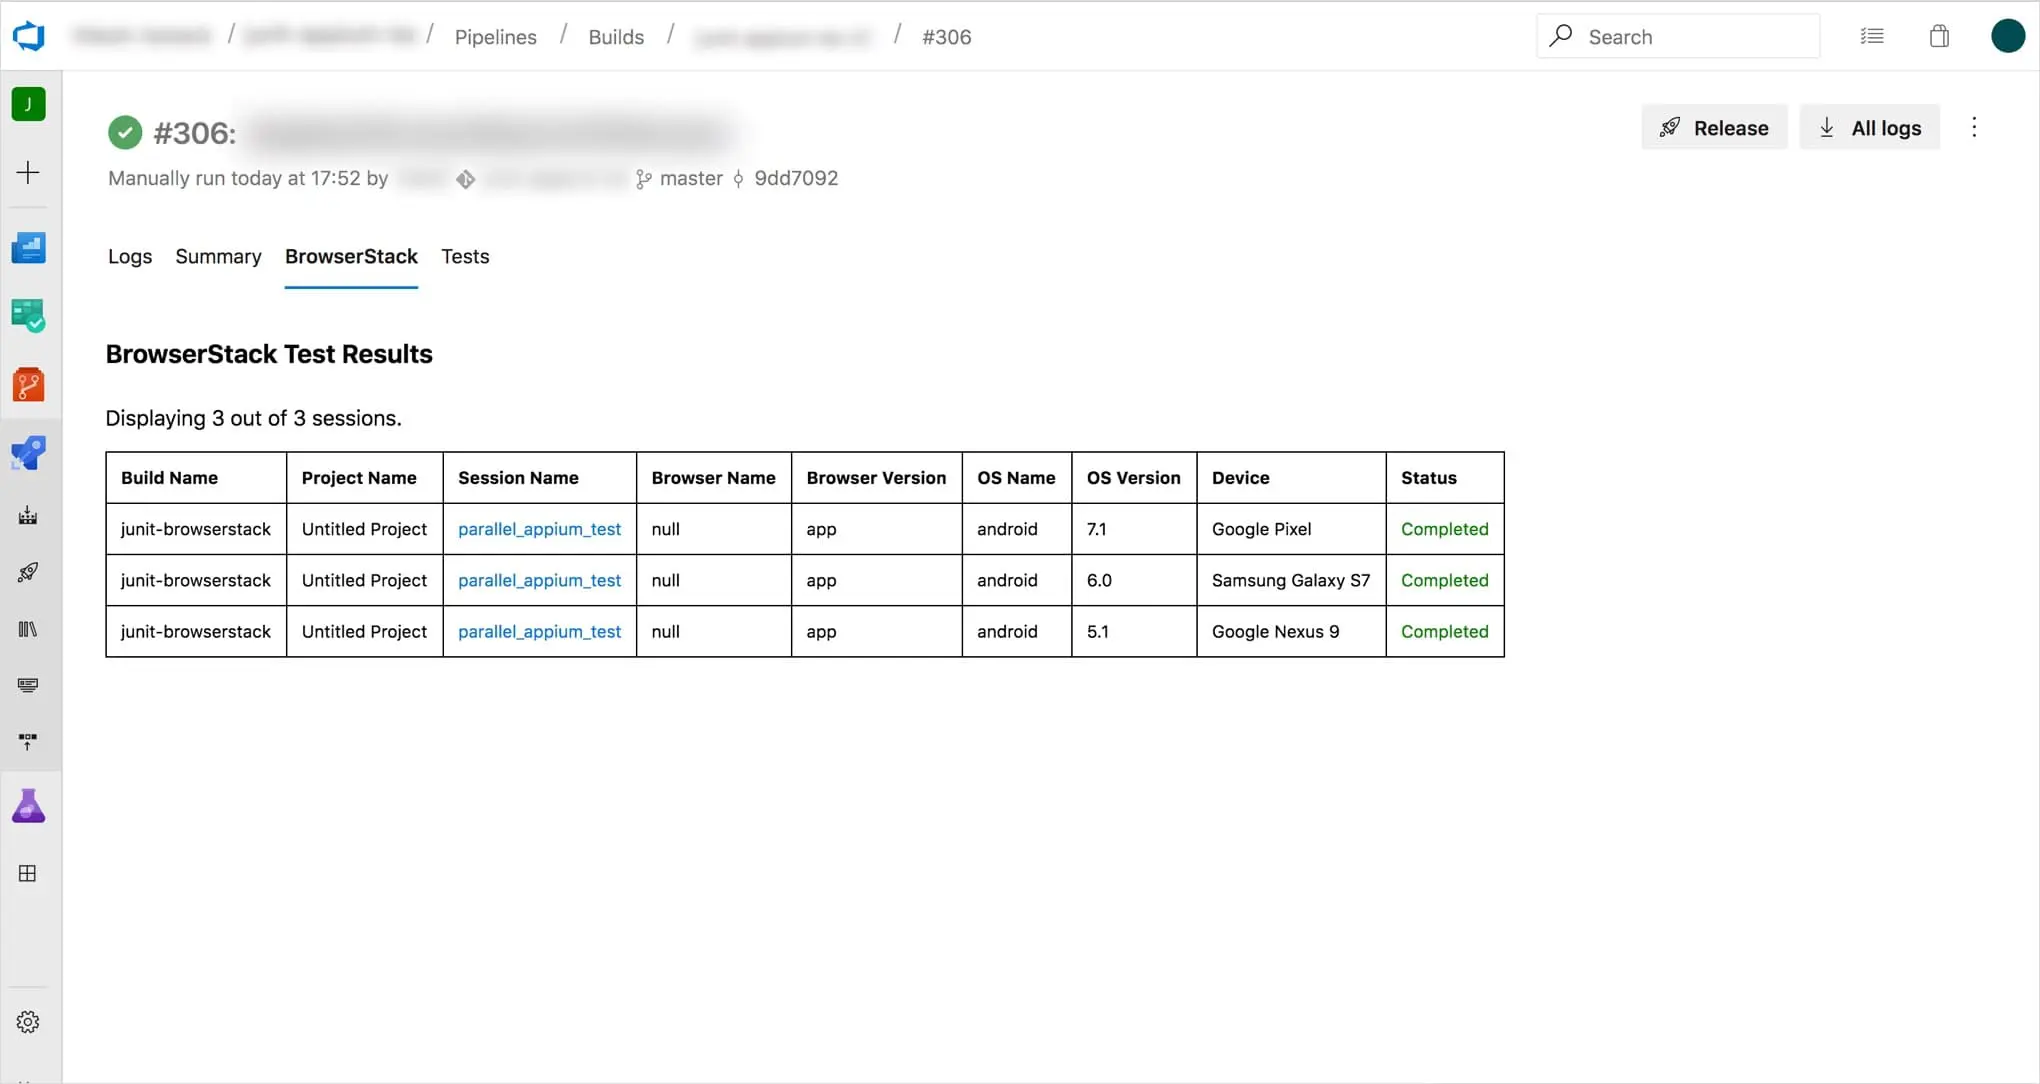
With this integration, you can now view the results of your Appium tests within Azure Pipelines. This is how the test results look in Azure Pipelines:
Conclusion
By following the steps outlined in this guide, you should have a seamless integration between your existing automation in Azure Pipelines, your Appium tests and the BrowserStack Appium grid. This will help you leverage all the benefits of test automation and the scale and coverage offered by BrowserStack.
We're sorry to hear that. Please share your feedback so we can do better
Contact our Support team for immediate help while we work on improving our docs.
We're continuously improving our docs. We'd love to know what you liked
- RESOURCES

Is this page helping you?
 Yes
No
Yes
No
We're sorry to hear that. Please share your feedback so we can do better
Contact our Support team for immediate help while we work on improving our docs.
We're continuously improving our docs. We'd love to know what you liked
Thank you for your valuable feedback!