Integrate Nightwatch tests with BrowserStack App Automate
Run automated tests using Appium with Nightwatch on BrowserStack App Automate. Start testing on real iOS and Android devices.
Ready to integrate your existing Nightwatch Appium test suite with BrowserStack? This document walks you through the simple steps to connect your tests to our cloud infrastructure and start running them on real devices. You’ll learn how to configure your environment, upload your app, and execute tests seamlessly on BrowserStack’s device cloud.
Prerequisites
- A BrowserStack
usernameandaccess_key. If you haven’t created an account yet, sign up for a free trial or purchase a paid plan. After signup, you can get your access credentials from Account Settings. - Node.js 14 or higher installed on your system. You can download the updated Node version from nodejs.org.
-
.apkor.aabfile of your Android app, or.ipafile of your iOS app.
Integration steps
Upload app
Upload your Android (.apk or .aab) or iOS (.ipa) apps to BrowserStack servers using one of the following ways:
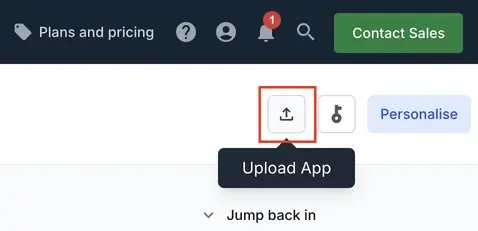
Upload app using the App Automate dashboard
On the App Automate dashboard, click the Upload button on the top-right corner. Select the app you want to upload from your filesystem.
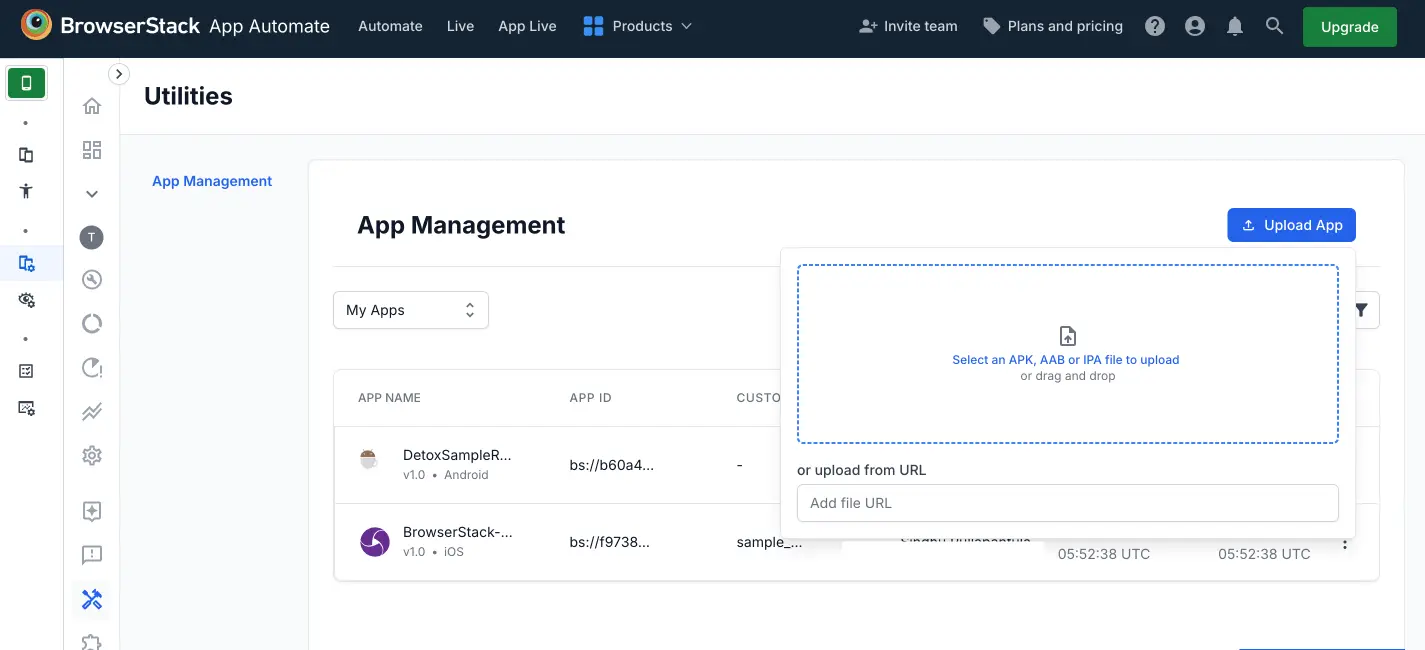
Upload app using App Management UI
To upload an app using the App Management UI:
- Navigate to App Automate dashboard, on the sidebar, click App Management.
- On the App Management UI, click Upload App.
- Select the app you want to upload from your filesystem. If you are uploading the app using a public URL, paste the URL of your app in the or upload from URL box.
- After selecting the app, choose the App Automate framework you want to use for testing. You can optionally add flags and a custom ID.
- Click Upload. The app is uploaded to the BrowserStack servers. You’ll receive an App ID, which you can use to run tests.
To manage your apps, refer to the documentation on managing apps using App Management UI.
Add App Automate specific environments to Nightwatch config
Add BrowserStack, Android, and iOS environments and capabilities in the nightwatch.conf.js file.
Replace the config variables as per the requirements
Edit the following variables in the nightwatch.conf.js file with the values corresponding to your app:
| Variables | Description |
|---|---|
BrowserStack username |
Your BrowserStack username. |
BrowserStack key |
Your BrowserStack access key. |
app |
Custom ID or BrowserStack URL (starts with bs://) of your app. Can also be used to set a custom id while uploading an app. |
appPackage |
The package name of your app. |
appActivity |
The main activity or screen of the app. |
appWaitActivity |
A screen which loads initially instead of the main activity page (e.g. onboarding activity). |
deviceName |
Name of the device in which you want to test. See a list of deviceName/PlatformName combinations available on BrowserStack. |
platformVersion |
The Android or iOS version. |
appUploadUrl |
Public URL of the app under test to upload to BrowserStack before testing. |
appUploadPath |
Local path of the app under test to upload to BrowserStack before testing. |
Enable Local Testing and debugging features
To enhance your testing experience on BrowserStack, add the corresponding capabilities in your nightwatch.conf.js file to enable Local Testing and debugging.
Enable BrowserStack Local
BrowserStack’s Local Testing feature connects your locally hosted API servers to BrowserStack to run your apps.
To enable Local Testing, add the following capability in your nightwatch.conf.js file:
'bstack:options': {
  userName: '',
  accessKey: '',
  appiumVersion: '2.0.0',
  local: true  // Enable Local Testing
}
For detailed information about testing apps with local/staging API servers, refer to BrowserStack Local Testing.
Enable debugging features
By default, BrowserStack provides prettified session logs, screenshots on every failed Appium command, and a video of the entire test. Additionally, you can enable the following features:
Visual logs: Enables screenshots for every Appium command run.
Network logs: Enables network capture for the session in HAR format. Note that this might reduce session performance slightly.
To enable these debugging features, add the following capabilities in your nightwatch.conf.js file:
'bstack:options': {
  userName: '',
  accessKey: '',
  appiumVersion: '2.0.0',
  debug: true,        // Enable visual logs
  networkLogs: true   // Enable network logs
}
For more information about debugging features, refer to Debugging test runs.
View test execution results
You can access the test execution results and debugging information such as video recordings, network logs, and device logs on App Automate dashboard or using our REST APIs.
Troubleshooting
Here’s a list of troubleshooting options you may find useful.
Errors faced during app upload
When you upload your app to BrowserStack, make sure that the app file and its path or URL are valid. If you see an error during app upload, first check the following:
- The file path is correct and the app file exists on your machine.
- The app URL is publicly accessible and not behind a firewall or authentication.
- The app file type is supported by BrowserStack.
You can upload your app from the App Automate dashboard, App Management UI, or by using the REST API. For detailed information on uploading and managing apps, refer to Uploading and managing apps.
Invalid device OS combination errors
If you face errors related to invalid device OS combinations, ensure that the device and OS version combinations you are trying to run your tests on are supported on BrowserStack.
- For detailed information on selecting devices, refer to the Select devices documentation.
- To use regular expressions to specify device attributes, refer to the Using regex to select devices documentation.
- To check the list of supported OS versions for devices on BrowserStack, refer to the App Automate supported devices documentation.
Re-signed apps and third-party library integration issues
-
Uploading an unsigned version of an Android app will require us to sign it with our certificates before installing it on our devices. In the same manner, any uploaded
.aabfiles will be converted into a universal APK and signed with our certificates. -
If BrowserStack resigns the apps, third-party library integrations such as Google Firebase services, Google Maps SDK, Facebook SDK, etc., may not function properly if the use of API keys is restricted based on the SHA-1 certificate fingerprint of the app’s signing key.
-
To prevent this issue, it’s recommended to sign the APK with your own certificates before uploading it to BrowserStack.
Disable re-signing for iOS apps
- If you upload an iOS app, we will re-sign the app with our own provisioning profile to be able to install your app on our devices during test execution.
- However, if your app is signed using the Apple Developer Enterprise Program, you can disable this behavior to test features such as push notifications on BrowserStack devices.
To disable re-signing for iOS apps, add the following capability in your nightwatch.conf.js file:
'bstack:options': {
  userName: '',
  accessKey: '',
  appiumVersion: '2.0.0',
  autoGrantPermissions: false,
  resignApp: false  // Disable re-signing for iOS apps
}
For more information, refer to Disabling app re-signing.
Need some help?
If you have any queries, please get in touch with us.
We're sorry to hear that. Please share your feedback so we can do better
Contact our Support team for immediate help while we work on improving our docs.
We're continuously improving our docs. We'd love to know what you liked

We're sorry to hear that. Please share your feedback so we can do better
Contact our Support team for immediate help while we work on improving our docs.
We're continuously improving our docs. We'd love to know what you liked
Thank you for your valuable feedback!