Test Observability on MSTest
Quick start guide to integrate BrowserStack Test Observability with MSTest
Prerequisites
- You have a C# MSTest test suite.
- Ensure you have .Net v5.0+ and MSTest v2.2.1+.
- You may run your tests on BrowserStack Automate or even on any other cloud provider or even locally.
- Your tests can be unit / integration / functional or of any nature.
- Note: The BrowserStack SDK for C# is currently not available on Mac computers with the M1 and M2 chip architecture.
Integrate with Test Observability
You can use BrowserStack Test Observability both when you’re using BrowserStack’s devices and browsers to run your functional end-to-end tests and also if you’re running tests locally on your laptop/CI system or even when you’re using some other cloud provider.
Not only that, Test Observability is agnostic to the type of testing and hence you could also integrate it with your unit or integration test suite written using MSTest.
Please select your setup below to get started with an awesome debugging experience with Test Observability:
To start using BrowserStack Test Observability with your existing setup of MSTest tests running on BrowserStack Automate or App Automate, you’d need to integrate with the BrowserStack SDK. Follow one of the methods below to integrate the SDK and start using Test Observability:
If you’re an existing BrowserStack SDK user, you can skip the steps below. However, ensure that you’ve specified static names (names should not change across build runs) for projectName and buildName in the browserstack.yml file in your project. Also, restrict the characters in your projectName and buildName to alphanumeric characters (A-Z, a-z, 0-9), underscores (_), colons (:), and hyphens (-). Any other character will be replaced with a space.
Set BrowserStack credentials
Save your BrowserStack credentials as environment variables. It simplifies running your test suite from your local or CI environment.
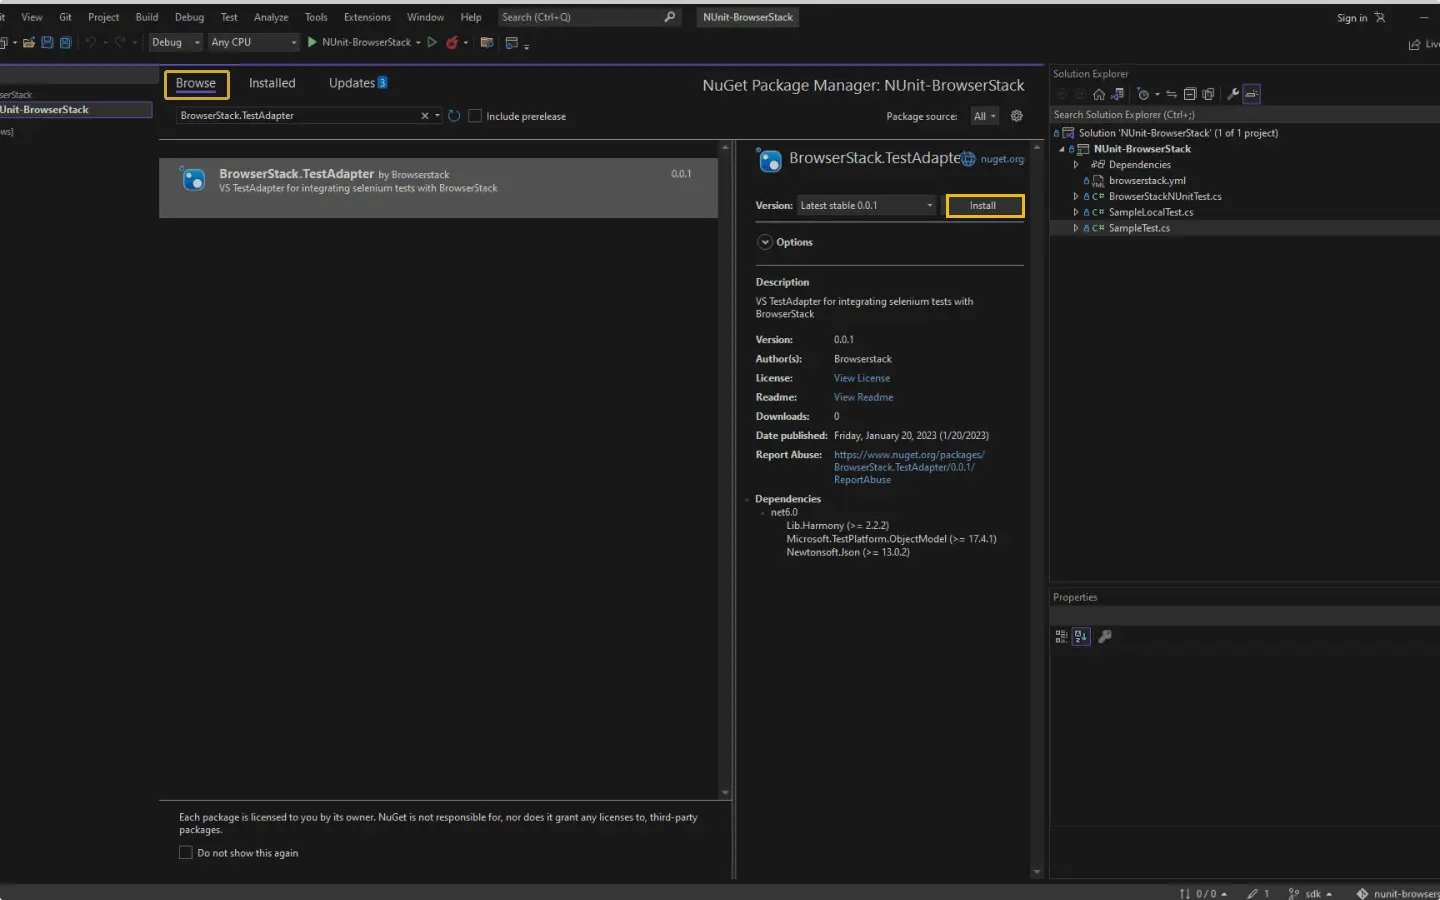
Add BrowserStack SDK as NuGet package
Steps to install BrowserStack SDK as a NuGet package:
- On the Visual Studio toolbar, select Project → Manage NuGet Packages. A NuGet Package Manager Window opens.
- In the Browse tab, search for BrowserStack.TestAdapter, and click Install.
Create the browserstack.yml file
Ensure you create browserstack.yml file at the root of your directory with the following structure.
The projectName and buildName config must be static and not change across different runs of the same build. This is a deviation in approach as specified by BrowserStack Automate or App Automate as Test Observability will automatically identify different build runs.
Restrict the characters in your projectName and buildName to alphanumeric characters (A-Z, a-z, 0-9), underscores (_), colons (:), and hyphens (-). Any other character will be replaced with a space.
Enable Test Observabality
Run the commands bellow to set Test Observability on in an environment variable. This is a onetime setup that you will need to do before running tests.
setx BROWSERSTACK_TEST_OBSERVABILITY="true"
set BROWSERSTACK_TEST_OBSERVABILITY="true"
dotnet build
export BROWSERSTACK_TEST_OBSERVABILITY="true"
dotnet build
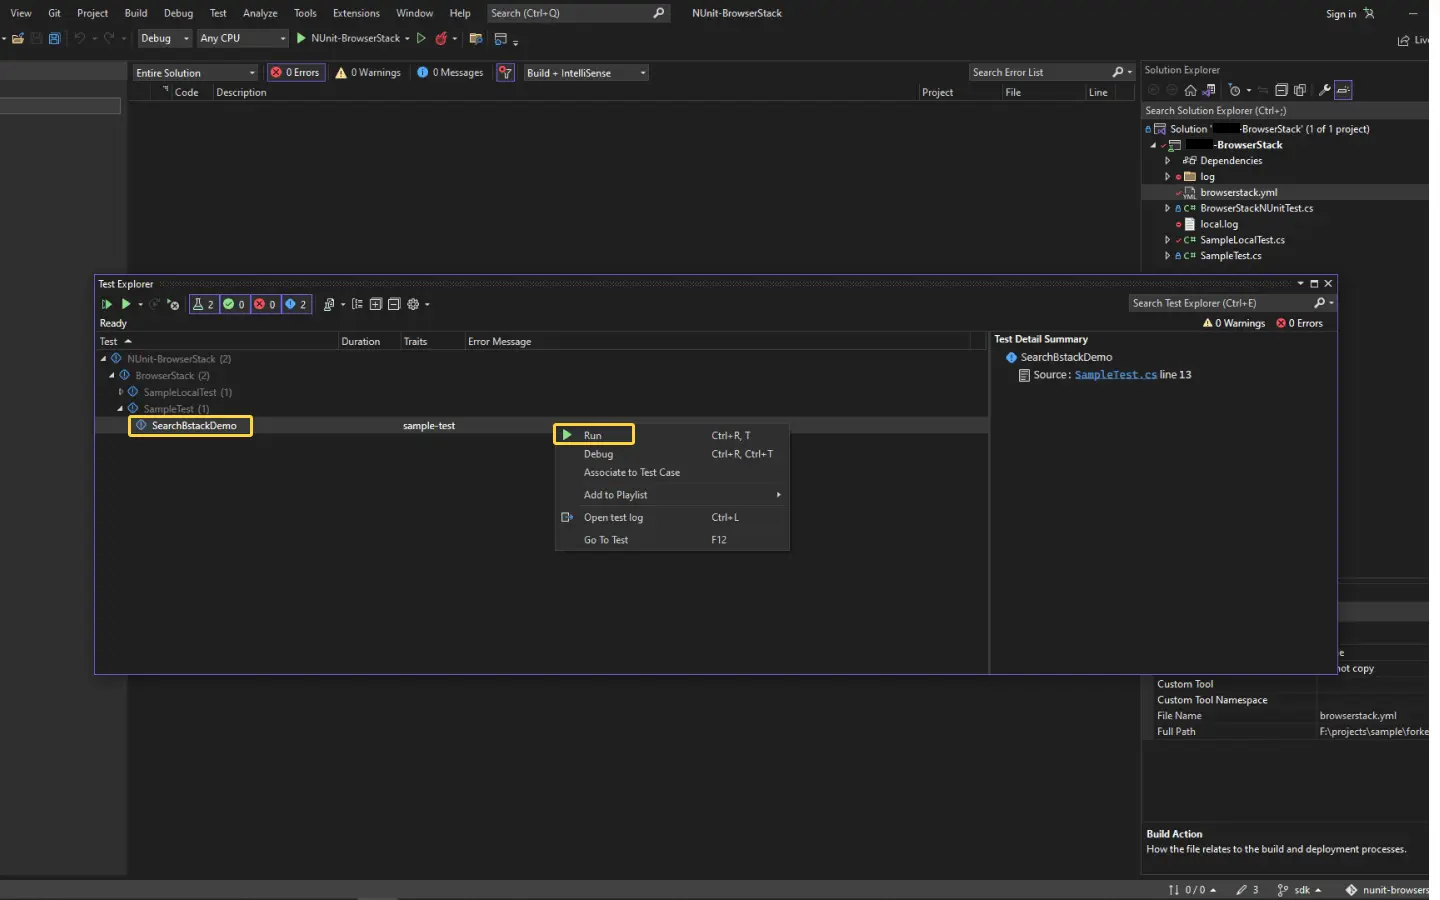
Run your suite with Test Observability
The BrowserStack Test Adapter enables you to execute your test suite seamlessly, just as you did previously.
- On the Visual Studio toolbar, select Test → Test Explorer.
- Right-click on your test and click Run.
Post build run completion, you’ll be able to see the build run report along with all necessary debugging information right on this dashboard.
Set BrowserStack credentials
Save your BrowserStack credentials as environment variables. It simplifies running your test suite from your local or CI environment.
Install BrowserStack SDK
Run the following command to install the BrowserStack SDK and create a browserstack.yml file in the root directory of your project.
Make changes in your browserstack.yml config file
Once you have installed the SDK, a browserstack.yml config file will be created at the root level of your project. This file holds all the required capabilities to run tests on BrowserStack.
BrowserStack SDK is a very powerful tool that you can use to set the different browser/device combinations and parallelization. For more details, check out the Automate Integration guide.
Make sure you copy the contents of the below config file and set it in your project’s browserstack.yml file:
The projectName and buildName config must be static and not change across different runs of the same build. This is a deviation in approach as specified by BrowserStack Automate or App Automate as Test Observability will automatically identify different build runs.
Restrict the characters in your projectName and buildName to alphanumeric characters (A-Z, a-z, 0-9), underscores (_), colons (:), and hyphens (-). Any other character will be replaced with a space.
Run your test suite with Test Observability
Continue running your tests as you have been running previously. The command to run your tests using the BrowserStack SDK remains unchanged. For your reference, here’s a sample command:
Post build run completion, you’ll be able to see the build run report along with all necessary debugging information right on this dashboard.
Verify you have BrowserStack.TestAdapter installed
As you’re an existing BrowserStack SDK user, you must already be having a browserstack.yml config file at the root level of your project, as well as BrowserStack.TestAdapter as a dependency.
Check if you have the following entry in your .csproj file of your project.
Alternatively, you can run dotnet list package and ensure BrowserStack.TestAdapter is present.
Install the latest SDK version
Now, run the below command to ensure that the latest version is installed:
Verify your browserstack.yml file
Test Observability mandatorily needs the following four configurations in the file. You need not change anything but you have to ensure that the values of the buildName and projectName variables are not changing across different build runs.
The projectName and buildName config must be static and not change across different runs of the same build. This is a deviation in approach as specified by BrowserStack Automate or App Automate as Test Observability will automatically identify different build runs.
Restrict the characters in your projectName and buildName to alphanumeric characters (A-Z, a-z, 0-9), underscores (_), colons (:), and hyphens (-). Any other character will be replaced with a space.
Enable Test Observabality
Run the commands bellow to set Test Observability on in an environment variable. This is a onetime setup that you will need to do before running tests.
setx BROWSERSTACK_TEST_OBSERVABILITY="true"
set BROWSERSTACK_TEST_OBSERVABILITY="true"
dotnet build
export BROWSERSTACK_TEST_OBSERVABILITY="true"
dotnet build
Run your test suite with Test Observability
Continue running your tests as you have been running previously. The command to run your tests using the BrowserStack SDK remains unchanged. For your reference, here’s a sample command:
Post build run completion, you’ll be able to see the build run report along with all necessary debugging information right on this dashboard.
To start using BrowserStack Test Observability with your existing setup of MSTest tests running on your local laptop or CI or even on any other cloud provider, you’d need to integrate using the BrowserStack SDK. Follow one of the methods below to integrate the SDK and start using Test Observability:
BrowserStack Test Observability works with any kind of automation tests. Use it with your unit or integration test suites and also your end-to-end functional test suite.
Set BrowserStack credentials
Save your BrowserStack credentials as environment variables. It simplifies running your test suite from your local or CI environment.
Add BrowserStack SDK as NuGet package
Steps to install BrowserStack SDK as a NuGet package:
- On the Visual Studio toolbar, select Project → Manage NuGet Packages. A NuGet Package Manager Window opens.
- In the Browse tab, search for BrowserStack.TestAdapter, and click Install.
Create the browserstack.yml file in your project root
Ensure you create browserstack.yml file at the root of your directory with the following structure.
The projectName and buildName config must be static and not change across different runs of the same build. This is a deviation in approach as specified by BrowserStack Automate or App Automate as Test Observability will automatically identify different build runs.
Restrict the characters in your projectName and buildName to alphanumeric characters (A-Z, a-z, 0-9), underscores (_), colons (:), and hyphens (-). Any other character will be replaced with a space.
Enable Test Observabality
Run the commands bellow to set Test Observability on in an environment variable. This is a onetime setup that you will need to do before running tests.
setx BROWSERSTACK_TEST_OBSERVABILITY="true"
set BROWSERSTACK_TEST_OBSERVABILITY="true"
dotnet build
export BROWSERSTACK_TEST_OBSERVABILITY="true"
dotnet build
Run your suite with Test Observability
The BrowserStack Test Adapter enables you to execute your test suite seamlessly, just as you did previously.
- On the Visual Studio toolbar, select Test → Test Explorer.
- Right-click on your test and click Run.
Post build run completion, you’ll be able to see the build run report along with all necessary debugging information right on this dashboard.
Set BrowserStack credentials
Save your BrowserStack credentials as environment variables. It simplifies running your test suite from your local or CI environment.
Install BrowserStack SDK
Run the following command to install the BrowserStack SDK and create a browserstack.yml file in the root directory of your project.
Make changes in your browserstack.yml config file
Once you have installed the SDK, a browserstack.yml config file will be created at the root level of your project. This file holds all the required capabilities to run tests on BrowserStack.
BrowserStack SDK is a very powerful tool that you can use to set the different browser/device combinations and parallelization. For more details, check out the Automate Integration guide.
Make sure you copy the contents of the below config file and set it in your project’s browserstack.yml file:
The projectName and buildName config must be static and not change across different runs of the same build. This is a deviation in approach as specified by BrowserStack Automate or App Automate as Test Observability will automatically identify different build runs.
Restrict the characters in your projectName and buildName to alphanumeric characters (A-Z, a-z, 0-9), underscores (_), colons (:), and hyphens (-). Any other character will be replaced with a space.
Run your test suite with Test Observability
Continue running your tests as you have been running previously. The command to run your tests using the BrowserStack SDK remains unchanged. For your reference, here’s a sample command:
Post build run completion, you’ll be able to see the build run report along with all necessary debugging information right on this dashboard.
We're sorry to hear that. Please share your feedback so we can do better
Contact our Support team for immediate help while we work on improving our docs.
We're continuously improving our docs. We'd love to know what you liked
Is this page helping you?
 Yes
No
Yes
No
We're sorry to hear that. Please share your feedback so we can do better
Contact our Support team for immediate help while we work on improving our docs.
We're continuously improving our docs. We'd love to know what you liked
Thank you for your valuable feedback!