Integrate BrowserStack Automate with Bitbucket CI/CD
Learn how to integrate Bitbucket CI/CD with the BrowserStack device cloud for running your Cypress tests.
The information in this section applies to Bitbucket CI/CD implemented as part of Bitbucket SaaS offering and requires some knowledge of Bitbucket. Check out Bitbucket documentation before configuring BrowserStack.
You can run your automated tests on BrowserStack Automate using your existing Bitbucket pipelines setup. Bitbucket Pipelines uses bitbucket-pipelines.yml for configuration, and the same can be used to run your tests on BrowserStack too.
If you are new to BrowserStack, take some time to check out the getting started guides to learn about integrating BrowserStack with your existing Cypress test scripts.
In this guide, you will learn how to:
Prerequisites
Before you start with the integration, ensure the following tasks are complete.
- Bitbucket account and the relevant project is accessible.
-
bitbucket-pipelines.ymlfile exists for your project. - You are a maintainer or owner of the project.
- Access to the BrowserStack account credentials, namely Username and Access Key.
Integrate with your existing Cypress test suite
Setting and using environment variables
If you are already using environment variables to specify your BrowserStack authentication details, you can skip this step.
If not, we strongly recommend you not to hardcode the auth details (username & access key) in your code (and hence do not commit and check-in your auth keys into code repositories). This helps in both maintaining a secure codebase, as well as helping you flexibly run your tests using different service accounts based on your needs (for example, run pre-prod regression suites using a team account with higher parallels limit).
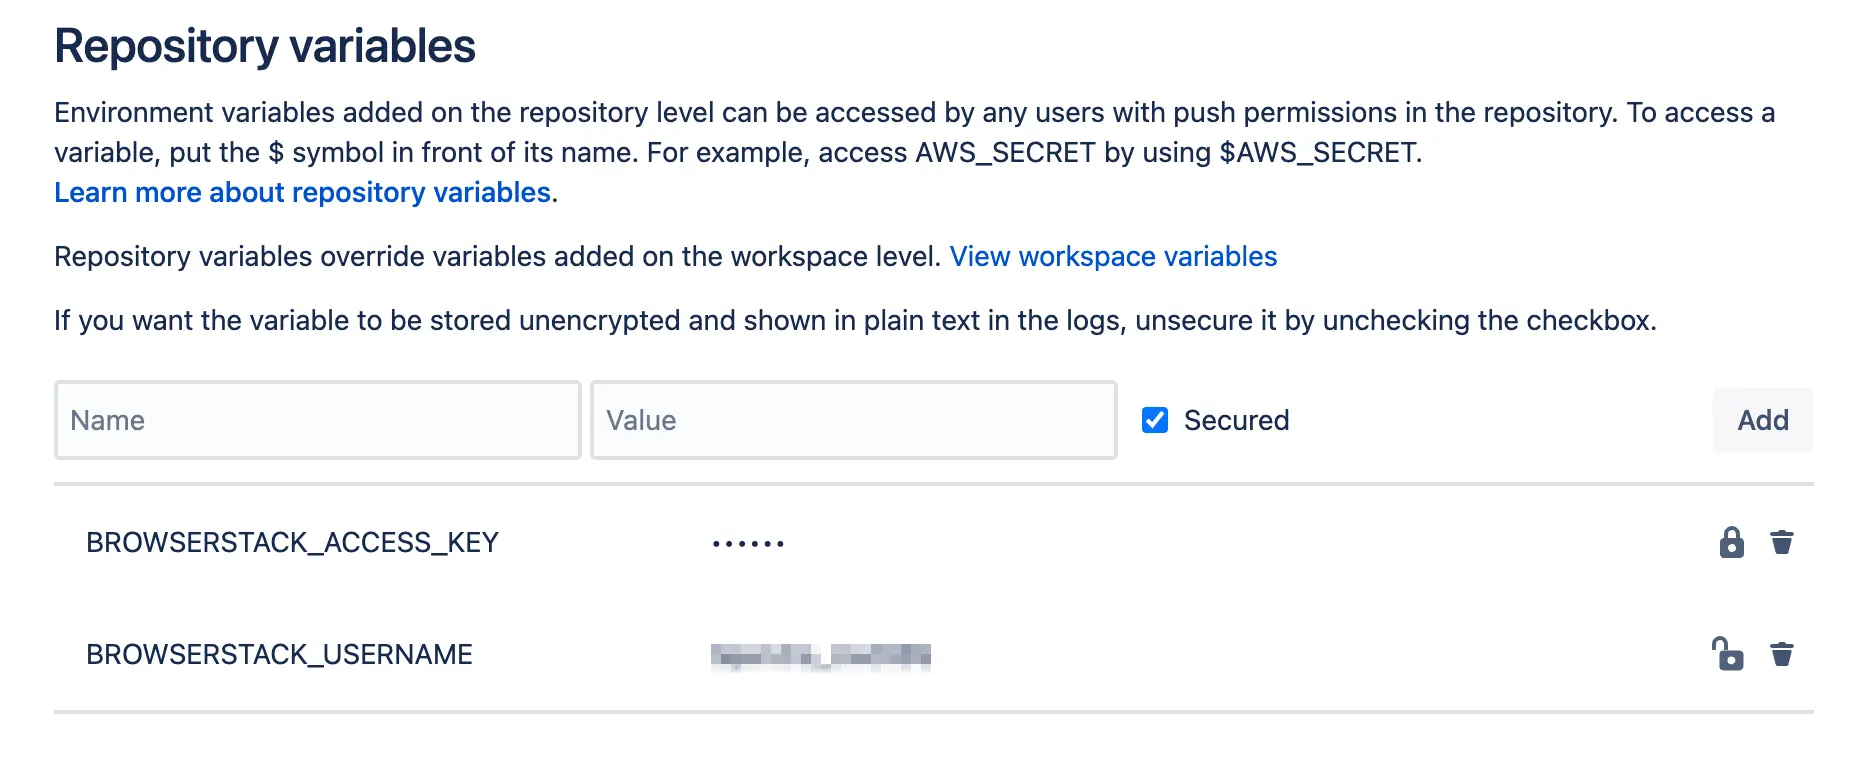
Go to your Bitbucket repository’s settings and add the following variables:
- BROWSERSTACK_USERNAME: Your BrowserStack username
- BROWSERSTACK_ACCESS_KEY: Your BrowserStack access key
In Bitbucket, you can add, edit, or remove variables at the workspace, repository, and deployment environment levels. The below screenshot shows variables added at the Repository level.

To know more about the different ways you can use variables, refer to bitbucket’s variables and secrets page.
After you have added the BrowserStack username and access key as variables in Bitbucket, you can refer them in the browserstack.json file as shown below.
...
{
  "auth": {
      "username": "BROWSERSTACK_USERNAME",
      "access_key": "BROWSERSTACK_ACCESS_KEY"
    },
  "browsers": [{
      "browser": "chrome",
      "os": "Windows 10",
      "versions": ["latest", "latest - 1"]
    },
    {
      "browser": "firefox",
      "os": "OS X Mojave",
      "versions": ["latest", "latest - 1"]
    },
    {
      "browser": "edge",
      "os": "OS X Catalina",
      "versions": ["latest"]
    }
  ],
  "run_settings": {
    "cypress_config_file": "./cypress.config.js",
    "cypress_version": "12.3",
    "npm_dependencies": {
      "npm-package-you-need-to-run-tests-1": "^1.2.1",
      "npm-package-you-need-to-run-tests-2": "^7.1.6-beta.13"
    },
    "project_name": "Cypress Kitchen Sink Example",
    "build_name": "Build no: 1",
    "parallels": 5,
    "exclude": ["some-folder/test.js", "static/*.pdf"]
  }
}
...
Setting up your test environment
You can simply update your bitbucket-pipelines.yml as per your needs. Here is an example configuration for your reference:
image: atlassian/default-image:3

pipelines:
  default:
    - step:
        name: "NPM Install and Run Test"
        image: node:latest
        script:
          # install dependencies
          - npm install
          # install browserstack-cypress-cli
          - npm install -g browserstack-cypress-cli
          # run cypress tests
          - browserstack-cypress run --sync --spec cypress/e2e/someTest.cy.js
To know more about how to set up your pipelines, refer to cypress official bitbucket-pipelines page.
Test your locally hosted websites
Use BrowserStack Local Testing to test your web applications hosted on private, development, and internal servers.
To set up Local testing with BrowserStack, set the local key as true within connections_settings in the browserstack.json file.
The following code snippet shows the sample configuration file:
...
{
  "connection_settings": {
    "local": true,
    "local_mode": "always-on"
  }
}
...
The local_mode key is set to always-on in the example above, ensuring that the local connection remains active thereby speeding up your tests.
For more configurations options, refer to run tests on localhost and staging websites.
When other Local connections might be present (for Selenium/JS tests from your account), it is advisable to set up a Local connection with an identifier.
The following code snippet shows how to add the local_identifier key to the browserstack.json file.
...
{
  "connection_settings": {
    "local": true,
    "local_identifier": "CypressLocalConnection1"
  }
}
...
And that’s all! You are now all set to run your tests automatically on BrowserStack Automate on every PR or commit as per your workflows.
We're sorry to hear that. Please share your feedback so we can do better
Contact our Support team for immediate help while we work on improving our docs.
We're continuously improving our docs. We'd love to know what you liked
- RESOURCES
We're sorry to hear that. Please share your feedback so we can do better
Contact our Support team for immediate help while we work on improving our docs.
We're continuously improving our docs. We'd love to know what you liked
Thank you for your valuable feedback!