Test Apple Pay on BrowserStack Live real iOS devices
You can test the payment flow of your websites or web apps that use Apple Pay as a payment method on real iOS devices using the AssistiveTouch and Device Passcode features.
This feature is currently a Private Beta service and available only under Team Pro and Enterprise Pro plans. Contact our Support team or Sales team to enable this feature. For more details, check out our pricing page.
Apple Pay payment flow testing involves the following steps:
To test Apple Pay on Private Devices, refer to our Testing Apple Pay on Private Devices Live documentation.
Supported devices
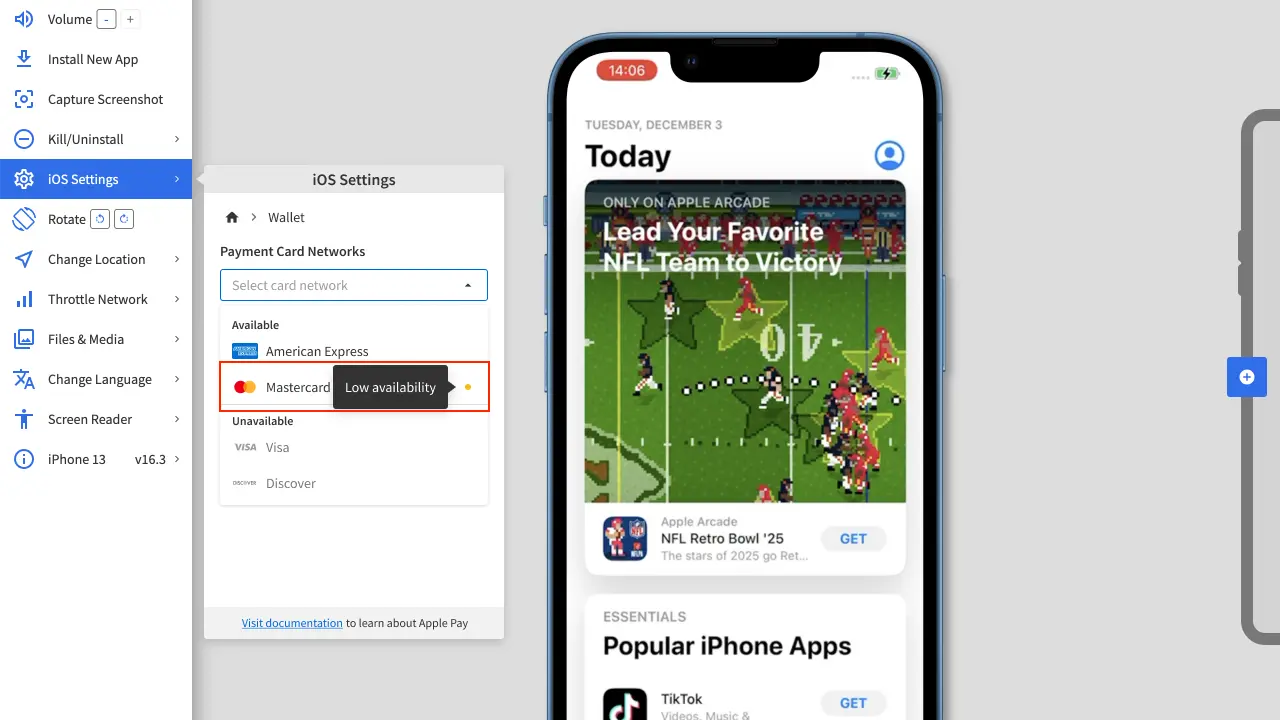
If you are on the Team Pro or Enterprise Pro plan, supported iOS devices appear in the Live device listing with the Apple Pay logo next to them, as shown in the image below:
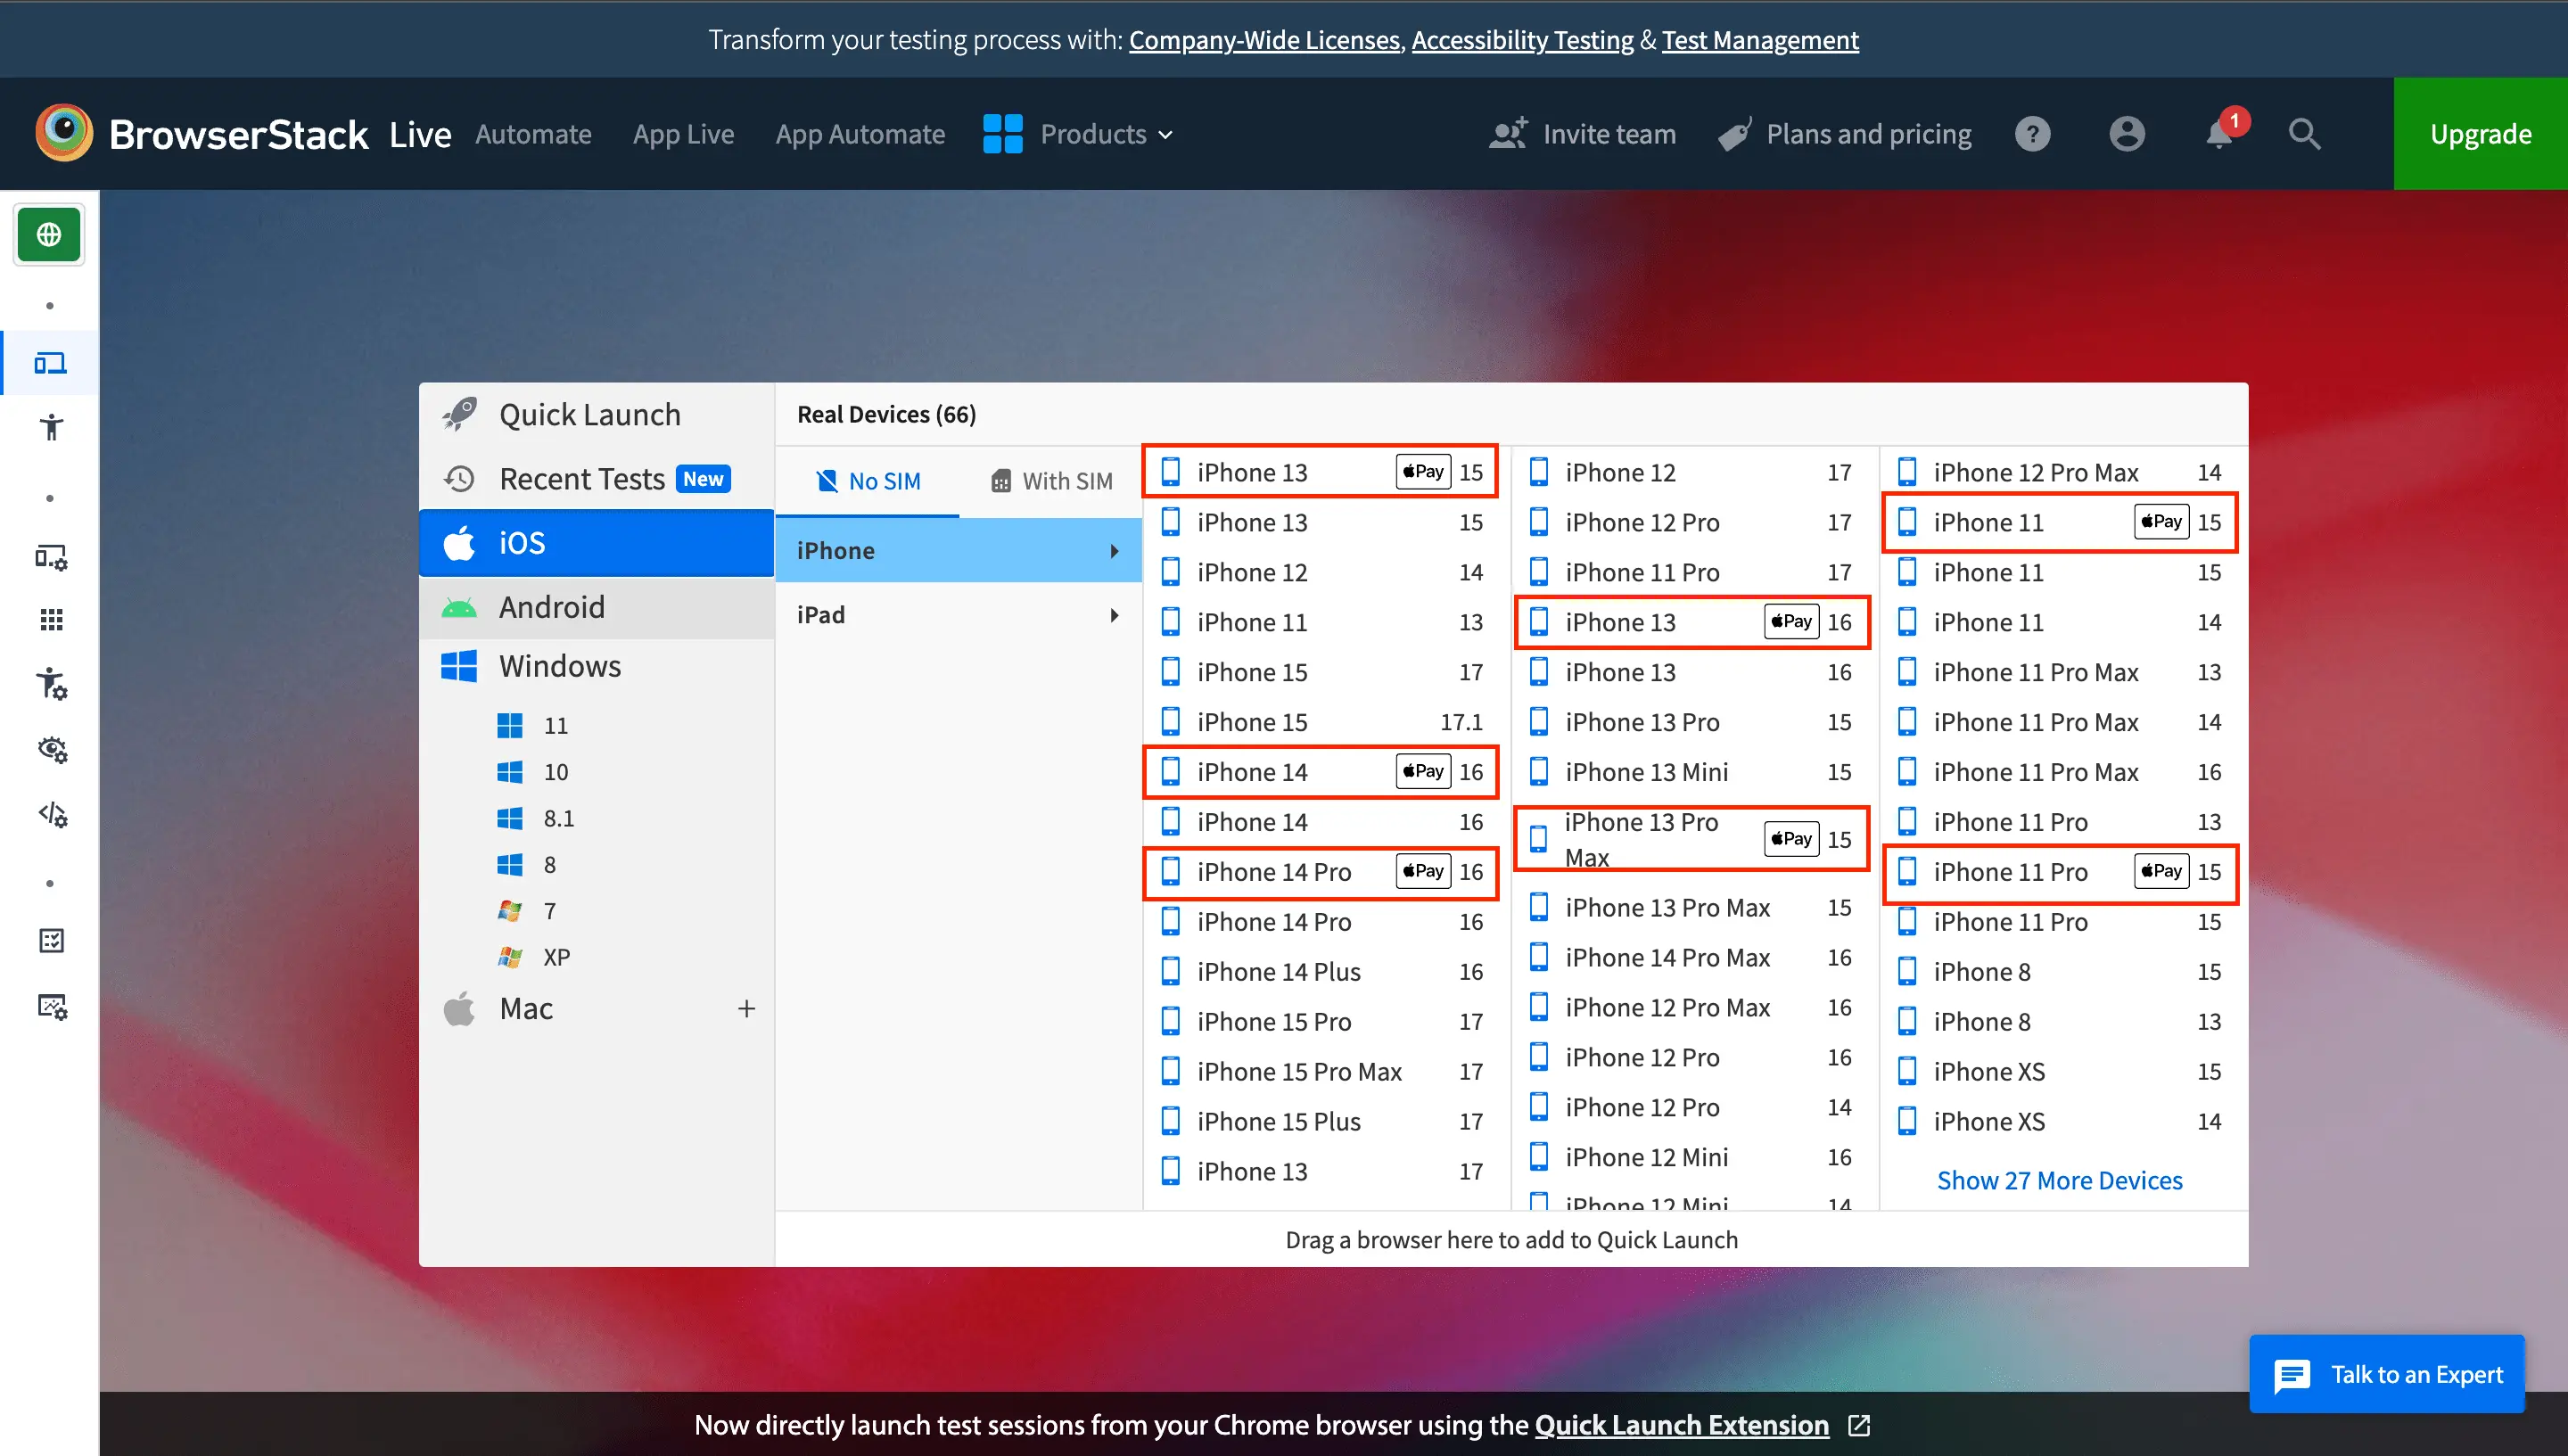
List of supported devices
| Supported Devices | iOS Version |
|---|---|
| iPhone 17 Pro | 26 |
| iPhone Air | 26 |
| iPad Pro 11 2025 | 26 |
| iPhone 16 | 18 |
| iPhone 15 | 17 |
| iPhone 14 | 16 |
| iPhone 14 Pro | 16 |
| iPhone 13 Pro Max | 15 |
| iPhone 13 Pro | 15 |
| iPhone 13 | 16 |
| iPhone 13 | 15 |
Launch a test session
To launch a test session with a device that supports Apple Pay, follow these steps:
- Log in to the Live dashboard.
- Select an iOS device with the Apple Pay logo, select your browser, and click Launch session on the prompt.
During the setup, the following actions are completed automatically:- Apple Pay is enabled.
- Device Passcode is enabled.
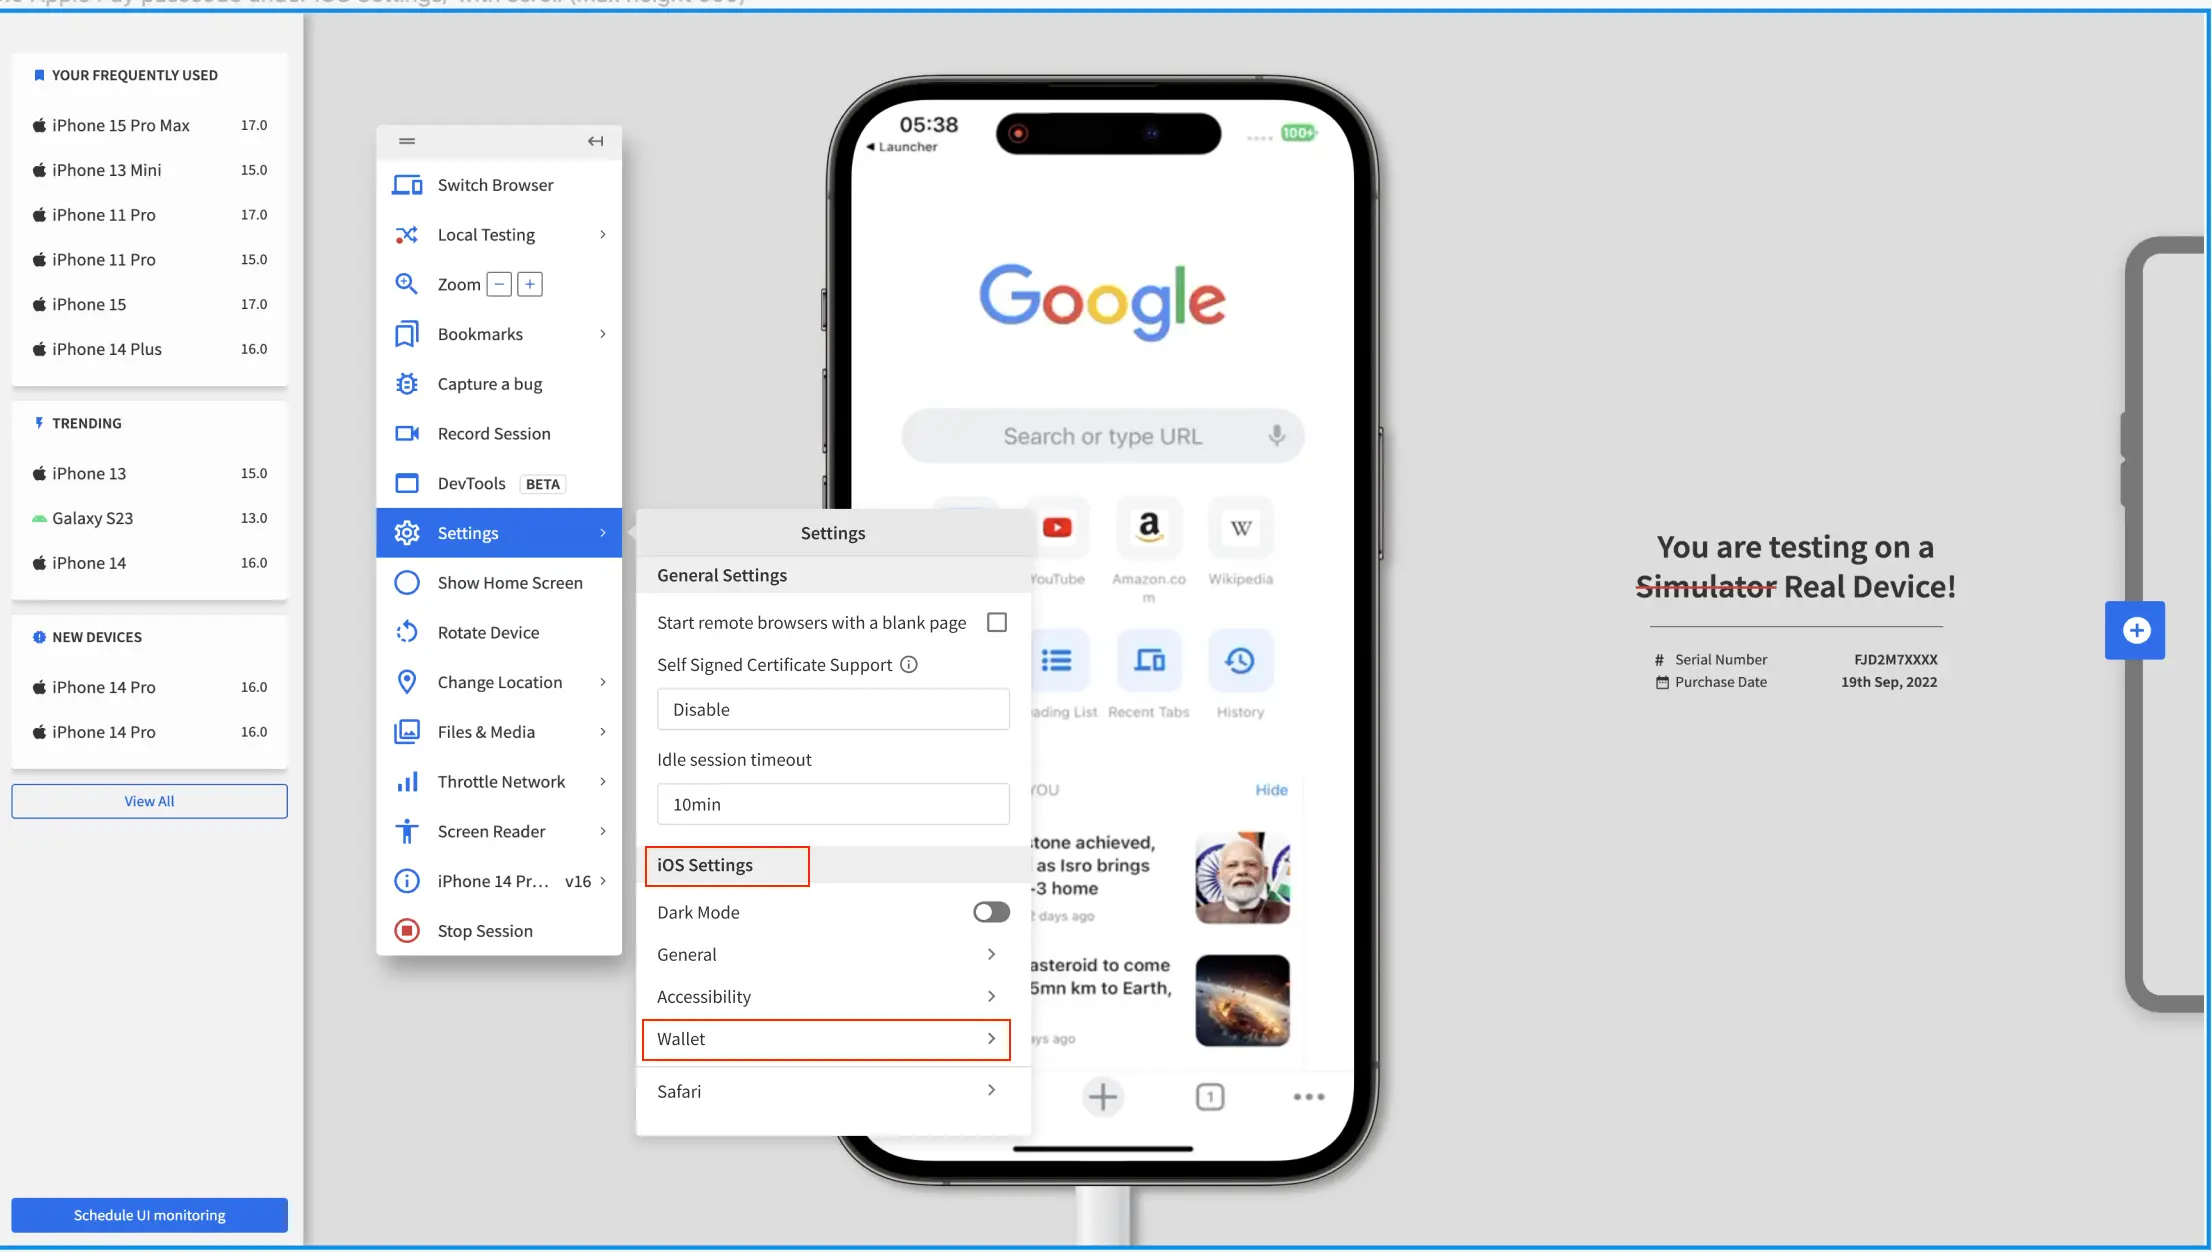
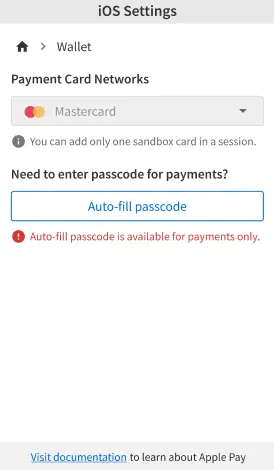
Add a payment card to the Wallet app
When you launch a new test session on a device that supports Apple Pay, the Settings > iOS Settings > Wallet prompt opens by default, asking you to add a payment card.
To add a payment card manually or during an active session:
- Ensure that you have launched a test session with a device that supports Apple Pay. For a list of supported devices, see Supported devices.
- On the Live vertical toolbar, click Settings.
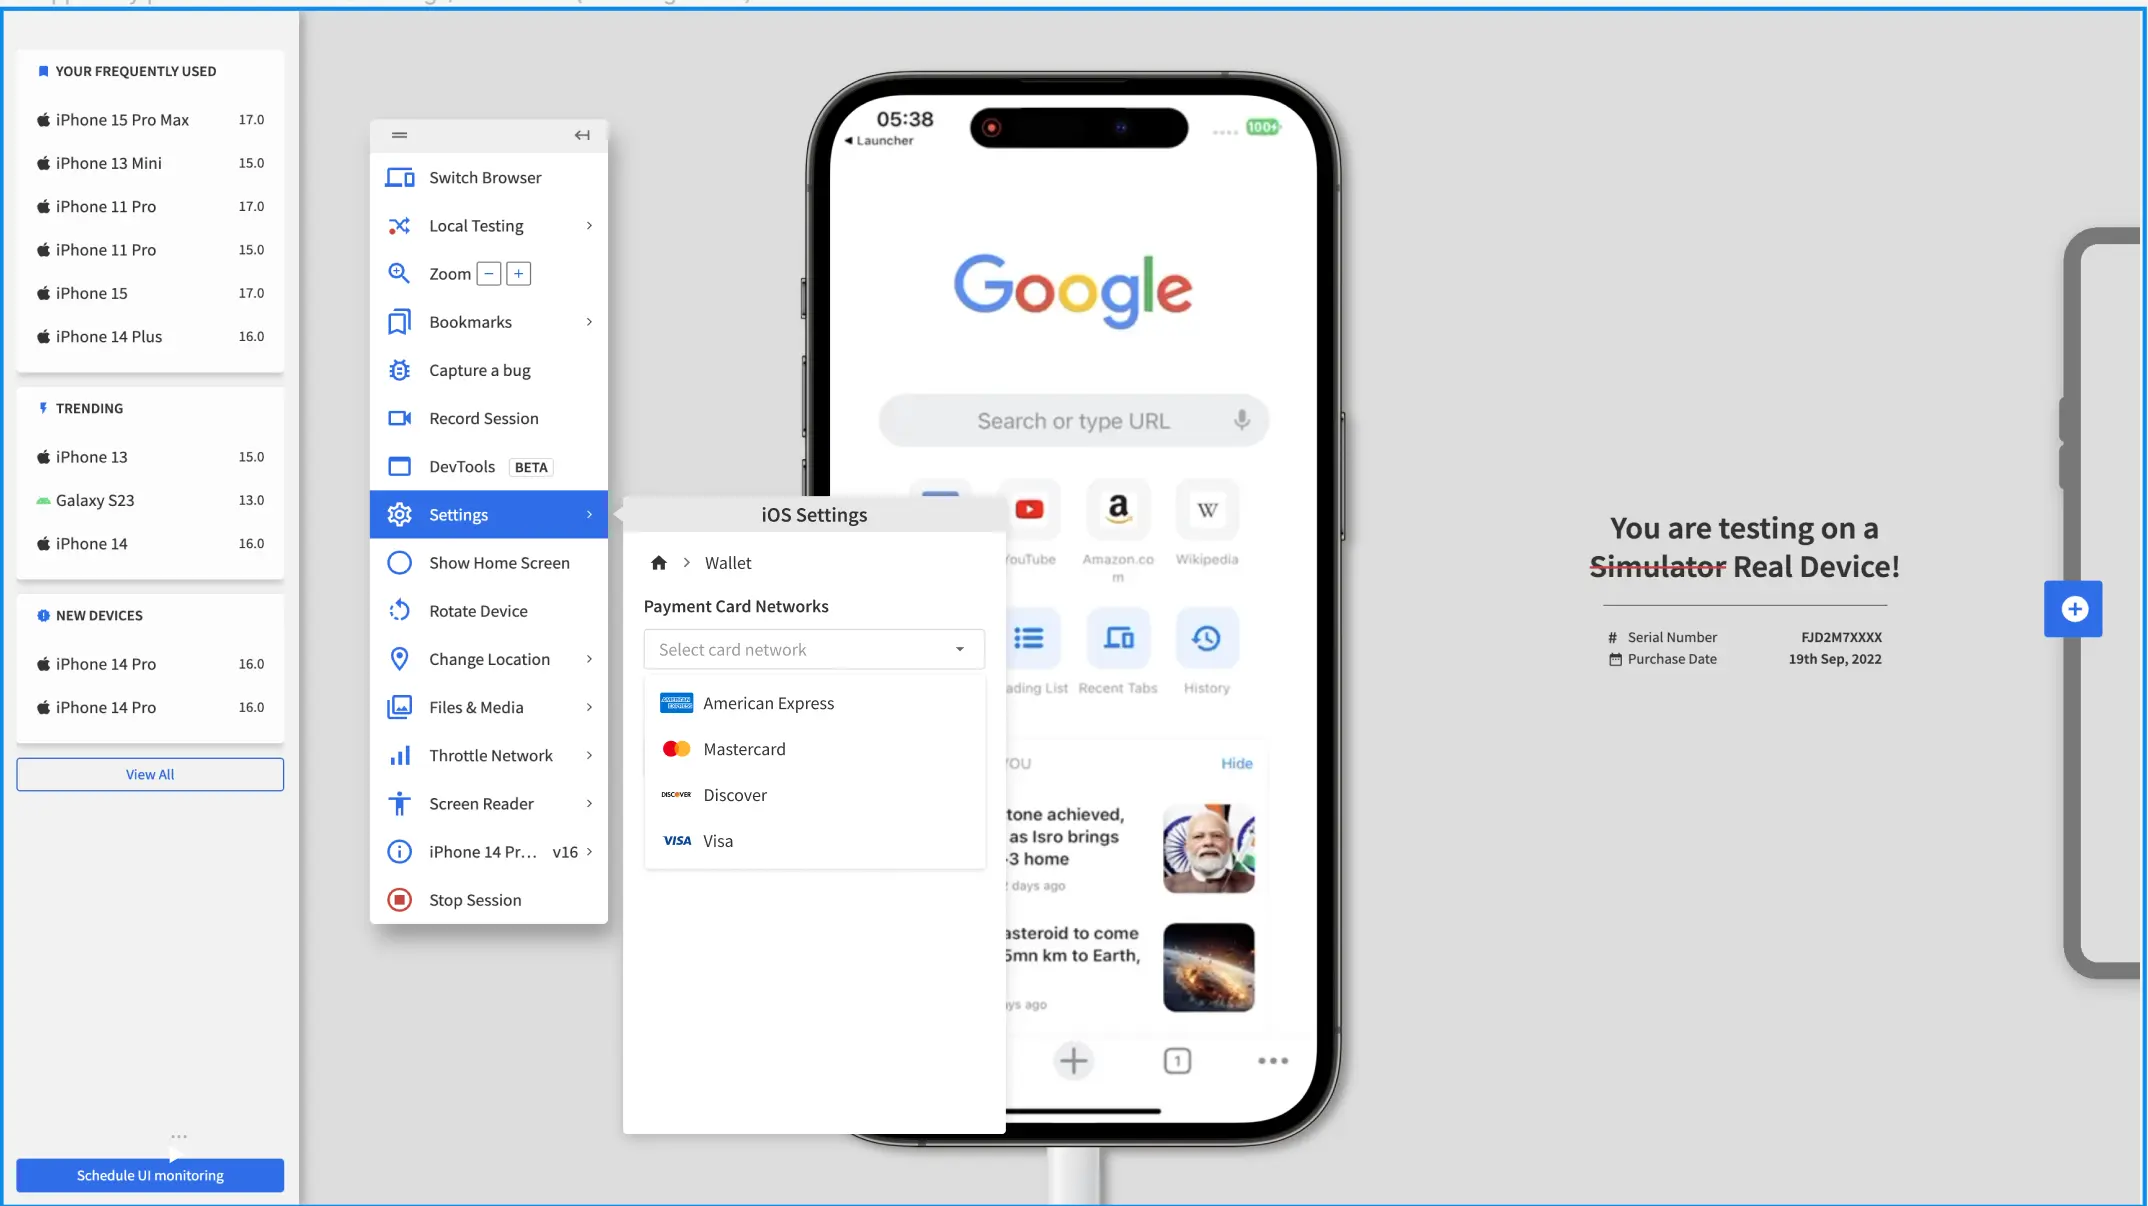
- In the Settings prompt, click Wallet.
-
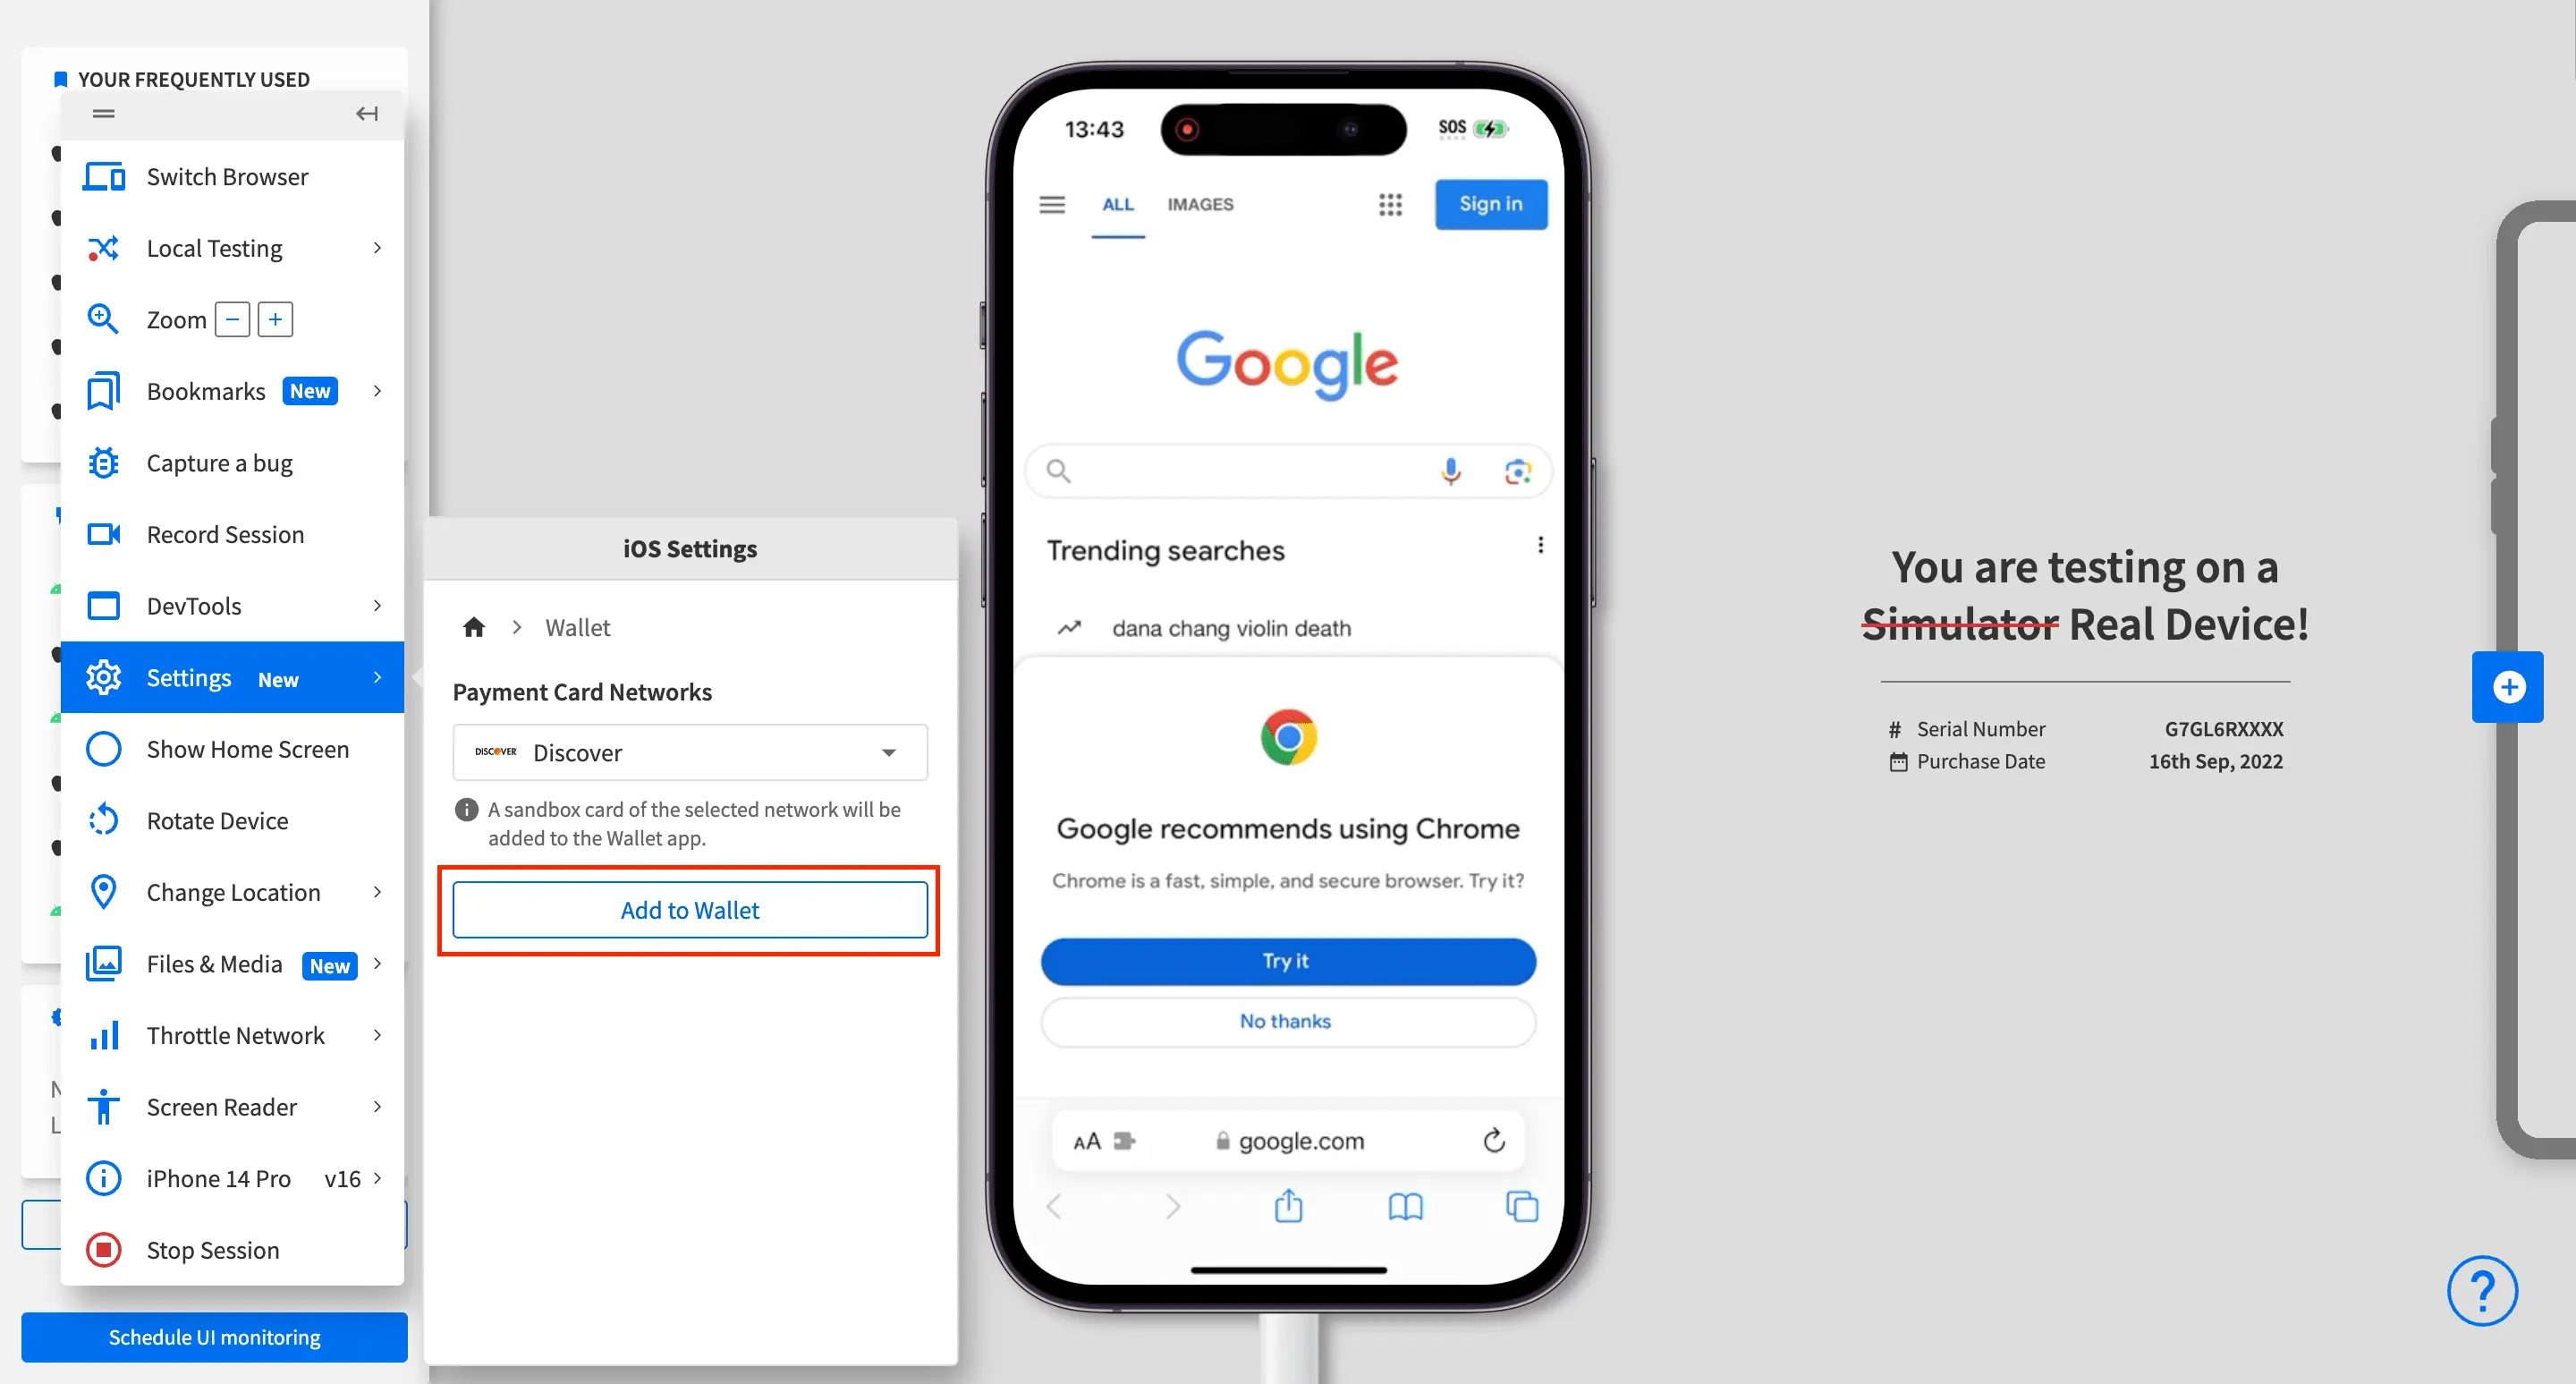
From the Payment Card Networks dropdown list, select the payment card network.
-
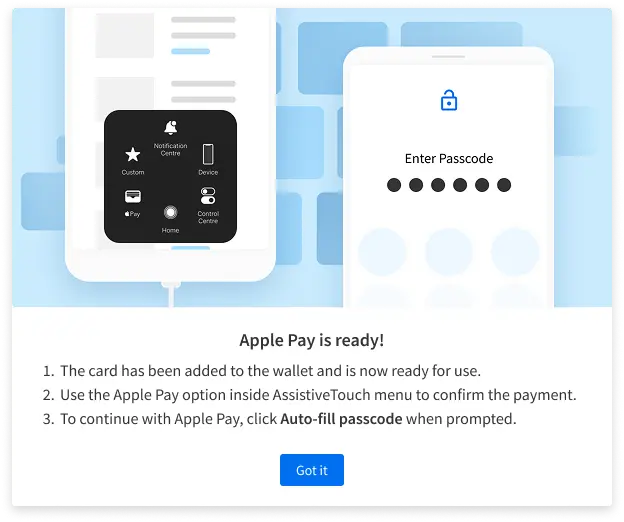
Click Add to Wallet. The Apple Pay is ready prompt is displayed with information about how to proceed with Apple Pay testing depending on the iOS version of your testing device.
- Based on your device’s iOS version, proceed with Apple Pay testing in one of the following ways:
-
For devices before iOS 26, the prompt confirms that a card has been added, AssistiveTouch is configured for Apple Pay authentication, and the device passcode is set to
123456.
Click Got it to close the prompt and proceed with testing.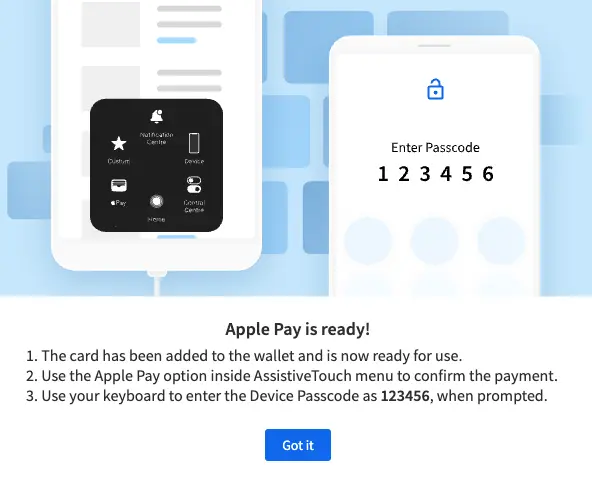
-
For iOS 26 or later, the prompt confirms that a card has been added, AssistiveTouch is configured for Apple Pay authentication, and explains the new passcode workflow.
Click Got it to close the prompt and proceed with testing.
-
You can only test with one payment card during a test session. To test with a different payment card, you must launch another test session and select the preferred payment card.
Test payment workflows
In a test session, you can switch to another iOS device that supports the Apple Pay feature.
To test payment workflows using Apple Pay:
- In your website, trigger the payment workflow that uses Apple Pay as the payment method.
The payment method selection page with the sample card is displayed. - Click Pay with Passcode.
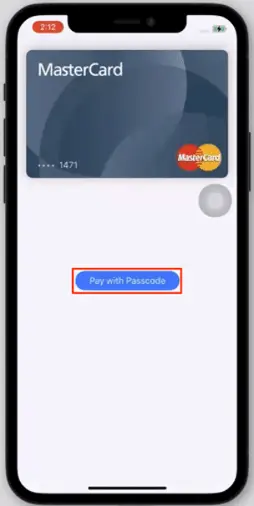
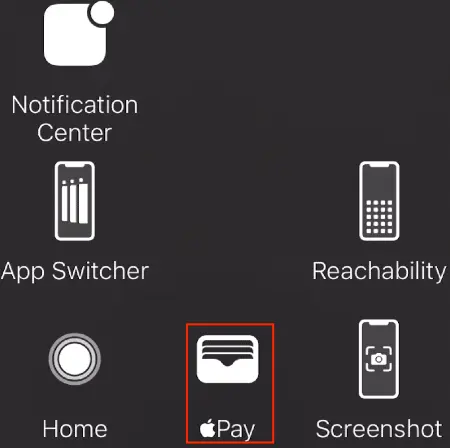
- On the AssistiveTouch screen, click Apple Pay.
- Click Confirm Apple Pay.
- Depending on your device’s iOS version, complete the passcode entry in one of the following ways when prompted to authenticate your payment:
- For devices before iOS 26: Enter the device passcode
123456to authenticate your payment. - For iOS 26 or later:
- Click the Settings button on the vertical toolbar.
- Click Wallet.
- Click Auto-fill passcode to authenticate your payment. The automation takes approximately 20 to 30 seconds to complete.
- For devices before iOS 26: Enter the device passcode
You’ve tested the Apple Pay payment workflow.
Troubleshoot Auto-fill passcode errors on devices running iOS 26 and later
Common errors when using the Auto-fill passcode button on devices running iOS 26 and later:
-
Error: Use passcode entry only on the Apple Pay ‘Enter your passcode’ screen.
This error occurs if you click Auto-fill passcode on a screen other than the Enter your passcode screen. To resolve this error, ensure that you are on the Enter your passcode screen before clicking the Auto-fill passcode button. -
Error: Passcode entry failed. Please try again.
This error occurs if the passcode automation fails. To resolve this error, click the Auto-fill passcode button again to retry the automation. If the error persists after multiple attempts, contact BrowserStack support for assistance.
Enhancements for Apple Pay stability
Apple provides sandboxed cards to BrowserStack as part of the Apple Pay setup process. The stability information for both the card and its network provider is displayed on the testing dashboard. If a card is experiencing stability issues, an indication appears on the dashboard next to the card.
The payment cards are sandboxed cards managed by third-party networks. As these are external services, Apple Pay test sessions may occasionally fail due to issues on the card provider’s end. While BrowserStack does not have control over these external services, there are ongoing efforts to monitor and improve the reliability of Apple Pay sessions.
We're sorry to hear that. Please share your feedback so we can do better
Contact our Support team for immediate help while we work on improving our docs.
We're continuously improving our docs. We'd love to know what you liked
We're sorry to hear that. Please share your feedback so we can do better
Contact our Support team for immediate help while we work on improving our docs.
We're continuously improving our docs. We'd love to know what you liked
Thank you for your valuable feedback!