Data driven testing
Run test against multiple scenarios
The data driven testing feature allows you to run a single test against multiple scenarios using different test data combinations. This is achieved by creating and utilizing test datasets.
Examples:
- Testing a login form with various usernames and passwords to verify authentication.
- Testing a search feature with diverse keywords to validate results and handling of invalid inputs.
- Testing a registration form with varying user inputs to ensure data validation and acceptance criteria.
- Testing a shopping cart with different product combinations and quantities to assess calculations and error handling.
- Testing a checkout process with diverse payment methods and shipping addresses to verify functionality and edge cases.
Create test dataset
You can create a test dataset in one of two ways:
Choose the option that best aligns with your workflow and data requirements.
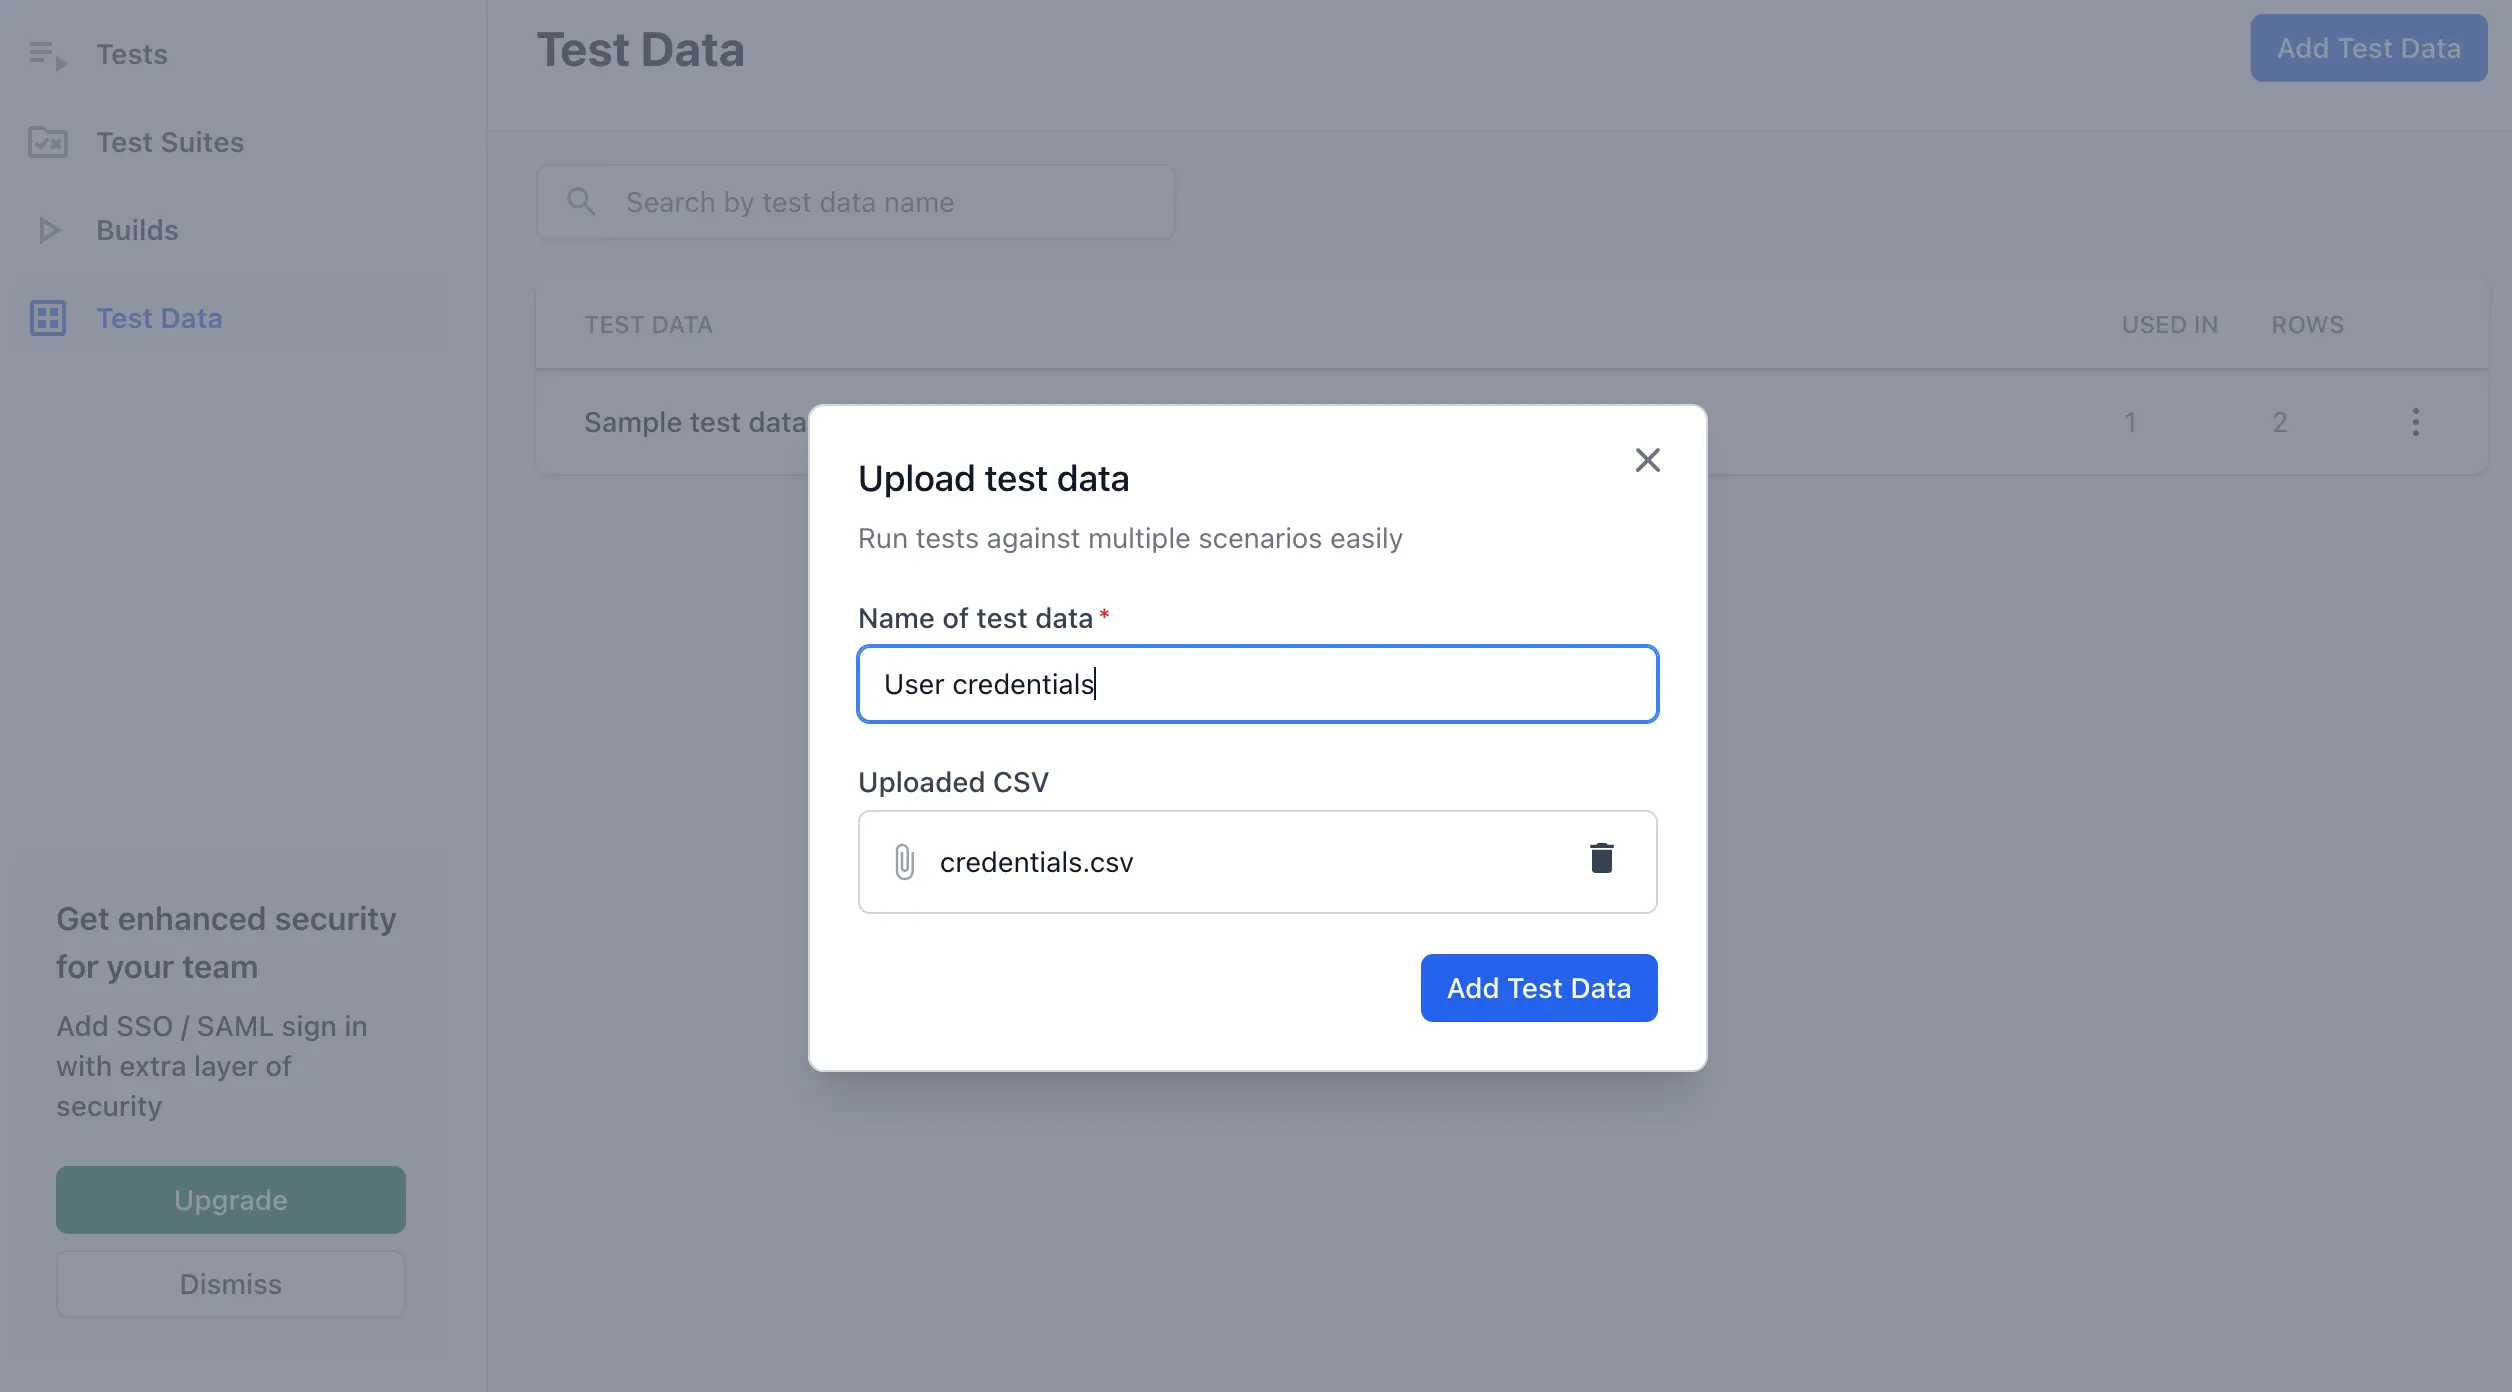
Upload a CSV file
- Expand Data configuration on the left pane and click Test dataset.
- Click Add Test Dataset to upload a csv file.
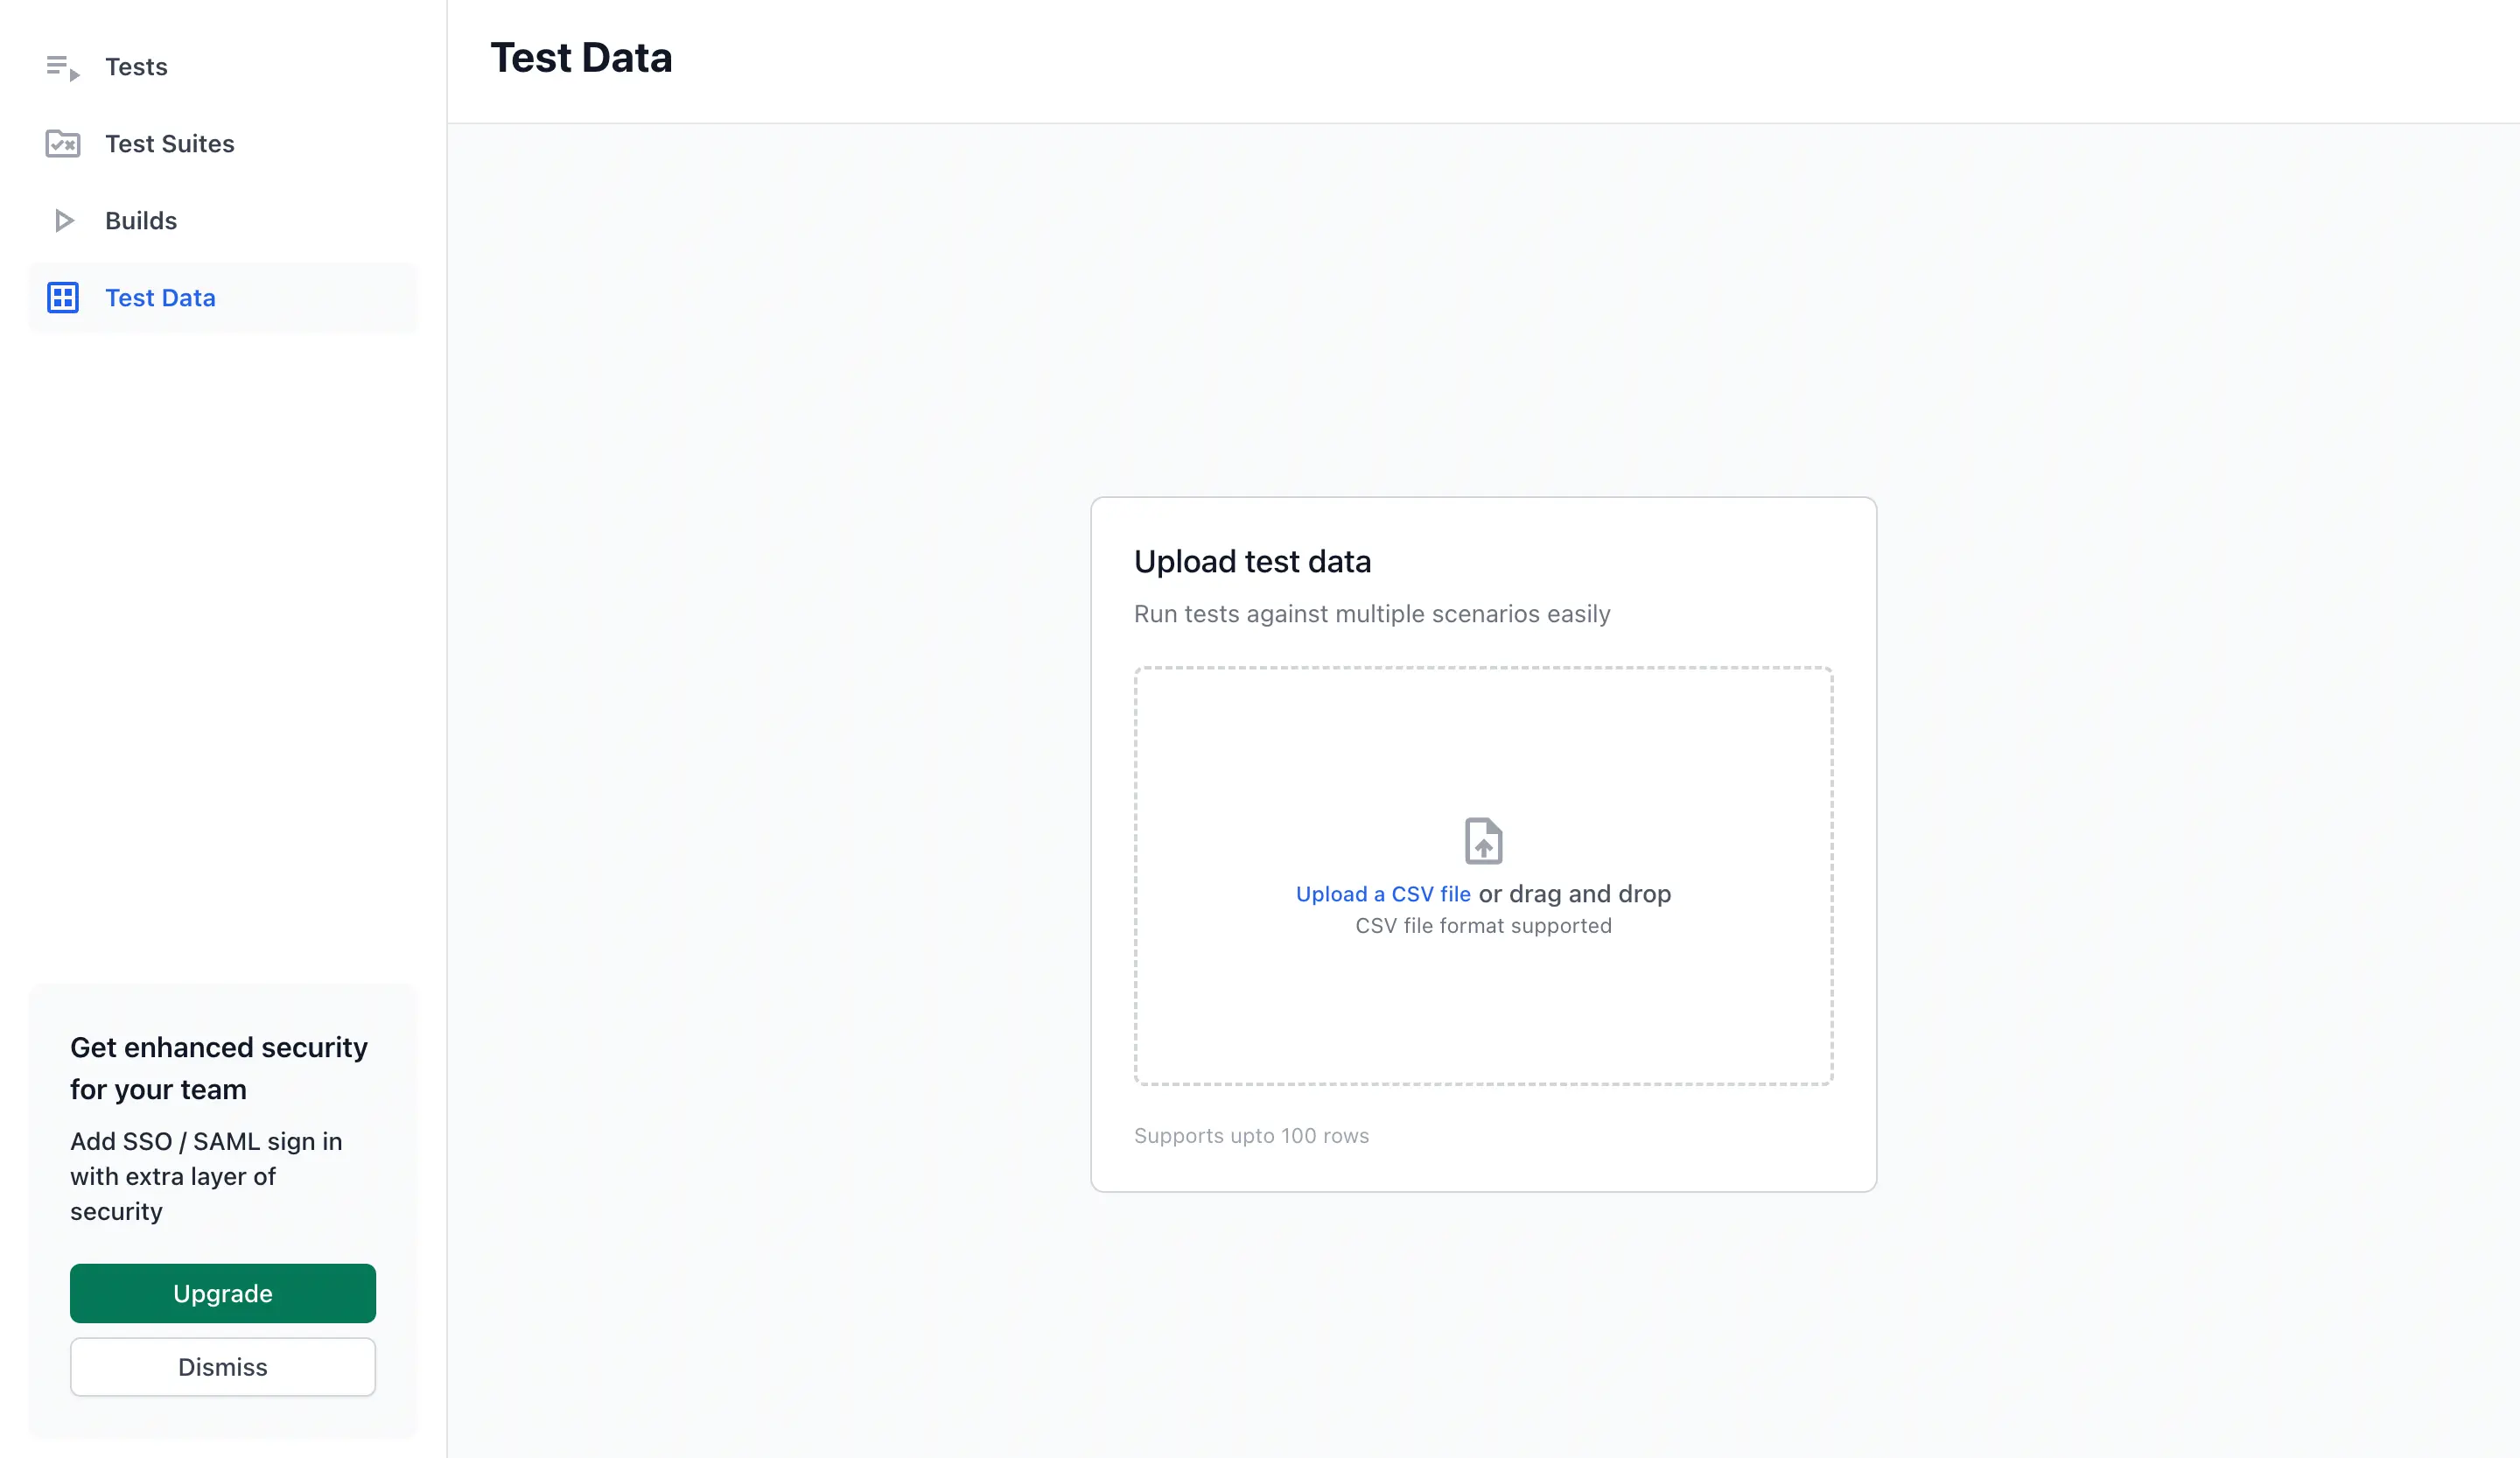
- Select a CSV file containing your test dataset.
- Ensure the file meets the following requirements:
- CSV format
- Consistent number of columns in each row
- Values not exceeding 1000 characters
- Maximum of 100 rows and 100 columns
- At least one row of data in addition to the header row
- Give the dataset a unique name.
Connect to your database
You can create test datasets directly from your database connection allowing you to execute tests with dynamic data combinations.
To create a test dataset from a database:
- Expand Data configuration on the left pane and click Test dataset.
- Click + Add Test Dataset and select Create from database.

- Select a database connection from the list and click + Connect.
- Alternatively, you can click + Add new connection to configure a new one. You can also create new connections from the Database section of the Low Code Automation. For more information, refer to the Run database query document.
- Enter your SQL query to fetch the required test data. Click Run Query to preview the query results.

- The query results display in a table. Enter a unique name and description for your dataset, then click Save dataset.

Run data-driven tests using real-time data from your database to ensure your test scenarios are always up to date.
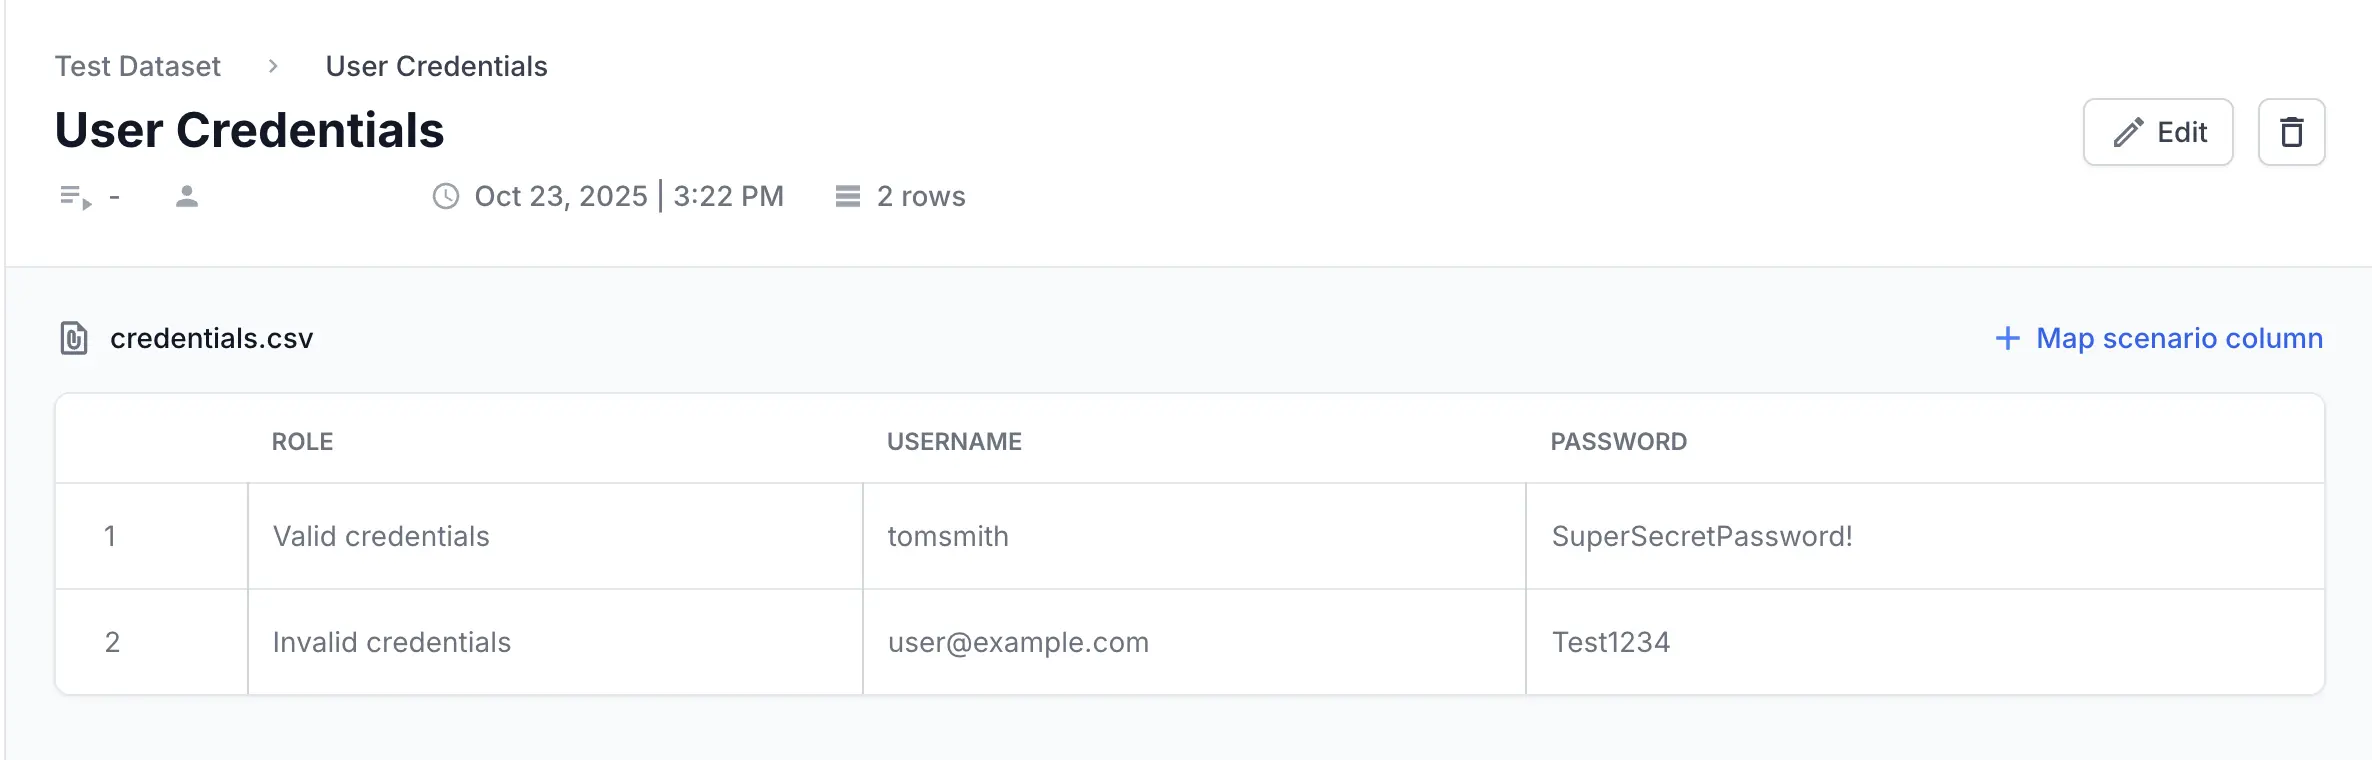
Review the test dataset
Once the dataset is created successfully, you can verify the data by looking at the data table.
Click the Refresh icon to update the dataset with the latest data from your database.
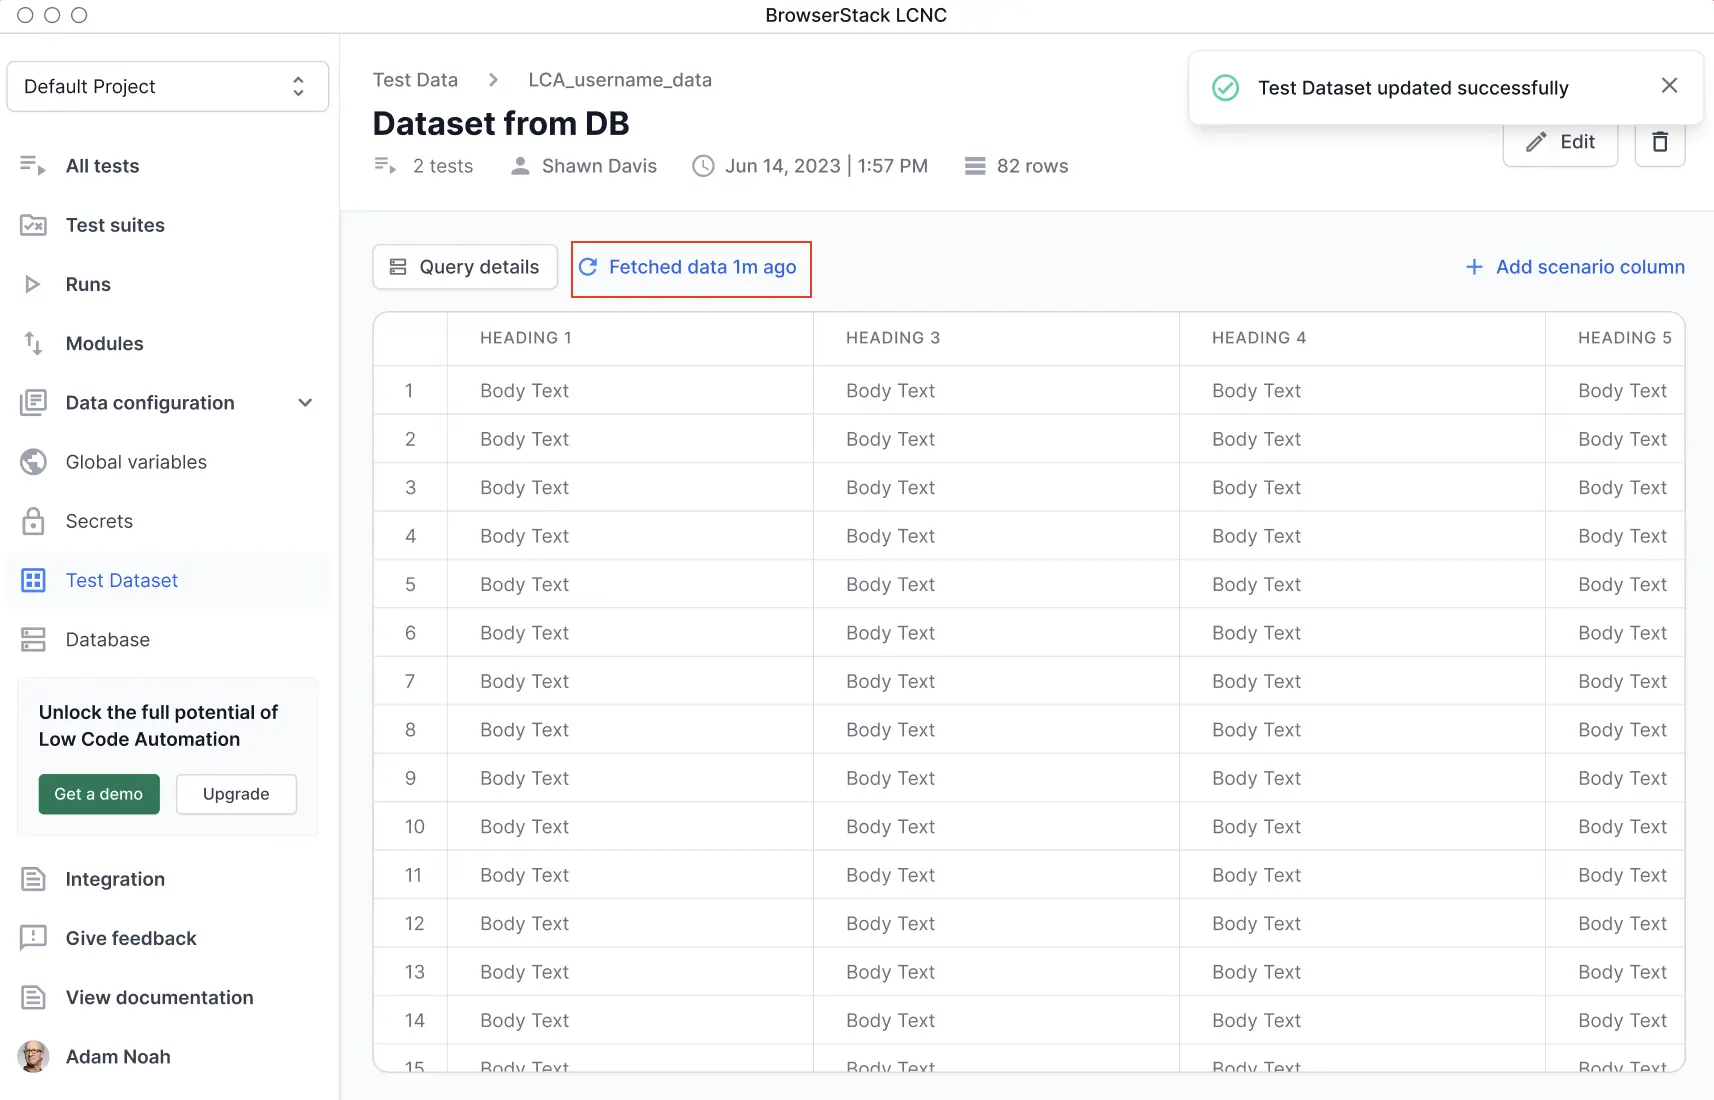
To view additional information about the query, click Query details.
You can also edit your test dataset after creation. For more information, refer to the Manage test dataset.
Optionally map a scenario name column
- Once a test dataset is created successfully, you can map any column from the dataset as scenario column
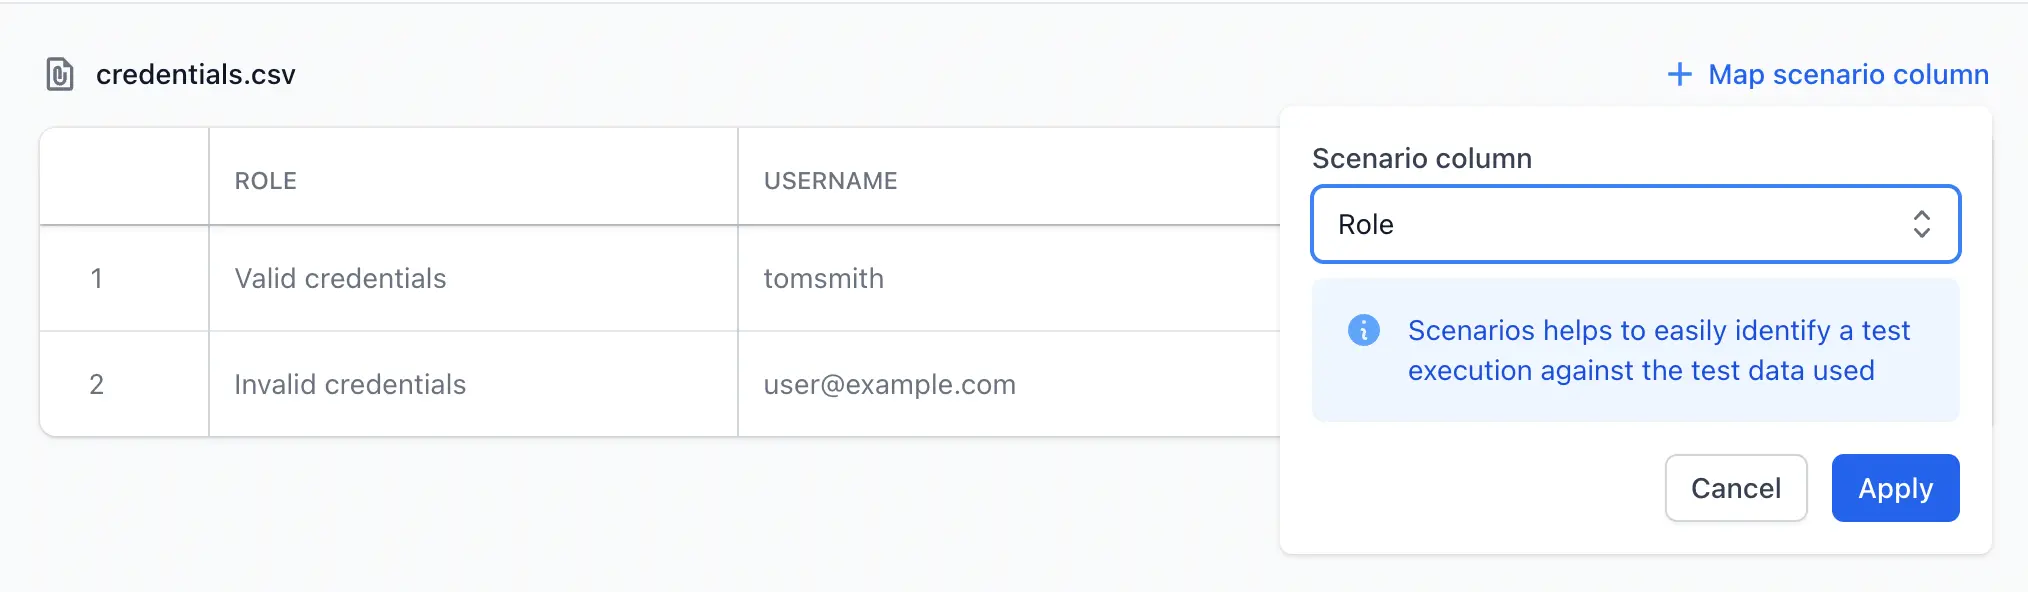
- It is used in build report and other places as a label to represent the particular row
- We recommend using the Map a scenario name column to a unique identifier or any column that uniquely identifies each row in your dataset.
Use datasets in tests
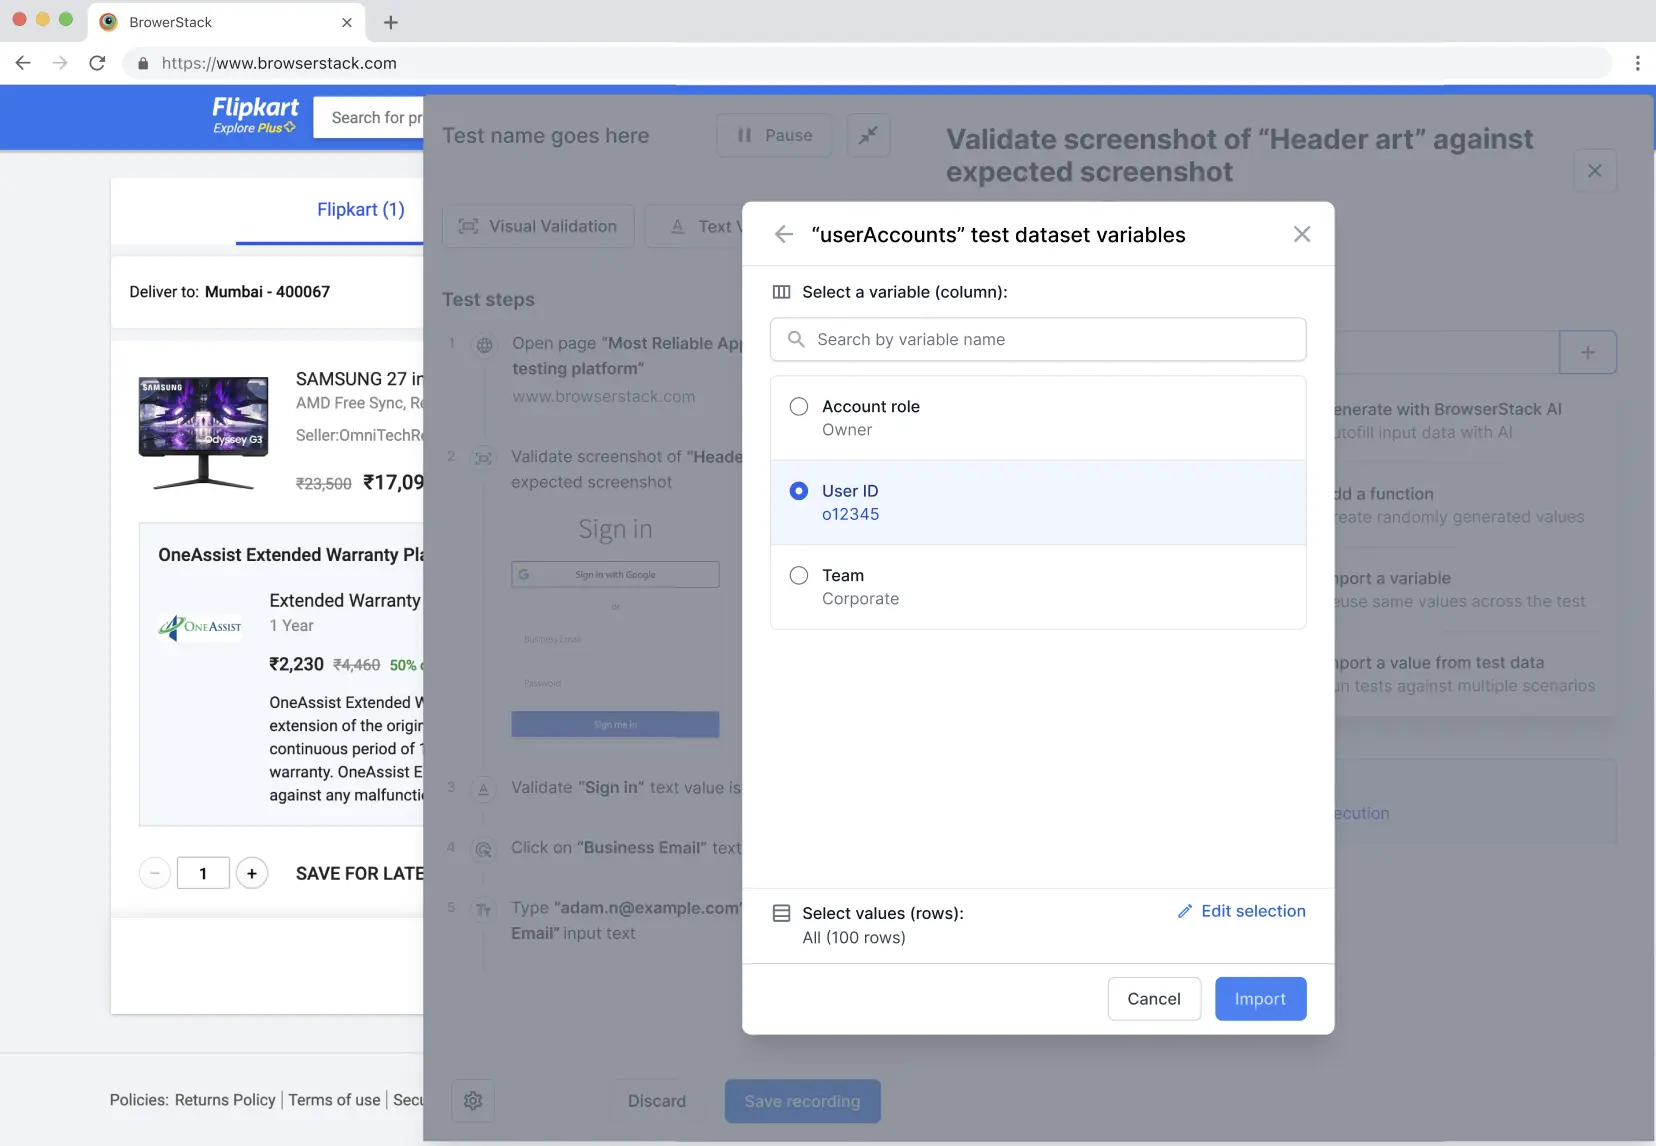
You can import any column from the dataset, similar to importing variables.
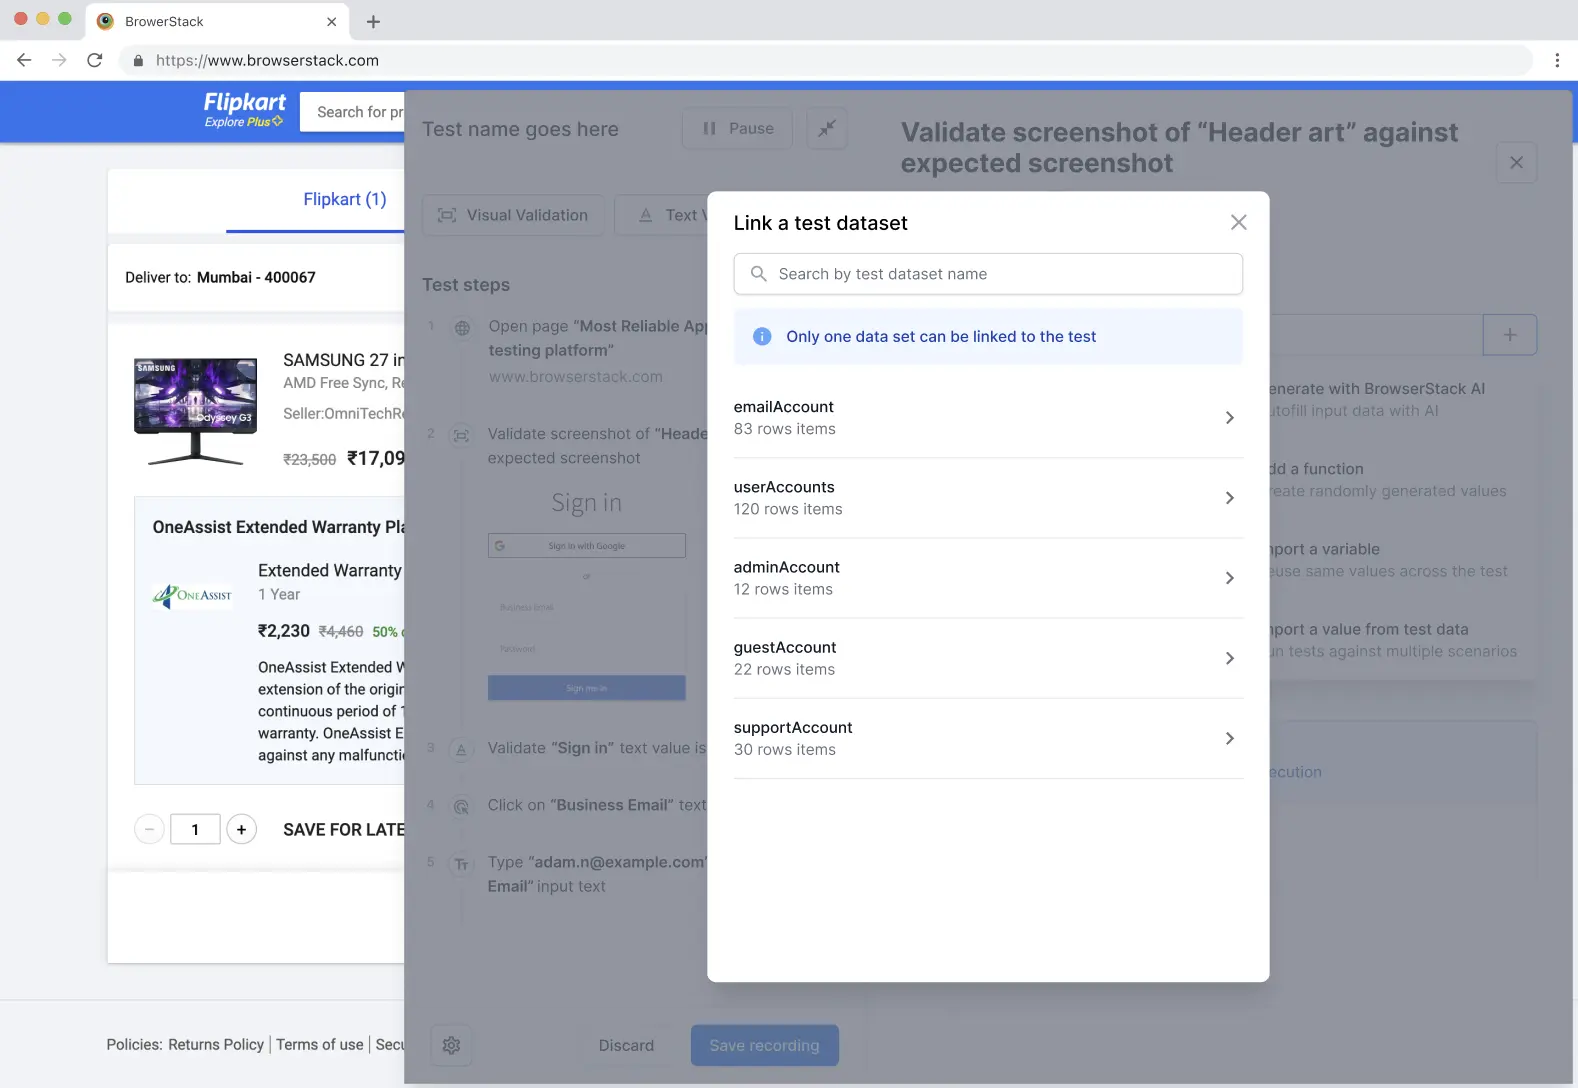
- A single test dataset can be linked to multiple tests.
- A test can only import variables from a single test dataset.
- You can execute selected rows from the dataset by choosing individual rows, ranges (like 1–10), or a mix of both (for example, 1–10, 14, and 16).
- You can execute rows based on specific conditions. For example, when the
User ID is o12345. - You can re-run only the failed rows instead of executing the entire dataset again.
Row selection is not supported in steps inside a module.
- Within a test, navigate to the step details.
- Click the + button and choose Import a value from test data.
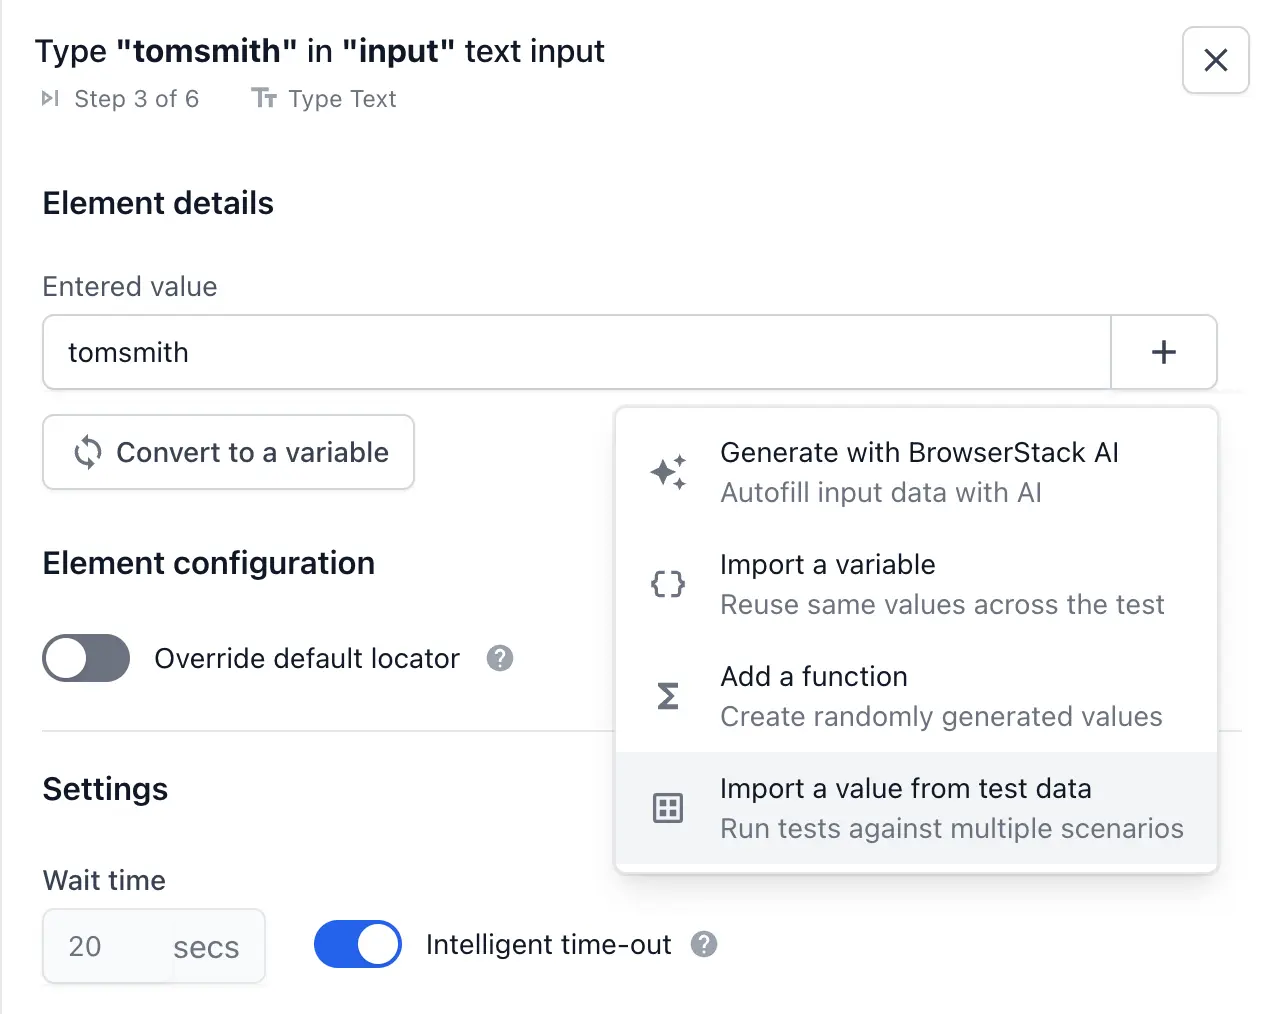
- Select and link a dataset from the list. If you do not have any dataset created, you can create a new test dataset by uploading a CSV file or connecting to your database in the Test dataset section. For more information, refer to Create test dataset.
- If you want to execute all the rows, select the column and click Import. This executes all the rows.
- If you want to choose or limit which rows to execute, click Edit selection.
- In the Select values of dataset dialog, you can choose rows using either of the following two methods:
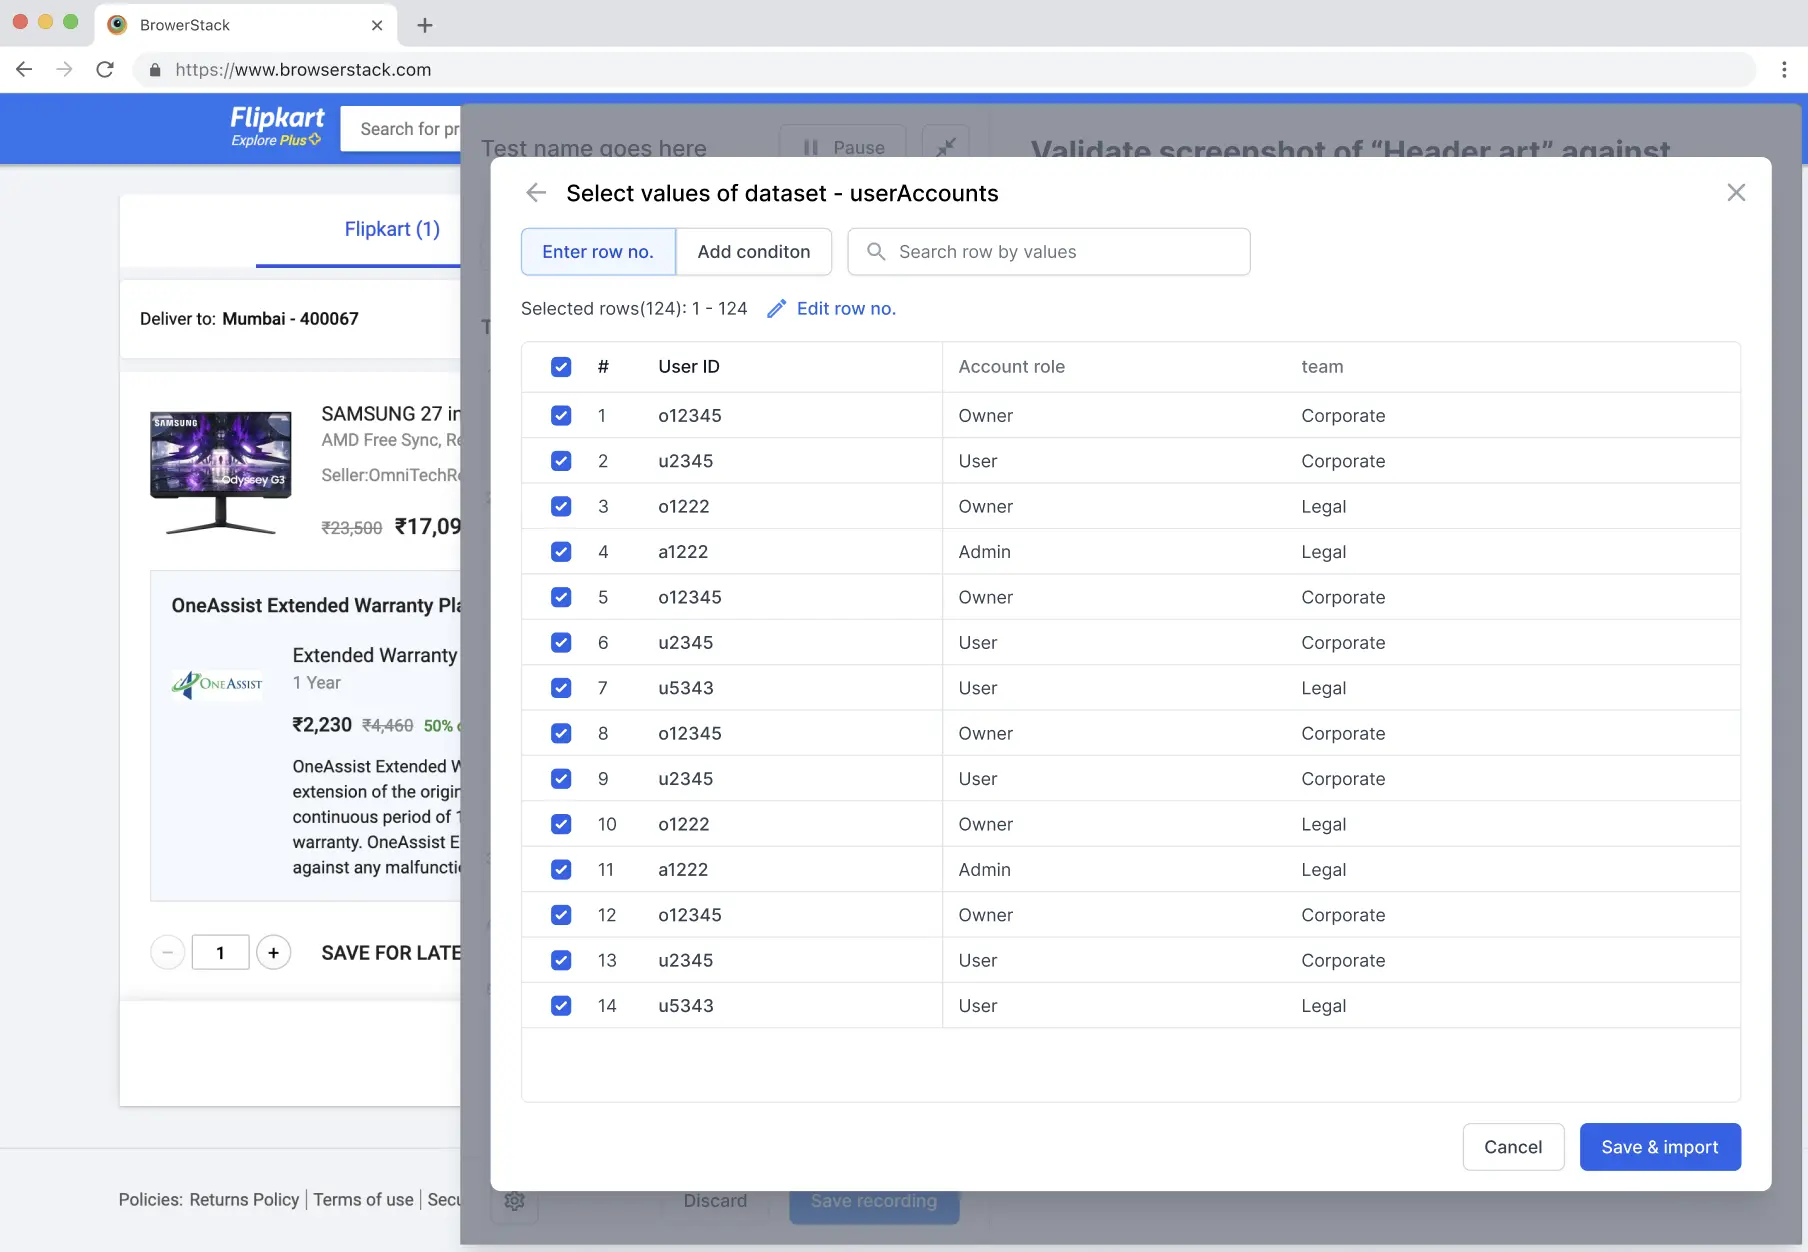
- To execute specific rows:
- Select individual rows using the checkboxes next to each row.
- Click Edit row no. and enter specific row numbers or ranges (for example,
1-5, 11, 14), then click the checkmark to confirm.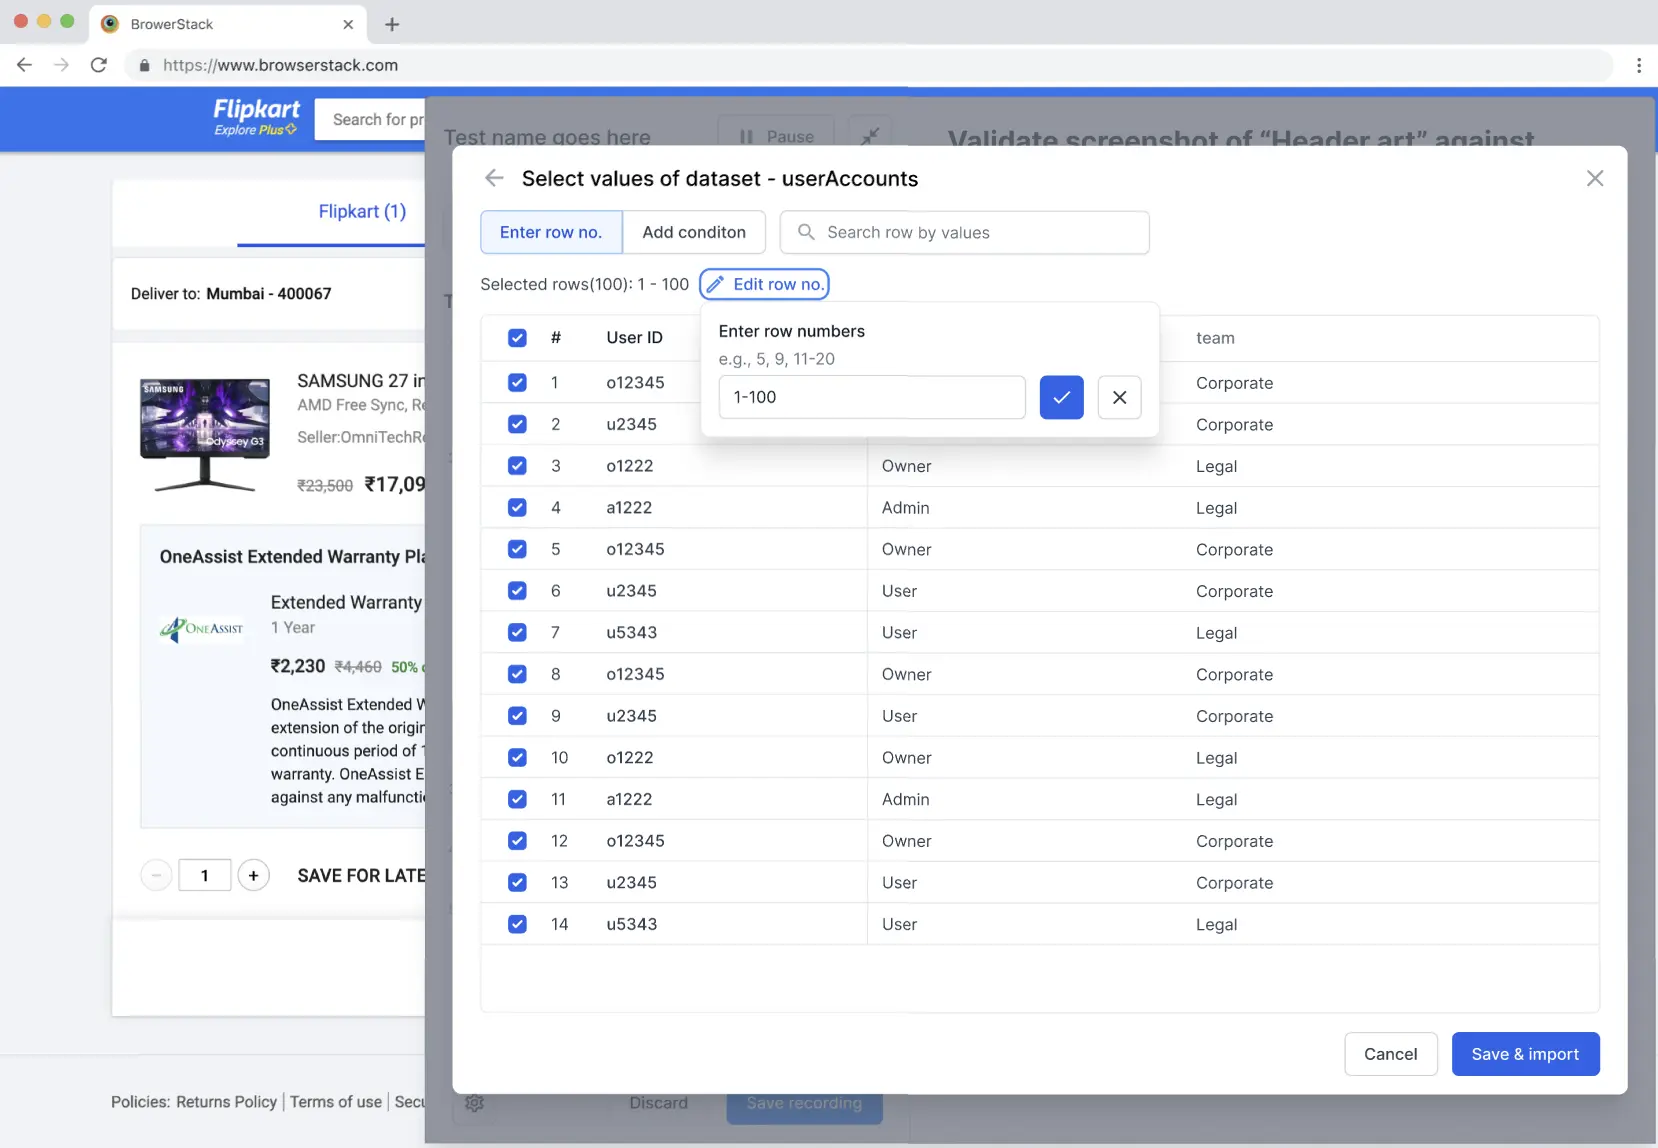
- To execute rows that match certain conditions:
- Click Add condition to define filter criteria based on column values.
- Configure your filter conditions:
-
Single column condition: For example, execute rows where
User ID is any of o12345, u2345. -
Multiple column condition: Use
ANDorORlogic to combine conditions. For example,User ID is any of o12345, u2345ANDUser ID is none of o1222, o12345.
Note: Only one type of logical operator is supported for multiple conditions. You can use either all AND operators or all OR operators, but not a mix of both. -
Global variable support: You can use global variables values. For example, Status is
{{status_variable}}.
-
Single column condition: For example, execute rows where
- Select the appropriate operator for each condition based on your data type:
- is: Matches exact values.
- is not: Excludes exact values.
- is any of: Matches any of the specified values.
- is none of: Excludes all specified values.
- contains: Matches values containing the specified text.
- does not contain: Excludes values containing the specified text.
- To remove a condition, click the Delete icon next to the condition.
- Only rows matching your defined conditions are selected for execution.
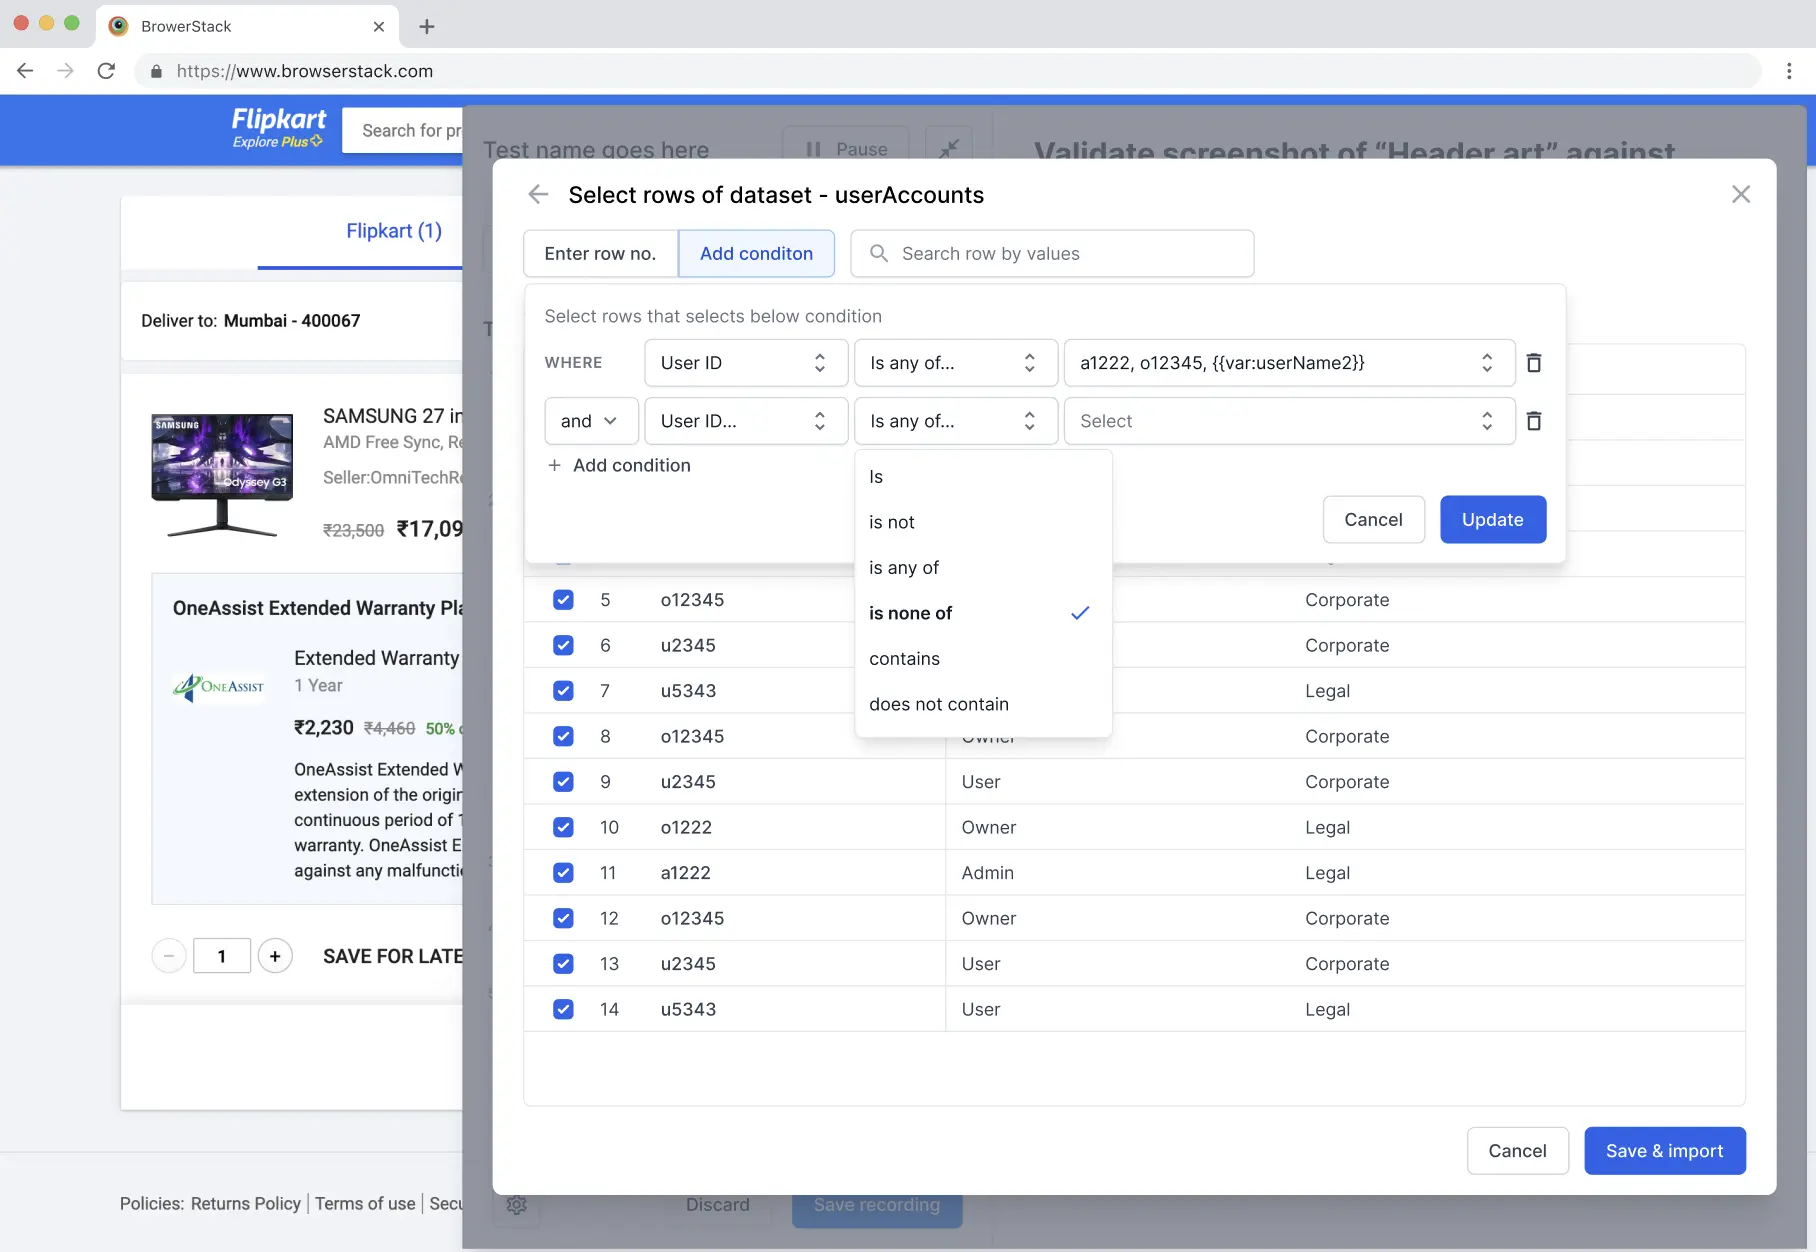
Note: You can use either step 1 (select specific rows) or step 2 (condition-based filtering) to narrow down your dataset rows. These methods are mutually exclusive. Choose the approach that best fits your testing needs.
- To execute specific rows:
- Optionally, use the search bar to quickly find and select relevant rows by value.
- Click Save & import.
Only the rows you selected are used during test execution. This allows users to test on specific scenarios or data conditions.
Manage test datasets
You can edit your test dataset directly without re-uploading a new file. The test dataset interface allows you to add columns, add rows, and modify data directly in the table.
Dataset editing capabilities are only available for CSV-generated datasets.
To manage your dataset:
- Open your test dataset from the Test dataset section in the left navigation pane.
- In the dataset table, you can:
- Add rows: Click +Add Row to insert a new row at the end for additional test data.
- Add columns: Click +Add Column to insert a new column at the end.
-
Edit data: Click directly on any cell in the table to modify column headers or row values.
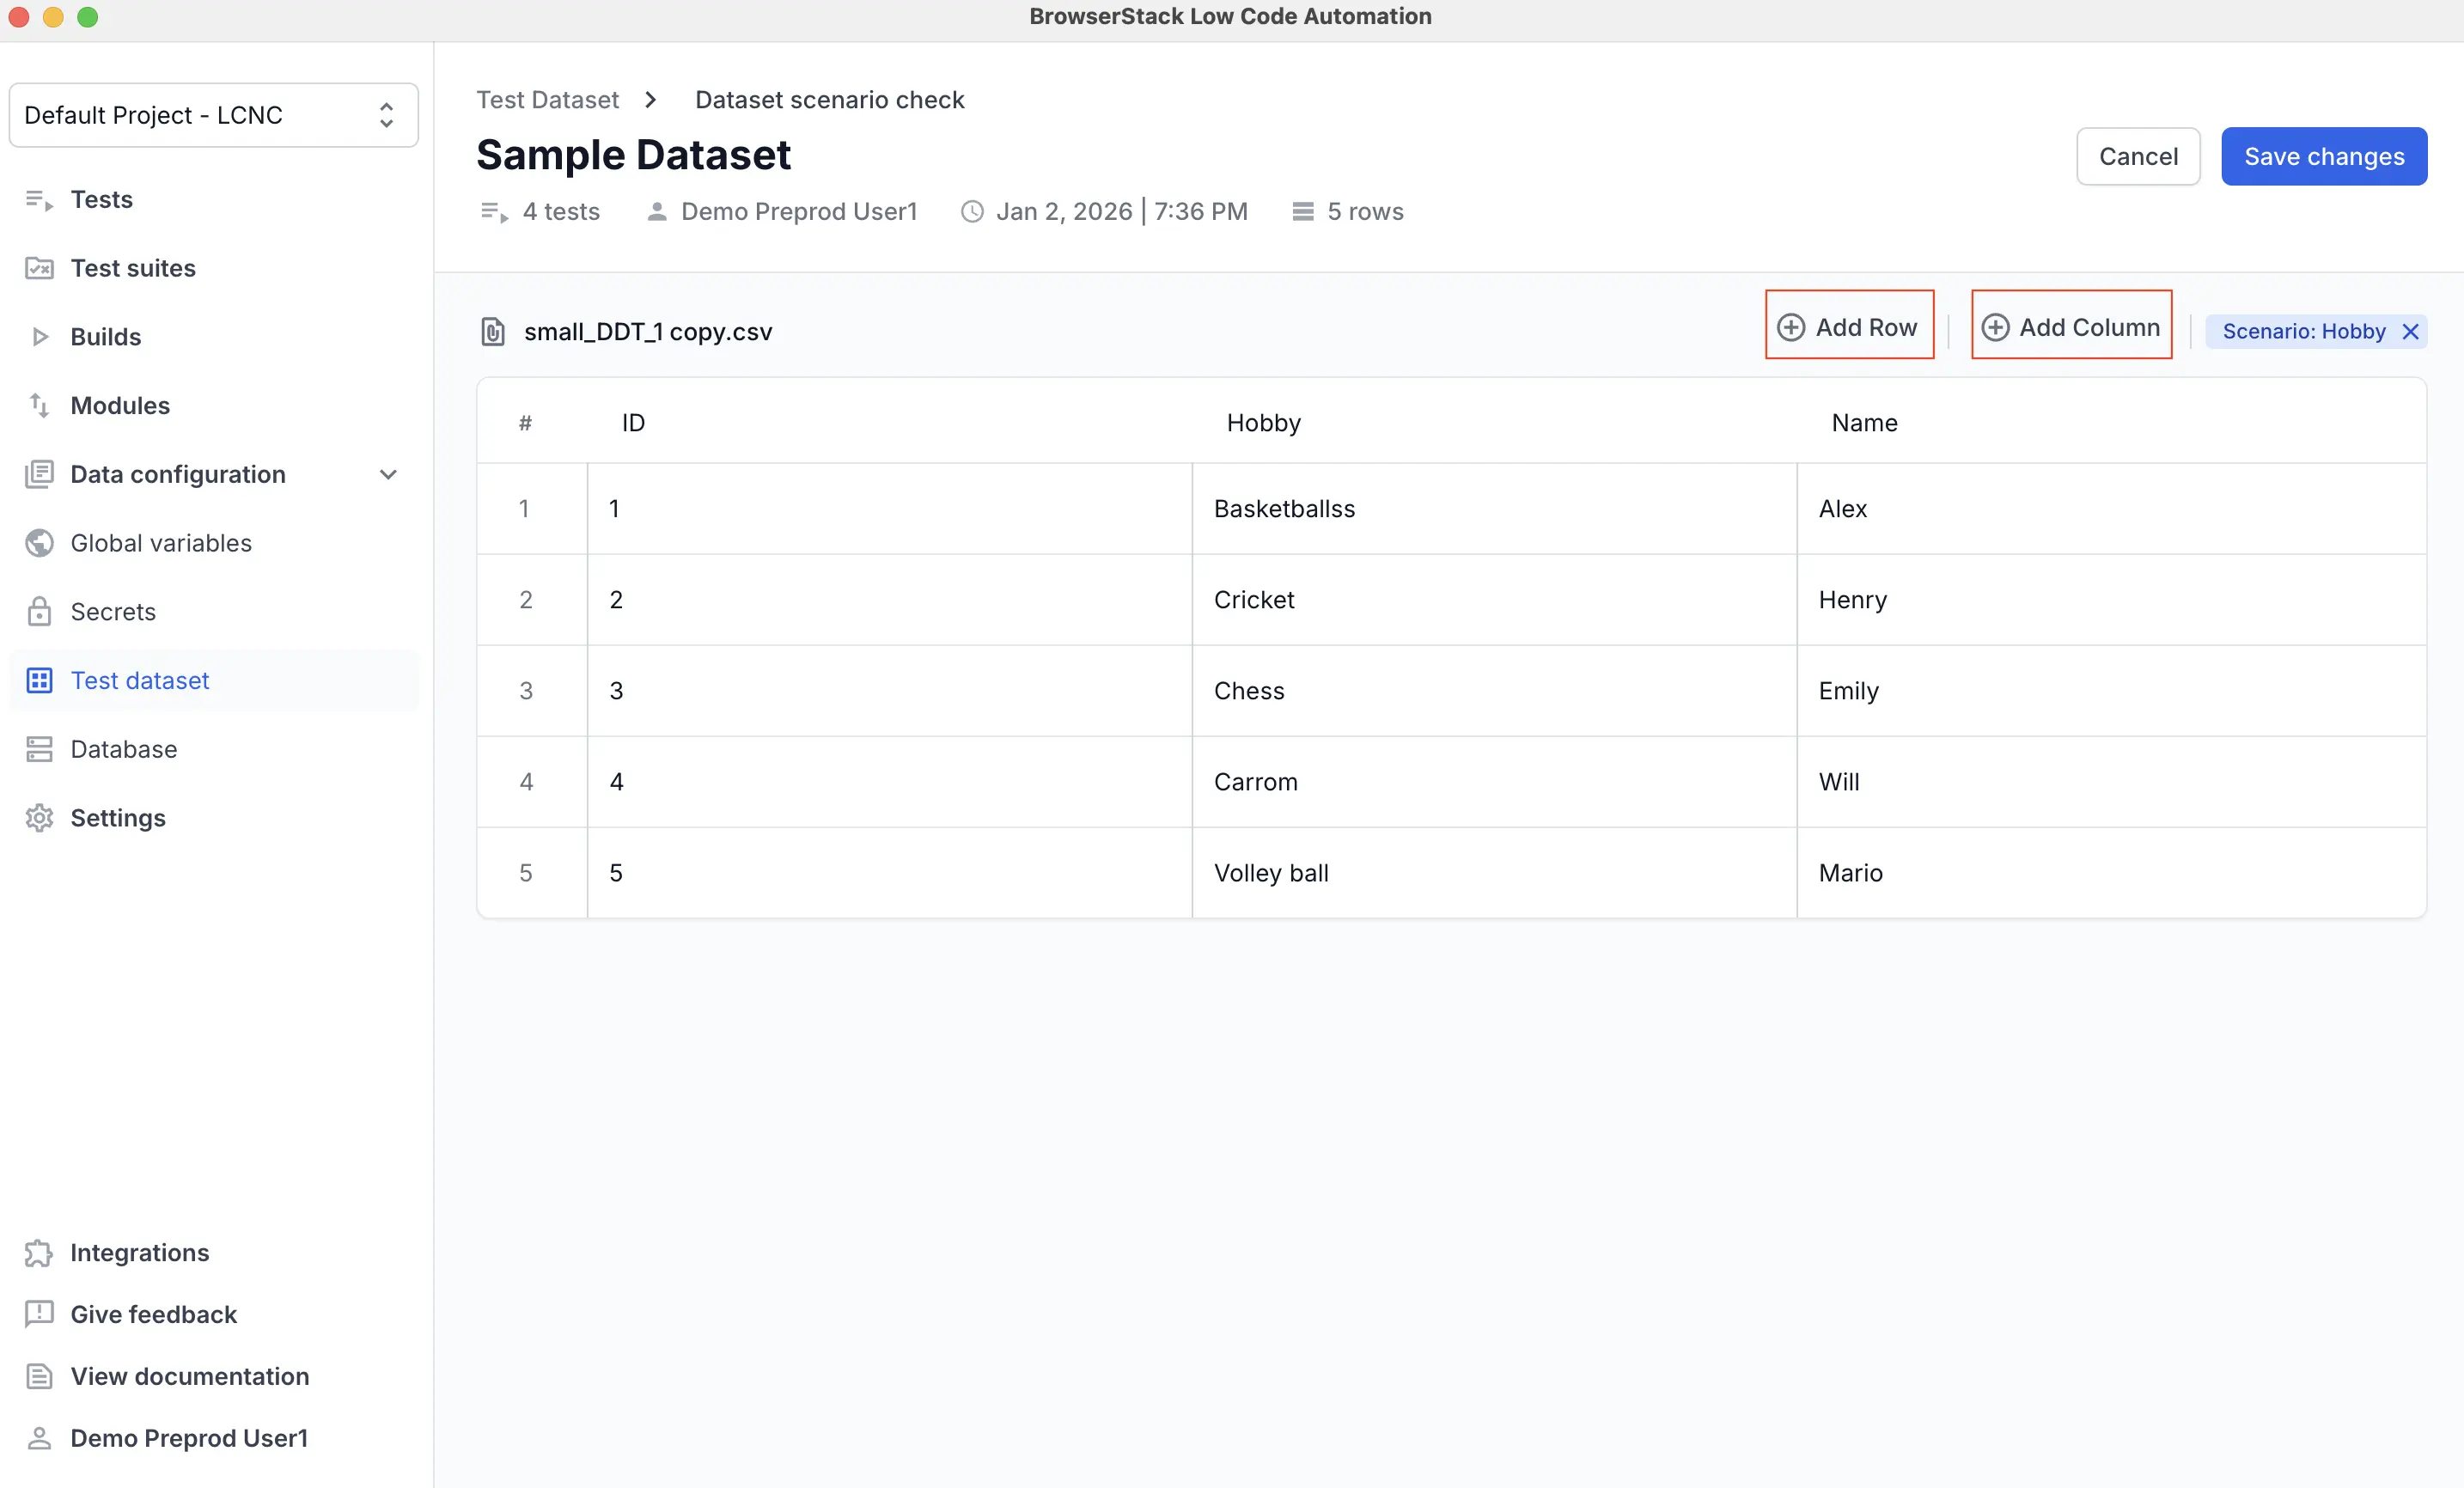
- Click Save changes.
Column names cannot be edited while they are used in another test, but row values can be modified either in the Test dataset section or by uploading a CSV file.
Test execution with test dataset
Local execution
- If you select all rows, local replay automatically uses the first row (excluding the header) from the dataset.
- If you select specific rows, only the first row from that selection is executed.
Cloud execution
- If you select all rows, the test is executed against each row of data in the test dataset.
- If you select specific rows, the test runs only on those selected rows.
- Build reports list each execution individually.
- Multiple executions of a test are grouped in the report. Observe the highlighted text, which represents the scenario column data previously mapped to the test.

- For datasets sourced from a database, the query executes at the start of the build to fetch the latest data for execution.
We're sorry to hear that. Please share your feedback so we can do better
Contact our Support team for immediate help while we work on improving our docs.
We're continuously improving our docs. We'd love to know what you liked
We're sorry to hear that. Please share your feedback so we can do better
Contact our Support team for immediate help while we work on improving our docs.
We're continuously improving our docs. We'd love to know what you liked
Thank you for your valuable feedback!