Organize Puppeteer tests for better reporting
Learn how to organize Puppeteer tests by using the project, build, and name capabilities on BrowserStack Automate.
If you are using the older dashboard, refer to the old dashboard documentation.
You can organize your automated Puppeteer tests that you run on BrowserStack by ‘projects’ and ‘builds’ by using the project, build, name, and buildTag capabilities while you start your Puppeteer test. The following table explains the different capabilities that you can specify:
| Capabilities | Description | Expected values |
|---|---|---|
name |
Name for your session / test case | A string. Only letters (A-Z, a-z), digits (0-9), periods (.), colons (:), hyphens (-), square brackets ([]), forward slashes (/), asperands (@), ampersands (&), single quotes (‘), and underscores (_) are allowed. Any other characters are ignored. |
build |
Build version / number | A string. Only letters (A-Z, a-z), digits (0-9), periods (.), colons (:), hyphens (-), square brackets ([]), forward slashes (/), asperands (@), ampersands (&), single quotes (‘), and underscores (_) are allowed. Any other characters are ignored. |
project |
Name of your project | A string. Only letters (A-Z, a-z), digits (0-9), periods (.), colons (:), hyphens (-), square brackets ([]), forward slashes (/), asperands (@), ampersands (&), single quotes (‘), and underscores (_) are allowed. Any other characters are ignored. |
buildTag |
A tag for your build | A string. Only letters (A-Z, a-z), digits (0-9), periods (.), colons (:), hyphens (-), square brackets ([]), forward slashes (/), asperands (@), ampersands (&), single quotes (‘), and underscores (_) are allowed. Any other characters are ignored. |
How to set the project, build and name Capabilities
For every Puppeteer test that you run on BrowserStack you need to connect to the BrowserStack CDP endpoint using puppeteer.connect. Within the CDP endpoint URL, we accept a string of capabilities at the end and you need to send all these project, build and name capabilities for your tests using this as shown below:
const caps = {
    'project': 'Your project name goes here',
    'build': 'Your specified build name goes here',
    'name': 'Your specified test name goes here',
    'buildTag': 'Your specified buildTag goes here',
    'browserstack.username': process.env.BROWSERSTACK_USERNAME || 'YOUR_USERNAME',
    'browserstack.accessKey': process.env.BROWSERSTACK_ACCESS_KEY || 'YOUR_ACCESS_KEY'
  };
  const browser = await puppeteer.connect({
  browserWSEndpoint:
  `wss://cdp.browserstack.com/puppeteer?caps=${encodeURIComponent(JSON.stringify(caps))}`,  // We have stringified the 'caps' JSON variable and sending all the list of params in the CDP endpoint URL
  });
As shown in the snippet above, the puppeteer.connect actually connects to a CDP endpoint at BrowserStack and in that URL, we accept the list of params as specified in the caps JSON object that was defined above.
Best practices for setting the different capabilities
As we have seen in the above code snippet, the project, build and name capabilities can be specified to take any value but hard coding all those values in your script is probably not a good idea.
Instead, you can follow the steps mentioned below to ensure that you get the best experience that these capabilities can provide:
- Define environment variables for
projectandbuildnames for e.g.export PUPPETEER_BUILD_NAME="staging-regression-9-august" export PUPPETEER_PROJECT_1="E2E Regression" - Once you have the environment variables, you can simply populate the
buildandprojectcapabilities using the values as defined in the environment variables, as shown below:const caps = { 'project': process.env.PUPPETEER_PROJECT_1, 'build': process.env.PUPPETEER_BUILD_NAME } - The advantage of using environment variables is, you can simply change the value of the environment variable before every build run on BrowserStack and you’d get newer tests organized in new build names every time (see next section to understand the benefits for using build, project and session names)
- You can hard code the
nameof each Puppeteer test because that will most probably not change across different build runs. Also, it is advisable to keep meaningful names of tests so that it becomes easily identifiable in the BrowserStack Dashboard.
Why should you organize your Puppeteer tests?
We’ve gone through the how and what part of organizing Puppeteer tests on BrowserStack. Now, we’ll take a look at the why part of it.
Organizing your Playwright tests by project, build, name and buildTag gives you multiple advantages when it comes to debugging your tests on the BrowserStack Dashboard. We take a look at the benefits with the help of examples:
- Using the
projectcapability would let you filter out only the tests that pertain to that project, in the BrowserStack Dashboard. The following snapshot of the Automate Dashboard shows the filter on the left pane that you can use to apply theprojectfilter.

- Using the
buildcapability will organize all test sessions with the samebuildname, under the same build. You can then access any session in that build simply by clicking on the build in the left pane of Automate Dashboard. - Using the
namecapability will enable you to recognize each individual test in the Automate Dashboard by its name. You also have the status of the test on the side and hence you can quickly understand exactly which test has passed/failed. - Using the
buildTagcapability will enable you to recognize each build in the Automate Dashboard by its assigned tag. You can also filter your builds based on thebuildTag.
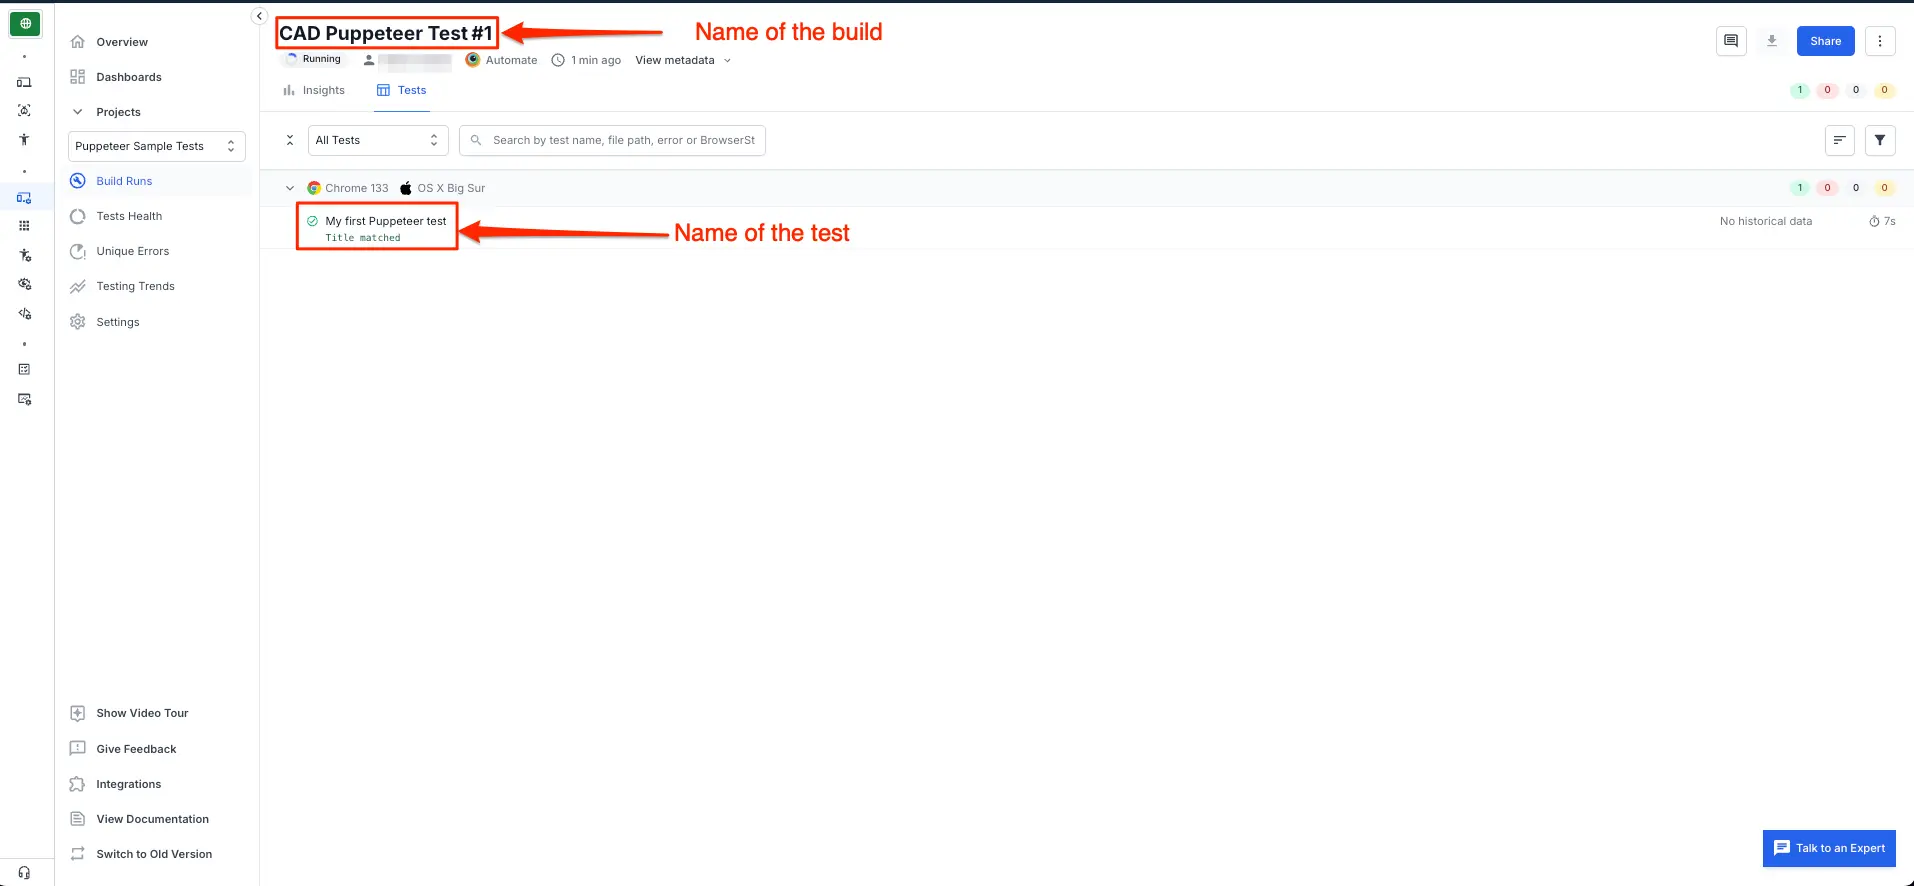
The below snapshot of a typical Automate Dashboard shows the list of builds in the left pane. On clicking on any build name, the right side shows the list of sessions that are a part of that build (basically all sessions where the same build name was used in capability). You can also see the test name for each session and it is evident from the example that using descriptive test names is beneficial for debugging purposes later on.
We're sorry to hear that. Please share your feedback so we can do better
Contact our Support team for immediate help while we work on improving our docs.
We're continuously improving our docs. We'd love to know what you liked
We're sorry to hear that. Please share your feedback so we can do better
Contact our Support team for immediate help while we work on improving our docs.
We're continuously improving our docs. We'd love to know what you liked
Thank you for your valuable feedback!