Run ACCELQ tests with Automate
A step-by-step guide to running ACCELQ tests with BrowserStack Automate
If you are using the older dashboard, refer to the old dashboard documentation.
Checkout our AI-enabled and intuitive low-code recorder for scalable, reliable test execution

ACCELQ is an AI-Powered Codeless Test Automation tool. By integrating ACCELQ with BrowserStack, you can run the ACCELQ recorded test scripts on 3000+ real devices and desktop browsers.
In this guide, you’ll learn how to:
- Run your ACCELQ tests on BrowserStack
- Run your ACCELQ mobile tests on BrowserStack
- Integrate test cases for locally hosted websites
- Run your parallel tests
Pre-requisites
- BrowserStack Username and Access Key to set up the BrowserStack integration. After logging into your BrowserStack account, visit the Settings page and copy your Username and Access Key. You can also sign up for a free trial here.
- A registered account at ACCELQ. You can sign up for a free trial here.
- ACCELQ Local Agent.
- A previously recorded ACCELQ test.
Run ACCELQ tests on BrowserStack
ACCELQ provides an ability to execute tests on Browser Stack through your Local Agent integration. As part of configuration, you select BrowserStack as your device cloud provider and invoke your application browser remotely, but the execution and results workflows remain the same. You continue to manage the test execution cycle through ACCELQ.
Running your ACCELQ tests involves:
Configure agent properties
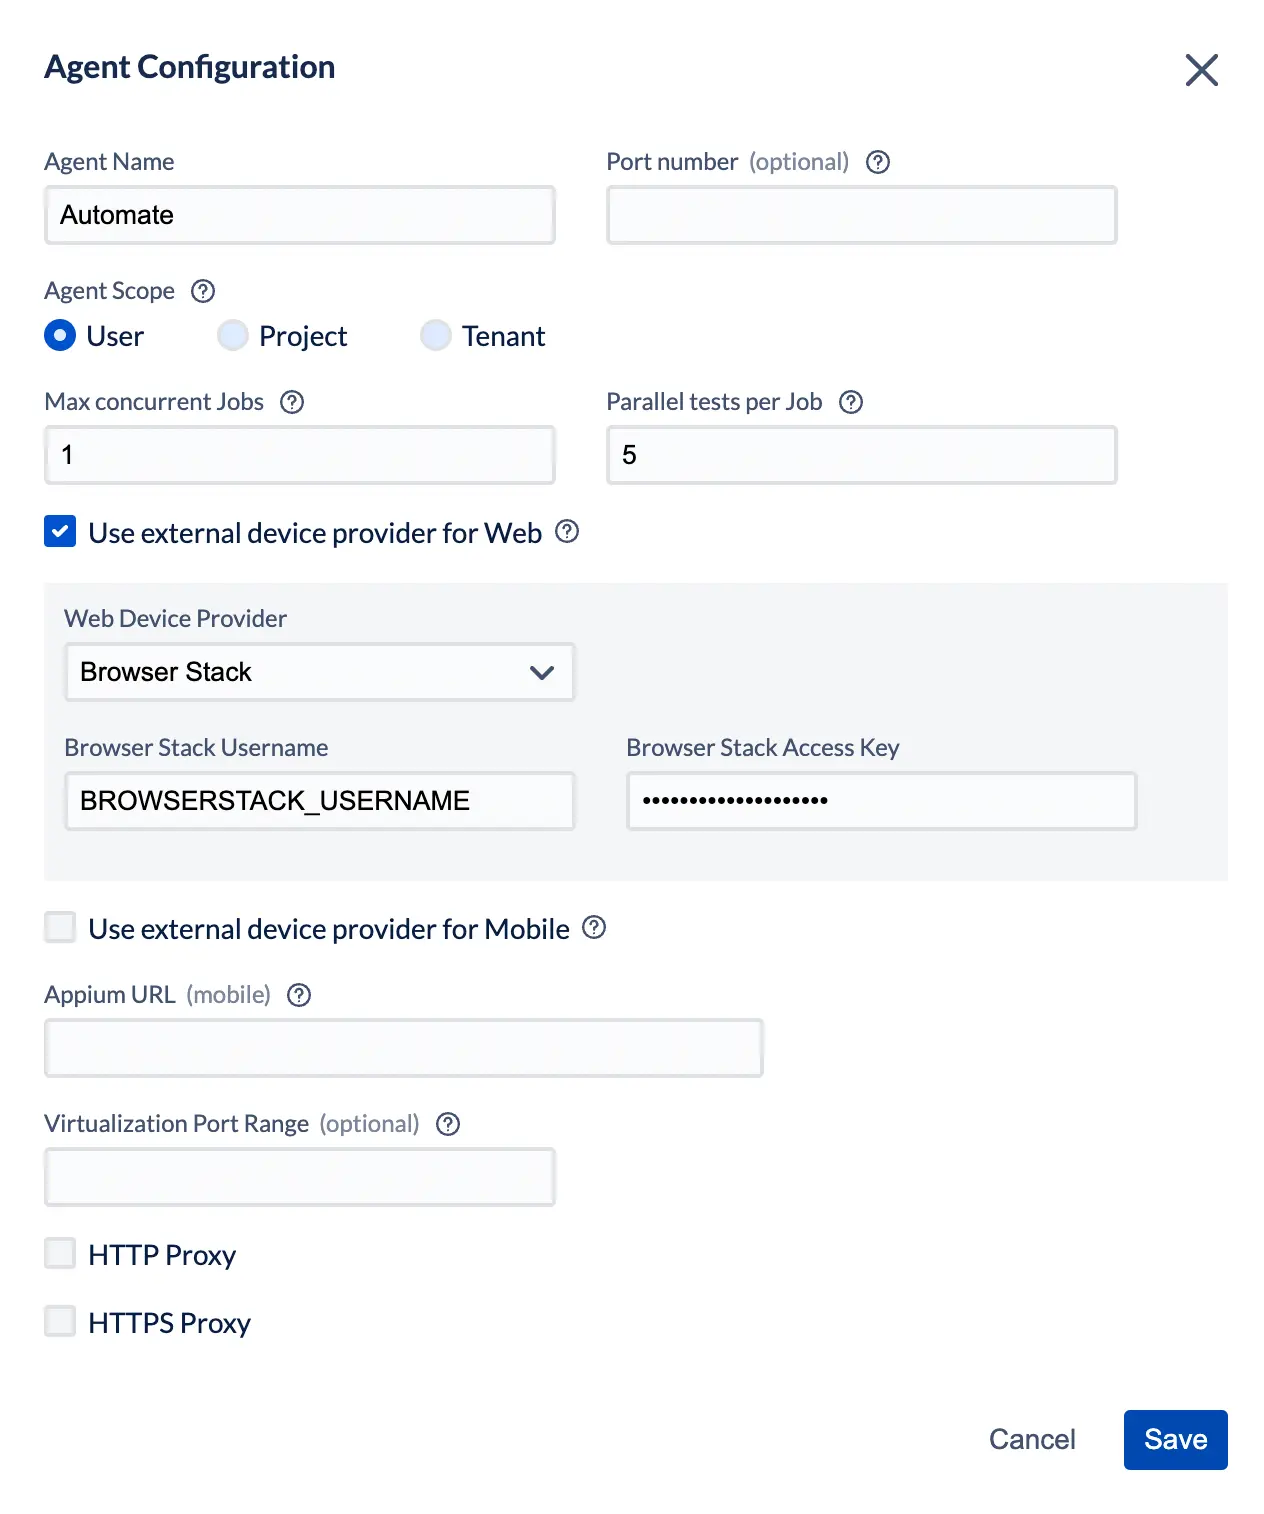
You can configure the agent properties of your Local Agent and set BrowserStack-specific details as follows:
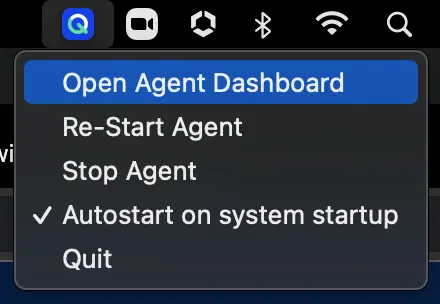
- In the toolbar doc, click the ACCELQ Local Agent icon and click Open Agent Dashboard.
- Create or edit an existing Agent configuration.
- Provide the Agent Name.
- In Parallel tests per Job, provide the number of parallels that your Automate plan supports.
- Select the Use external device provider for Web check box.
- Under Web Device Provider, select BrowserStack.
- Set your username and access key details in Browser Stack Username and Browser Stack Access Key respectively.
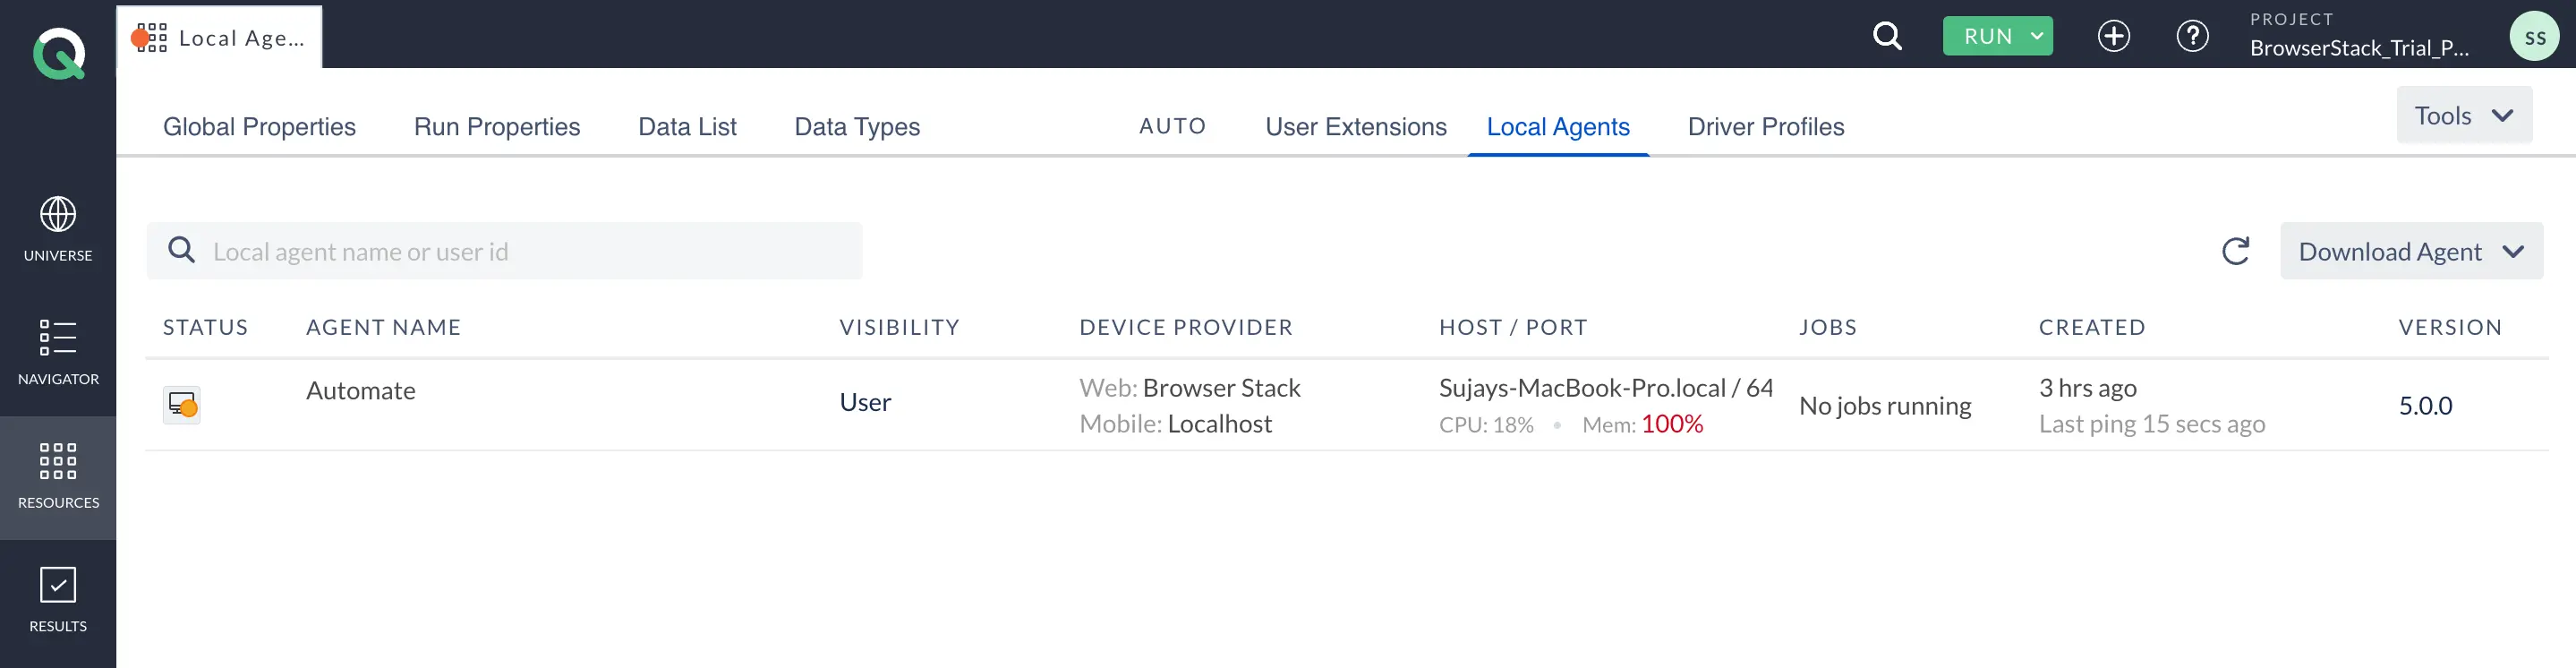
After you login to your ACCELQ account, click Resources, and then click Local Agents to view your Local Agent configuration as follows:
Configure driver profile
Create a Driver Profile to set capabilities. You can add any BrowserStack-specific capabilities.
- Login to your ACCELQ account.
- Click Resources, and then click Driver Profiles.
- On the Driver Profiles tab, click Create Driver Profile.
- Provide the Profile name.
- In the App Type drop down, select Web.
- In the Additional Configuration section, provide the capabilities in JSON format as follows:
{ "cloudOptions": { "debug": "true", "networkLogs": "true" } } - Click Save to save your driver profile.
On the Driver Profiles tab, your Driver Profile is created as follows: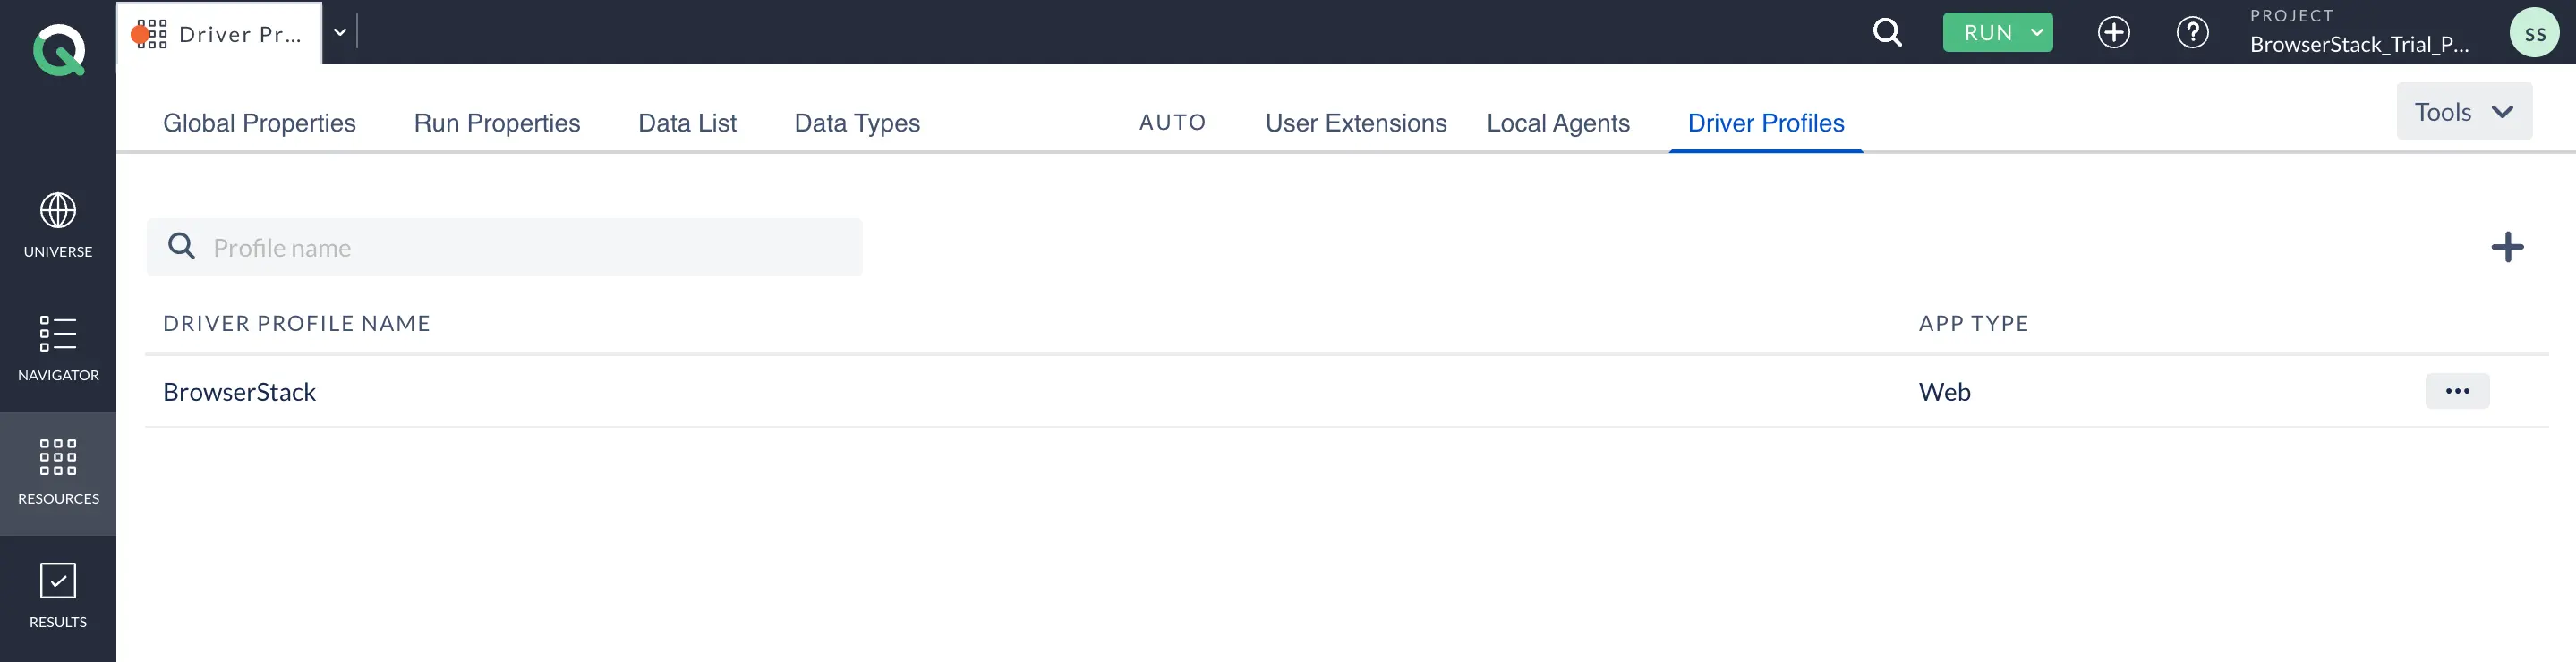
Run your first test
- Login to your ACCELQ account.
- Click Navigator, and then click Scenarios.
- Open the scenario that you want to run.
- Click Run to proceed with the execution of the scenario.
- In the Run Automation Test screen, under AGENT/HOST section, select the Local Agent that you had configured in the Configure agent properties section.
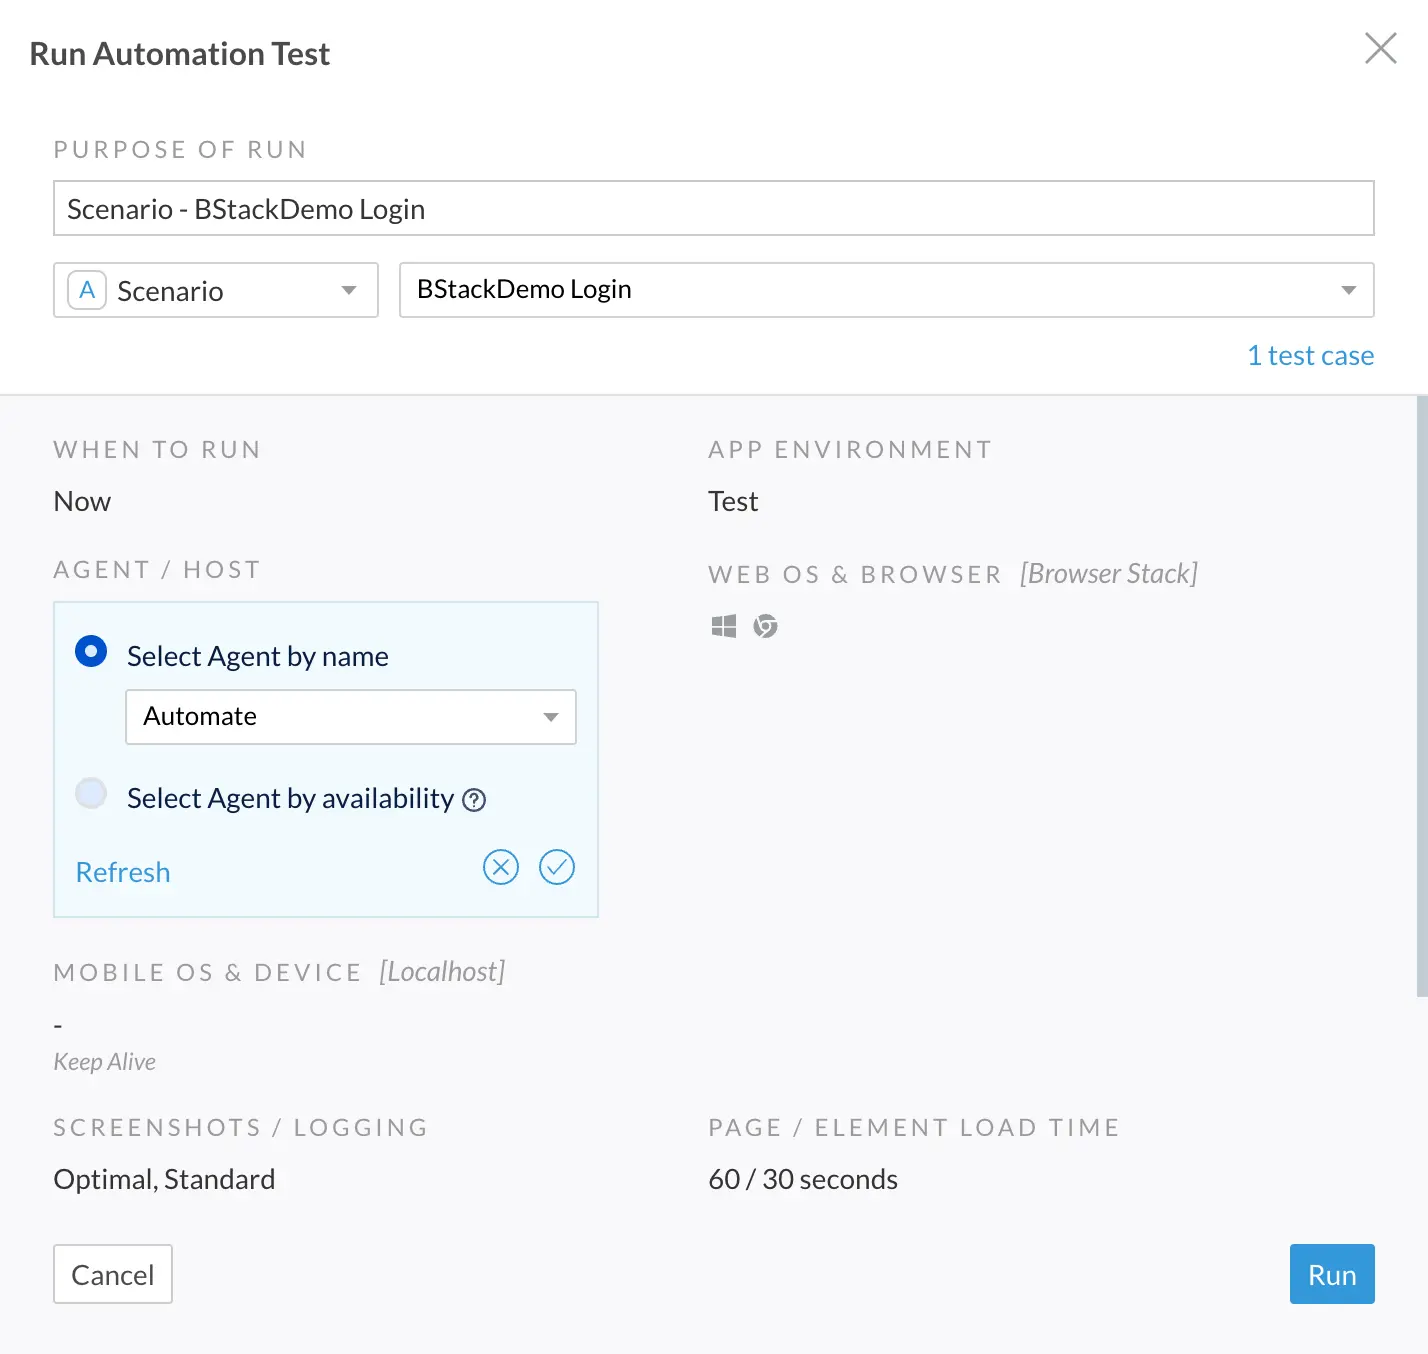
- In the WEB OS & BROWSER section, select the os/browser combination on which you want to run your test.
- In Driver Profile drop-down, select the Driver Profile that you had created in the Configure driver profile section.
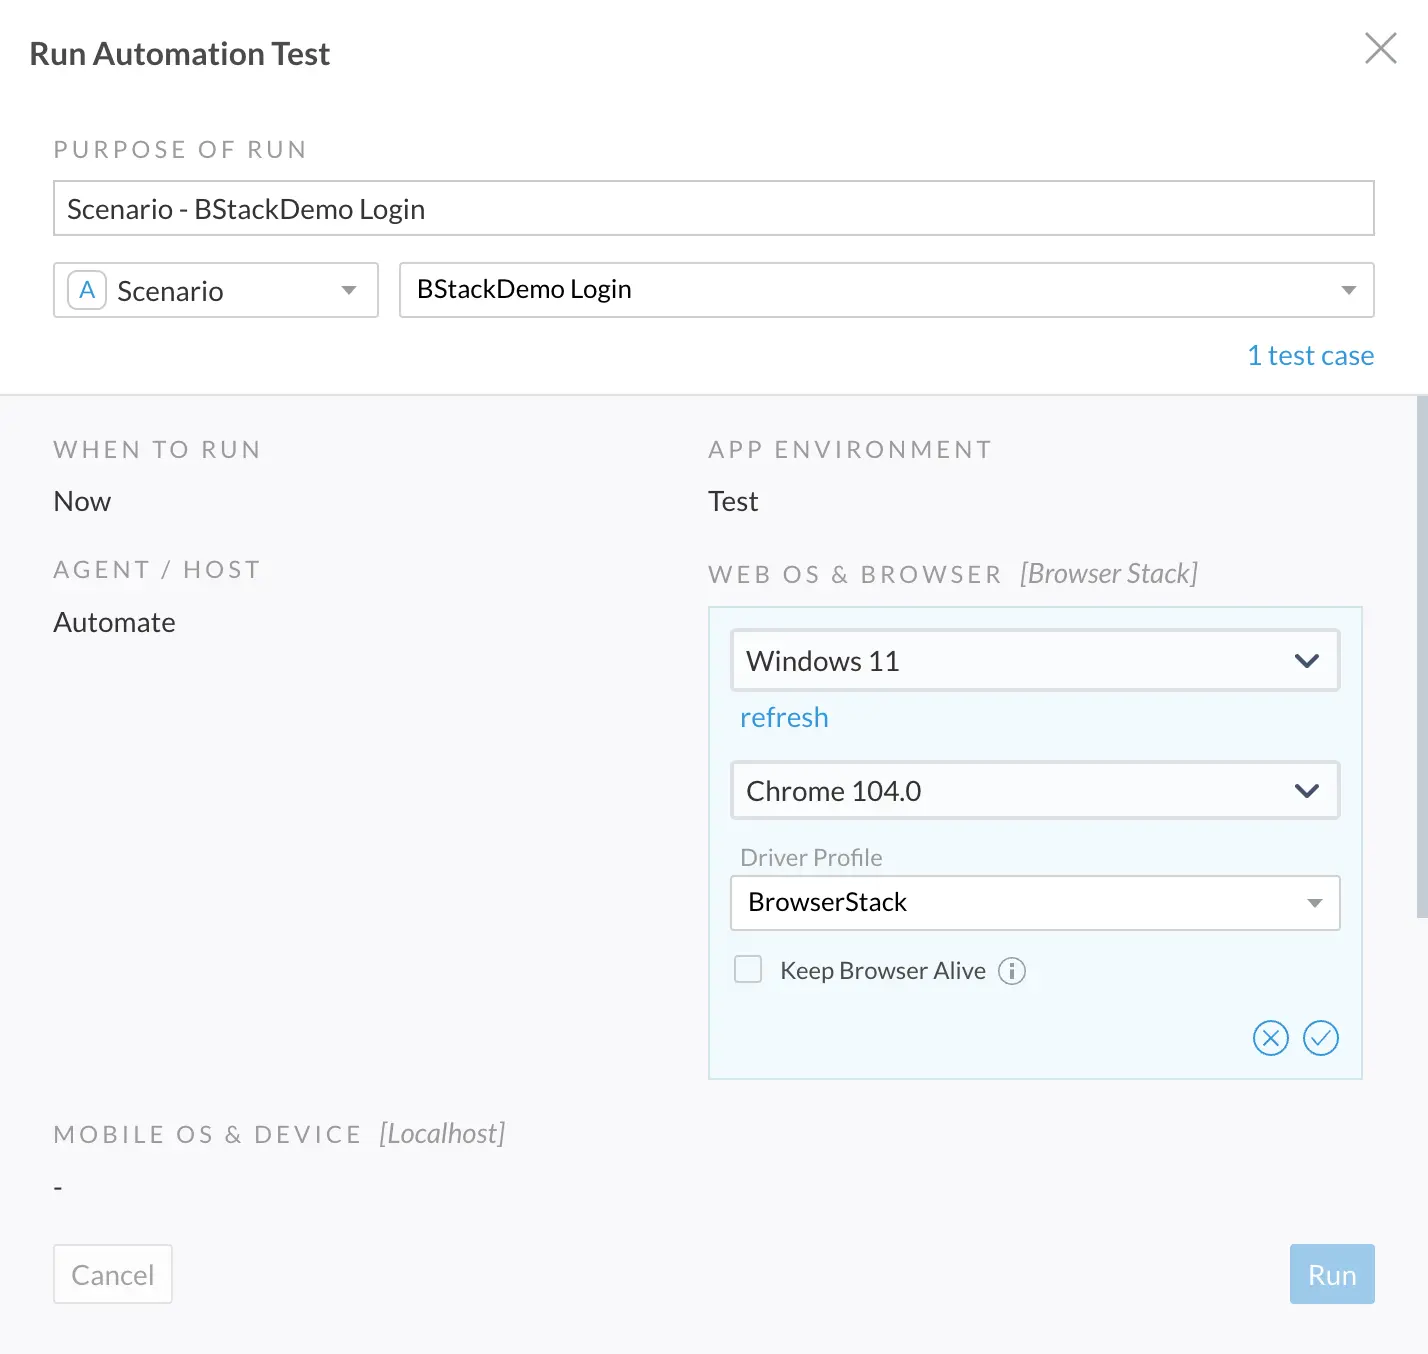
- Click Run.
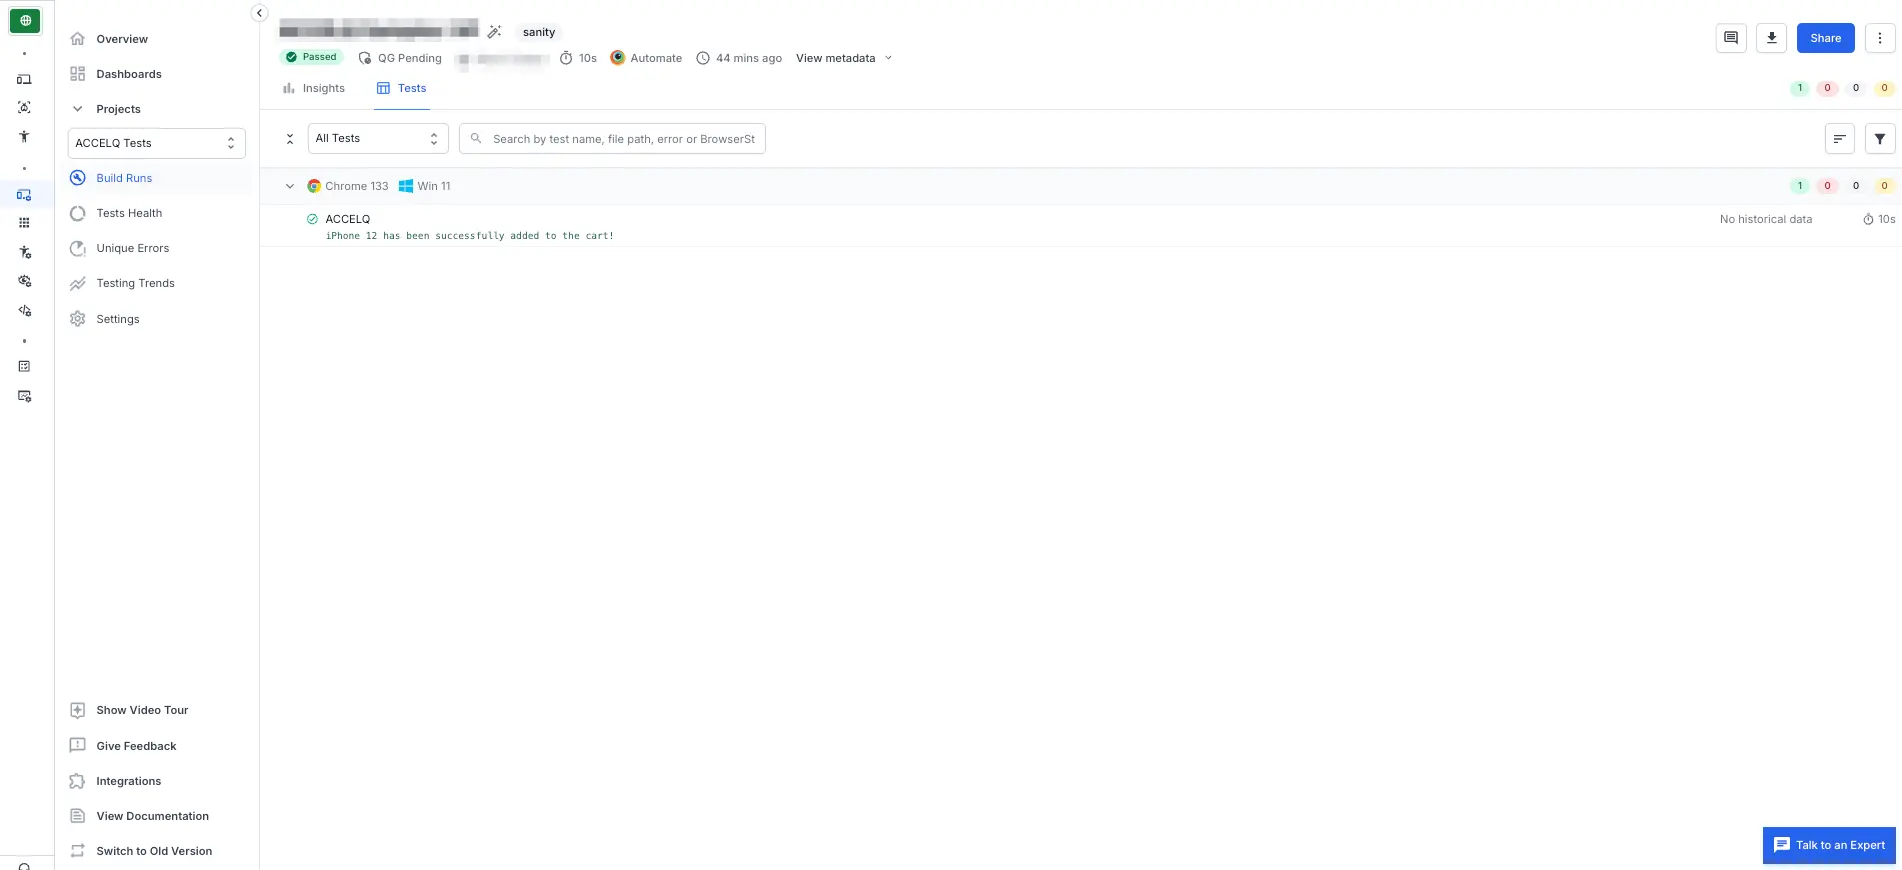
You can see the execution of your scenario on the Automate dashboard.
Run tests on Mobile Browsers
If you want to run tests on mobile browsers, you need to create a specific Driver Profile to run your tests.
- Create a new Driver Profile by following the steps in the Configure driver profile section.
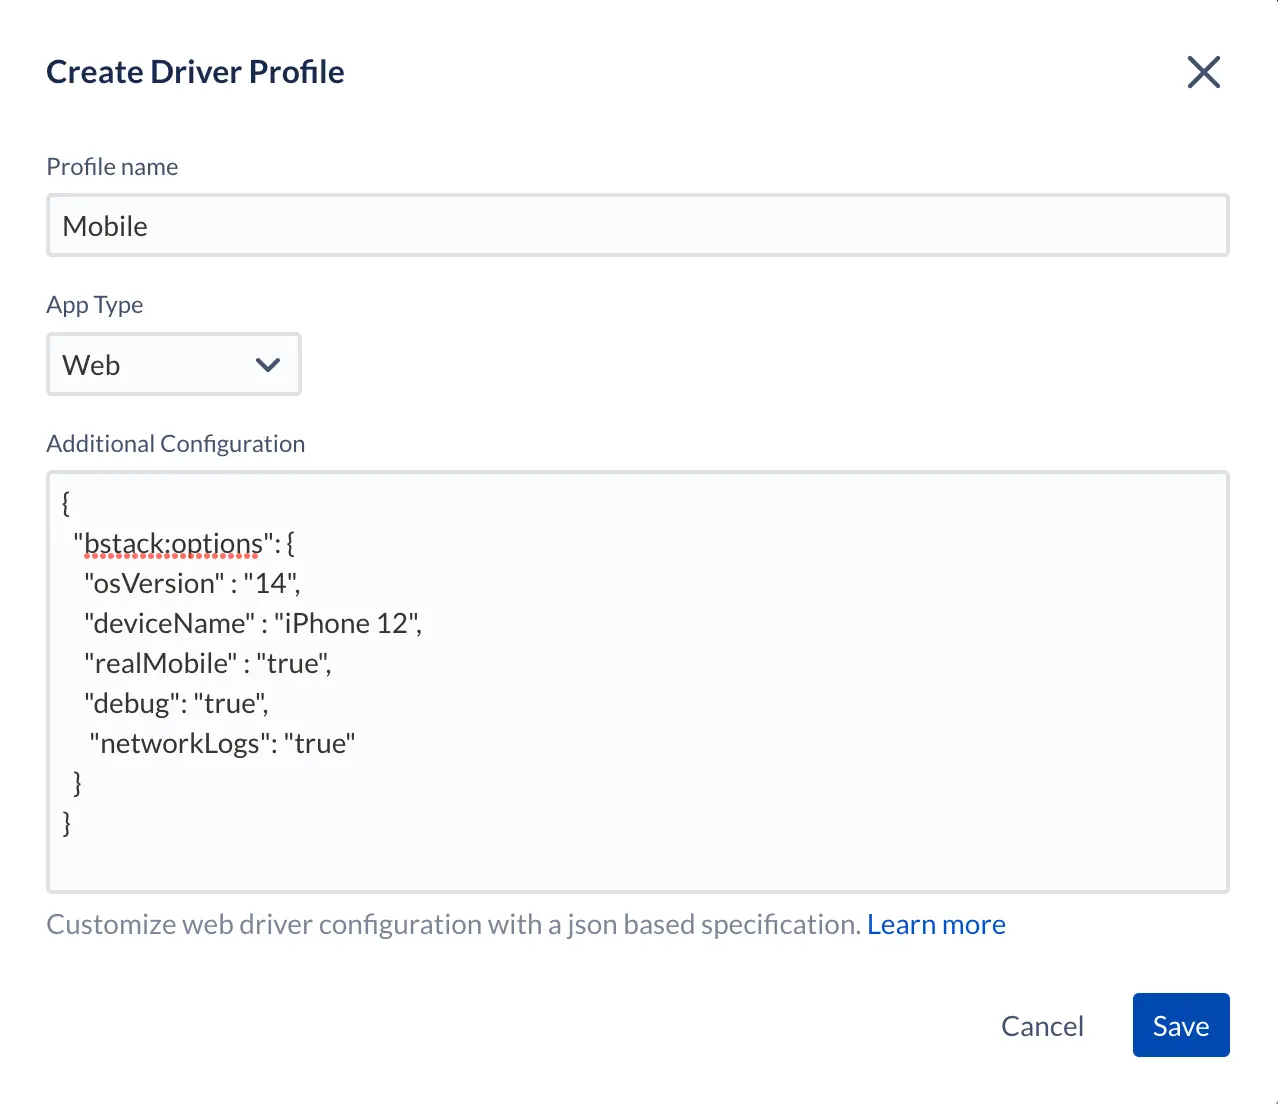
- For this driver profile, in the Additional Configuration section, provide the mobile-specific capabilities such as
deviceNameandosVersionin JSON format as follows.{ "cloudOptions": { "osVersion" : "14", "deviceName" : "iPhone 12", "realMobile" : "true", "debug": "true", "networkLogs": "true" } }The mobile-specific driver profile is configured as seen.
- Save the driver profile.
- Click Navigator, and then click Scenarios.
- Open the scenario that you want to run.
- Click Run to proceed with the execution of the scenario.
- In the Run Automation Test screen, under AGENT/HOST section, select the Local Agent that you had configured in the Configure agent properties section.
- In Driver Profile drop-down, select the Driver Profile that you created in step 1.The OS and Browser selected is ignored because of the details provided in the driver profile.
- Click Run.
You can see the execution of your scenario on a mobile browser on the Automate dashboard.
Test privately hosted websites
You can test your websites that are hosted privately using the BrowserStack Local testing feature. This section will guide you through enabling Local Testing, and then using it to test websites on your work machines, CI/CD machines/nodes, and other private network configurations.
Enabling Local Testing with Automate is a two-step process:
- Establishing a Local Testing connection.
- Configuring ACCELQ test scripts so they run through the Local Testing connection.
Establishing a Local Testing connection
You can set up the Local testing connection between your system and BrowserStack cloud using the following steps:
- Download the appropriate binary for your system:
- Unzip the binary to a folder/directory on your machine.
- Open your command-line interface and navigate to the folder containing the Local binary.
- Run the binary using the following command:
./BrowserStackLocal --key YOUR_ACCESS_KEY
BrowserStackLocal.exe --key YOUR_ACCESS_KEY
Your machine and BrowserStack Cloud remain connected unless you explicitly end the connection since the Local Testing connection is persistent. Hence, close the connection after test execution is complete.
The Local Testing setup might differ slightly based on your requirements, for example, proxy settings, restricting connections to certain domains, etc. Check out the complete list of flags to set up Local Testing for different environments or network configurations.
Configure tests to run with Local Testing connection
- Create a new driver profile by following the steps mentioned in the Configure driver profile section.
- For this driver profile, in the Additional Configuration section, provide the mobile-specific capabilities such as
localin JSON format as follows.{ "cloudOptions": { "local": "true" } }The local-specific driver profile is configured as seen.
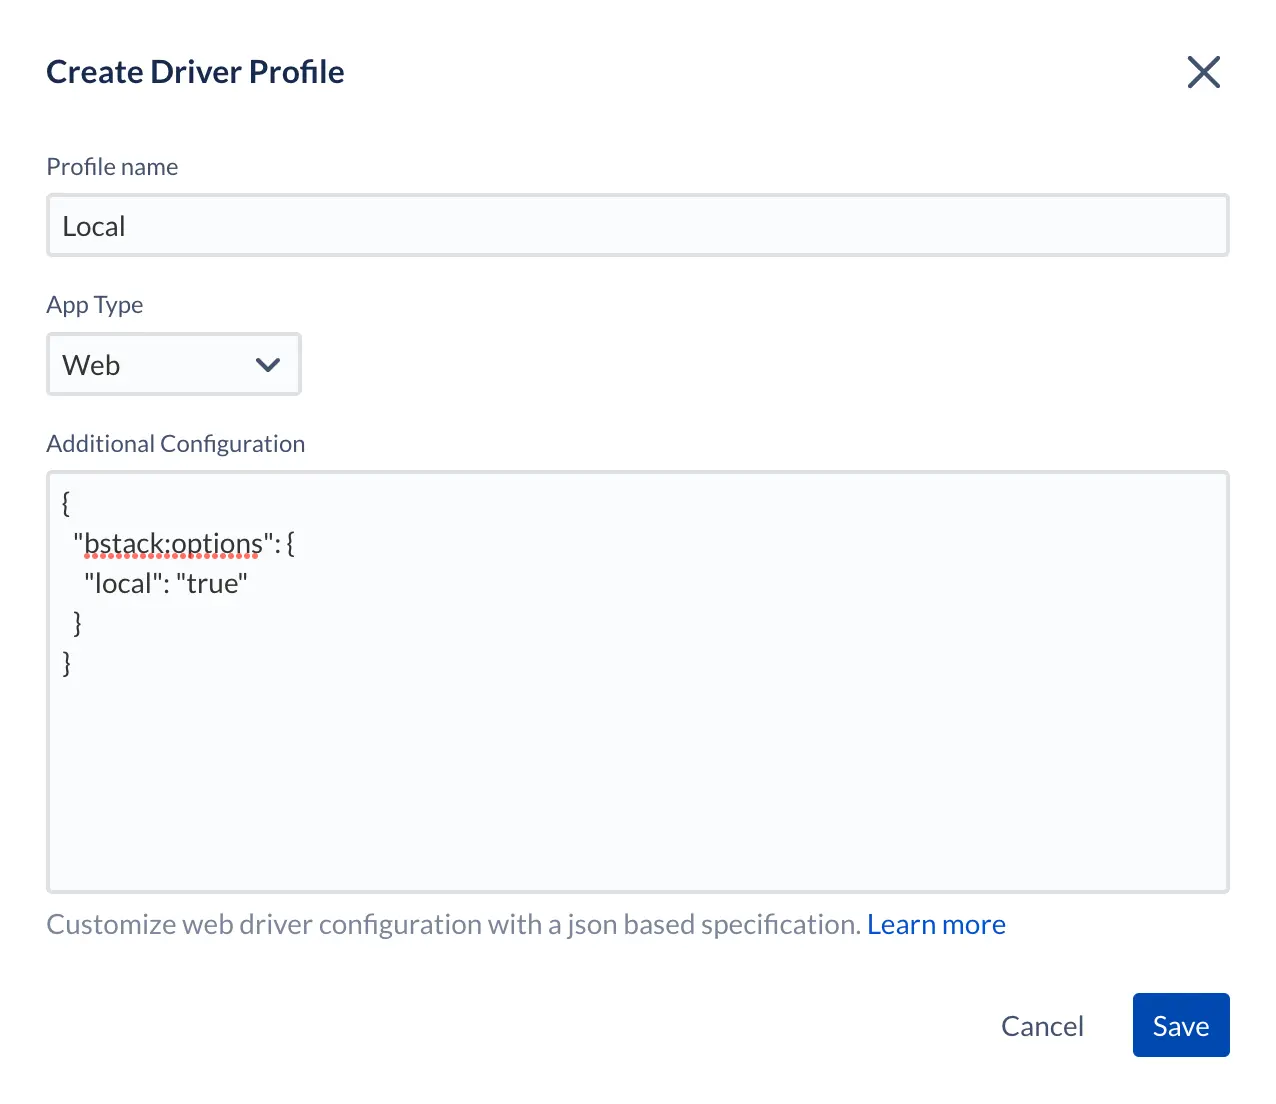
- Save the driver profile.
- Click Navigator, and then click Scenarios.
- Open the scenario that tests a locally hosted website.
- Click Run to proceed with the execution of the scenario.
- In the Run Automation Test screen, under AGENT/HOST section, select the Local Agent that you had configured in the Configure agent properties section.
- In Driver Profile drop-down, select the Driver Profile that you created in step 1.
- In the WEB OS & BROWSER section, select the os/browser combination on which you want to run your test. If you want to run tests on mobile browsers, create a mobile-specific driver profile that includes the
localcapability. - Click Run.
You can see the execution of your local scenario on a mobile browser on the Automate dashboard.
Run multiple tests in parallel
Prerequisites:
- Edit your Agent configuration to set the Parallel tests per Job to the number of parallels that your account supports.
- A Test Scenario that includes multiple test cases.
To run your parallel tests:
- Click Navigator, and then click Scenarios.
- Open the scenario that includes multiple test cases.
- Click Run to proceed with the execution of the scenario.
- In the Run Automation Test screen, under AGENT/HOST section, select the Local Agent that includes the Parallel test per Job set to the supported parallels.
- In Driver Profile drop-down, select the required Driver Profile.
- In the PARALLEL EXECUTION section, set the Parallel Thread Count to the number of parallels you want to run.
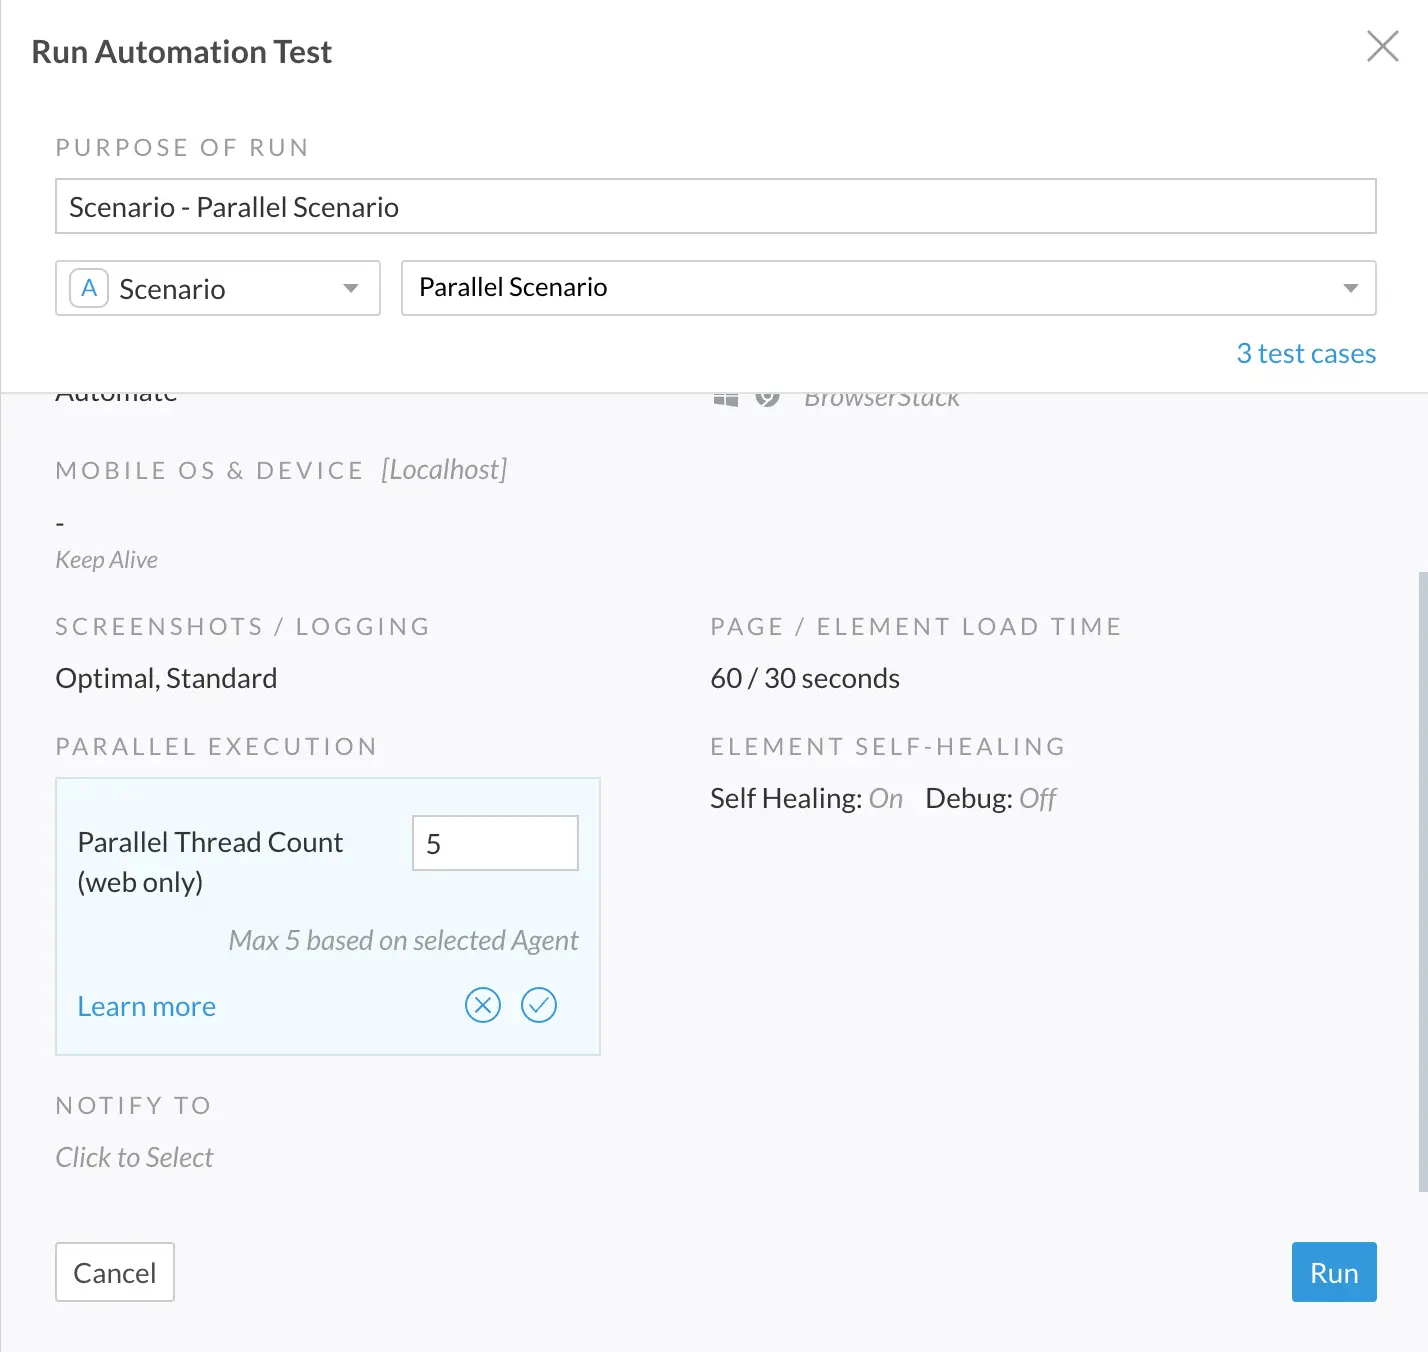
- Click Run.
You can see the execution of your scenario with multiple tests running in parallel on the Automate dashboard.
We're sorry to hear that. Please share your feedback so we can do better
Contact our Support team for immediate help while we work on improving our docs.
We're continuously improving our docs. We'd love to know what you liked
We're sorry to hear that. Please share your feedback so we can do better
Contact our Support team for immediate help while we work on improving our docs.
We're continuously improving our docs. We'd love to know what you liked
Thank you for your valuable feedback!