Integrate BrowserStack Automate with Azure Pipelines
A step-by-step guide to help you integrate Azure Pipelines or Visual Studio Team Services (VSTS) with the BrowserStack device cloud for running all your Selenium tests on BrowserStack Automate.
Azure Pipelines is a continuous integration tool used to integrate your test suites. It enables continuous testing, build, and deployment of iterative code changes. CI/CD tools help catch failures ahead of the production stage and mitigate them as they occur.
The information in this section applies to using the BrowserStack plugin with Azure Pipelines as part of the Azure DevOps Services (cloud) offering only.
In this guide, you’ll learn how to:
- Install the BrowserStack Azure DevOps Extension
- Configure BrowserStack Local in Azure Pipelines
- View Test Reports in Azure Pipelines
Prerequisites
Before you can start integration, ensure that:
- You’ve hosted your project on any of these source repositories supported by Azure.
- You are a maintainer or owner of the project.
- You are an administrator of your Azure DevOps organization.
- You’ve created a pipeline for the project’s repository. If you are yet to create a pipeline, check out how to create an Azure Pipeline.
- You have access to the BrowserStack account credentials, namely Access Key and Username.
Install the BrowserStack Azure DevOps Extension
The BrowserStack Azure DevOps Extension eases the process of configuring Azure Pipelines to run tests on BrowserStack. To install the extension follow these steps:
- In the Visual Studio Marketplace, click Azure DevOps.
- Search for BrowserStack Azure DevOps Extension.
- In the BrowserStack Azure DevOps Extension page, click Get it Free.
- The Sign in page opens to sign in to your Azure account. After you sign-in, click Select an Azure DevOps organization and select your organization.
- Click Install to add the extension.
BrowserStack’s extension is now installed in your Azure DevOps organization. This installs the BrowserStack Config, BrowserStackResults, and BrowserStackStopLocal tasks to the list of available tasks for you to use them in your pipeline.
Configure BrowserStack in Azure Pipelines
For your tests to run on BrowserStack, the Azure Pipeline needs additional information, such as BrowserStack credentials.
You can create a pipeline using either a YAML editor or a classic editor. Depending on the editor you used to create the pipeline, refer to the steps in the following tabs to integrate BrowserStack in your pipeline.
-
Open the Azure portal page and click My Azure DevOps Organizations.
-
In the Azure DevOps Organizations page, click the project where you’ve created a pipeline for your project’s repository from the list of projects that appear.
-
Click Project settings located at the bottom-left corner of your project’s page.
-
In the Project details page, click Service connections > Create service connection.
-
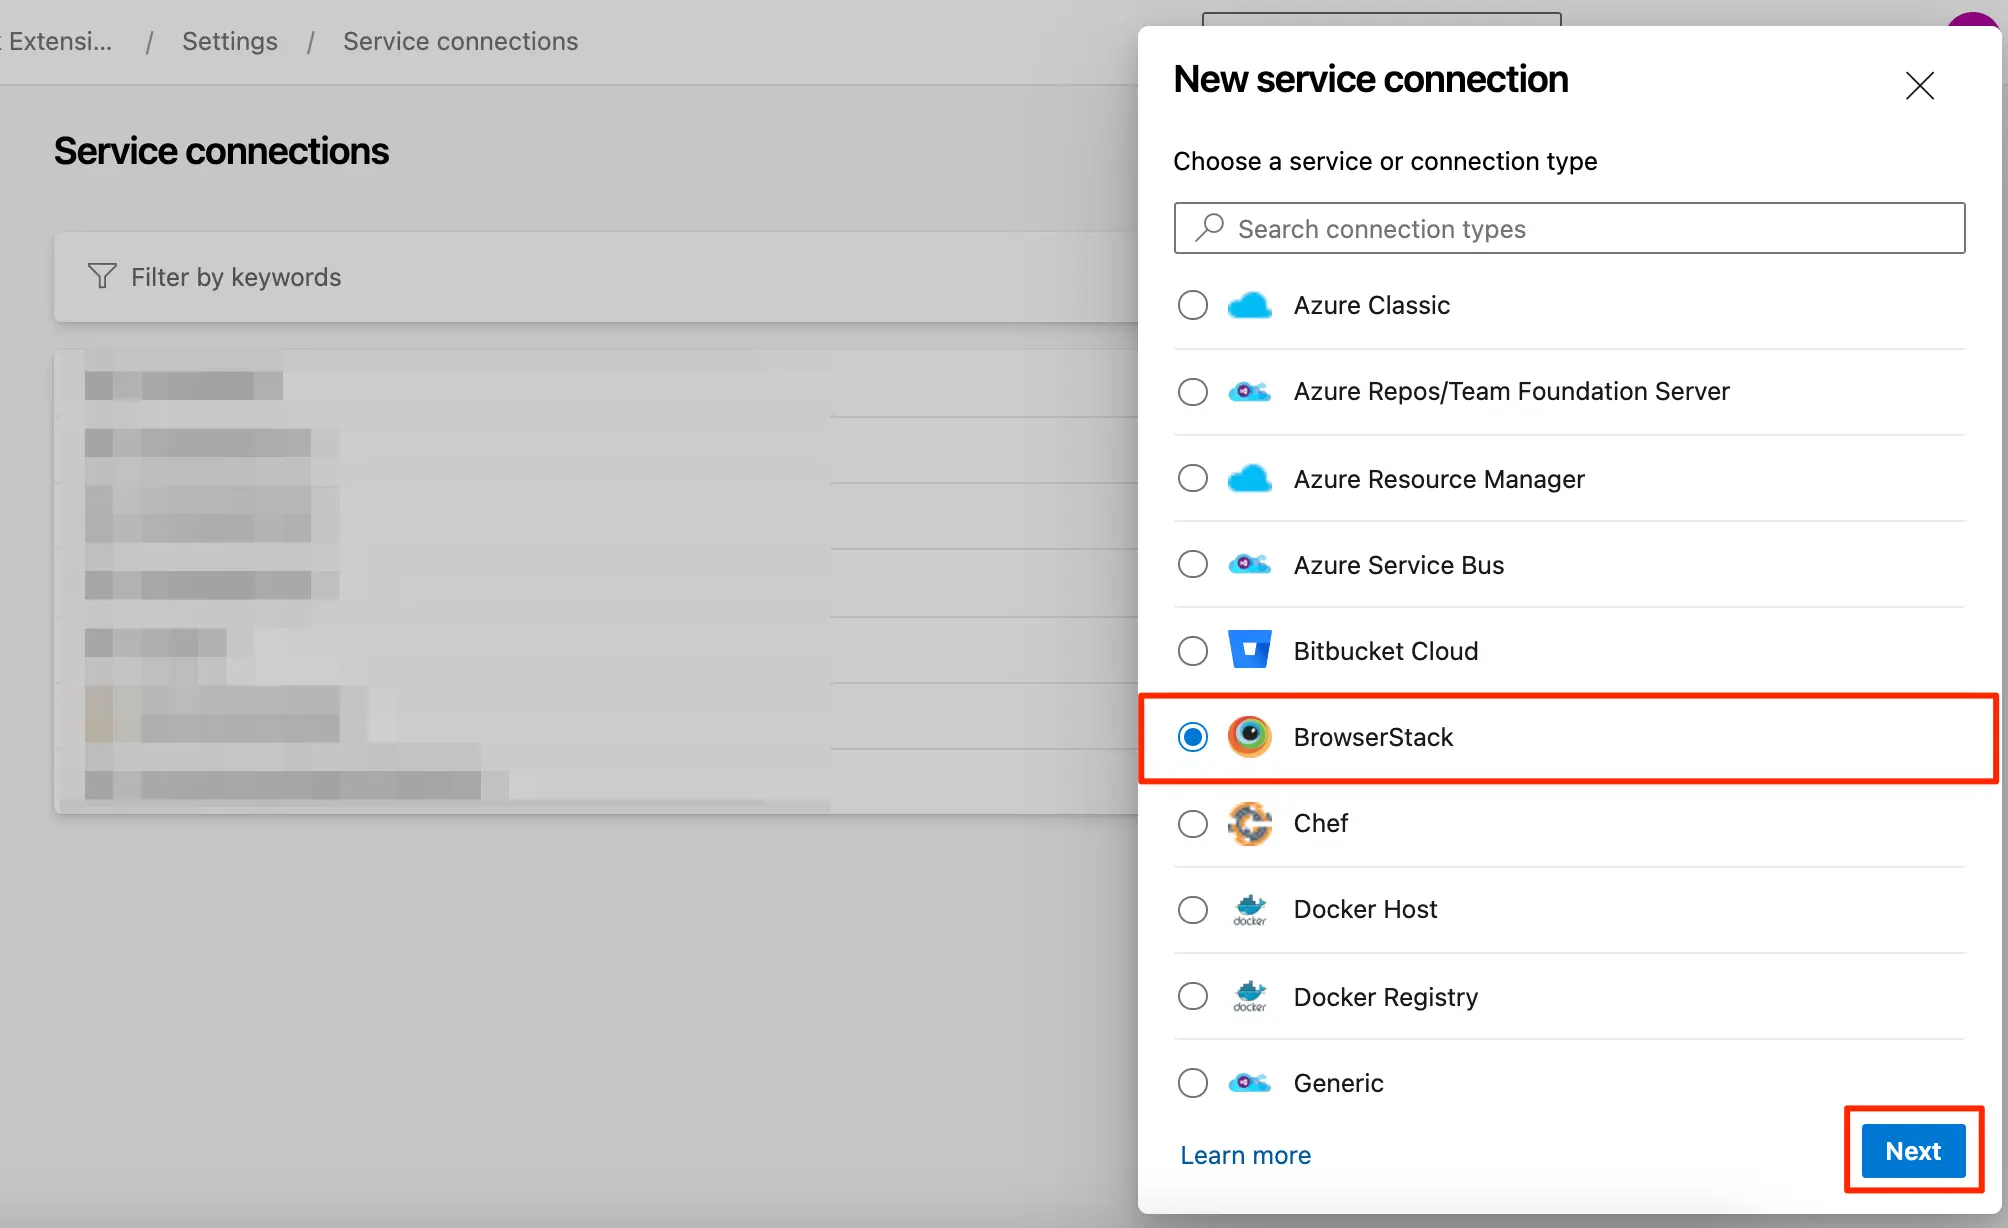
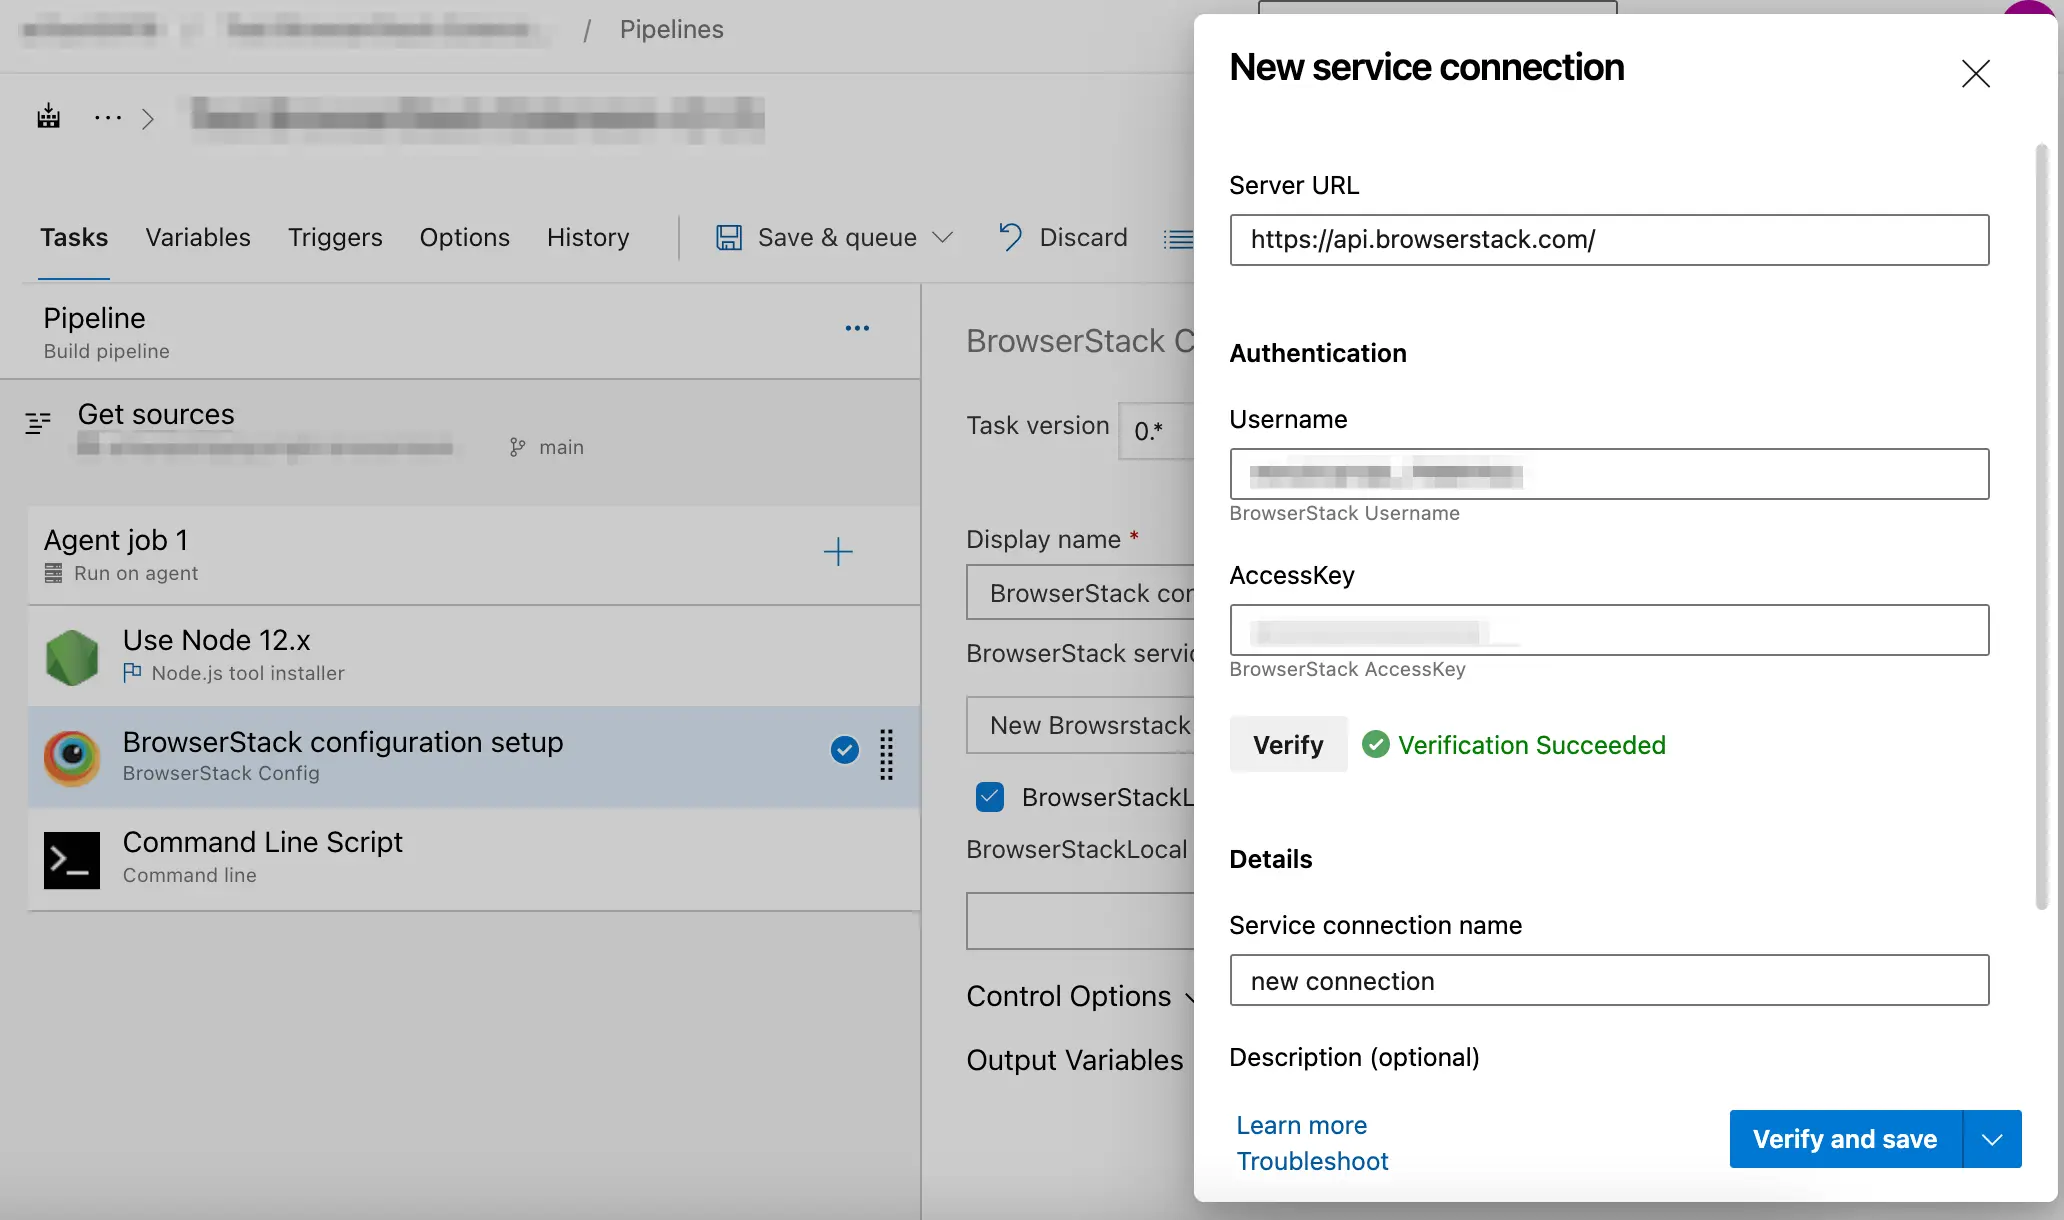
In the New service connection section, select BrowserStack from the given list, and click Next.
-
In the New BrowserStack service connection section, enter your BrowserStack Username in the Username field, and then enter Access key in the AccessKey field.
-
Click Verify to verify your BrowserStack credentials.
-
After verification succeeds, enter a service connection name in the Service connection name field, such as
browserstack-connection, and then click Verify and save. The service connection gets added and you’re redirected to the Service connections page.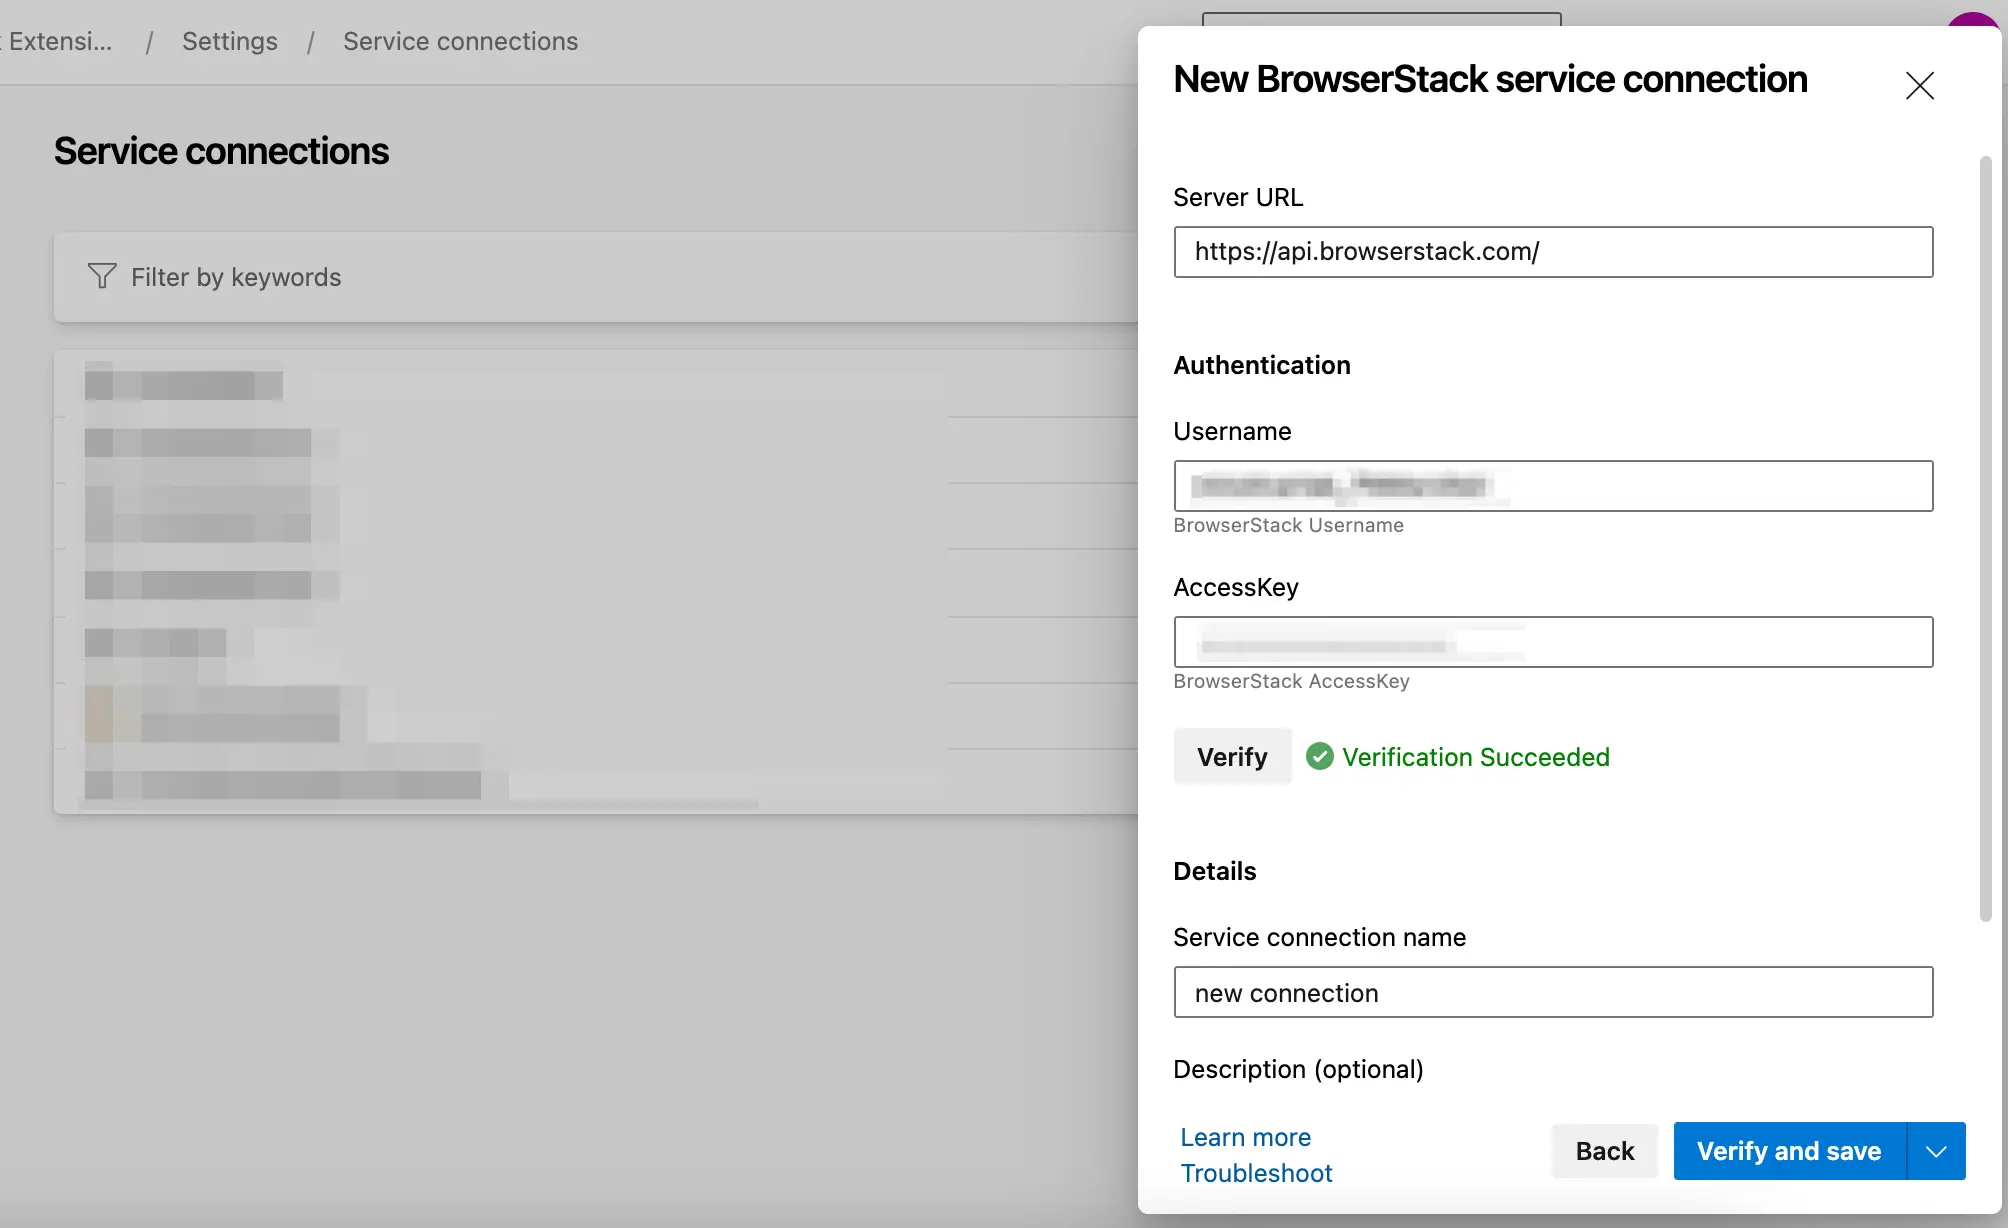
-
Click the
 (Pipelines) icon.
 -
In the Pipelines page, select your pipeline.
-
Click Edit to edit the pipeline.
-
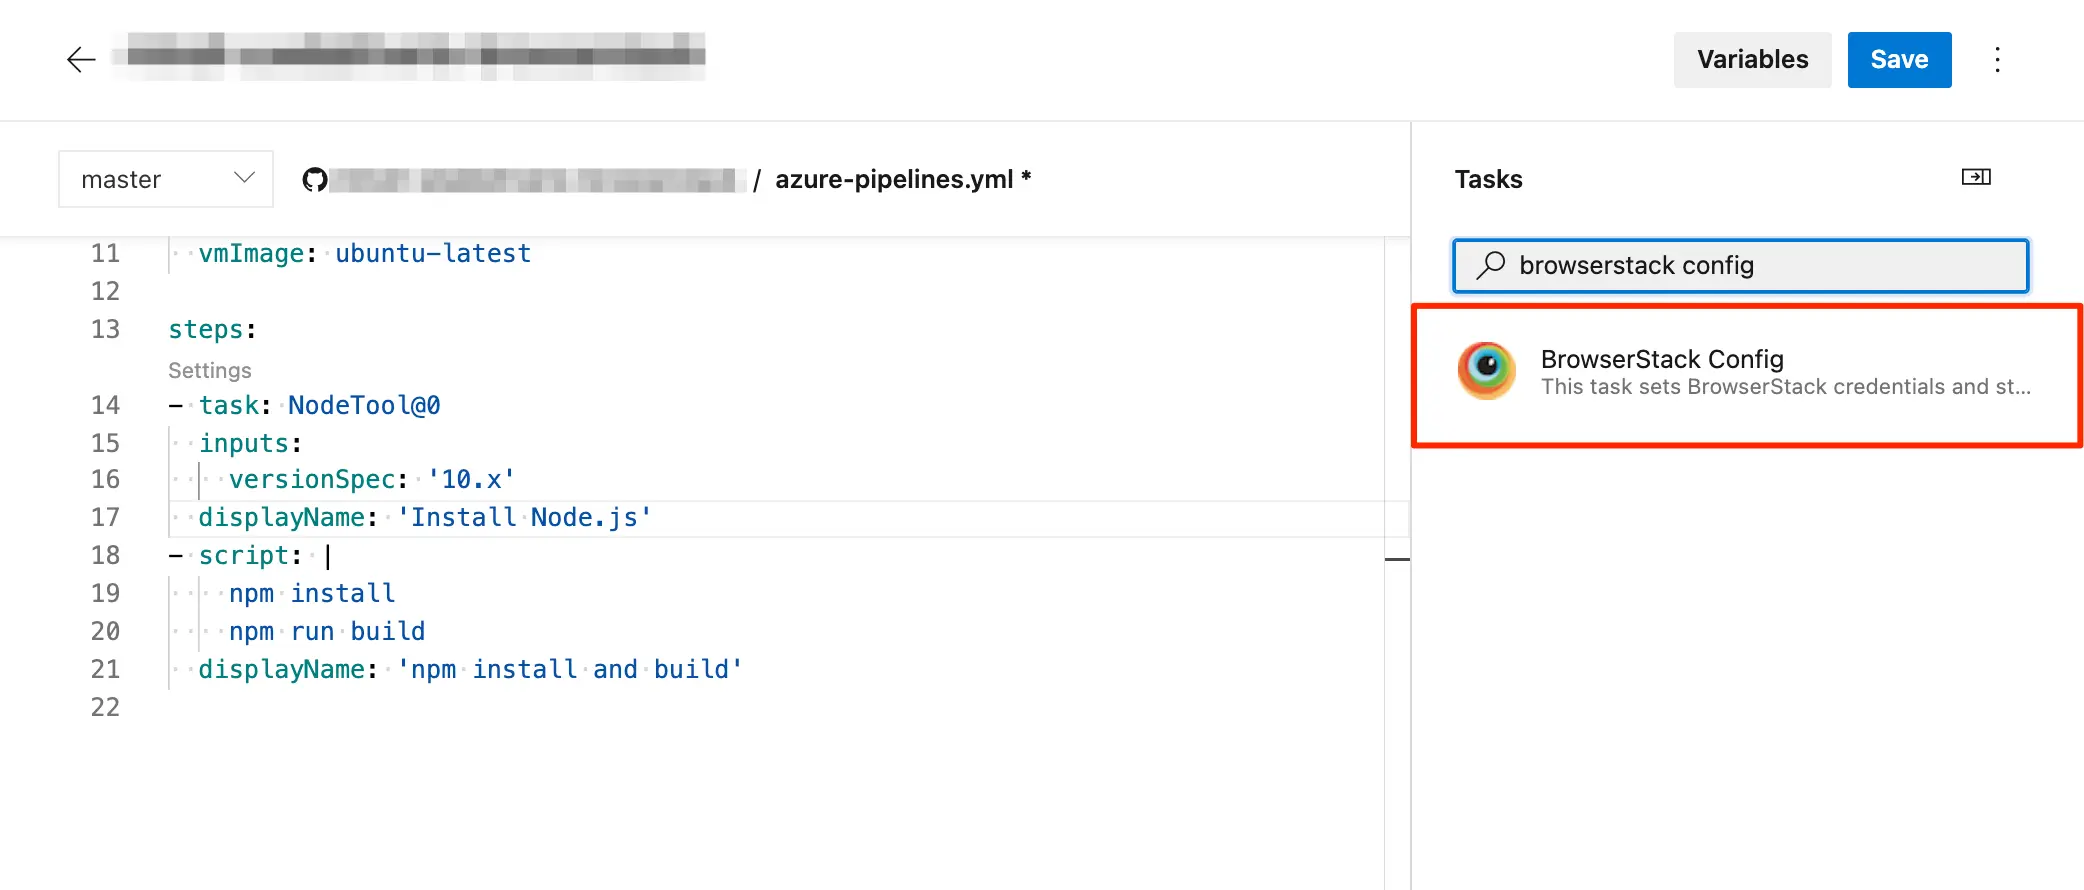
In the pipeline editor, from the Tasks pane, search for the BrowserStack Config task, and then select it.
-
In the BrowserStack Config section, select the connection, created in Step 8, from BrowserStack service end point
-
Click Add.
-
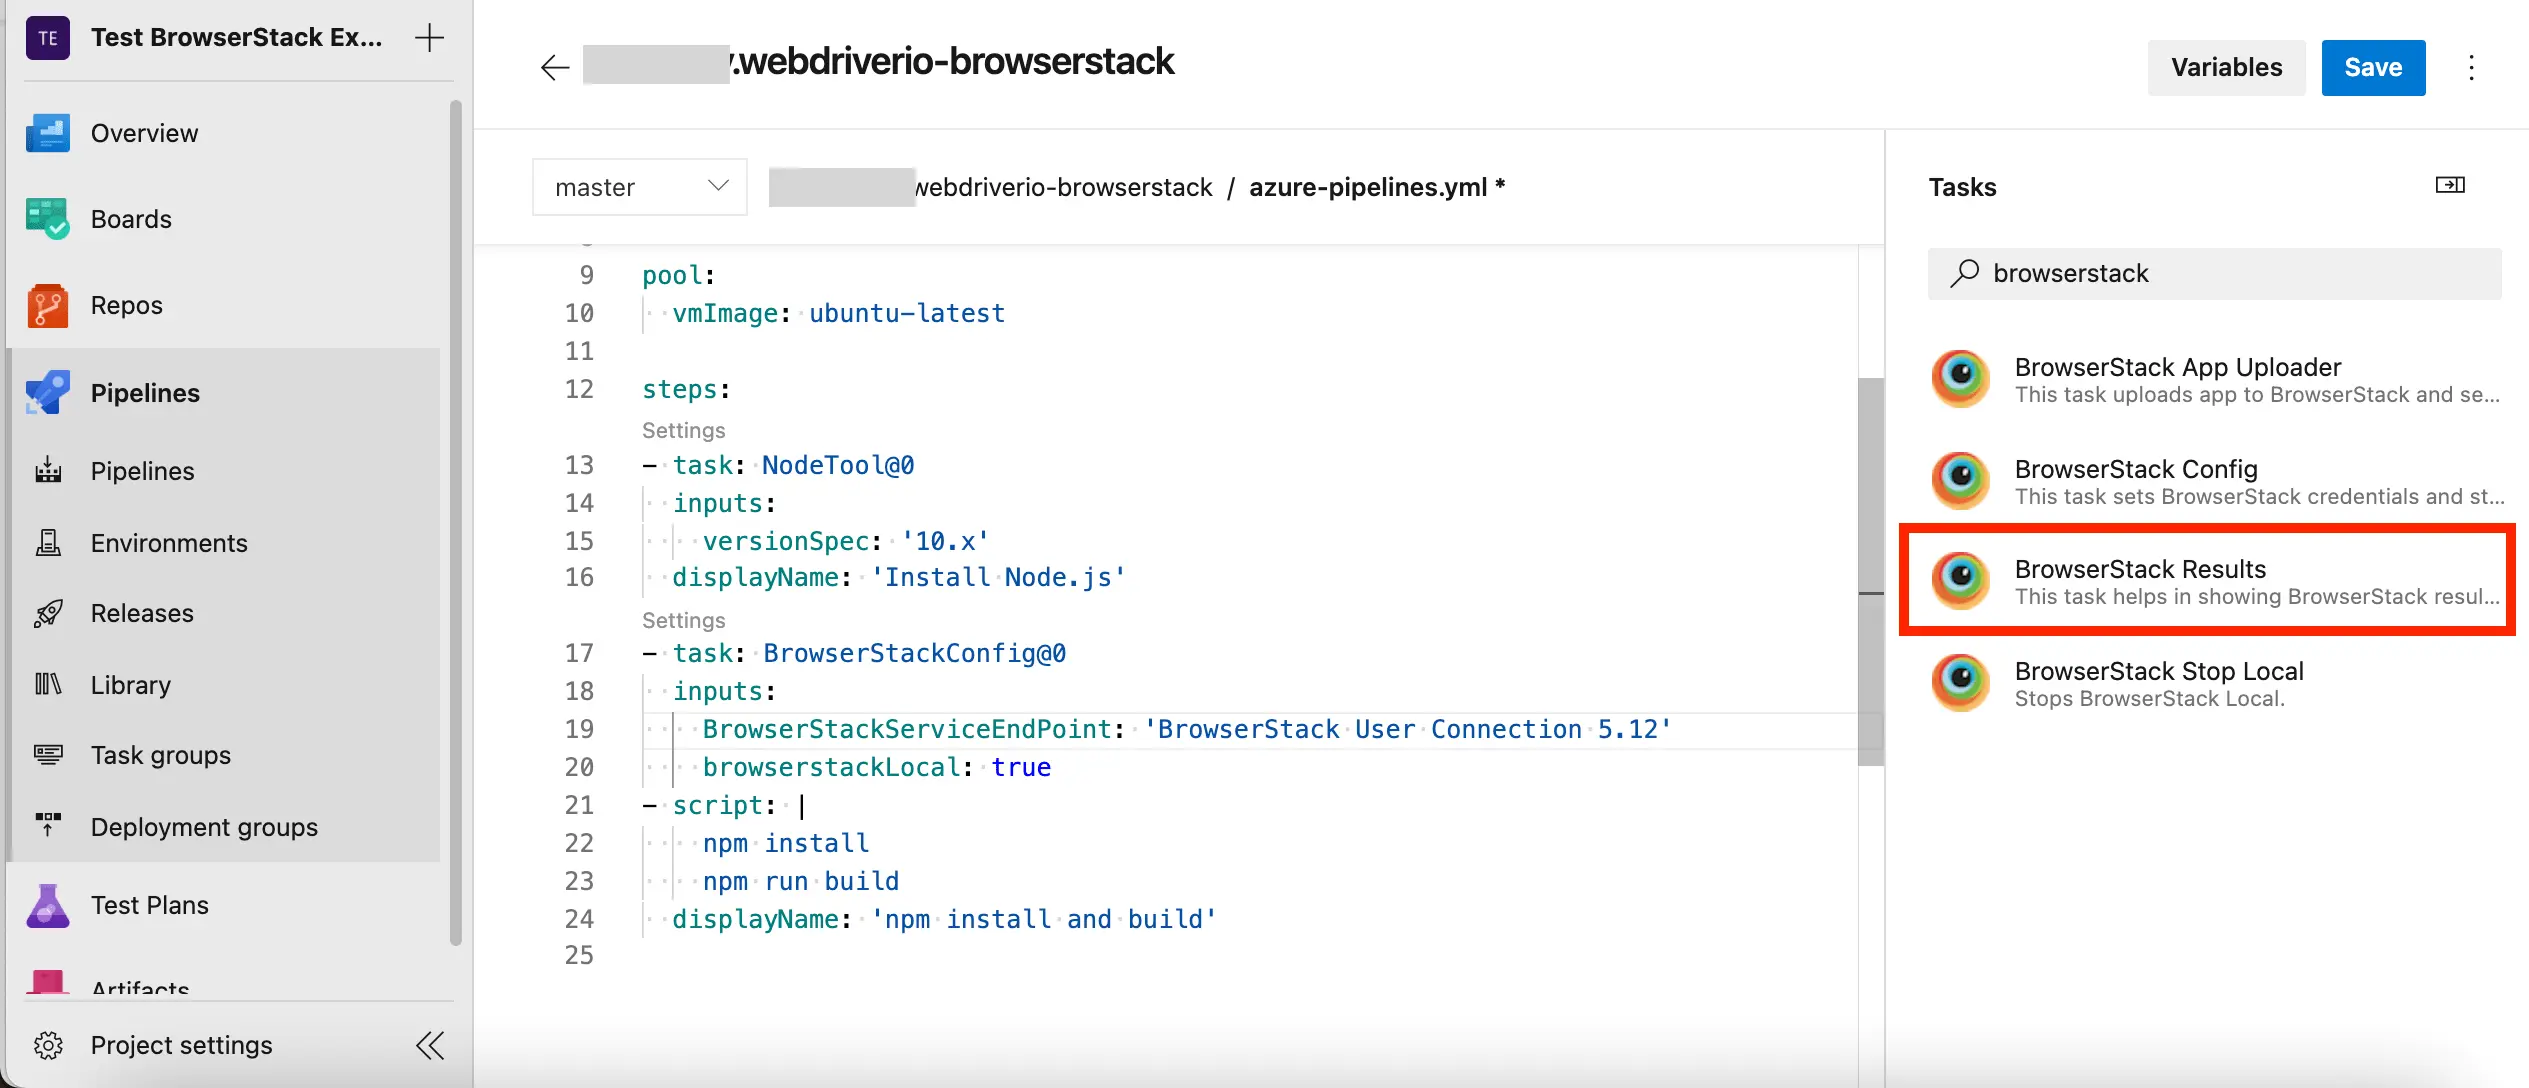
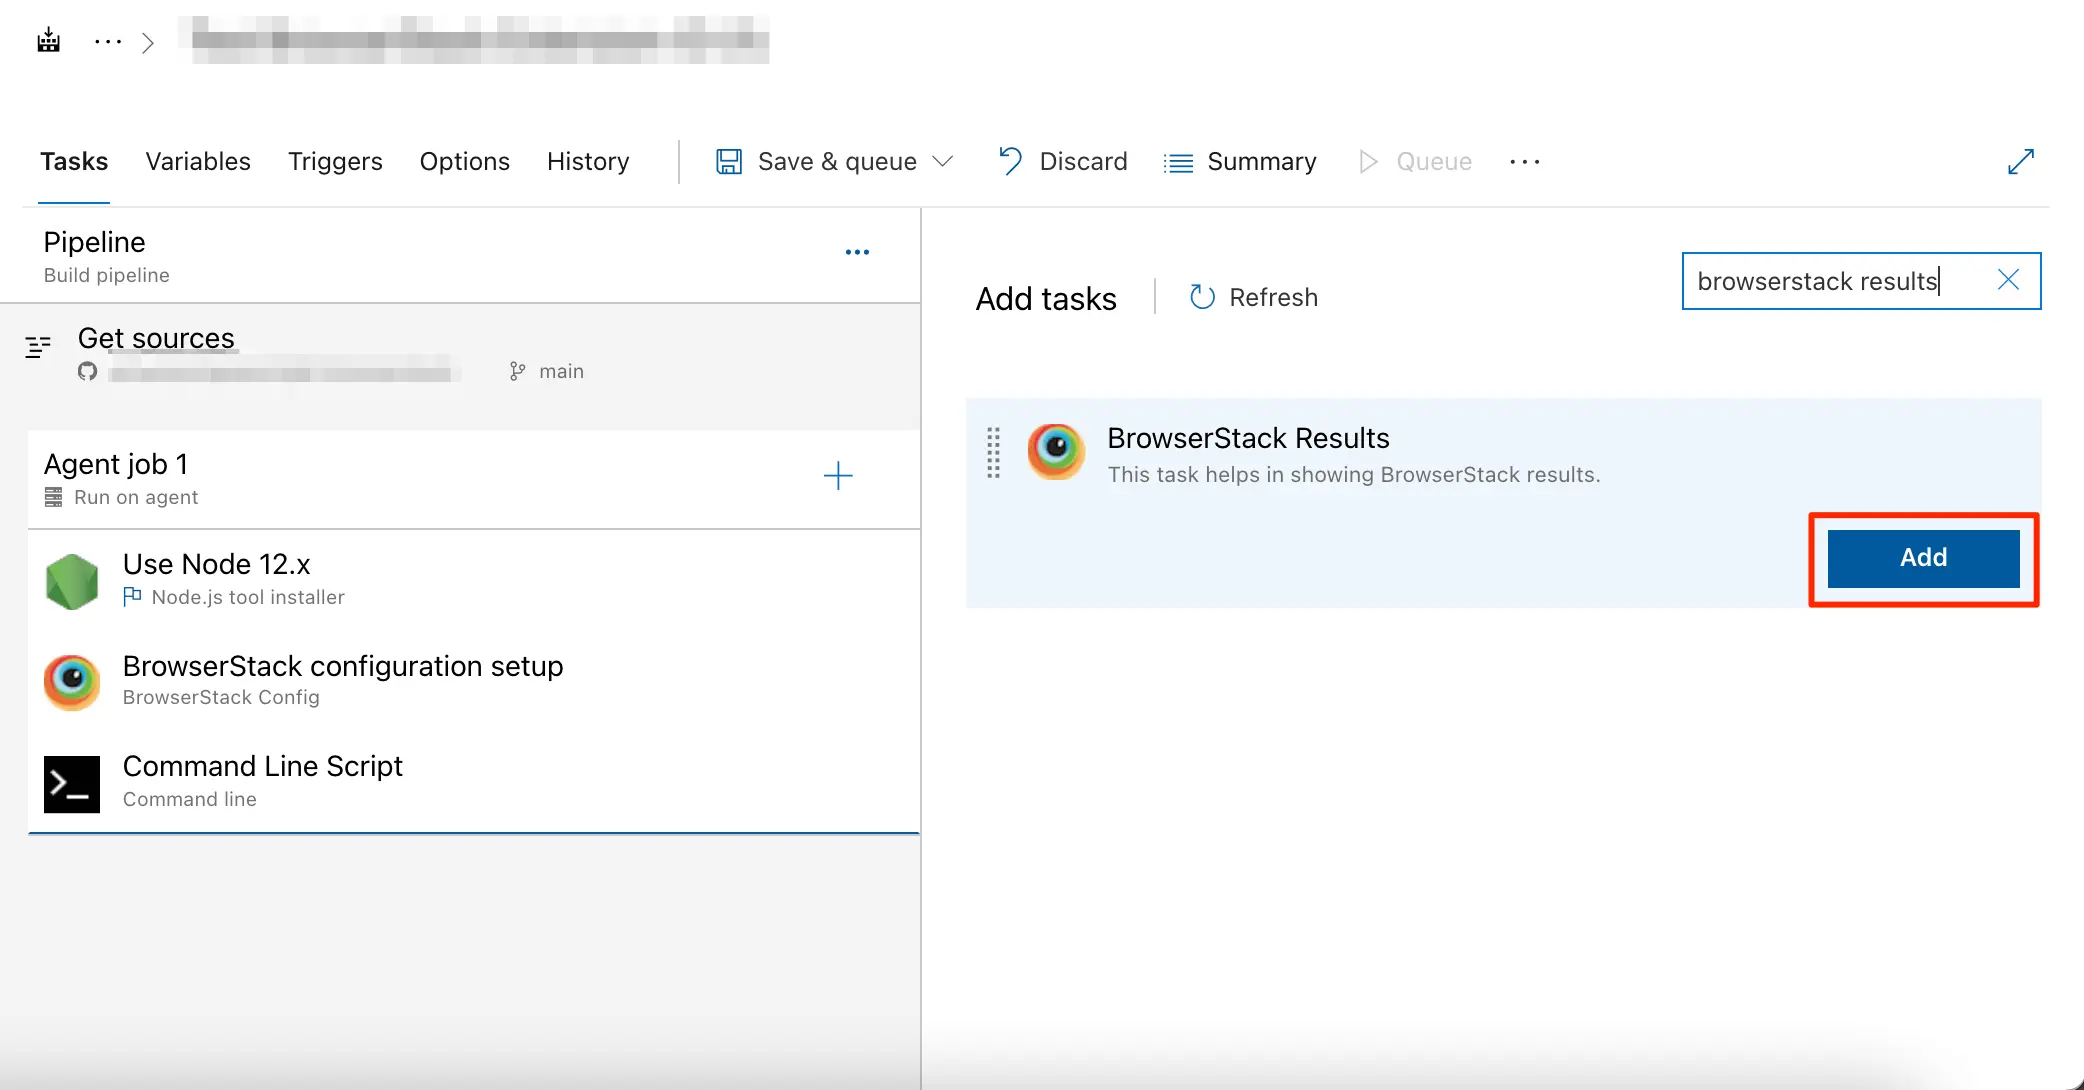
In the pipeline editor, from the Tasks pane, search for the BrowserStack Results task, and then select it.
-
In the BrowserStack Results section, enter
automatein the Enter the product in use field, and then click Add.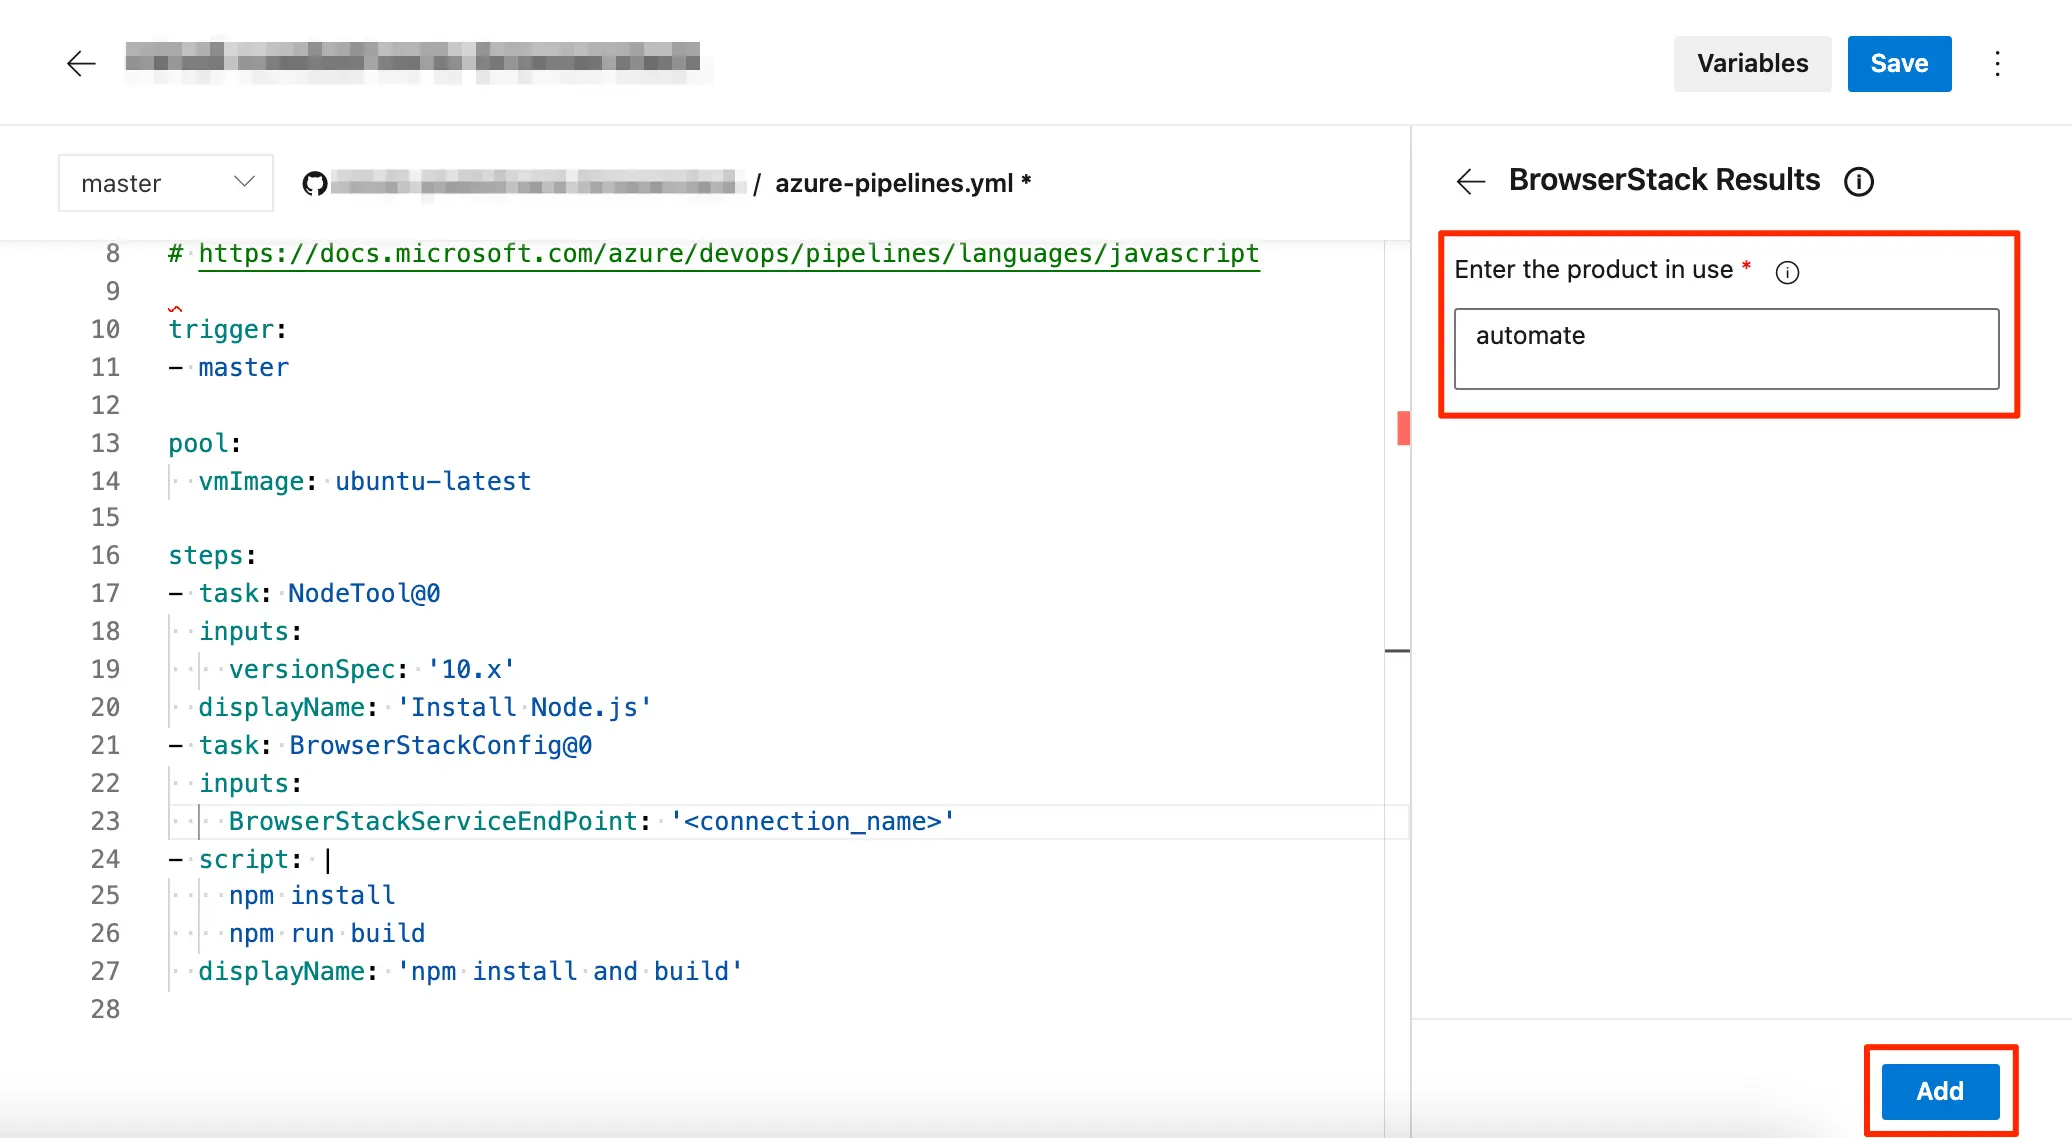
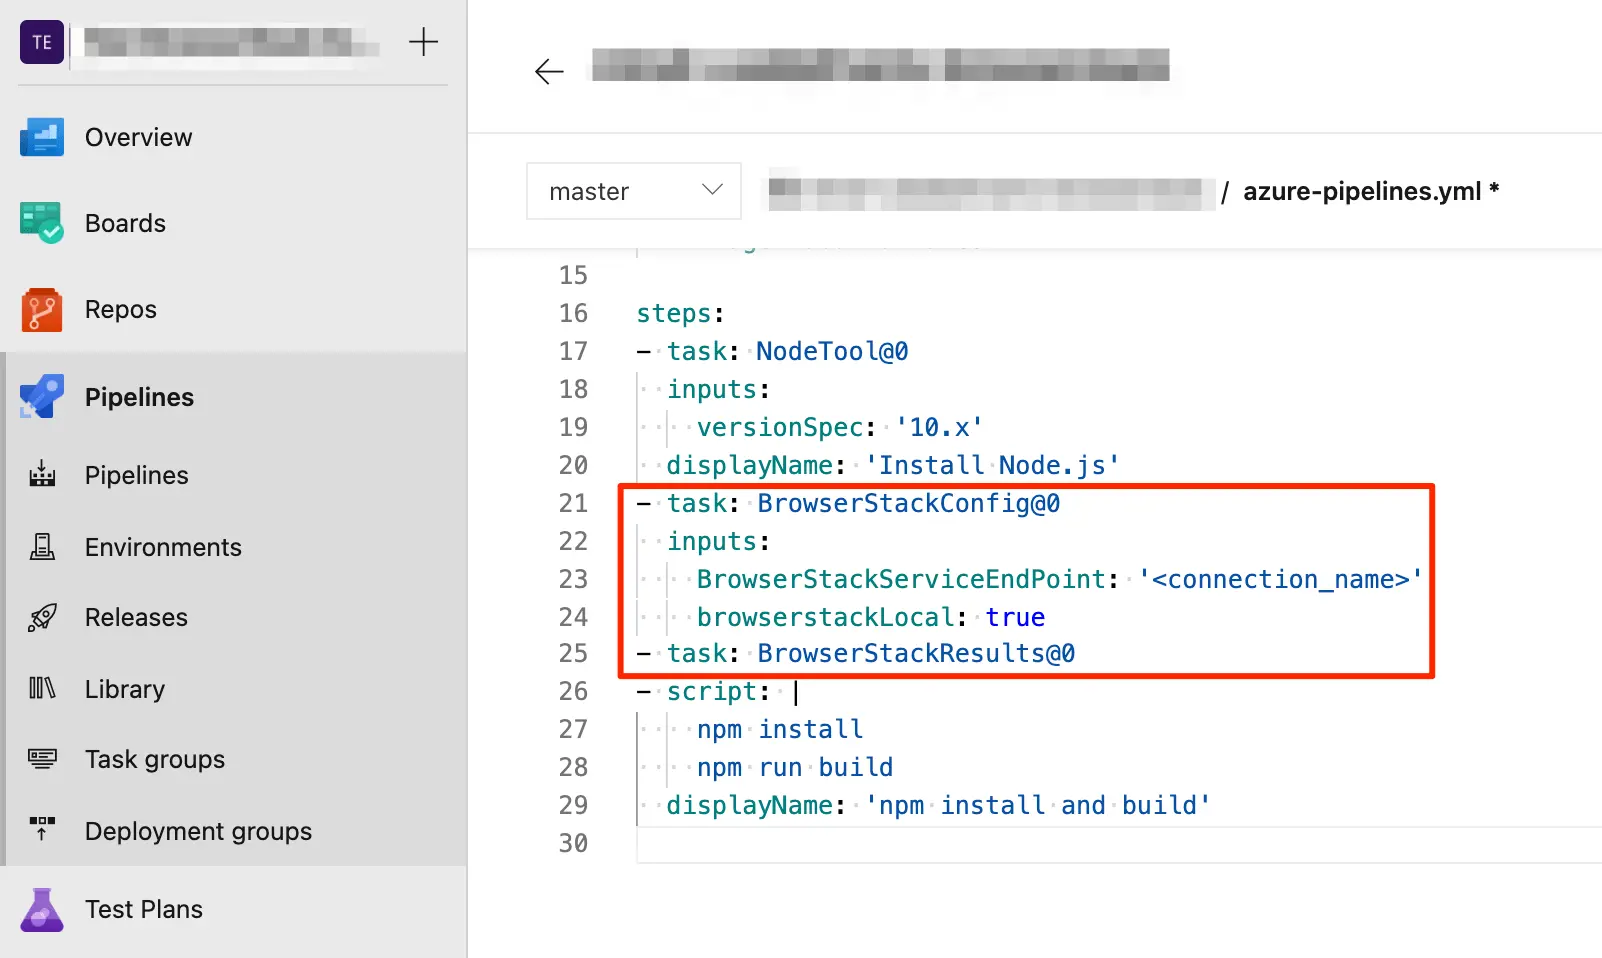
The following image shows the azure-pipelines.yml file with all the BrowserStack tasks configured to run your test on BrowserStack.

Ensure to set the build capability in your test script using the environment variable BROWSERSTACK_BUILD_NAME. The extension will fail to embed test reports in your pipeline if this capability is missing. Check out Edit your test script to call environment variables to learn more.
-
Open the Azure portal page and click My Azure DevOps Organizations.
-
In the Azure DevOps Organizations page, select the project from the given list.
-
In the project’s page, click the
Pipelines option. -
In the Pipelines page, click to select your pipeline.
-
In the pipeline’s page, click Edit to edit your pipeline.
-
In the Tasks tab, click the Add (+) icon next to the Agent Job 1 card.
-
In the Add tasks pane, select the BrowserStack Config task from the tasks list, and click Add.
-
Click the BrowserStack configuration setup card and click + New.
-
Create a new service connection using the following steps in the New service connection screen:
a. Enter your BrowserStack Username.
b. Enter your BrowserStack Access key.
c. Click Verify.
d. After verification succeeds, enter a name for service connection.
e. Click Verify and save.
-
In the Tasks tab, click + on the Agent job 1 card to add the BrowserStack Results task.
-
In the Add tasks panel, from the tasks list, select the BrowserStack Results task and click Add.
-
Click the BrowserStack Results card and enter
automatein the Enter the product in use field.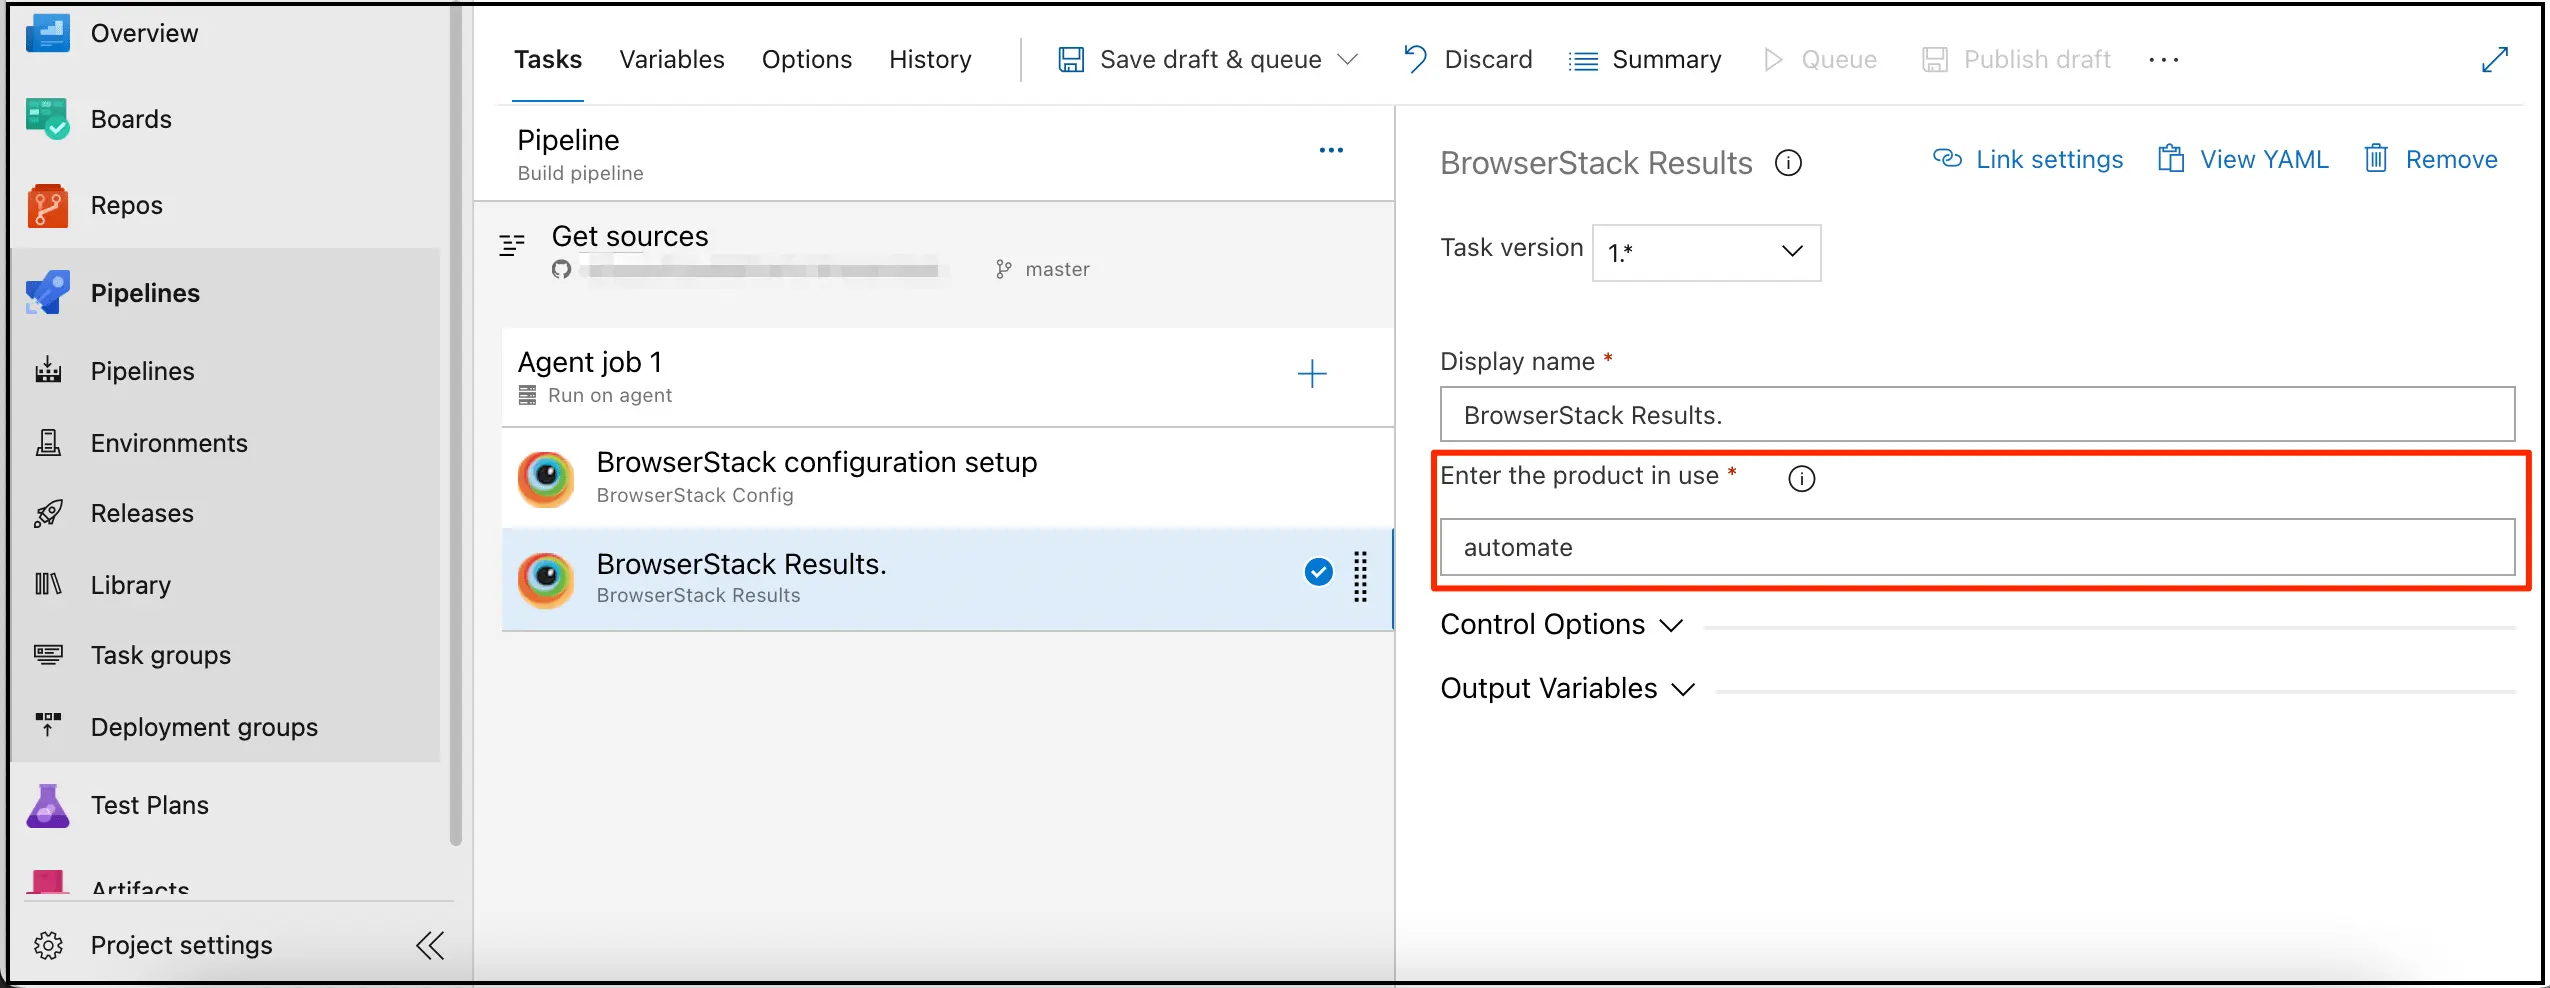
-
Click Save & queue and select Save to save the changes.
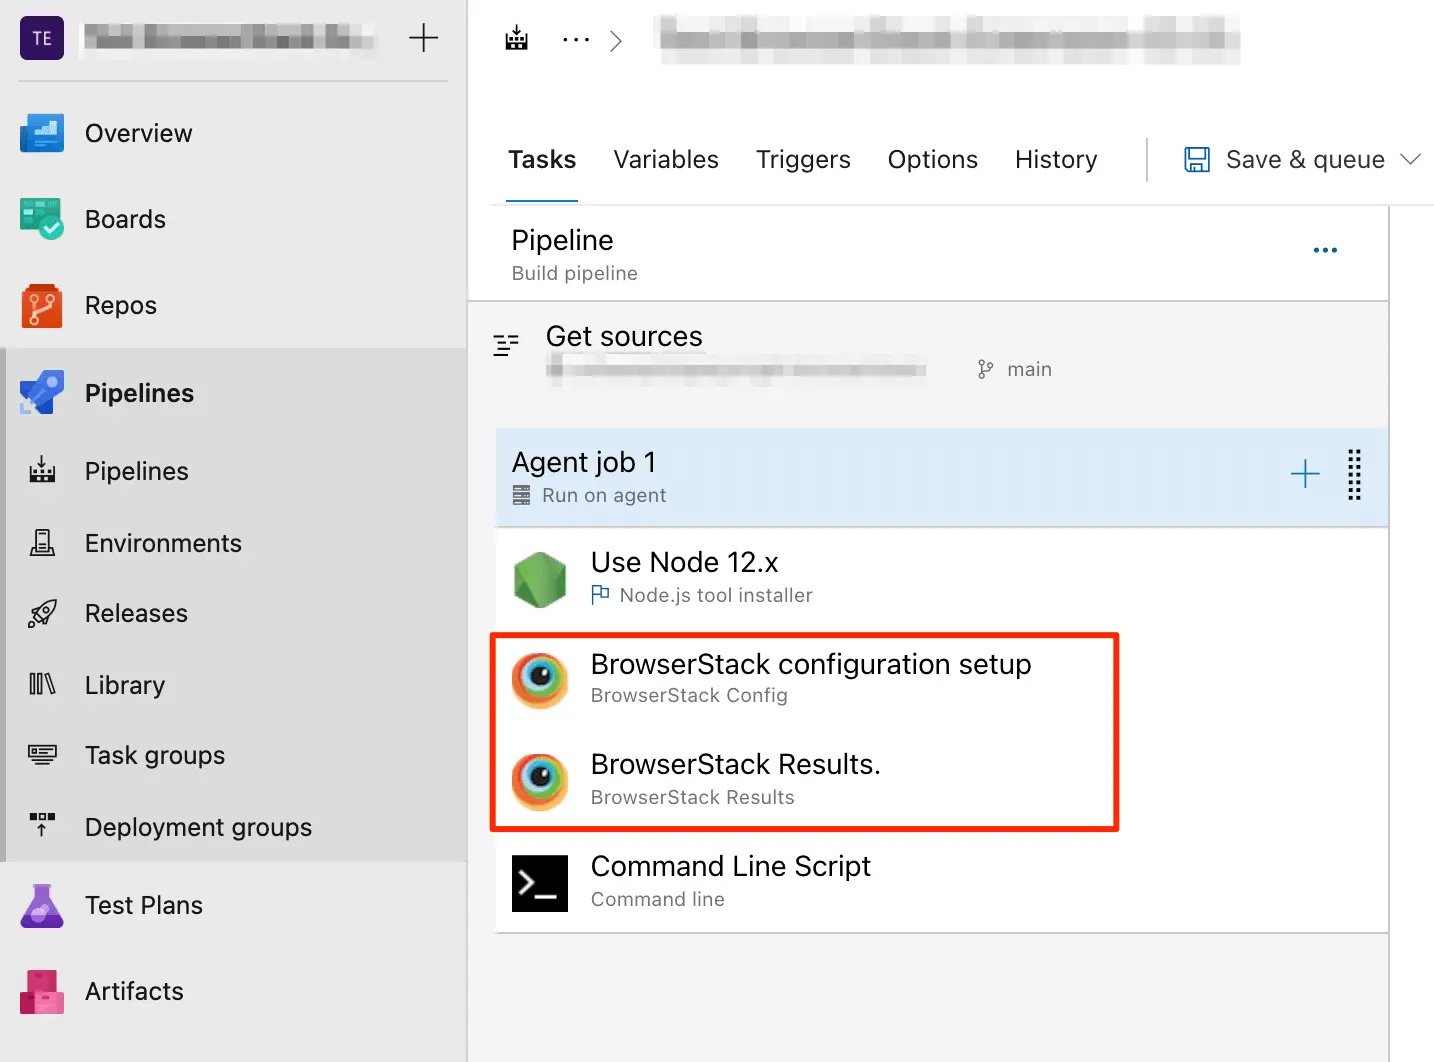
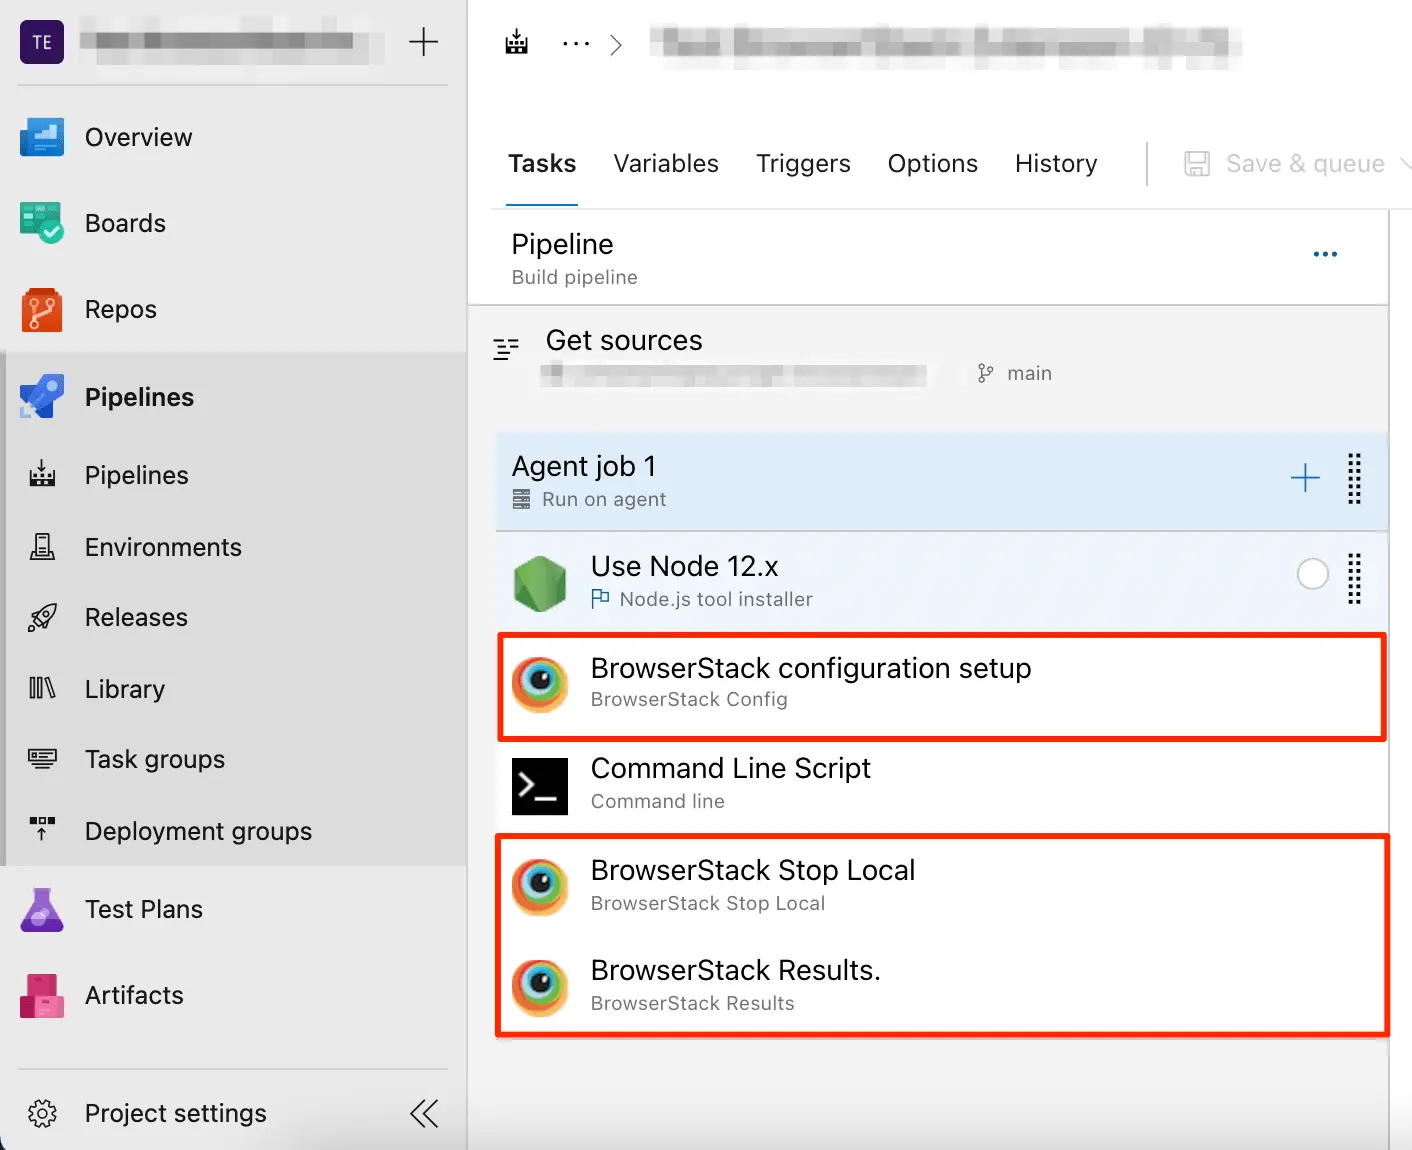
The following image shows all the BrowserStack tasks configured in the pipeline to run your test on BrowserStack.
Ensure to set the build capability in your test script using the environment variable BROWSERSTACK_BUILD_NAME. The extension will fail to embed test reports in your pipeline if this capability is missing. Check out Edit your test script to call environment variables to learn more.
Your build pipeline is successfully configured to connect with the BrowserStack cloud for your project.
Configure BrowserStack Local in Azure Pipelines
Use BrowserStack Local Testing to test your web applications hosted on private, development, and internal servers. With the BrowserStack Local Testing binary, you can create a secure, private connection between the BrowserStack Selenium Grid and your internal servers.
Configuring BrowserStack Local involves:
- Setting environment variables
- Editing test scripts to use environment variables
- Starting the BrowserStack Local
- Stopping the BrowserStack Local
- Using BrowserStack Local when behind proxy
Set variables for BrowserStack Azure DevOps Extension
The BrowserStack Azure DevOps extension, by default, sets the following environment variables:
BROWSERSTACK_USERNAME
BROWSERSTACK_ACCESS_KEY
BROWSERSTACK_LOCAL
BROWSERSTACK_LOCAL_IDENTIFIER
BROWSERSTACK_BUILD_NAME
When you create a service connection, the BROWSERSTACK_USERNAME and the BROWSERSTACK_ACCESS_KEY are automatically added as variables during the configuration step.
In addition, when you add the BrowserStack Config task in your pipeline, the BROWSERSTACK_LOCAL and BROWSERSTACK_LOCAL_IDENTIFIER environment variables are set automatically by the extension.
The extension also adds the BROWSERSTACK_BUILD_NAME variable that autogenerates a build name for your test runs.
Edit your test script to call environment variables
Edit your test script to add the environment variables for setting capabilities using the following code snippets:
Ensure to pass the browserstackLocal and localIdentifier capabilities to run tests on your local development servers.
String username = System.getenv("BROWSERSTACK_USERNAME");
String accessKey = System.getenv("BROWSERSTACK_ACCESS_KEY");
String buildName = System.getenv("BROWSERSTACK_BUILD_NAME");
String local = System.getenv("BROWSERSTACK_LOCAL");
String Localidentifier = System.getenv("BROWSERSTACK_LOCAL_IDENTIFIER");

MutableCapabilities capabilities = new MutableCapabilities();
capabilities.setCapability("browserName", "Chrome");
capabilities.setCapability("browserVersion", "100.0");
HashMap<String, Object> browserstackOptions = new HashMap<String, Object>();
browserstackOptions.put("os", "Windows");
browserstackOptions.put("osVersion", "10");
browserstackOptions.put("sessionName", "BStack Build Name: " + buildName); // CI/CD job name using BROWSERSTACK_BUILD_NAME env variable
browserstackOptions.put("local", local);
browserstackOptions.put("localIdentifier", localIdentifier);
browserstackOptions.put("seleniumVersion", "4.0.0");
capabilities.setCapability("bstack:options", browserstackOptions);

WebDriver driver = new RemoteWebDriver(new URL("https://" + username + ":" + accessKey + "@hub.browserstack.com/wd/hub"), capabilities);
username = process.env.BROWSERSTACK_USERNAME
accessKey = process.env.BROWSERSTACK_ACCESS_KEY
buildName = process.env.BROWSERSTACK_BUILD_NAME
local = process.env.BROWSERSTACK_LOCAL
localIdentifier = process.env.BROWSERSTACK_LOCAL_IDENTIFIER

var capabilities = {
  'bstack:options' : {
    "os" : "Windows",
    "osVersion" : "10",
    "sessionName" : "BStack Build Name: " + buildName, // CI/CD job name using BROWSERSTACK_BUILD_NAME env variable
    "local" : local,
    "localIdentifier" : localIdentifier,
    "userName" : username,
    "accessKey" : accessKey,
    "seleniumVersion" : "4.0.0",
  },
    "browserName" : "Chrome",
    "browserVersion" : "100.0",
}

var driver = new webdriver.Builder().
  usingServer("https://hub-cloud.browserstack.com/wd/hub").
  withCapabilities(capabilities).
  build();
String username = Environment.GetEnvironmentVariable("BROWSERSTACK_USERNAME");
String accessKey = Environment.GetEnvironmentVariable("BROWSERSTACK_ACCESS_KEY");
String buildName = Environment.GetEnvironmentVariable("BROWSERSTACK_BUILD_NAME");
String local = Environment.GetEnvironmentVariable("BROWSERSTACK_LOCAL");
String localIdentifier = Environment.GetEnvironmentVariable("BROWSERSTACK_LOCAL_IDENTIFIER");

ChromeOptions capabilities = new ChromeOptions();
capabilities.BrowserVersion = "100.0"; // Use latest-beta, latest, latest-1 and so on
Dictionary<string, object> browserstackOptions = new Dictionary<string, object>();
browserstackOptions.Add("os", "Windows");
browserstackOptions.Add("osVersion", "10");
browserstackOptions.Add("sessionName", "BStack Build Name: " + buildName); // CI/CD job name using BROWSERSTACK_BUILD_NAME env variable
browserstackOptions.Add("userName", username);
browserstackOptions.Add("accessKey", accessKey);
browserstackOptions.Add("seleniumVersion", "4.0.0");
browserstackOptions.Add("local", local);
browserstackOptions.Add("localIdentifier", localIdentifier);
capabilities.AddAdditionalOption("bstack:options", browserstackOptions);

driver = new RemoteWebDriver(new Uri("https://hub.browserstack.com/wd/hub/"), capabilities);
$username = getenv('BROWSERSTACK_USERNAME');
$accessKey = getenv('BROWSERSTACK_ACCESS_KEY');
$buildName = getenv('BROWSERSTACK_BUILD_NAME');
$local = getenv('BROWSERSTACK_LOCAL');
$localIdentifier = getenv('BROWSERSTACK_LOCAL_IDENTIFIER');

$caps = array(
'bstack:options' => array(
    "os" => "Windows",
    "osVersion" => "10",
    "sessionName" => "BStack Build Name: ".$buildName, // CI/CD job name using BROWSERSTACK_BUILD_NAME env variable
    "browserstack.local" => "".$local,
    "browserstack.localIdentifier" => "".$localIdentifier
    "seleniumVersion" => "4.0.0",
),
  "browserName" => "Chrome",
  "browserVersion" => "100.0",
);
$web_driver = RemoteWebDriver::create(
  "https://".$username.":".$accessKey."@hub.browserstack.com/wd/hub",
  $caps
);
username = os.environ.get('BROWSERSTACK_USERNAME')
accessKey = os.environ.get('BROWSERSTACK_ACCESS_KEY')
buildName = os.environ.get('BROWSERSTACK_BUILD_NAME')
local = os.environ.get('BROWSERSTACK_LOCAL')
localIdentifier = os.environ.get('BROWSERSTACK_LOCAL_IDENTIFIER')

bstack_options = {
    "os" : "Windows",
    "osVersion" : "10",
    "sessionName" : "BStack Build Name: " + buildName, # CI/CD job name using BROWSERSTACK_BUILD_NAME env variable
    "local": local,
    "localIdentifier": localIdentifier,
    "seleniumVersion" : "4.0.0",
    "userName": username,
    "accessKey": accessKey
}
options = ChromeOptions()
options.set_capability('bstack:options', bstack_options)
driver = webdriver.Remote(
    command_executor="https://hub.browserstack.com/wd/hub",
    options=options)
username = ENV['BROWSERSTACK_USERNAME']
accessKey = ENV['BROWSERSTACK_ACCESS_KEY']
buildName = ENV['BROWSERSTACK_BUILD_NAME']
local = ENV['BROWSERSTACK_LOCAL']
localIdentifier = ENV['BROWSERSTACK_LOCAL_IDENTIFIER']

# to run on Chrome
options = Selenium::WebDriver::Options.chrome
capabilities = {
  'bstack:options' => {
    "os" => "Windows",
    "osVersion" => "10",
    "sessionName" => "BStack Build Name: " + buildName, # CI/CD job name using BROWSERSTACK_BUILD_NAME env variable
    "local" = local,
    "localIdentifier" = localIdentifier,
    "seleniumVersion" => "4.0.0",
  },
  "browserName" => "Chrome",
  "browserVersion" => "100.0",
}

options.add_option('bstack:options', bstack_options)
driver = Selenium::WebDriver.for(:remote,
  :url => "https://"+username+":"+accessKey+"@hub.browserstack.com/wd/hub",
  :capabilities => options)
Ensure to pass the browserstackLocal and localIdentifier capabilities to run tests on your local development servers.
String username = System.getenv("BROWSERSTACK_USERNAME");
String accessKey = System.getenv("BROWSERSTACK_ACCESS_KEY");
String browserstackLocal = System.getenv("BROWSERSTACK_LOCAL");
String buildName = System.getenv("BROWSERSTACK_BUILD_NAME");
String browserstackLocalIdentifier = System.getenv("BROWSERSTACK_LOCAL_IDENTIFIER");

DesiredCapabilities capabilities = new DesiredCapabilities();
capabilities.setCapability("os", "Windows");
capabilities.setCapability("browser", "chrome");
capabilities.setCapability("build", buildName); // CI/CD job name using BROWSERSTACK_BUILD_NAME env variable
capabilities.setCapability("browserstack.local", browserstackLocal);
capabilities.setCapability("browserstack.localIdentifier", browserstackLocalIdentifier);

driver = new RemoteWebDriver(new URL("https://" + username + ":" + accessKey + "@hub.browserstack.com/wd/hub"), capabilities);
username = process.env.BROWSERSTACK_USERNAME
accessKey = process.env.BROWSERSTACK_ACCESS_KEY
var buildName = process.env.BROWSERSTACK_BUILD_NAME;
browserstackLocal = process.env.BROWSERSTACK_LOCAL
browserstackLocalIdentifier = process.env.BROWSERSTACK_LOCAL_IDENTIFIER

var capabilities = {
 "os" : "Windows",
 "browser" : "chrome",
 	"build" : buildName, // CI/CD job name using BROWSERSTACK_BUILD_NAME env variable
 "browserstack.local" : browserstackLocal,
 "browserstack.localIdentifier" : browserstackLocalIdentifier,
 "browserstack.user" : username,
 "browserstack.key" : accessKey
}

var driver = new webdriver.Builder().
  usingServer("https://hub-cloud.browserstack.com/wd/hub").
  withCapabilities(capabilities).
  build();
username = Environment.GetEnvironmentVariable("BROWSERSTACK_USERNAME");
accessKey = Environment.GetEnvironmentVariable("BROWSERSTACK_ACCESS_KEY");
buildName = Environment.GetEnvironmentVariable("BROWSERSTACK_BUILD_NAME");
browserstackLocal = Environment.GetEnvironmentVariable("BROWSERSTACK_LOCAL");
browserstackLocalIdentifier = Environment.GetEnvironmentVariable("BROWSERSTACK_LOCAL_IDENTIFIER");

IWebDriver driver;
OpenQA.Selenium.Chrome.ChromeOptions capability = new OpenQA.Selenium.Chrome.ChromeOptions();
capability.setCapability("os", "Windows", true);
capability.AddAdditionalCapability("os_version", "10", true);
capability.AddAdditionalCapability("browser", "Chrome", true);
capability.AddAdditionalCapability("browser_version", "latest", true); // Use latest-beta, latest, latest-1 and so on
capability.AddAdditionalCapability("name", "BStack-[Azure] Sample Test", true); // test name
capability.AddAdditionalCapability("build", buildName, true); // CI/CD job name using BROWSERSTACK_BUILD_NAME env variable
capability.AddAdditionalCapability("browserstack.local", browserstackLocal, true);
capability.AddAdditionalCapability("browserstack.localIdentifier", browserstackLocalIdentifier, true);
capability.AddAdditionalCapability("browserstack.user", username, true);
capability.AddAdditionalCapability("browserstack.key", accessKey, true);

driver = new RemoteWebDriver(new Uri("https://hub-cloud.browserstack.com/wd/hub/"), capability);
$username = getenv("BROWSERSTACK_USERNAME");
$accessKey = getenv("BROWSERSTACK_ACCESS_KEY");
$buildName = getenv("BROWSERSTACK_BUILD_NAME");
$browserstackLocal = getenv("BROWSERSTACK_LOCAL");
$browserstackLocalIdentifier = getenv("BROWSERSTACK_LOCAL_IDENTIFIER");

$caps = array(
  "os" => "Windows",
  "browser" => "chrome",
  "build" => $buildName, // CI/CD job name using BROWSERSTACK_BUILD_NAME env variable
  "browserstack.local" => $browserstackLocal,
  "browserstack.localIdentifier" => $browserstackLocalIdentifier
);

$web_driver = RemoteWebDriver::create(
  "https://" . $username . ":" . $accessKey . "@hub-cloud.browserstack.com/wd/hub",
  $caps
);
username = os.getenv("BROWSERSTACK_USERNAME")
access_key = os.getenv("BROWSERSTACK_ACCESS_KEY")
build_name = os.getenv("BROWSERSTACK_BUILD_NAME")
browserstack_local = os.getenv("BROWSERSTACK_LOCAL")
browserstack_local_identifier = os.getenv("BROWSERSTACK_LOCAL_IDENTIFIER")

caps = {
 'os': 'Windows',
 'browser': 'chrome',
 'build': build_name, # CI/CD job name using BROWSERSTACK_BUILD_NAME env variable
 'browserstack.local': browserstack_local,
 'browserstack.localIdentifier': browserstack_local_identifier,
 'browserstack.user': username,
 'browserstack.key': access_key
}

driver = webdriver.Remote(
    command_executor='https://hub-cloud.browserstack.com/wd/hub',
    desired_capabilities=caps)
username = ENV["BROWSERSTACK_USERNAME"]
access_key = ENV["BROWSERSTACK_ACCESS_KEY"]
build_name = ENV["BROWSERSTACK_BUILD_NAME"]
browserstack_local = ENV["BROWSERSTACK_LOCAL"]
browserstack_local_identifier = ENV["BROWSERSTACK_LOCAL_IDENTIFIER"]

caps = Selenium::WebDriver::Remote::Capabilities.new
caps["os"] = "Windows"
caps["browser"] = "chrome"
caps["build"] = build_name # CI/CD job name using BROWSERSTACK_BUILD_NAME env variable
caps["browserstack.local"] = browserstack_local
caps["browserstack.localIdentifier"] = browserstack_local_identifier
caps["browserstack.user"] = username
caps["browserstack.key"] = YOUR_ACCESS_KEY

driver = Selenium::WebDriver.for(:remote,
  :url => "https://hub-cloud.browserstack.com/wd/hub",
  :desired_capabilities => caps)
Ensure to pass the BROWSERSTACK_LOCAL and BROWSERSTACK_LOCAL_IDENTIFIER capabilities to run tests on your local development servers.
To address the Build x not found error, ensure you set the environment variable BROWSERSTACK_TEST_RUN_NAME to match the auto-generated build name of the BrowserStack Azure plugin. This can be achieved using the following command:
export BROWSERSTACK_TEST_RUN_NAME=$BROWSERSTACK_BUILD_NAME
By doing this, the test name will align with the build name generated by the BrowserStack Azure plugin, preventing the error.
Add task to start BrowserStack Local
When you add the BrowserStack Config task, you have an option to select BrowserStack Local to run your tests on any development or staging environment. Based on the editor you used to create your pipeline, refer to the steps in the following tabs:
-
Navigate to your pipeline and click Edit.
-
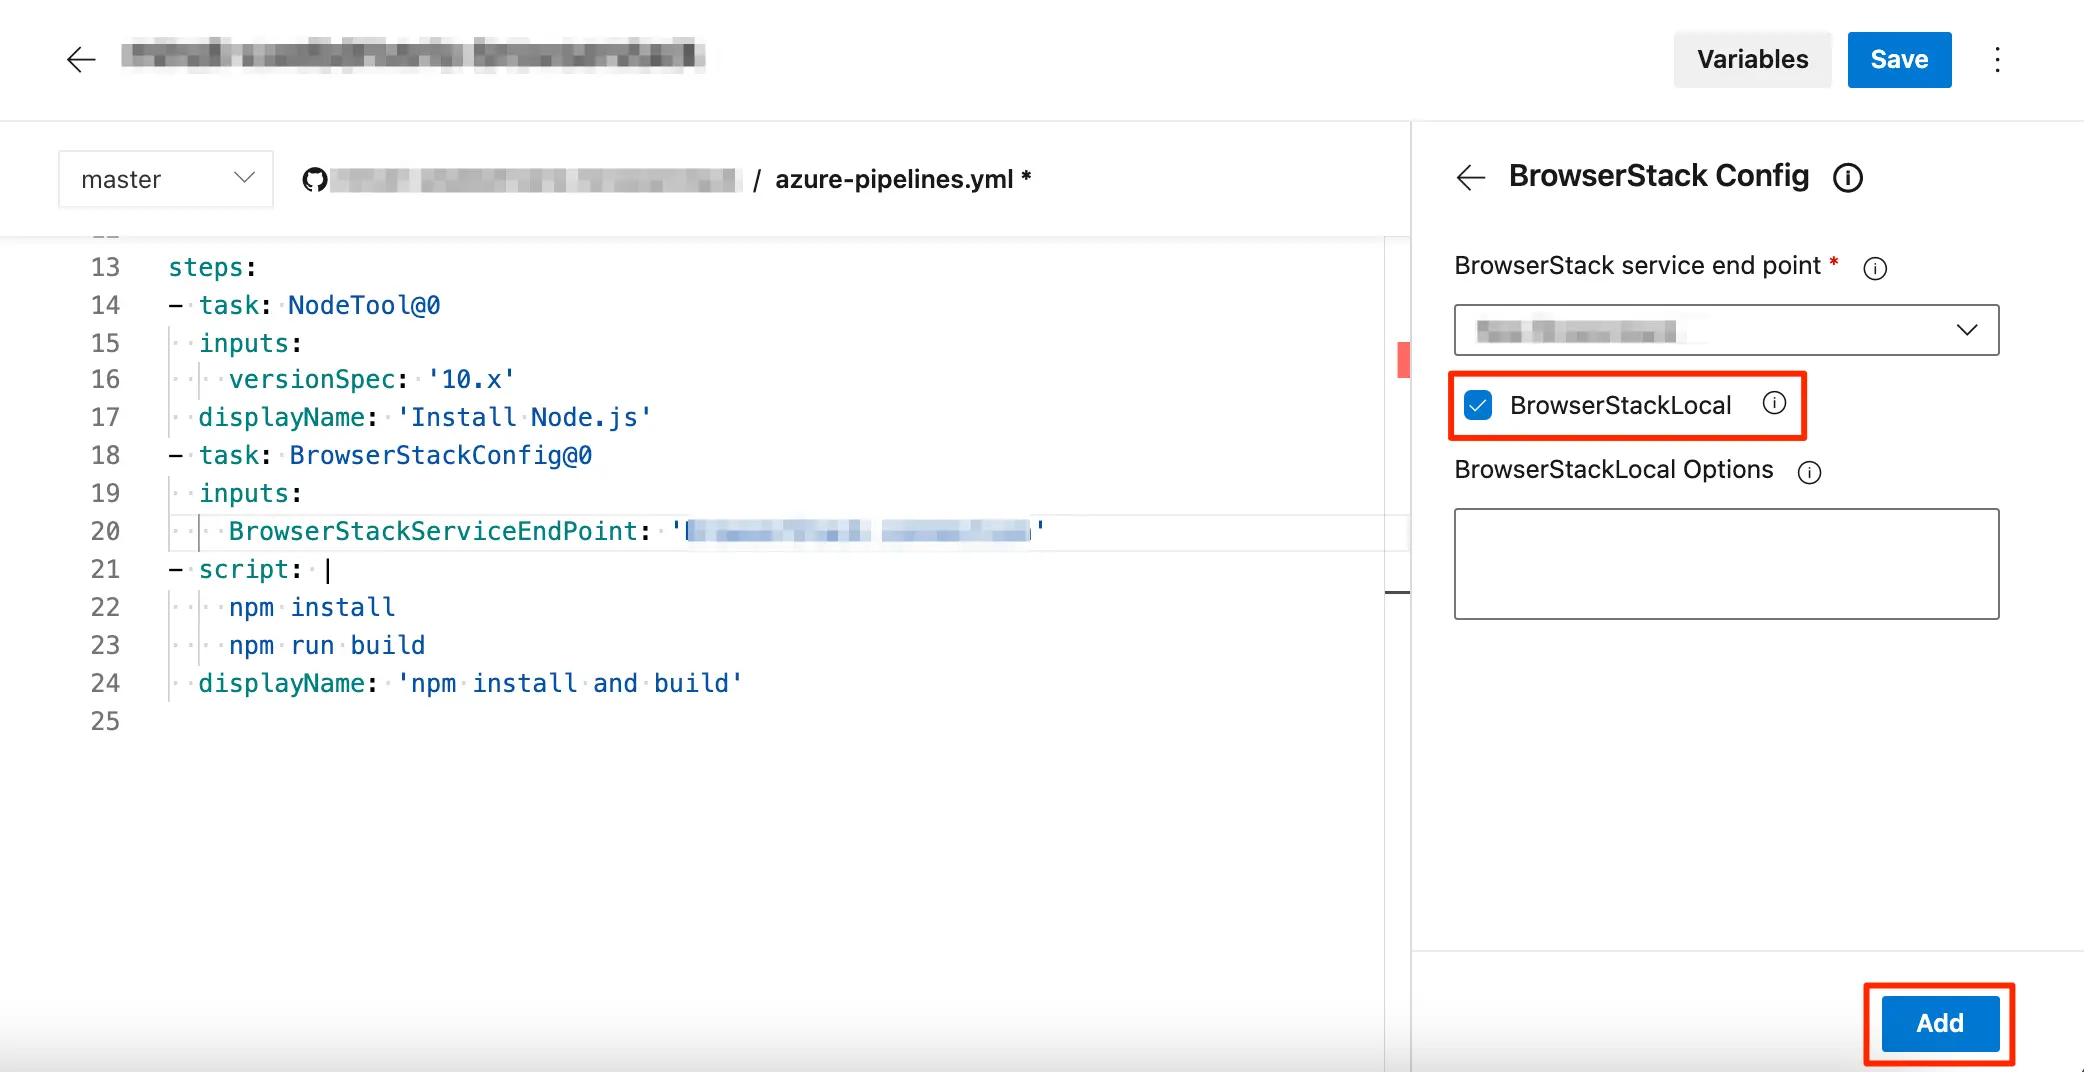
In the Tasks pane, select BrowserStack Config from the tasks list.
-
Select the service endpoint you created earlier.
-
Select the BrowserStackLocal checkbox, and then click Add.
 Note: You can set additional configuration options, such as enabling verbose logging, for the Local binary in the BrowserStackLocal Options input field. Check out Set Additional Configuration options to learn more.
 -
In the Tasks pane, select BrowserStack Results from the tasks list.
-
In the BrowserStack Results section, enter
automatein the Enter the product in use field, and then click Add.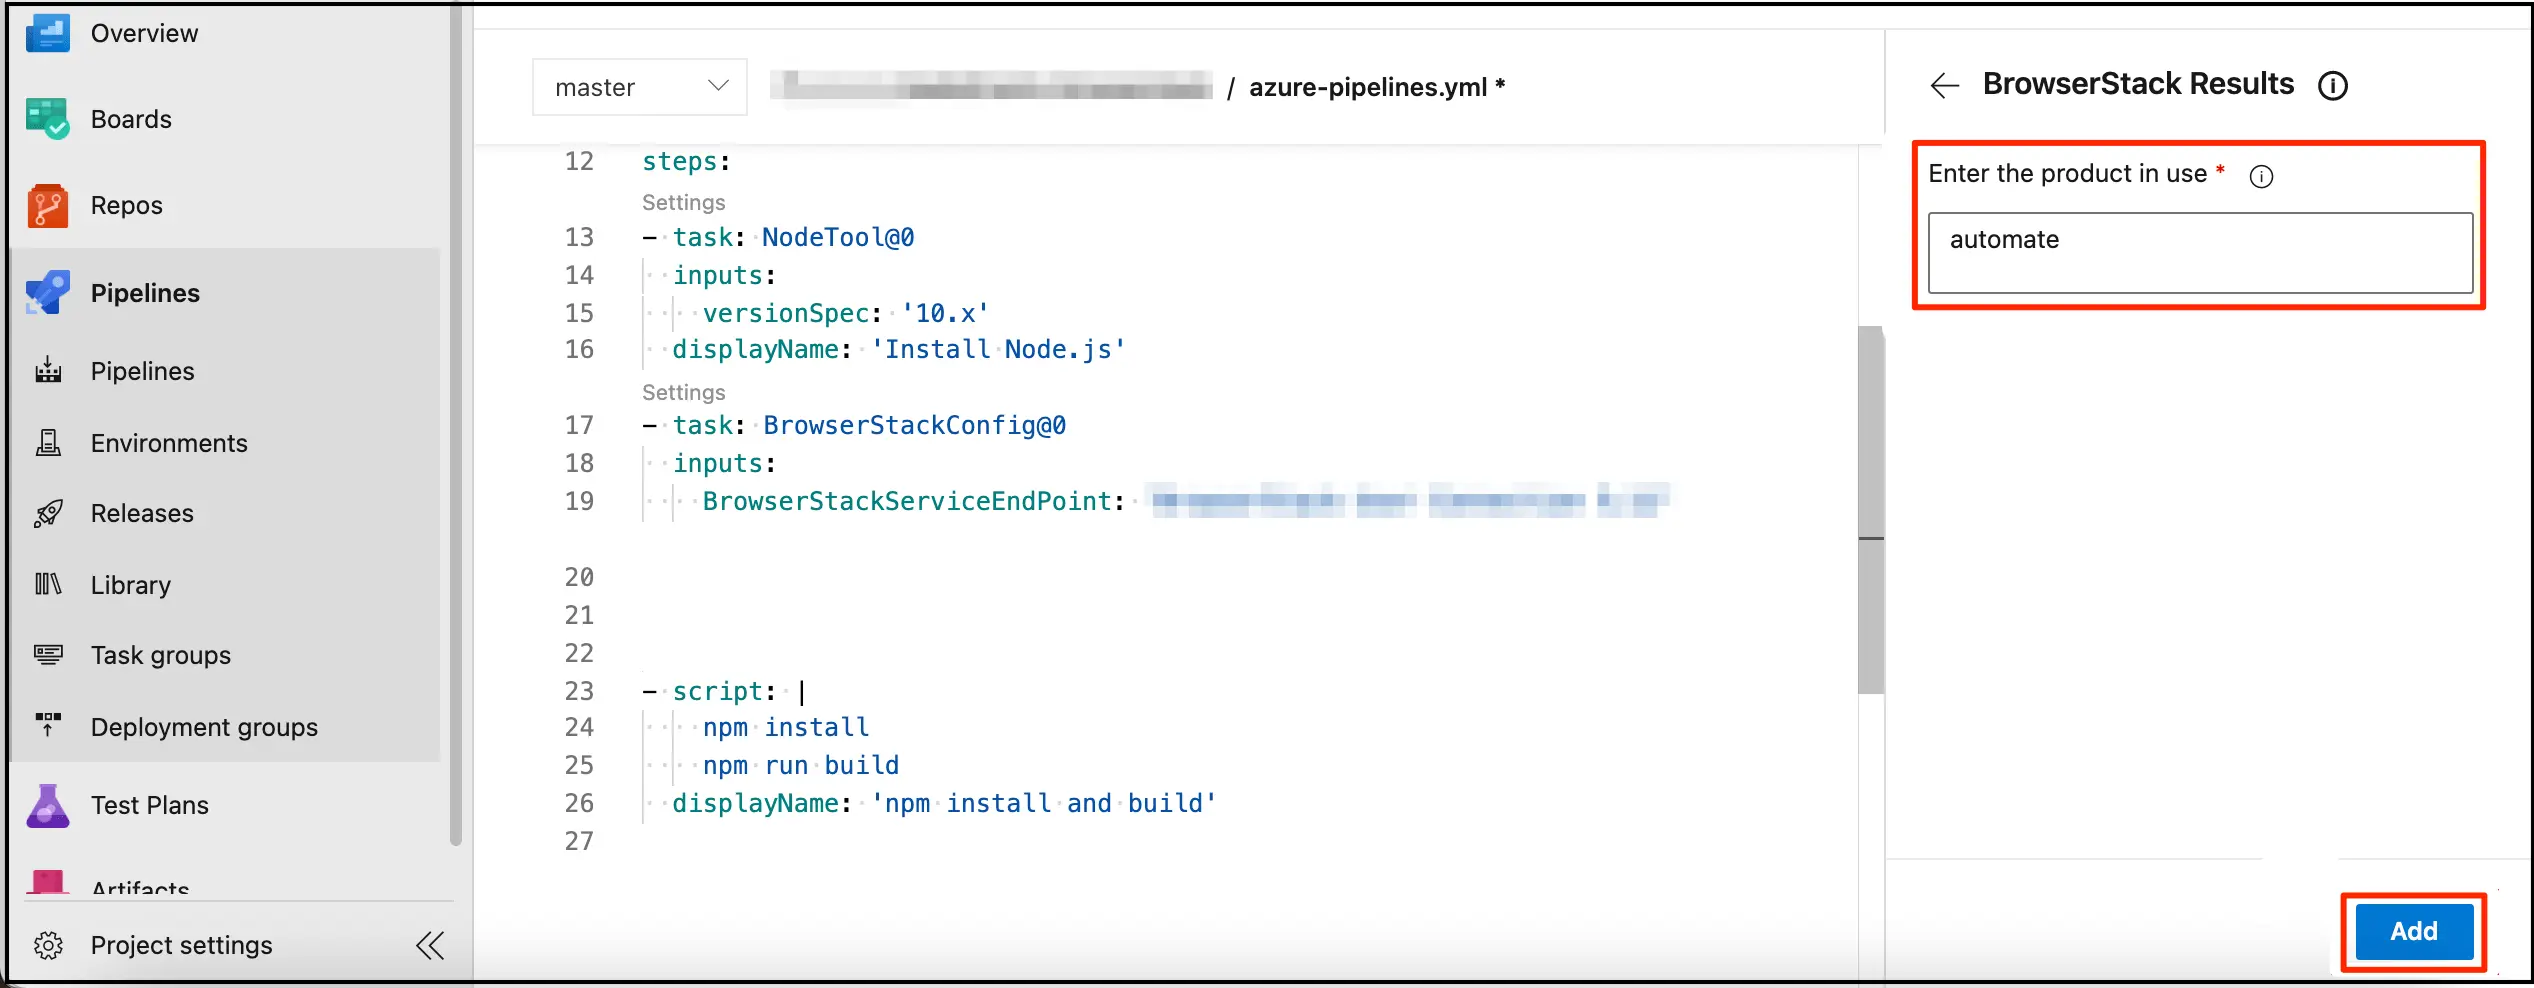
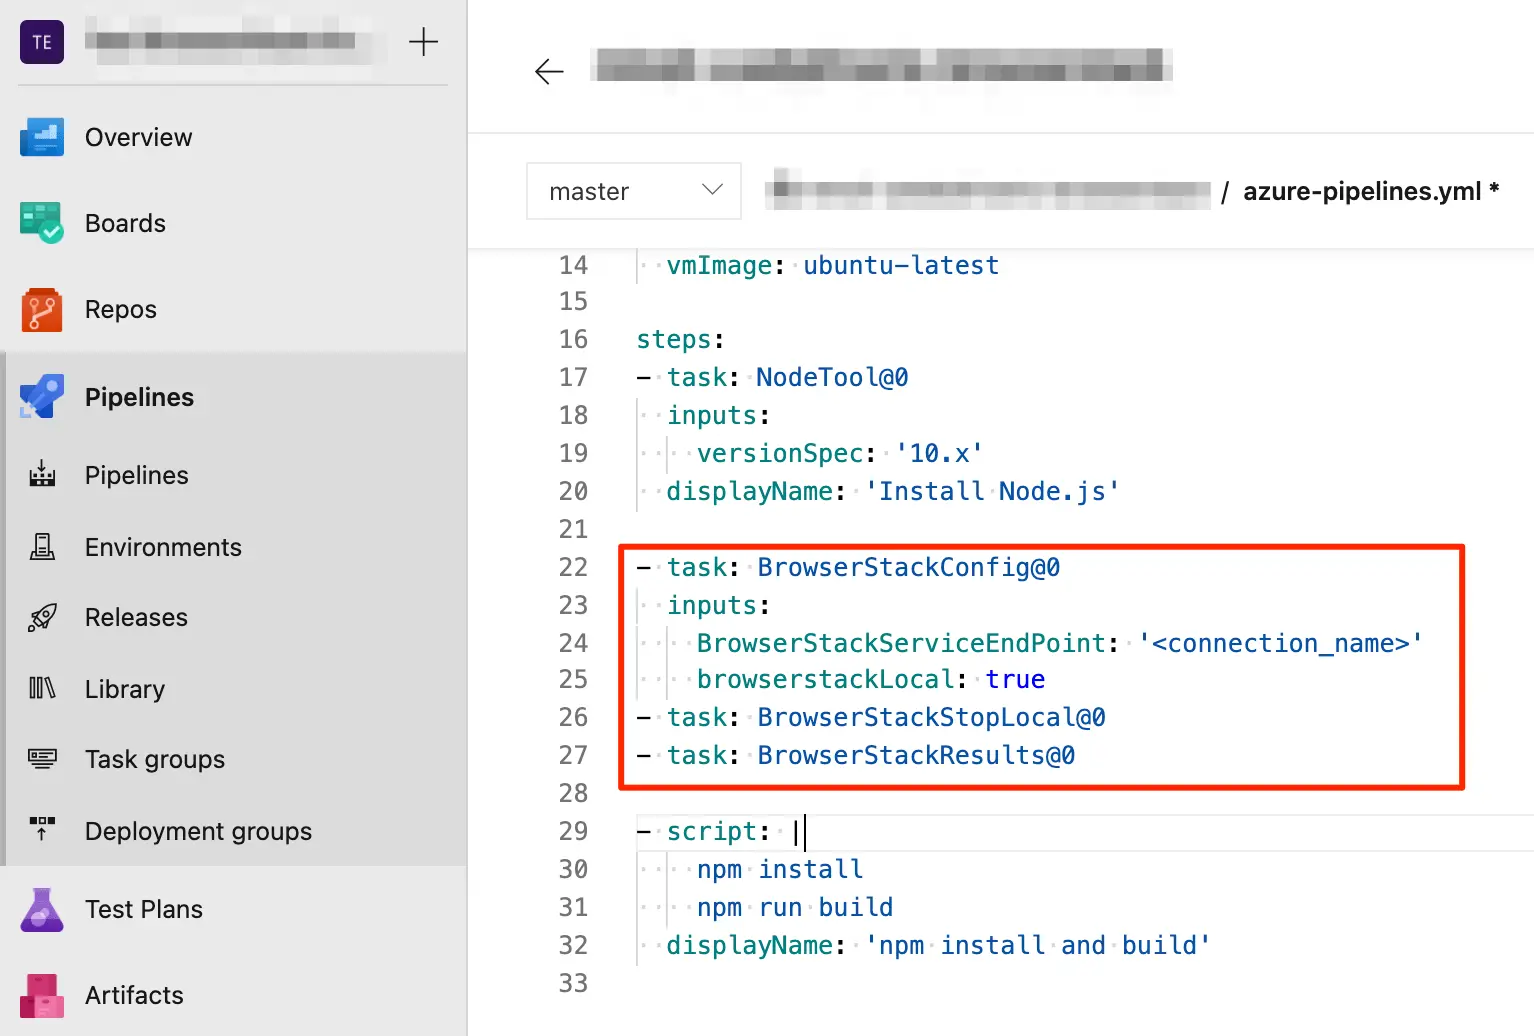
The following image shows the azure-pipelines.yml file with all the BrowserStack tasks and local configured to run your test on BrowserStack.
-
Navigate to your pipeline page and click Edit.
-
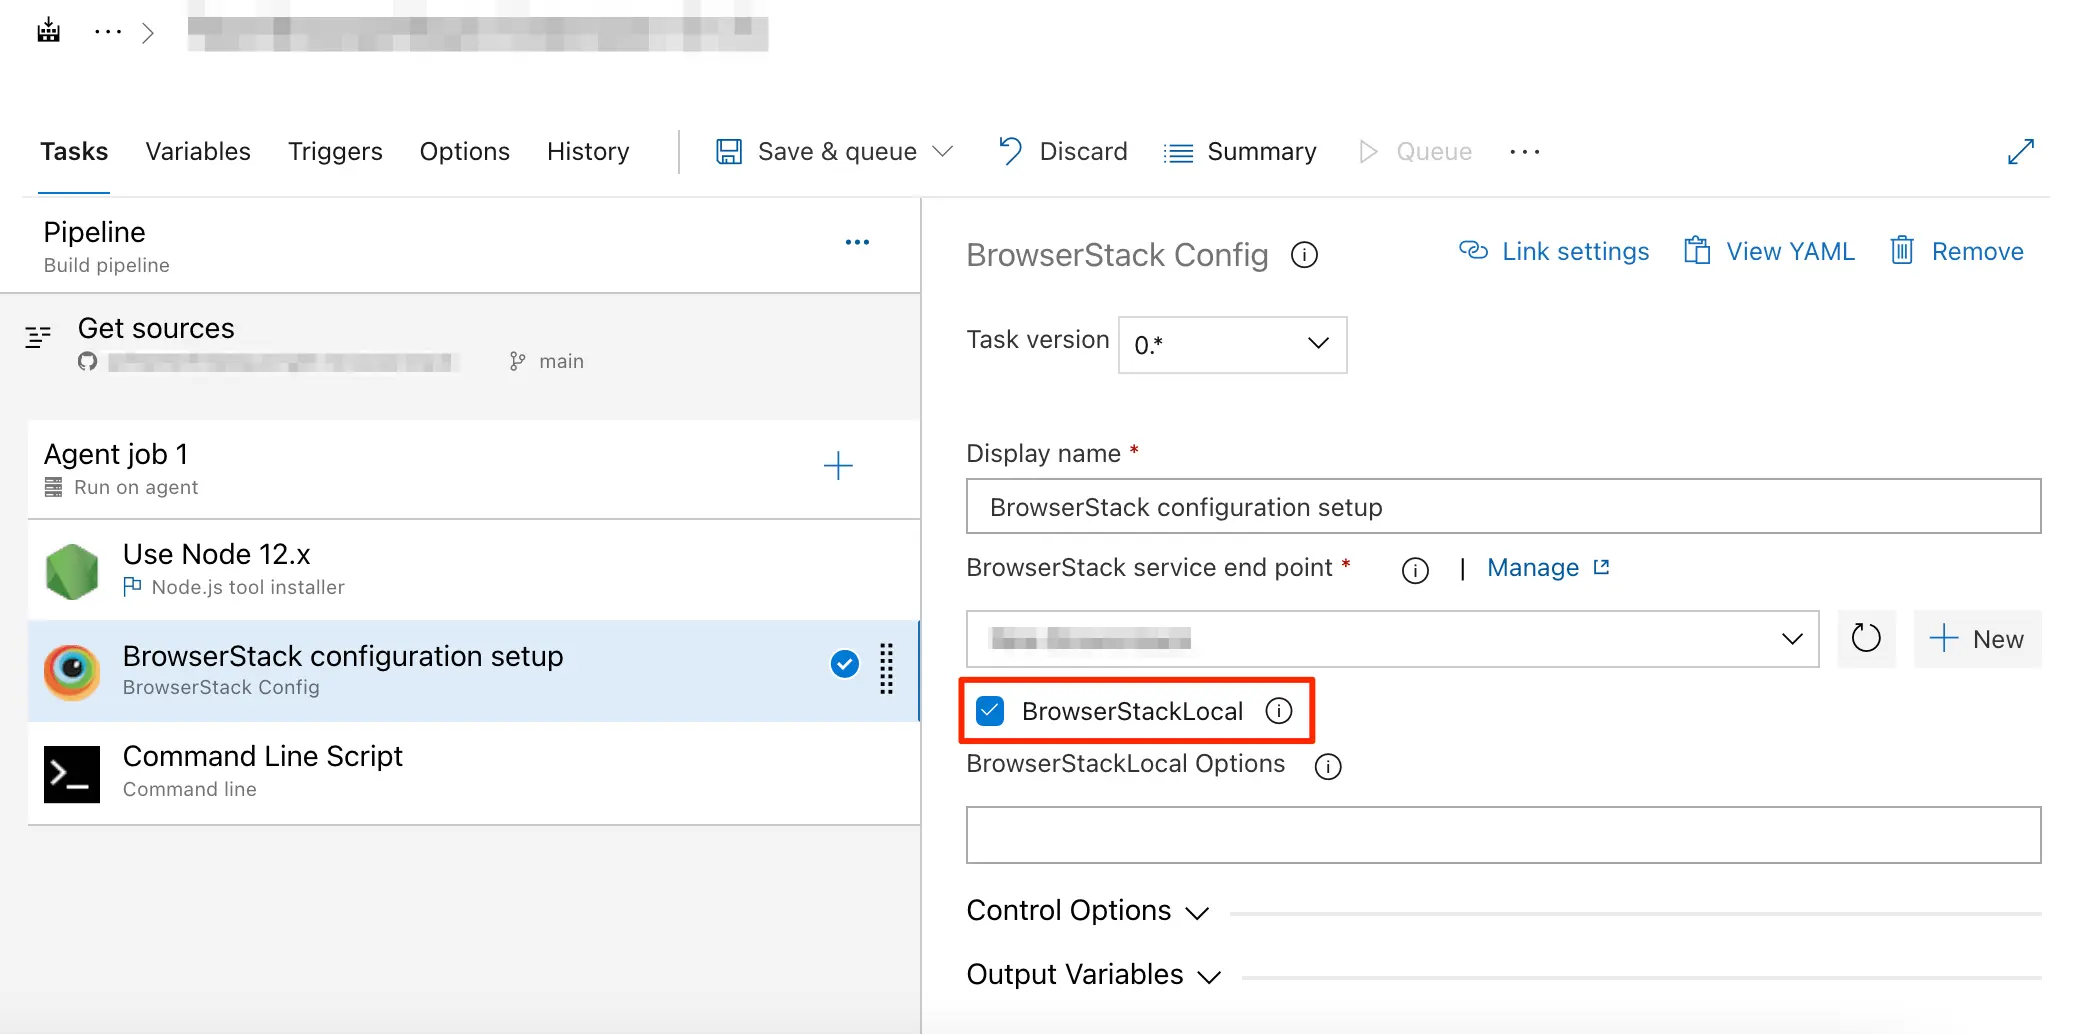
In the Tasks tab, click the BrowserStack configuration setup card.
-
In the BrowserStack Config section, select the BrowserStackLocal checkbox.
 Note: You can set additional configuration options, such as enabling verbose logging, for the Local binary in the BrowserStackLocal Options input field. Check out Set Additional Configuration options to learn more.
 -
In the Tasks tab, click + on the Agent job 1 card to add the BrowserStack Results task.
-
In the Add tasks panel, from the tasks list, select the BrowserStack Results task and click Add.
-
Click the BrowserStack Results card and enter
automatein the Enter the product in use field. -
Click Save & queue and select Save to save the changes.
The following image shows the azure-pipelines.yml file with all the BrowserStack tasks and local configured to run your test on BrowserStack.
You must pass browserstack.local and browserstack.localIdentifier capabilities to test on your local development servers.
Set Proxy URL in the Pipeline
If your application is behind a proxy setup, you can specify the proxy host and port details as environment variables in Azure DevOps. Adding this information as variables ensures that the Local Testing binary passes test traffic through it.
Based on the type of proxy, either HTTP or HTTPS, you can set the value for HTTP_PROXY or HTTPS_PROXY, respectively, as shown:
HTTP_PROXY = "http://proxy-host>:<proxy-port>"

HTTPS_PROXY = "https://<proxy-host>:<proxy-port>"
If the proxy requires authentication, pass the credentials in the format of a basic auth URL, as follows:
HTTP_PROXY = "http://<username>:<password>@<proxy-host>:<proxy-port>"

HTTPS_PROXY = "https://<username>:<password>@<proxy-host>:<proxy-port>"
Depending on the editor you used to create your pipeline, refer to the steps in the following tabs:
-
Navigate to your pipeline and click Edit.
-
Click Variables located at the top-right corner of the page.
-
In the Variables section, click New Variable.
-
In the Variables section, enter
HTTP_PROXYorHTTPS_PROXYin the Name field, and enter its value, such ashttp://127.0.0.1:8080, in the Value field. -
Click OK.
-
In the Variables section, click Save.
-
Navigate to your pipeline and click Edit.
-
Click the Variables tab to view a list of predefined variables with their respective values in the Pipeline variables section.
-
Click + Add and enter
HTTP_PROXYorHTTPS_PROXYin the name field, and enter its value, such ashttp://127.0.0.1:8080, in the value field. -
Click Save & queue and select Save to save the changes.
Set Additional Configuration options
With the Local binary, you can set additional configurations, such as verbose logging, excluding hosts, and so on. To set any additional configuration options, add the flags in the BrowserStackLocal Options section. For example, to enable verbose logging and to route all traffic via the proxy, set the following flags in the BrowserStackLocal Options field:
{"verbose": true, "forceProxy": true}
Check out Flag for Local Binary to learn about more Local Testing parameters.
Follow Camel case style when adding local modifier options. For example, enter the --force-local option as forcelocal in the BrowserStackLocal Options section.
Add task to stop BrowserStack Local
It is recommended to stop the BrowserStack Local binary after tests have been executed to optimize your resources. Add the BrowserStack Stop Local task in your pipeline using the following steps:
-
Navigate to your pipeline and click Edit.
-
In the Tasks pane, search for BrowserStack Stop Local from the tasks list, and then select it.
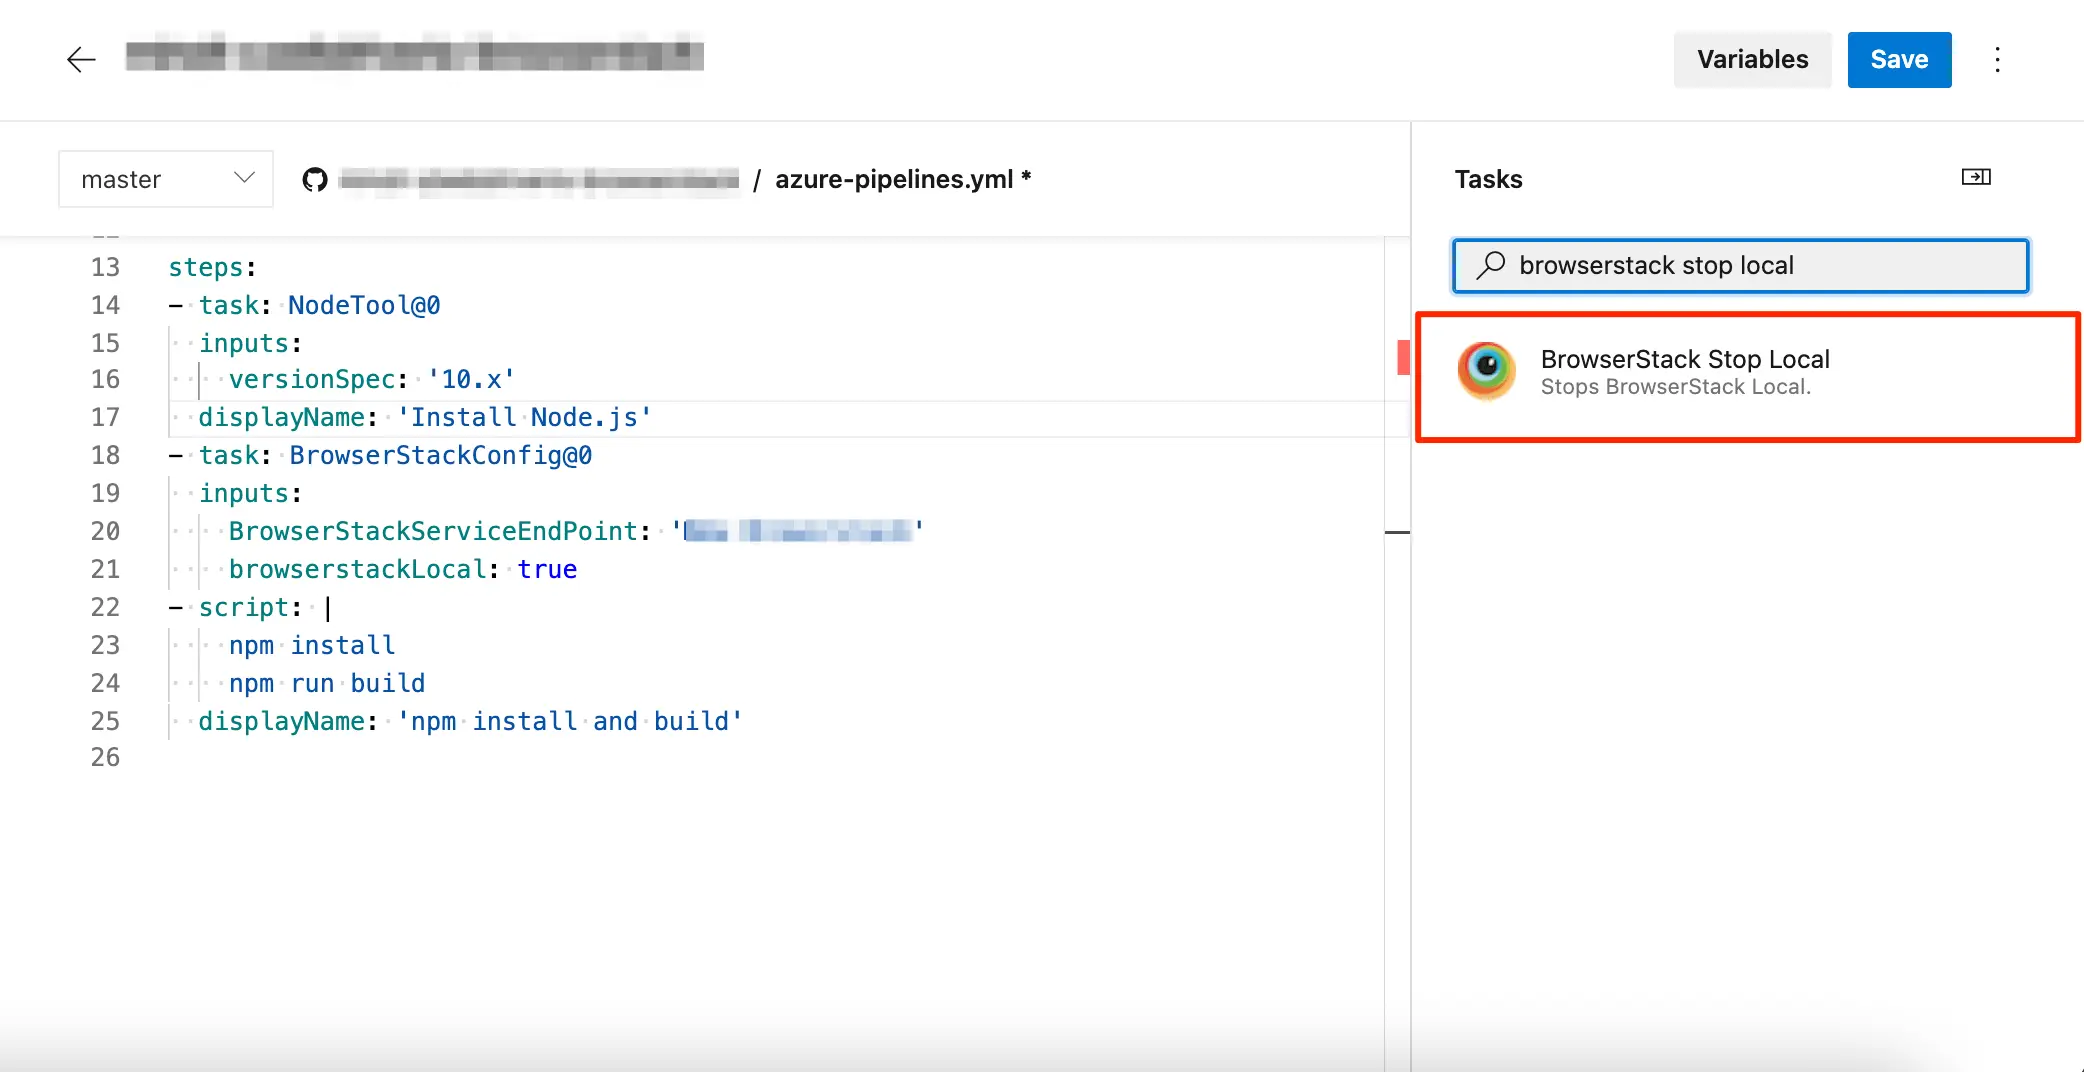
The following image shows the azure-pipelines.yml file with all the BrowserStack tasks configured to run your local test on BrowserStack.
-
Navigate to your pipeline and click Edit.
-
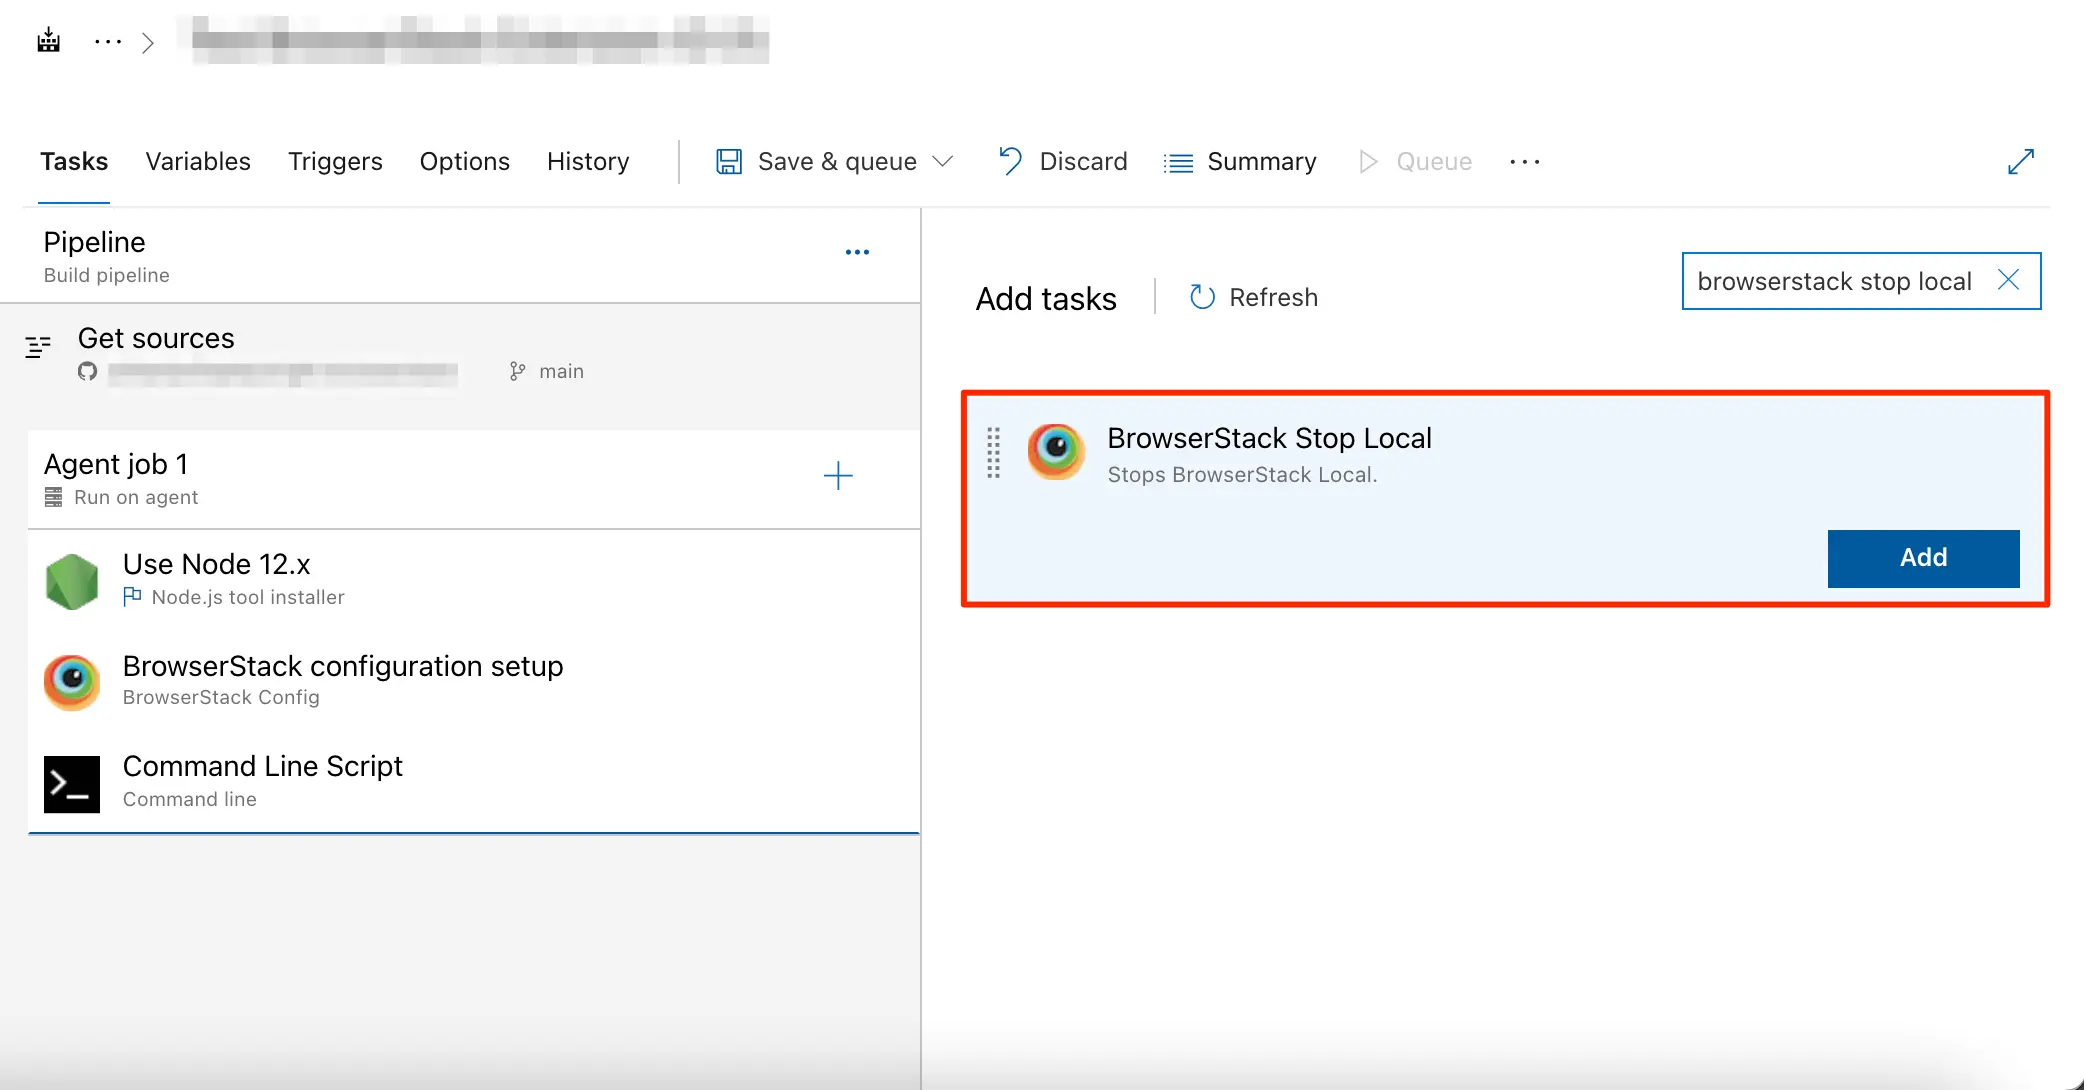
In the Task tab, click + on the Agent job 1 card.
-
Search for BrowserStack Stop Local and click Add.
-
Click Save & queue and select Save to save the changes.
The following image shows all the BrowserStack tasks configured to run your local test on BrowserStack.
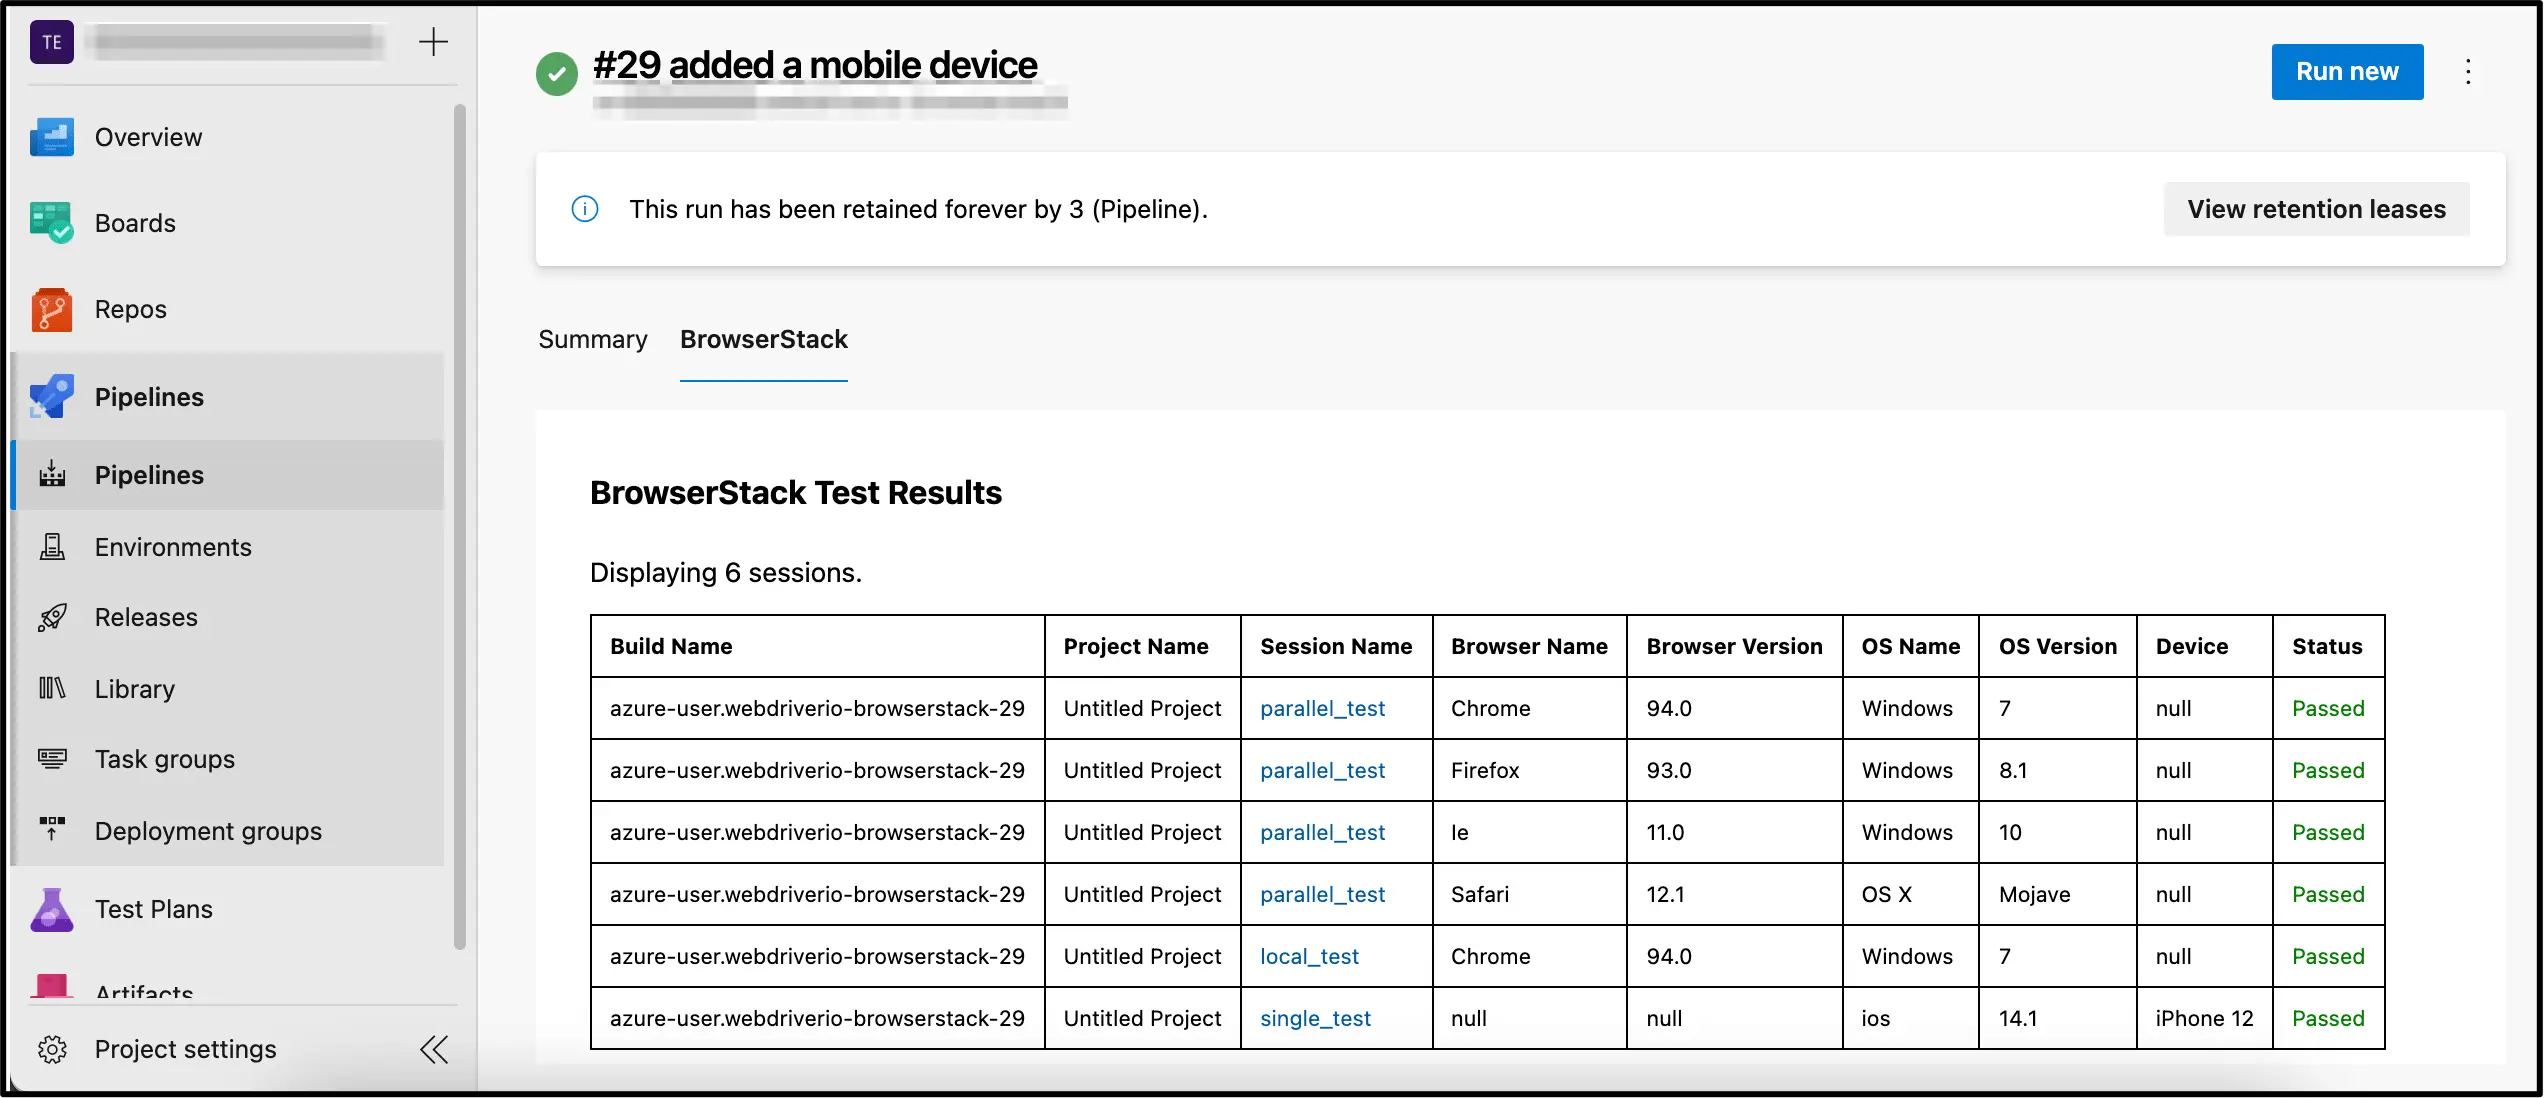
View Test Reports in Azure Pipelines
The BrowserStack Azure Pipelines plugin enables you to embed the test results from BrowserStack into Azure Pipelines.
With this integration, you can now start testing your web applications and view your test results within Azure Pipelines. The following image shows how the test results appear in Azure Pipelines:
We're sorry to hear that. Please share your feedback so we can do better
Contact our Support team for immediate help while we work on improving our docs.
We're continuously improving our docs. We'd love to know what you liked
We're sorry to hear that. Please share your feedback so we can do better
Contact our Support team for immediate help while we work on improving our docs.
We're continuously improving our docs. We'd love to know what you liked
Thank you for your valuable feedback!