BrowserStack user provisioning with Azure AD (aka Microsoft Entra ID)
Connect Azure Active Directory with BrowserStack.
Azure Active Directory integration with BrowserStack allows you to automatically provision and de-provision users from Azure AD.
If you’re a new BrowserStack customer, to assign roles and products, see Assign roles using Automated User Provisioning and Assign product access using Automated User Provisioning.
Prerequisites
- Enterprise plan on BrowserStack.
- A user account in Azure AD with permission to configure provisioning (for example, Application Administrator, Cloud Application administrator, Application Owner, or Global Administrator).
- Single Sign-on integration with BrowserStack (mandatory).
- User with Owner permissions can setup user provisioning on BrowserStack.
Supported features
Azure AD & BrowserStack user provisioning integration currently supports the following features:
- User provisioning & de-provisioning
- Attribute assignment for users on BrowserStack:
- Role assignment
- Product access
- Team assignment
BrowserStack provisions individual users only and does not support group provisioning. Assign each user’s team, role, and product access using the custom attributes on this page.
Step 1: Initiate provisioning setup
Follow the steps below to setup user provisioning with Azure AD:
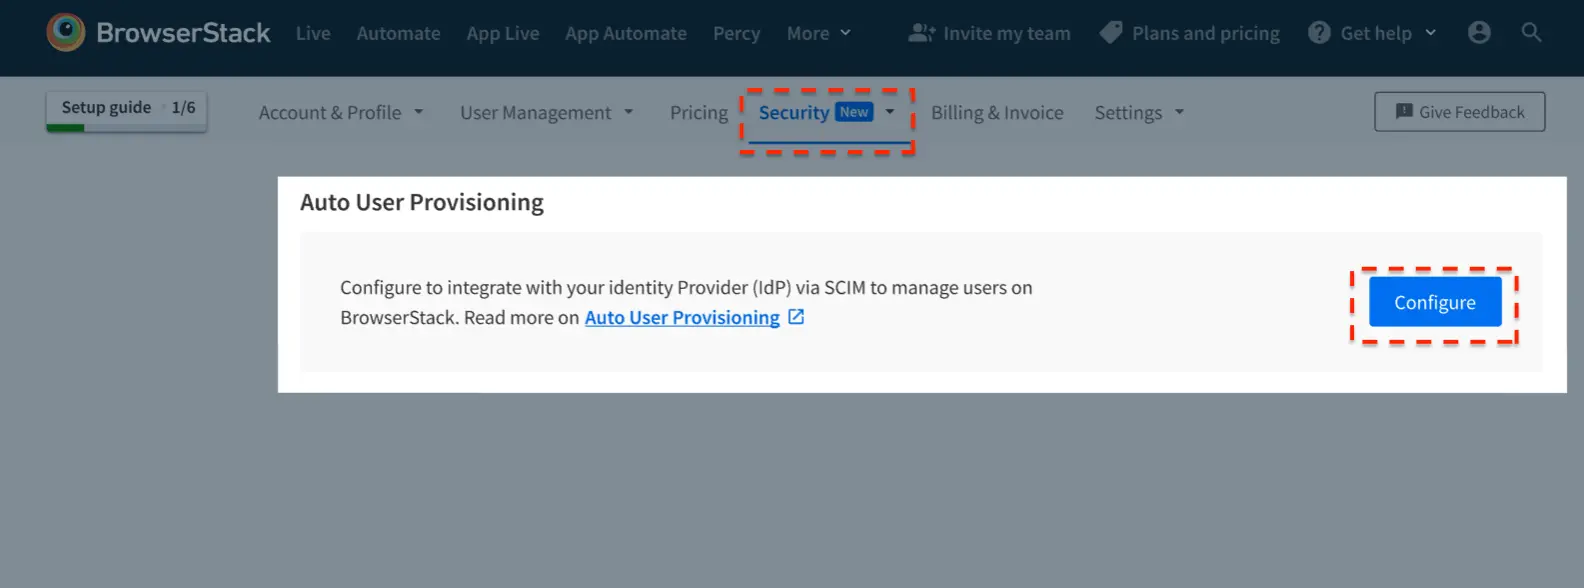
- Log in to BrowserStack as a user with Owner permissions.
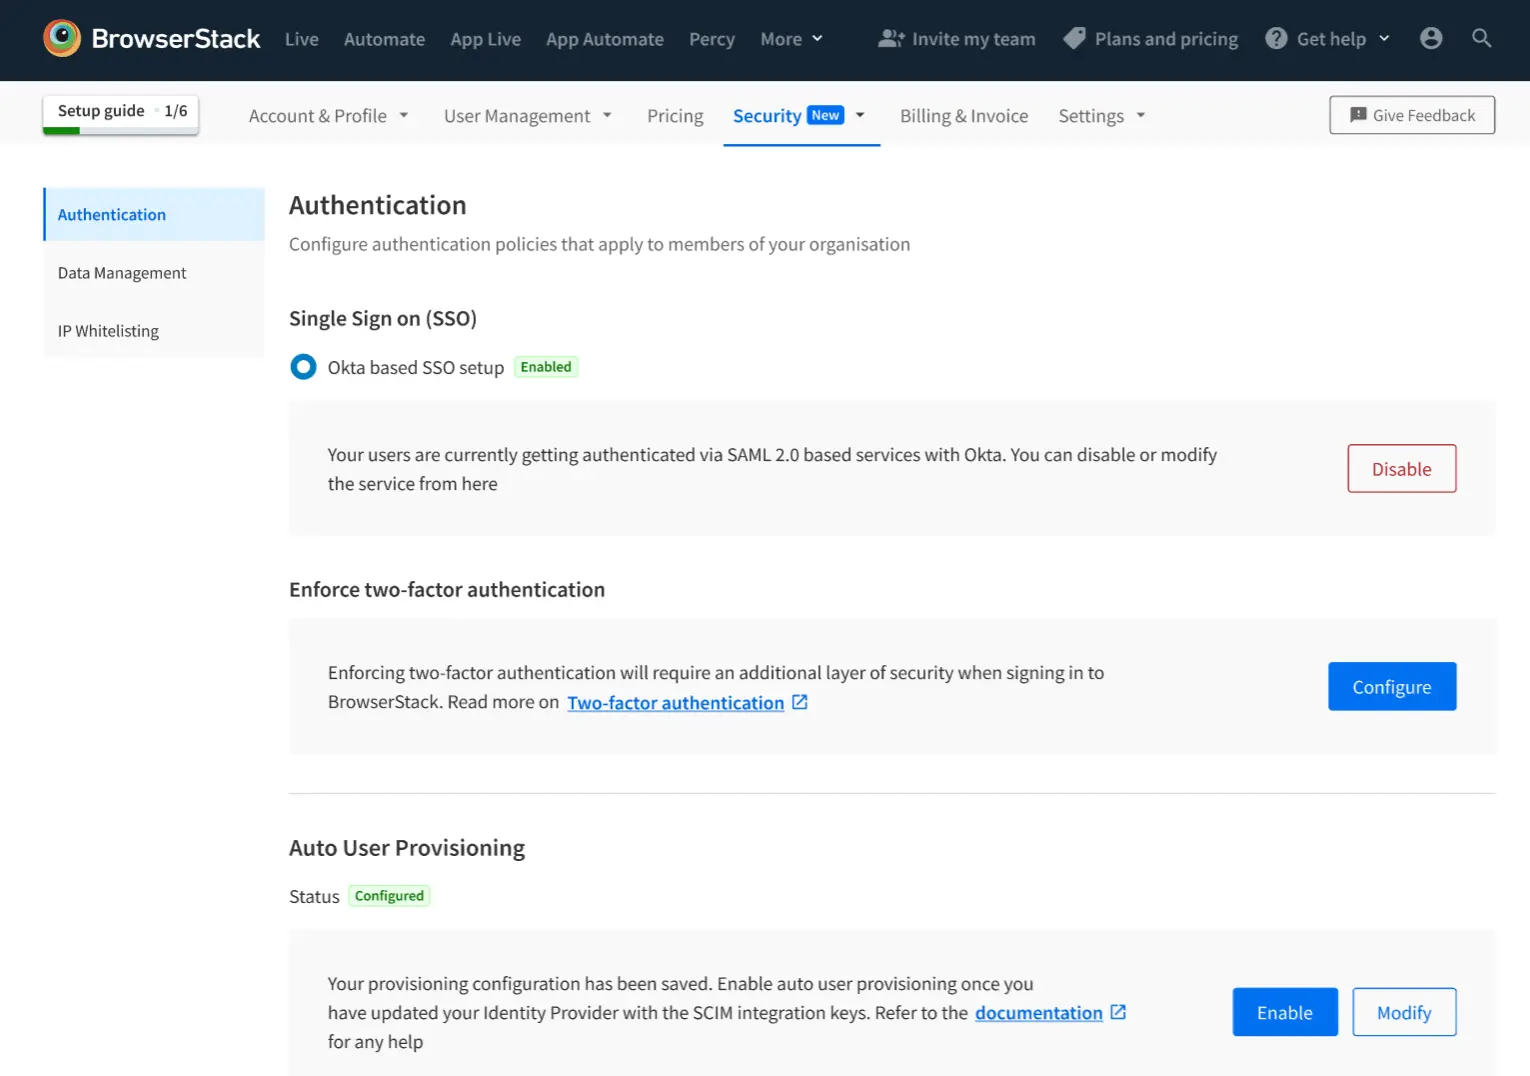
- Go to Account > Security and select Authentication from the side-nav menu.
- Under Auto User Provisioning, click Configure.
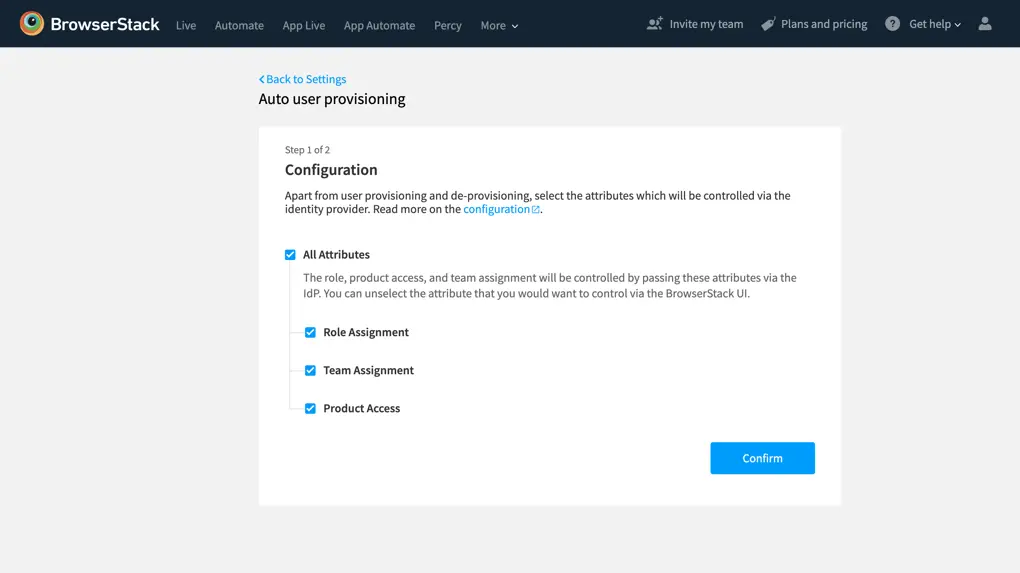
- Select the user attributes that you want to control from Azure AD and click Confirm.
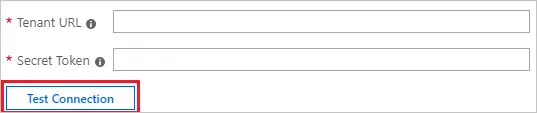
- Copy the Tenant URL and Secret Token. These values will be entered in the Tenant URL and Secret Token fields in the Provisioning tab of your BrowserStack application in the Azure portal. Click Done.

- Your provisioning configuration has been saved on BrowserStack. Enable user provisioning in BrowserStack once the provisioning setup on Azure AD is completed, to prevent blocking of inviting new users from BrowserStack Account.
Step 2: Configure app on Azure AD
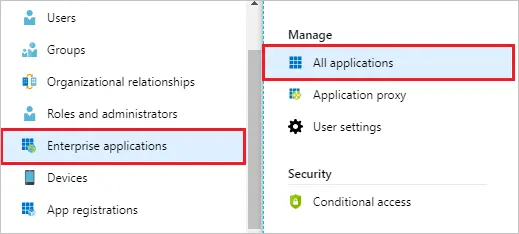
- Sign in to the Azure portal. Select Enterprise Applications, then select All applications.
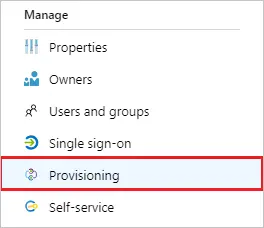
- In the applications list, select BrowserStack Single Sign-on.

- Select the Provisioning tab.
- Set the Provisioning Mode to Automatic.

- Under the Admin Credentials section, input your BrowserStack Tenant URL and Secret Token. Click Test Connection to ensure Azure AD can connect to BrowserStack. If the connection fails, ensure your BrowserStack account has Admin permissions and try again.
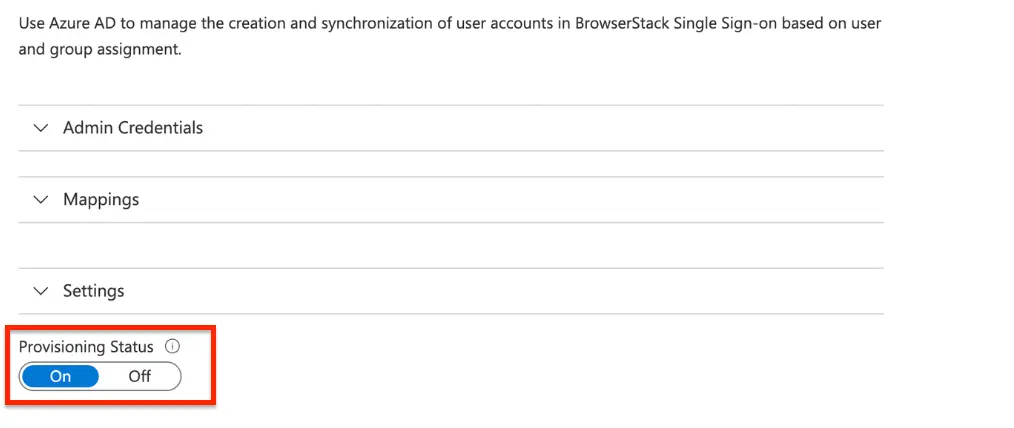
- Once the connection is successful, turn the Provisioning Status to ON.
- In the Notification Email field, enter the email address of a person who should receive the provisioning error notifications and select the Send an email notification when a failure occurs check box.
- Select Save.
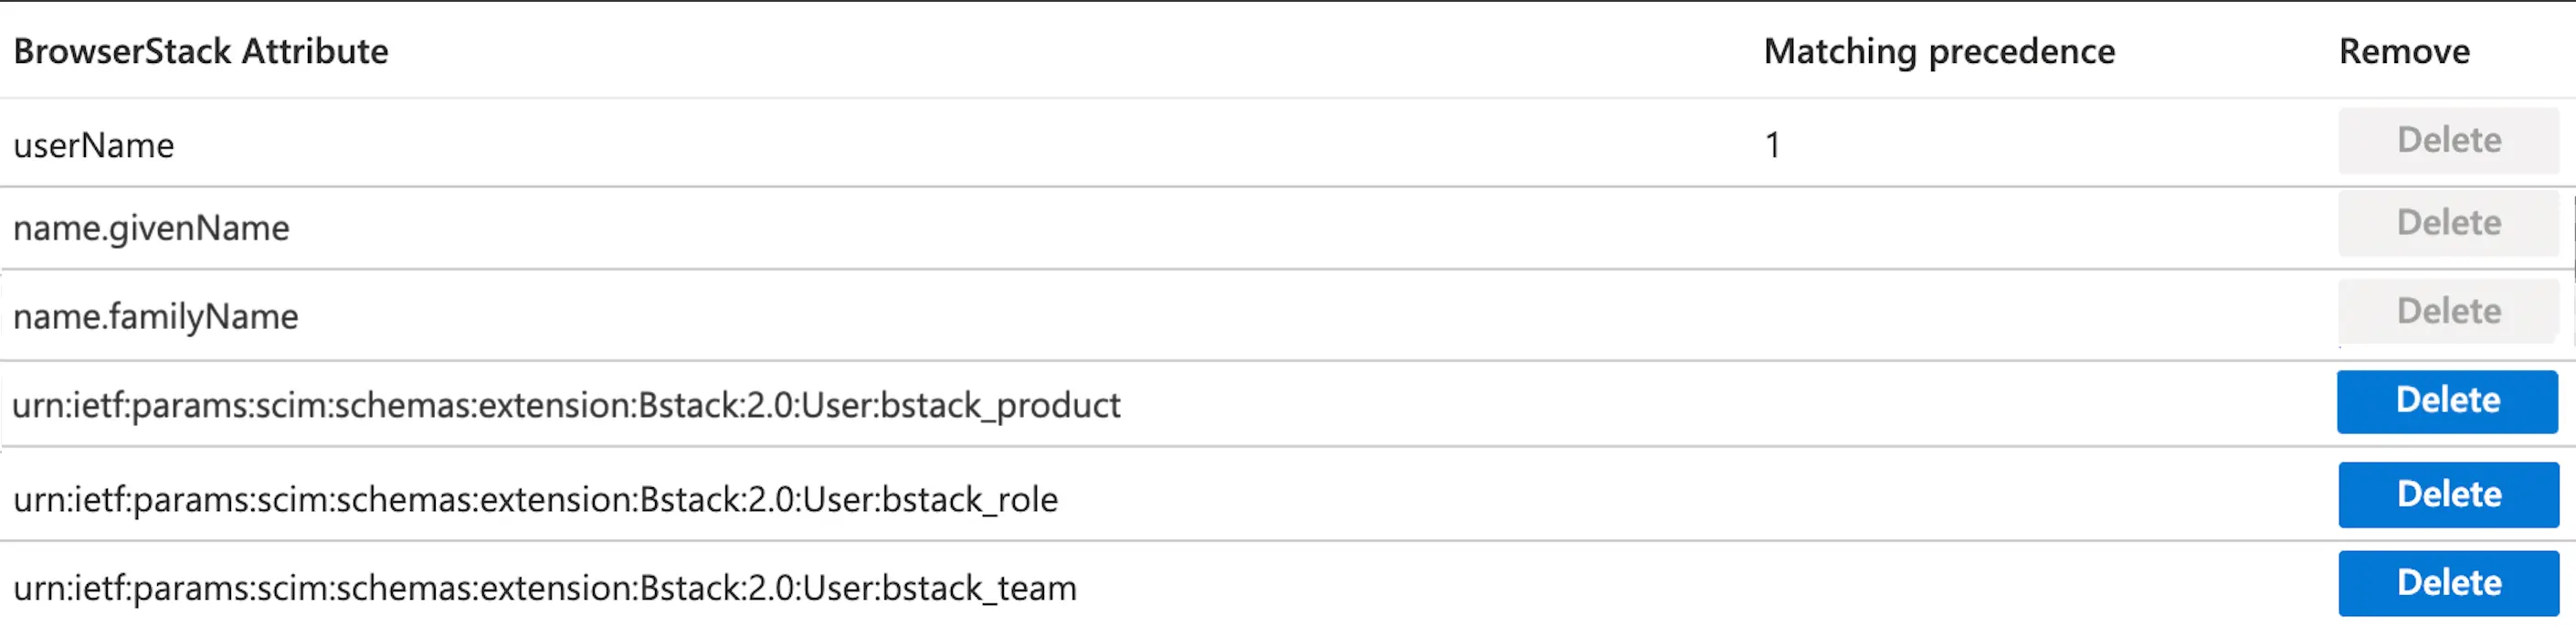
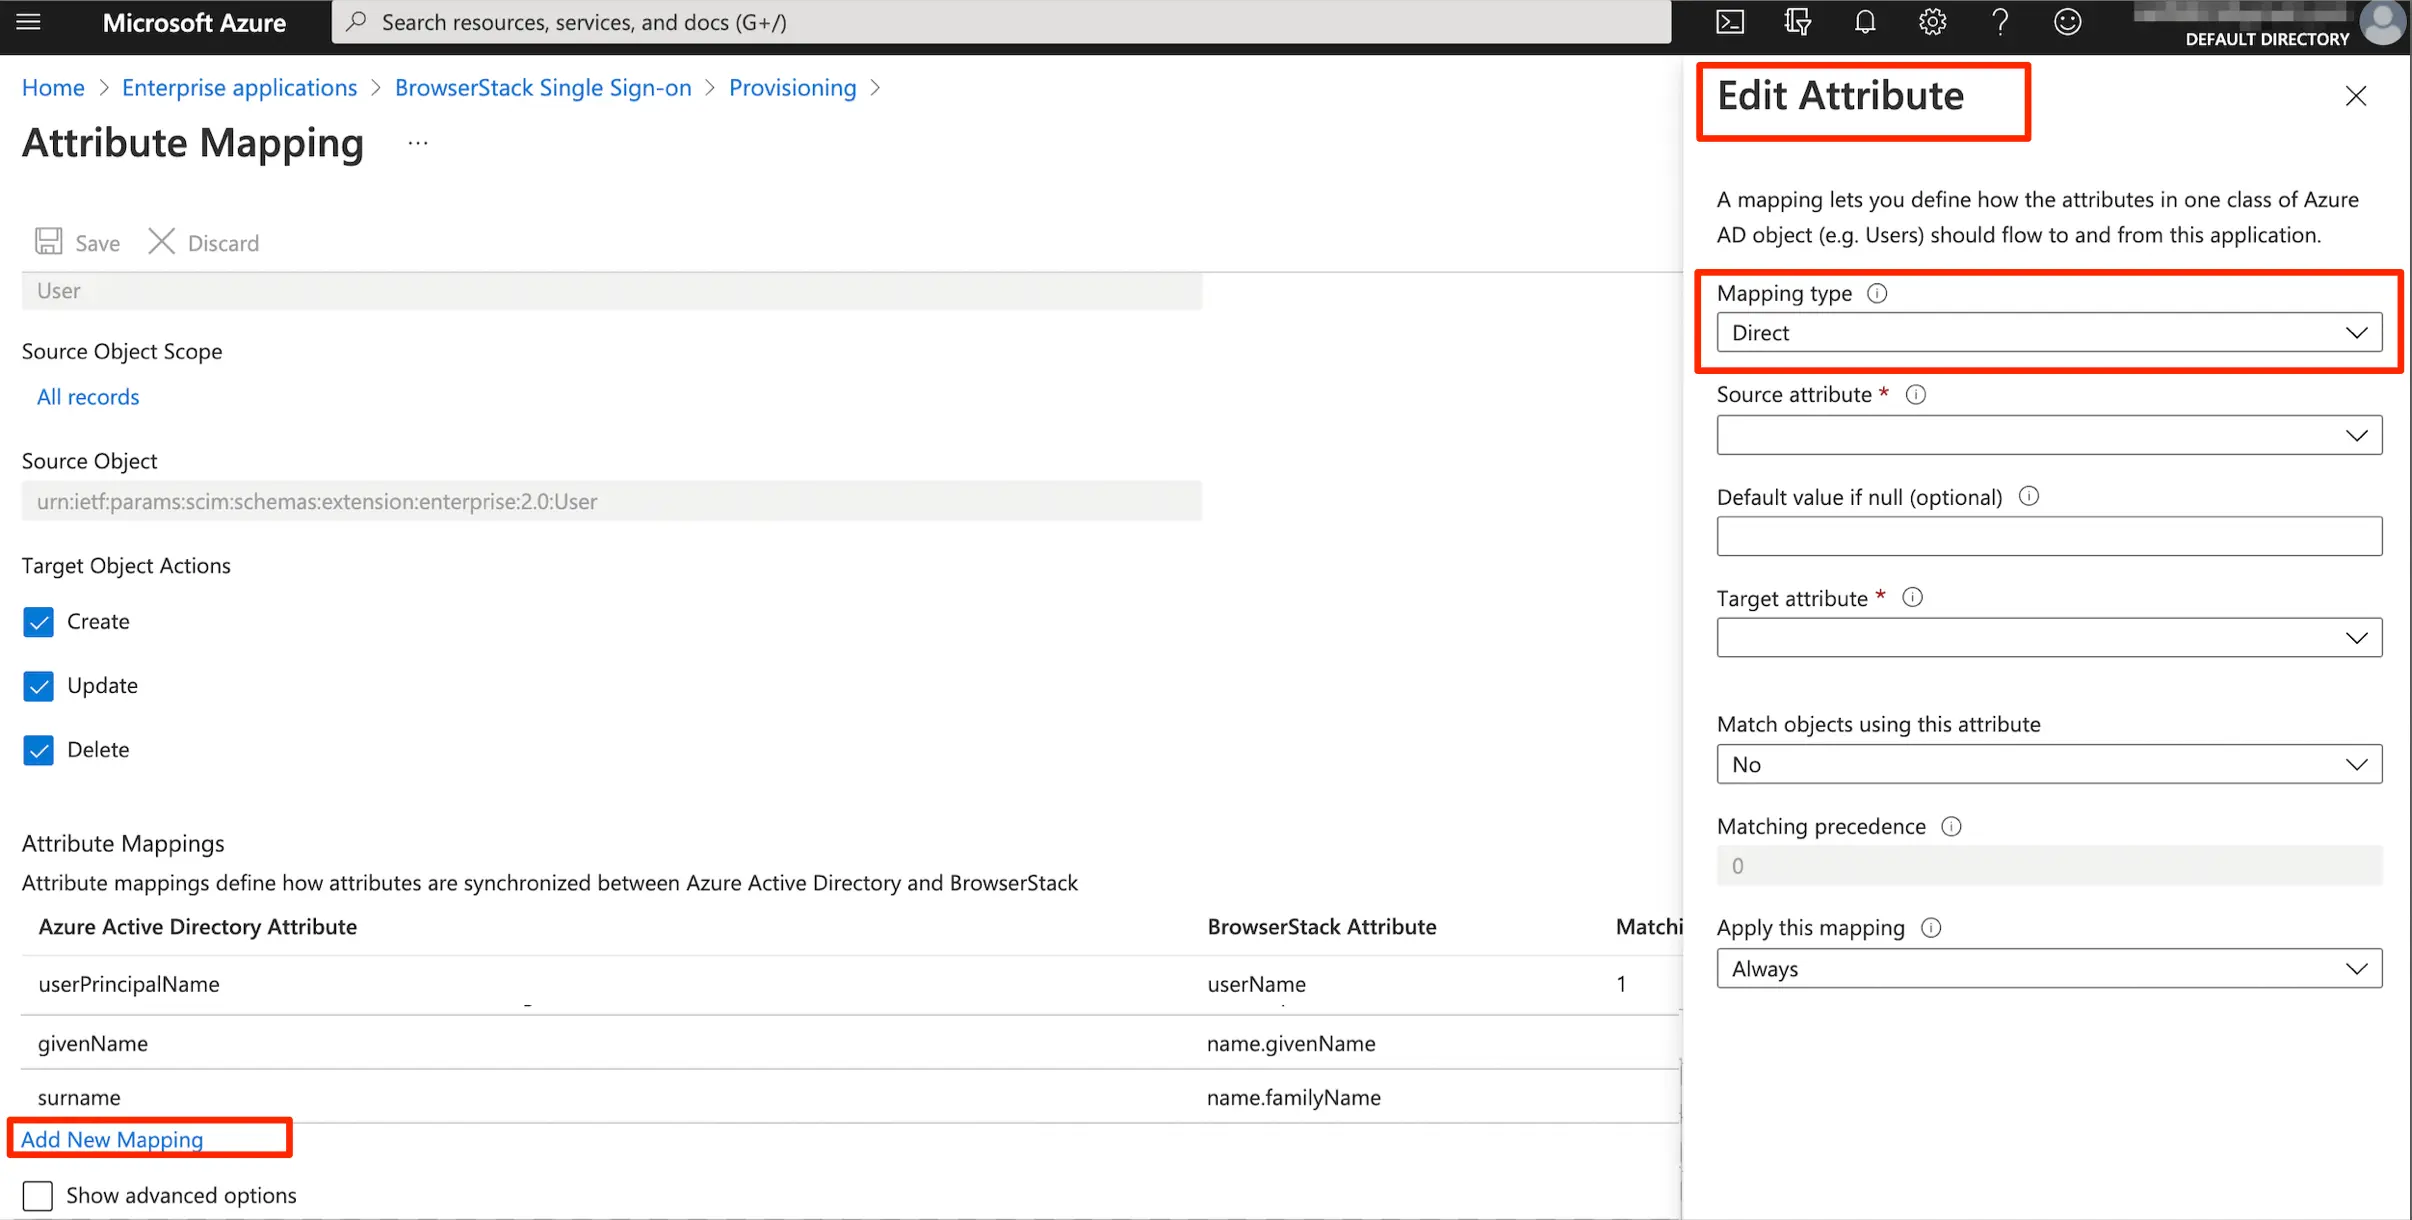
Step 3: Custom attribute mappings
- Under the Mappings section, click Provision Azure Active Directory Users.
- There will be default attributes visible under Attribute Mappings. These attribute-mappings are mandatory ( e.g.
userName,name.givenName,name.familyName) for application to function correctly. For these required attributes, the Delete feature is unavailable in Azure.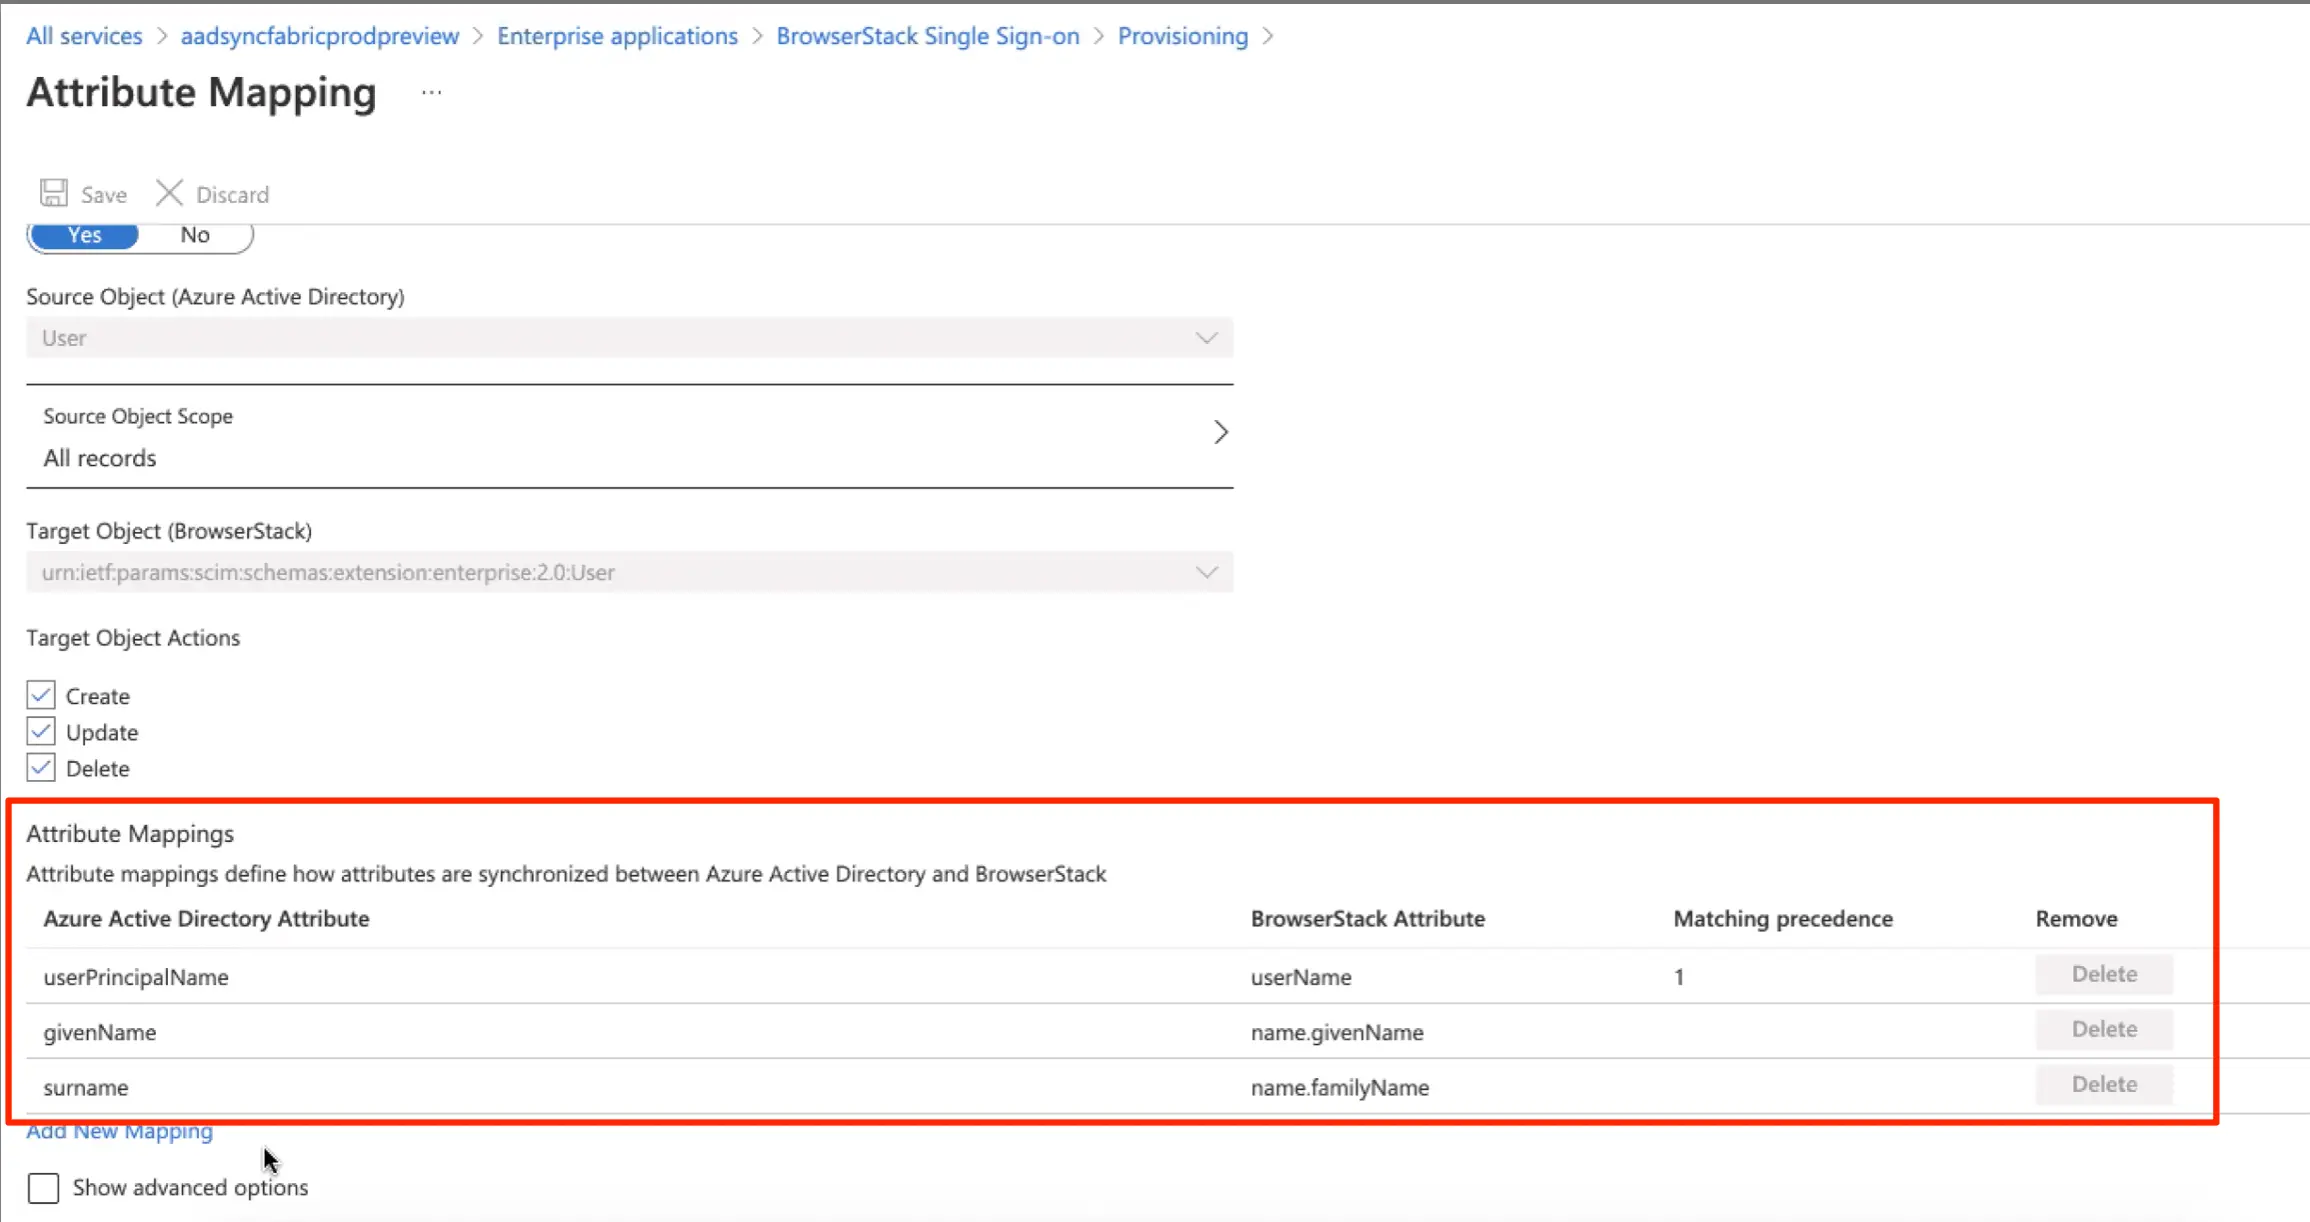
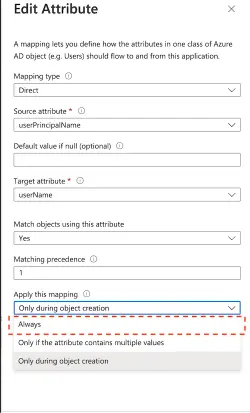
- For the
userPrincipalNamemapping, click Edit. Under Apply this mapping dropdown, you need to selectAlwaysas the value.
- Apart from required attributes, you will need to configure the custom attributes in order to configure role, team and product-access for any users on BrowserStack:
- In order to configure the custom attribute, click Add New Mapping.
- Under Edit Attribute, select the Mapping type.
Mapping types
Mapping type allows you to define how the custom attributes are populated.You can either use Direct, Constant, or Expression mapping type depending on your needs. Details on how to use a particular mapping type:
A. Direct mapping
In case of Direct mapping, the target attribute is populated with the value of an attribute of the linked object in Azure AD.
- Click Mapping type dropdown. Select Direct.
- Under Edit Attribute, you can click Target attribute dropdown, to view the 3 custom attributes. You need to map each of these target attributes to a source attribute.
- When customizing attribute mappings for user provisioning, you can select the attribute you want to map to any of the target attribute. You can either use existing available source attributes or you can also create and add new source attributes:
| Users in Azure AD Cloud | For users only in Azure AD, you can use Microsoft Graph or PowerShell to extend the user schema for users in Azure AD. |
| Users in on-premise Active Directory | For users in on-premise Active Directory, you must sync the users to Azure AD cloud. You can sync users and attributes using Azure AD Connect. Azure AD Connect automatically synchronizes certain attributes to Azure AD, but not all attributes. |
B. Expression mapping
If you don’t want to create a Source attribute, you can make use of Expression mapping. In this case, the target attribute is populated based on the result of a script-like expression.
- Click Mapping type dropdown. Select Expression.
- Define the
Expressionfor populating target attribute. For expressions, you can use the user resource type attributes that are supported by the Azure AD directory user profile. Example for expressions:
| Target attribute | Expression |
|---|---|
| urn:ietf:params:scim:schemas:extension:Bstack:2.0:User:bstack_product | Switch([department], "Live-Testing", "team1", "App-Automate-Testing","team2", "App-Live-Testing") |
| urn:ietf:params:scim:schemas:extension:Bstack:2.0:User:bstack_role | Switch([city], "User", "Mumbai", "Admin", "Delhi", "User") |
C. Constant mapping
If you want the target attribute to be populated with a specific string you specified, you can make use of Constant mapping. Example for constants:
| Target attribute | Constant Value |
|---|---|
| urn:ietf:params:scim:schemas:extension:Bstack:2.0:User:bstack_role | User |
| urn:ietf:params:scim:schemas:extension:Bstack:2.0:User:bstack_product | Live-Testing |
BrowserStack attributes description
If you’re a new BrowserStack customer, to assign roles and products, see Assign roles using Automated User Provisioning and Assign product access using Automated User Provisioning.
The details on BrowserStack’s attribute mapping, their possible values and description:
BrowserStack attribute: urn:ietf:params:scim:schemas:extension:Bstack:2.0:User:bstack_role
- Default role assigned is
User. This is possible in two scenarios:- Unexpected, empty or no value specified
- Role attribute is controlled from BrowserStack account section
- Supported attribute values (when attribute controlled from Azure AD):
| Values | Description |
|---|---|
| User | User role will be assigned |
| Admin | Admin role will be assigned |
| Owner | New Owner will be assigned, the current/old owner will be replaced with the new owner. The current/old owner will become an admin. |
|
No Value Empty or Any other value |
The user is created as User by default. |
BrowserStack attribute: urn:ietf:params:scim:schemas:extension:Bstack:2.0:User:bstack_team
- By default, a user is added to the organization on BrowserStack. This is possible in two scenarios:
- Empty or no value specified
- Team attribute controlled from BrowserStack account section
- Supported attribute values (when attribute controlled from Azure AD):
| Values | Description |
|---|---|
| Example: team_web_testing | User will get added to an existing team (if a team exists with this name). If the team does not exist, a new team will be created with the passed attribute value. |
| No value/Empty | User will be assigned as part of the main organization. |
BrowserStack attribute: urn:ietf:params:scim:schemas:extension:Bstack:2.0:User:bstack_product
- By default no product access is assigned. This is possible in two scenarios:
- Unexpected, empty or no value specified
- Product attribute is controlled from BrowserStack account section
- Supported attribute values (when attribute controlled from Azure AD):
| Attribute values | Product access assigned |
|---|---|
| Visual-Testing | Percy |
| Automate-Testing | Automate |
| Live-Testing | Live |
| App-Automate-Testing | App Automate |
| App-Live-Testing | App Live |
| App-Percy | App-Percy |
| App-Accessibility-Testing | App Accessibility |
| Accessibility-Testing | Accessibility Testing |
| Test-Reporting-&-Analytics | Test Reporting & Analytics |
| Test-Management | Test Management |
| Low-Code-Automation | Low Code Automation |
| Bug-Capture | Bug Capture |
| Requestly | Requestly |
| Testing-Toolkit | Testing Toolkit |
| Central-Scanner | Central Scanner |
| Automate-turboscale | Automate TurboScale |
| Accessibility-Design-Toolkit | Accessibility Design Toolkit |
- You can pass multiple values for product access using a comma-separated string. Example:
Live-Testing,Visual-Testing. - If product access is controlled through an IdP, you can update product roles as part of the product access attributes. For example:
Percy:Product Admin, Test-Management:Product User. - If RBAC is enabled, refer to the Assign roles using Automated User Provisioning and Assign product access using Automated User Provisioning documentation for details.
Step 4: Enable user provisioning
Once you have completed the above steps, go to on BrowserStack and click Enable to enable user provisioning. If you don’t enable it, you will be locked out of inviting new users via BrowserStack UI.
Manage users from app on Azure AD
Once auto user provisioning is enabled, the user list is controlled and managed from the IdP.
- For your existing users on BrowserStack, we would suggest that as a first step, assign all these users to the BrowserStack application in Azure AD. This would avoid any discrepancies between the user list on BrowserStack and Azure AD.
- By assigning user(s) to the application, they will get provisioned on BrowserStack.
- Users will be logged out of the BrowserStack, and will be redirected to log-in via SSO.
- To add new users on BrowserStack, add these users in Azure AD and assign them to BrowserStack application via the Assignments tab. Invite modal will no longer be visible in the Account page anymore. If there were any existing invites already sent (before user provisioning was enabled), those invites will become invalid.
- Any user can be removed from BrowserStack or their access by revoked by removing the user from the BrowserStack application on Azure AD.
Monitor your deployment
Once you’ve configured provisioning, use the following resources to monitor your deployment:
- Use the provisioning logs to determine which users have been provisioned successfully or unsuccessfully.
- Check the progress bar to see the status of the provisioning cycle and how close it is to completion.
- If the provisioning configuration seems to be in an unhealthy state, the application will go into quarantine. Learn more about quarantine states in the quarantine status documentation.
Troubleshooting
Below is a list of possible errors that might be encountered and how to resolve them:
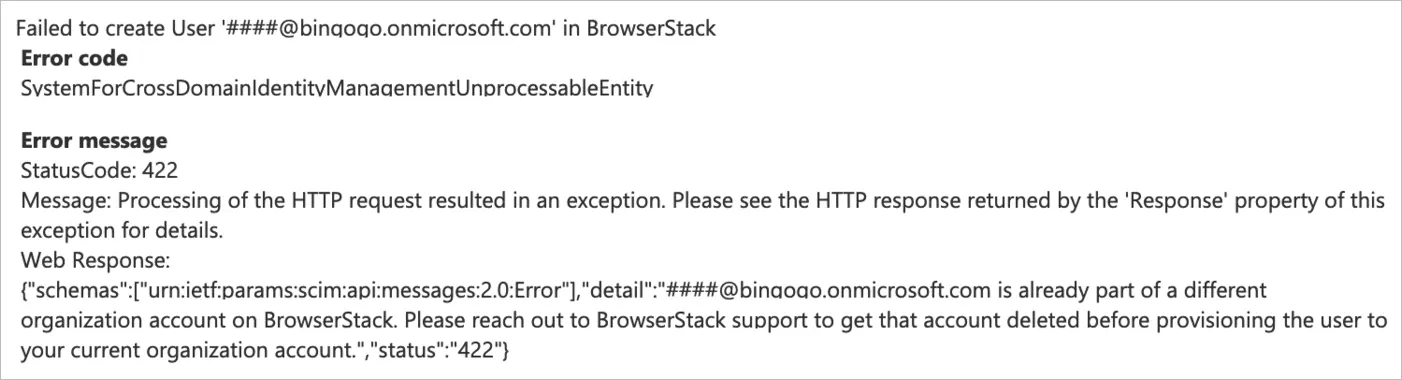
Email is already part of a different organization account on BrowserStack
Resolution: User is already present on BrowserStack under a different organization, please reach out to BrowserStack support to get that account deleted before provisioning the user to your current organization account.
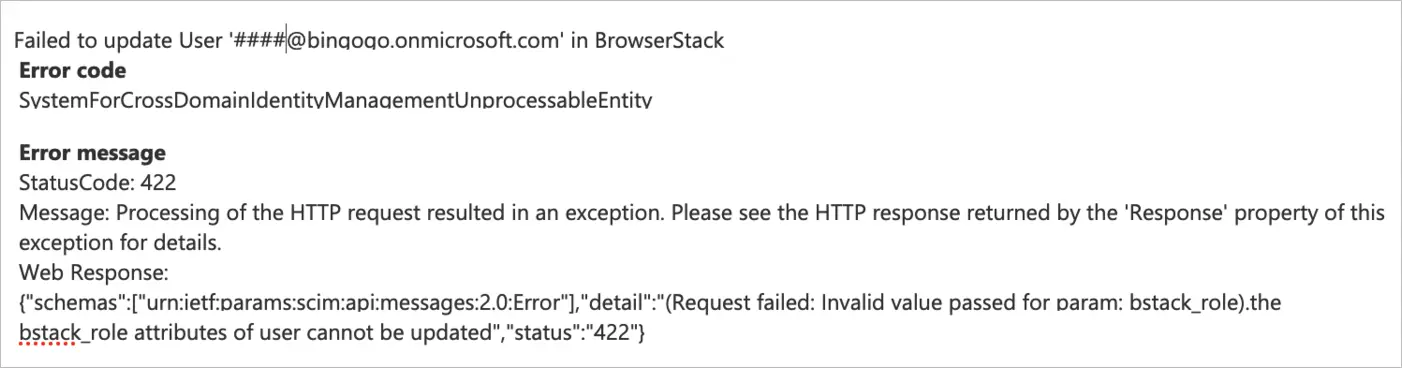
Invalid parameter or attribute
Resolution: Role/Product is not a valid use-case, please use the attribute values provided above.
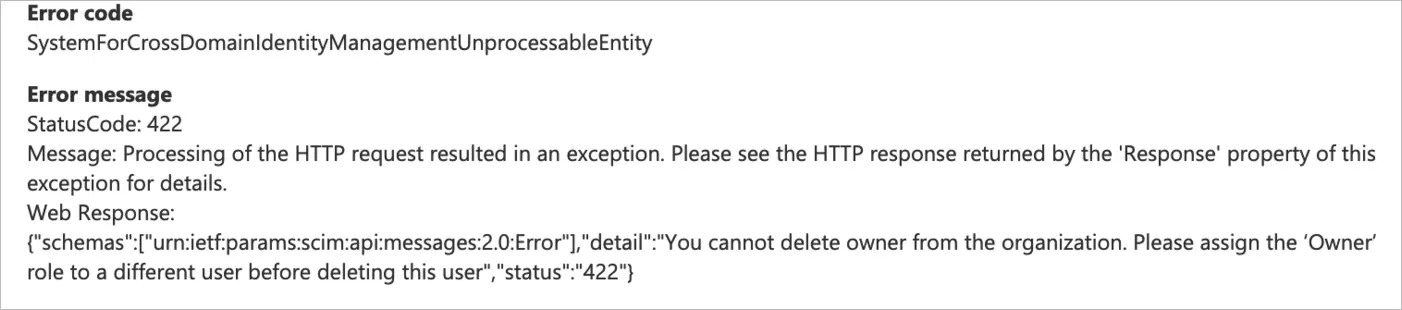
Owner deletion
Resolution: Assign ownership to a different user before deletion of this user. Owner cannot be deleted, BrowserStack account needs a user to have Owner role assigned.
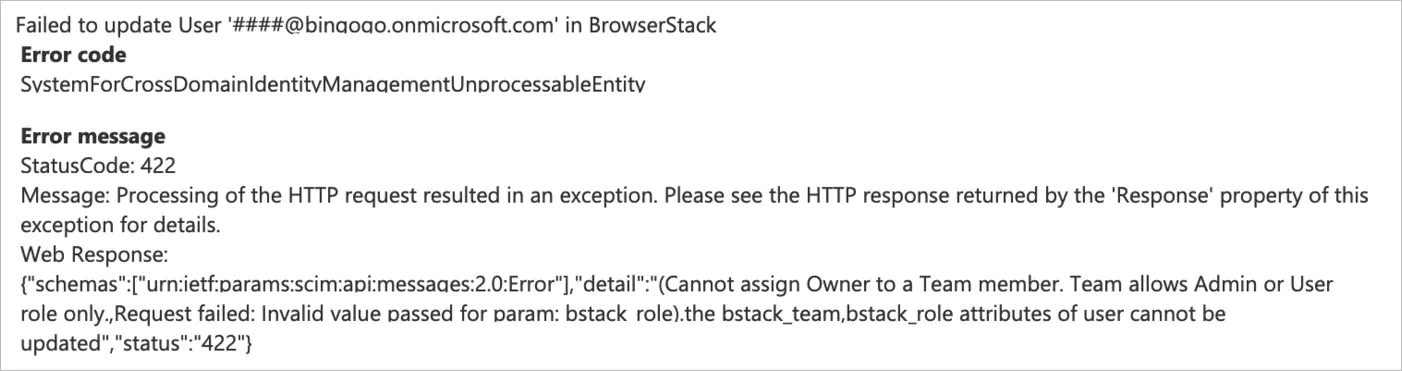
Incompatible attributes
Resolution: You are assigning incompatible user attributes, for example Owner cannot have a team assigned.
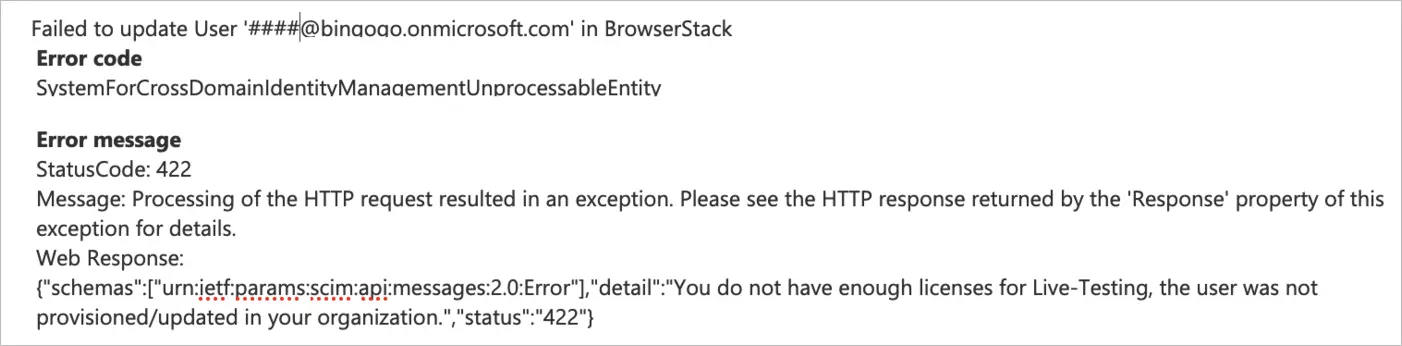
Licenses unavailability
Resolution: You have used up all your licenses for the product, please unassign users or add more licenses. Contact your Account Executive to get information on adding licenses.
Escalation/Support
Contact us for any escalations or support.
We're sorry to hear that. Please share your feedback so we can do better
Contact our Support team for immediate help while we work on improving our docs.
We're continuously improving our docs. We'd love to know what you liked
We're sorry to hear that. Please share your feedback so we can do better
Contact our Support team for immediate help while we work on improving our docs.
We're continuously improving our docs. We'd love to know what you liked
Thank you for your valuable feedback!