Get your setup working faster. Join our Discord for optimisation tips from elite testers.Join our Discord
Integrate App Percy with Appium and Cucumber-TestNG
Learn how to integrate Appium with Cucumber-TestNG automated tests and App Percy to catch visual differences in mobile apps.
App Percy integrates with your tests using both Percy and BrowserStack SDK. To establish this integration, choose the appropriate SDK and refer to the following section accordingly:
An application is uploaded on App Automate, and an app URL is generated. Utilize the generated app URL in the BrowserStack configuration file as the app parameter
Set BrowserStack credentials
Save your BrowserStack credentials as environment variables. It simplifies running your test suite from your local or CI environment. You can export the environment variables for the Username and Access Key of your BrowserStack account or you can set it in the config file.
Set a projectName.
After you run a test, an App Automate project and an App Percy project are created with the project name you set here.
If a App Percy project by the name you set in the browserstack.yml file already exists, your screenshots are added to the same project. However, if the name matches a Percy project, your visual tests will continue to run, but an error message will appear in your logs. Your functional tests still run as expected.
Set percyCaptureMode: auto.
There are other supported automated capture modes in the percyCaptureMode parameter. The table below lists and describes all the acceptable modes.
App Percy screenshot capture mode
Description
auto
Automatically capture screenshots on common events such as screenshot, click, and sendKeys.
testcase
Automatically capture screenshots at the end of each test case.
click
Automatically capture screenshots on every click.
screenshot
Automatically capture screenshots on every driver.screenshot call.
manual
This gives you more control over the screenshots you want captured. When used, you have to add the AppPercySDK.screenshot(driver, name) method at required points in your test script.
Below sample browserstack.yml file shows how to set the percy, the projectName, and the percyCaptureMode parameters.
You can continue running your tests as you have been previously.
Summary
You have successfully integrated App Percy with BrowserStack SDK and created your first build. To see the build with snapshots of your application, visit your project in Percy.
When you run another build with visual changes to your application, App Percy takes new screenshots. You can then see the comparisons between the two runs on the new build. You can access the App Percy dashboard directly from the App Automate dashboard.
The Percy Appium SDK ships ready-made Cucumber step definitions in the io.percy.appium.cucumber.PercySteps class. Add this package to the Cucumber glue path to write visual tests in plain Gherkin, without authoring custom Java step code.
Prerequisites
In order to conduct Percy visual testing for Java Appium with Cucumber, you must possess the following dependencies:
Appium version through v2.4.1
Node 12+ with npm
Cucumber Java 7.x
Create new app project on percy dashboard
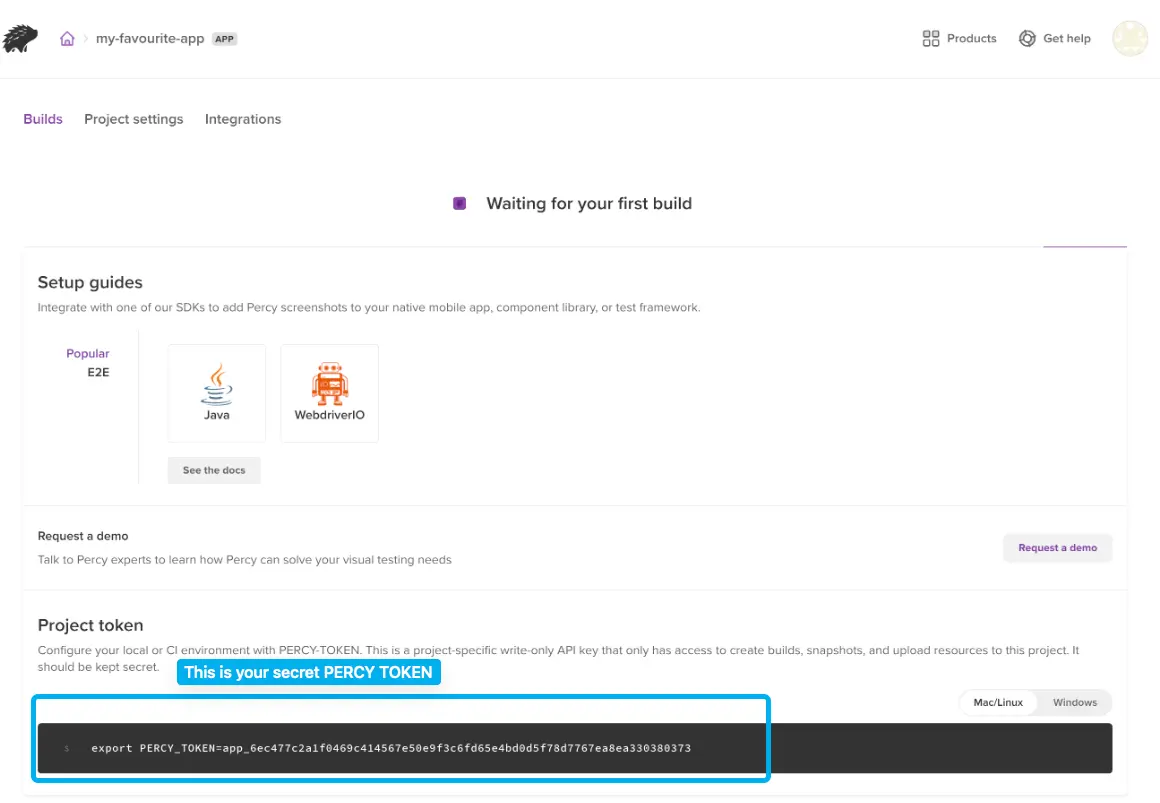
Sign in to Percy and create a new app type project. After you’ve created the project, you’ll be shown a PERCY_TOKEN environment variable. Percy will use the PERCY_TOKEN to know which organisation and project to upload the screenshots to. You will need this PERCY_TOKEN in next steps.
Set the project token as an environment variable
Run the given command to set PERCY_TOKEN as an environment variable:
If you’re using Maven, add percy-appium-app and cucumber-java to your project dependencies. The Percy SDK declares Cucumber as a provided dependency, so you supply your own Cucumber version (7.x is recommended):
Pass your AppiumDriver instance to PercySteps from a Cucumber @Before hook, and reset it in an @After hook. The setDriver method also registers the Cucumber wrapper in your Percy build information.
```java
import io.percy.appium.cucumber.PercySteps;
import io.cucumber.java.Before;
import io.cucumber.java.After;
import io.appium.java_client.AppiumDriver;
import io.appium.java_client.android.AndroidDriver;
public class Hooks {
private static AppiumDriver driver;
@Before
public void setUp() {
driver = new AndroidDriver(appiumServerUrl, capabilities);
PercySteps.setDriver(driver);
}
@After
public void tearDown() {
if (driver != null) {
driver.quit();
}
PercySteps.reset();
}
}
```
Use the Percy steps in your Gherkin scenarios. Define device and region options with Given steps before the When screenshot step in the same scenario. The following feature file captures a screenshot on a configured device, and a full page screenshot that ignores a region:
```gherkin
Feature: Mobile app visual testing with Percy
Scenario: Homepage on Galaxy S22
Given I set device name "Samsung Galaxy S22"
And I set orientation "portrait"
And I set status bar height 50
When I take a Percy screenshot named "Homepage" with options
Scenario: Full page without ads
Given I add ignore region XPath "//android.widget.Button[@text='AD']"
And I set full page to "true"
When I take a Percy screenshot named "Full Page No Ads" with options
```
Run your tests using the percy app:exec command as shown below:
If you are unable to use the percy app:exec command or prefer to run your tests using IDE run options, you can use the percy app:exec:start and percy app:exec:stop commands. To learn more, visit Run Percy.
You have successfully integrated App Percy with your Appium Cucumber test suite and created your first build. To see the build with snapshots of your application, visit your project in Percy.
When you run another build with visual changes to your application, Percy takes new snapshots. You can then see the comparisons between the two runs on the new build.
Available step definitions
The PercySteps class provides Gherkin steps for screenshots, device configuration, and ignore or consider regions.
Screenshot steps
Capture mobile app screenshots:
Gherkin step
Description
When I take a Percy screenshot named "name"
Basic screenshot
When I take a Percy screenshot named "name" with full page
Full page screenshot
When I take a Percy screenshot named "name" with full screen
Full screen screenshot
When I take a Percy screenshot named "name" with options
Screenshot with all configured options
Region steps
Define ignore or consider regions before you take a screenshot:
Gherkin step
Description
Given I add ignore region XPath "//android.widget.Button[@text='AD']"
Ignore a region by XPath
Given I add ignore region accessibility ID "ad-banner"
Ignore a region by accessibility ID
Given I add consider region XPath "//android.widget.LinearLayout"
Consider a region by XPath
Given I add consider region accessibility ID "main-content"
Consider a region by accessibility ID
Given I add custom ignore region 0, 100, 0, 200
Ignore a region by coordinates
Given I add custom consider region 0, 100, 0, 200
Consider a region by coordinates
Given I add ignore region Appium element "elementXPath"
Ignore an Appium element
Given I add consider region Appium element "elementXPath"
Consider an Appium element
Device and configuration steps
Set device and capture options before you take a screenshot:
Gherkin step
Description
Given I set device name "Samsung Galaxy S22"
Set the device name
Given I set orientation "portrait"
Set the orientation, portrait or landscape
Given I set status bar height 50
Set the status bar height in pixels
Given I set nav bar height 48
Set the navigation bar height in pixels
Given I set full page to "true"
Enable or disable full page capture
Given I set screen lengths 3
Set the number of screen lengths to capture
Given I set labels "smoke,regression"
Set labels to organize screenshots
Given I set test case "TC-001"
Set the test case ID
Given I set sync to "true"
Enable sync mode
Given I set scrollable XPath "//android.widget.ScrollView"
Set the scrollable element XPath
Given I set scrollable ID "scrollview"
Set the scrollable element ID
Given I set top scrollview offset 100
Set the top scroll offset
Given I set bottom scrollview offset 50
Set the bottom scroll offset
Given I set scroll speed 200
Set the scroll speed
Given I set android scroll area percentage 80
Set the Android scroll area percentage
Given I clear Percy options
Reset all options to their defaults
To set a test case execution ID, use the Given I set the test case execution ID "exec-123" step. This step matches the exact phrasing shipped in the SDK.

 Join our Discord