Integrate BrowserStack Automate with Jenkins
Learn how to integrate your Playwright tests with Jenkins using BrowserStack’s plugin.
Jenkins is a continuous integration tool that enables continuous testing, build, and deployment of iterative code changes. CI/CD tools help catch failures ahead of the production stage and mitigate them as they occur.
In this guide, you’ll learn how to:
- Install and configure the BrowserStack Jenkins plugin
- Integrate Jenkins in your existing test suite
- Integrate Jenkins for privately hosted websites
- View test reports in Jenkins
Prerequisites
Before you can start integration, ensure that the following tasks are complete.
- Jenkins CI server (v1.653+) is installed on your machine.
- Access to the BrowserStack account credentials, namely Access Key and Username.
- Jenkins server is running locally on the default port
http://localhost:8080/, and have created a pipeline. - You are a maintainer or owner of your project repository.
- Jenkinsfile is created in your project repository.
Install and configure the BrowserStack Jenkins plugin
The BrowserStack Jenkins plugin eases the process of configuring Jenkins to run tests on BrowserStack. This section explains how to:
Step 1: Install the BrowserStack Plugin
To install the BrowserStack plugin, complete the following steps:
- Navigate to your Jenkins page, and click Manage jenkins in the left navigation bar.
- On the Manage Jenkins page, click Manage Plugins.
- On the Plugin Manager page, click the Available tab.
- Search for BrowserStack in the search box.
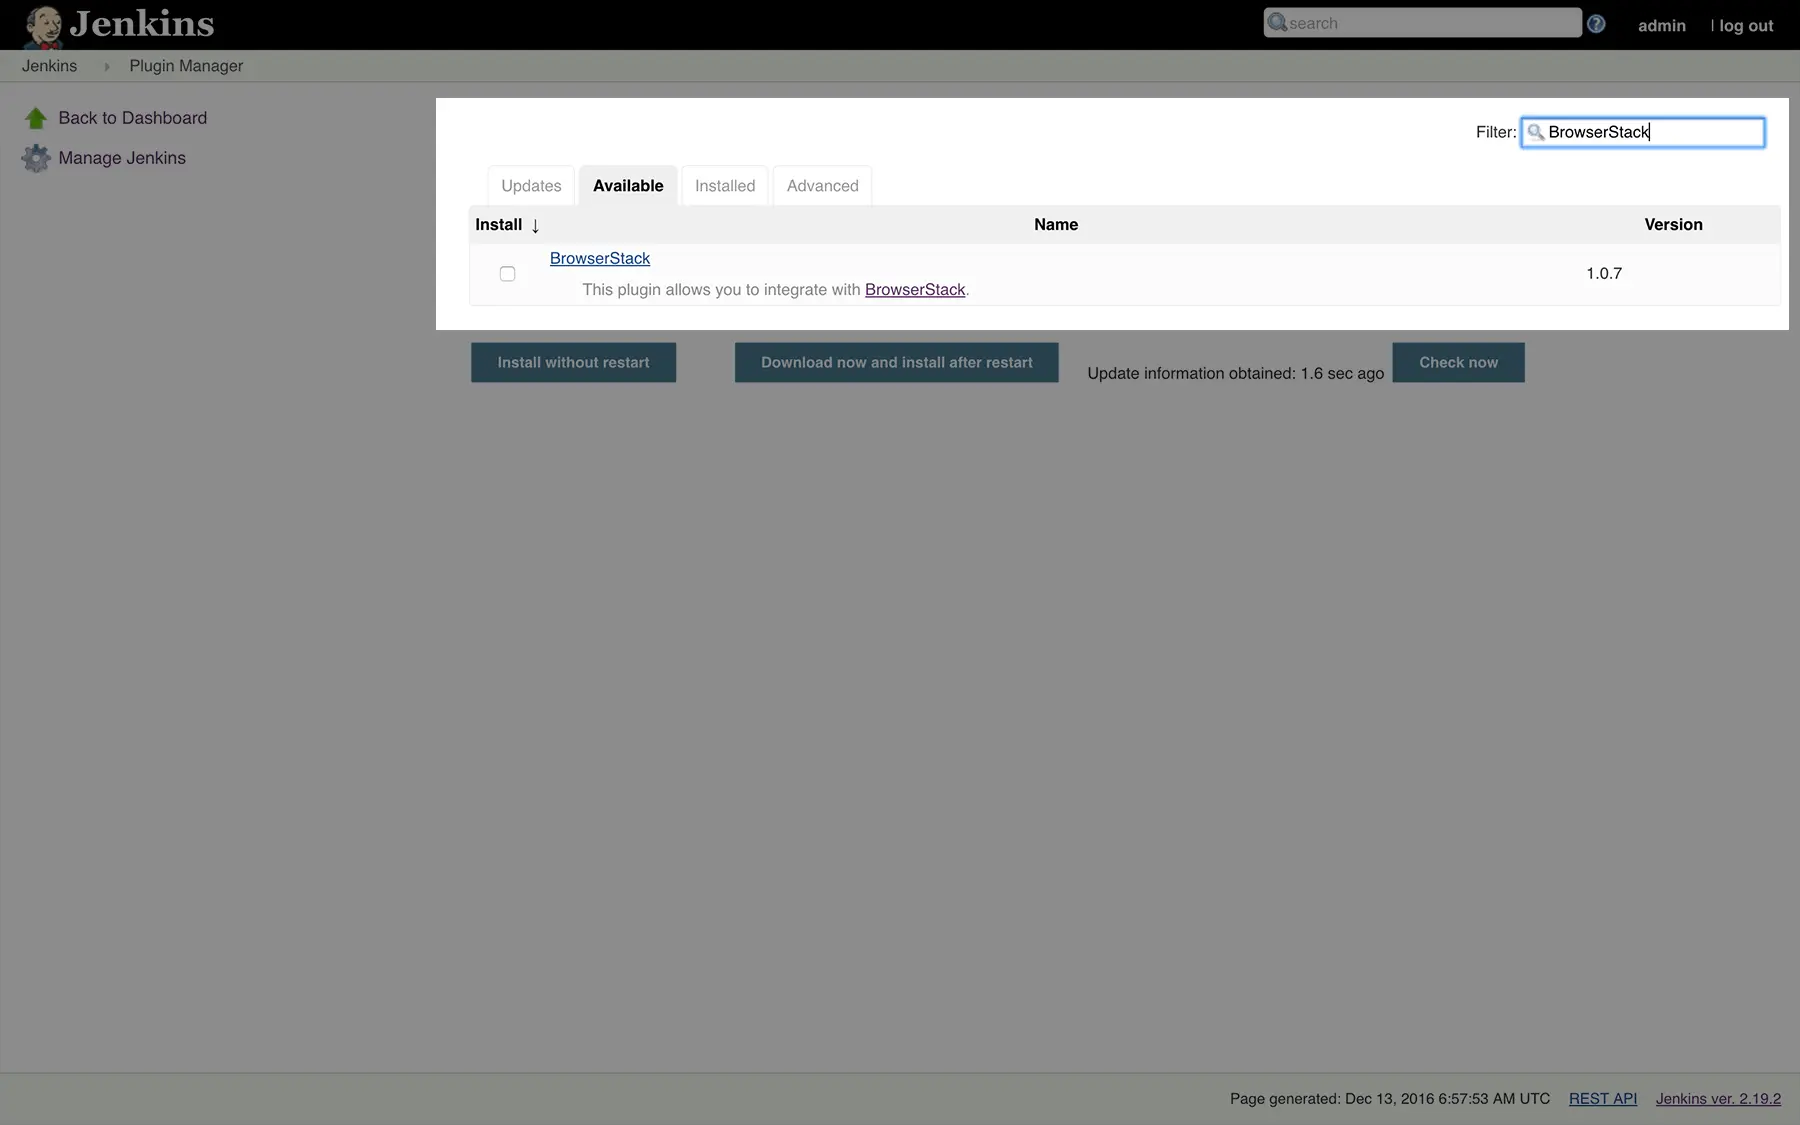
- Select BrowserStack and click either Install without restart or Download now and install after restart, depending on your preference.
- On the Installing Plugins/Upgrades page, view the installation status of the plugin.
- After successful installation, click Go back to the top page to configure the plugin.
Step 2: Configure BrowserStack credentials in Jenkins
After the plugin installation, complete the following steps to configure your BrowserStack credentials in the plugin:
- On your Jenkins page, click Manage Jenkins > Configure System.
- Under the BrowserStack Credentials section, click Add > Jenkins.
- In the Jenkins Credentials Provider: Jenkins window, enter your Username and Access Key.
- Click Authenticate. After the plugin verifies your BrowserStack credentials, a Success text appears.
- Click Add at the bottom of the Jenkins Credentials Provider: Jenkins window. You will be redirected to the configuration page.
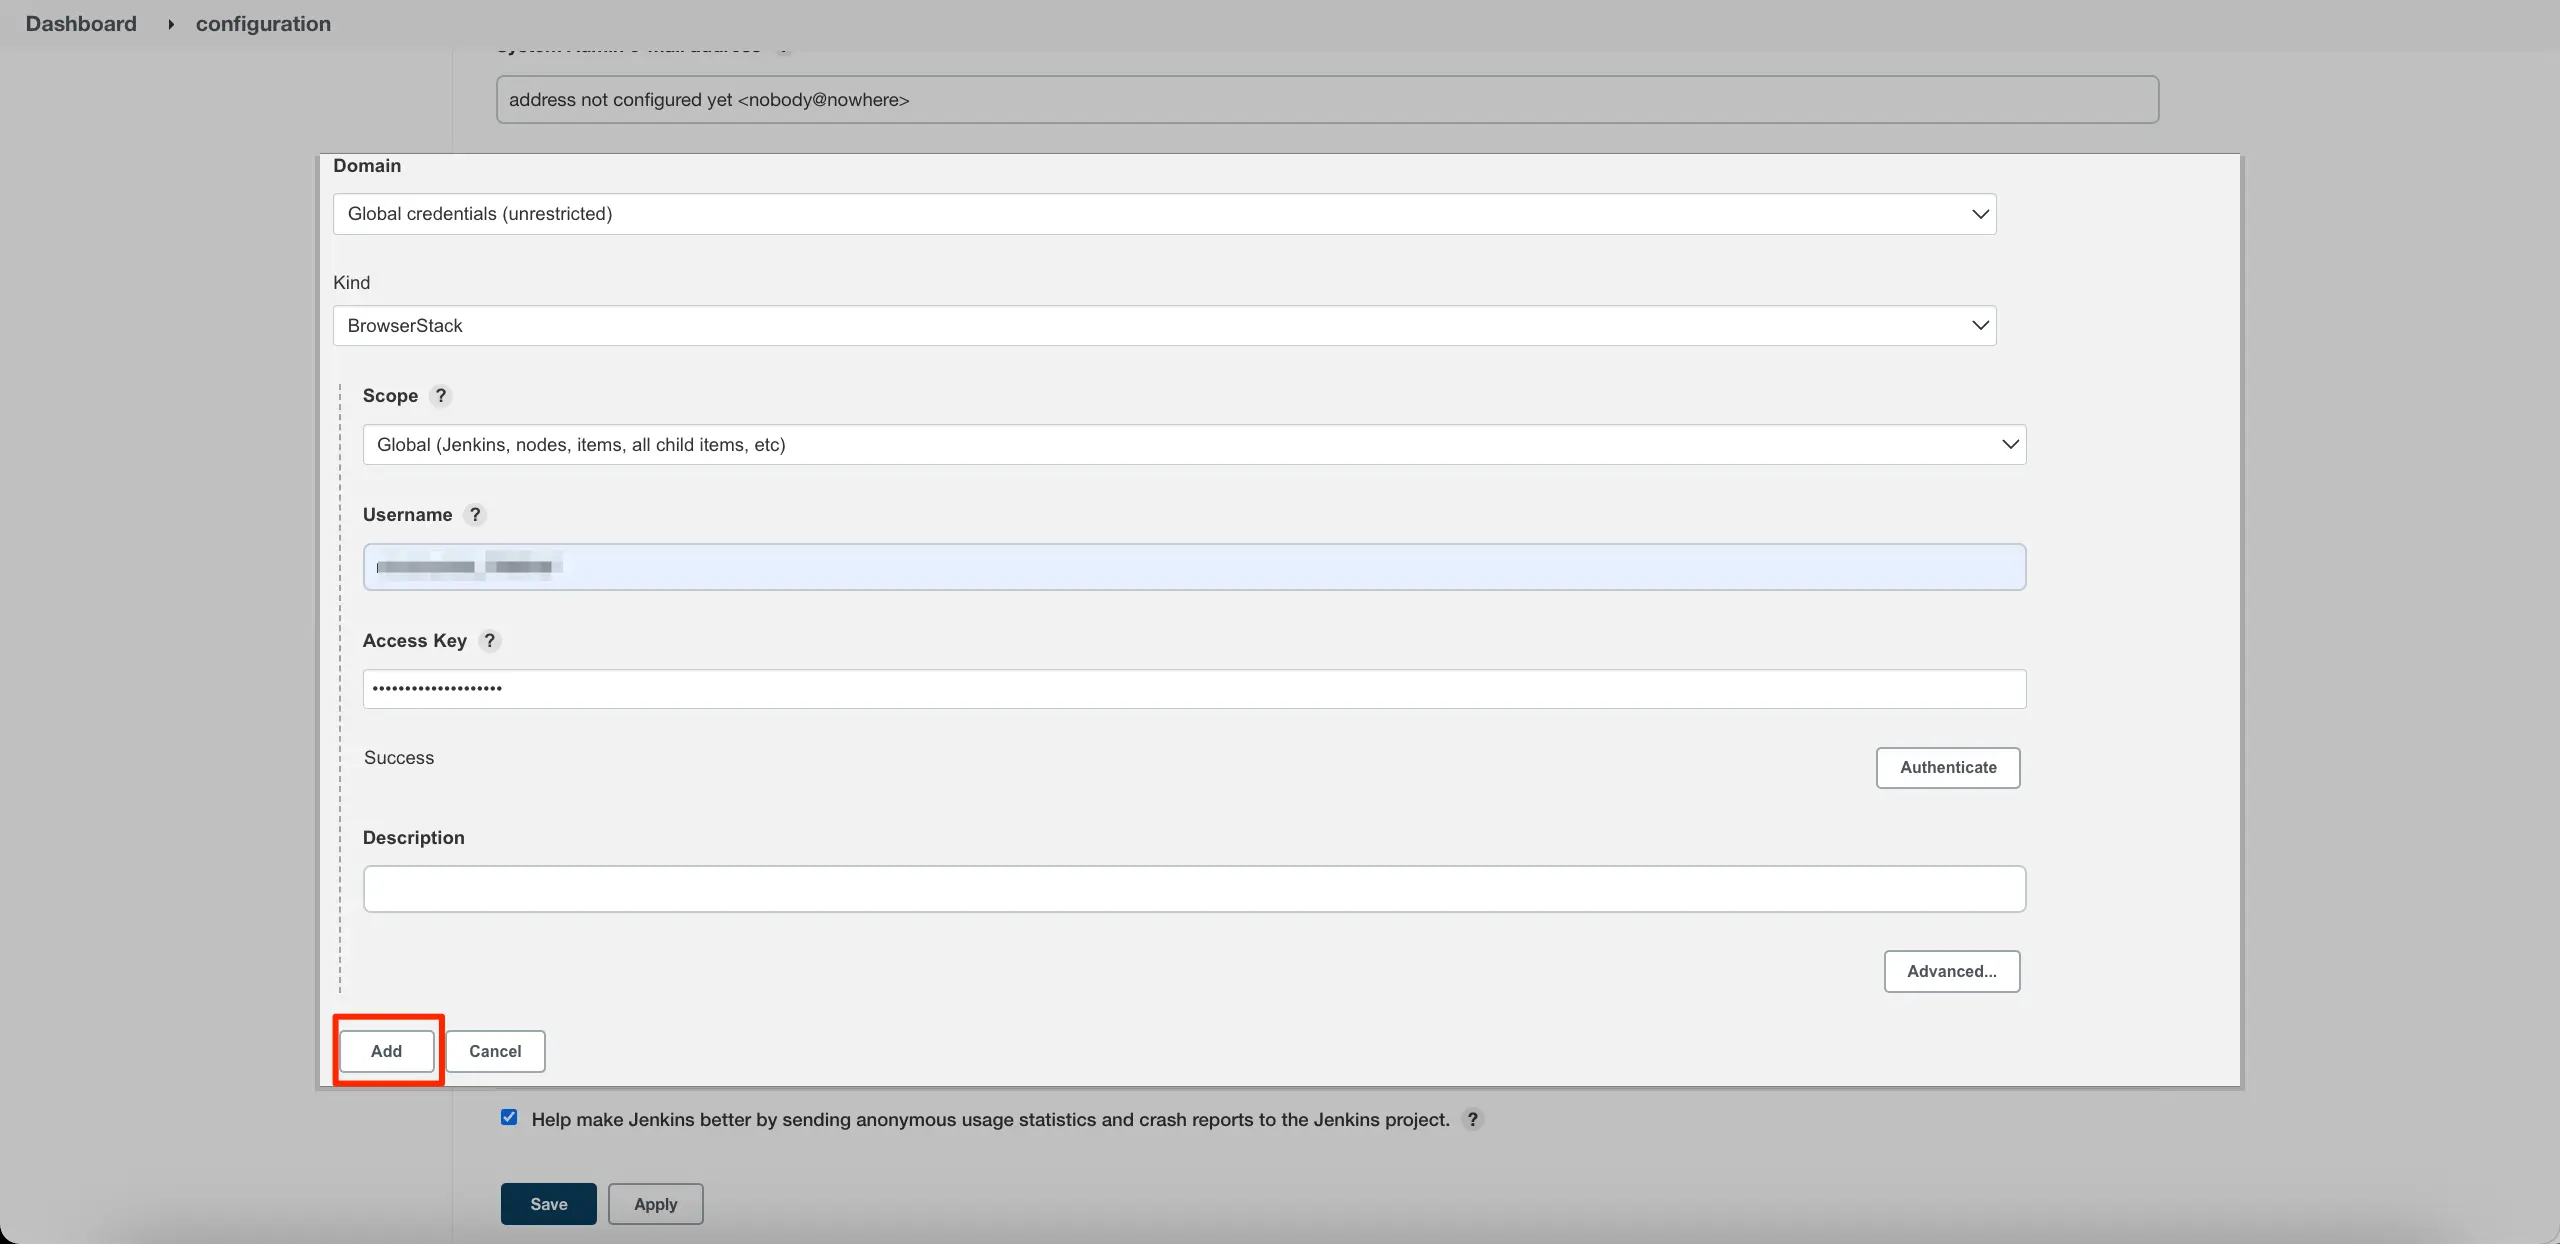
- On the configuration page, click Save.
- On your Jenkins Dashboard, click Manage Jenkins > Manage Credentials.
- In the Credentials section, note down the ID of the credential shown in the ID column. This ID will be used in the
Jenkinsfileof your project.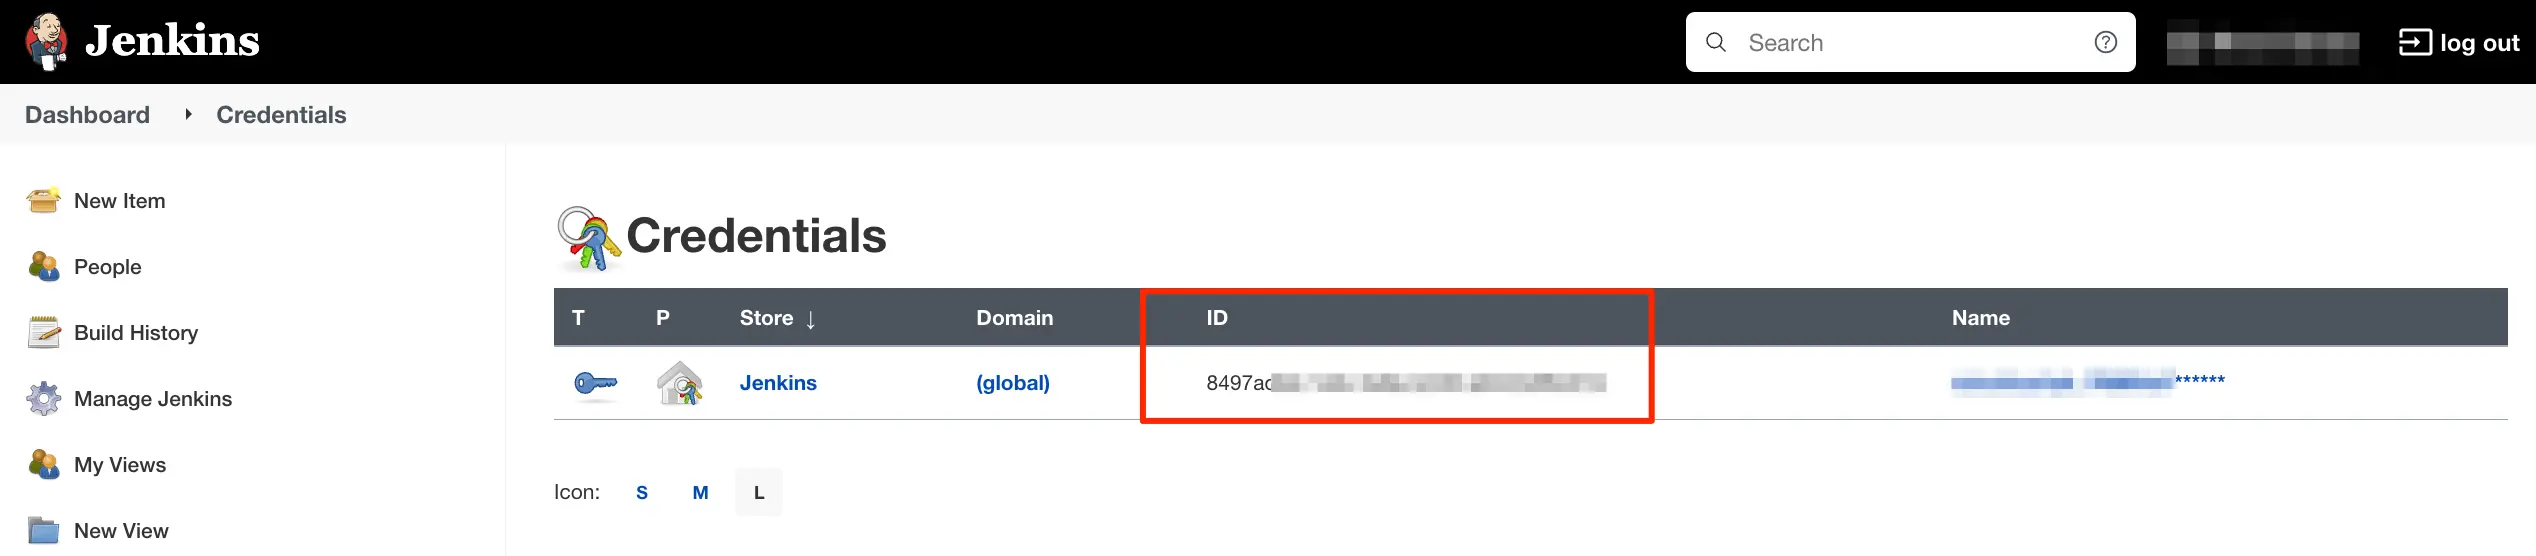
- In the
Jenkinsfileof your project, add thebrowserstack(credentialsId: '<credential_id>')statement and wrap all the test commands inside it, as follows:browserstack(credentialsId: '<credential_id>') { # your test commands }
The following sample Jenkinsfile defines the setup stage, credential ID, and a sample shell command:
pipeline {
   agent any
   stages {
      stage('setup') {
         steps {
            browserstack(credentialsId: '<credential_id>') {
               echo "hello"
            }
         }
      }
    }
  }
Integrate existing test cases
With existing test cases, integrating BrowserStack involves editing your test cases to add BrowserStack capabilities, credentials, and remote URL.
Though your existing test scripts include capabilities, BrowserStack expects specific capabilities, such as browser version, etc. that helps determine how tests are run. This example code snippet shows the BrowserStack specific capabilities.
Step 1: Set environment variables in test script
The BrowserStack Jenkins plugin sets the following environment variables:
-
BROWSERSTACK_USERNAMEandBROWSERSTACK_ACCESS_KEY: They are set to your BrowserStack Username and Access Key, respectively, when you configure BrowserStack credentials in Jenkins. -
BROWSERSTACK_BUILD_NAME: It is generated automatically by Jenkins plugin
Use the following example code snippet to set environment variables and capabilities in your tests:
String username = System.getenv("BROWSERSTACK_USERNAME");
String accessKey = System.getenv("BROWSERSTACK_ACCESS_KEY");
String buildName = System.getenv("BROWSERSTACK_BUILD_NAME");

DesiredCapabilities capabilities = new DesiredCapabilities();
capabilities.setCapability("os", "Windows");
capabilities.setCapability("os_version", "10");
capabilities.setCapability("browser", "chrome");
capabilities.setCapability("browser_version", "latest");
capabilities.setCapability("name", "BStack-[Java] Sample Test"); // test buildName
capabilities.setCapability("build", buildName); // CI/CD job name using BROWSERSTACK_BUILD_NAME env variable
var username = process.env.BROWSERSTACK_USERNAME;
var accessKey = process.env.BROWSERSTACK_ACCESS_KEY;
var buildName = process.env.BROWSERSTACK_BUILD_NAME;

var capabilities = {
	"os" : "Windows",
	"os_version" : "10",
	"browser" : "chrome",
	"browser_version" : "latest",
	"name": "BStack -[Jenkins] Sample Test", // test name
	"build" : buildName, // CI/CD job name using BROWSERSTACK_BUILD_NAME env variable
	"browserstack.user" : username,
	"browserstack.key" : accessKey
};
username = Environment.GetEnvironmentVariable("BROWSERSTACK_USERNAME");
accessKey = Environment.GetEnvironmentVariable("BROWSERSTACK_ACCESS_KEY");
buildName = Environment.GetEnvironmentVariable("BROWSERSTACK_BUILD_NAME");

OpenQA.Selenium.Chrome.ChromeOptions capability = new OpenQA.Selenium.Chrome.ChromeOptions();
capability.setCapability("os", "Windows", true);
capability.AddAdditionalCapability("os_version", "10", true);
capability.AddAdditionalCapability("browser", "Chrome", true);
capability.AddAdditionalCapability("browser_version", "latest", true);
capability.AddAdditionalCapability("name", "BStack-[Jenkins] Sample Test", true); // test name
capability.AddAdditionalCapability("build", buildName, true); // CI/CD job name using BROWSERSTACK_BUILD_NAME env variable
capability.AddAdditionalCapability("browserstack.user", username, true);
capability.AddAdditionalCapability("browserstack.key", accessKey, true);
username = os.getenv("BROWSERSTACK_USERNAME")
access_key = os.getenv("BROWSERSTACK_ACCESS_KEY")
build_name = os.getenv("BROWSERSTACK_BUILD_NAME")

caps = {
 'os': 'Windows',
 'os_version': '10',
 'browser': 'chrome',
 'browser_version': 'latest',
 'name': 'BStack-[Jenkins] Sample Test', # test name
 'build': build_name, # CI/CD job name using BROWSERSTACK_BUILD_NAME env variable
 'browserstack.user': username,
 'browserstack.key': access_key
}
Step 2: Add commands in Jenkinsfile to run test
Add commands in your Jenkinsfile to run your test using the following steps:
- Navigate to the
Jenkinsfileof your project. -
Add the commands and wrap all the test commands inside the
browserStackstatement, as follows. To run parallel tests, add the command used to run parallel tests.Jenkinsfilepipeline { agent any stages { stage('setup') { steps { browserstack(credentialsId: '<credential_ID>') { // add commands to run test // Following are some of the example commands ----- sh 'npm install' sh 'npx playwright test --config=./playwright.config.js' } } # ... } } }
Integrate test cases for privately hosted websites
If you are testing websites hosted locally as part of your testing or development environment, you need to configure your Jenkins pipeline to use the Local testing.
Using the Local testing feature of BrowserStack, remote browsers at the BrowserStack cloud can access websites hosted on your private or internal networks. To learn more about how Local testing works, check out the Local Testing guide.
Apart from setting up a Local connection, you must also set the browserstack.local capability to true in your test scripts.
The BrowserStack Jenkins plugin is responsible for:
- Downloading the BrowserStack Local binary for every platform that the build job is running on
- Setting up and tearing down the secure tunnel.
Step 1: Enable BrowserStack Local in Jenkinsfile
Navigate to the Jenkinsfile of your project and apart from the credentials ID, add the localConfig option to the browserstack statement as follows:
Adding this option sets the BROWSERSTACK_LOCAL variable to true in your Jenkins pipeline.
browserstack(credentialsId: '<credentials_ID>', localConfig: [localOptions: '<local-options>', localPath: '/path/to/local']) {
    // commands for executing tests
}
Parameters specified within the localConfig parameter are as follows:
| Parameter | Description | Values |
|---|---|---|
localOptions |
Specify additional configuration options when running the Local binary. This is an optional parameter. |
For example, localOptions: '--force, --proxy-user'. Check out the Local binary flags section to learn about several flags. Keep it blank to specify none of the configuration. |
localPath |
If you are using an externally downloaded binary, you can enter its location here. This is an optional parameter. |
For example, localPath: '/Users/demo/Downloads/BrowserStackLocal'Keep it blank if you want BrowserStack Local binary to be downloaded at the current working directory of your Jenkins pipeline. Keeping it blank is recommended especially if you are using Jenkins in master-slave configurations, since the plugin will download the appropriate binary for the build agent OS. |
Step 2: Set environment variables in test script
The BrowserStack Jenkins plugin sets the following environment variables:
-
BROWSERSTACK_USERNAMEandBROWSERSTACK_ACCESS_KEY: They are set to your BrowserStack Username and Access Key, respectively, when you configure BrowserStack credentials in Jenkins -
BROWSERSTACK_BUILD_NAME: It is generated automatically by Jenkins plugin -
BROWSERSTACK_LOCALandBROWSERSTACK_LOCAL_IDENTIFIER: They are set only if you have enabled BrowserStack Local in your Jenkins pipeline
Use the following example code snippet to set environment variables and capabilities in your tests:
String username = System.getenv("BROWSERSTACK_USERNAME");
String accessKey = System.getenv("BROWSERSTACK_ACCESS_KEY");
String buildName = System.getenv("BROWSERSTACK_BUILD_NAME");
String browserstackLocal = System.getenv("BROWSERSTACK_LOCAL");
String browserstackLocalIdentifier = System.getenv("BROWSERSTACK_LOCAL_IDENTIFIER");

DesiredCapabilities capabilities = new DesiredCapabilities();
capabilities.setCapability("os", "Windows");
capabilities.setCapability("os_version", "10");
capabilities.setCapability("browser", "chrome");
capabilities.setCapability("browser_version", "latest");
capabilities.setCapability("name", "BStack-[Java] Sample Test"); // test buildName
capabilities.setCapability("build", buildName); // CI/CD job name using BROWSERSTACK_BUILD_NAME env variable
capabilities.setCapability("browserstack.local", browserstackLocal);
capabilities.setCapability("browserstack.localIdentifier", browserstackLocalIdentifier);
var username = process.env.BROWSERSTACK_USERNAME;
var accessKey = process.env.BROWSERSTACK_ACCESS_KEY;
var buildName = process.env.BROWSERSTACK_BUILD_NAME;
var browserstackLocal = process.env.BROWSERSTACK_LOCAL;
var browserstackLocalIdentifier = process.env.BROWSERSTACK_LOCAL_IDENTIFIER;

var capabilities = {
	"os" : "Windows",
	"os_version" : "10",
	"browser" : "chrome",
	"browser_version" : "latest",
	"name": "BStack -[Jenkins] Sample Test", // test name
	"build" : buildName, // CI/CD job name using BROWSERSTACK_BUILD_NAME env variable
	"browserstack.local" : browserstackLocal,
	"browserstack.localIdentifier" : browserstackLocalIdentifier,
	"browserstack.user" : username,
	"browserstack.key" : accessKey
};
username = Environment.GetEnvironmentVariable("BROWSERSTACK_USERNAME");
accessKey = Environment.GetEnvironmentVariable("BROWSERSTACK_ACCESS_KEY");
buildName = Environment.GetEnvironmentVariable("BROWSERSTACK_BUILD_NAME");
browserstackLocal = Environment.GetEnvironmentVariable("BROWSERSTACK_LOCAL");
browserstackLocalIdentifier = Environment.GetEnvironmentVariable("BROWSERSTACK_LOCAL_IDENTIFIER");

IWebDriver driver;
OpenQA.Selenium.Chrome.ChromeOptions capability = new OpenQA.Selenium.Chrome.ChromeOptions();
capability.setCapability("os", "Windows", true);
capability.AddAdditionalCapability("os_version", "10", true);
capability.AddAdditionalCapability("browser", "Chrome", true);
capability.AddAdditionalCapability("browser_version", "latest", true);
capability.AddAdditionalCapability("name", "BStack-[Jenkins] Sample Test", true); // test name
capability.AddAdditionalCapability("build", buildName, true); // CI/CD job name using BROWSERSTACK_BUILD_NAME env variable
capability.AddAdditionalCapability("browserstack.local", browserstackLocal, true);
capability.AddAdditionalCapability("browserstack.localIdentifier", browserstackLocalIdentifier, true);
capability.AddAdditionalCapability("browserstack.user", username, true);
capability.AddAdditionalCapability("browserstack.key", accessKey, true);
username = os.getenv("BROWSERSTACK_USERNAME")
access_key = os.getenv("BROWSERSTACK_ACCESS_KEY")
build_name = os.getenv("BROWSERSTACK_BUILD_NAME")
browserstack_local = os.getenv("BROWSERSTACK_LOCAL")
browserstack_local_identifier = os.getenv("BROWSERSTACK_LOCAL_IDENTIFIER")

caps = {
 'os': 'Windows',
 'os_version': '10',
 'browser': 'chrome',
 'browser_version': 'latest',
 'name': 'BStack-[Jenkins] Sample Test', # test name
 'build': build_name, # CI/CD job name using BROWSERSTACK_BUILD_NAME env variable
 'browserstack.local': browserstack_local,
 'browserstack.localIdentifier': browserstack_local_identifier,
 'browserstack.user': username,
 'browserstack.key': access_key
}
Step 3: Add command in Jenkins to run Local test
You can run Local testing in Jenkins using either of the following options:
- Go to the
Jenkinsfileof your project repository. - Add the following commands, inside the
browserStackstatement, to set up the Local binary and run the Local test.
These commands use the--daemon startand--daemon stopflags to start and stop Local binary respectively as follows. Check out the Binary parameter guide to learn about additional flags used in running Local binary.
pipeline {
agent any
stages {
    stage('setup') {
        steps {
            browserstack(credentialsId: '<credential_ID>', localConfig: [localOptions: '', localPath: '']) {
                // For Linux-based systems, add the following commands in the given console to download the binary, run it, and stop its execution after the test has been executed.
                sh 'wget "https://local-downloads.browserstack.com/BrowserStackLocal-linux-x64.zip"'
                sh 'unzip BrowserStackLocal-linux-x64.zip'
                sh './BrowserStackLocal --key $BROWSERSTACK_ACCESS_KEY --daemon start'
                sh '<your_test_commands>'
                sh './BrowserStackLocal --key $BROWSERSTACK_ACCESS_KEY --daemon stop'

                // For macOS-based systems, add the following commands in the given console to download the binary, run it, and stop its execution after the test has been executed.
                sh 'wget "https://local-downloads.browserstack.com/BrowserStackLocal-darwin-x64.zip"'
                sh 'unzip BrowserStackLocal-darwin-x64.zip'
                sh './BrowserStackLocal --key $BROWSERSTACK_ACCESS_KEY --daemon start'
                sh '<your_test_commands>'
                sh './BrowserStackLocal --key $BROWSERSTACK_ACCESS_KEY --daemon stop'

                // For Windows-based systems, add the following commands in the given console to download the binary, run it, and stop its execution after the test has been executed.
                sh 'wget "https://local-downloads.browserstack.com/BrowserStackLocal-win32.zip"'
                sh 'powershell.exe D:\BrowserStackLocal.exe'
                sh '<your-test-commands>'
                sh './BrowserStackLocal --key $BROWSERSTACK_ACCESS_KEY --daemon stop'
            }
        }
    }
    }
}
If you prefer to manage the Local connection through your test scripts, you can use the language bindings.
With language bindings, the start and stop of local binary is handled in the test script itself. Check out the enabling Local testing using language bindings guide to edit your test scripts.
After you use language binding in your test script, complete the following steps:
- Navigate to the
Jenkinsfileof your project repository. - Add the command to run Local test inside the
browserStackstatement, as follows:
pipeline {
  agent any
  stages {
      stage('setup') {
        steps {
            browserstack(credentialsId: '<credential_ID>', localConfig: [localOptions: '', localPath: '']) {
                // add commands to run Local test
                // For example -----
                // sh 'npm install'
                // sh 'node local.js'
            }
        }
      }
    }
  }
Local testing setup without using the CI/CD plugin
Following are the ways to configure local testing without using the BrowserStack-Jenkins plugin
Using BrowserStackLocal Binary
In this case, you will need to set the browserstack.local capability to true and start a BrowserStackLocal binary instance from your terminal.
Download BrowserStackLocal Binary file
All the available flags in local testing
Using Language bindings
You can initiate a local testing instance directly from your code. Here, you will need to start a local testing instance before the test starts and stop the instance once the test is completed. For this, you will need to install the browserstack-local npm package and import it in your code to create a BrowserStackLocal instance.
Make sure that you have set the browserstack.local capability to true.
Start and stop a local testing instance through language bindings
View test reports in Jenkins
The BrowserStack Jenkins plugin enables you to embed the test results from BrowserStack Automate into Jenkins. The report gives an overall summary of the test build and its sessions.
build capability to the BROWSERSTACK_BUILD_NAME environment variable in your test script without which the plugin fails to generate and embed reports in Jenkins. Check out the Using Environment variables section to learn about environment variables.
Enable reporting in Jenkins using the following steps:
- Go to the
Jenkinsfileof your project. - Add the following code statement after the
browserstackblock in the Jenkinsfile:// Enable reporting in Jenkins browserStackReportPublisher 'automate'
A sample Jenkinsfile that uses the browserStackReportPublisher 'automate' statement is as follows:
pipeline {
agent any
tools {nodejs "node"}
stages {
stage('setup') {
steps {
browserstack(credentialsId: '<credential_id>') {
// some example test commands ...
sh 'npm install'
sh 'npx playwright test --config=./playwright.config.js'
}
 // Enable reporting in Jenkins
 browserStackReportPublisher 'automate'
}
}
}
}
With this integration, you can now view the results of your tests run on BrowserStack within Jenkins.
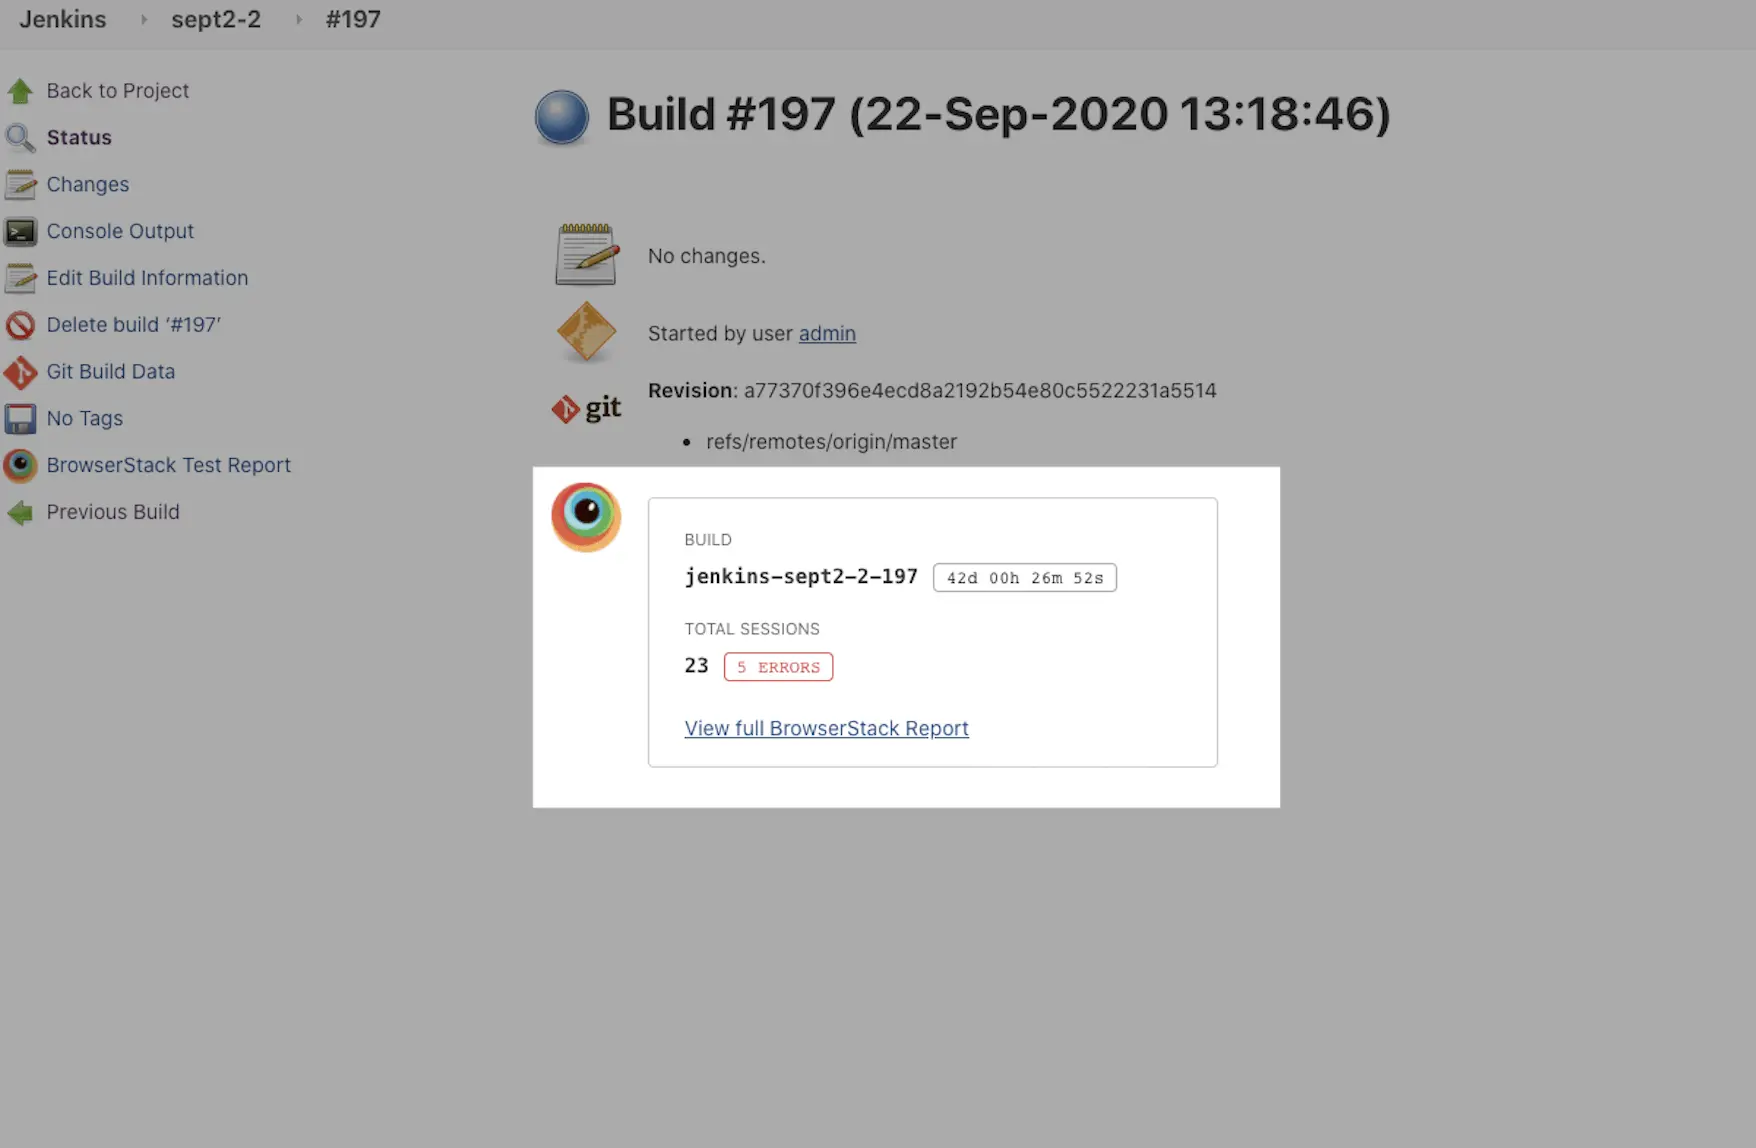
Click either View Full BrowserStack Report or BrowserStack Test Report link in the left navigation bar to view the list of test sessions.
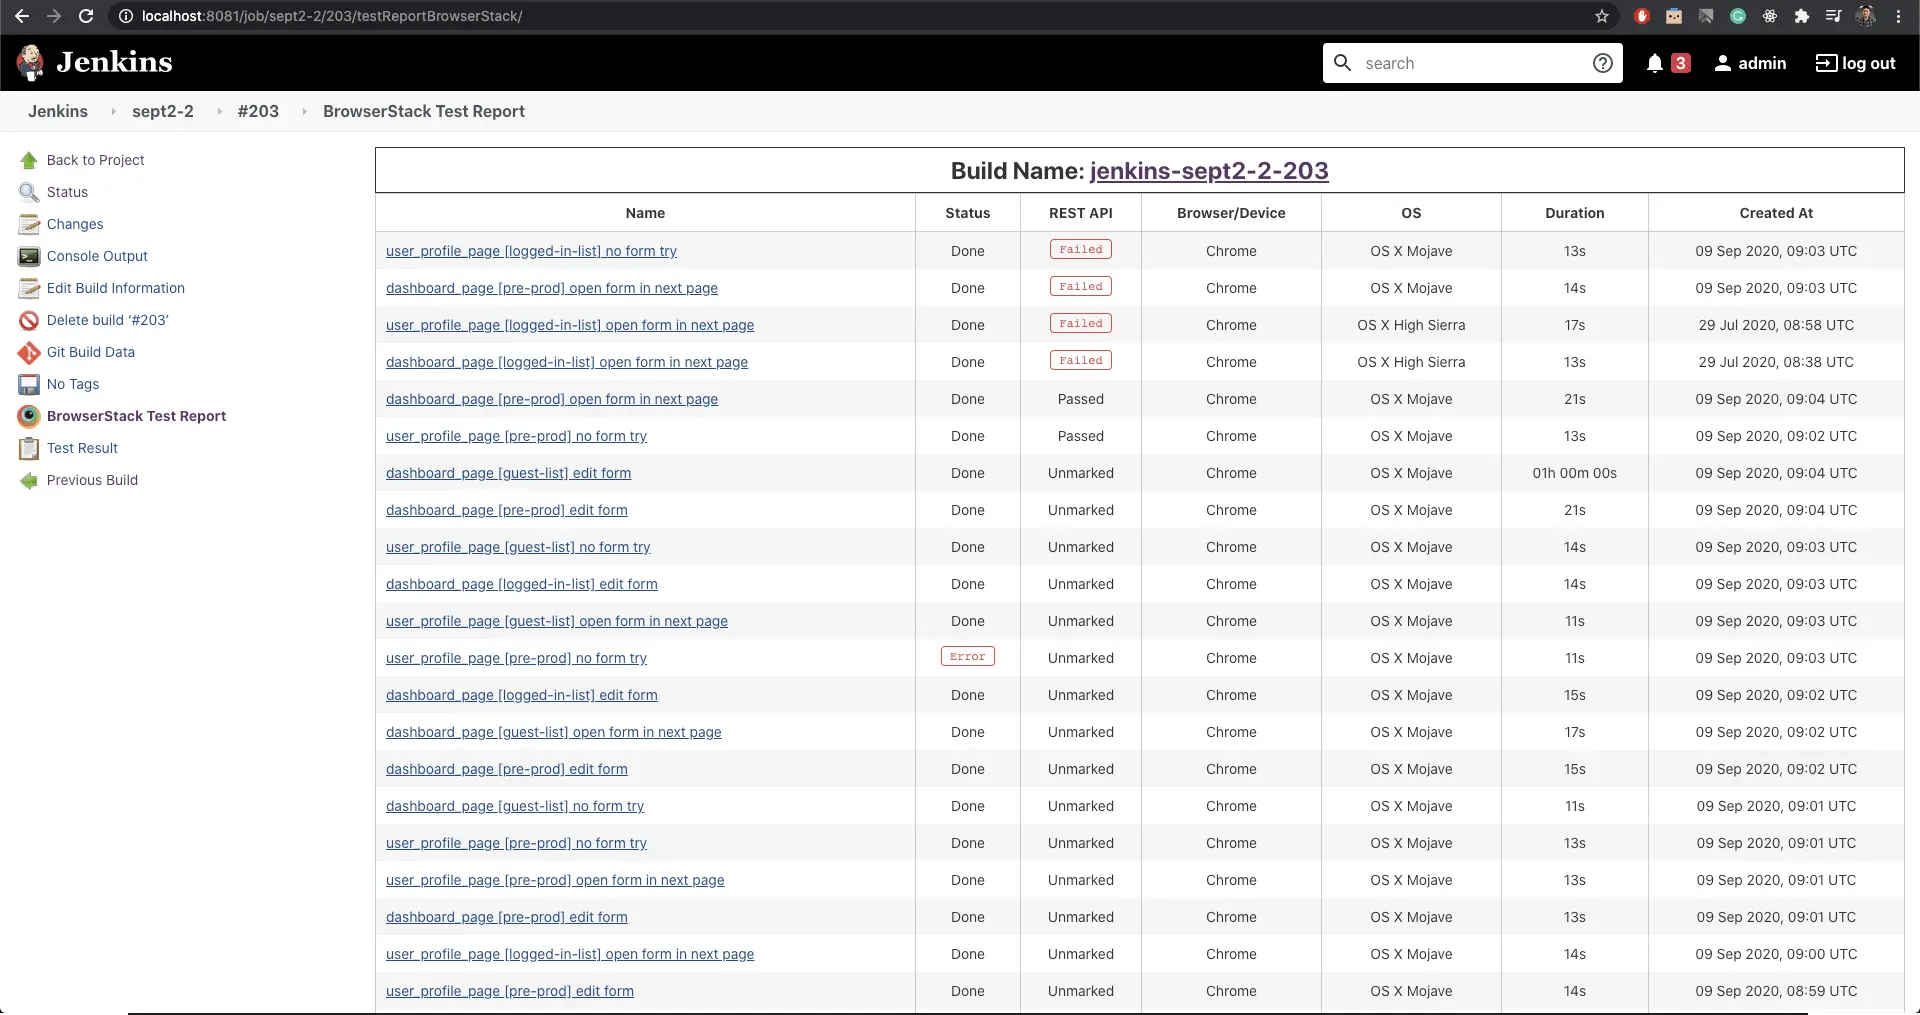
Selecting any session from this table redirects you to the Automate dashboard where you can view video recording, text logs, and other debugging options for a session.
We're sorry to hear that. Please share your feedback so we can do better
Contact our Support team for immediate help while we work on improving our docs.
We're continuously improving our docs. We'd love to know what you liked
We're sorry to hear that. Please share your feedback so we can do better
Contact our Support team for immediate help while we work on improving our docs.
We're continuously improving our docs. We'd love to know what you liked
Thank you for your valuable feedback!