Set up teams
Create and manage multiple teams within an organization account.
Teams is a way to group members on BrowserStack to reflect your organization’s structure. Creating teams is useful for organizations having multiple teams working on different products, belonging to different business units or might be geographically dispersed. We recommend creating teams that align with organization’s internal team structure (e.g. Frontend, MobileSquad, etc ).

Permissions to create teams
If you are the organization Owner or Admin, you can create teams and delete teams. Multiple members can be added to any team with Admin or User roles.
Updates to teams may take a few minutes to take effect across all products.
Manage teams
- Visit User Management under Account.
- On the left navigation bar, Click Teams
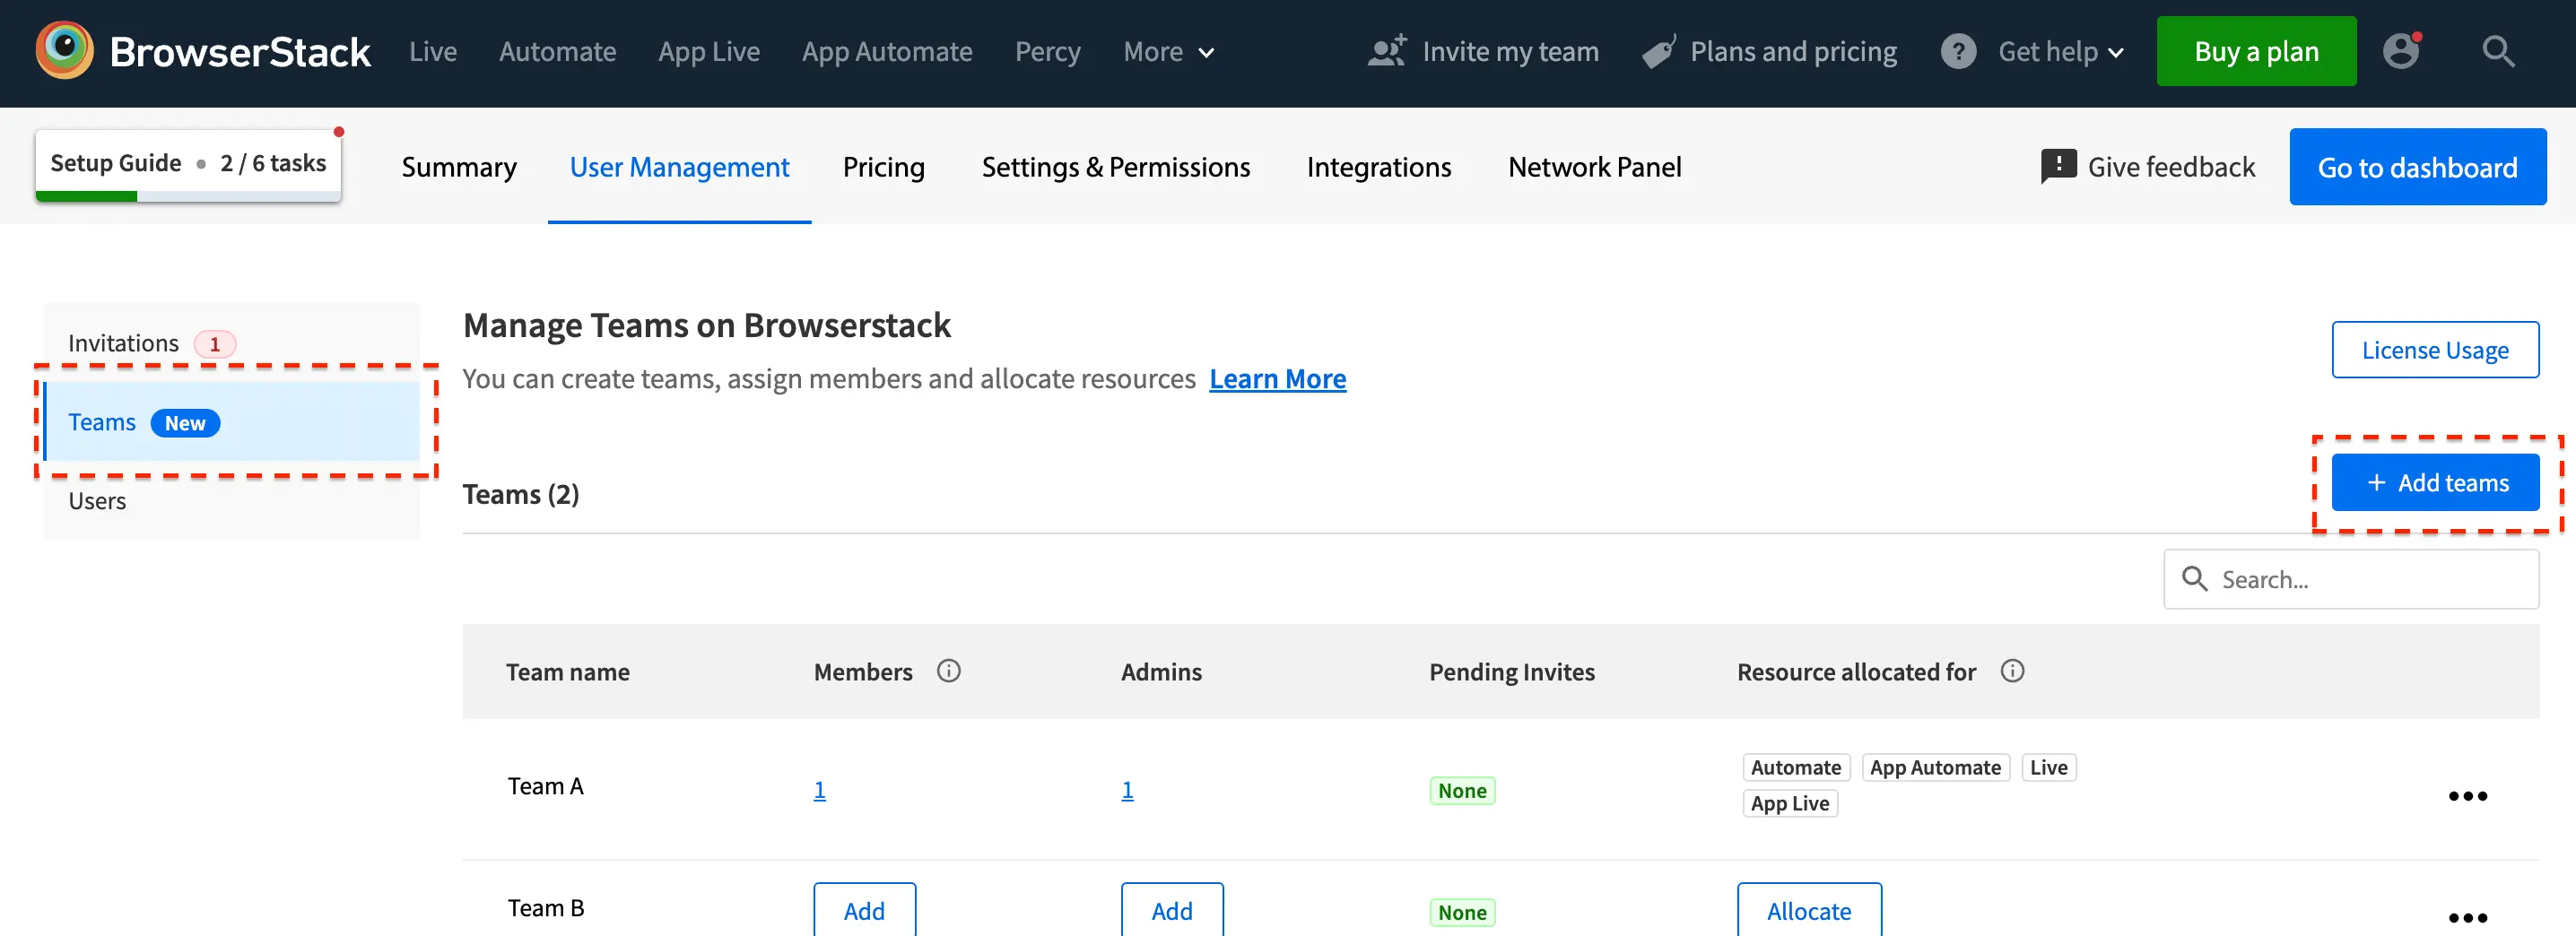
- Click Add Teams button.
- In the Add team dialog, enter a Team Name and click Add Team

- A new team will be created visible in the Teams table.
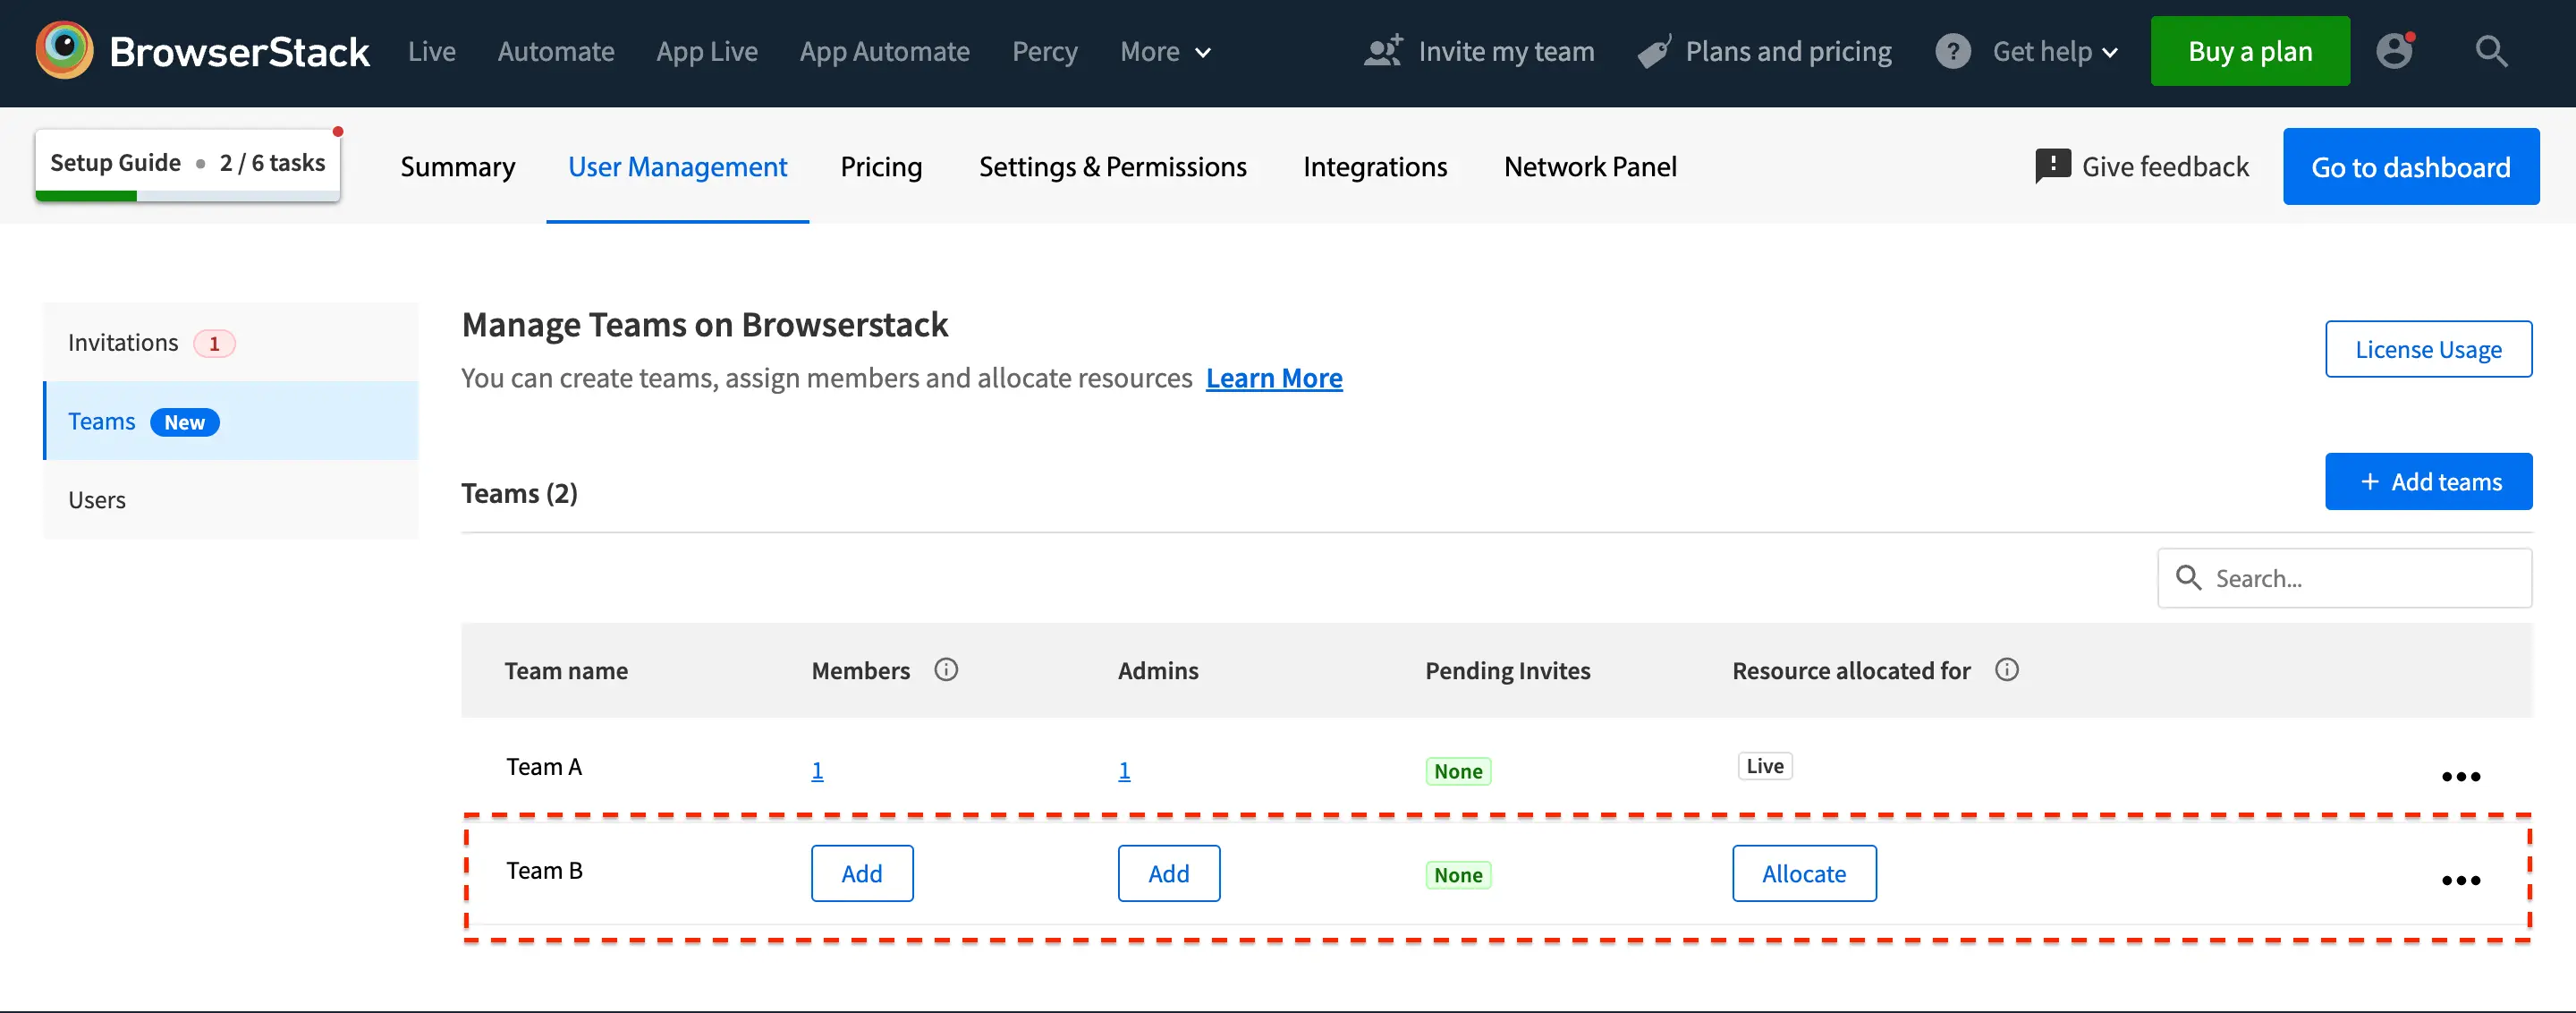
- You can now add users to the new team from the same page by clicking on the Add button in the Members column or by navigating to the users list.
- Visit User Management under Account.
- On the left navigation bar, Click Teams
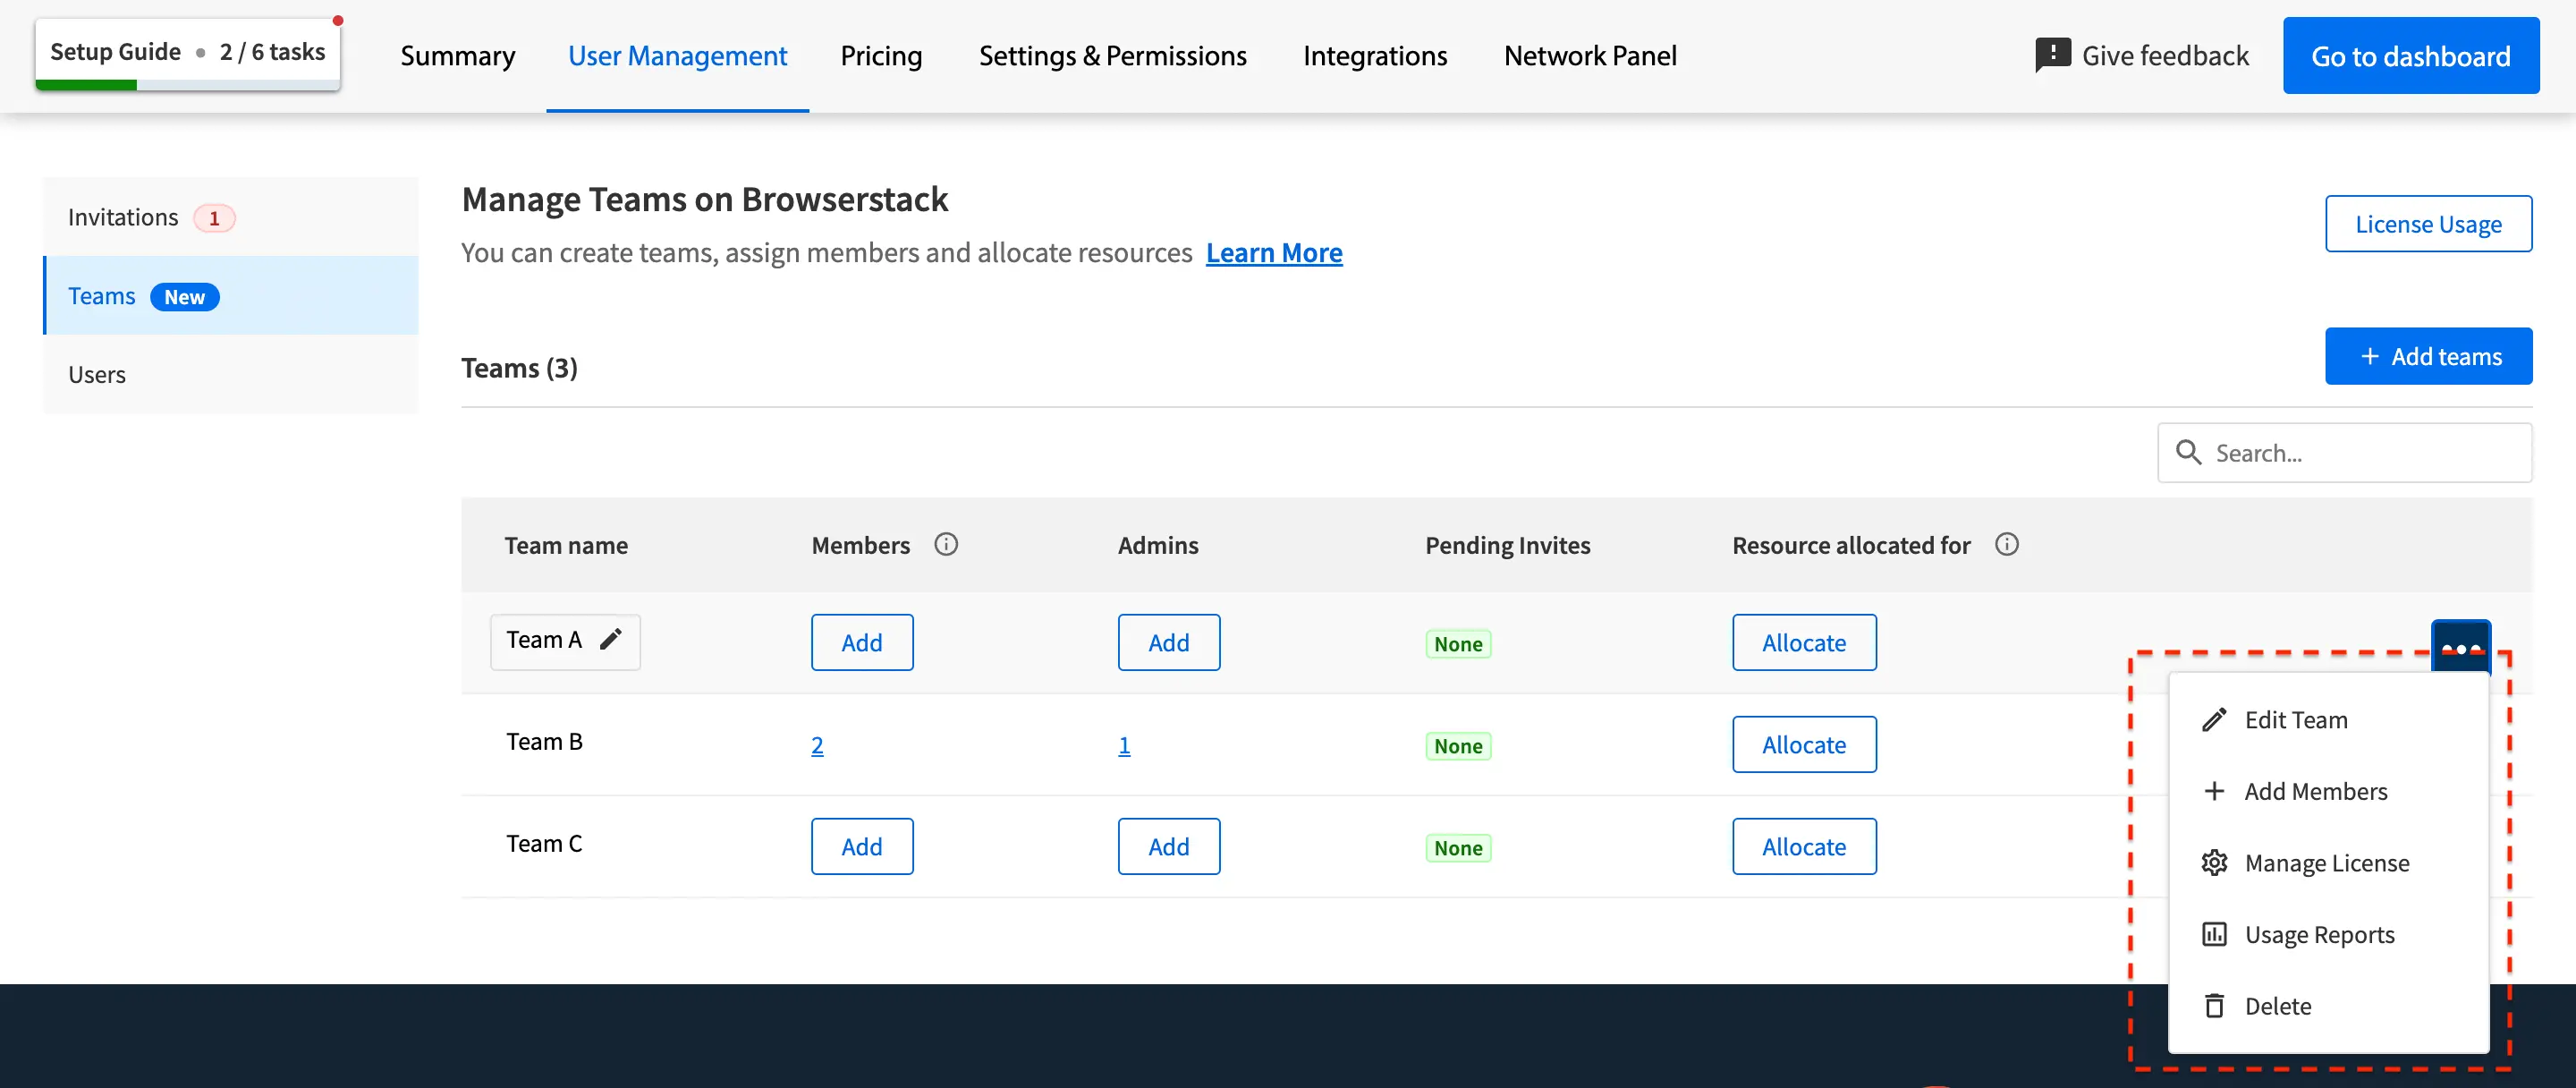
- On the Manage Teams page, locate the Team in the table titled Teams.
- Click More actions (3 dot icon) button at the right side of the row and select Delete
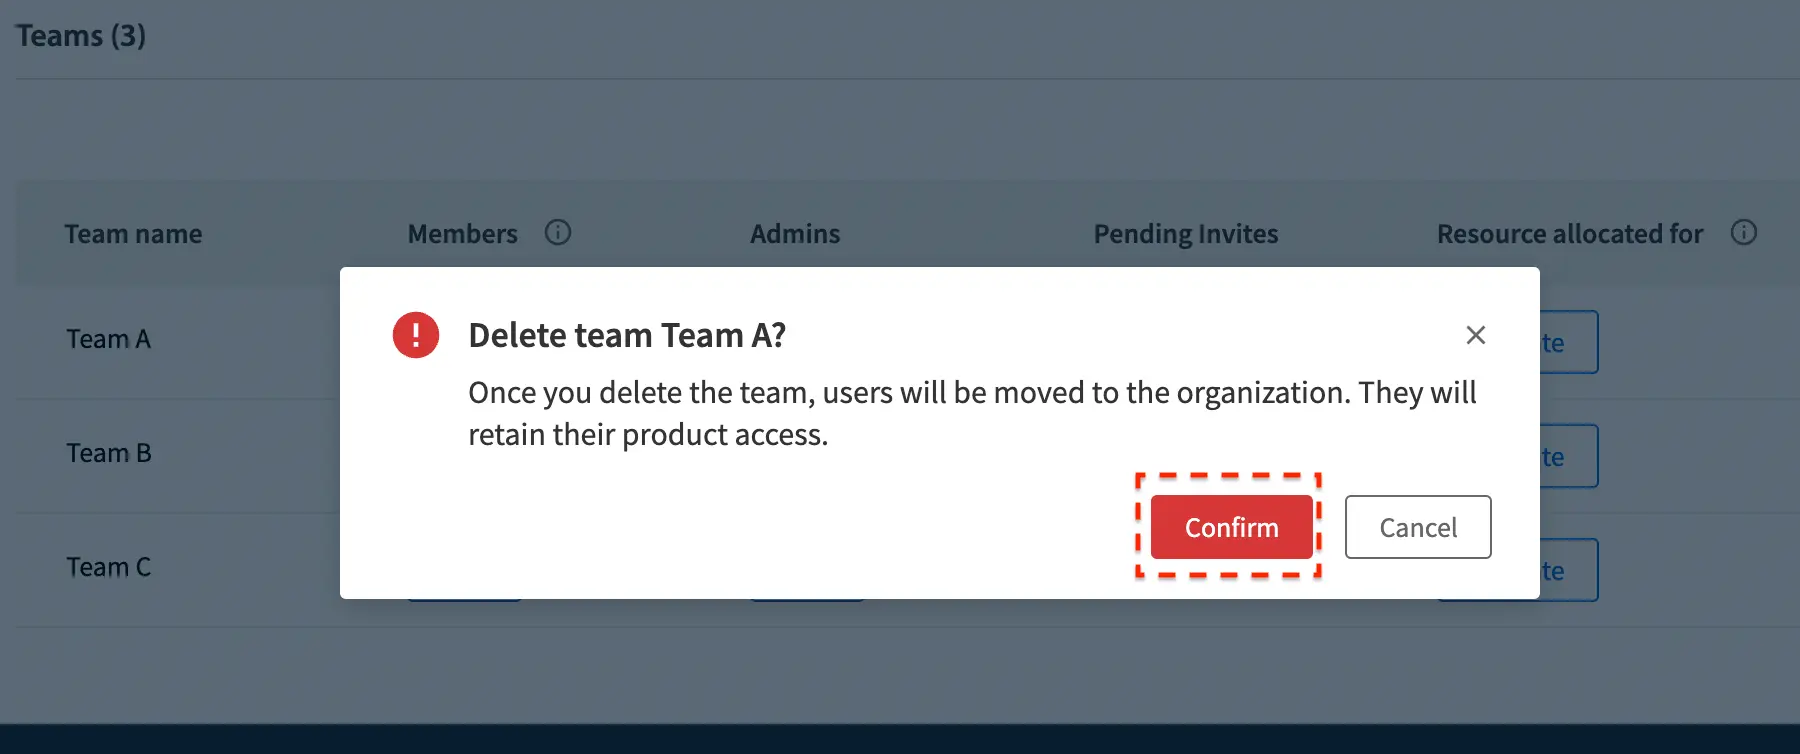
- On the Delete team dialog, click Confirm to delete the team
Advanced team management features
Once teams have been set up for your organization, you can also make use of advanced team management features:
- Manage data access across Teams (only available on Enterprise plan)
- User license allocation for Teams
- Parallel allocation for Teams
- Screenshot capping allocation for Teams
- Test execution allocation for Teams
Manage data access across Teams
Manage Data Access allows organizations to control visibility of data across teams (on the product Dashboards, Test Insights, APIs etc.). Owner can either choose to provide test data access to all users across the organization or restrict users to view test data of their respective teams only by selecting the desired setting:
- Global access: Unrestricted data access to all users.
- Team access: Access restricted to respective team of user.
| Role | Value offering |
|---|---|
| For administrators: | Get the flexibility to maintain data security. Control test-data visibility for team members to enforce compliance with internal security protocols by reducing the risk of information breaches. |
| For users: | See what matters upfront! Get customized views across product and test insights dashboard for faster and easier access. |
For more information, see the Manage Data Access section. You can learn how to enable Global access or Team access settings.
User license allocation for Teams
Once Teams are created, owner can choose either to assign user licenses (for Live and App Live products) to individual teams or let the teams share from the pool of organization user licenses. This helps to ensure that the user licenses are distributed as per testing needs of respective Teams.
How user license allocation for team works?
- Suppose an Organization Acme Inc. has a total 100 users for Live product. There are 2 teams in this organization Team A and TeamB.
- The Owner allocates 25 user licenses to TeamA.
- User licenses for TeamB are left blank.
| Org/Team | User licenses |
|---|---|
| Acme Inc. | |
| Team A | 25 |
| Team B |
This means that this maximum of 25 users (having Live product access) can be invited/added to Team A. The remaining 75 user licenses left can be shared between the Acme Inc. and TeamB.
How to allocate user licenses to a team?
- Visit User Management under Account.
- On the left navigation bar, Click Teams
- Within the Manage Teams page, find the Team in the Teams table.
- Click More actions (3 dot icon) button at the right side of the row and select Manage Licenses. Alternatively, you can also click Allocate in the Resource allocated for column, if available.
- Select the Live/ App Live product from Select Product dropdown.
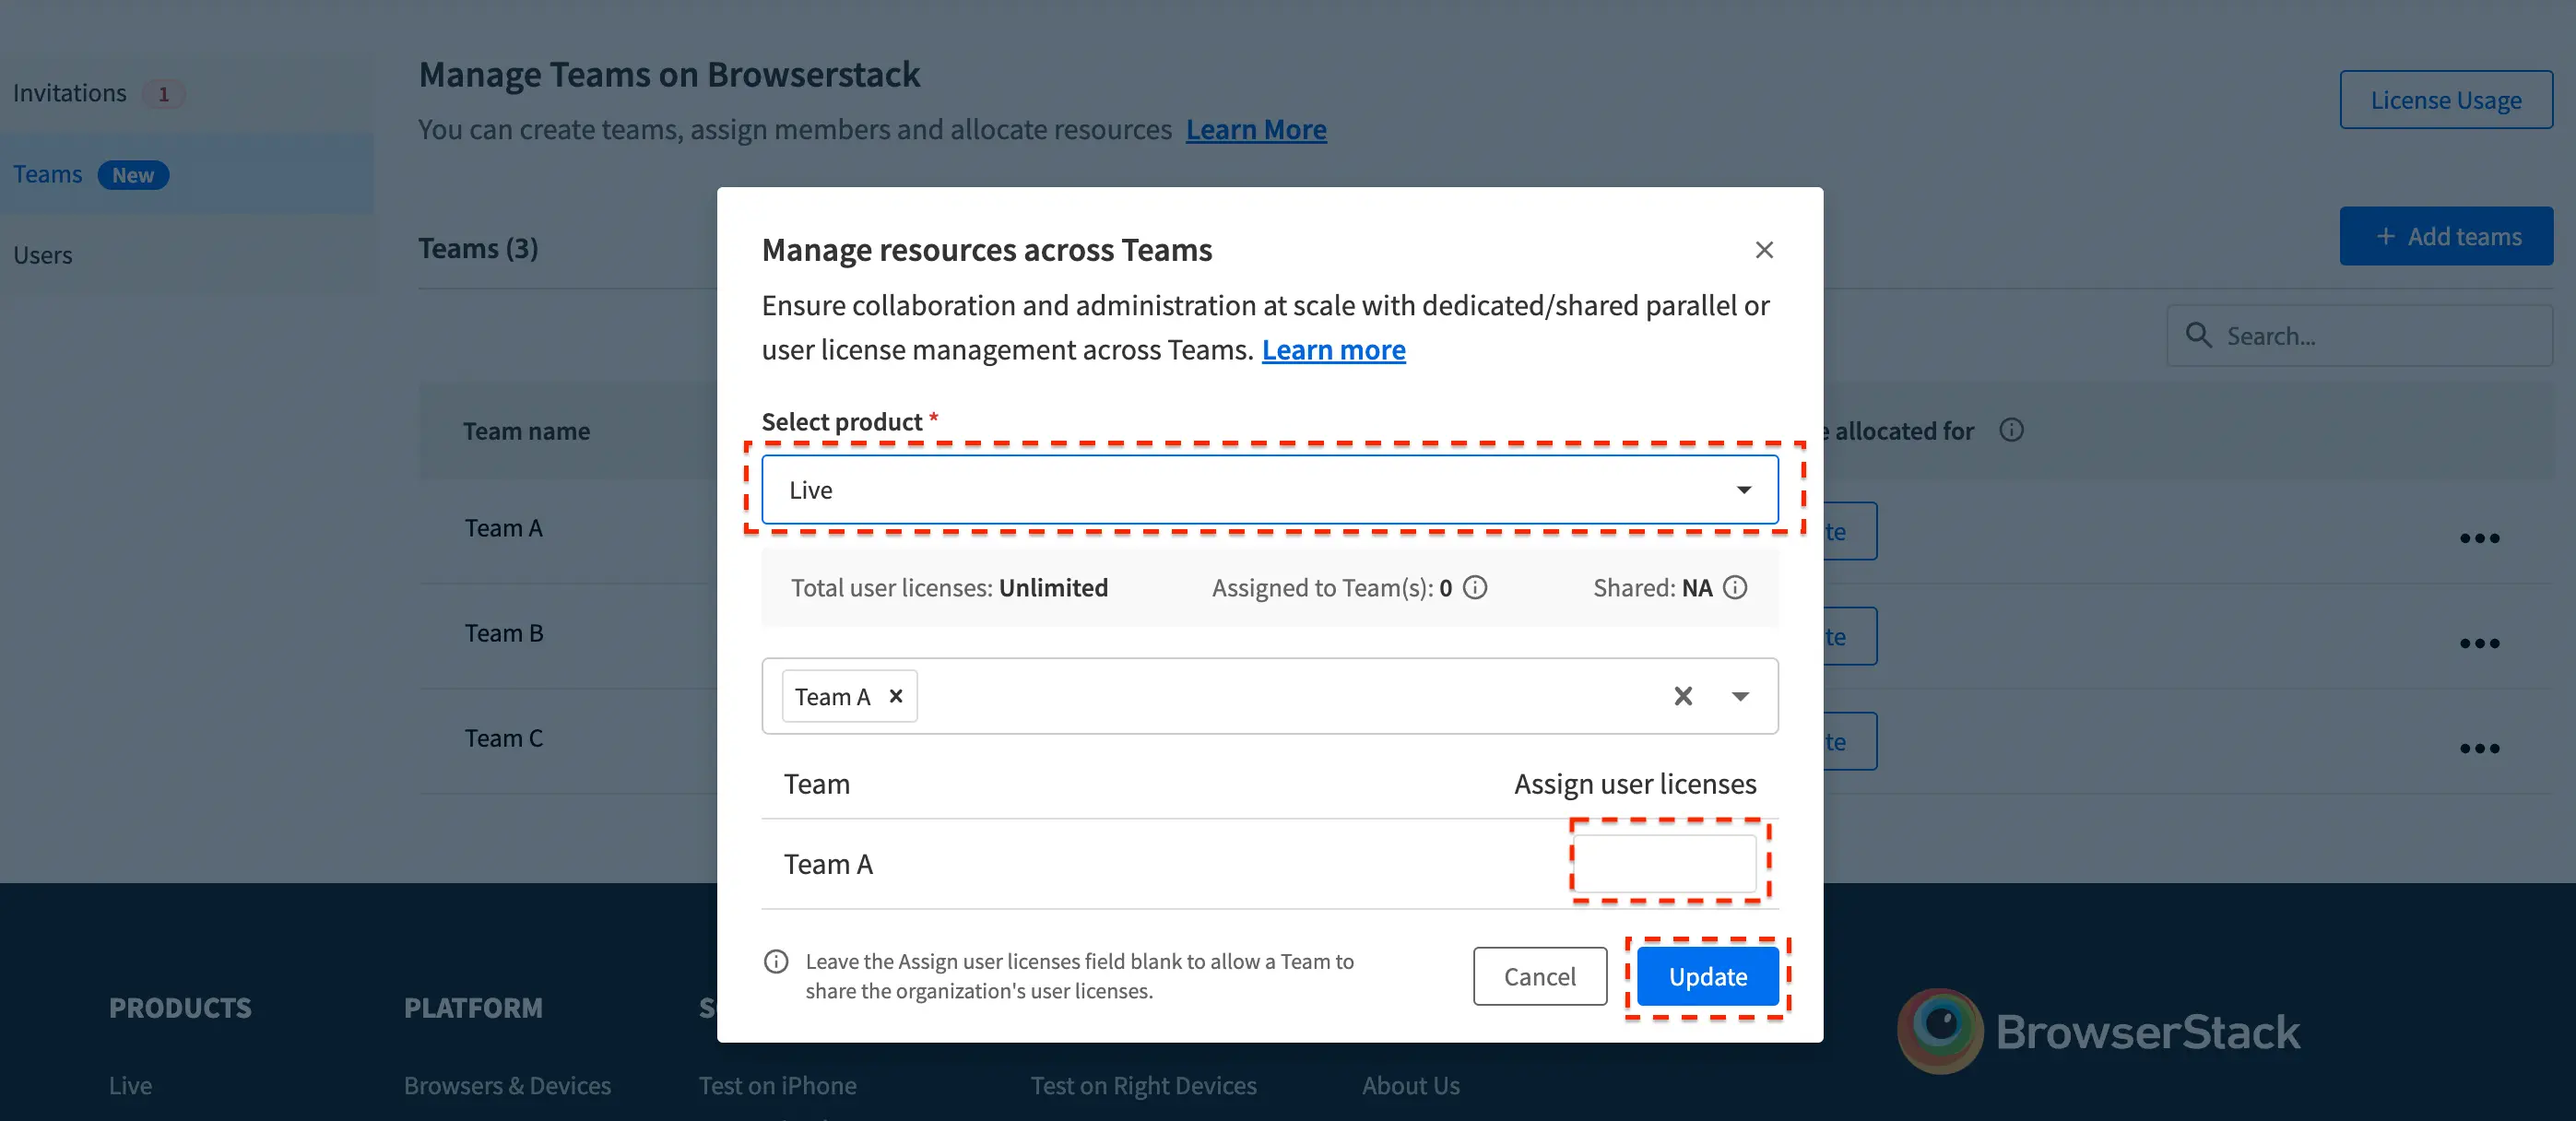
- Add the user licenses limit that you want to assign to the team.
- Leave the Assign user licences input field blank for the Team(s) that will be sharing user licenses with the Organization.
- Click Update to save the changes.
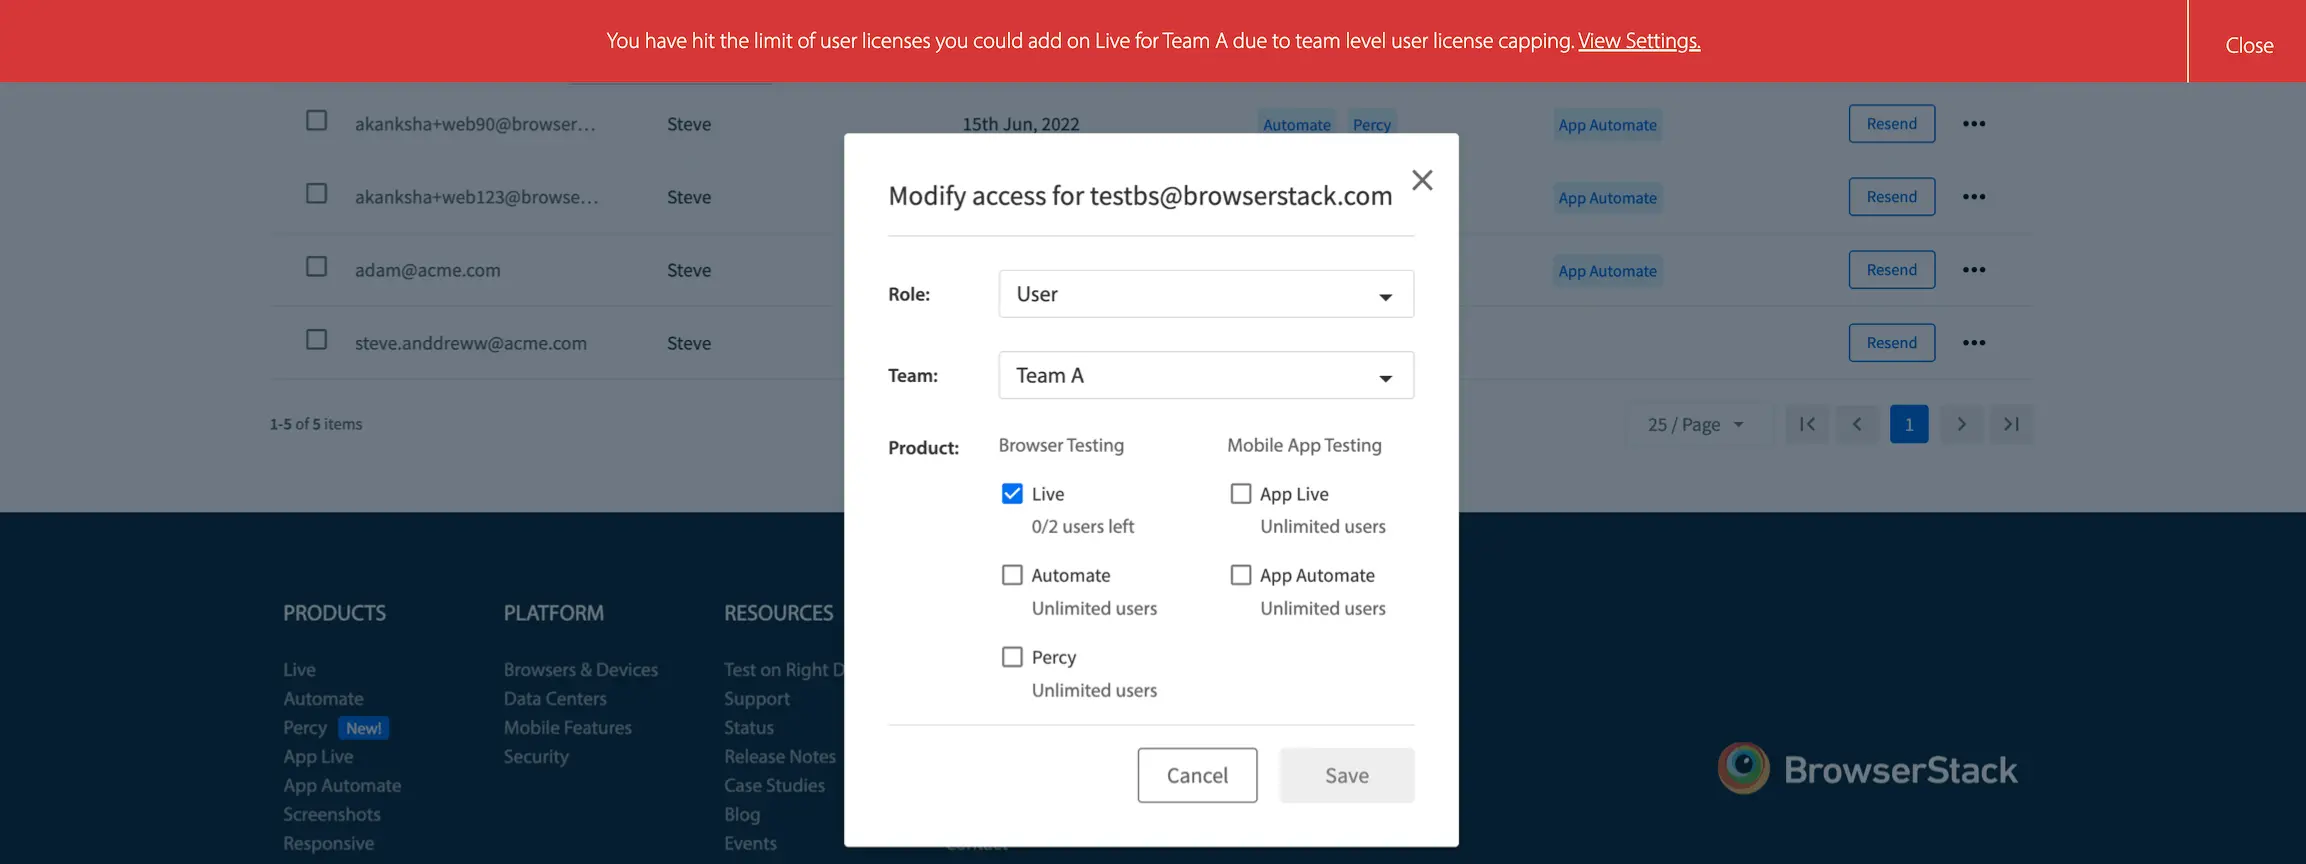
What happens when you hit the team limits of user licenses for a product?
If you exhaust the product licenses available for a team e.g Live for Team A, there will be an error encountered in the following scenarios:
- Invite a member with Live product access.
- Assign Live product access to an existing user in the organization.
Parallel allocation for Teams
Parallel test execution gives you the scale you need to deliver quality at speed. Once Teams are created, organization can choose either to assign dedicated parallels (for Automate and App Automate products) to individual teams or let the Teams share from the pool of organization parallels. This helps to ensure that the parallels are distributed as per testing needs of respective Teams.
How parallel allocation for team works?
- Suppose an Organization Acme Inc. has a total 100 parallels for Automate product. There are 2 teams in this organization TeamA and TeamB.
- The Owner allocates 25 parallels to TeamA.
- Parallels for TeamB are left blank.
| Org/Team | Parallels |
|---|---|
| Acme Inc. | |
| Team A | 25 |
| Team B |
This means that Team A can run 25 parallel tests (for Automate product) at a given instance. The remaining 75 parallels left can be shared between the Acme Inc. and TeamB.
How to allocate parallels to a team?
- Visit User Management under Account.
- On the left navigation bar, Click Teams
- Within the Manage Teams page, find the Team in the Teams table.
- Click More actions (3 dot icon) at the right side of the row and select Manage Licenses. Alternatively, you can also click Allocate in the Resource allocated for column if available.
- Select the Automate/ App Automate product from Select Product dropdown.
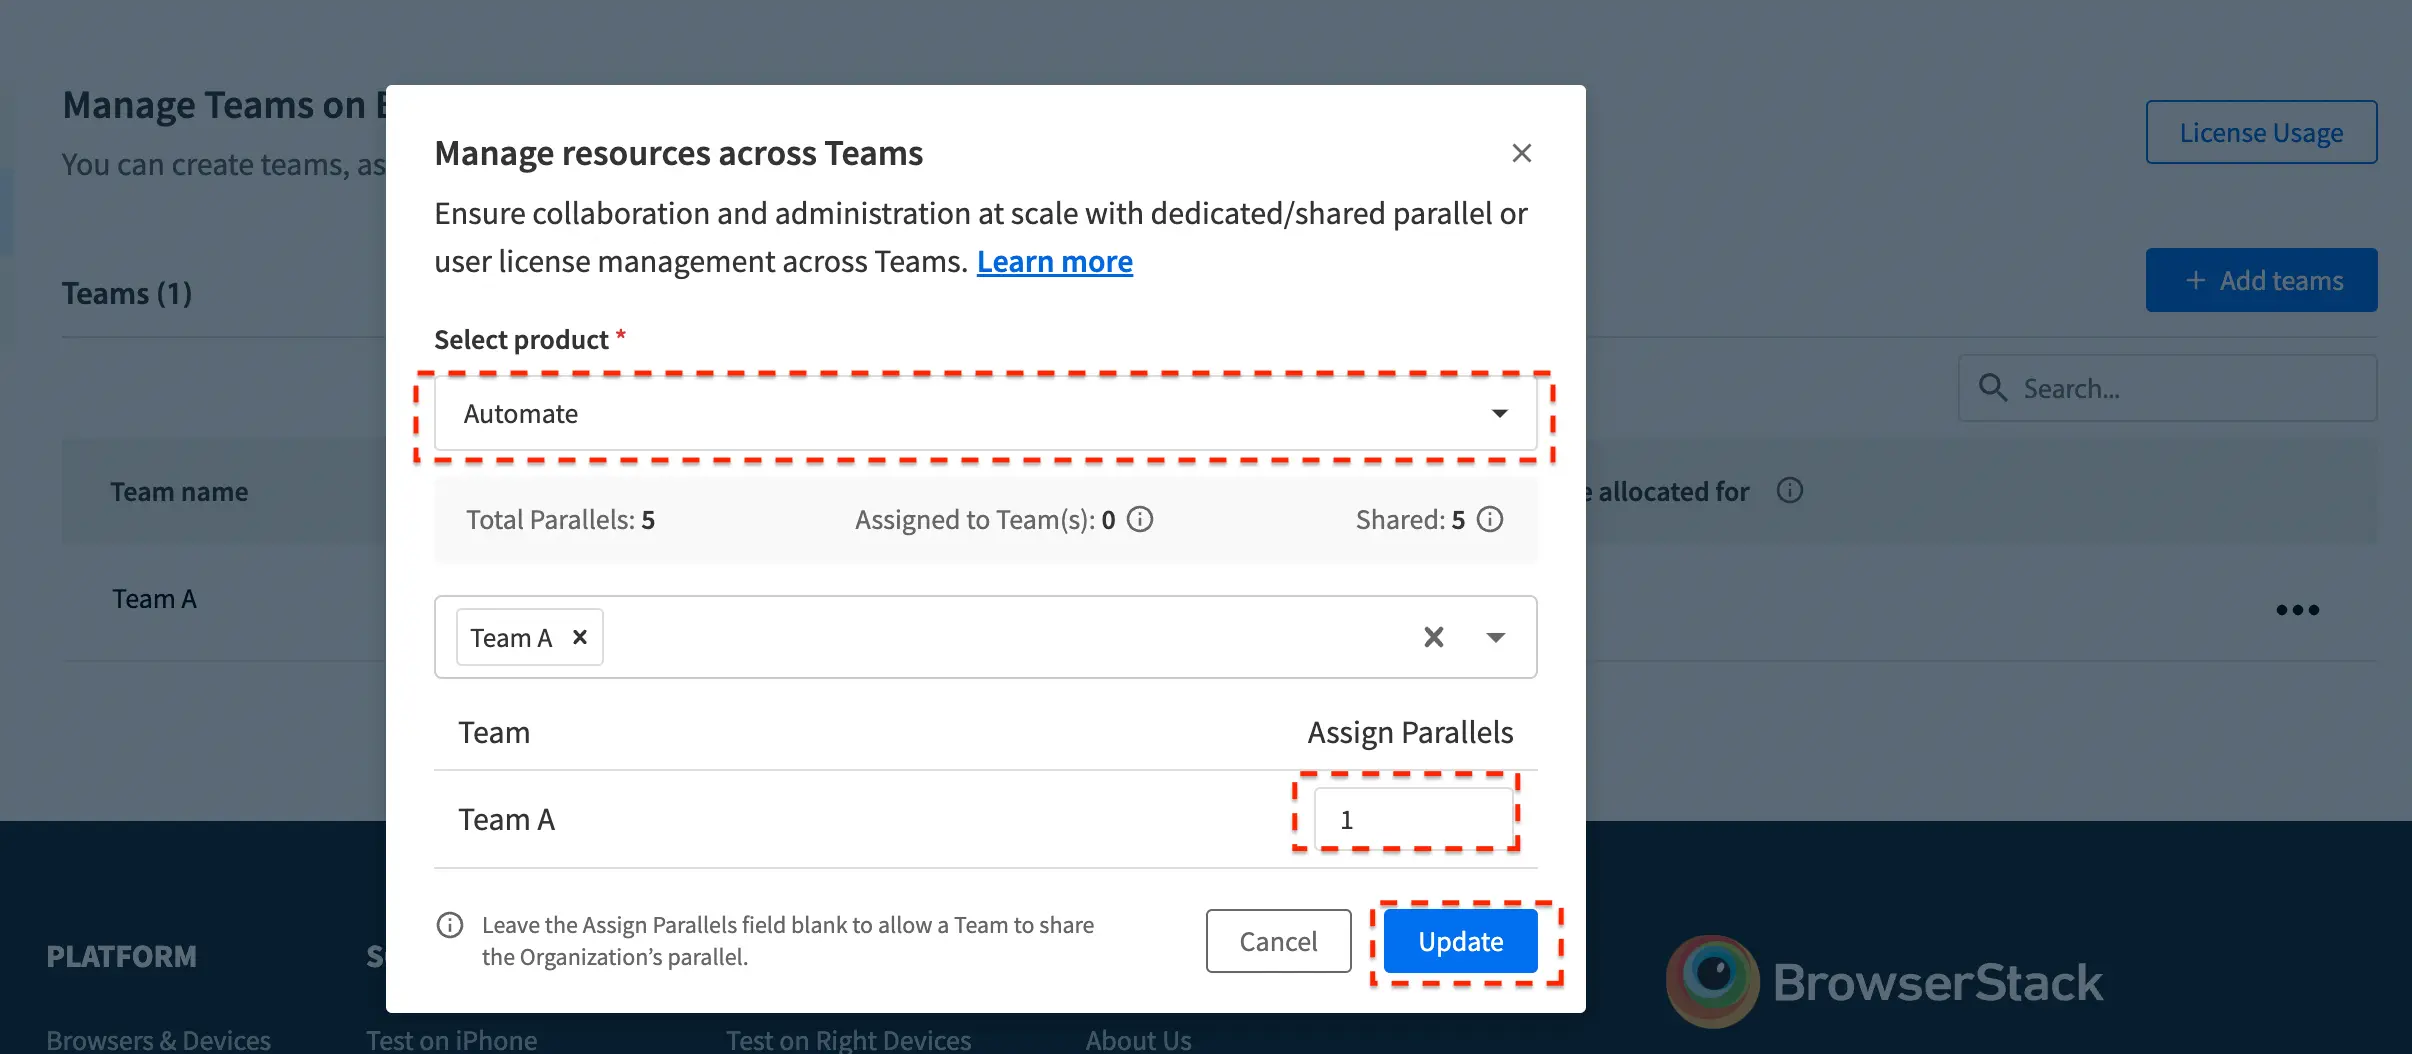
- Add the parallels limit that you want to assign to the team.
- Leave the Assign parallels input field blank for the Team(s) that will be sharing parallels with the Organization.
- Click Update to save the changes.
Screenshot capping allocation for Teams
After creating Teams, owners/admins can opt to provide dedicated screenshot allocations (for Percy products) to individual teams or let the teams share screenshots from the organization’s pool. This helps to ensure that the screenshots are distributed in accordance with the testing needs of each team.
How screenshot capping allocation for teams works?
- Screenshot limits allocation for teams is
- Mandatory for all teams when Allow Additional Screenshots setting is turned OFF.
- Optional for any team when Allow Additional Screenshots setting is turned ON.
- Screenshot limits must be allocated only in multiples of 10000.
When “Allow Additional Screenshots” setting is turned OFF
- Suppose an Organization Acme Inc. has a total 100,000 screenshots for Percy product. There are 2 teams in this organization TeamA and TeamB.
- The Owner allocates a screenshot capping limit of 20,000 screenshots for TeamA and 30,000 screenshots for TeamB.
| Org/Team | Screenshot limits |
|---|---|
| Acme Inc. | |
| Team A | 20000 |
| Team B | 30000 |
This means that TeamA and TeamB can consume up to 20000, 30000 screenshots for their builds respectively(for the Percy product) during the course of the month. The remaining 50000 screenshots can be used by Acme Inc..
Any usage in excess of the allocated limits will not be permitted for individual teams (teamA, TeamB) or the Organization (Acme Inc).
When “Allow Additional Screenshots” setting is turned ON
- Suppose an Organization Acme Inc. has a total 100,000 screenshots for Percy product. There are 2 teams in this organization TeamA and TeamB.
- The Owner allocates a screenshot capping limit of 20,000 screenshots for TeamA.
- Screenshot limit for TeamB is left blank.
| Org/Team | Screenshot limits |
|---|---|
| Acme Inc. | |
| Team A | 20000 |
| Team B |
This means that during the course of the month, TeamA can consume up to 20,000 screenshots for their builds (for the Percy product) and will not be able to exceed this limit.
The remaining 80,000 screenshots will be shared between Acme Inc. and TeamB. Any usage in excess of this limit shared by Acme Inc. and TeamB will be considered as overage and charged at the overage rate.
How to allocate screenshot limits to a team?
- Visit User Management under Account.
- On the left navigation bar, click Teams
- Within the Manage Teams page, find the Team in the Teams table.
- Click More actions (3 dot icon) at the right side of the row and select Manage Licenses. Alternatively, you can also click Allocate in the Resource allocated for column, if available.

- Select the Percy product from Select Product dropdown.

- Toggle the Allow Additional Screenshots setting to ON (Optional but recommended)
- Add the screenshot limits that you want to assign to the team.
- Leave the Screenshot limits input field blank for the Team(s) that will be sharing screenshots with the Organization.
- Click Update to save the changes.
Test execution allocation for Teams
After creating Teams, owners or admins can opt to provide dedicated test execution allocations for Test Reporting & Analytics to individual teams or let the teams share test executions from the organization’s pool. Team-wise allocation of test execution ensures that the test executions are distributed according to the testing needs of each team.
How test execution capping allocation for teams works?
Test execution limits must be allocated only in multiples of 5000.
Suppose an Organization Acme Inc. has a total 20,000 test executions for Test Reporting & Analytics product. There are 2 teams in this organization Team A and Team B.
The Owner allocates a test execution capping limit of 5,000 test executions for Team A and 10,000 test executions for Team B.
| Org/Team | Test Execution Limits |
|---|---|
| Acme Inc. | |
| Team A | 5000 |
| Team B | 10000 |
Team A can use up to 5000 test executions, and Team B can use up to 10000 test executions for their builds each month. The remaining 5000 test executions can be used by Acme Inc.
Any usage in excess of the allocated limits will not be permitted for individual teams (Team A, Team B) or the Organization (Acme Inc).
How to allocate test execution limits to a team?
- Visit User Management under Account.
- On the left navigation bar, click Teams.
- Within the Manage Teams page, find the team in the Teams table.
- Click More actions (3 dot icon) at the right side of the row and select Manage Resources. Alternatively, you can also click Allocate in the Resource allocated for column if available.
- Select Test Reporting & Analytics in Select product.
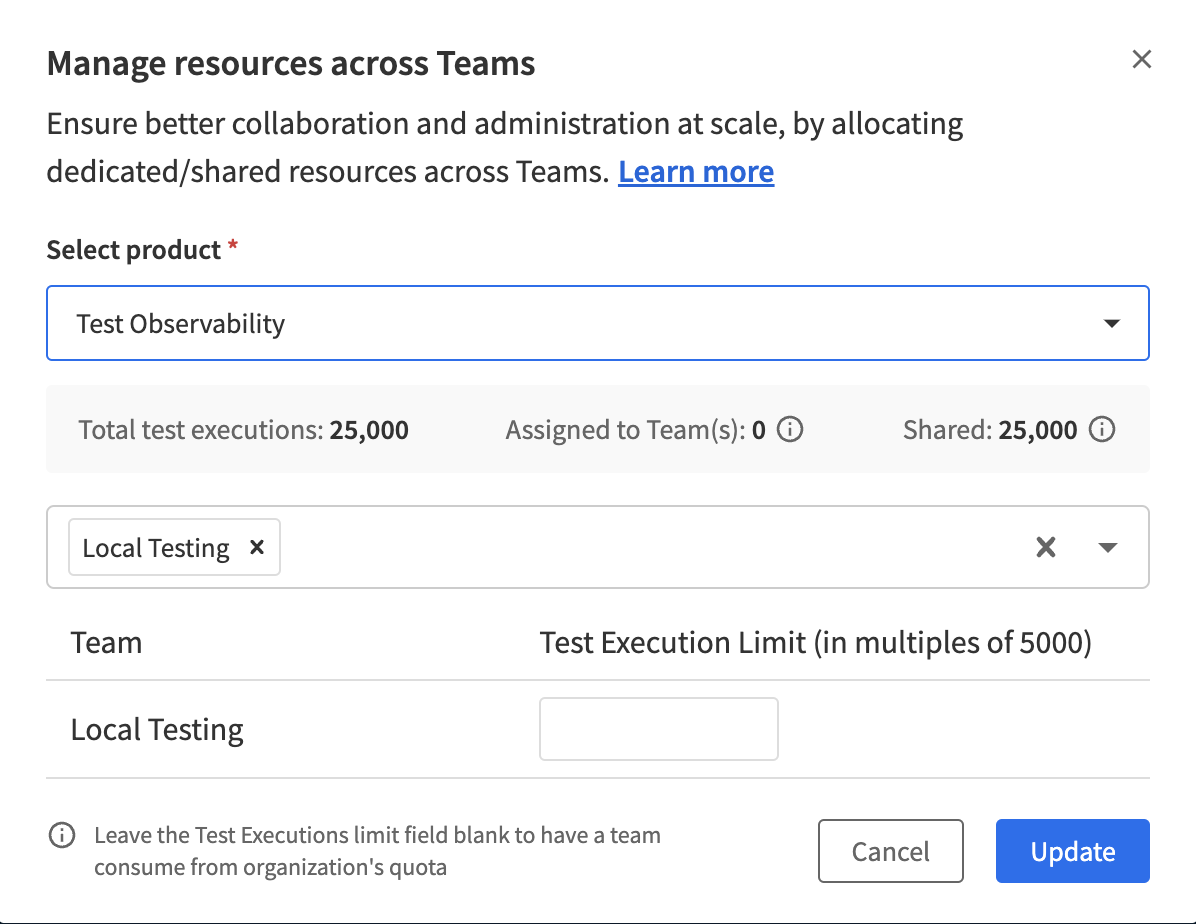
- Select the teams needed using the drop-down.
- Add the test execution limits that you want to assign to the team.
- Leave the test executions limits input field blank for the Team(s) that will be sharing test executions with the organization.
- Click Update.
We're sorry to hear that. Please share your feedback so we can do better
Contact our Support team for immediate help while we work on improving our docs.
We're continuously improving our docs. We'd love to know what you liked
We're sorry to hear that. Please share your feedback so we can do better
Contact our Support team for immediate help while we work on improving our docs.
We're continuously improving our docs. We'd love to know what you liked
Thank you for your valuable feedback!