Migration from Local Chrome Application to Native Application
Google will be deprecating Chrome Applications very soon. To avoid any disruption in BrowserStack local usage, we strongly recommend you to stop using Local Chrome Application and start using the Local Native Application immediately.
This guide will help you navigate through the migration from the Local Chrome Application to the Local Native Application. If both Local Chrome Application and Local Native Application are installed, precedence will be given to the tunnel connection via the Local Native Application. Hence, the recommended strategy is to setup the Local Native Application, ensure that the local/ staging/ dev website is loading and then to uninstall the Chrome Application.
Verify if you are using the Chrome Application
Open the Live or App Live Dashboard. There can be 3 possibilities now :-
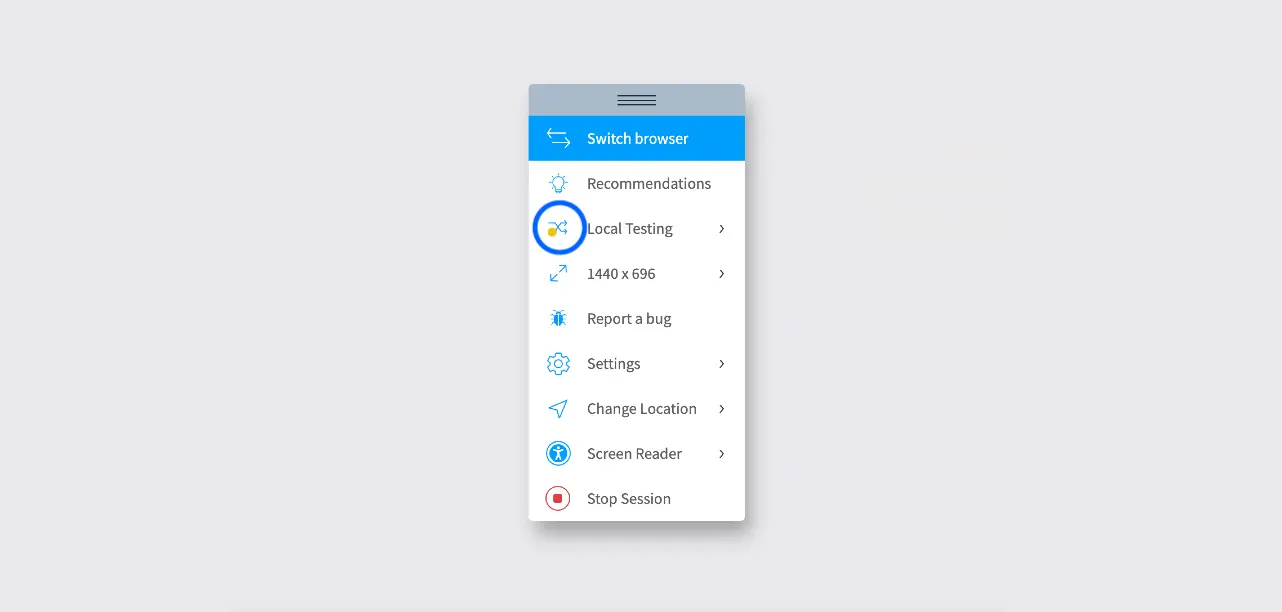
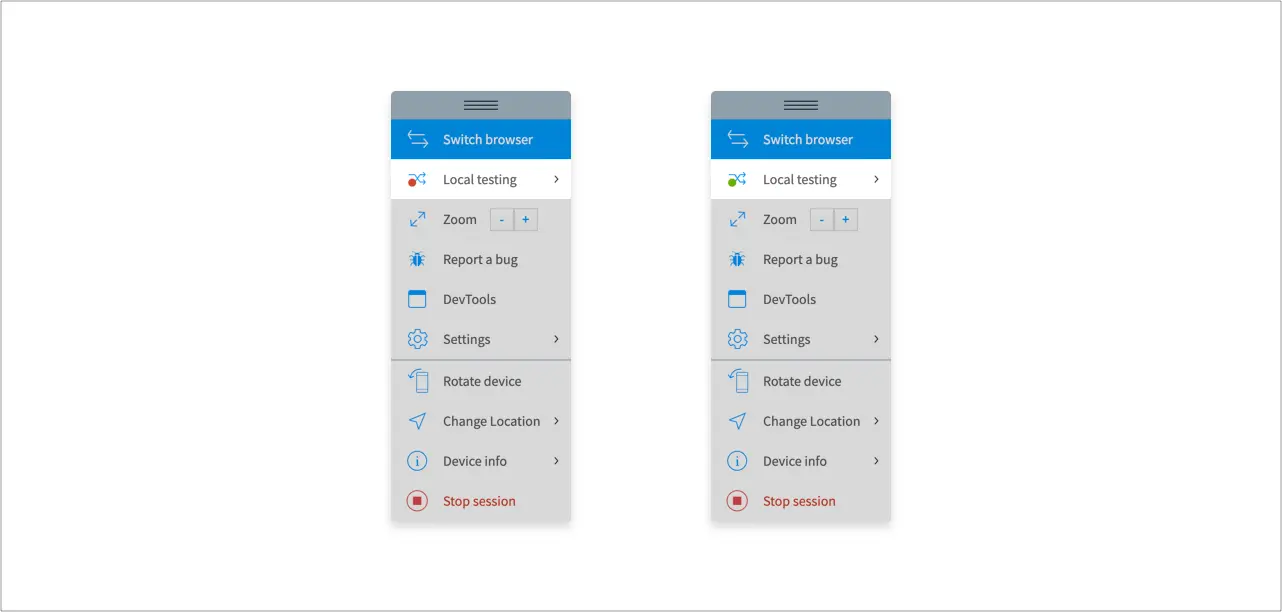
Yellow Indicator
If you are seeing a yellow indicator as highlighted in the below image, then it means that the tunnel connection was started via the Chrome Application.
Green Indicator
If you are seeing a green indicator as highlighted in the below image, the Local Native Application is installed and setup. Now if your website/mobile app loads in the Live or App Live session, you can proceed to uninstall the Chrome Application. Follow these steps
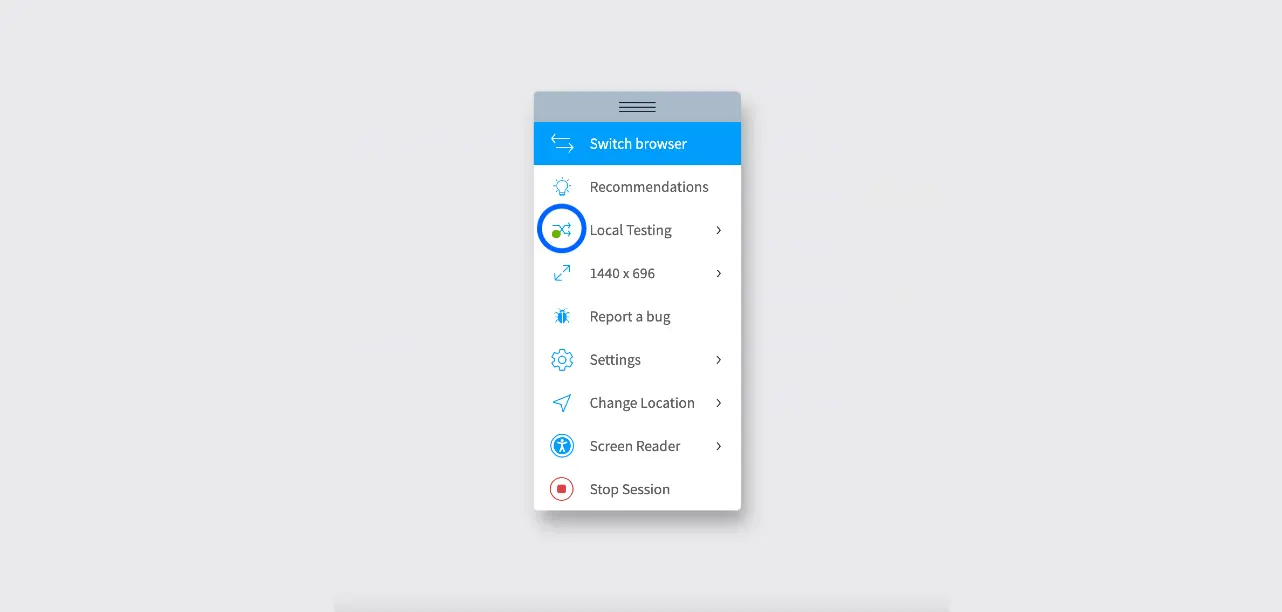
If you are seeing a green indicator as shown below, but your website/mobile app is not loading, then please proceed to click on Options or open http://localhost:45454 and configure the advanced settings.
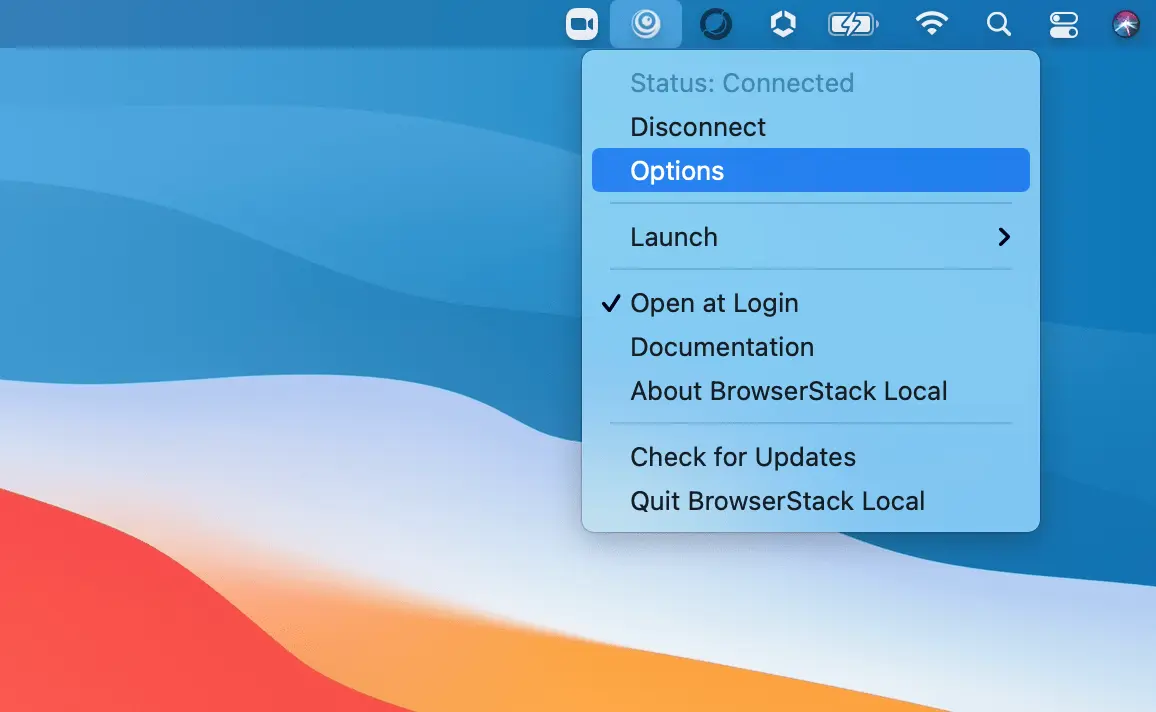
Once you click on Options or open the link in your browser, the Local Dashboard will open.
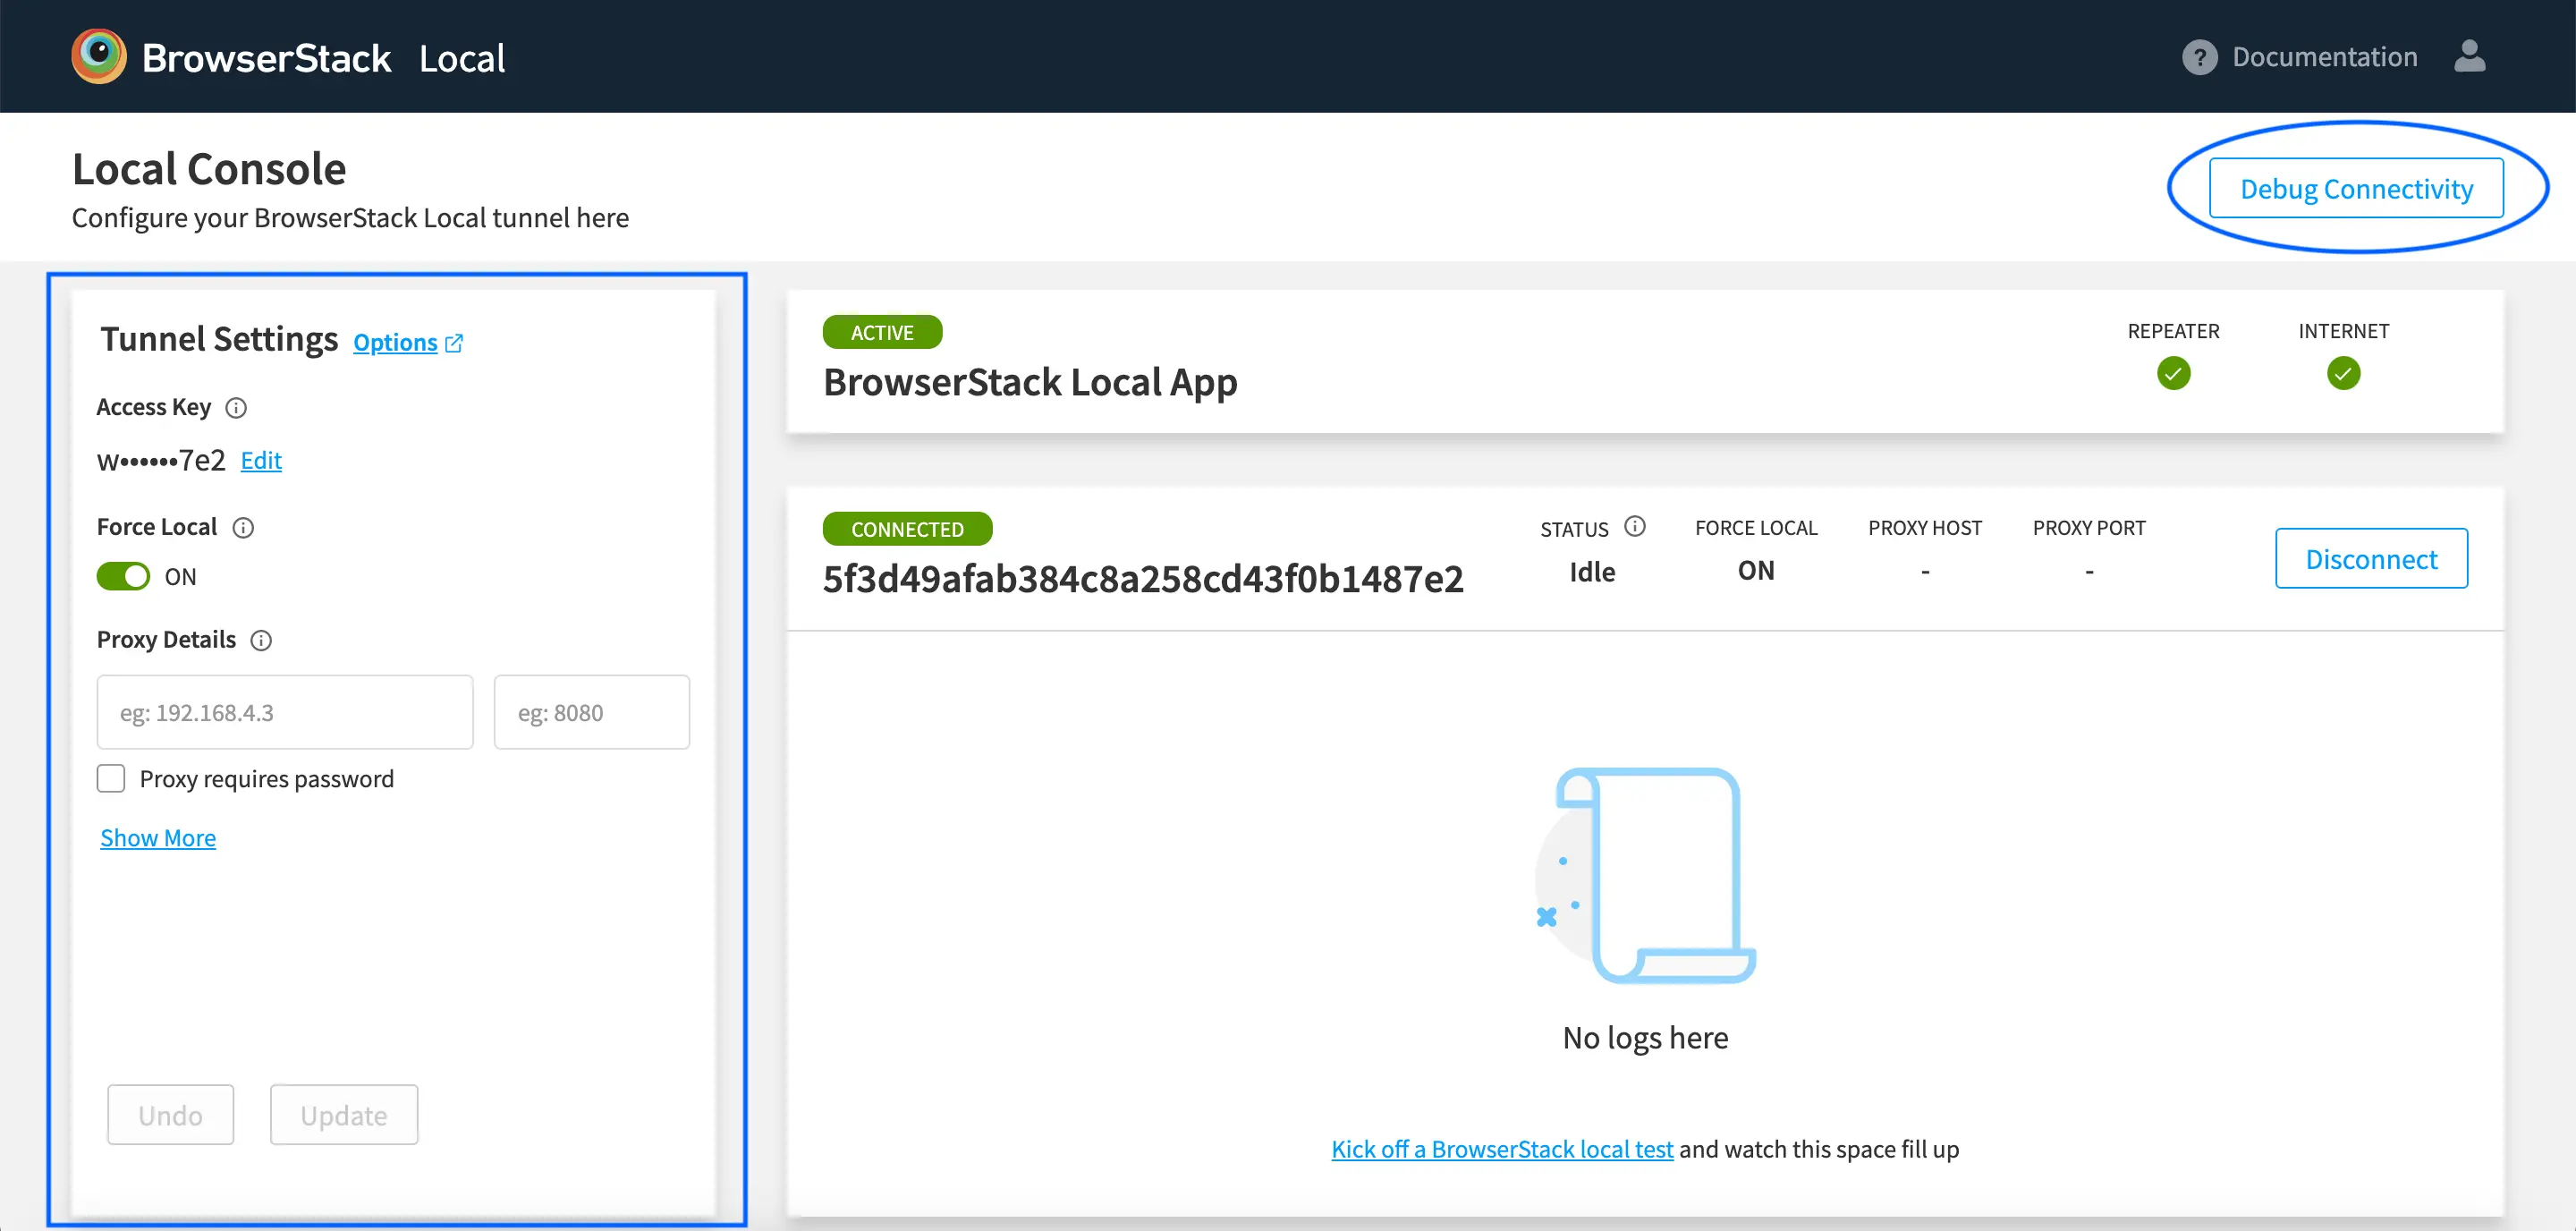
Once you are on the Local Dashboard, please proceed with adding the additional configuration like Proxy, MITM, Force Local etc in the left panel as highlighted as a rectangle in the above image. Click on “Show more” in case you want to check out the additional configuration options that are available. It is recommended that you use the Debug Connectivity button (Highlighted in oval in the above image) to check if the website URL is loading via the tunnel connection.
After checking if the website is loading via “Debug Connectivity”, please go back to the Live/App Live dashboard. If you see the green indicator and your website is loading with the advanced configurations, then please proceed to uninstall the Local Chrome Application. Follow these steps
Red Indicator
If you are seeing a red indicator as highlighted in the below image, then proceed with the enablement of the Local Native App
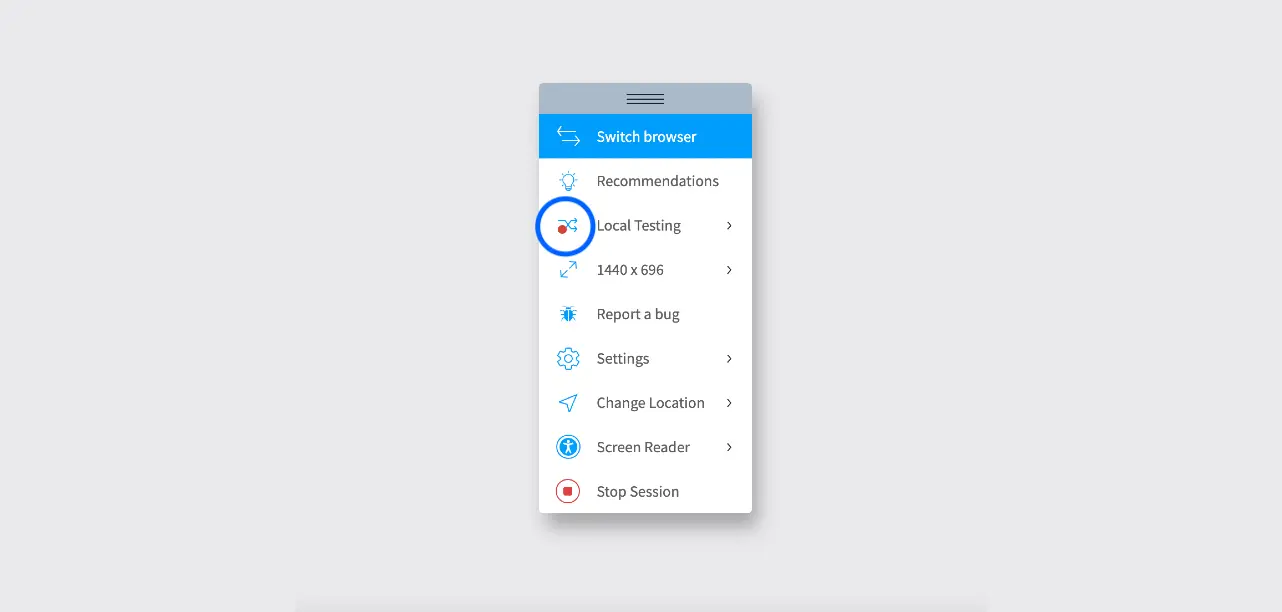
Enable Local Testing via Local Native App
Select the OS and browser that you are using to access BrowserStack Live. Then, follow the setup instructions.
Search for the BrowserStack Local app on your machine. If you have the app installed, Local Testing will be enabled for your Live sessions. There is no additional setup required.
If you don’t have BrowserStack Local app on your machine, download the BrowserStackLocal app (for Windows).
Start the app and you’ll see the BrowserStack Local icon in your system tray area like this::
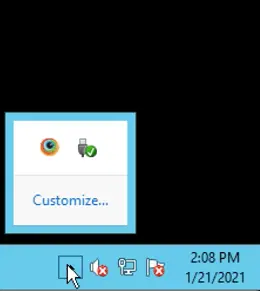
This enables Local Testing. Start a Live session and look for a green indicator
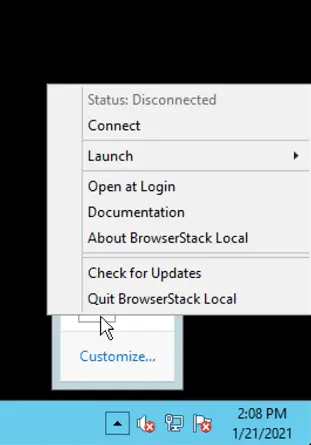
on the Local Testing icon in the toolbar dock. You can launch the Live dashboard right from the app
by clicking on the BrowserStack Local app and navigating to Launch > Live.
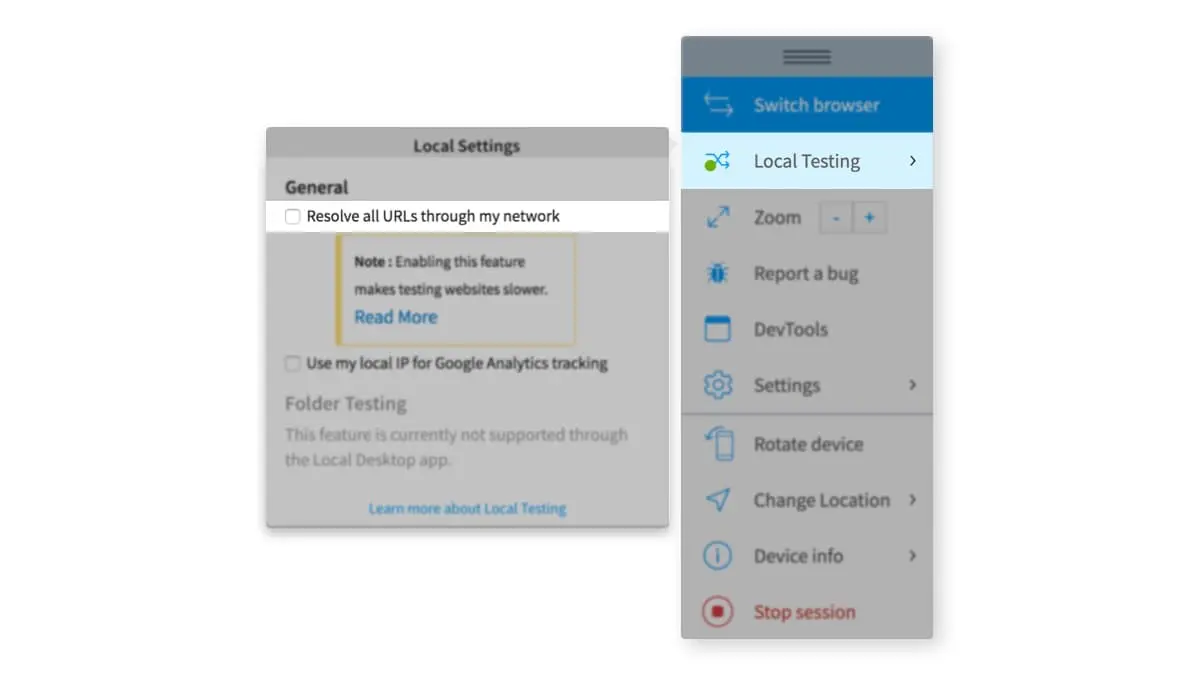
To resolve all requests to local URLs via your machine, click on the Local Testing icon and check Resolve all URLs through my network option.
For example, if there is a URL like abc.com which is restricted to your
network or you have /etc/hosts entry for abc.com mapping to localhost or an
internal server/environment, this option will resolve all abc.com requests
from remote browser/mobile device via your machine.
First, Download the BrowserStack Local binary for Windows.
Unzip the file to a folder/directory on your machine, and open command-line interface and navigate to the folder containing the Local binary. Run the Local binary using the following command:
BrowserStackLocal.exe --key YOUR_ACCESS_KEY
This enables Local Testing for your Live sessions—as well as Screenshots. To verify, start a Live session on your browser and look for Local Testing in the toolbar dock. The green/red icon will indicate whether Local Testing for your session is enabled/disabled.
To resolve all requests to local URLs via your machine, establish the Local
Testing connection with a --force-local flag, as follows:
BrowserStackLocal.exe --key YOUR_ACCESS_KEY --force-local
For example, if there is a URL like abc.com which is restricted to your
network or you have /etc/hosts entry for abc.com mapping to localhost or an
internal server/environment, this option will resolve all abc.com requests
from remote browser/mobile device via your machine.
Search for the BrowserStack Local app on your machine. If you have the app installed, Local Testing will be enabled for your Live sessions. There is no additional setup required.
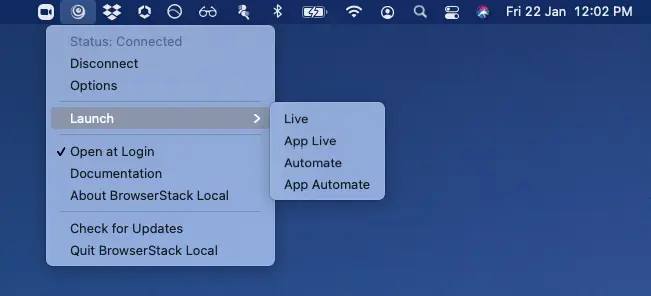
If you don’t have BrowserStack Local app on your machine, download the BrowserStackLocal app (for macOS / OS X). Click on the BrowserStackLocal.pkg and install it. Start the app and you’ll see the BrowserStack Local icon in your menu bar at the top of the screen like this:

This enables Local Testing. Start a Live session and look for a green indicator
on the Local Testing icon in the toolbar dock. You can launch the Live
dashboard right from the app by clicking on the BrowserStack Local icon in your
menu bar and navigating to Launch > Live.
To resolve all requests to local URLs via your machine, click on the Local Testing icon and check Resolve all URLs through my network option.
For example, if there is a URL like abc.com which is restricted to your
network or you have /etc/hosts entry for abc.com mapping to localhost or an
internal server/environment, this option will resolve all abc.com requests
from remote browser/mobile device via your machine.

First, Download the BrowserStack Local binary for macOS / OS X.
Unzip the file to a folder/directory on your machine, and open command-line interface and navigate to the folder containing the Local binary. Run the Local binary using the following command:
./BrowserStackLocal --key YOUR_ACCESS_KEY
This enables Local Testing for your Live sessions—as well as Screenshots. To verify, start a Live session on your browser and look for Local Testing in the toolbar dock. The green/red icon will indicate whether Local Testing for your session is enabled/disabled.

To resolve all requests to local URLs via your machine, establish the Local
Testing connection with a --force-local flag, as follows:
./BrowserStackLocal --key YOUR_ACCESS_KEY --force-local
For example, if there is a URL like abc.com which is restricted to your
network or you have /etc/hosts entry for abc.com mapping to localhost or an
internal server/environment, this option will resolve all abc.com requests
from remote browser/mobile device via your machine.
First, Download the appropriate BrowserStack Local binary for your system: Linux 32-bit | Linux 64-bit
Unzip the file to a folder/directory on your machine, and open command-line interface and navigate to the folder containing the Local binary. Run the Local binary using the following command:
./BrowserStackLocal --key YOUR_ACCESS_KEY
This enables Local Testing for your Live sessions—as well as Screenshots. To verify, start a Live session on your browser and look for Local Testing in the toolbar dock. The green/red icon will indicate whether Local Testing for your session is enabled/disabled.

To resolve all requests to local URLs via your machine, establish the Local
Testing connection with a --force-local flag, as follows:
./BrowserStackLocal --key YOUR_ACCESS_KEY --force-local
For example, if there is a URL like abc.com which is restricted to your
network or you have /etc/hosts entry for abc.com mapping to localhost or an
internal server/environment, this option will resolve all abc.com requests
from remote browser/mobile device via your machine.
Uninstalling Chrome Application
In order to uninstall the Chrome Application, click on the Chrome Application Icon in your Chrome Browser as highlighted in oval in the below image.
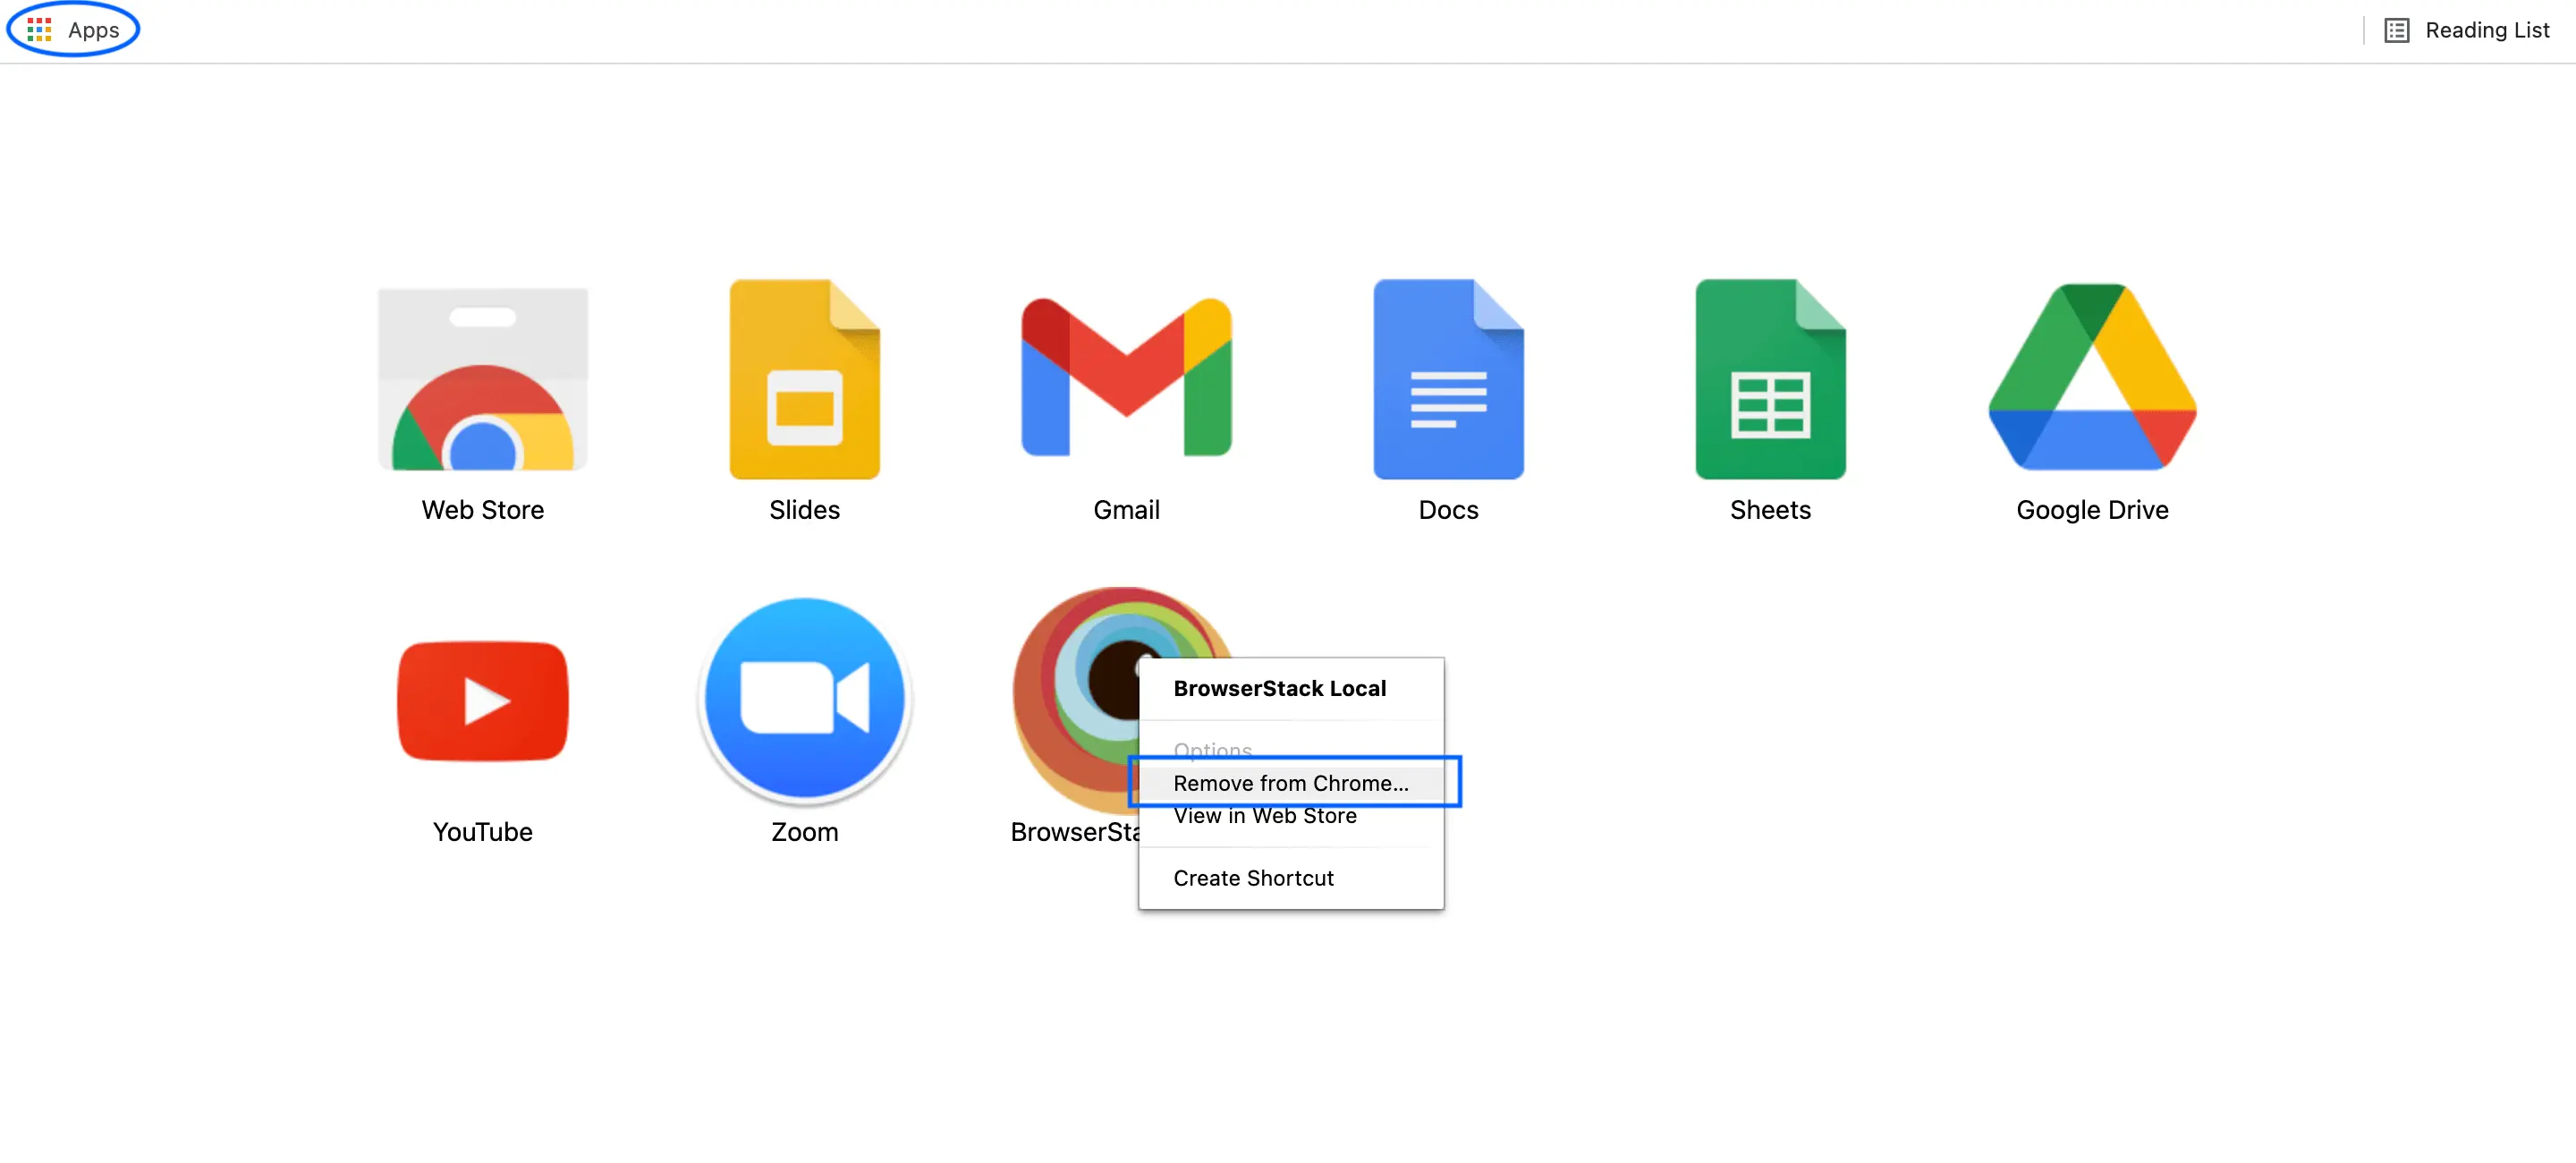
Once the Application Drawer opens, search for the BrowserStack Local application, right click on the BrowserStack Local application icon and click on “Remove from chrome” as highlighted in rectangle in the above image.
Disconnecting Local Testing
The Local Testing connection is persistent. Essentially, your machine and BrowserStack Cloud remain connected unless:
- You explicitly end the connection (for example, when using the binary)
- You close the browser window
- You sign out of your BrowserStack account.
Even if you accidentally close the browser tab, you can resume Local Testing on re-opening it.
Next Steps
Live
- Learn how to test websites using Local Testing
- Learn how to test websites in environments behind one (or more) proxies
- Learn how to test websites hosted on environments behind a firewall or VPN
- Learn more about what isn’t supported
App Live
- Learn how to test your apps using Local Testing
- Learn how to test apps from behind one (or more) proxies
- Learn how to test apps from behind a firewall or VPN
- Learn more about what isn’t supported
We're sorry to hear that. Please share your feedback so we can do better
Contact our Support team for immediate help while we work on improving our docs.
We're continuously improving our docs. We'd love to know what you liked
We're sorry to hear that. Please share your feedback so we can do better
Contact our Support team for immediate help while we work on improving our docs.
We're continuously improving our docs. We'd love to know what you liked
Thank you for your valuable feedback!