
 Join our Discord
Test Reporting & Analytics on JUnit4
Quick start guide to integrate BrowserStack Test Reporting & Analytics with JUnit4
Prerequisites
- You have a JUnit4 test suite.
-
Maven is installed on your machine, its environment variables are set, and its bin is added to system path,
$PATH. - You may run your tests on BrowserStack Automate or even on any other cloud provider or even locally.
- Your tests can be unit / integration / functional or of any nature.
- Cucumber-Java v5+ (for Cucumber-JUnit4), Java v8+, Selenium v2.5+ (JSON Wire / W3C).
Integrate with Test Reporting & Analytics
You can use BrowserStack Test Reporting & Analytics both when you’re using BrowserStack’s devices and browsers to run your functional end-to-end tests and also if you’re running tests locally on your laptop/CI system or even when you’re using some other cloud provider.
Not only that, Test Reporting & Analytics is agnostic to the type of testing and hence you could also integrate it with your unit or integration test suite written using JUnit4.
Choose JUnit4 or Cucumber-JUnit4 depending on your test setup.
Please select your setup below to get started with an awesome debugging experience with Test Reporting & Analytics:
To start using BrowserStack Test Reporting & Analytics with your existing setup of Junit4 tests running on BrowserStack Automate, you’d need to integrate with browserstack-java-sdk (if not already done). Follow one of the methods below to integrate the SDK and start using Test Reporting & Analytics:
If you’re an existing browserstack-java-sdk user, you can skip the steps below. However, ensure that you’ve specified static names (names should not change across build runs) for projectName and buildName in the browserstack.yml file in your project. Also, restrict the characters in your projectName and buildName to alphanumeric characters (A-Z, a-z, 0-9), underscores (_), colons (:), and hyphens (-). Any other character will be replaced with a space.
Install BrowserStack plugin
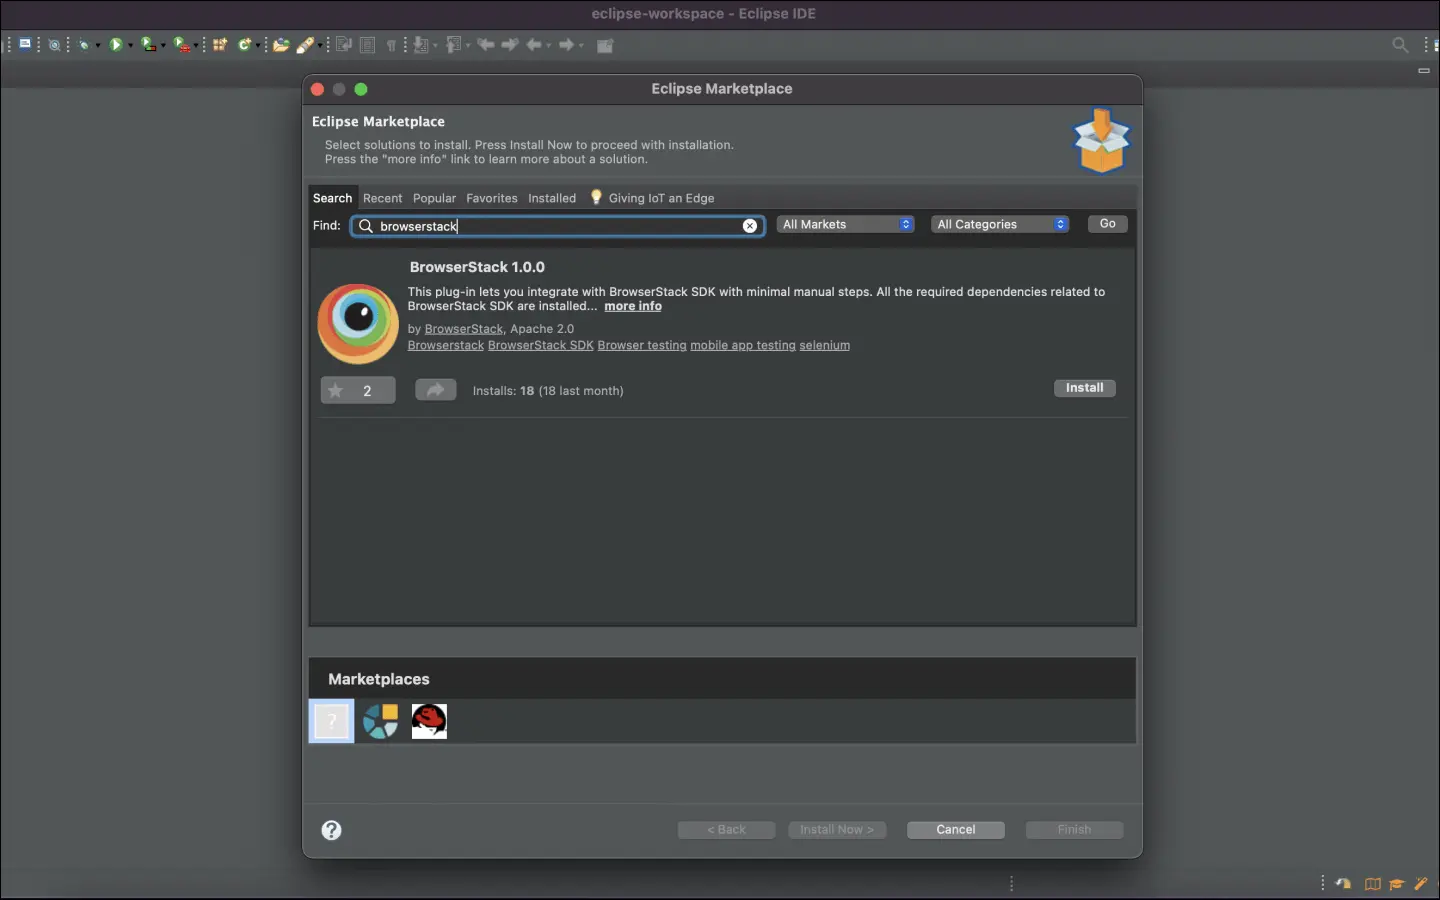
On the Eclipse toolbar, click Help > Eclipse Marketplace. In the Eclipse Marketplace, search for BrowserStack > click Install > Finish.
Configure your test suite with BrowserStack SDK
BrowserStack plugin automatically adds the browserstack-java-sdk dependency to your pom.xml file and generates a browserstack.yml configuration file.
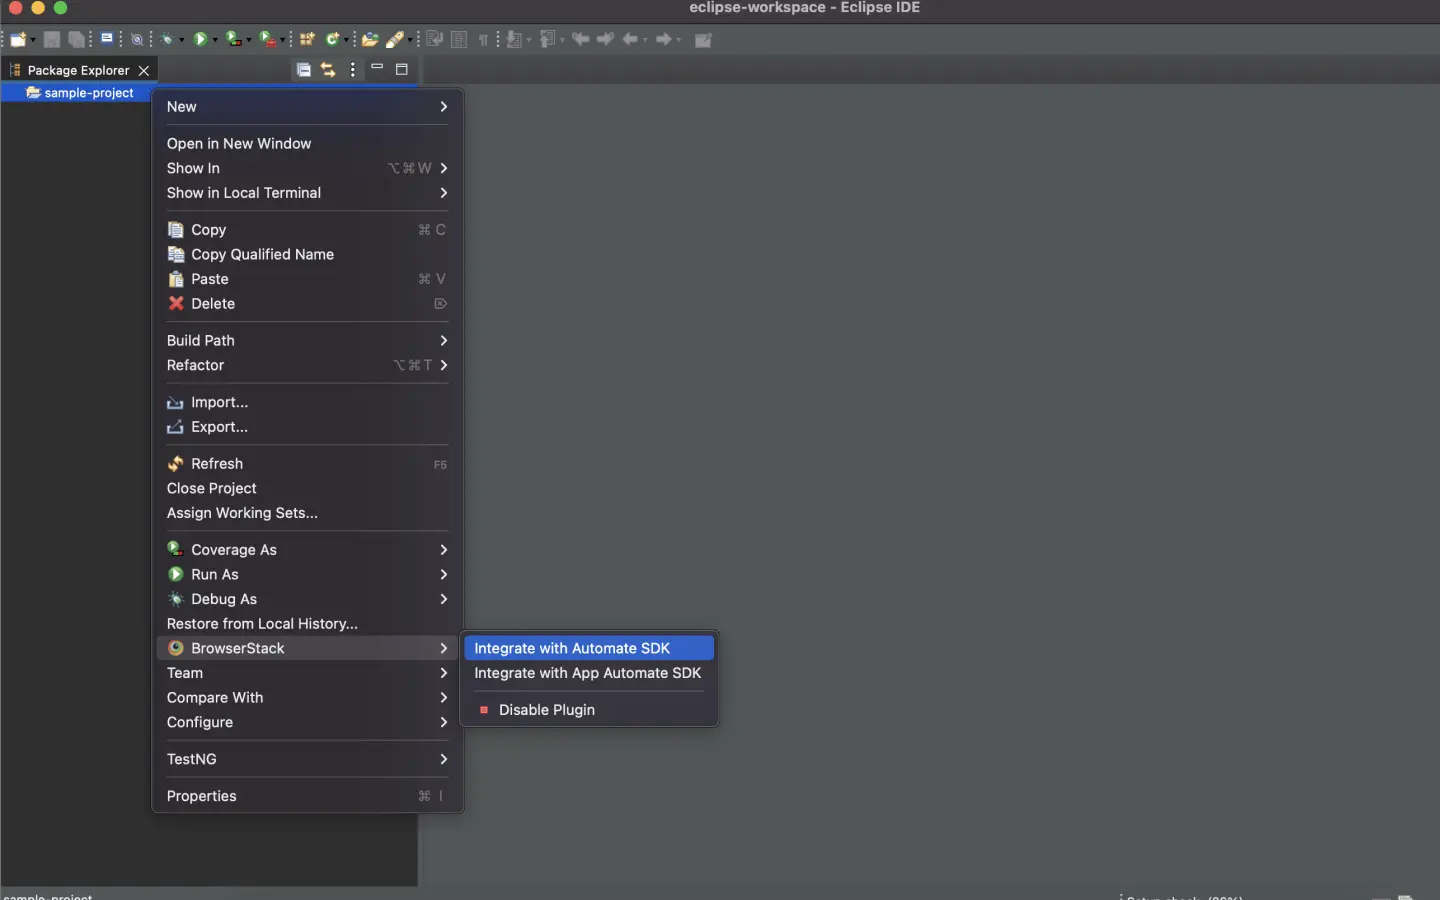
Right-click on your project folder > BrowserStack > select Integrate with Automate SDK.
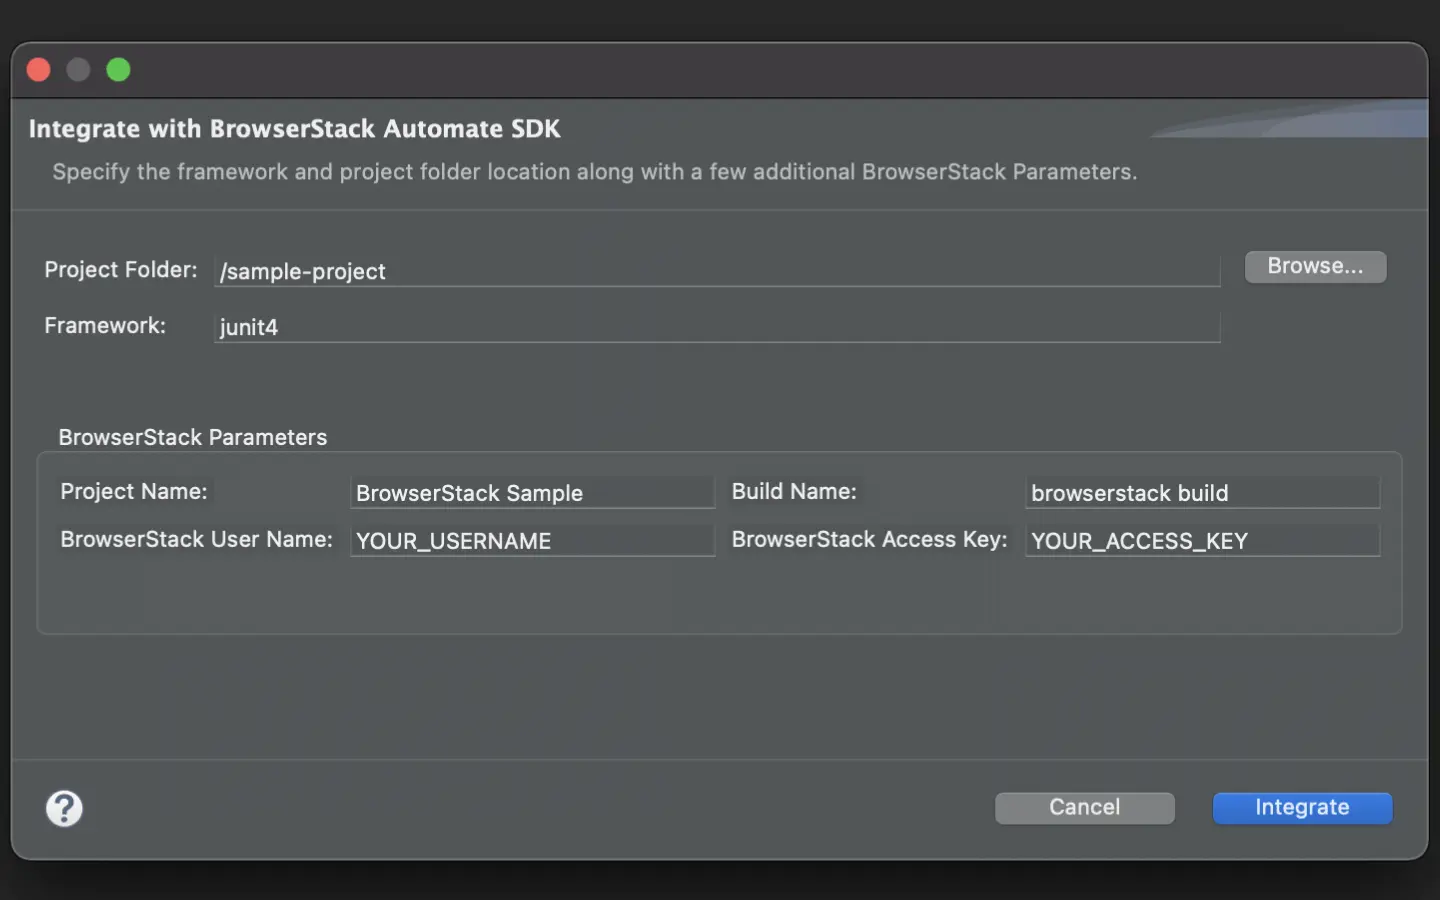
Select your Project Folder, Framework, and other BrowserStack Parameters, and then click Integrate.
Update browserstack.yml file
Update the browserstack.yml file in the root folder of your test suite.
The projectName and buildName config must be static and not change across different runs of the same build. This is a deviation in approach as specified by BrowserStack Automate or App Automate as Test Reporting & Analytics will automatically identify different build runs.
Restrict the characters in your projectName and buildName to alphanumeric characters (A-Z, a-z, 0-9), underscores (_), colons (:), and hyphens (-). Any other character will be replaced with a space.
BrowserStack SDK is a powerful tool you can use to set the different browser/device combinations and parallelization. For more details, check out the Automate Integration guide or the App Automate integration guide.
Run your test suite
Run your tests as usual.
View results and insights on Test Reporting & Analytics dashboards
Post build run completion, you’ll be able to see the build run report along with all necessary debugging information.
Install BrowserStack plugin
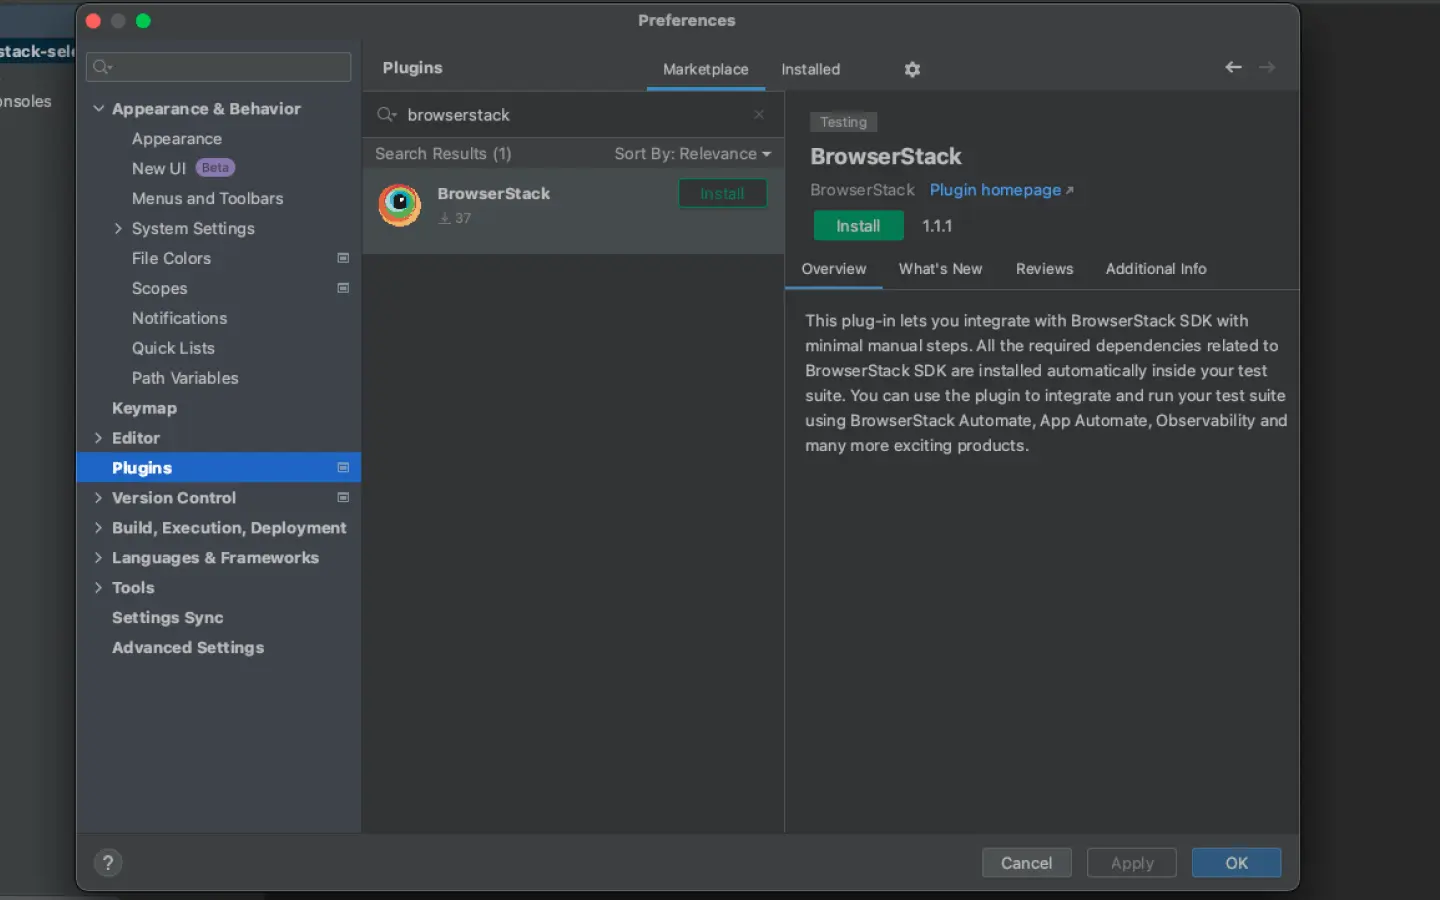
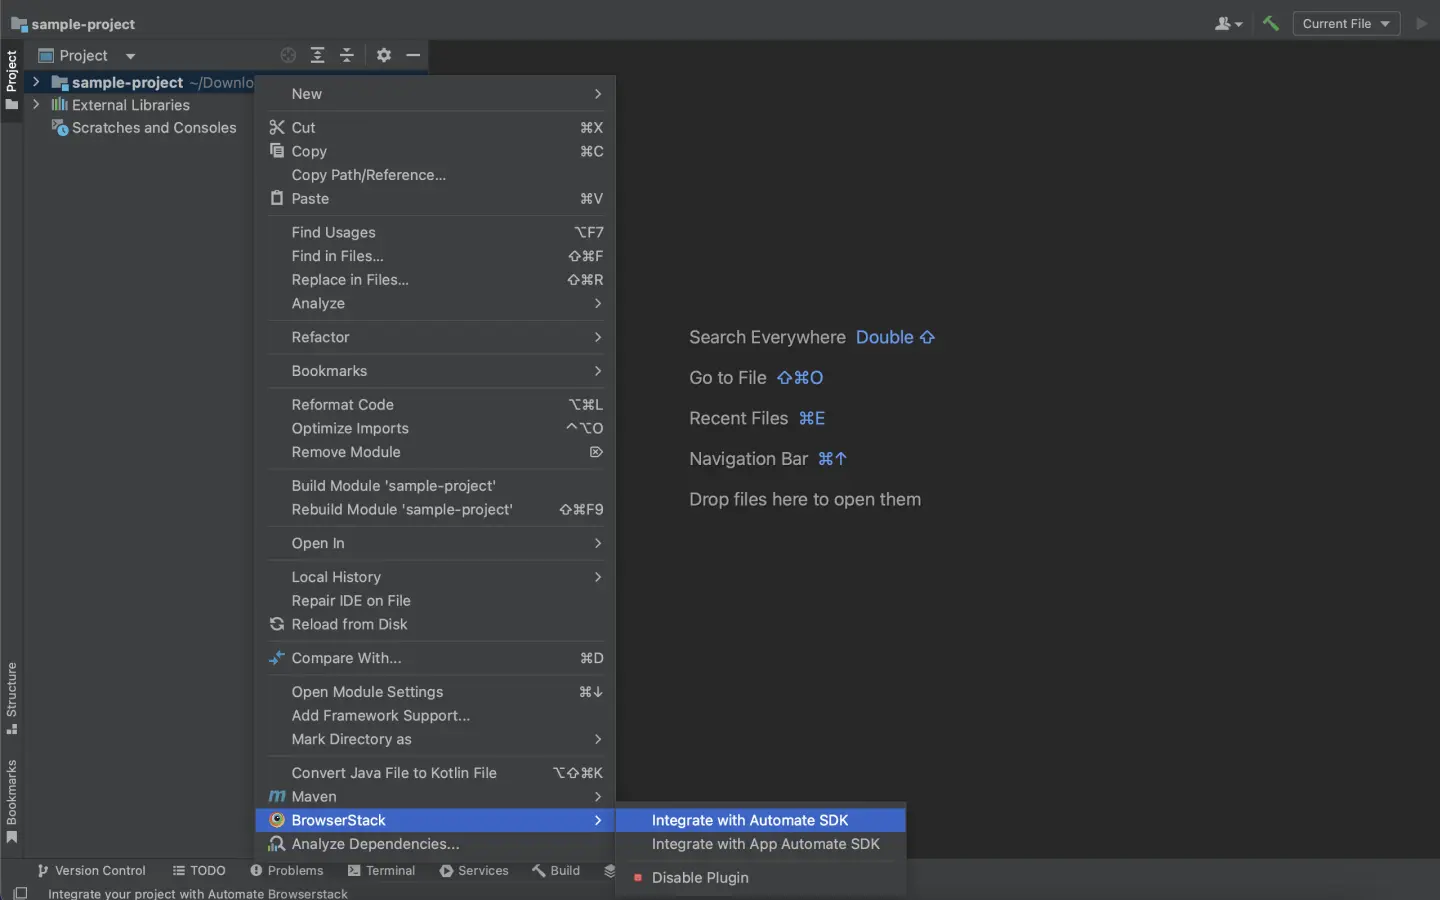
Click IntelliJ IDEA > Preferences > Plugins. Search for BrowserStack and click Install.
Configure your test suite with BrowserStack SDK
BrowserStack plugin automatically adds the browserstack-java-sdk dependency to your pom.xml file and generates a browserstack.yml configuration file.
Right-click on your project folder > BrowserStack > select Integrate with Automate SDK.
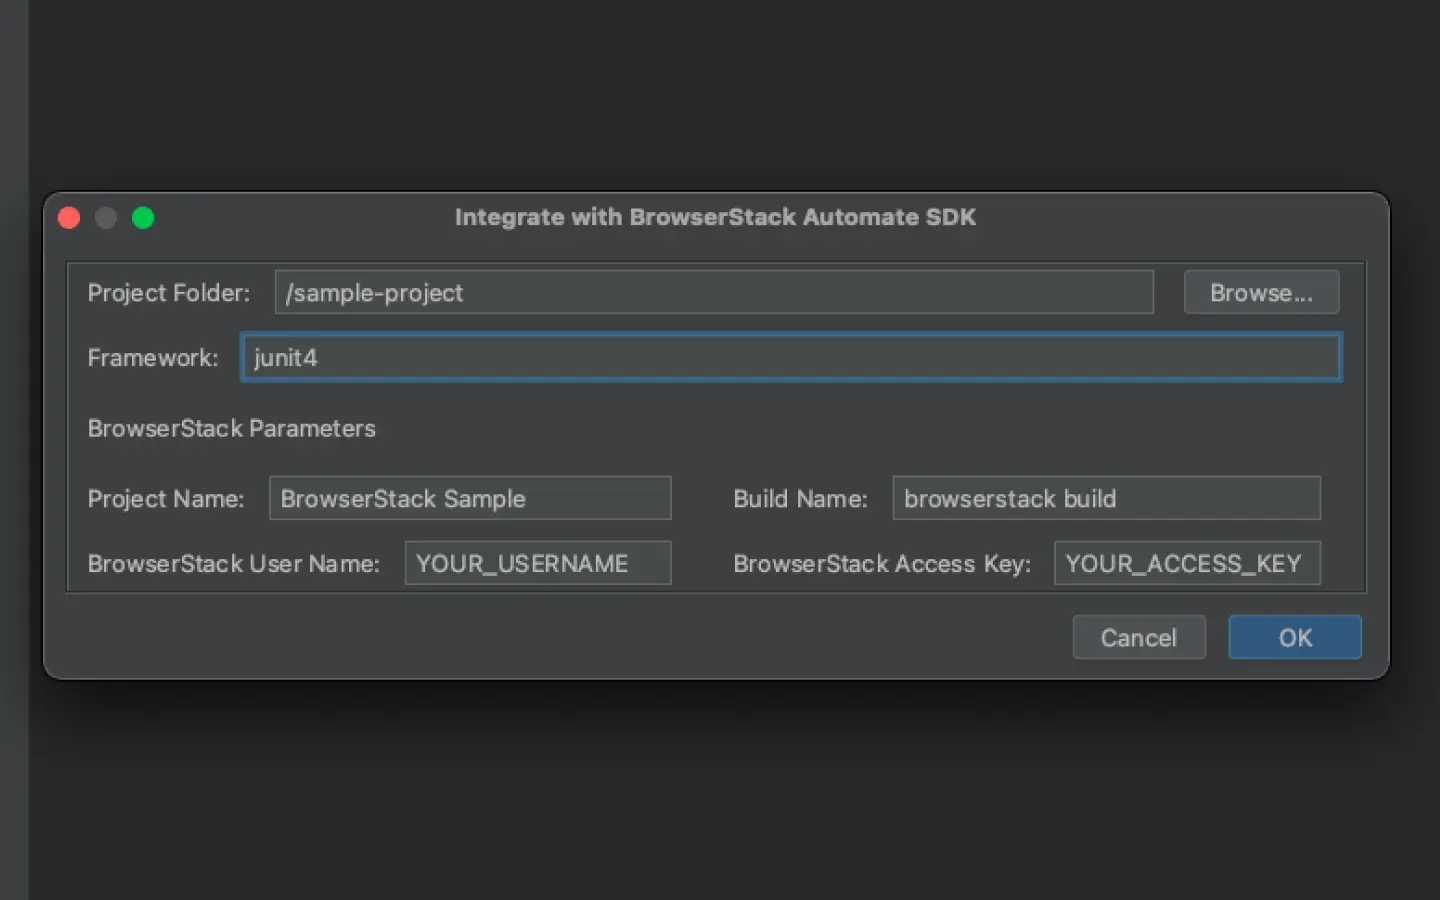
Select your Project Folder, Framework, and other BrowserStack Parameters, and then click Integrate.
Update browserstack.yml file
Update the browserstack.yml file in the root folder of your test suite.
The projectName and buildName config must be static and not change across different runs of the same build. This is a deviation in approach as specified by BrowserStack Automate or App Automate as Test Reporting & Analytics will automatically identify different build runs.
Restrict the characters in your projectName and buildName to alphanumeric characters (A-Z, a-z, 0-9), underscores (_), colons (:), and hyphens (-). Any other character will be replaced with a space.
BrowserStack SDK is a powerful tool you can use to set the different browser/device combinations and parallelization. For more details, check out the Automate Integration guide or the App Automate integration guide.
Run your test suite
Run your tests as usual.
View results and insights on Test Reporting & Analytics dashboards
Post build run completion, you’ll be able to see the build run report along with all necessary debugging information right on this dashboard.
Set BrowserStack credentials
Saving your BrowserStack credentials as environment variables makes it easier to run your test suite from your local or CI environment.
Install BrowserStack SDK using Maven Archetype
Maven Archetype provides a template to quickly configure your project. Copy & run the adjacent command on your terminal/command prompt to add browserstack-java-sdk dependency in your pom.xml and browserstack.yml config file in your project.
Make changes in your browserstack.yml config file
Once you have installed the SDK, a browserstack.yml config file will be created at the root level of your project. This file holds all the required capabilities to run tests on BrowserStack.
BrowserStack SDK is a powerful tool you can use to set the different browser/device combinations and parallelization. For more details, check out the Automate Integration guide or the App Automate integration guide.
Make sure you copy the contents of the below config file and set it in your project’s browserstack.yml file:
The projectName and buildName config must be static and not change across different runs of the same build. This is a deviation in approach as specified by BrowserStack Automate or App Automate as Test Reporting & Analytics will automatically identify different build runs.
Restrict the characters in your projectName and buildName to alphanumeric characters (A-Z, a-z, 0-9), underscores (_), colons (:), and hyphens (-). Any other character will be replaced with a space.
Run your test suite with Test Reporting & Analytics
Run the adjacent command from the project’s root directory to run your test suite with BrowserStack.
Post build run completion, you’ll be able to see the build run report along with all necessary debugging information.
Verify your pom.xml entries
As you’re an existing browserstack-java-sdk user, you must already have the following entry in your pom.xml file of your project. Please verify that the following exists:
Install the latest SDK version
The previous step outlines that your pom.xml must have the LATEST tag against the browserstack-java-sdk. Now, run the below command to ensure that the latest version is installed:
Ensure that you have browserstack-java-sdk version 1.12.3 or higher.
Verify your browserStack.yml config file
As you’re an existing browserstack-java-sdk user, you must already be having a browserstack.yml config file at the root level of your project.
Test Reporting & Analytics mandatorily needs the following four configurations in the file. You need not change anything but you have to ensure that the values of the buildName and projectName variables are not changing across different build runs.
The projectName and buildName config must be static and not change across different runs of the same build. This is a deviation in approach as specified by BrowserStack Automate or App Automate as Test Reporting & Analytics will automatically identify different build runs.
Restrict the characters in your projectName and buildName to alphanumeric characters (A-Z, a-z, 0-9), underscores (_), colons (:), and hyphens (-). Any other character will be replaced with a space.
Run your test suite with Test Reporting & Analytics
Run the following command from the project’s root directory to run your test suite with BrowserStack.
Post build run completion, you’ll be able to see the build run report along with all necessary debugging information right on this dashboard.
To start using BrowserStack Test Reporting & Analytics with your existing setup of Junit4 tests running on your local laptop or CI or even on any other cloud provider, you’d need to integrate the browserstack-java-sdk. Follow one of the methods below to integrate the SDK and start using Test Reporting & Analytics:
BrowserStack Test Reporting & Analytics works with any kind of automation tests. Use it with your unit or integration test suites and also your end-to-end functional test suite.
Install BrowserStack plugin
On the Eclipse toolbar, click Help > Eclipse Marketplace. In the Eclipse Marketplace, search for BrowserStack > click Install > Finish.
Configure your test suite with BrowserStack SDK
BrowserStack plugin automatically adds the browserstack-java-sdk dependency to your pom.xml file and generates a browserstack.yml configuration file.
Right-click on your project folder > BrowserStack > select Integrate with Automate SDK.
Select your Project Folder, Framework, and other BrowserStack Parameters, and then click Integrate.
Update browserstack.yml file
Update the browserstack.yml file in the root folder of your test suite.
The projectName and buildName config must be static and not change across different runs of the same build. This is a deviation in approach as specified by BrowserStack Automate or App Automate as Test Reporting & Analytics will automatically identify different build runs.
Restrict the characters in your projectName and buildName to alphanumeric characters (A-Z, a-z, 0-9), underscores (_), colons (:), and hyphens (-). Any other character will be replaced with a space.
BrowserStack SDK is a powerful tool you can use to set the different browser/device combinations and parallelization. For more details, check out the Automate Integration guide or the App Automate integration guide.
Run your test suite
Run your tests as usual.
View results and insights on Test Reporting & Analytics dashboards
Post build run completion, you’ll be able to see the build run report along with all necessary debugging information.
Install BrowserStack plugin
Click IntelliJ IDEA > Preferences > Plugins. Search for BrowserStack and click Install.
Configure your test suite with BrowserStack SDK
BrowserStack plugin automatically adds the browserstack-java-sdk dependency to your pom.xml file and generates a browserstack.yml configuration file.
Right-click on your project folder > BrowserStack > select Integrate with Automate SDK.
Select your Project Folder, Framework, and other BrowserStack Parameters, and then click Integrate.
Update browserstack.yml file
Update the browserstack.yml file in the root folder of your test suite.
The projectName and buildName config must be static and not change across different runs of the same build. This is a deviation in approach as specified by BrowserStack Automate or App Automate as Test Reporting & Analytics will automatically identify different build runs.
Restrict the characters in your projectName and buildName to alphanumeric characters (A-Z, a-z, 0-9), underscores (_), colons (:), and hyphens (-). Any other character will be replaced with a space.
BrowserStack SDK is a powerful tool you can use to set the different browser/device combinations and parallelization. For more details, check out the Automate Integration guide or the App Automate integration guide.
Run your test suite
Run your tests as usual.
View results and insights on Test Reporting & Analytics dashboards
Post build run completion, you’ll be able to see the build run report along with all necessary debugging information.
Set BrowserStack credentials
Saving your BrowserStack credentials as environment variables makes it easier to run your test suite from your local or CI environment.
Install BrowserStack SDK using Maven Archetype
Maven Archetype provides a template to quickly configure your project. Copy & run the following command on your terminal/command prompt to add browserstack-java-sdk dependency in your pom.xml and browserstack.yml config file in your project.
Make changes in your browserstack.yml config file
Once you have installed the SDK, a browserstack.yml config file will be created at the root level of your project. This file holds all the required capabilities to run tests on BrowserStack.
BrowserStack SDK is a powerful tool you can use to set the different browser/device combinations and parallelization. For more details, check out the Automate Integration guide or the App Automate integration guide.
Make sure you copy the contents of the below config file and set it in your project’s browserstack.yml file:
The projectName and buildName config must be static and not change across different runs of the same build. This is a deviation in approach as specified by BrowserStack Automate or App Automate as Test Reporting & Analytics will automatically identify different build runs.
Restrict the characters in your projectName and buildName to alphanumeric characters (A-Z, a-z, 0-9), underscores (_), colons (:), and hyphens (-). Any other character will be replaced with a space.
Run your test suite with Test Reporting & Analytics
Run the following command from the project’s root directory to run your test suite with BrowserStack.
Post build run completion, you’ll be able to see the build run report along with all necessary debugging information.
Please select your setup below to get started with an awesome debugging experience with Test Reporting & Analytics:
To start using BrowserStack Test Reporting & Analytics with your existing setup of Cucumber-JUnit4 tests running on BrowserStack Automate or App Automate, you’d need to integrate with the browserstack-java-sdk (if not already done). Use one of the following methods to integrate the SDK and start using Test Reporting & Analytics:
If you’re an existing browserstack-java-sdk user, you can skip the steps below. However, ensure that you’ve specified static names (names should not change across build runs) for projectName and buildName in the browserstack.yml file in your project. Also, restrict the characters in your projectName and buildName to alphanumeric characters (A-Z, a-z, 0-9), underscores (_), colons (:), and hyphens (-). Any other character will be replaced with a space.
Install BrowserStack plugin
On the Eclipse toolbar, click Help > Eclipse Marketplace. In the Eclipse Marketplace, search for BrowserStack > click Install > Finish.
Configure your test suite with BrowserStack SDK
BrowserStack plugin automatically adds the browserstack-java-sdk dependency to your pom.xml file and generates a browserstack.yml configuration file.
Right-click on your project folder > BrowserStack > select Integrate with Automate SDK.
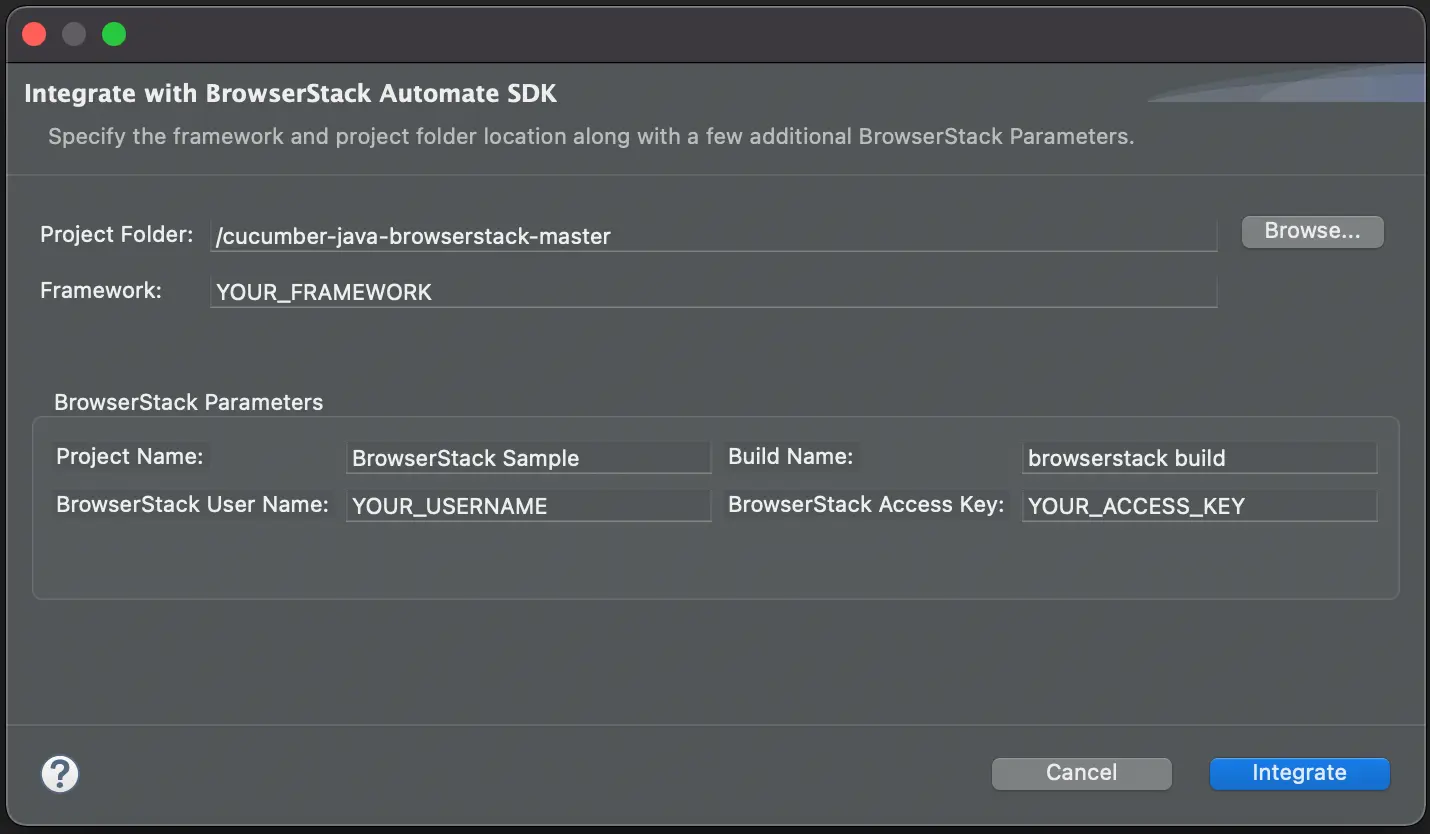
Select your Project Folder, Framework, and other BrowserStack Parameters, and then click Integrate.
Framework: cucumber-junit4
BrowserStack User Name: YOUR_USERNAME
BrowserStack Access Key: YOUR_ACCESS_KEY
Update browserstack.yml file
Update the browserstack.yml file in the root folder of your test suite.
The projectName and buildName config must be static and not change across different runs of the same build. This is a deviation in approach as specified by BrowserStack Automate or App Automate as Test Reporting & Analytics will automatically identify different build runs.
Restrict the characters in your projectName and buildName to alphanumeric characters (A-Z, a-z, 0-9), underscores (_), colons (:), and hyphens (-). Any other character will be replaced with a space.
BrowserStack SDK is a powerful tool you can use to set the different browser/device combinations and parallelization. For more details, check out the Automate Integration guide or the App Automate integration guide.
Run your test suite
Run your tests as usual.
View results and insights on Test Reporting & Analytics dashboards
Post build run completion, you’ll be able to see the build run report along with all necessary debugging information right on this dashboard.
Install BrowserStack plugin
Click IntelliJ IDEA > Preferences > Plugins. Search for BrowserStack and click Install.
Configure your test suite with BrowserStack SDK
BrowserStack plugin automatically adds the browserstack-java-sdk dependency to your pom.xml file and generates a browserstack.yml configuration file.
Right-click on your project folder > BrowserStack > select Integrate with Automate SDK.
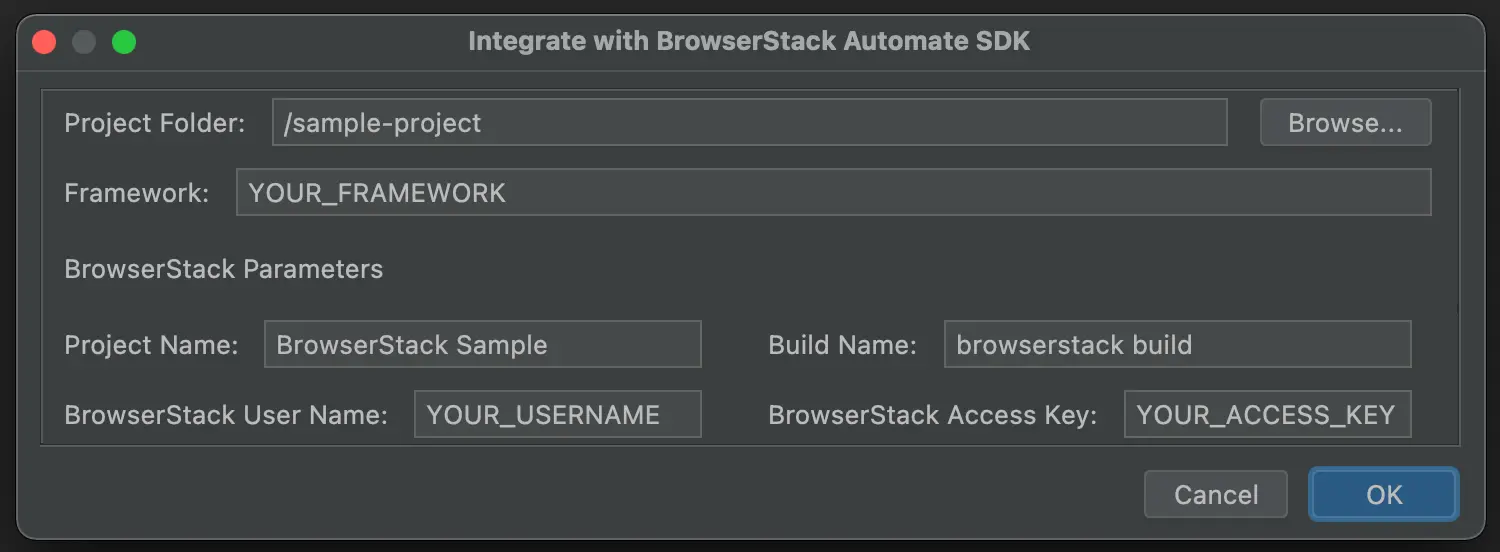
Select your Project Folder, Framework, and other BrowserStack Parameters, and then click Integrate.
Framework: cucumber-junit4
BrowserStack User Name: YOUR_USERNAME
BrowserStack Access Key: YOUR_ACCESS_KEY
Update browserstack.yml file
Update the browserstack.yml file in the root folder of your test suite.
The projectName and buildName config must be static and not change across different runs of the same build. This is a deviation in approach as specified by BrowserStack Automate or App Automate as Test Reporting & Analytics will automatically identify different build runs.
Restrict the characters in your projectName and buildName to alphanumeric characters (A-Z, a-z, 0-9), underscores (_), colons (:), and hyphens (-). Any other character will be replaced with a space.
BrowserStack SDK is a powerful tool you can use to set the different browser/device combinations and parallelization. For more details, check out the Automate Integration guide or the App Automate integration guide.
Run your test suite
Run your tests as usual.
View results and insights on Test Reporting & Analytics dashboards
Post build run completion, you’ll be able to see the build run report along with all necessary debugging information right on this dashboard.
Set BrowserStack credentials
Saving your BrowserStack credentials as environment variables makes it easier to run your test suite from your local or CI environment.
Install BrowserStack SDK using Maven Archetype
Maven Archetype provides a template to quickly configure your project. Copy & run the following command on your terminal/command prompt to add browserstack-java-sdk dependency in your pom.xml and browserstack.yml config file in your project.
Please ensure that you now have at least browserstack-java-sdk v1.20.0 before proceeding.
Make changes in your browserstack.yml config file
Once you have installed the SDK, a browserstack.yml config file will be created at the root level of your project. This file holds all the required capabilities to run tests on BrowserStack.
BrowserStack SDK is a powerful tool you can use to set the different browser/device combinations and parallelization. For more details, check out the Automate Integration guide or the App Automate integration guide.
Make sure you copy the contents of the following config file and set it in your project’s browserstack.yml file:
The projectName and buildName config must be static and not change across different runs of the same build. This is a deviation in approach as specified by BrowserStack Automate or App Automate as Test Reporting & Analytics will automatically identify different build runs.
Restrict the characters in your projectName and buildName to alphanumeric characters (A-Z, a-z, 0-9), underscores (_), colons (:), and hyphens (-). Any other character will be replaced with a space.
Run your test suite with Test Reporting & Analytics
Run the following command from the project’s root directory to run your test suite with BrowserStack.
Post build run completion, you will see the build URL of Test Reporting & Analytics. Alternatively, you can also navigate to your build run using Build Runs.
Verify your pom.xml entries
Since you’re an existing browserstack-java-sdk user, you must already have the following entry in your pom.xml file of your project. Please verify that the following exists:
Install the latest SDK version
The previous step outlines that your pom.xml must have the LATEST tag against the browserstack-java-sdk. Now, run the below command to ensure that the latest version is installed:
Please ensure that you now have at least browserstack-java-sdk v1.20.0 before proceeding.
Verify your browserStack.yml config file
Since you’re an existing browserstack-java-sdk user, you must already be having a browserstack.yml config file at the root level of your project.
Test Reporting & Analytics mandatorily needs the following four configurations in the file. You need not change anything but you have to ensure that the values of the buildName and projectName variables are not changing across different build runs.
The projectName and buildName config must be static and not change across different runs of the same build. This is a deviation in approach as specified by BrowserStack Automate or App Automate as Test Reporting & Analytics will automatically identify different build runs.
Restrict the characters in your projectName and buildName to alphanumeric characters (A-Z, a-z, 0-9), underscores (_), colons (:), and hyphens (-). Any other character will be replaced with a space.
Run your test suite with Test Reporting & Analytics
Run the following command from the project’s root directory to run your test suite with BrowserStack.
Post build run completion, you will see the build URL of Test Reporting & Analytics. Alternatively, you can also navigate to your build run using Build Runs.
To start using BrowserStack Test Reporting & Analytics with your existing setup of Cucumber-JUnit4 tests running on your local laptop or CI or even on any other cloud provider, you’d need to integrate the browserstack-java-sdk. Use one of the following methods to integrate the SDK and start using Test Reporting & Analytics:
BrowserStack Test Reporting & Analytics works with any kind of automation tests. Use it with your unit or integration test suites and also your end-to-end functional test suite.
Install BrowserStack plugin
On the Eclipse toolbar, click Help > Eclipse Marketplace. In the Eclipse Marketplace, search for BrowserStack > click Install > Finish.
Configure your test suite with BrowserStack SDK
BrowserStack plugin automatically adds the browserstack-java-sdk dependency to your pom.xml file and generates a browserstack.yml configuration file.
Right-click on your project folder > BrowserStack > select Integrate with Automate SDK.
Select your Project Folder, Framework, and other BrowserStack Parameters, and then click Integrate.
Framework: cucumber-junit4
BrowserStack User Name: YOUR_USERNAME
BrowserStack Access Key: YOUR_ACCESS_KEY
Update browserstack.yml file
Update the browserstack.yml file in the root folder of your test suite.
The projectName and buildName config must be static and not change across different runs of the same build. This is a deviation in approach as specified by BrowserStack Automate or App Automate as Test Reporting & Analytics will automatically identify different build runs.
Restrict the characters in your projectName and buildName to alphanumeric characters (A-Z, a-z, 0-9), underscores (_), colons (:), and hyphens (-). Any other character will be replaced with a space.
BrowserStack SDK is a powerful tool you can use to set the different browser/device combinations and parallelization. For more details, check out the Automate Integration guide or the App Automate integration guide.
Run your test suite
Run your tests as usual.
View results and insights on Test Reporting & Analytics dashboards
Post build run completion, you’ll be able to see the build run report along with all necessary debugging information right on this dashboard.
Install BrowserStack plugin
Click IntelliJ IDEA > Preferences > Plugins. Search for BrowserStack and click Install.
Configure your test suite with BrowserStack SDK
BrowserStack plugin automatically adds the browserstack-java-sdk dependency to your pom.xml file and generates a browserstack.yml configuration file.
Right-click on your project folder > BrowserStack > select Integrate with Automate SDK.
Select your Project Folder, Framework, and other BrowserStack Parameters, and then click Integrate.
Framework: cucumber-junit4
BrowserStack User Name: YOUR_USERNAME
BrowserStack Access Key: YOUR_ACCESS_KEY
Update browserstack.yml file
Update the browserstack.yml file in the root folder of your test suite.
The projectName and buildName config must be static and not change across different runs of the same build. This is a deviation in approach as specified by BrowserStack Automate or App Automate as Test Reporting & Analytics will automatically identify different build runs.
Restrict the characters in your projectName and buildName to alphanumeric characters (A-Z, a-z, 0-9), underscores (_), colons (:), and hyphens (-). Any other character will be replaced with a space.
BrowserStack SDK is a powerful tool you can use to set the different browser/device combinations and parallelization. For more details, check out the Automate Integration guide or the App Automate integration guide.
Run your test suite
Run your tests as usual.
View results and insights on Test Reporting & Analytics dashboards
Post build run completion, you’ll be able to see the build run report along with all necessary debugging information right on this dashboard.
Set BrowserStack credentials
Saving your BrowserStack credentials as environment variables makes it easier to run your test suite from your local or CI environment.
Install BrowserStack SDK using Maven Archetype
Maven Archetype provides a template to quickly configure your project. Copy & run the following command on your terminal/command prompt to add browserstack-java-sdk dependency in your pom.xml and browserstack.yml config file in your project along with the required variables.
Please ensure that you now have at least browserstack-java-sdk v1.20.0 before proceeding.
Make changes in your browserstack.yml config file
Once you have installed the SDK, a browserstack.yml config file will be created at the root level of your project. This file holds all the required capabilities to run tests on BrowserStack.
Make sure you copy the contents of the below config file and set it in your project’s browserstack.yml file:
The projectName and buildName config must be static and not change across different runs of the same build. Different runs of the same build/job would be automatically identified by Test Reporting & Analytics.
Restrict the characters in your projectName and buildName to alphanumeric characters (A-Z, a-z, 0-9), underscores (_), colons (:), and hyphens (-). Any other character will be replaced with a space.
Run your test suite with Test Reporting & Analytics
Run the following command from the project’s root directory to run your test suite with BrowserStack.
Post build run completion, you will see the build URL of Test Reporting & Analytics. Alternatively, you can also navigate to your build run using Build Runs.
Visit Test Reporting & Analytics
Setup for log4j in JUnit4
Add custom appender to support log4j logs
If you use log4j for your logs, you need to make a few changes to your test suite to support it.
-
Add log4j properties file if not already done.
logDir=logs # Initialize root logger with level ERROR for stdout and fout log4j.rootLogger=TRACE,stdout,fout # Set the log level for these components log4j.logger.com.endeca=INFO log4j.logger.com.endeca.itl.web.metrics=INFO # Add a ConsoleAppender to the logger log4j.appender.stdout=org.apache.log4j.ConsoleAppender log4j.appender.stdout.layout=org.apache.log4j.PatternLayout # Use a simple message format log4j.appender.stdout.layout.ConversionPattern=%p\t%d{ISO8601}\t%r\t%c\t[%t]\t%m%n # Add a FileAppender to the logger log4j.appender.fout=org.apache.log4j.FileAppender log4j.appender.fout.File=logs/app.log log4j.appender.fout.layout=org.apache.log4j.PatternLayout log4j.appender.fout.layout.ConversionPattern=%p\t%d{ISO8601}\t%r\t%c\t[%t]\t%m%n -
Define and use the logger.
 import org.apache.log4j.Logger;
 import org.junit.jupiter.api.Test;
 public class MyJUnit4Test {
     protected static Logger log = Logger.getLogger(MyJUnit4Test.class);
 // <your test code>
 }
We're sorry to hear that. Please share your feedback so we can do better
Contact our Support team for immediate help while we work on improving our docs.
We're continuously improving our docs. We'd love to know what you liked
Thank you for your valuable feedback
Is this page helping you?
We're sorry to hear that. Please share your feedback so we can do better
Contact our Support team for immediate help while we work on improving our docs.
We're continuously improving our docs. We'd love to know what you liked
Thank you for your valuable feedback!