Get your setup working faster. Join our Discord for optimisation tips from elite testers.Join our Discord
View build reports in Azure Pipelines
Embed your Test Reporting & Analytics build report in the Azure Pipelines run summary using the BrowserStack Azure DevOps extension.
Azure Pipelines is a continuous integration tool that builds, tests, and deploys your code on every change. The BrowserStack Azure DevOps extension embeds your Test Reporting & Analytics build report into the Azure Pipelines run summary, so you can review pass and fail counts, failure categories, and test-level detail without leaving Azure DevOps.
The information in this section applies to using the BrowserStack plugin with Azure Pipelines as part of the Azure DevOps Services (cloud) offering only.
The BrowserStack Azure DevOps extension streamlines configuring Azure Pipelines to run tests on BrowserStack and to publish reports back to the pipeline. To install the extension, follow these steps:
In the BrowserStack Azure DevOps Extension page, click Get it Free. The Sign in page opens.
Sign in to your Azure account, click Select an Azure DevOps organization and select your organization.
Click Install to add the extension.
BrowserStack’s extension is now installed in your Azure DevOps organization and the BrowserStack Config, BrowserStackResults, and BrowserStackStopLocal tasks are added to the list of available tasks in your pipeline.
Configure BrowserStack in Azure Pipelines
For your tests to run on BrowserStack and report to Test Reporting & Analytics, the Azure pipeline needs additional information, such as your BrowserStack credentials. You supply the credentials through a BrowserStack service connection and the BrowserStack Config task.
You can create a pipeline using either a YAML editor or a classic editor. Depending on the editor you used to create the pipeline, refer to the steps in the following tabs:
Open the Azure portal page and click My Azure DevOps Organizations.
In the Azure DevOps Organizations page, click the project where you’ve created a pipeline for your project’s repository from the list of projects that appear.
Click Project settings located at the bottom-left corner of your project’s page.
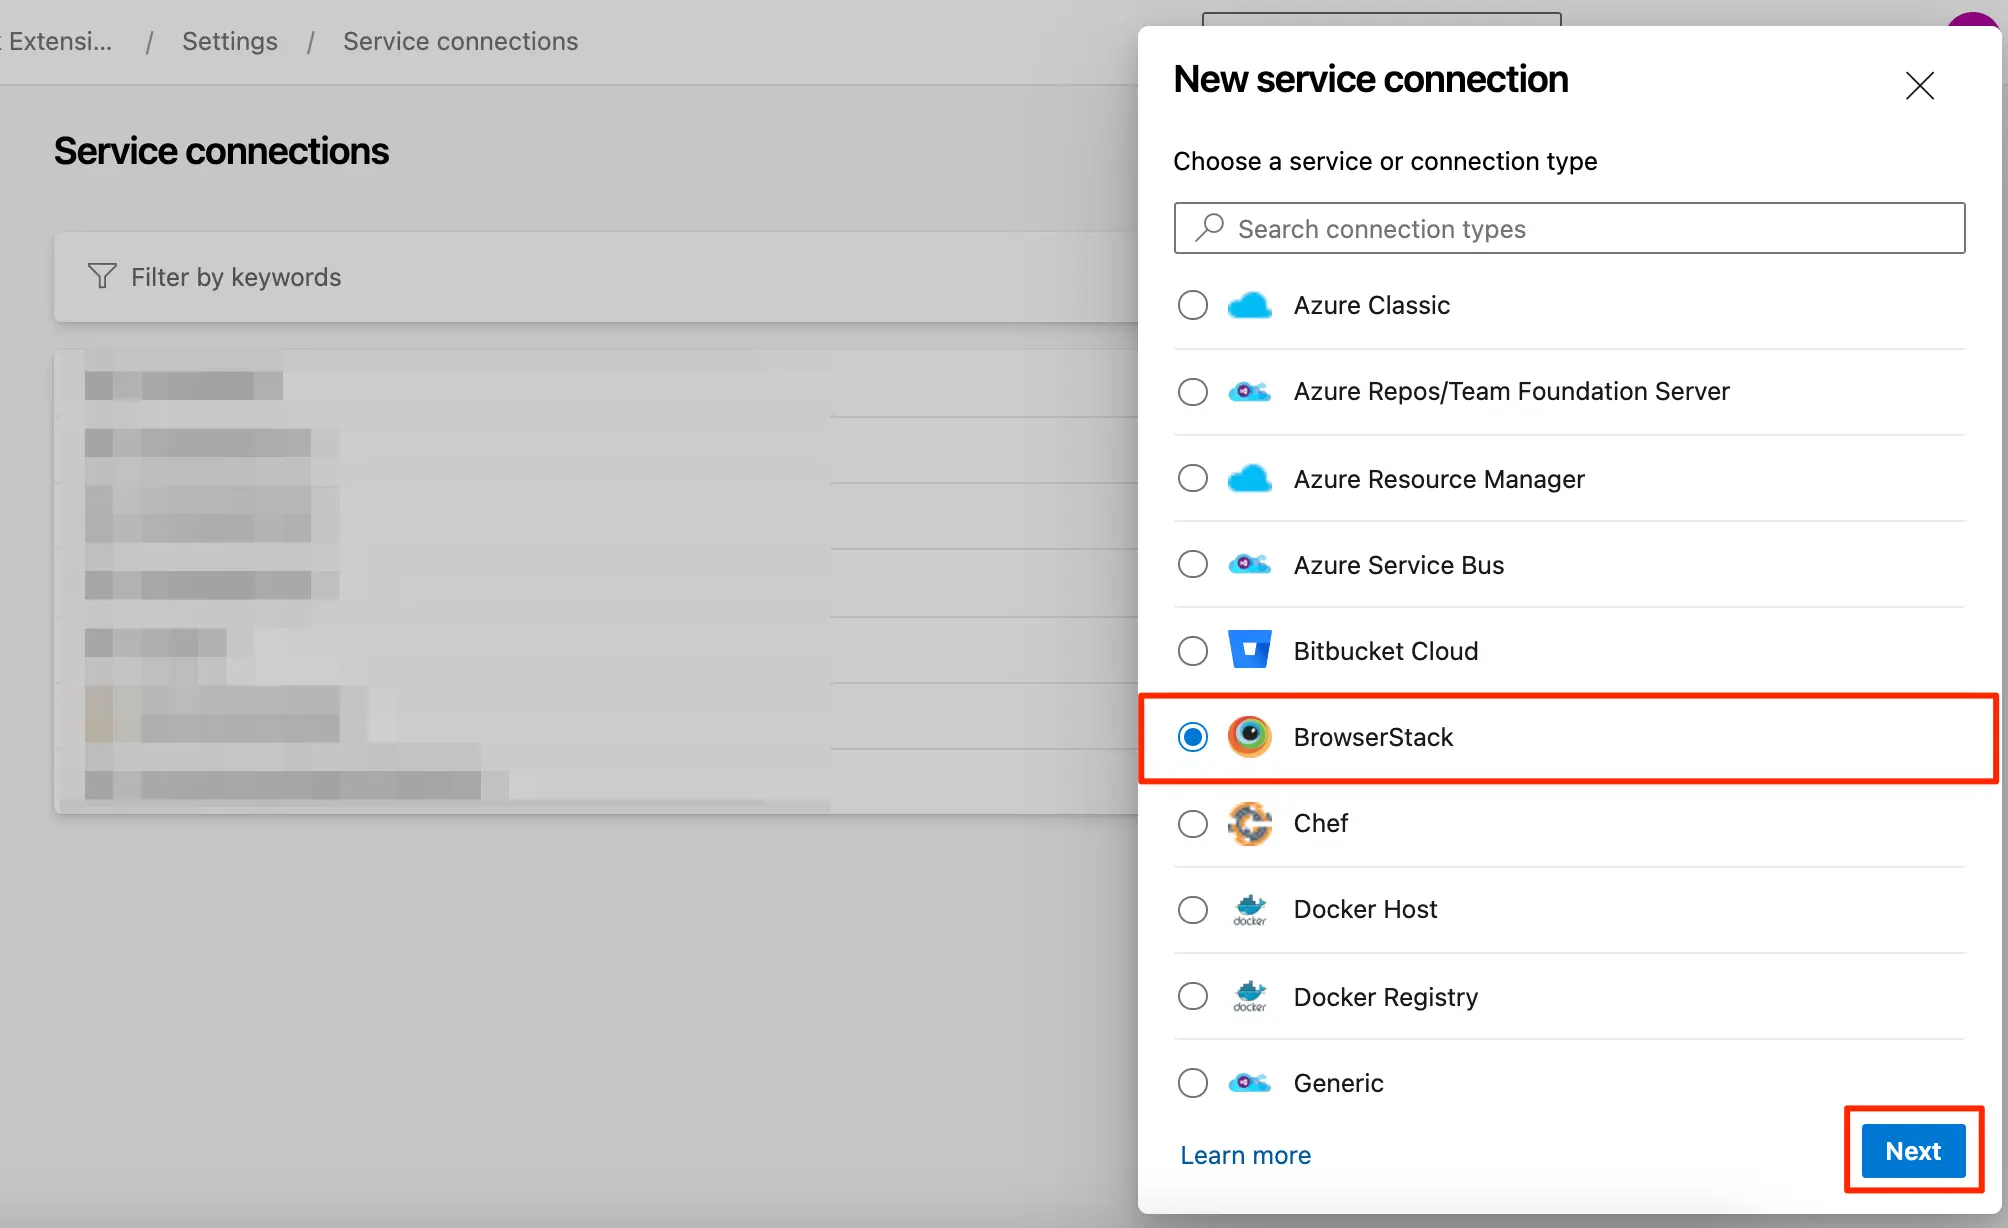
In the Project details page, click Service connections > Create service connection.
In the New service connection section, select BrowserStack from the given list, and click Next.
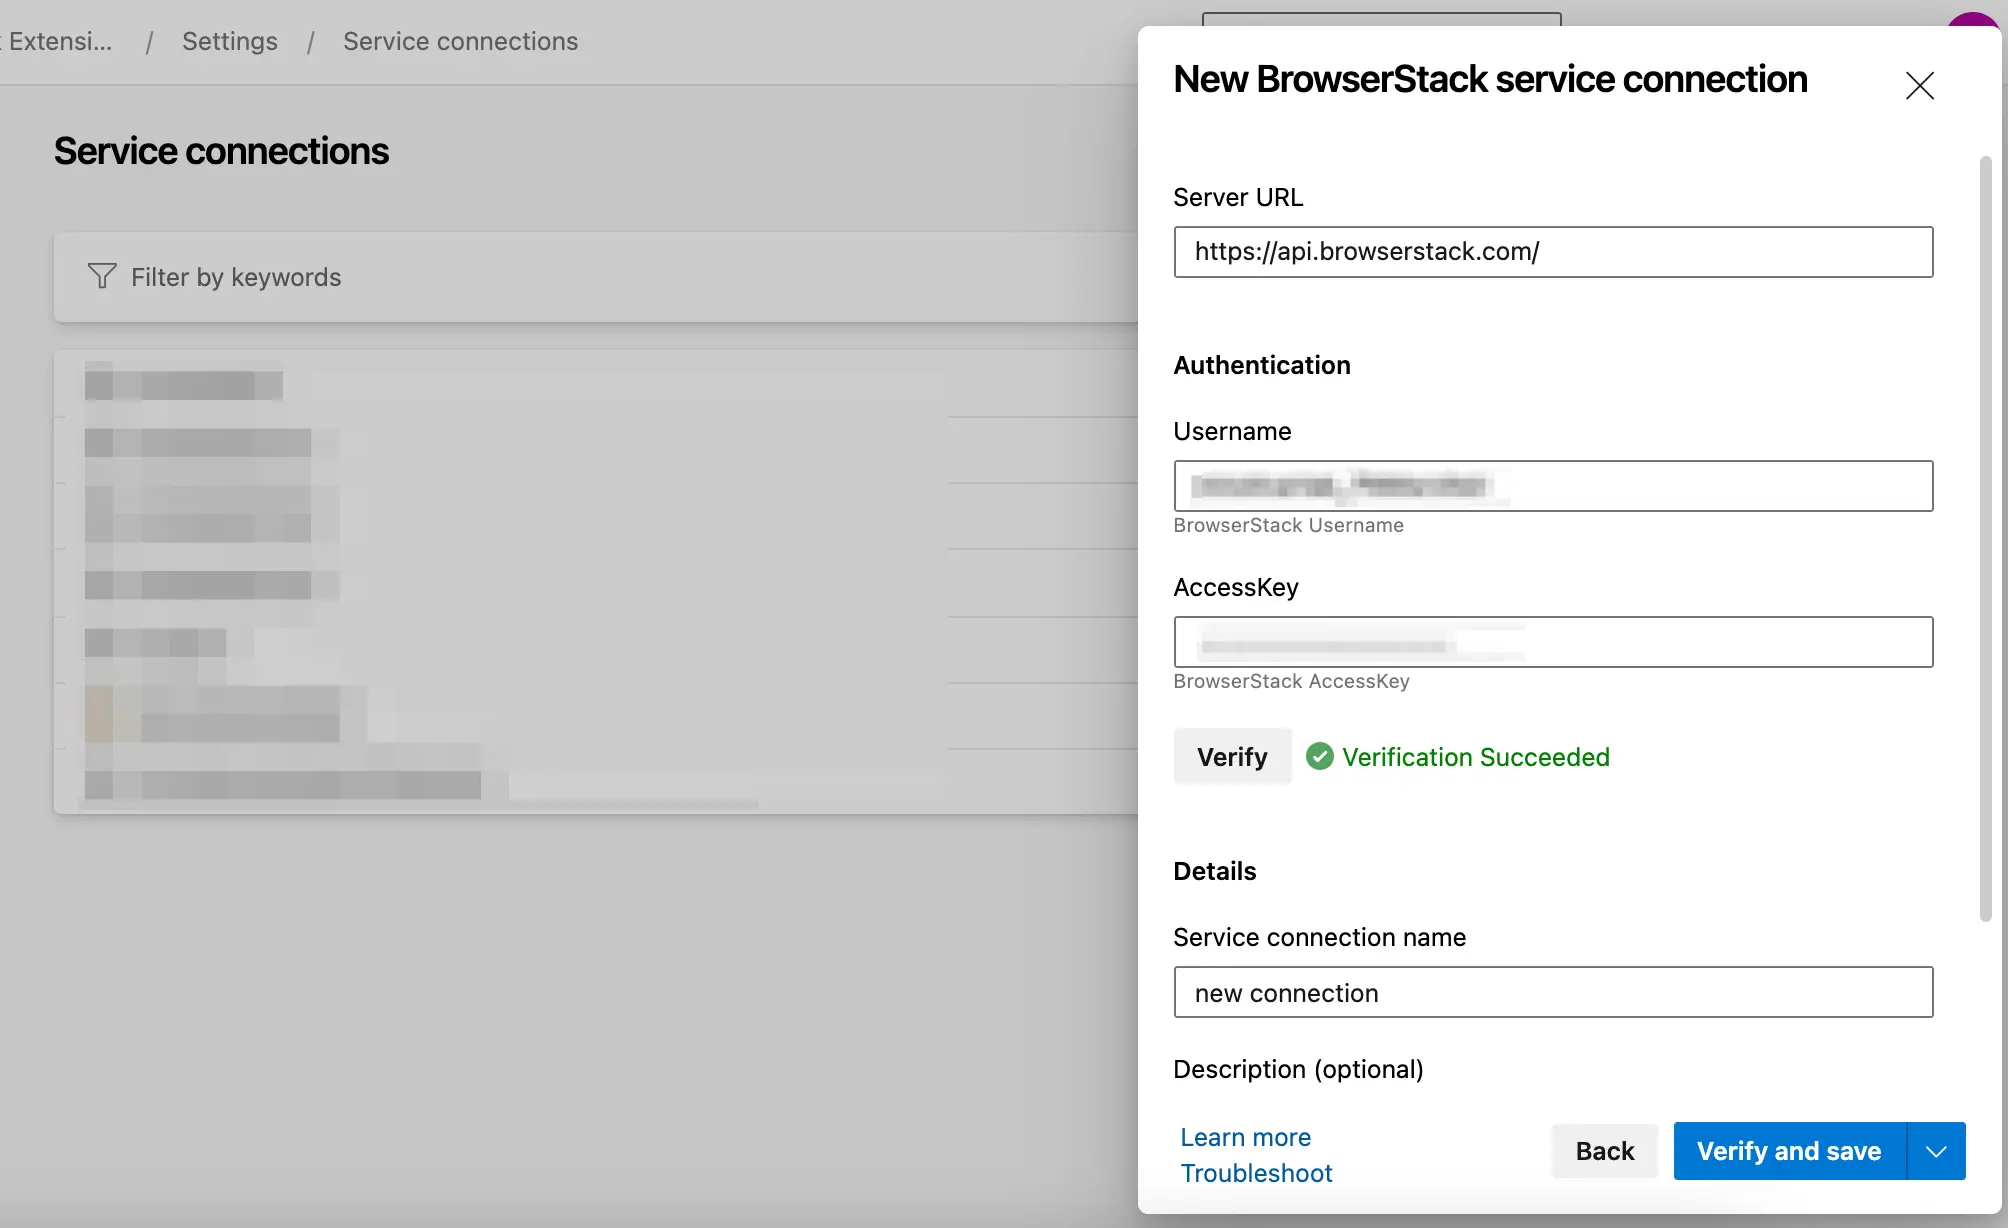
In the New BrowserStack service connection section, enter your BrowserStack username in the Username field, and then enter your access key in the AccessKey field.
Click Verify to verify your BrowserStack credentials.
After verification succeeds, enter a service connection name in the Service connection name field, such as browserstack-connection, and then click Verify and save. BrowserStack adds the service connection and you’re redirected to the Service connections page.
Click the (Pipelines) icon.
In the Pipelines page, select your pipeline.
Click Edit to edit the pipeline.
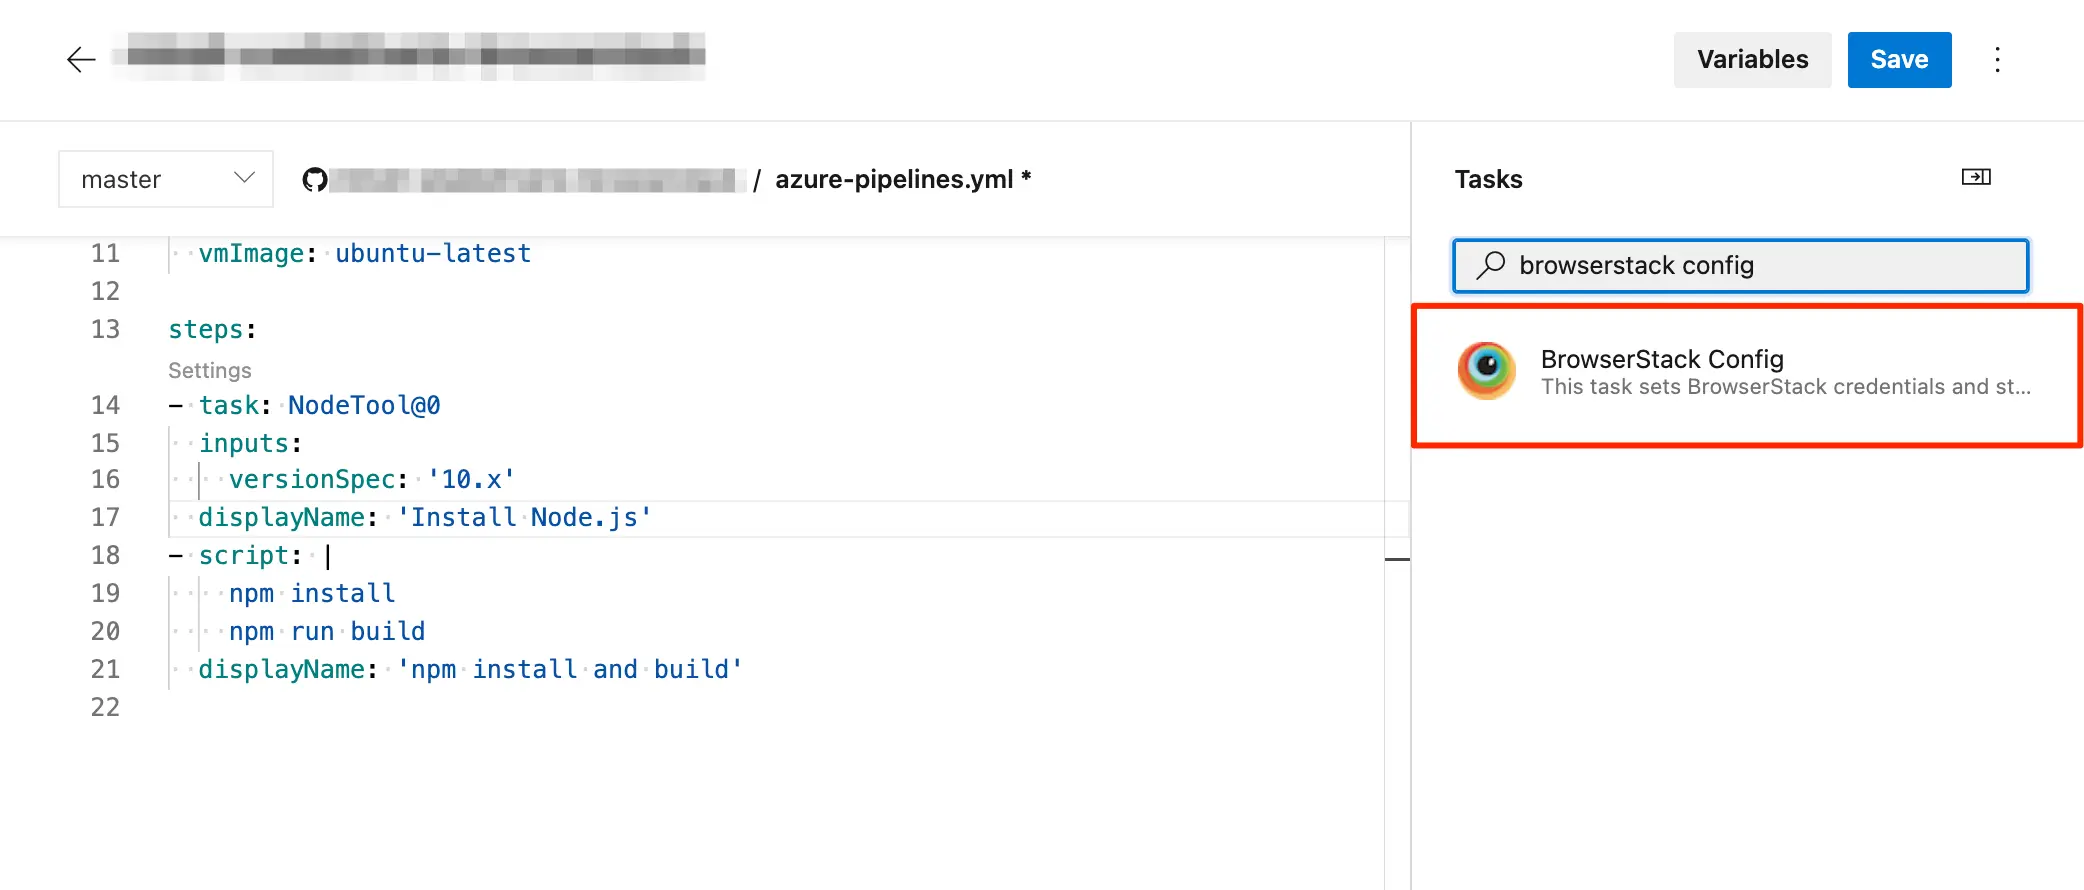
In the pipeline editor, from the Tasks pane, search for the BrowserStack Config task, and then select it.
In the BrowserStack Config section, select the connection you created in Step 8 from BrowserStack service end point.
Click Add, and then click Save to commit the change.
The BrowserStack Config task is added to your azure-pipelines.yml file as the first step of the job:
Set the build capability in your test script using the BROWSERSTACK_BUILD_NAME environment variable. The extension can’t match your pipeline run to a Test Reporting & Analytics build, and the report fails to embed, if this capability is missing. For details, see Edit your test script to call environment variables.
Open the Azure portal page and click My Azure DevOps Organizations.
In the Azure DevOps Organizations page, select the project from the given list.
In the project’s page, click the Pipelines option.
In the Pipelines page, click to select your pipeline.
In the pipeline’s page, click Edit to edit your pipeline.
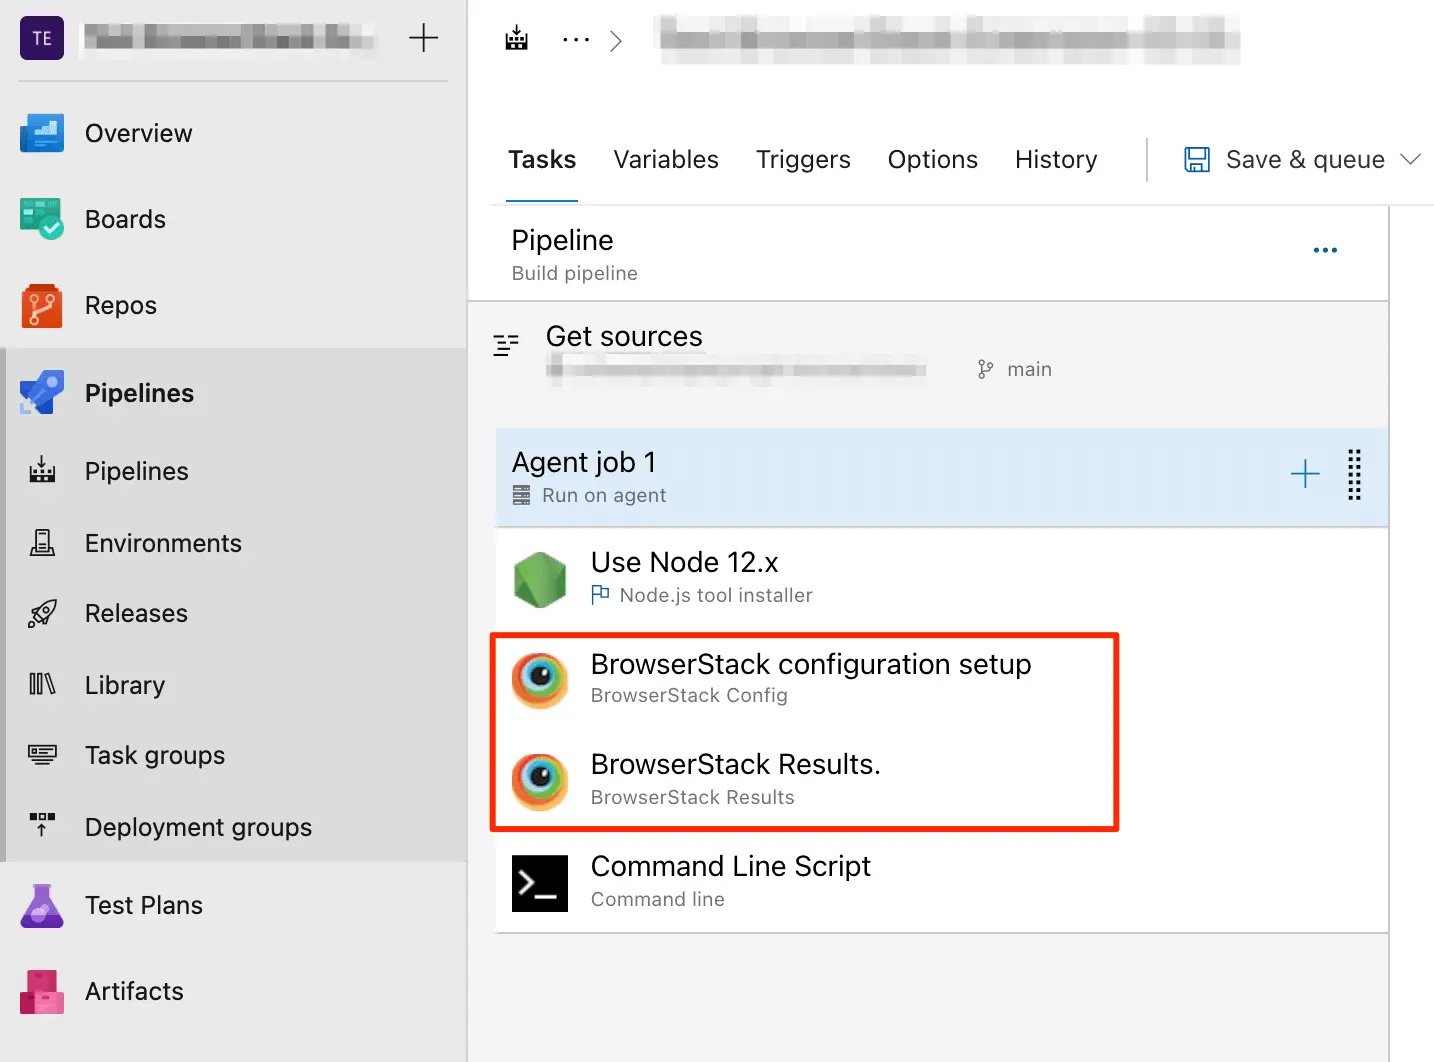
In the Tasks tab, click the Add (+) icon next to the Agent job 1 card.
In the Add tasks pane, select the BrowserStack Config task from the tasks list, and click Add.
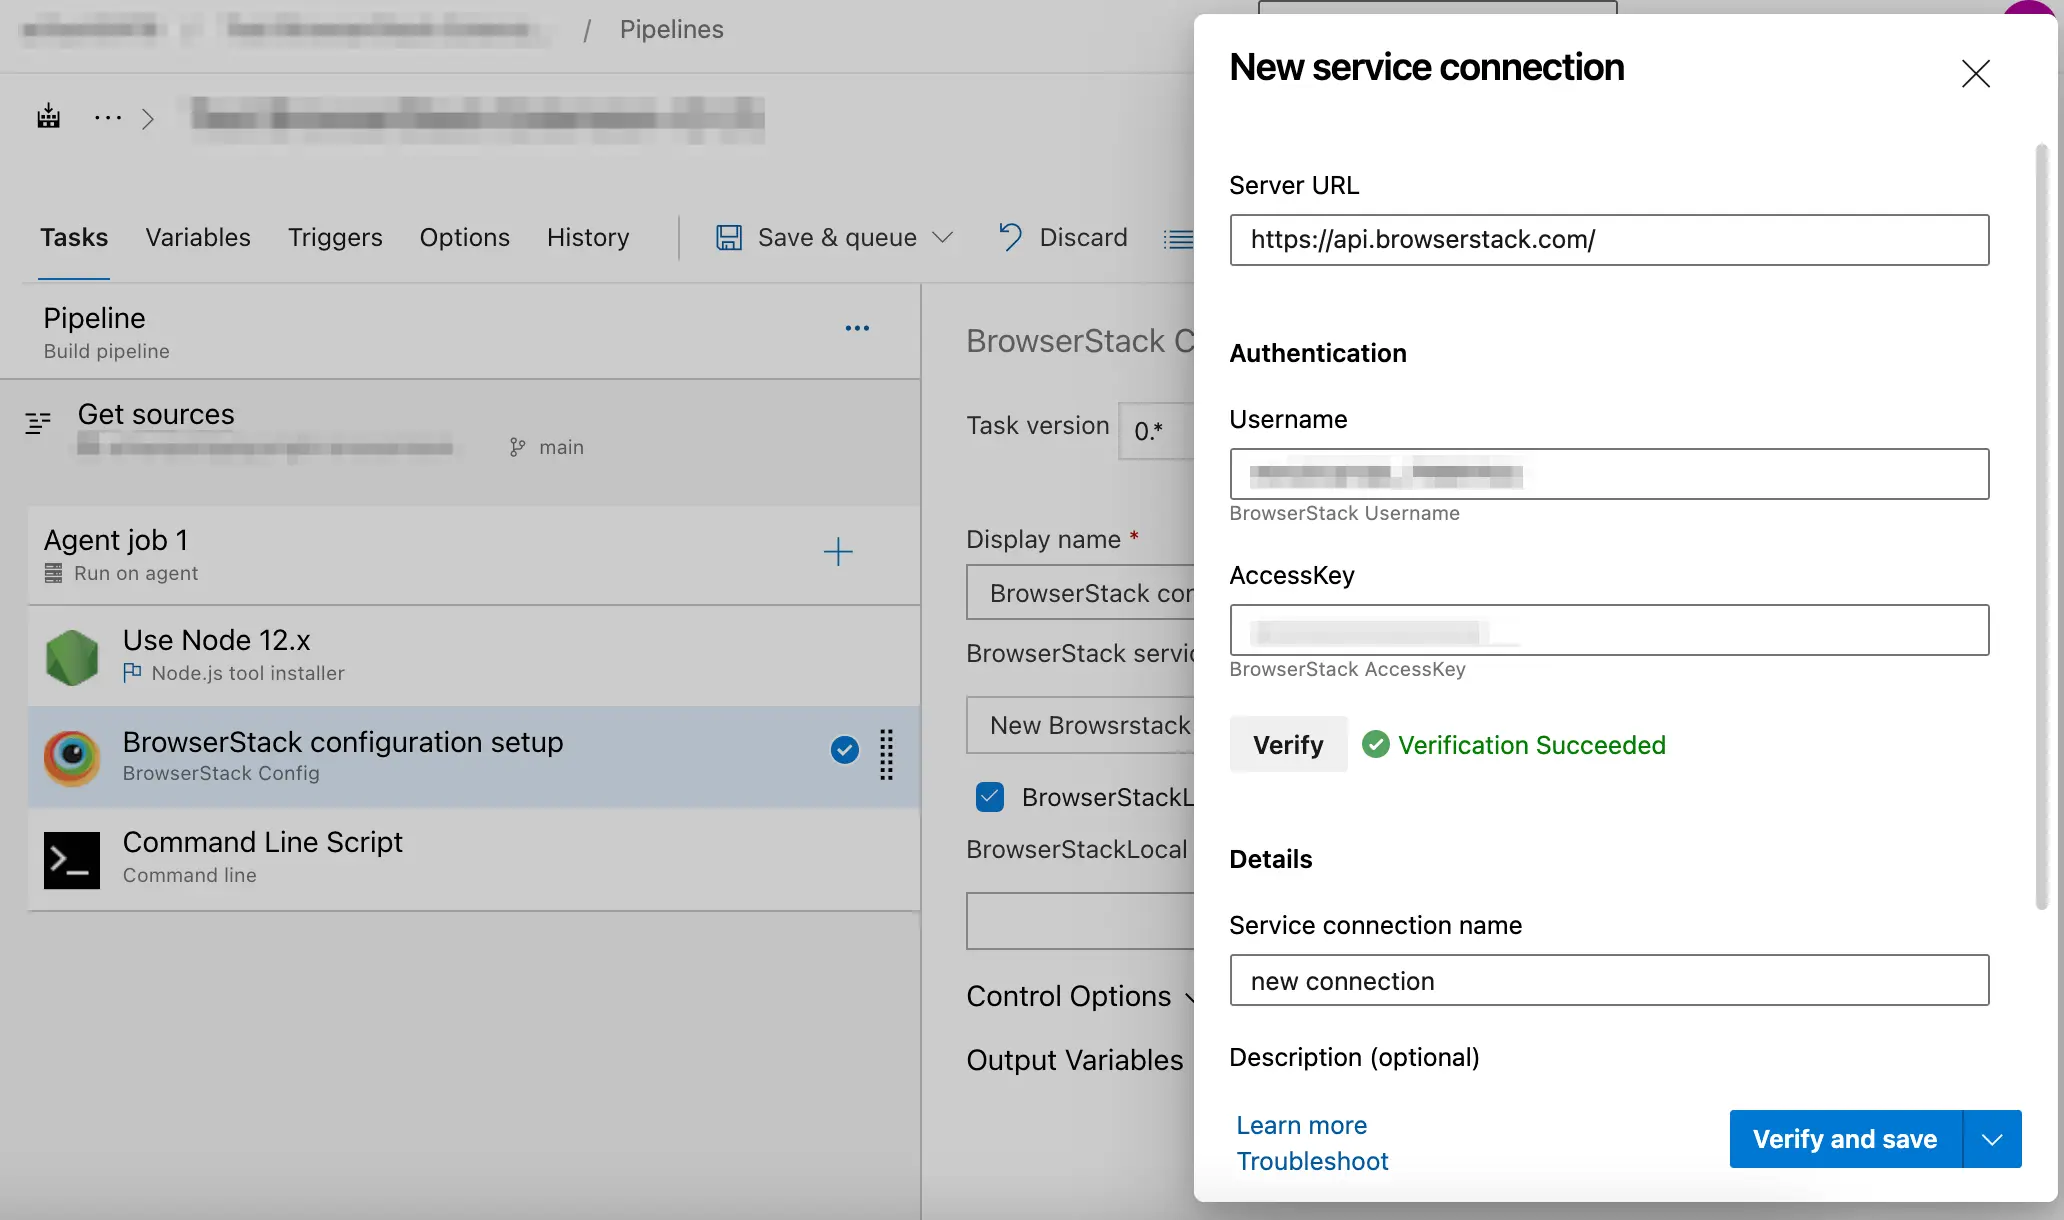
Click the BrowserStack configuration setup card and click + New.
Create a new service connection using the following steps in the New service connection screen:
a. Enter your BrowserStack username.
b. Enter your BrowserStack access key.
c. Click Verify.
d. After verification succeeds, enter a name for the service connection.
e. Click Verify and save.
Drag the BrowserStack configuration setup card so that it’s the first task in Agent job 1, before the task that runs your tests.
Click Save & queue and select Save to save the changes.
Set the build capability in your test script using the BROWSERSTACK_BUILD_NAME environment variable. The extension can’t match your pipeline run to a Test Reporting & Analytics build, and the report fails to embed, if this capability is missing. For details, see Edit your test script to call environment variables.
Your build pipeline is successfully configured to connect with the BrowserStack cloud for your project.
The BrowserStack Config task sets the BROWSERSTACK_BUILD_NAME environment variable, and the BrowserStack Results task uses that value to find the matching build in Test Reporting & Analytics. If your test script sets a different build name, the report can’t be matched to a build.
Configure BrowserStack Local in Azure Pipelines
Use BrowserStack Local Testing to test your web applications hosted on private, development, and internal servers. With the BrowserStack Local Testing binary, you can create a secure, private connection between the BrowserStack Selenium Grid and your internal servers.
In addition, when you add the BrowserStack Config task in your pipeline, the BROWSERSTACK_LOCAL and BROWSERSTACK_LOCAL_IDENTIFIER environment variables are set automatically by the extension.
The extension also adds the BROWSERSTACK_BUILD_NAME variable that autogenerates a build name for your test runs. The BrowserStack Results task uses this build name to fetch the matching Test Reporting & Analytics build.
Edit your test script to call environment variables
Edit your test script to add the environment variables for setting capabilities using the following code snippets:
Stringusername=System.getenv("BROWSERSTACK_USERNAME");StringaccessKey=System.getenv("BROWSERSTACK_ACCESS_KEY");StringbuildName=System.getenv("BROWSERSTACK_BUILD_NAME");Stringlocal=System.getenv("BROWSERSTACK_LOCAL");StringLocalidentifier=System.getenv("BROWSERSTACK_LOCAL_IDENTIFIER");MutableCapabilitiescapabilities=newMutableCapabilities();capabilities.setCapability("browserName","Chrome");capabilities.setCapability("browserVersion","100.0");HashMap<String,Object>browserstackOptions=newHashMap<String,Object>();browserstackOptions.put("os","Windows");browserstackOptions.put("osVersion","10");browserstackOptions.put("sessionName","BStack Build Name: "+buildName);// CI/CD job name using BROWSERSTACK_BUILD_NAME env variablebrowserstackOptions.put("local",local);browserstackOptions.put("localIdentifier",localIdentifier);browserstackOptions.put("seleniumVersion","4.0.0");capabilities.setCapability("bstack:options",browserstackOptions);WebDriverdriver=newRemoteWebDriver(newURL("https://"+username+":"+accessKey+"@hub.browserstack.com/wd/hub"),capabilities);
username=process.env.BROWSERSTACK_USERNAMEaccessKey=process.env.BROWSERSTACK_ACCESS_KEYbuildName=process.env.BROWSERSTACK_BUILD_NAMElocal=process.env.BROWSERSTACK_LOCALlocalIdentifier=process.env.BROWSERSTACK_LOCAL_IDENTIFIERvarcapabilities={'bstack:options':{"os":"Windows","osVersion":"10","sessionName":"BStack Build Name: "+buildName,// CI/CD job name using BROWSERSTACK_BUILD_NAME env variable"local":local,"localIdentifier":localIdentifier,"userName":username,"accessKey":accessKey,"seleniumVersion":"4.0.0",},"browserName":"Chrome","browserVersion":"100.0",}vardriver=newwebdriver.Builder().usingServer("https://hub-cloud.browserstack.com/wd/hub").withCapabilities(capabilities).build();
Stringusername=Environment.GetEnvironmentVariable("BROWSERSTACK_USERNAME");StringaccessKey=Environment.GetEnvironmentVariable("BROWSERSTACK_ACCESS_KEY");StringbuildName=Environment.GetEnvironmentVariable("BROWSERSTACK_BUILD_NAME");Stringlocal=Environment.GetEnvironmentVariable("BROWSERSTACK_LOCAL");StringlocalIdentifier=Environment.GetEnvironmentVariable("BROWSERSTACK_LOCAL_IDENTIFIER");ChromeOptionscapabilities=newChromeOptions();capabilities.BrowserVersion="100.0";// Use latest-beta, latest, latest-1 and so onDictionary<string,object>browserstackOptions=newDictionary<string,object>();browserstackOptions.Add("os","Windows");browserstackOptions.Add("osVersion","10");browserstackOptions.Add("sessionName","BStack Build Name: "+buildName);// CI/CD job name using BROWSERSTACK_BUILD_NAME env variablebrowserstackOptions.Add("userName",username);browserstackOptions.Add("accessKey",accessKey);browserstackOptions.Add("seleniumVersion","4.0.0");browserstackOptions.Add("local",local);browserstackOptions.Add("localIdentifier",localIdentifier);capabilities.AddAdditionalOption("bstack:options",browserstackOptions);driver=newRemoteWebDriver(newUri("https://hub.browserstack.com/wd/hub/"),capabilities);
$username=getenv('BROWSERSTACK_USERNAME');$accessKey=getenv('BROWSERSTACK_ACCESS_KEY');$buildName=getenv('BROWSERSTACK_BUILD_NAME');$local=getenv('BROWSERSTACK_LOCAL');$localIdentifier=getenv('BROWSERSTACK_LOCAL_IDENTIFIER');$caps=array('bstack:options'=>array("os"=>"Windows","osVersion"=>"10","sessionName"=>"BStack Build Name: ".$buildName,// CI/CD job name using BROWSERSTACK_BUILD_NAME env variable"browserstack.local"=>"".$local,"browserstack.localIdentifier"=>"".$localIdentifier"seleniumVersion"=>"4.0.0",),"browserName"=>"Chrome","browserVersion"=>"100.0",);$web_driver=RemoteWebDriver::create("https://".$username.":".$accessKey."@hub.browserstack.com/wd/hub",$caps);
username=os.environ.get('BROWSERSTACK_USERNAME')accessKey=os.environ.get('BROWSERSTACK_ACCESS_KEY')buildName=os.environ.get('BROWSERSTACK_BUILD_NAME')local=os.environ.get('BROWSERSTACK_LOCAL')localIdentifier=os.environ.get('BROWSERSTACK_LOCAL_IDENTIFIER')bstack_options={"os":"Windows","osVersion":"10","sessionName":"BStack Build Name: "+buildName,# CI/CD job name using BROWSERSTACK_BUILD_NAME env variable
"local":local,"localIdentifier":localIdentifier,"seleniumVersion":"4.0.0","userName":username,"accessKey":accessKey}options=ChromeOptions()options.set_capability('bstack:options',bstack_options)driver=webdriver.Remote(command_executor="https://hub.browserstack.com/wd/hub",options=options)
username=ENV['BROWSERSTACK_USERNAME']accessKey=ENV['BROWSERSTACK_ACCESS_KEY']buildName=ENV['BROWSERSTACK_BUILD_NAME']local=ENV['BROWSERSTACK_LOCAL']localIdentifier=ENV['BROWSERSTACK_LOCAL_IDENTIFIER']# to run on Chromeoptions=Selenium::WebDriver::Options.chromecapabilities={'bstack:options'=>{"os"=>"Windows","osVersion"=>"10","sessionName"=>"BStack Build Name: "+buildName,# CI/CD job name using BROWSERSTACK_BUILD_NAME env variable"local"=local,"localIdentifier"=localIdentifier,"seleniumVersion"=>"4.0.0",},"browserName"=>"Chrome","browserVersion"=>"100.0",}options.add_option('bstack:options',bstack_options)driver=Selenium::WebDriver.for(:remote,:url=>"https://"+username+":"+accessKey+"@hub.browserstack.com/wd/hub",:capabilities=>options)
Ensure to pass the browserstackLocal and localIdentifier capabilities to run tests on your local development servers.
Stringusername=System.getenv("BROWSERSTACK_USERNAME");StringaccessKey=System.getenv("BROWSERSTACK_ACCESS_KEY");StringbrowserstackLocal=System.getenv("BROWSERSTACK_LOCAL");StringbuildName=System.getenv("BROWSERSTACK_BUILD_NAME");StringbrowserstackLocalIdentifier=System.getenv("BROWSERSTACK_LOCAL_IDENTIFIER");DesiredCapabilitiescapabilities=newDesiredCapabilities();capabilities.setCapability("os","Windows");capabilities.setCapability("browser","chrome");capabilities.setCapability("build",buildName);// CI/CD job name using BROWSERSTACK_BUILD_NAME env variablecapabilities.setCapability("browserstack.local",browserstackLocal);capabilities.setCapability("browserstack.localIdentifier",browserstackLocalIdentifier);driver=newRemoteWebDriver(newURL("https://"+username+":"+accessKey+"@hub.browserstack.com/wd/hub"),capabilities);
username=process.env.BROWSERSTACK_USERNAMEaccessKey=process.env.BROWSERSTACK_ACCESS_KEYvarbuildName=process.env.BROWSERSTACK_BUILD_NAME;browserstackLocal=process.env.BROWSERSTACK_LOCALbrowserstackLocalIdentifier=process.env.BROWSERSTACK_LOCAL_IDENTIFIERvarcapabilities={"os":"Windows","browser":"chrome","build":buildName,// CI/CD job name using BROWSERSTACK_BUILD_NAME env variable"browserstack.local":browserstackLocal,"browserstack.localIdentifier":browserstackLocalIdentifier,"browserstack.user":username,"browserstack.key":accessKey}vardriver=newwebdriver.Builder().usingServer("https://hub-cloud.browserstack.com/wd/hub").withCapabilities(capabilities).build();
username=Environment.GetEnvironmentVariable("BROWSERSTACK_USERNAME");accessKey=Environment.GetEnvironmentVariable("BROWSERSTACK_ACCESS_KEY");buildName=Environment.GetEnvironmentVariable("BROWSERSTACK_BUILD_NAME");browserstackLocal=Environment.GetEnvironmentVariable("BROWSERSTACK_LOCAL");browserstackLocalIdentifier=Environment.GetEnvironmentVariable("BROWSERSTACK_LOCAL_IDENTIFIER");IWebDriverdriver;OpenQA.Selenium.Chrome.ChromeOptionscapability=newOpenQA.Selenium.Chrome.ChromeOptions();capability.setCapability("os","Windows",true);capability.AddAdditionalCapability("os_version","10",true);capability.AddAdditionalCapability("browser","Chrome",true);capability.AddAdditionalCapability("browser_version","latest",true);// Use latest-beta, latest, latest-1 and so oncapability.AddAdditionalCapability("name","BStack-[Azure] Sample Test",true);// test namecapability.AddAdditionalCapability("build",buildName,true);// CI/CD job name using BROWSERSTACK_BUILD_NAME env variablecapability.AddAdditionalCapability("browserstack.local",browserstackLocal,true);capability.AddAdditionalCapability("browserstack.localIdentifier",browserstackLocalIdentifier,true);capability.AddAdditionalCapability("browserstack.user",username,true);capability.AddAdditionalCapability("browserstack.key",accessKey,true);driver=newRemoteWebDriver(newUri("https://hub-cloud.browserstack.com/wd/hub/"),capability);
$username=getenv("BROWSERSTACK_USERNAME");$accessKey=getenv("BROWSERSTACK_ACCESS_KEY");$buildName=getenv("BROWSERSTACK_BUILD_NAME");$browserstackLocal=getenv("BROWSERSTACK_LOCAL");$browserstackLocalIdentifier=getenv("BROWSERSTACK_LOCAL_IDENTIFIER");$caps=array("os"=>"Windows","browser"=>"chrome","build"=>$buildName,// CI/CD job name using BROWSERSTACK_BUILD_NAME env variable"browserstack.local"=>$browserstackLocal,"browserstack.localIdentifier"=>$browserstackLocalIdentifier);$web_driver=RemoteWebDriver::create("https://".$username.":".$accessKey."@hub-cloud.browserstack.com/wd/hub",$caps);
username=os.getenv("BROWSERSTACK_USERNAME")access_key=os.getenv("BROWSERSTACK_ACCESS_KEY")build_name=os.getenv("BROWSERSTACK_BUILD_NAME")browserstack_local=os.getenv("BROWSERSTACK_LOCAL")browserstack_local_identifier=os.getenv("BROWSERSTACK_LOCAL_IDENTIFIER")caps={'os':'Windows','browser':'chrome','build':build_name,# CI/CD job name using BROWSERSTACK_BUILD_NAME env variable
'browserstack.local':browserstack_local,'browserstack.localIdentifier':browserstack_local_identifier,'browserstack.user':username,'browserstack.key':access_key}driver=webdriver.Remote(command_executor='https://hub-cloud.browserstack.com/wd/hub',desired_capabilities=caps)
username=ENV["BROWSERSTACK_USERNAME"]access_key=ENV["BROWSERSTACK_ACCESS_KEY"]build_name=ENV["BROWSERSTACK_BUILD_NAME"]browserstack_local=ENV["BROWSERSTACK_LOCAL"]browserstack_local_identifier=ENV["BROWSERSTACK_LOCAL_IDENTIFIER"]caps=Selenium::WebDriver::Remote::Capabilities.newcaps["os"]="Windows"caps["browser"]="chrome"caps["build"]=build_name# CI/CD job name using BROWSERSTACK_BUILD_NAME env variablecaps["browserstack.local"]=browserstack_localcaps["browserstack.localIdentifier"]=browserstack_local_identifiercaps["browserstack.user"]=usernamecaps["browserstack.key"]=YOUR_ACCESS_KEYdriver=Selenium::WebDriver.for(:remote,:url=>"https://hub-cloud.browserstack.com/wd/hub",:desired_capabilities=>caps)
Ensure to pass the BROWSERSTACK_LOCAL and BROWSERSTACK_LOCAL_IDENTIFIER capabilities to run tests on your local development servers.
To address the Build x not found error, ensure you set the environment variable BROWSERSTACK_TEST_RUN_NAME to match the auto-generated build name of the BrowserStack Azure plugin. This can be achieved using the following command:
By doing this, the test name will align with the build name generated by the BrowserStack Azure plugin, preventing the error.
Add task to start BrowserStack Local
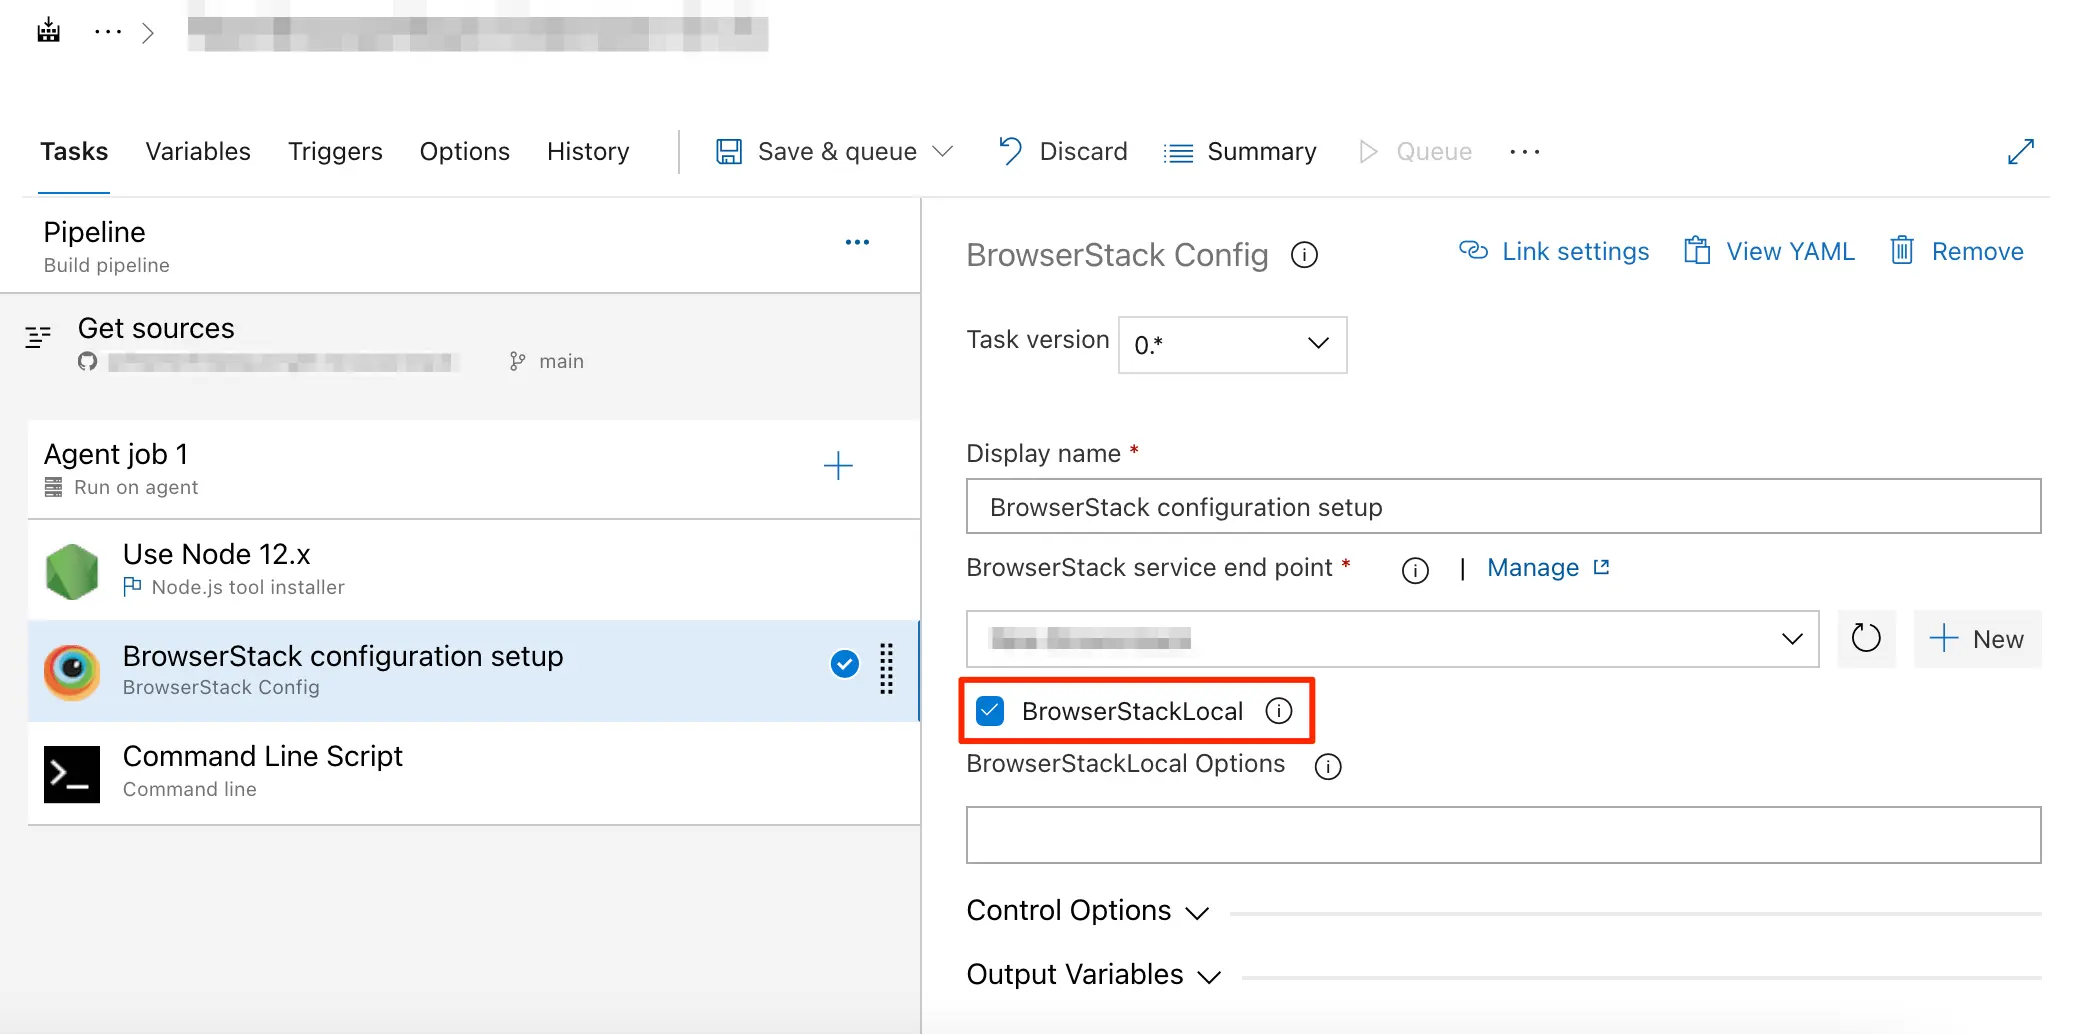
When you add the BrowserStack Config task, you can select BrowserStack Local to run your tests on any development or staging environment. Based on the editor you used to create your pipeline, refer to the steps in the following tabs:
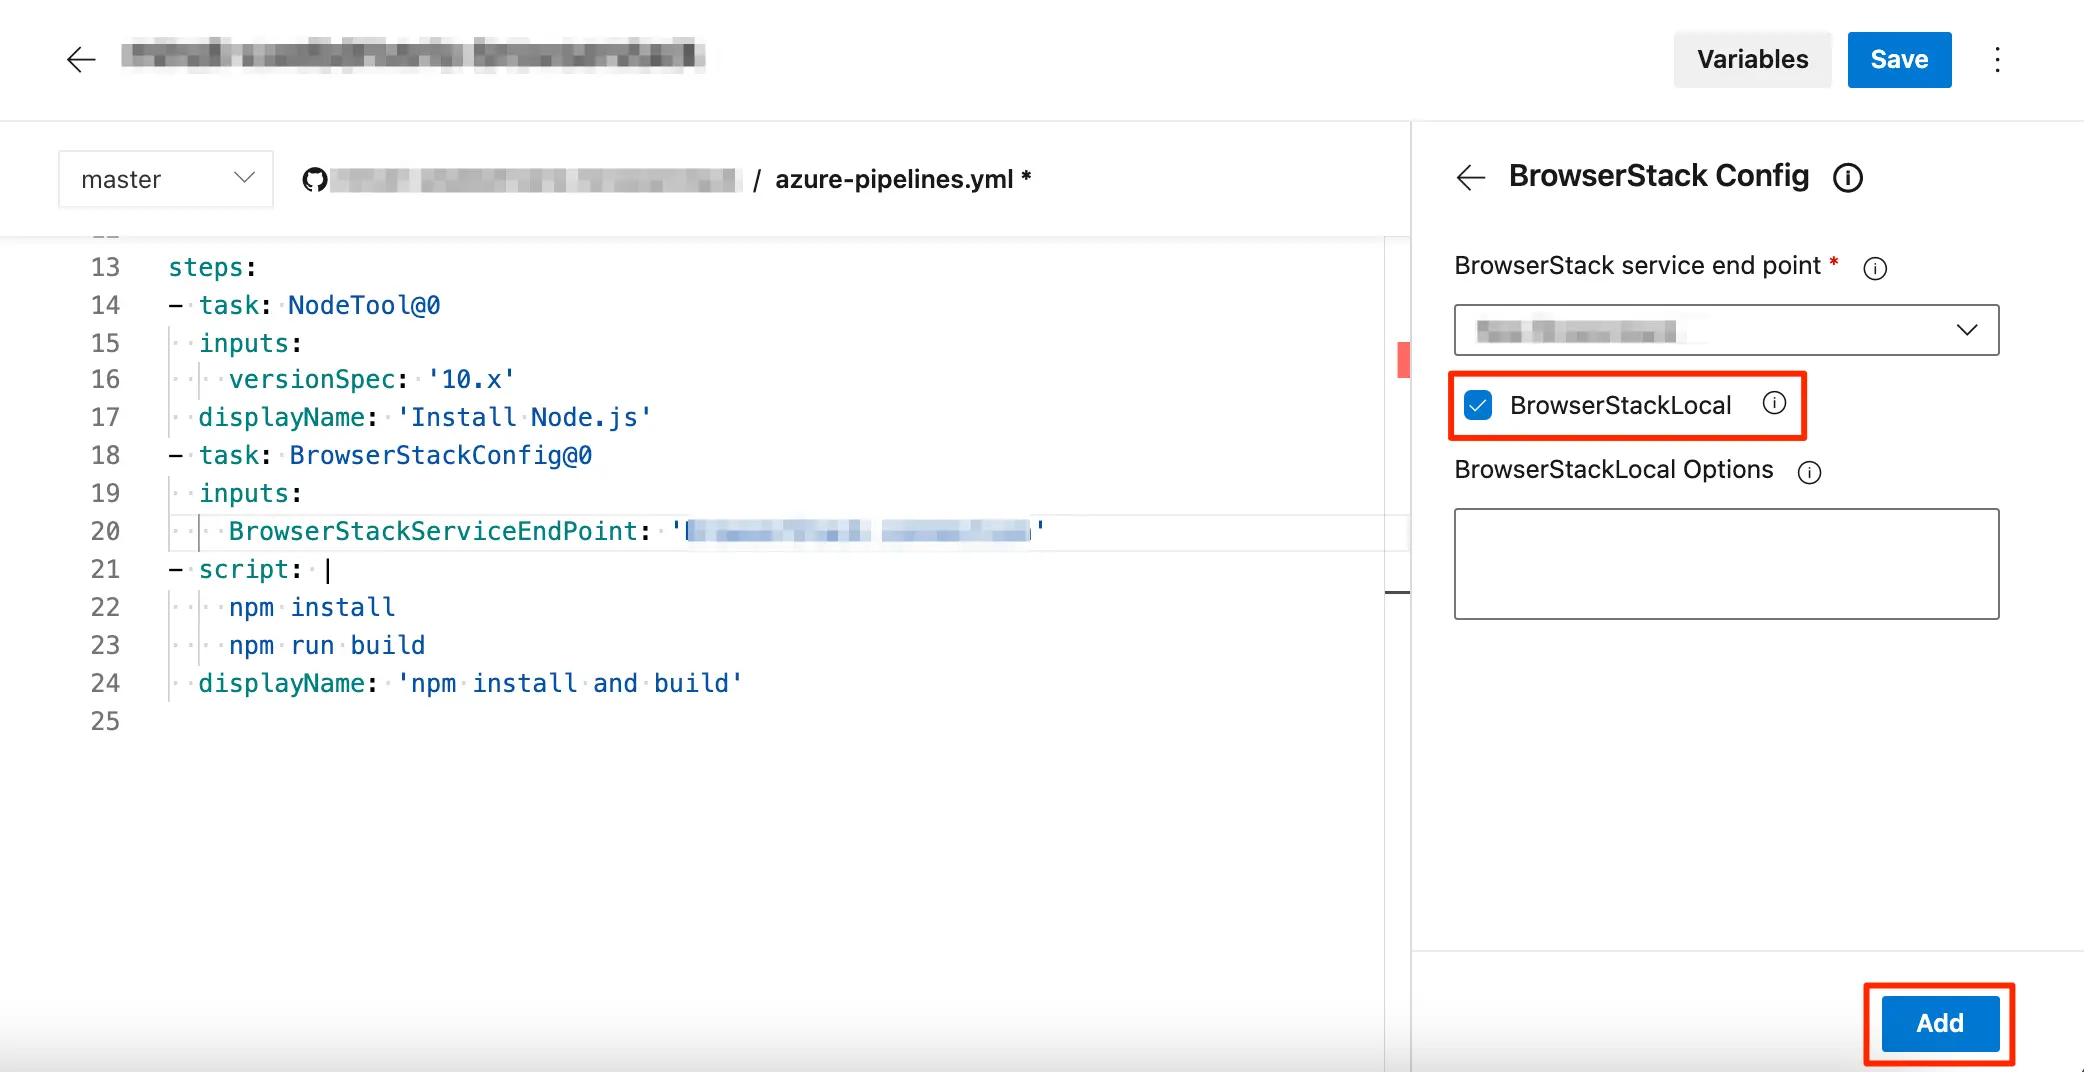
Select the BrowserStackLocal checkbox, and then click Add.
Click Save to commit the change.
You can set additional configuration options, such as verbose logging, for the Local binary in the BrowserStackLocal Options field. For details, see Set additional configuration options.
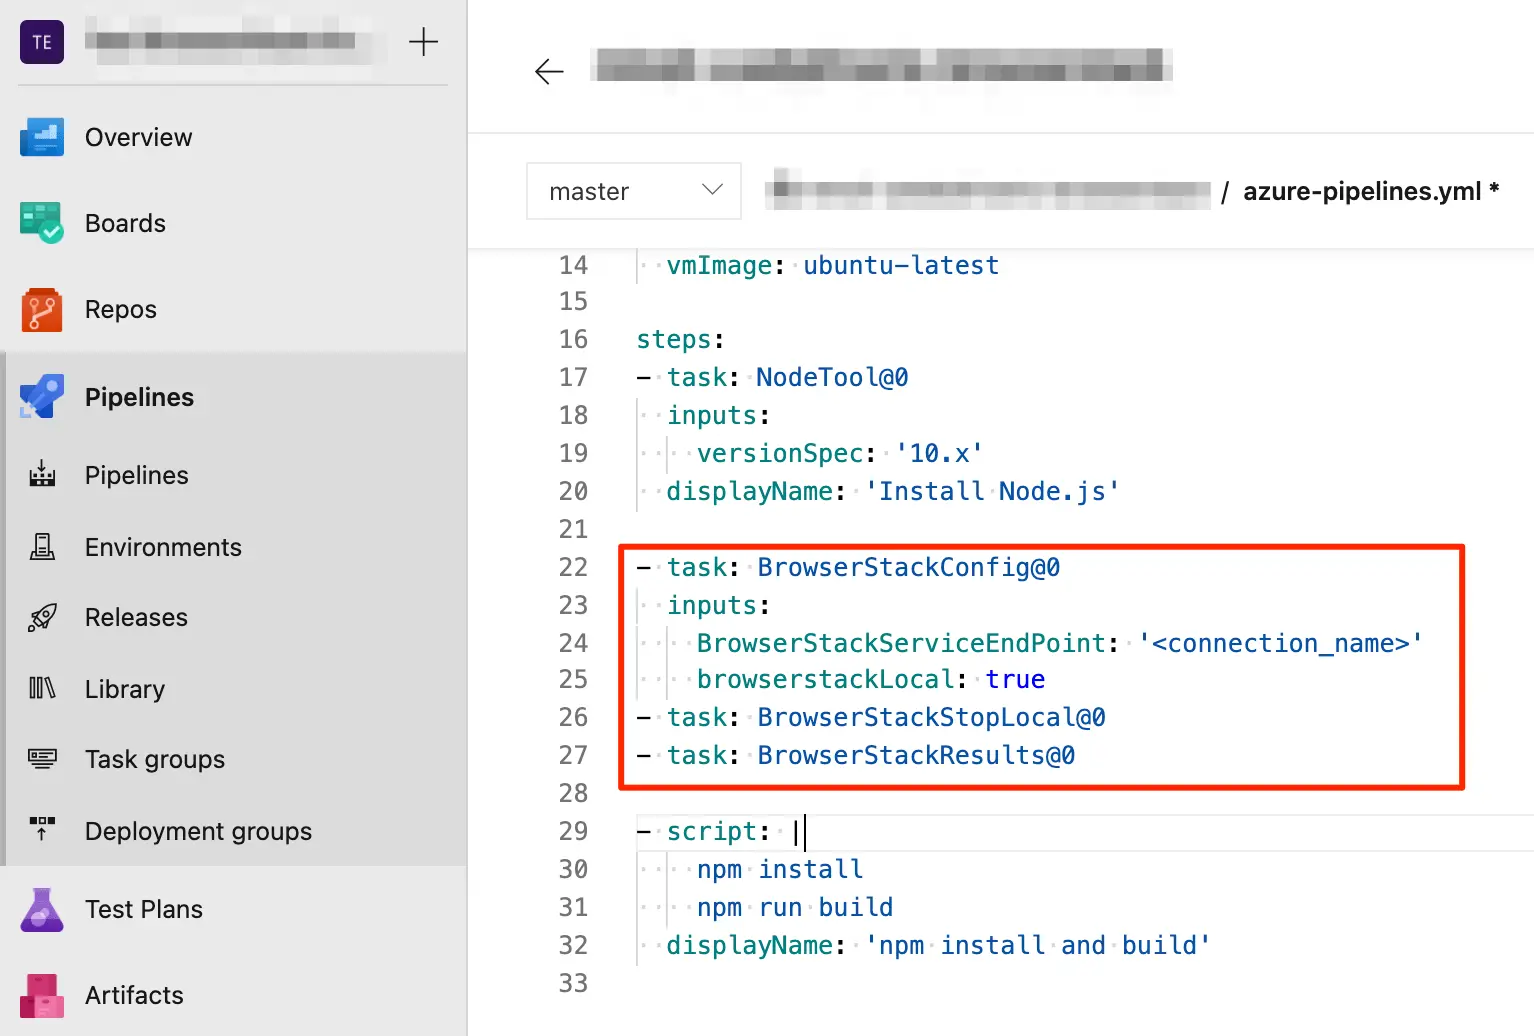
The following image shows the azure-pipelines.yml file with the BrowserStack tasks and Local configured for your test run:
Go to your pipeline page and click Edit.
In the Tasks tab, click the BrowserStack configuration setup card.
In the BrowserStack Config section, select the BrowserStackLocal checkbox.
Click Save & queue and select Save to save the changes.
You can set additional configuration options, such as verbose logging, for the Local binary in the BrowserStackLocal Options field. For details, see Set additional configuration options.
You must pass browserstack.local and browserstack.localIdentifier capabilities to test on your local development servers.
Set proxy URL in the pipeline
If your application is behind a proxy setup, you can specify the proxy host and port details as environment variables in Azure DevOps. Adding this information as variables ensures that the Local Testing binary passes test traffic through the proxy.
Based on the type of proxy, either HTTP or HTTPS, you can set the value for HTTP_PROXY or HTTPS_PROXY, respectively, as shown:
Click Variables located at the top-right corner of the page.
In the Variables section, click New Variable.
In the Variables section, enter HTTP_PROXYor HTTPS_PROXY in the Name field, and enter its value, such as http://127.0.0.1:8080, in the Value field.
Click OK.
In the Variables section, click Save.
Navigate to your pipeline and click Edit.
Click the Variables tab to view a list of predefined variables with their respective values in the Pipeline variables section.
Click + Add and enter HTTP_PROXYor HTTPS_PROXY in the name field, and enter its value, such as http://127.0.0.1:8080, in the value field.
Click Save & queue and select Save to save the changes.
Set additional configuration options
With the Local binary, you can set additional configurations, such as verbose logging, excluding hosts, and so on. To set any additional configuration options, add the flags in the BrowserStackLocal Options section. For example, to enable verbose logging and to route all traffic via the proxy, set the following flags in the BrowserStackLocal Options field:
Follow Camel case style when adding local modifier options. For example, enter the --force-local option as forcelocal in the BrowserStackLocal Options section.
Add task to stop BrowserStack Local
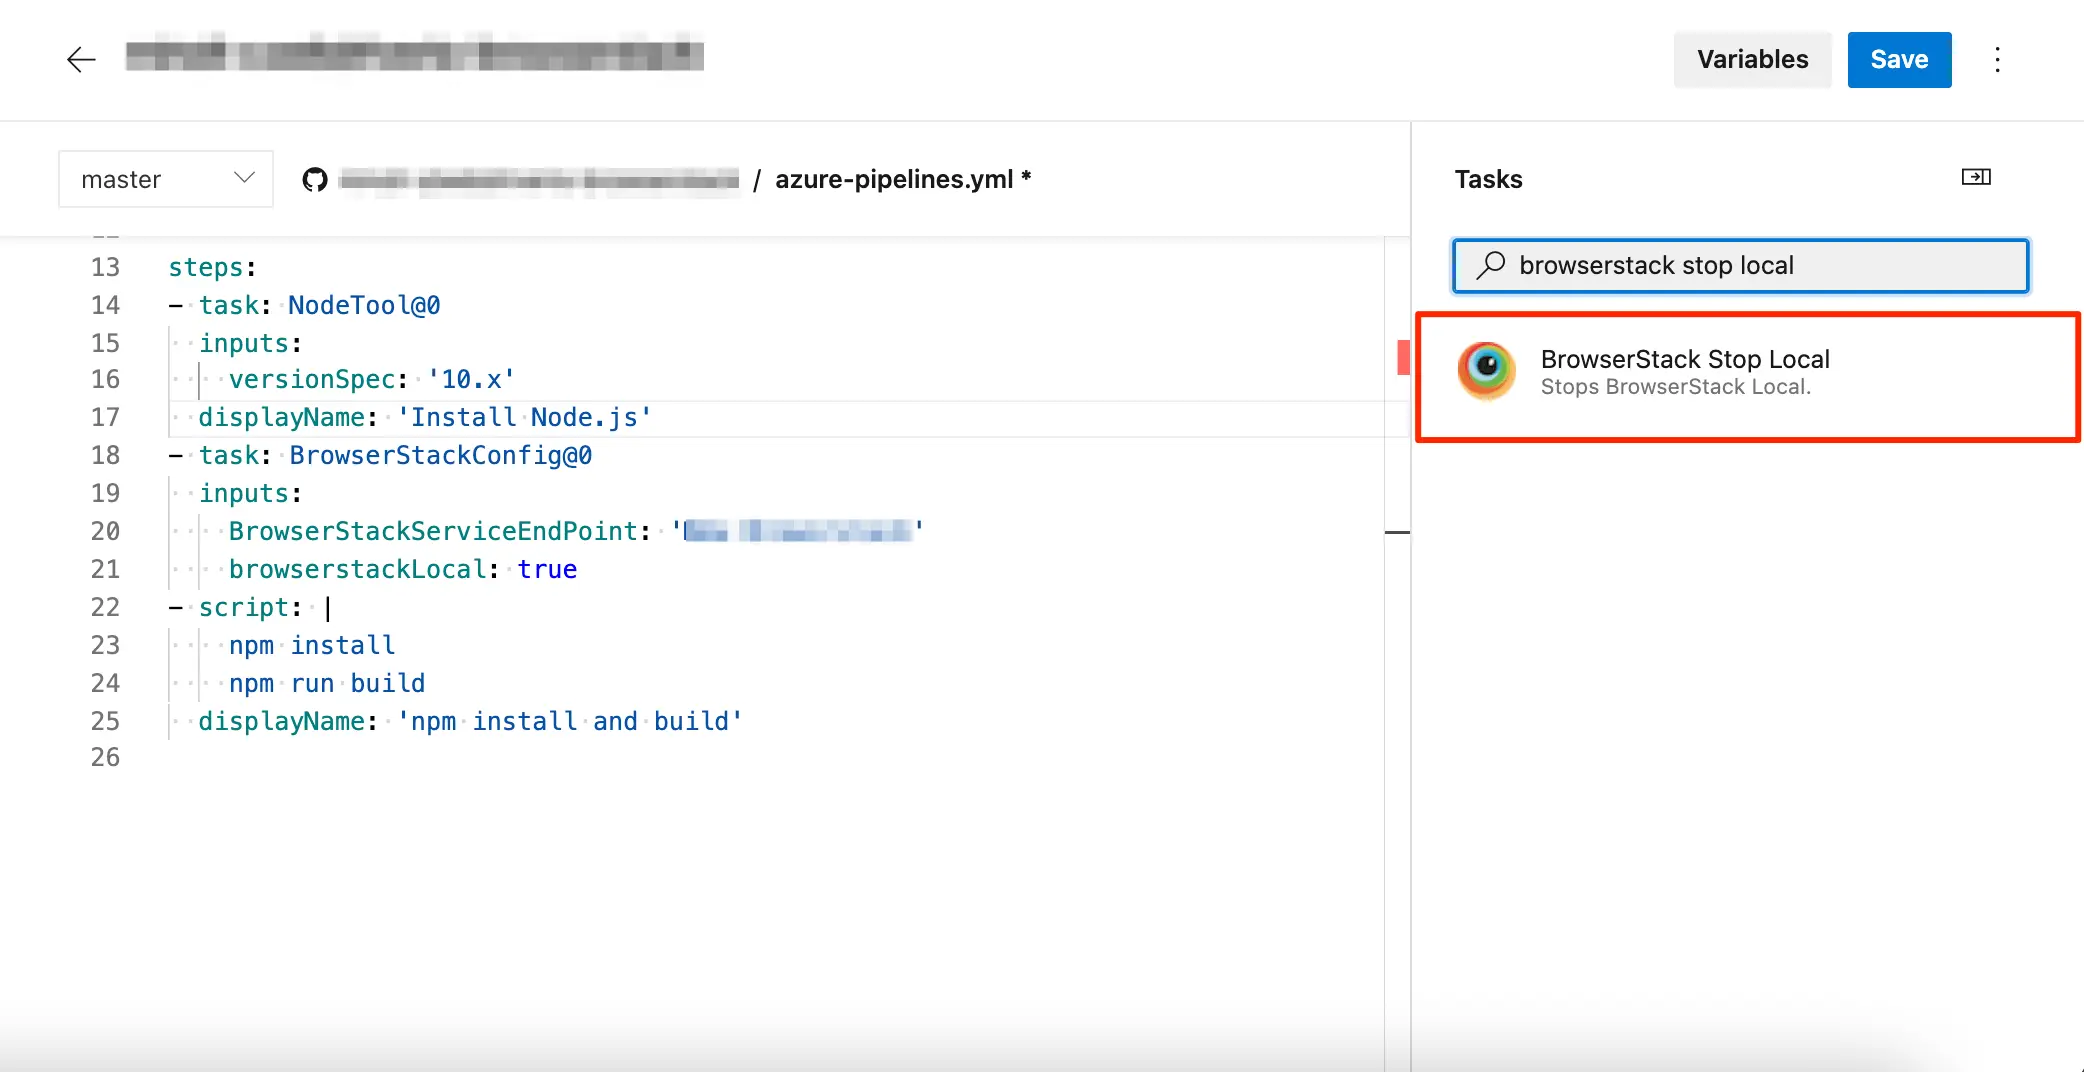
Stop the BrowserStack Local binary after your tests run to free up your resources. Add the BrowserStack Stop Local task in your pipeline using the following steps:
In the Tasks pane, search for BrowserStack Stop Local from the tasks list, and then select it.
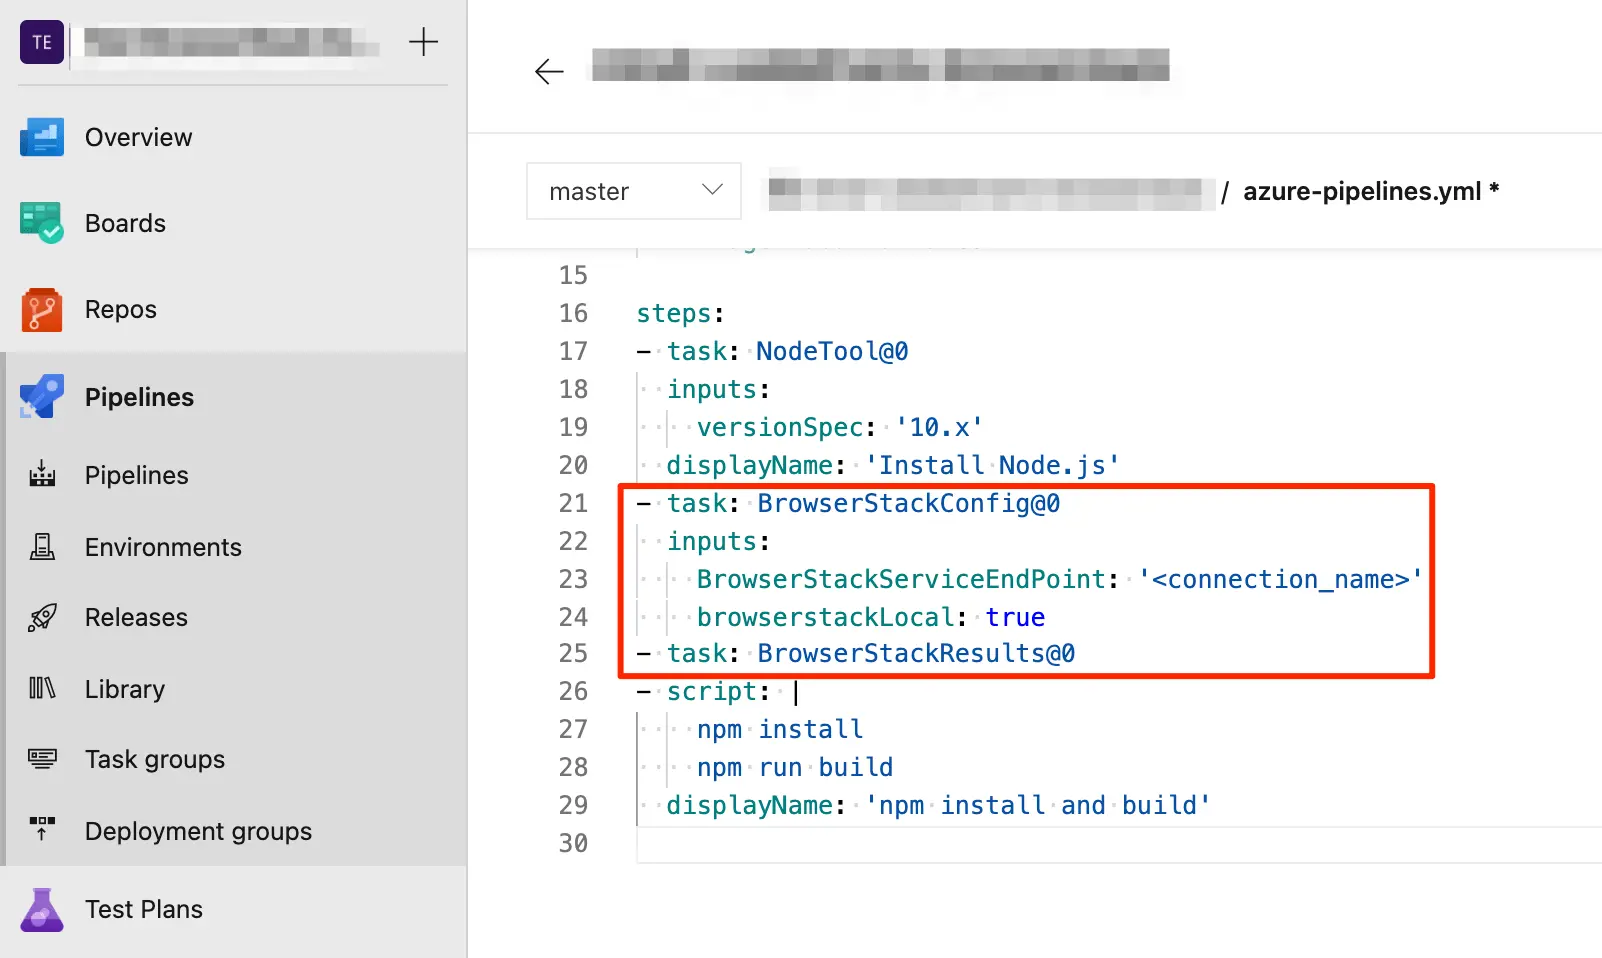
The following image shows the azure-pipelines.yml file with all the BrowserStack tasks configured to run your local test on BrowserStack.
Navigate to your pipeline and click Edit.
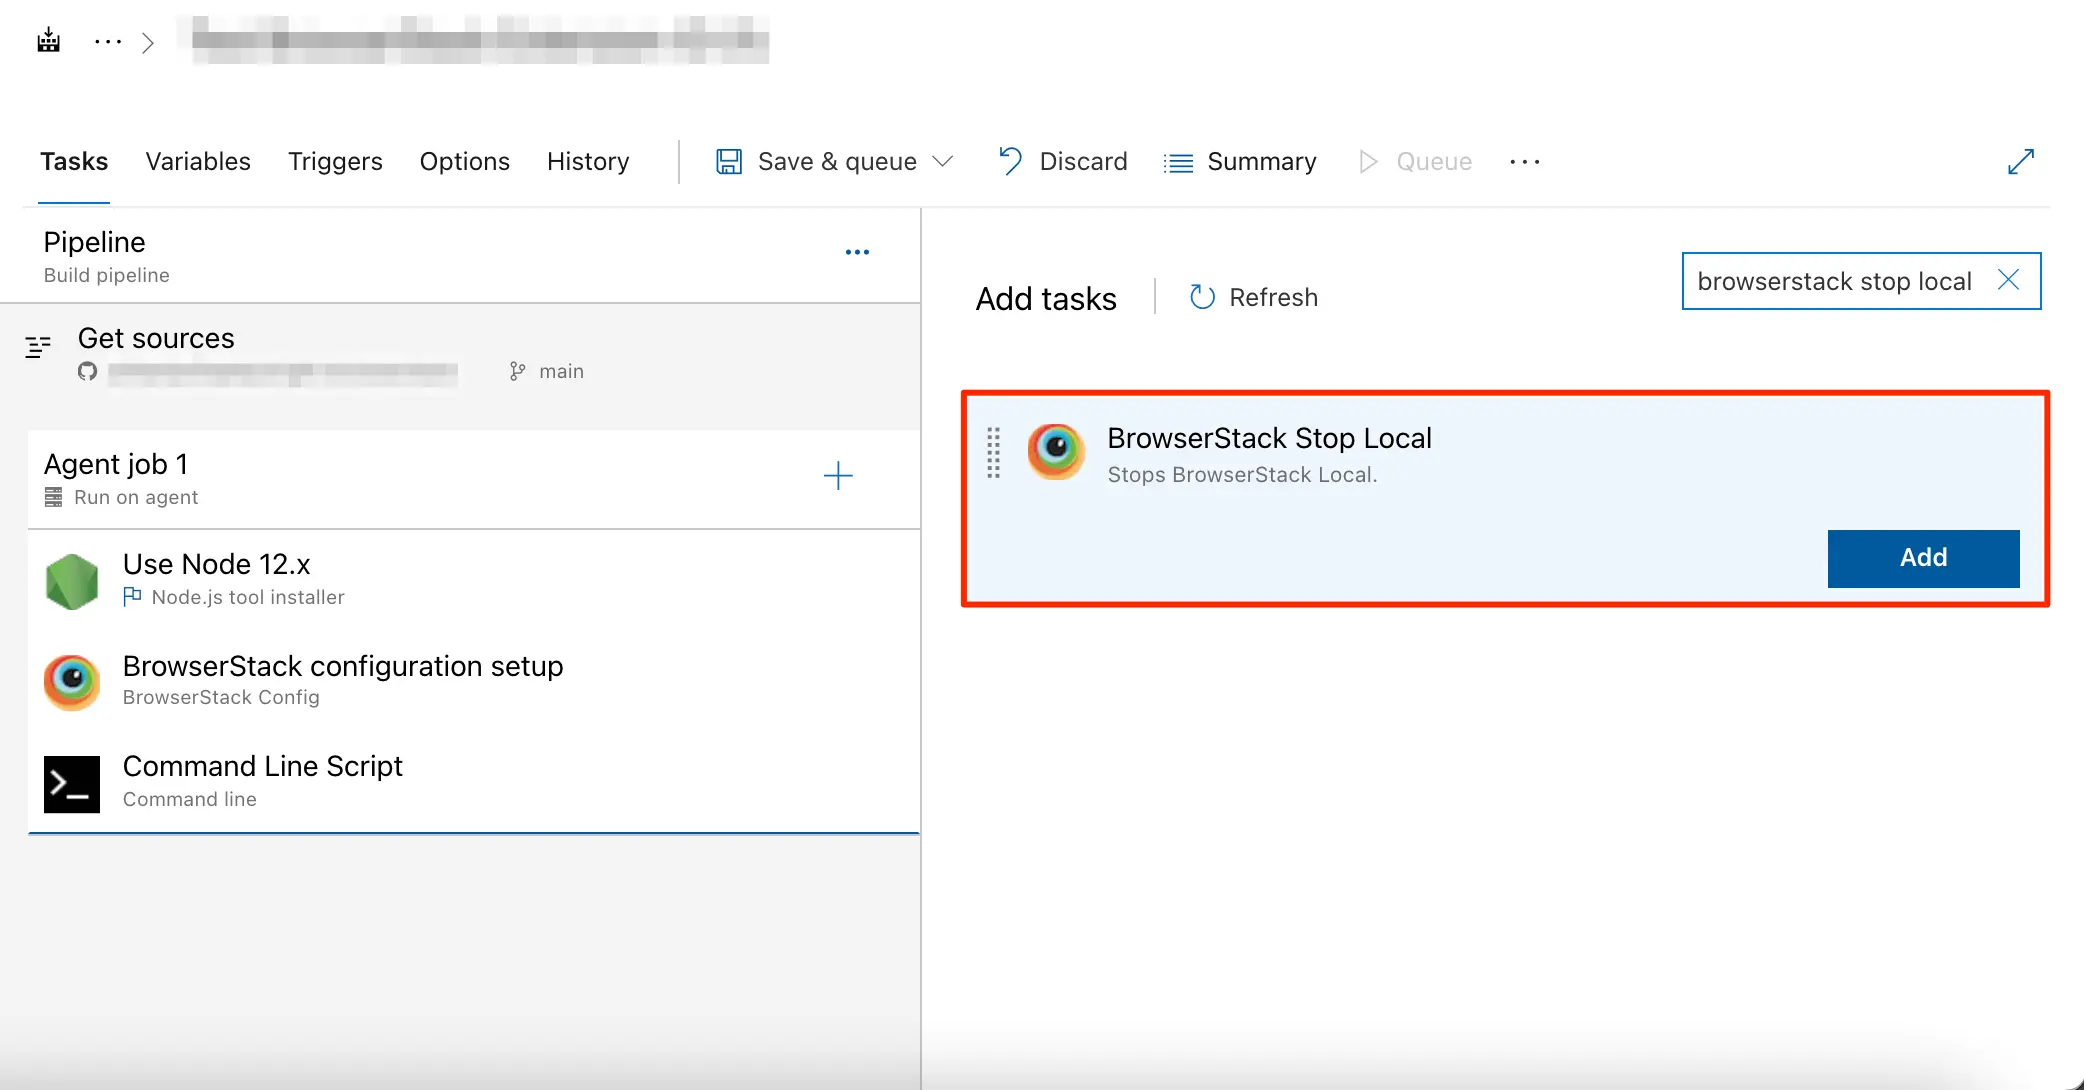
In the Task tab, click + on the Agent job 1 card.
Search for BrowserStack Stop Local and click Add.
Click Save & queue and select Save to save the changes.
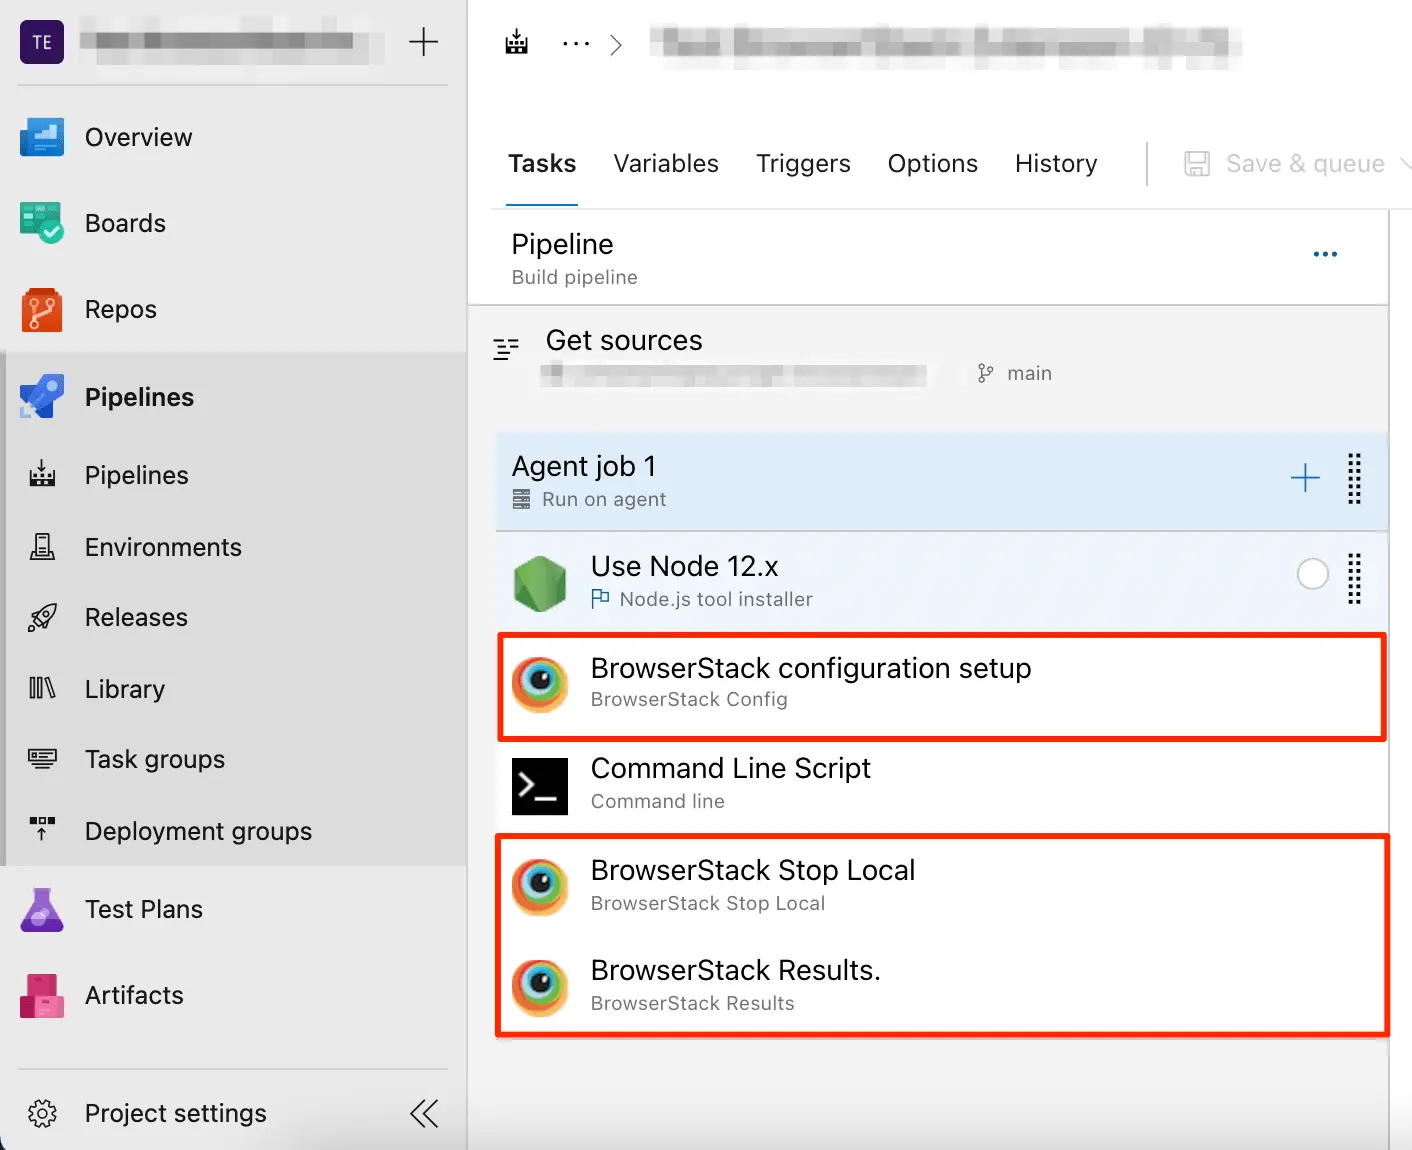
The following image shows all the BrowserStack tasks configured to run your local test on BrowserStack.
Embed the build report in Azure Pipelines
The BrowserStack Results task fetches the Test Reporting & Analytics report for the current build and publishes it to the run summary. Depending on the editor you used to create your pipeline, follow the steps in the relevant tab:
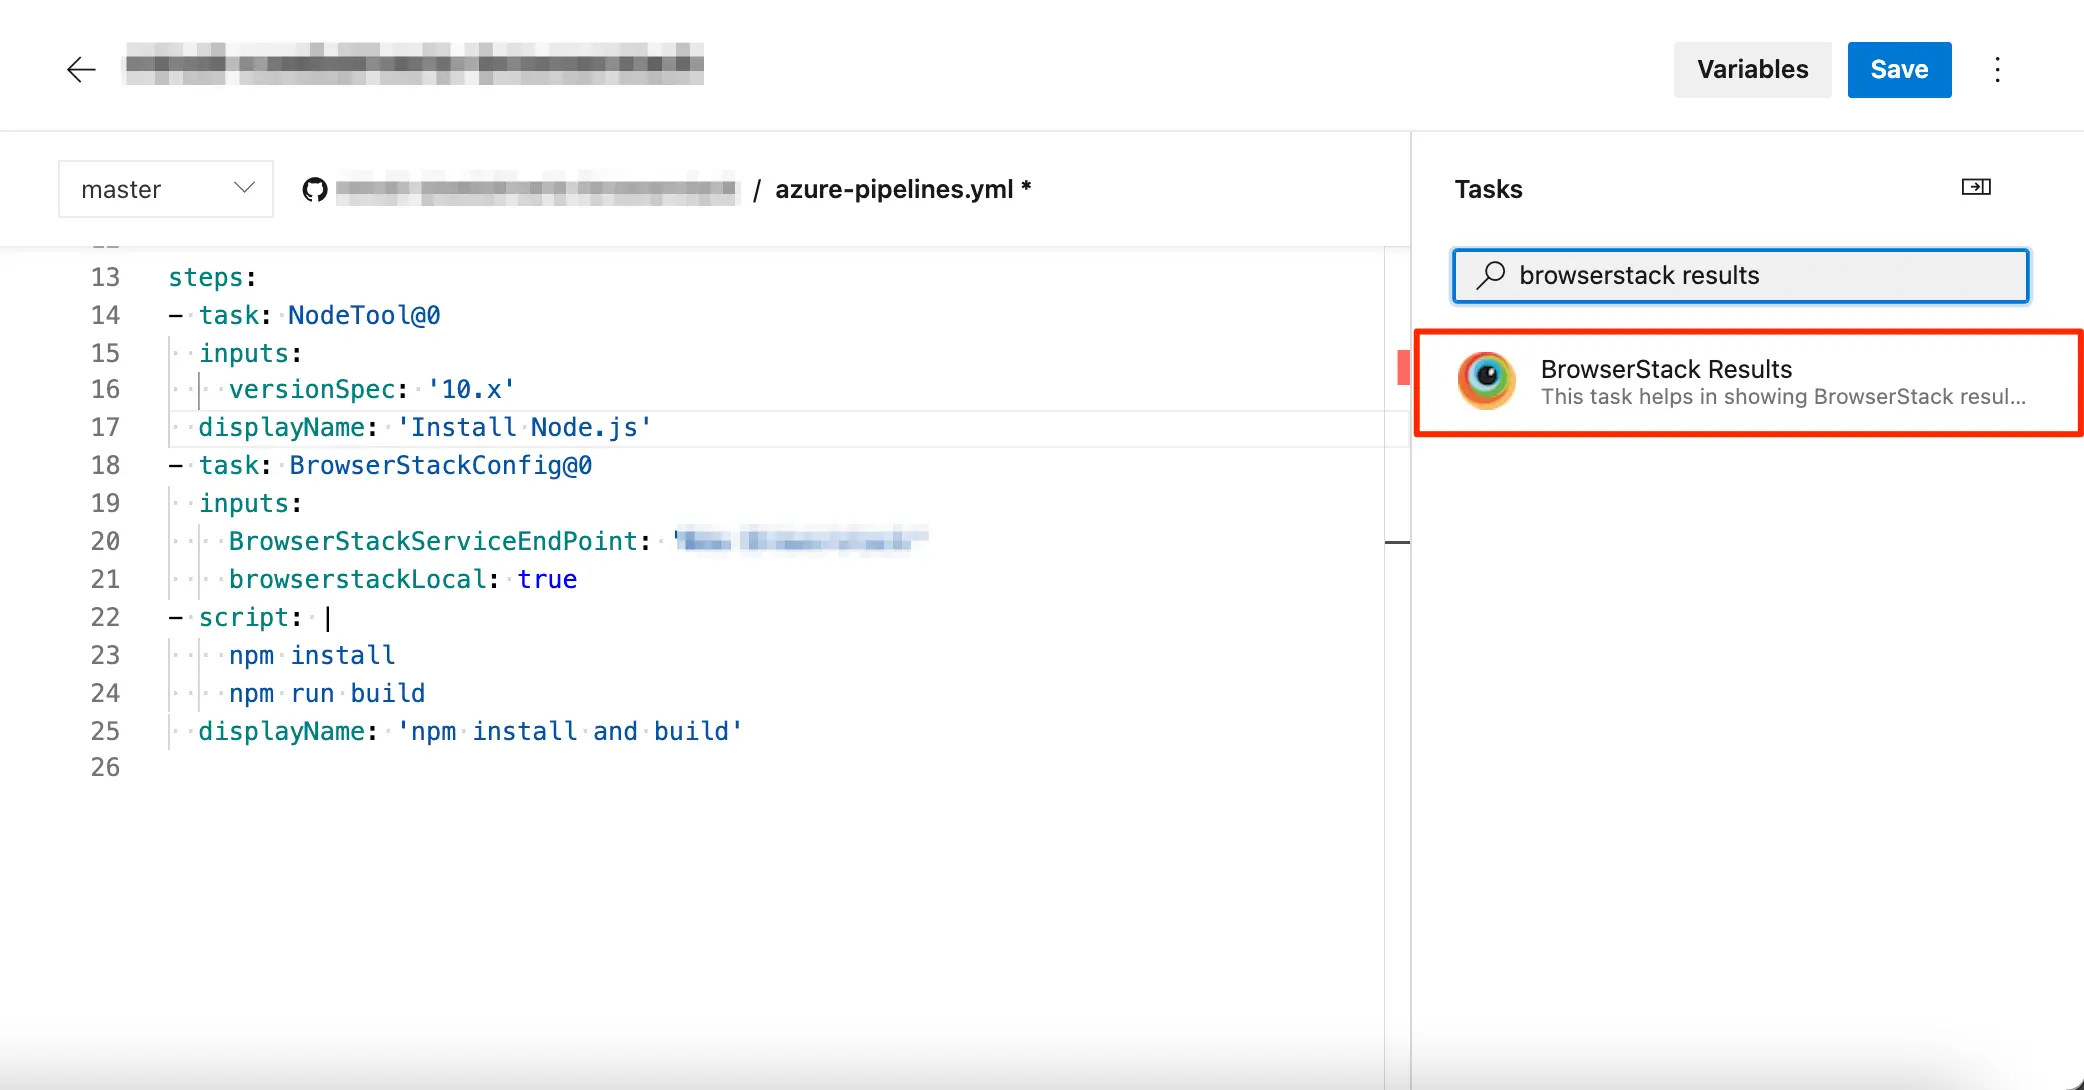
Move the task so that it’s the last step in the job, after the step that runs your tests.
Click Save to commit the change and run the pipeline.
Go to your pipeline and click Edit.
In the Tasks tab, click + on the Agent job 1 card.
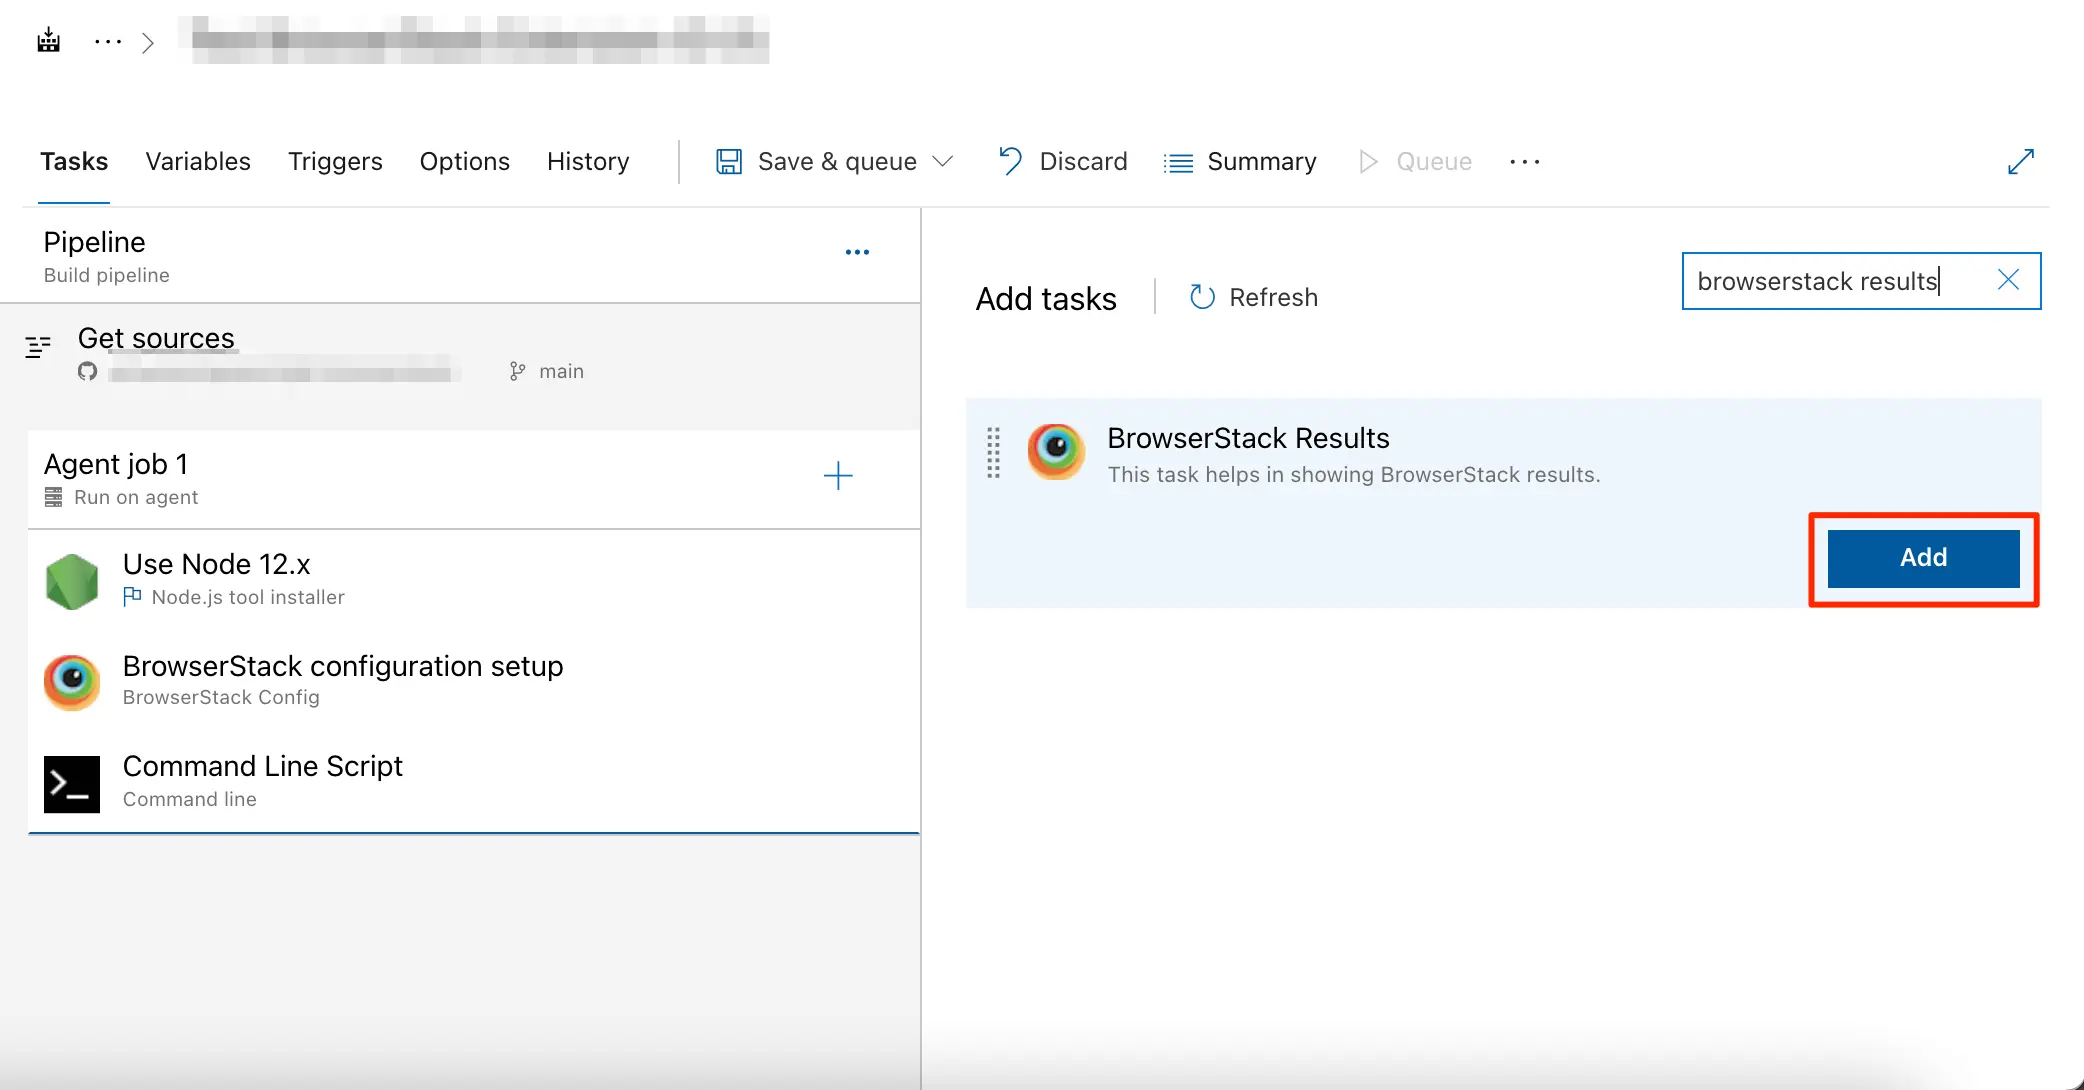
In the Add tasks panel, select the BrowserStack Results task and click Add.
Click the BrowserStack Results card and enter observability in the Enter the product in use field.
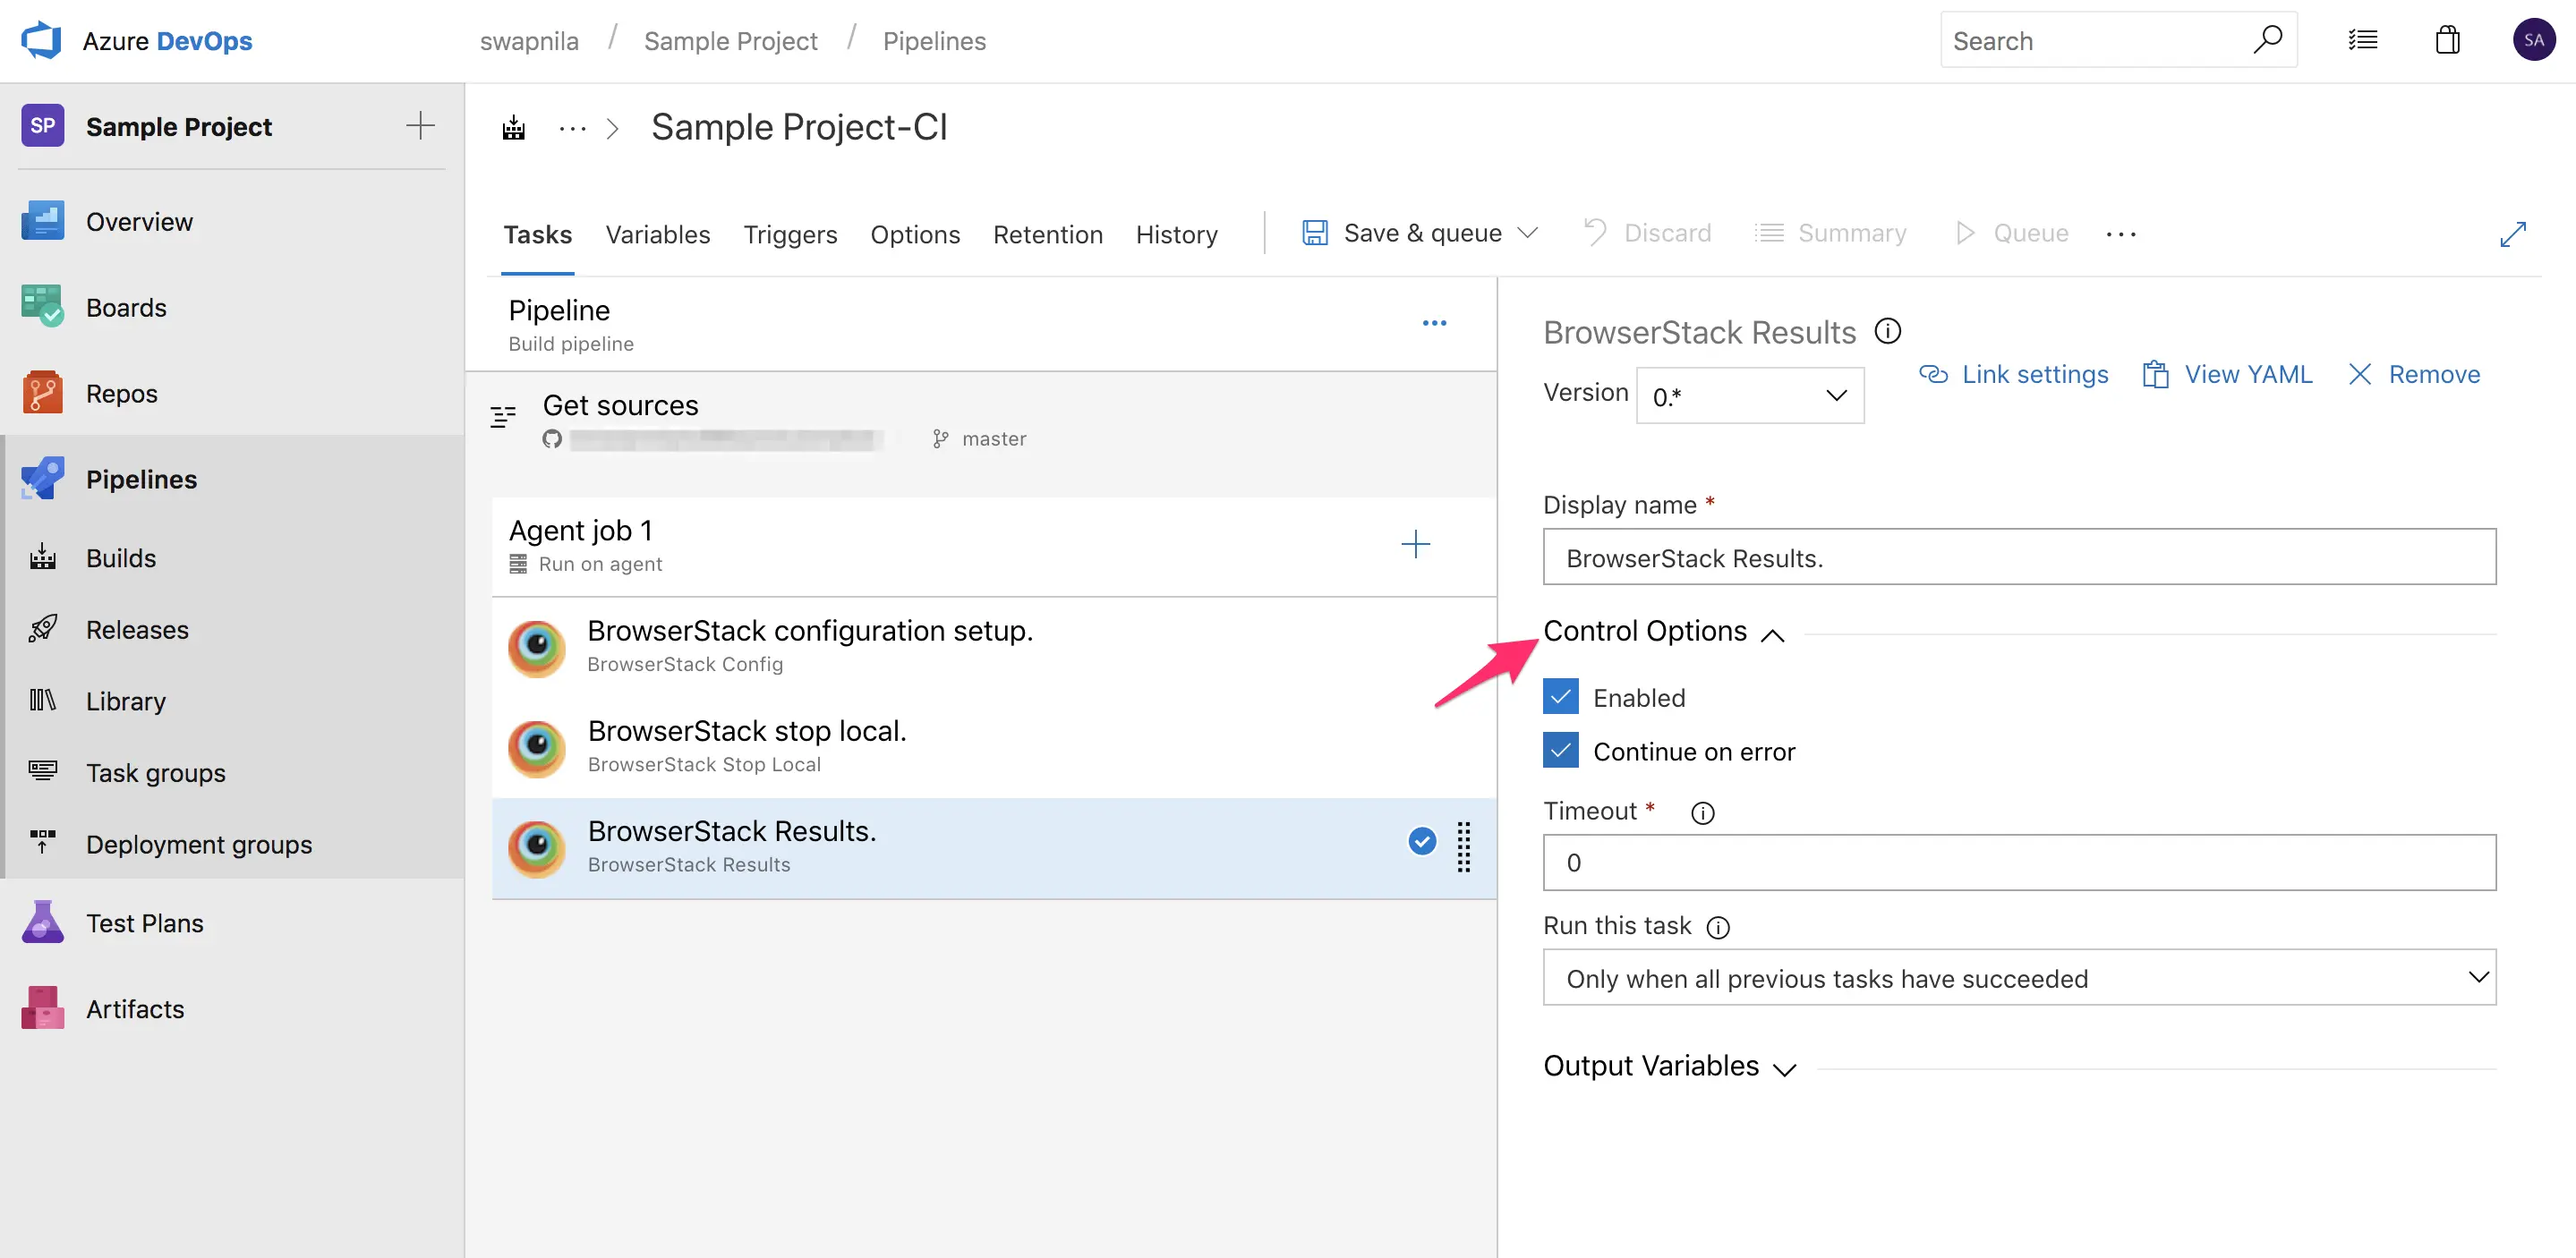
Click Control Options and select Continue on error so a report failure doesn’t fail your pipeline.
Drag the task so that it’s the last task in the job, after the task that runs your tests.
Click Save & queue to commit the change and run the pipeline.
The following image shows all the BrowserStack tasks configured in the pipeline:
Add the BrowserStack Results task as the last step of the job, after the step that runs your tests. The task requires Test Reporting & Analytics to completely process the build, so running the task earlier returns an incomplete report.
View the build report
After the pipeline run finishes, follow these steps to view the report:
In your Azure DevOps project, click Pipelines.
Select your pipeline, and then select the run you want to review.
In the run summary, select the BrowserStack tab.
The tab shows the Test Reporting & Analytics report for that build, including the build status, the number of tests that passed and failed, the failure categories, and the list of failed tests.
To open the full report, select the build name in the report. The Test Reporting & Analytics dashboard opens for that build, where you can review test-level logs, failure analysis, and history.
Azure Releases CI works differently than Jenkins and Azure Pipelines. If you use Azure Releases, builds with the same name are combined into a single build if they occur within a six-hour interval. This happens even if you have not set up BROWSERSTACK_BUILD_RUN_IDENTIFIER to be the same across those builds.
Rerun failed tests
After you integrate Azure Pipelines, you can rerun failed tests directly from the Test Reporting & Analytics dashboard instead of triggering the whole pipeline again. For the steps, see Rerun tests on Azure.
Did this page help you?
We're sorry to hear that. Please share your feedback so we can do better
Contact our Support team for immediate help while we work on improving our docs.
We're continuously improving our docs. We'd love to know what you liked
Thank you for your valuable feedback
Is this page helping you?
Yes
No
We're sorry to hear that. Please share your feedback so we can do better
Contact our Support team for immediate help while we work on improving our docs.
We're continuously improving our docs. We'd love to know what you liked

 Join our Discord
 (Pipelines) icon.