Get your setup working faster. Join our Discord for optimisation tips from elite testers.Join our Discord
Access Espresso test screenshots on BrowserStack App Automate
Access screenshots for your Espresso test executions on BrowserStack App Automate
As part of debugging, capturing screenshots makes it easier to identify the exact step in your test where the failure occurred. These screenshots also help in identifying any layout or design-related issues in your application.
You can capture screenshots using either of the following two ways:
Native screenshot feature: A native screenshot feature in App Automate to capture screenshots. This feature is supported with all Android versions.
Spoon library: The screenshot feature provided as part of the Spoon library. This feature is supported only with Android 10 and lower versions.
Capture screenshots of your test execution
Use the information in the following tabs to edit your scripts and capture screenshots.
```java
import android.graphics.Bitmap;
import android.os.Build;
import android.os.Environment;
import androidx.test.runner.screenshot.BasicScreenCaptureProcessor;
import androidx.test.runner.screenshot.ScreenCapture;
import androidx.test.runner.screenshot.Screenshot;
import java.io.File;
import java.io.IOException;
import java.util.regex.Pattern;
public final class NativeScreenshot {
private static String methodName;
private static String className;
private static final Pattern SCREENSHOT_NAME_VALIDATION = Pattern.compile("[a-zA-Z0-9_-]+");
private NativeScreenshot() {}
/**
* Captures screenshot using Androidx Screenshot library and stores in the filesystem.
* Special Cases:
* If the screenshotName contains spaces or does not pass validation, the corresponding
* screenshot is not visible on BrowserStack's Dashboard.
* If there is any runtime exception while capturing screenshot, the method throws
* Exception and the test might fail if exception is not handled properly.
* @param screenshotName a screenshot identifier
* @return path to the screenshot file
*/
public static String capture(String screenshotName) {
StackTraceElement testClass = findTestClassTraceElement(Thread.currentThread().getStackTrace());
className = testClass.getClassName().replaceAll("[^A-Za-z0-9._-]", "_");
methodName = testClass.getMethodName();
EspressoScreenCaptureProcessor screenCaptureProcessor = new EspressoScreenCaptureProcessor();
if (!SCREENSHOT_NAME_VALIDATION.matcher(screenshotName).matches()) {
throw new IllegalArgumentException("ScreenshotName must match " + SCREENSHOT_NAME_VALIDATION.pattern() + ".");
} else {
ScreenCapture capture = Screenshot.capture();
capture.setFormat(Bitmap.CompressFormat.PNG);
capture.setName(screenshotName);
try {
return screenCaptureProcessor.process(capture);
} catch (IOException e) {
throw new RuntimeException("Unable to capture screenshot.", e);
}
}
}
/**
* Extracts the currently executing test's trace element based on the test runner
* or any framework being used.
* @param trace stacktrace of the currently running test
* @return StackTrace Element corresponding to the current test being executed.
*/
private static StackTraceElement findTestClassTraceElement(StackTraceElement[] trace) {
for(int i = trace.length - 1; i >= 0; --i) {
StackTraceElement element = trace[i];
if ("android.test.InstrumentationTestCase".equals(element.getClassName()) && "runMethod".equals(element.getMethodName())) {
return extractStackElement(trace, i);
}
if ("org.junit.runners.model.FrameworkMethod$1".equals(element.getClassName()) && "runReflectiveCall".equals(element.getMethodName())) {
return extractStackElement(trace, i);
}
if ("cucumber.runtime.model.CucumberFeature".equals(element.getClassName()) && "run".equals(element.getMethodName())) {
return extractStackElement(trace, i);
}
}
throw new IllegalArgumentException("Could not find test class!");
}
/**
* Based on the test runner or framework being used, extracts the exact traceElement.
* @param trace stacktrace of the currently running test
* @param i a reference index
* @return trace element based on the index passed
*/
private static StackTraceElement extractStackElement(StackTraceElement[] trace, int i) {
int testClassTraceIndex = Build.VERSION.SDK_INT >= 23 ? i - 2 : i - 3;
return trace[testClassTraceIndex];
}
private static class EspressoScreenCaptureProcessor extends BasicScreenCaptureProcessor {
private static final String SCREENSHOT = "screenshots";
EspressoScreenCaptureProcessor() {
File screenshotDir = new File(String.valueOf(Environment.getExternalStoragePublicDirectory(Environment.DIRECTORY_DOWNLOADS)), SCREENSHOT);
File classDir = new File(screenshotDir, className);
mDefaultScreenshotPath = new File(classDir, methodName);
}
/**
* Converts the filename to a standard path to be stored on device.
* Example: "post_addition" converts to "1648038895211_post_addition"
* which is later suffixed by the file extension i.e. png.
* @param filename a screenshot identifier
* @return custom filename format
*/
@Override
protected String getFilename(String filename) {
return System.currentTimeMillis() + "_" + filename;
}
}
}
```
```kotlin
import android.graphics.Bitmap
import android.os.Build
import android.os.Environment
import androidx.test.runner.screenshot.BasicScreenCaptureProcessor
import androidx.test.runner.screenshot.ScreenCapture
import androidx.test.runner.screenshot.Screenshot
import java.io.File
import java.io.IOException
import java.util.regex.Pattern
object NativeScreenshot {
private var methodName: String? = null
private var className: String? = null
private val SCREENSHOT_NAME_VALIDATION: Pattern = Pattern.compile("[a-zA-Z0-9_-]+")
/**
* Captures screenshot using Androidx Screenshot library and stores in the filesystem.
* Special Cases:
* If the screenshotName contains spaces or does not pass validation, the corresponding
* screenshot is not visible on BrowserStack's Dashboard.
* If there is any runtime exception while capturing screenshot, the method throws
* Exception and the test might fail if the exception is not handled properly.
* @param screenshotName a screenshot identifier
* @return path to the screenshot file
*/
fun capture(screenshotName: String): String {
val testClass = findTestClassTraceElement(Thread.currentThread().stackTrace)
className = testClass.className.replace("[^A-Za-z0-9._-]".toRegex(), "_")
methodName = testClass.methodName
val screenCaptureProcessor = EspressoScreenCaptureProcessor()
if (!SCREENSHOT_NAME_VALIDATION.matcher(screenshotName).matches()) {
throw IllegalArgumentException("ScreenshotName must match ${SCREENSHOT_NAME_VALIDATION.pattern()}.")
} else {
val capture = Screenshot.capture()
capture.format = Bitmap.CompressFormat.PNG
capture.name = screenshotName
try {
return screenCaptureProcessor.process(capture)
} catch (e: IOException) {
throw RuntimeException("Unable to capture screenshot.", e)
}
}
}
/**
* Extracts the currently executing test's trace element based on the test runner
* or any framework being used.
* @param trace stacktrace of the currently running test
* @return StackTrace Element corresponding to the current test being executed.
*/
private fun findTestClassTraceElement(trace: Array<StackTraceElement>): StackTraceElement {
for (i in trace.indices.reversed()) {
val element = trace[i]
if ("android.test.InstrumentationTestCase" == element.className && "runMethod" == element.methodName) {
return extractStackElement(trace, i)
}
if ("org.junit.runners.model.FrameworkMethod\$1" == element.className && "runReflectiveCall" == element.methodName) {
return extractStackElement(trace, i)
}
if ("cucumber.runtime.model.CucumberFeature" == element.className && "run" == element.methodName) {
return extractStackElement(trace, i)
}
}
throw IllegalArgumentException("Could not find test class!")
}
/**
* Based on the test runner or framework being used, extracts the exact traceElement.
* @param trace stacktrace of the currently running test
* @param i a reference index
* @return trace element based on the index passed
*/
private fun extractStackElement(trace: Array<StackTraceElement>, i: Int): StackTraceElement {
val testClassTraceIndex = if (Build.VERSION.SDK_INT >= 23) i - 2 else i - 3
return trace[testClassTraceIndex]
}
private class EspressoScreenCaptureProcessor : BasicScreenCaptureProcessor() {
companion object {
private const val SCREENSHOT = "screenshots"
}
init {
val screenshotDir = File(Environment.getExternalStoragePublicDirectory(Environment.DIRECTORY_DOWNLOADS).toString(), SCREENSHOT)
val classDir = File(screenshotDir, className)
mDefaultScreenshotPath = File(classDir, methodName)
}
/**
* Converts the filename to a standard path to be stored on device.
* Example: "post_addition" converts to "1648038895211_post_addition"
* which is later suffixed by the file extension i.e. png.
* @param filename a screenshot identifier
* @return custom filename format
*/
override fun getFilename(filename: String): String {
return "${System.currentTimeMillis()}_$filename"
}
}
}
```
Call the NativeScreenshot.capture("tag") method to capture screenshots from your Espresso tests, as shown in the following sample code snippet.
The tag parameter is used to provide a name to the screenshot on your App Automate’s session detail page.
@TestpublicvoidensureAdditionWorks(){// test actionsonView(withId(R.id.buttonOne)).perform(click());onView(withId(R.id.buttonTwo)).perform(click());onView(withId(R.id.buttonAdd)).perform(click());// other test actions ...onView(withId(R.id.editText)).check(matches(withText("33")));// capture the screenshot and add the 'post_addition' tag to the screenshotNativeScreenshot.capture("post_addition");}
3. Enable screenshots on BrowserStack
Add the debugscreenshots parameter in the REST API request to enable screenshots on your Espresso test session.
The following sample cURL command shows the parameters used to enable screenshots on Android v7.1:
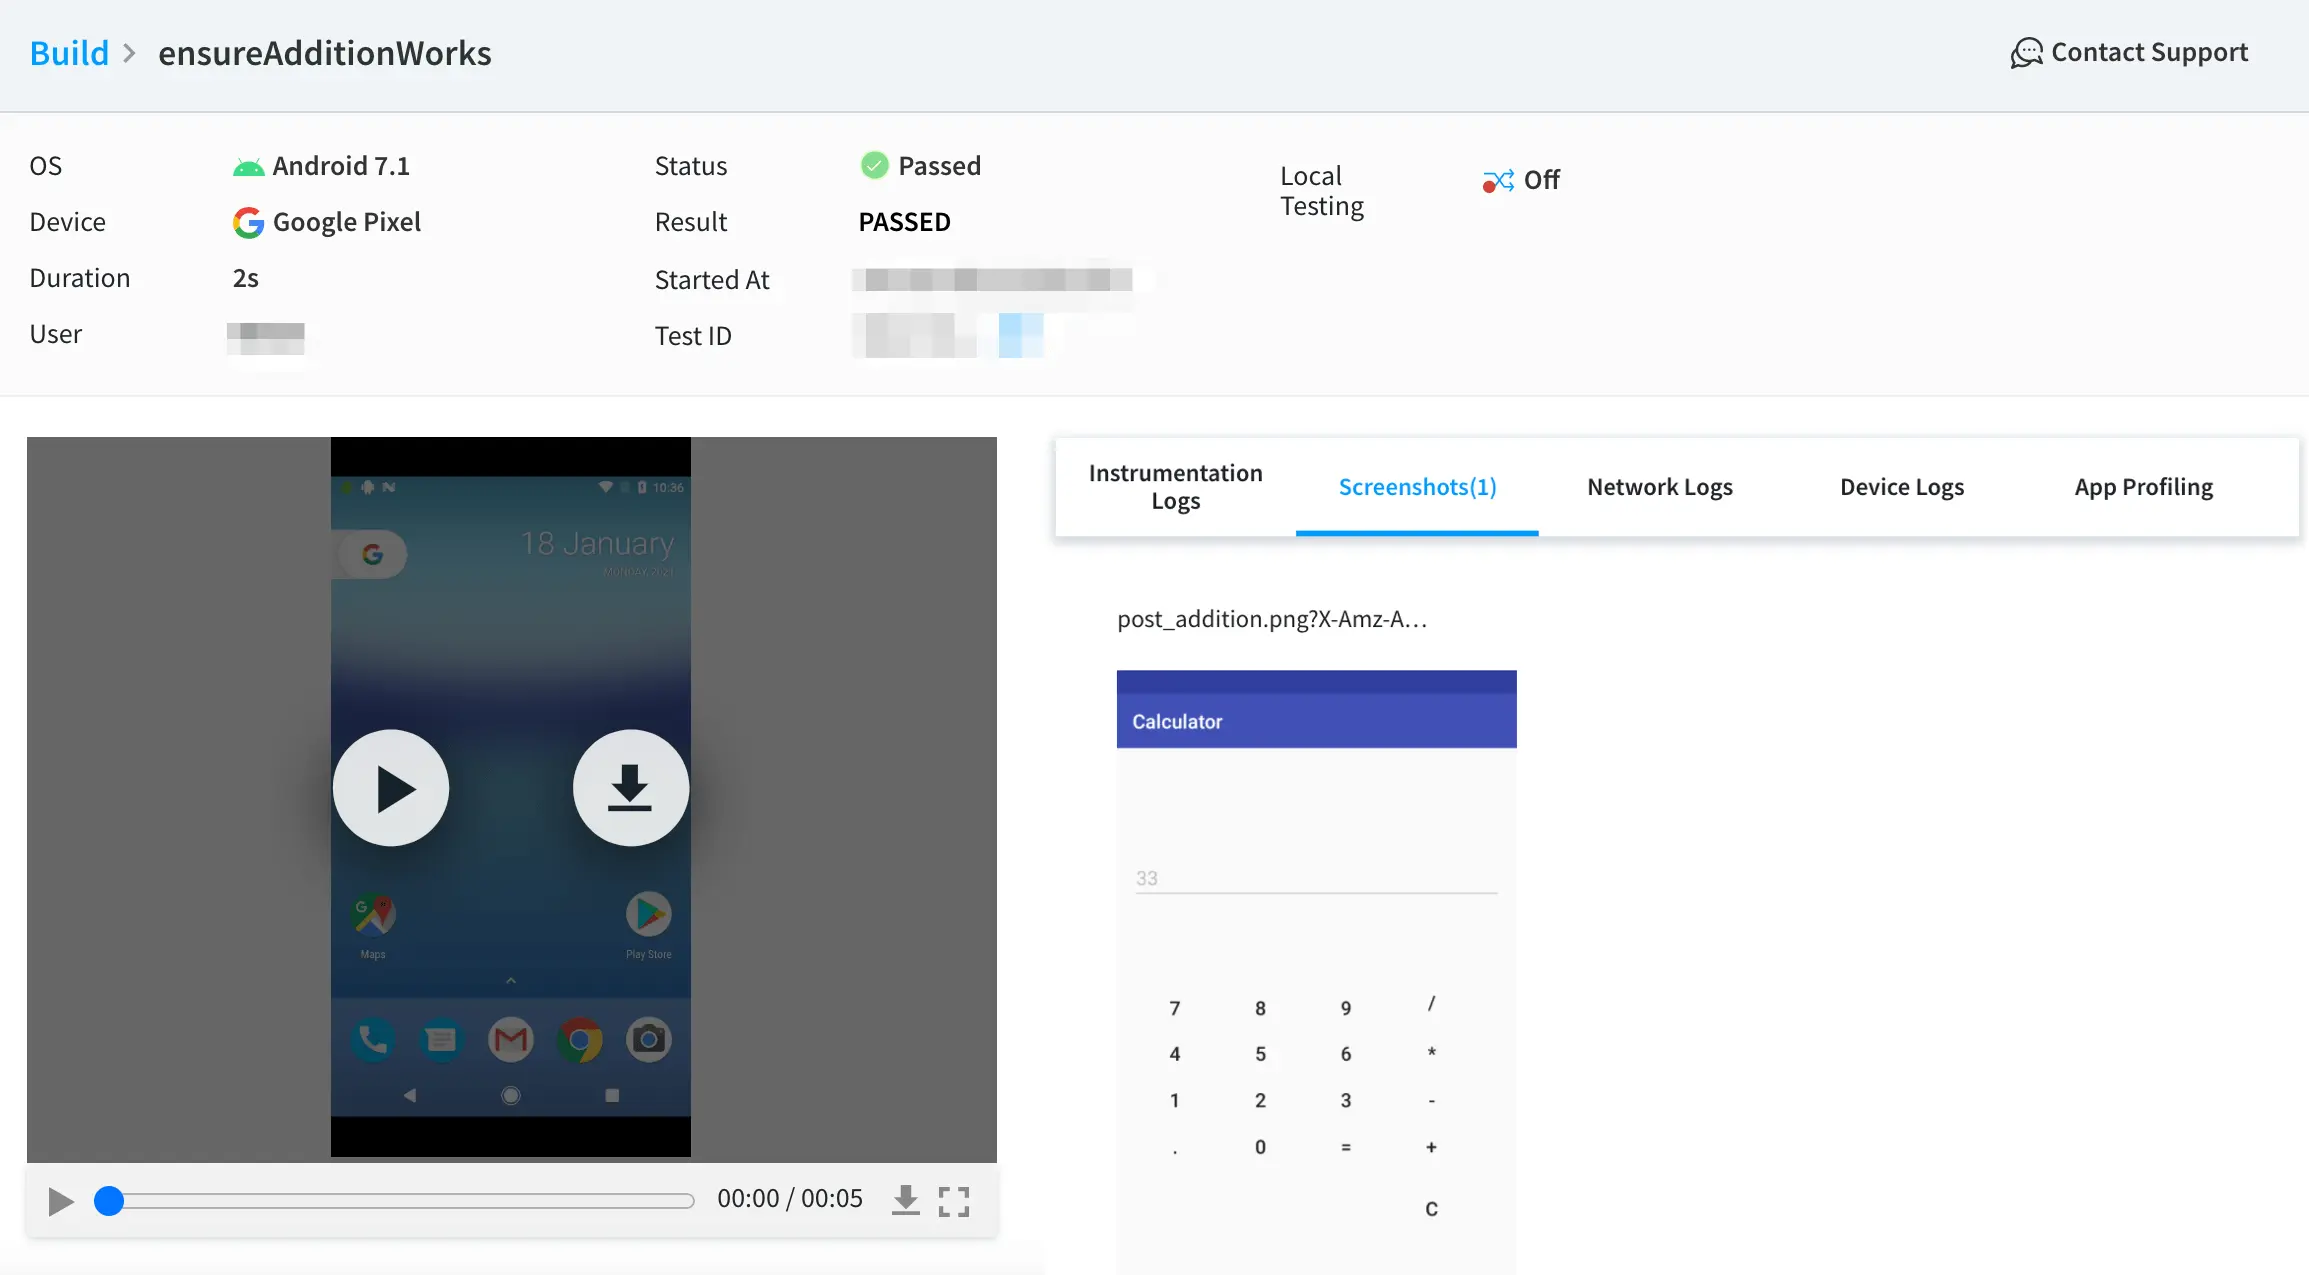
Navigate to your App Automate dashboard. On your session detail page, click the Screenshots tab. You can view screenshots for each test case as shown in the following image:
The name of the screenshot is set to the tag value that you provided inside NativeScreenshot.capture("tag") method.
1. Add required dependencies to your project
Follow the instructions mentioned on the Spoon project’s page to add required dependencies to your project.
2. Change storage permissions
Add the WRITE_EXTERNAL_STORAGE permissions in your app’s AndroidManifest.xml file to save screenshots, as shown in the following sample code snippet:
If you’re targeting your app on Android v10, add the android:requestLegacyExternalStorage="true" tag in the Application tag of the AndroidManifest.xml file.
3. Edit your test scripts to take screenshots
Call the Spoon.screenshot(activityName, tag) method to capture screenshots from your Espresso tests, as shown in the following sample code snippet.
The tag parameter is used to provide a name to the screenshot on your App Automate’s session detail page.
@TestpublicvoidensureAdditionWorks(){onView(withId(R.id.buttonOne)).perform(click());onView(withId(R.id.buttonTwo)).perform(click());onView(withId(R.id.buttonAdd)).perform(click());onView(withId(R.id.editText)).check(matches(withText("33")));// capture the screenshot and add the 'post_addition' tag to the screenshotSpoon.screenshot(mainActivity,"post_addition");}
4. Enable screenshots on BrowserStack
Add the debugscreenshots parameter in the REST API request to enable screenshots on your Espresso test session.
The following sample cURL command shows the parameters used to enable screenshots on Android v7.1:
Navigate to your App Automate dashboard. On your session detail page, click the Screenshots tab. You can view screenshots for each test case as shown in the following image:
The name of the screenshot is the tag value set in your script when you used the Spoon.screenshot(activityName, tag) method.
Did this page help you?
We're sorry to hear that. Please share your feedback so we can do better
Contact our Support team for immediate help while we work on improving our docs.
We're continuously improving our docs. We'd love to know what you liked
Thank you for your valuable feedback
Is this page helping you?
Yes
No
We're sorry to hear that. Please share your feedback so we can do better
Contact our Support team for immediate help while we work on improving our docs.
We're continuously improving our docs. We'd love to know what you liked