Remote MCP server
Connect your AI assistant without local installation or complex configurations using the BrowserStack remote MCP Server.
The BrowserStack Remote MCP server gives you all the power of a standard MCP server with zero local installation or complex setup. It’s the simplest way to connect your AI coding assistant to our real device cloud. Remote MCP Server uses OAuth to authenticate securely with BrowserStack’s system. This standards-based approach eliminates manual credential handling and reduces the risk of exposure.
Key benefits
- Access BrowserStack tools & AI agents with zero setup.
- Unlock simplified access even in firewall-restricted enterprise networks without requiring local installation.
- Securely integrate with AI assistants like Copilot, Claude etc. via OAuth without passing credentials.
- Access BrowserStack tools like Test Management, Test Reporting & Analytics, Accessibility, Live, & Automate on chatbots like Claude, ChatGPT.
Installation and setup of Remote MCP server
You can configure the remote MCP server using 2 methods - Global or Project specific:
A global installation enables the MCP server for your user account in a specific client.
Click the Tools icon on your Github Copilot chat window. A tools menu appears at the top of your IDE.
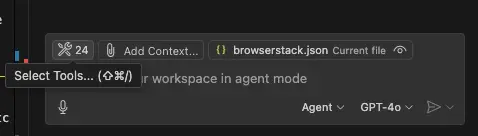
Select Add MCP server from the list.

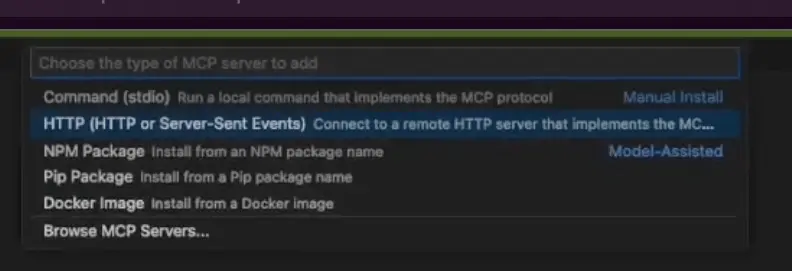
Select the HTTP option.
Paste Remote MCP Server URL: https://mcp.browserstack.com/mcp.
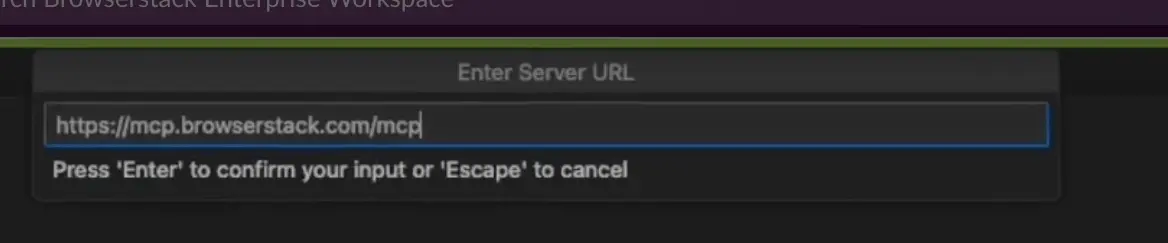
Enter server id as: browserstack.

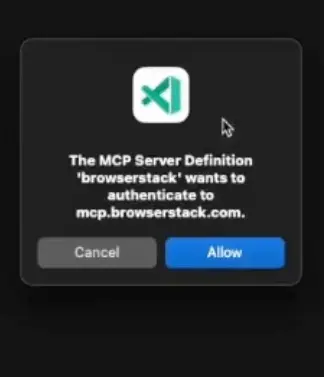
In VSCode, click on Start MCP Server and then click on Allow on the pop-up to authenticate using OAuth.
A Project installation enables the MCP server for your project root folder using the mcp.json file.
This method uses VS Code with GitHub Copilot.
-
Locate or create the configuration file: In your project’s root directory, find or create a folder named
.vscode. -
Create
mcp.json: Inside the.vscodefolder, create a new file namedmcp.json. -
Add configuration: Paste the following JSON content into the
mcp.jsonfile:{ "servers": { "browserstack": { "url": "https://mcp.browserstack.com/mcp" } } }
- For automated testing and debugging, we recommend using GitHub Copilot or Cursor.
- For manual testing (like Live testing), we recommend using Claude Desktop.
We're sorry to hear that. Please share your feedback so we can do better
Contact our Support team for immediate help while we work on improving our docs.
We're continuously improving our docs. We'd love to know what you liked
We're sorry to hear that. Please share your feedback so we can do better
Contact our Support team for immediate help while we work on improving our docs.
We're continuously improving our docs. We'd love to know what you liked
Thank you for your valuable feedback!