
 Join our Discord
Trigger CI jobs from Build Runs
Configure CI Triggers to fire a CI job on Jenkins, GitHub Actions, GitLab, or any webhook-based CI tool directly from Build Runs.
When a build run needs a rerun of a broader CI or CD pipeline stage, you often have to leave Test Reporting & Analytics, open your CI tool, and start the job. Using CI Triggers, you can configure a webhook-based trigger for your CI tool from BrowserStack. After configuring the CI trigger, you can start the job with a click, directly from Build Runs.
CI Triggers is available wherever build runs appears, including BrowserStack Test Reporting & Analytics and BrowserStack Test Management.
Prerequisites
Before you set up a CI trigger, ensure that you have:
- A CI tool that supports triggering jobs through a webhook or HTTP request, such as Jenkins, GitHub Actions, GitLab CI, CircleCI, or Azure Pipelines. You can also use Custom CI tool for any other webhook-triggerable tool.
- For Jenkins, the BrowserStack Jenkins plugin installed on your Jenkins instance.
- For any other CI tool, a webhook endpoint that’s reachable over the public internet.
- The credentials your CI tool needs to authenticate the trigger request, for example a Jenkins API token or a webhook secret.
Set up a CI trigger
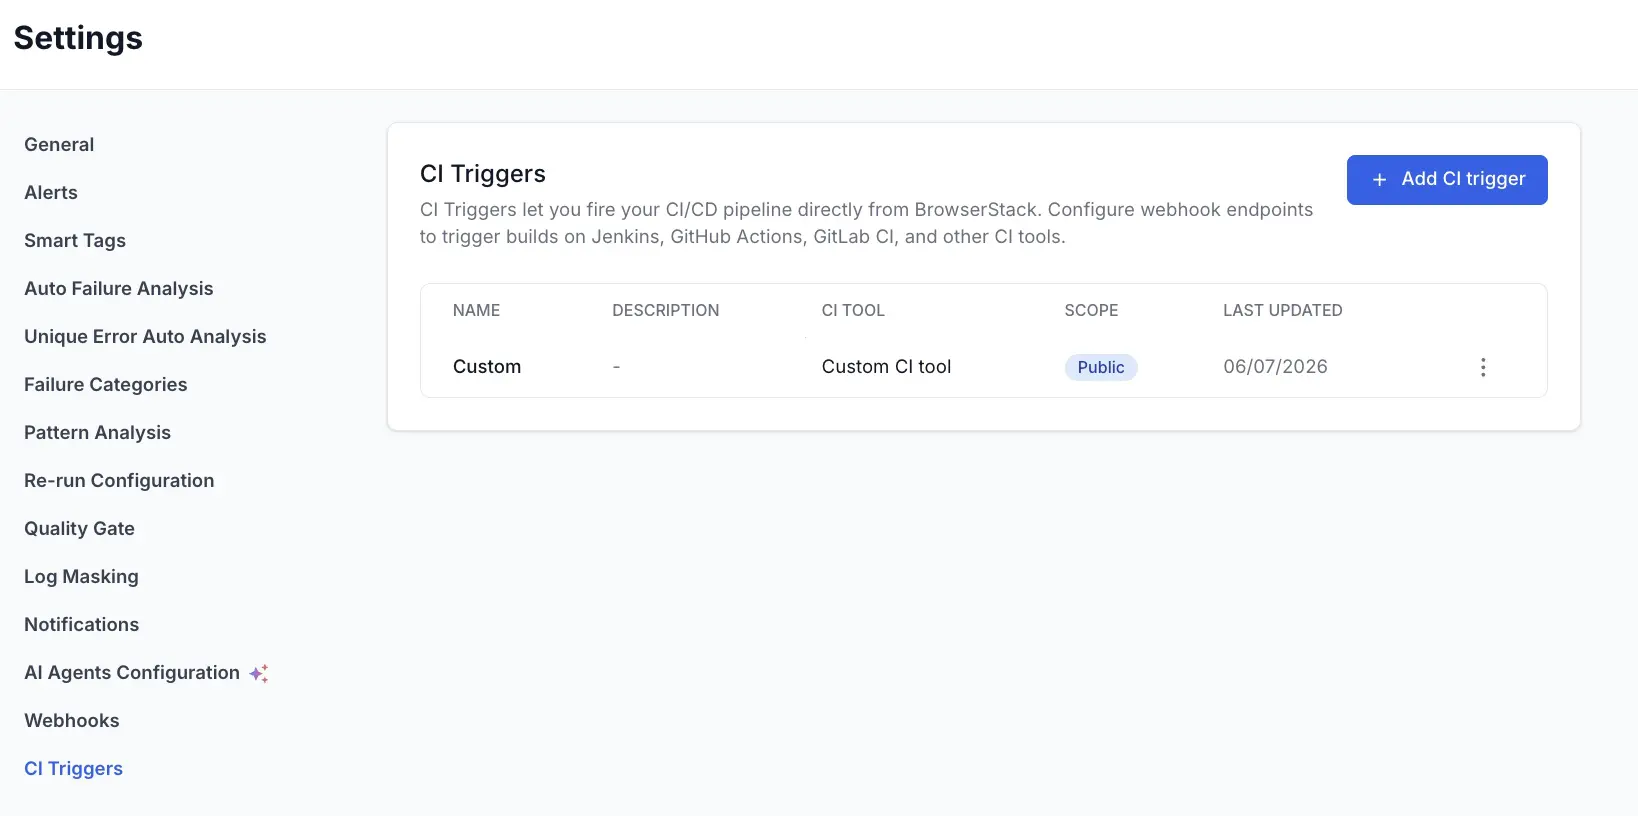
You can create and manage CI triggers from Settings > CI Triggers.
By default, a trigger is private. Only the creator of the CI trigger can see and use it.
The CI Triggers page shows a table of your configured triggers with the following columns:
| Column | Description |
|---|---|
| Trigger name | The name you gave the trigger when you created it. |
| Description | The optional description you added for the trigger. |
| CI tool | The CI tool the trigger is configured for, for example Jenkins or GitHub Actions. |
| Scope | Whether the trigger is Public (visible to all project members) or Private (visible only to its creator). |
| Last updated at | The date and time the trigger was last edited. |
If you don’t have any triggers yet, you see an empty state with a + Add CI trigger call to action instead of the table. Either way, there’s always a + Add CI trigger button in the top-right corner of the page.
To set up a CI trigger, follow these steps:
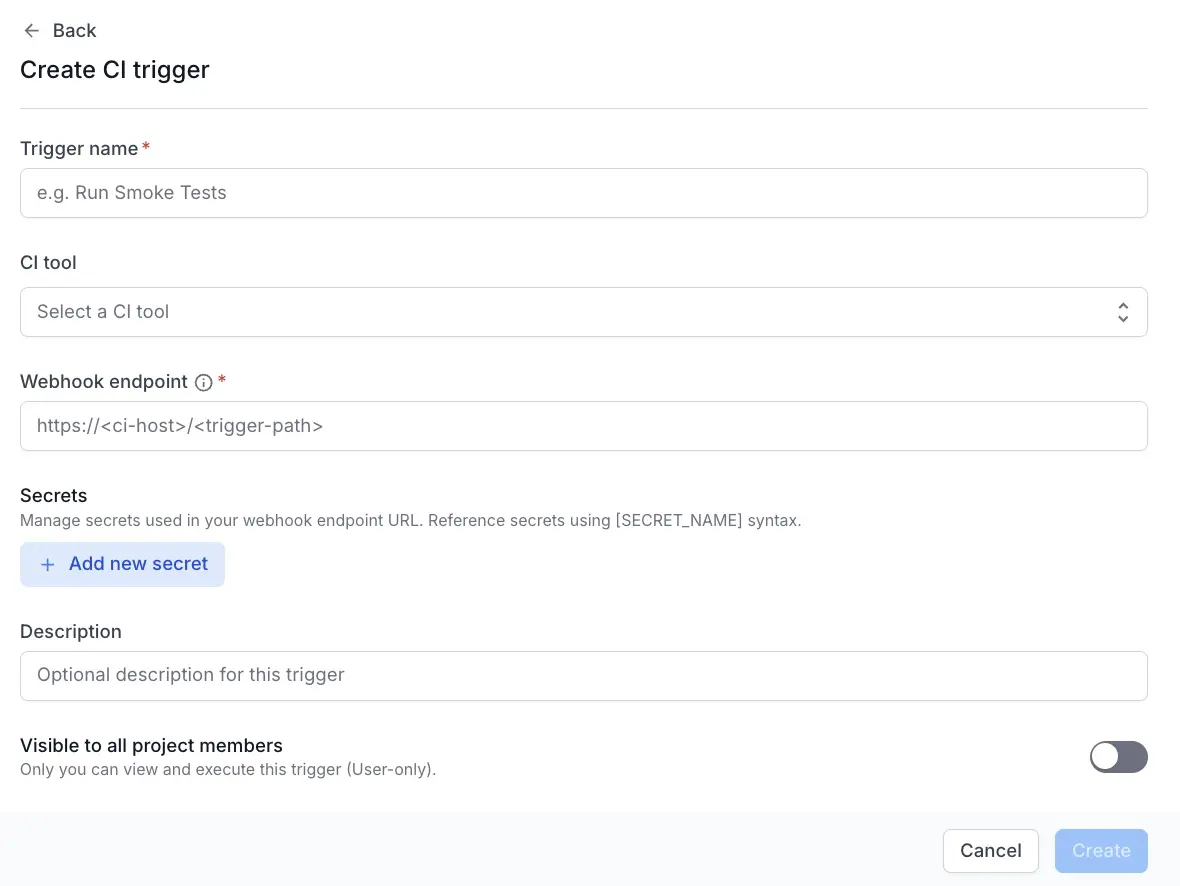
Click + Add CI trigger in the top-right corner of the CI Triggers page. You can also open the form directly by adding ?createTrigger=true to the CI Triggers page URL.
In the Trigger name field, enter a name for the trigger. This name appears in the CI Triggers dropdown on the Build Runs page, so use something you can recognize at a glance.
From the CI tool dropdown, select the CI tool you want to trigger. The dropdown lists popular CI tools that support triggering jobs through a webhook or HTTP request, ordered by popularity. If your CI tool isn’t listed, select Custom CI tool, then fill in the webhook endpoint, HTTP method, headers or authentication, and request body yourself. Test Reporting & Analytics provides editable default values for a custom CI tool since it doesn’t know the exact API your tool expects.
After you select a CI tool, a note appears with more information.
If you select Jenkins, Test Reporting & Analytics sends the trigger request directly from your browser. Install the BrowserStack Jenkins plugin on your Jenkins instance so it accepts these cross-origin requests.
For every other CI tool, including Custom CI tool, the webhook endpoint must be reachable over the public internet. Test Reporting & Analytics blocks requests to internal or private network addresses for security reasons.
In the Webhook endpoint field, enter the trigger URL your CI tool exposes.
Mark any secret or token value in the URL with a placeholder in square brackets, for example [ACCESS_SECRET_JENKINS]. You can reference multiple secrets in the same URL by adding multiple placeholders.
As soon as you enter the endpoint, Test Reporting & Analytics scans it for placeholders and checks whether a secret with that name already exists.
Below the webhook endpoint, the Secrets section lists the secrets that apply to this trigger:
| Column | Description |
|---|---|
| Secret name | The name of the secret, in capital letters only, for example JENKINS_TOKEN. |
| Used in | The triggers whose webhook endpoint references this secret. |
| Created by | The user who created the secret. |
| Created at | The date and time the secret was created. |
If a placeholder in your webhook URL doesn’t match an existing secret, you can’t save the trigger until you create it. Click Add new secret in the top-right corner of the Secrets section, and fill in:
-
Secret name: capital letters only, for example
JENKINS_TOKEN. - Value: the actual secret. Test Reporting & Analytics always masks this value after you save it.
- Description: optional context, shown in the secrets table.
Under Visible to all project members, choose whether to share the trigger:
- Off: Only you can see and fire the trigger. This is the default option.
- On: Everyone with access to the project can see and fire the trigger. It always runs with your stored credentials, so other users don’t supply their own.
If you turn on Visible to all project members, Test Reporting & Analytics asks you to confirm before saving.
You’re about to make this trigger available to everyone in this project. Anyone in the project can fire this trigger using your configured credentials.
In the Description field, optionally add context for the trigger, for example the pipeline stage it runs.
Click Create. Create is enabled only once every secret referenced in the webhook endpoint exists and the webhook endpoint is filled in.
If you navigate away from the create or edit trigger form with unsaved changes, Test Reporting & Analytics shows a confirmation dialog asking if you want to leave.
Trigger a CI job from Build Runs
Once a trigger is configured, you can fire it from Build Runs:
- From Build Runs, click the trigger icon next to the All Builds dropdown.
- Select the trigger you want to fire from the list. If you haven’t configured any triggers yet, the list only shows + Add CI trigger, which opens the CI Triggers settings page in a new tab.
- Confirm the action in the dialog that appears.
- Test Reporting & Analytics runs the trigger and shows a success message when it completes, or an error message if it fails.
Manage triggers and secrets
You can edit or remove a trigger or a secret at any time:
- In the CI Triggers table or the Secrets table, click the three-dot menu next to a row to Edit or Delete it.
- Deleting a trigger or a secret always asks you to confirm first.
- Editing a secret never shows its existing value. The Value field shows masked dots, and whatever you type replaces the old value.
Things to know
- Triggers are private by default. Turning on Visible to all project members lets everyone with access to the project fire the trigger, but it always runs with the creator’s stored credentials.
- Trigger requests time out after 10 seconds.
- For Jenkins, BrowserStack sends the trigger request directly from your browser, the same way Rerun tests works, so it can reach Jenkins instances on localhost or behind a corporate firewall. This requires the BrowserStack Jenkins plugin.
- For every other CI tool, Test Reporting & Analytics calls the webhook endpoint on your behalf from its backend, so that endpoint must be reachable over the public internet.
- CI Triggers is available on all BrowserStack plans, with no group or plan restriction.
Related topics
We're sorry to hear that. Please share your feedback so we can do better
Contact our Support team for immediate help while we work on improving our docs.
We're continuously improving our docs. We'd love to know what you liked
We're sorry to hear that. Please share your feedback so we can do better
Contact our Support team for immediate help while we work on improving our docs.
We're continuously improving our docs. We'd love to know what you liked
Thank you for your valuable feedback!