View Build reports in Jenkins
Jenkins is a continuous integration tool that enables continuous testing, build, and deployment of iterative code changes. CI/CD tools help catch failures ahead of the production stage and mitigate them as they occur.
Prerequisites
Before you can start integration, ensure that the following tasks are complete.
- Jenkins CI server (v1.653+) is installed on your machine.
- Access to the BrowserStack account credentials, namely BrowserStack account credentials.
- Jenkins server is running locally on the default port
http://localhost:8080/, and you have created a pipeline. - You are a maintainer or owner of your project repository.
-
Jenkinsfile is created in your project repository. This is required only if you are using the
jenkinsfilemethod.
Install and configure the BrowserStack Jenkins plugin
The BrowserStack Jenkins plugin eases the process of configuring Jenkins to run tests on BrowserStack. This section explains how to:
After installing and configuring the BrowserStack plugin, you can now integrate Test Reporting & Analytics with Jenkins using either of the following methods:
- Using the
jenkinsfile. - Using Post-build actions in Jenkins.
Step 1: Install the BrowserStack Plugin
To install the BrowserStack plugin, complete the following steps:
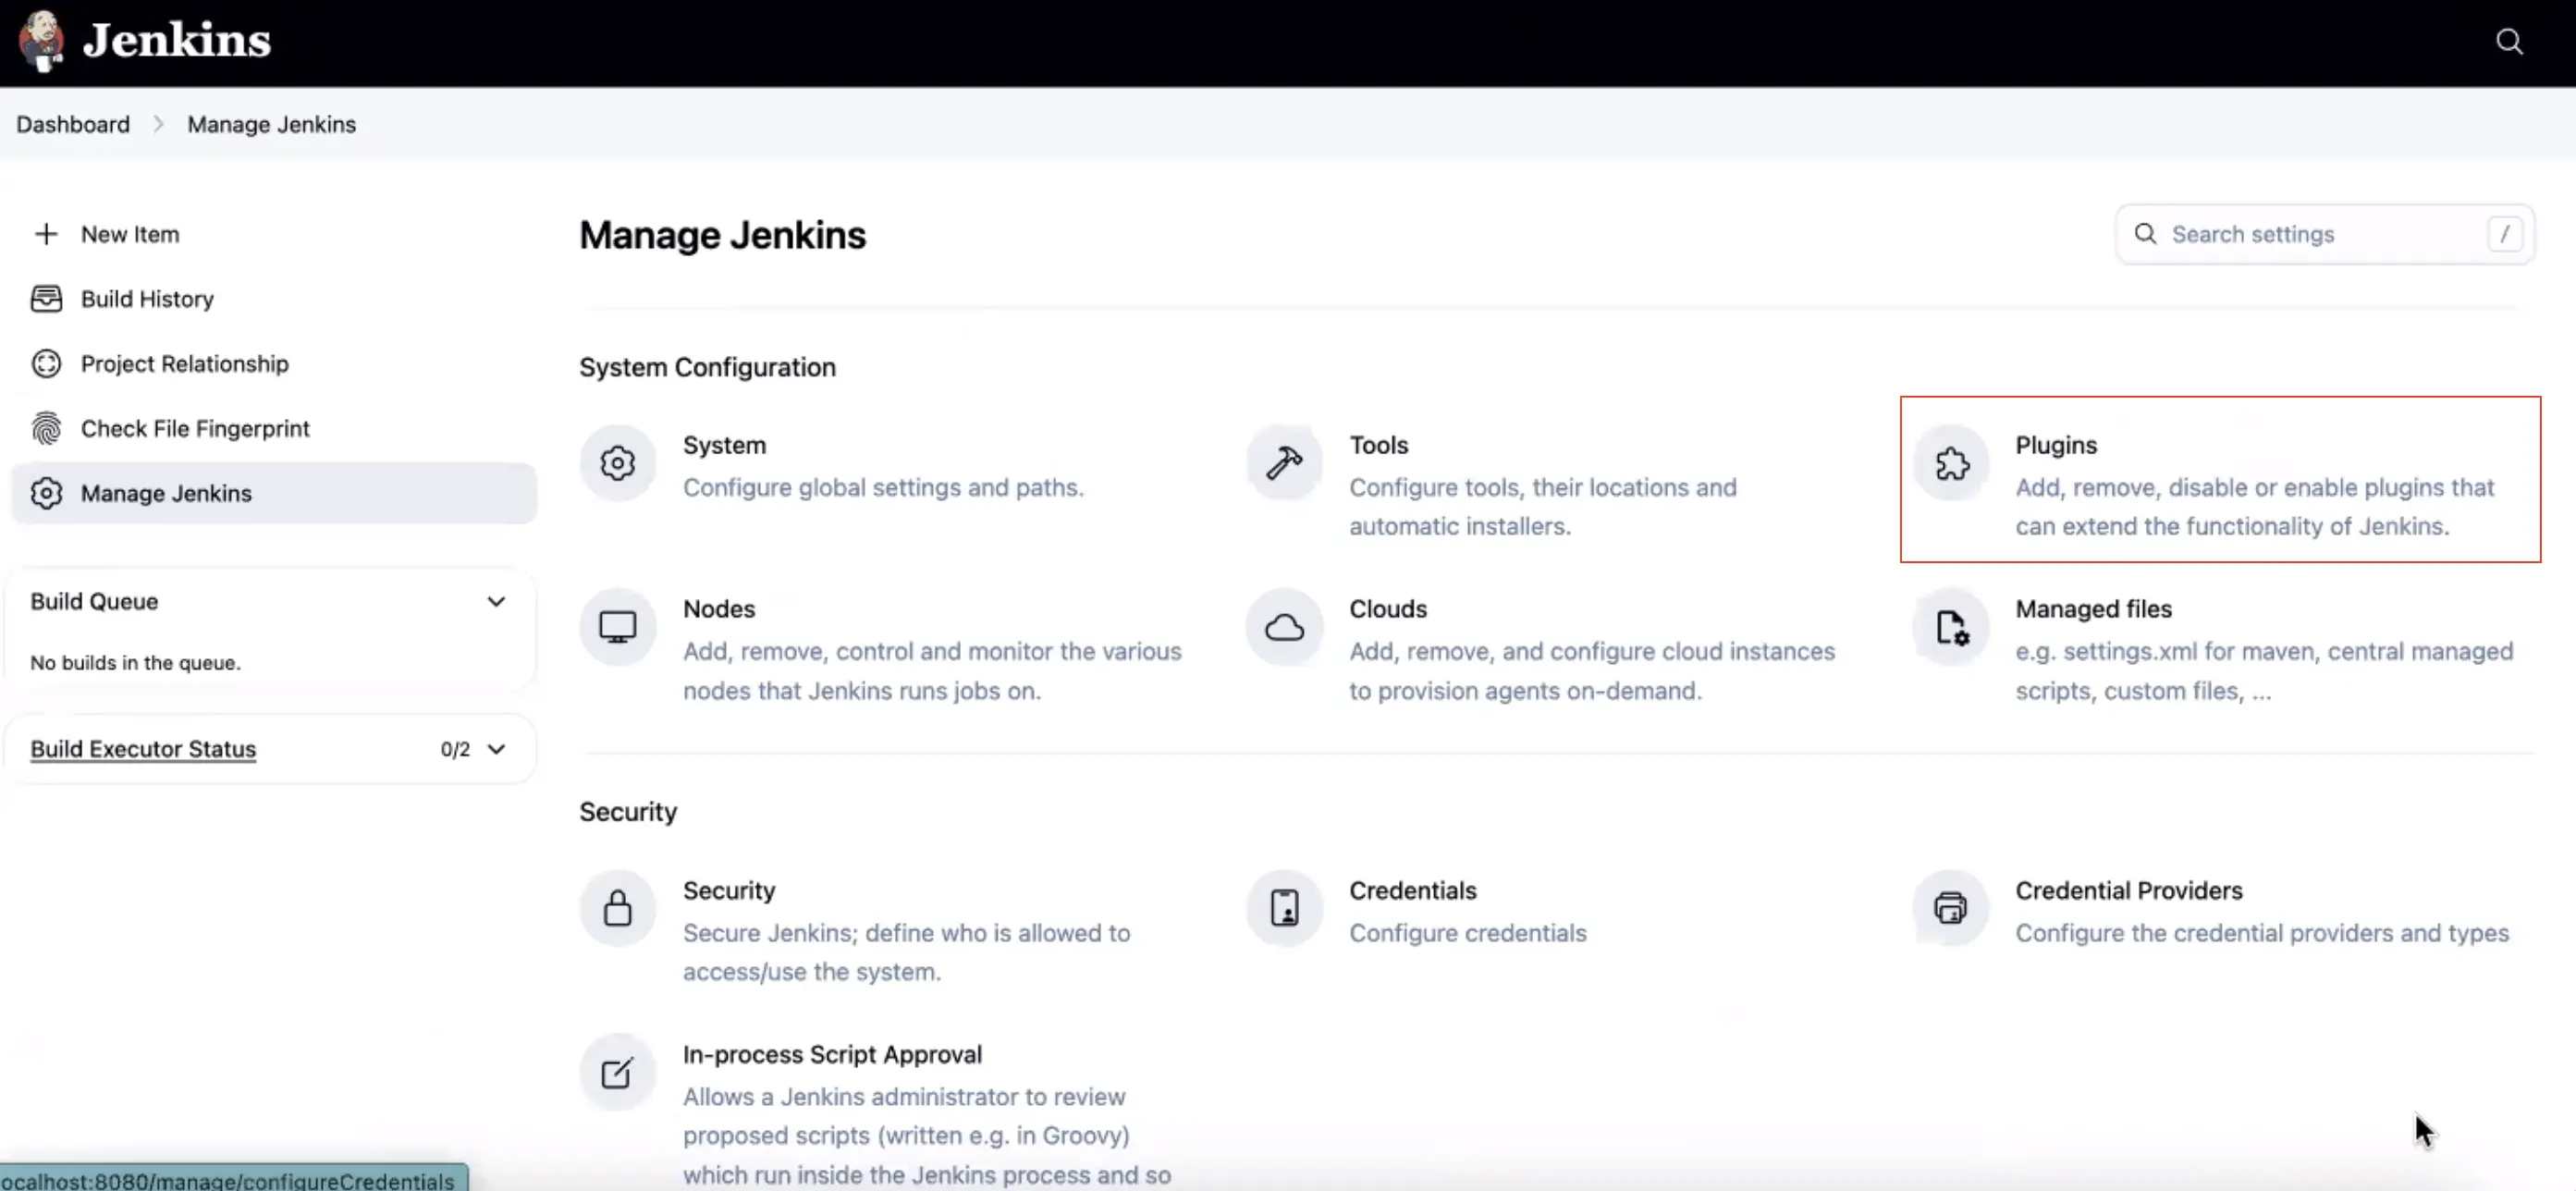
- Go to your Jenkins page, running by default on
http://localhost:8080/, and click Manage jenkins in the left navigation bar. - On the System configuration page, click Plugins.
- Search for BrowserStack in the search box.
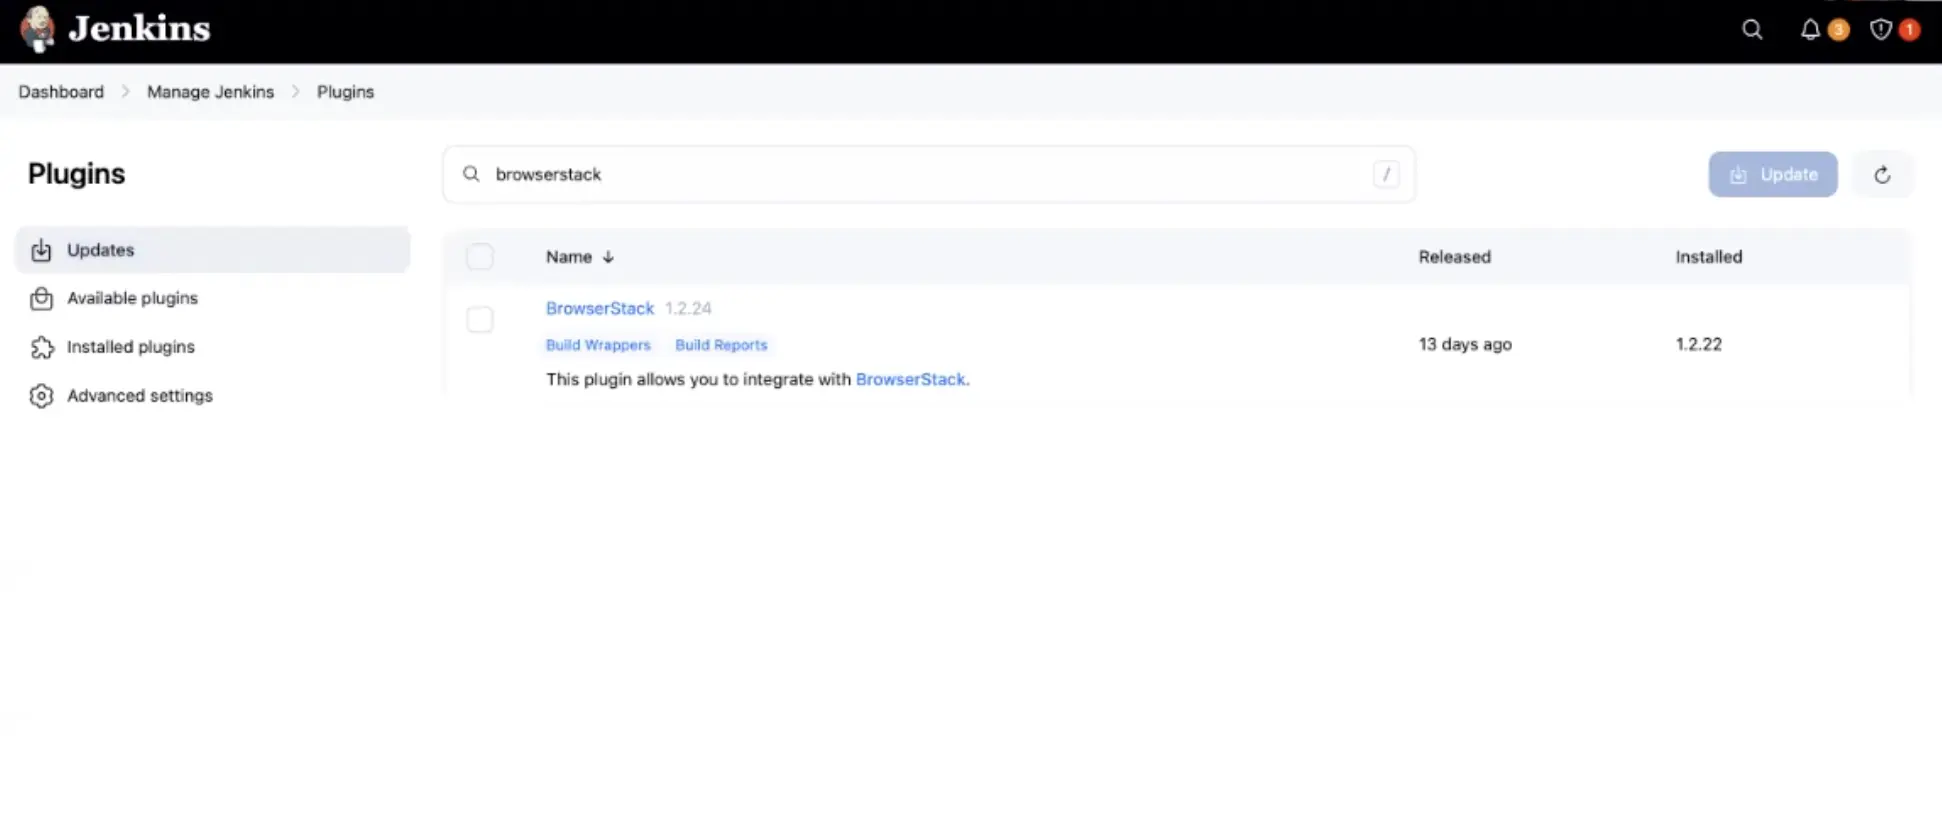
- Select BrowserStack and click either Install without restart or Download now and install after restart, depending on your preference.
- On the Installing Plugins/Upgrades page, view the installation status of the plugin.
- After installation is successful, click Go back to the top page to configure the plugin.
Step 2: Configure BrowserStack credentials in Jenkins
After you’ve installed the plugin, complete the following steps to configure your BrowserStack credentials in the plugin:
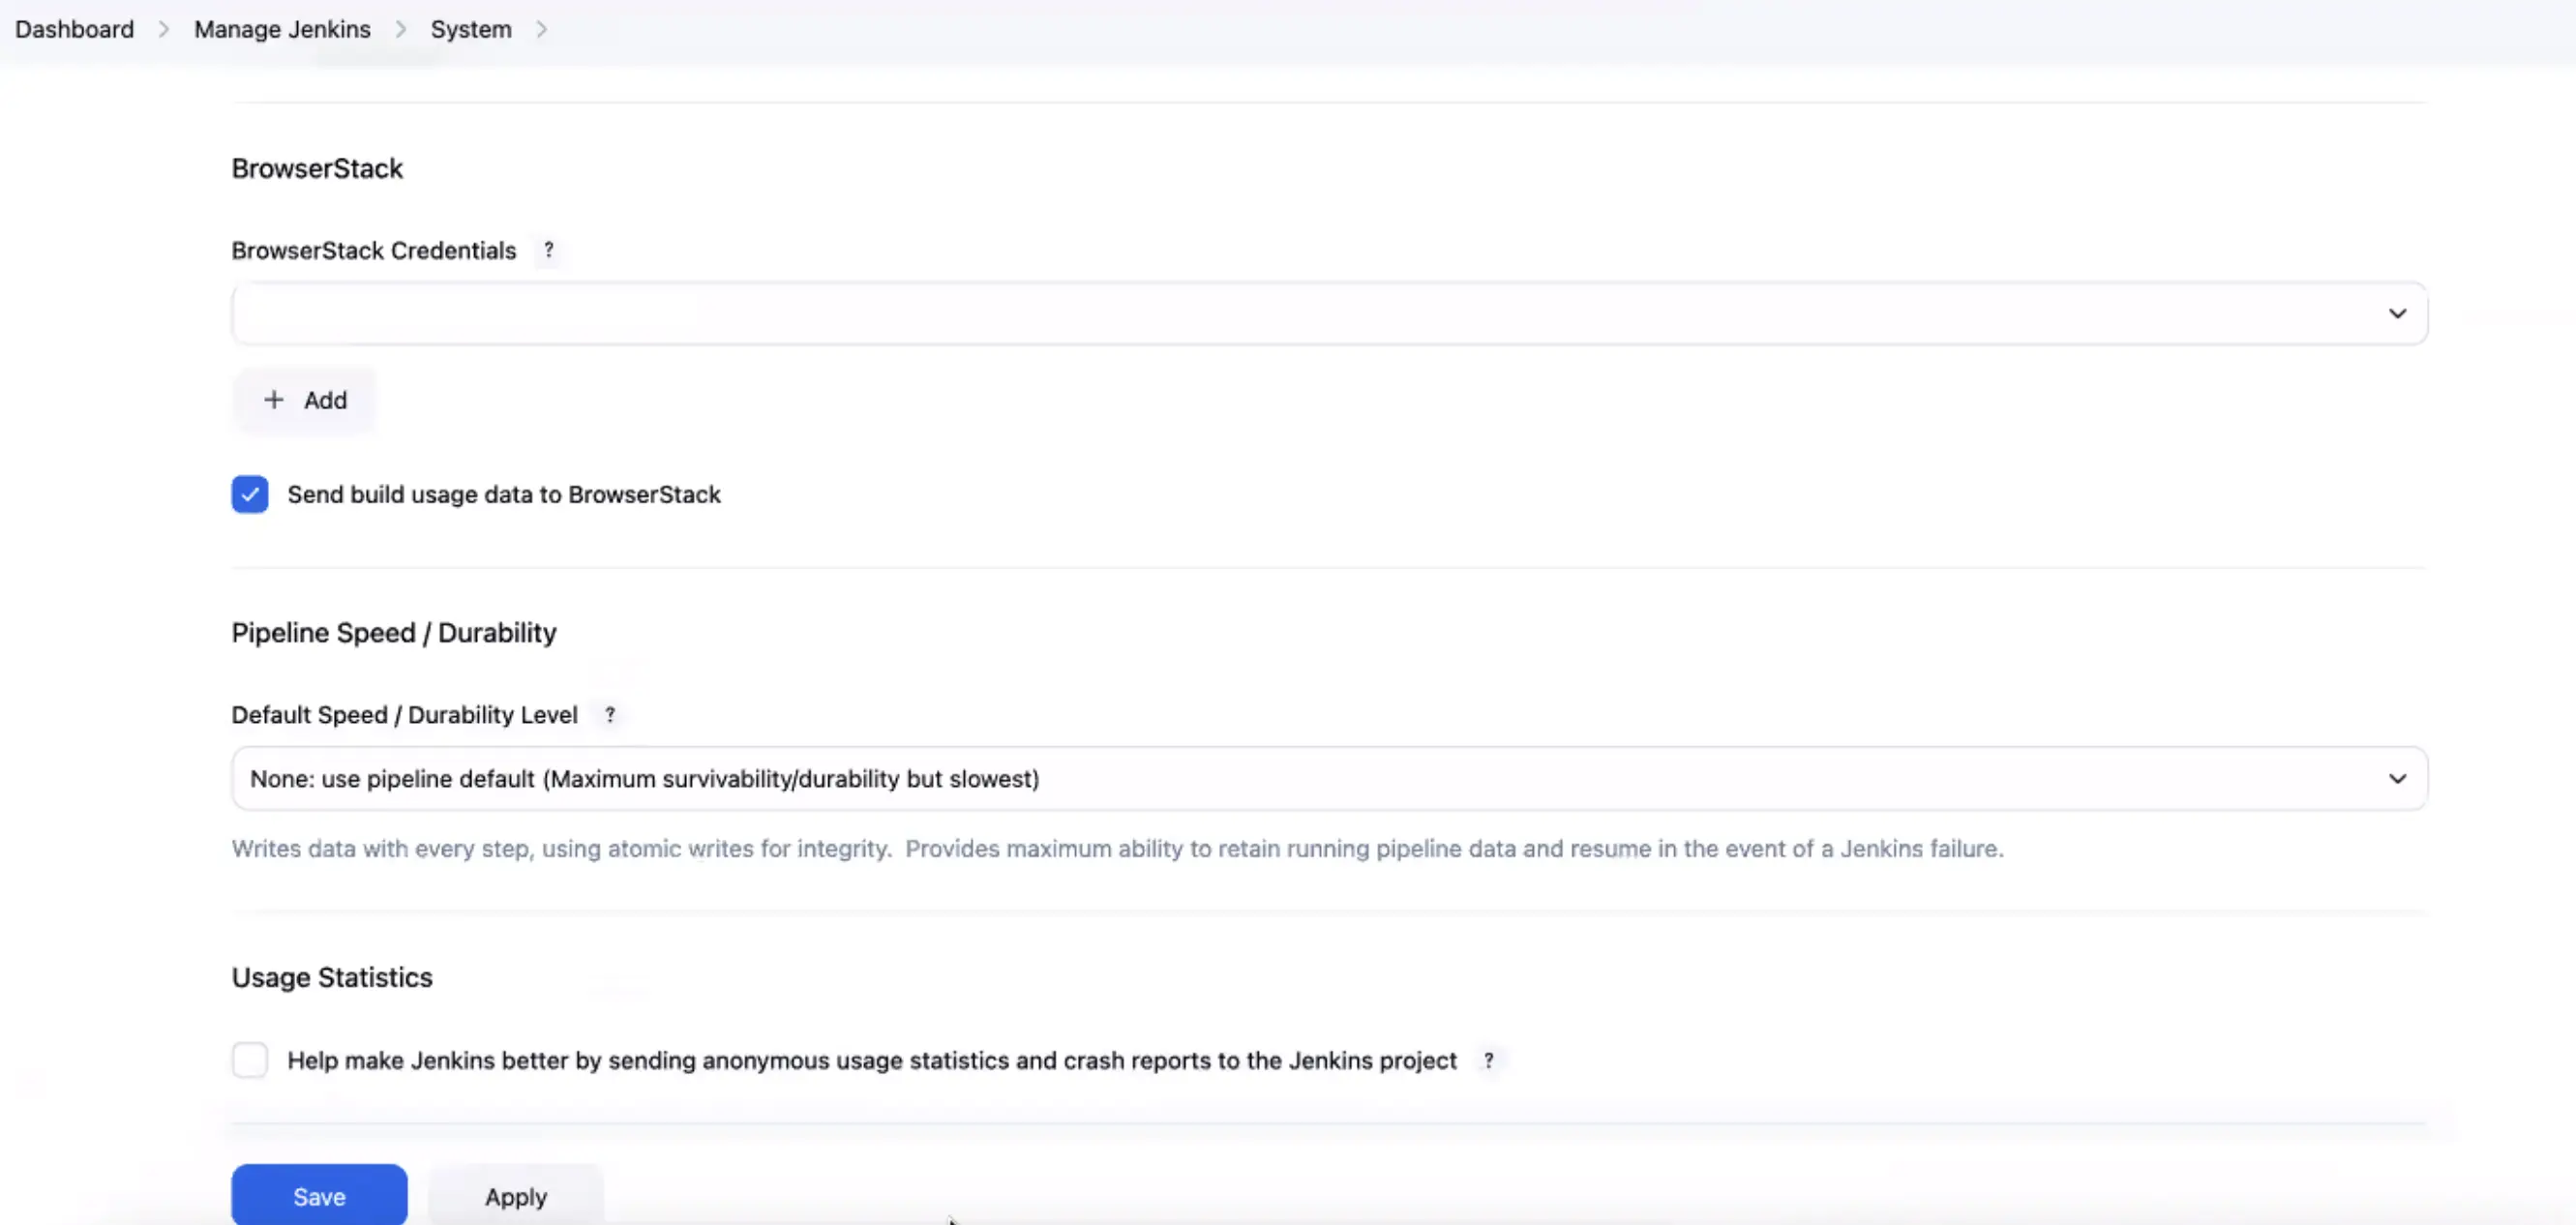
- On your Jenkins page (
http://localhost:8080/), click Manage Jenkins > System. - Under the BrowserStack Credentials section, click Add > Jenkins.
- In the Jenkins Credentials Provider: Jenkins window, enter your Username and Access Key.
- Click Authenticate. After the plugin verifies your BrowserStack credentials, a Success text appears.
- Click Add at the bottom of the Jenkins Credentials Provider: Jenkins window. You will be redirected to the configuration page.
- On the Configuration page, click Save.
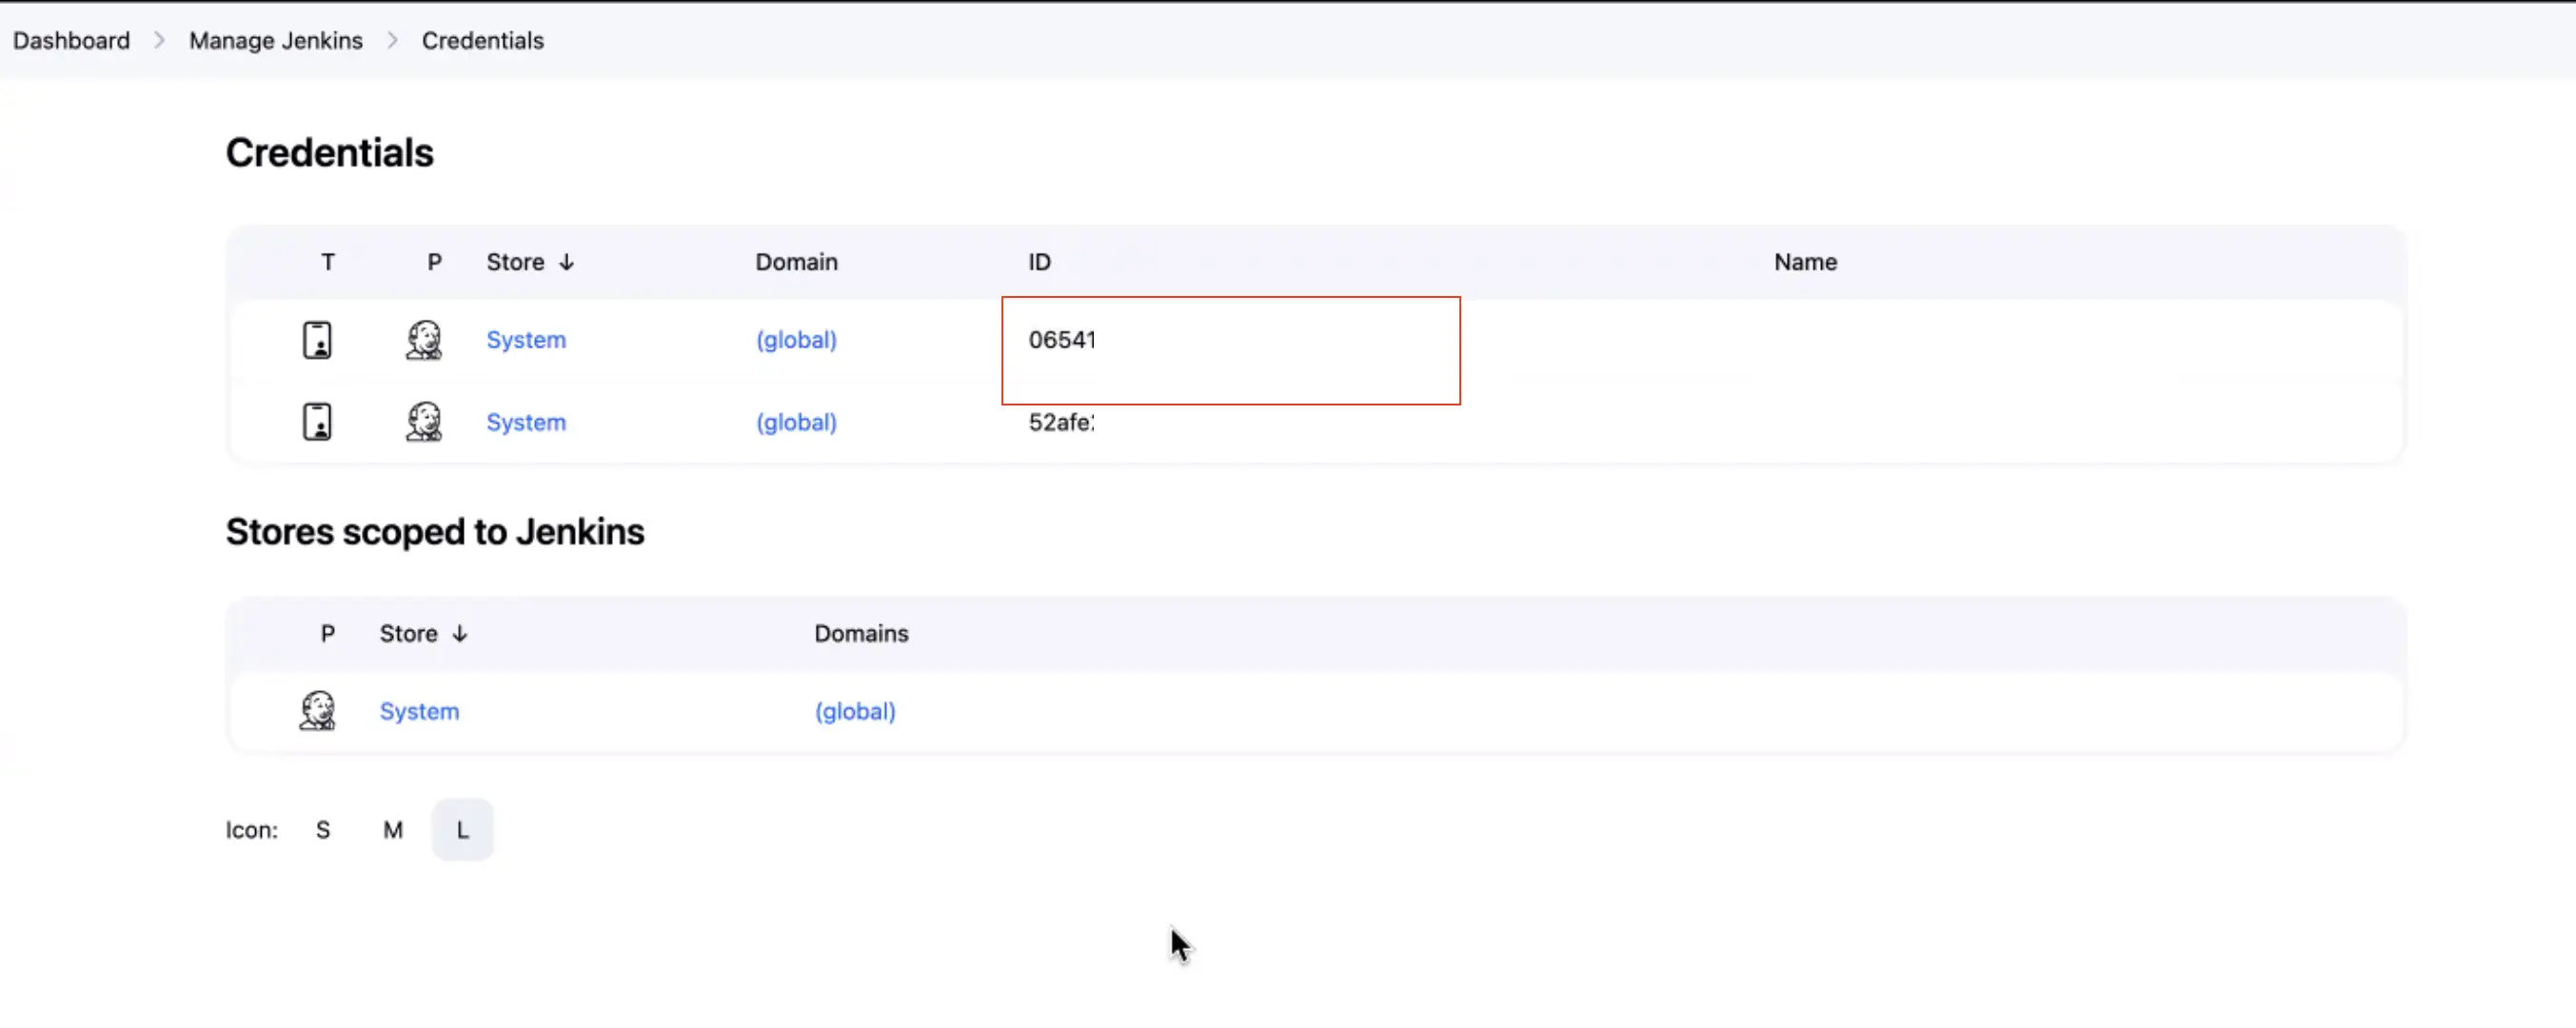
- On your Jenkins Dashboard, click Manage Jenkins > Credentials.
- In the Credentials section, note down the ID of the credential shown in the ID column. This ID will be used in the
Jenkinsfileof your project.
- In the
Jenkinsfileof your project, add thebrowserstack(credentialsId: '<credential_id>')statement and wrap all the test commands inside it, as follows:
The following sample Jenkinsfile defines the setup stage, credential ID, and a sample shell command:
Integrate BrowserStack TRA with Jenkins using the Jenkinsfile
To integrate BrowserStack with Jenkins using the jenkinsfile, you need to add the BrowserStack plugin to your pipeline script. Here’s an example of how to do this:
pipeline {
    agent any
    stages {
        stage('Test') {
            steps {
                script {
                    browserstack {
                        // Your test commands go here
                    }
                }
            }
        }
    }
}
Integrate existing test cases
With existing test cases, integrating BrowserStack involves editing your test cases to add BrowserStack capabilities, credentials, and remote URL.
Though your existing test scripts include capabilities, BrowserStack expects specific capabilities, such as browser version, etc. that help determine how tests are run. This example code snippet shows the BrowserStack specific capabilities.
Step 1: Set environment variables in test script
The BrowserStack Jenkins plugin sets the following environment variables:
-
BROWSERSTACK_USERNAMEandBROWSERSTACK_ACCESS_KEY: They are set to your BrowserStack Username and Access Key, respectively, when you configure BrowserStack credentials in Jenkins. -
BROWSERSTACK_BUILD_NAME: It is generated automatically by Jenkins plugin
Use the following example code snippet to set environment variables and capabilities in your website tests:
String username = System.getenv("BROWSERSTACK_USERNAME");
String accessKey = System.getenv("BROWSERSTACK_ACCESS_KEY");
String buildName = System.getenv("JENKINS_LABEL");

MutableCapabilities capabilities = new MutableCapabilities();
capabilities.setCapability("browserName", "Chrome");
capabilities.setCapability("browserVersion", "100.0");
HashMap<String, Object> browserstackOptions = new HashMap<String, Object>();
browserstackOptions.put("os", "Windows");
browserstackOptions.put("osVersion", "10");
browserstackOptions.put("sessionName", "BStack Build Name: " + buildName);
browserstackOptions.put("seleniumVersion", "4.0.0");
capabilities.setCapability("bstack:options", browserstackOptions);

WebDriver driver = new RemoteWebDriver(new URL("https://" + username + ":" + accessKey + "@hub.browserstack.com/wd/hub"), capabilities);
username = process.env.BROWSERSTACK_USERNAME
accessKey = process.env.BROWSERSTACK_ACCESS_KEY
buildName = process.env.JENKINS_LABEL

var capabilities = {
  'bstack:options' : {
    "os" : "Windows",
    "osVersion" : "10",
    "sessionName" : "BStack Build Name: " + buildName,
    "userName" : username,
    "accessKey" : accessKey,
    "seleniumVersion" : "4.0.0",
  },
    "browserName" : "Chrome",
    "browserVersion" : "100.0",
}

var driver = new webdriver.Builder().
  usingServer("https://hub-cloud.browserstack.com/wd/hub").
  withCapabilities(capabilities).
  build();
using System;
using OpenQA.Selenium;
using OpenQA.Selenium.Remote;
namespace SeleniumTest {
  class Program {
    static void Main(string[] args) {
      String username = Environment.GetEnvironmentVariable("BROWSERSTACK_USERNAME");
      String accessKey = Environment.GetEnvironmentVariable("BROWSERSTACK_ACCESS_KEY");
      String buildName = Environment.GetEnvironmentVariable("JENKINS_BUILD_LABEL");

      IWebDriver driver;
      ChromeOptions capabilities = new ChromeOptions();
      capabilities.BrowserVersion = "100.0";
      Dictionary<string, object> browserstackOptions = new Dictionary<string, object>();
      browserstackOptions.Add("os", "Windows");
      browserstackOptions.Add("osVersion", "10");
      browserstackOptions.Add("sessionName", "BStack Build Name: " + buildName);
      browserstackOptions.Add("userName", username);
      browserstackOptions.Add("accessKey", accessKey);
      browserstackOptions.Add("seleniumVersion", "4.0.0");
      capabilities.AddAdditionalOption("bstack:options", browserstackOptions);

      driver = new RemoteWebDriver(new Uri("https://hub.browserstack.com/wd/hub/"), capabilities);

            // test steps
        }
    }
}
$username = getenv('BROWSERSTACK_USERNAME');
$accessKey = getenv('BROWSERSTACK_ACCESS_KEY');
$buildName = getenv('JENKINS_LABEL');

$caps = array(
'bstack:options' => array(
    "os" => "Windows",
    "osVersion" => "10",
    "sessionName" => "BStack Build Name: ".$buildName,
    "seleniumVersion" => "4.0.0",
),
  "browserName" => "Chrome",
  "browserVersion" => "100.0",
);
$web_driver = RemoteWebDriver::create(
  "https://".$username.":".$accessKey."@hub.browserstack.com/wd/hub",
  $caps
);
username = os.environ.get('BROWSERSTACK_USERNAME')
accessKey = os.environ.get('BROWSERSTACK_ACCESS_KEY')
buildName = os.environ.get('JENKINS_LABEL')

bstack_options = {
    "os" : "Windows",
    "osVersion" : "10",
    "sessionName" : "BStack Build Name: " + buildName,
    "seleniumVersion" : "4.0.0",
    "userName": username,
    "accessKey": accessKey
}
options = ChromeOptions()
options.set_capability('bstack:options', bstack_options)
driver = webdriver.Remote(
    command_executor="https://hub.browserstack.com/wd/hub",
    options=options)
username = ENV['BROWSERSTACK_USERNAME']
accessKey = ENV['BROWSERSTACK_ACCESS_KEY']
buildName = ENV['JENKINS_LABEL']

# to run on Chrome
options = Selenium::WebDriver::Options.chrome
capabilities = {
  'bstack:options' => {
    "os" => "Windows",
    "osVersion" => "10",
    "sessionName" => "BStack Build Name: " + buildName,
    "seleniumVersion" => "4.0.0",
  },
  "browserName" => "Chrome",
  "browserVersion" => "100.0",
}

options.add_option('bstack:options', bstack_options)
driver = Selenium::WebDriver.for(:remote,
  :url => "https://"+username+":"+accessKey+"@hub.browserstack.com/wd/hub",
  :capabilities => options)
String username = System.getenv("BROWSERSTACK_USERNAME");
String accessKey = System.getenv("BROWSERSTACK_ACCESS_KEY");
String buildName = System.getenv("BROWSERSTACK_BUILD_NAME");

DesiredCapabilities capabilities = new DesiredCapabilities();
capabilities.setCapability("os", "Windows");
capabilities.setCapability("os_version", "10");
capabilities.setCapability("browser", "chrome");
capabilities.setCapability("browser_version", "latest");
capabilities.setCapability("name", "BStack-[Java] Sample Test"); // test buildName
capabilities.setCapability("build", buildName); // CI/CD job name using BROWSERSTACK_BUILD_NAME env variable

driver = new RemoteWebDriver(new URL("https://" + username + ":" + accessKey + "@hub.browserstack.com/wd/hub"), capabilities);
var username = process.env.BROWSERSTACK_USERNAME;
var accessKey = process.env.BROWSERSTACK_ACCESS_KEY;
var buildName = process.env.BROWSERSTACK_BUILD_NAME;

var capabilities = {
	"os" : "Windows",
	"os_version" : "10",
	"browser" : "chrome",
	"browser_version" : "latest",
	"name": "BStack -[Jenkins] Sample Test", // test name
	"build" : buildName, // CI/CD job name using BROWSERSTACK_BUILD_NAME env variable
	"browserstack.user" : username,
	"browserstack.key" : accessKey
};

var driver = new webdriver.Builder().
  usingServer("https://hub-cloud.browserstack.com/wd/hub").
  withCapabilities(capabilities).
  build();
using System;
using OpenQA.Selenium;
using OpenQA.Selenium.Remote;
namespace SeleniumTest {
  class Program {
    static void Main(string[] args) {
      username = Environment.GetEnvironmentVariable("BROWSERSTACK_USERNAME");
	  accessKey = Environment.GetEnvironmentVariable("BROWSERSTACK_ACCESS_KEY");
	  buildName = Environment.GetEnvironmentVariable("BROWSERSTACK_BUILD_NAME");

      IWebDriver driver;
      OpenQA.Selenium.Chrome.ChromeOptions capability = new OpenQA.Selenium.Chrome.ChromeOptions();
      capability.setCapability("os", "Windows", true);
      capability.AddAdditionalCapability("os_version", "10", true);
      capability.AddAdditionalCapability("browser", "Chrome", true);
      capability.AddAdditionalCapability("browser_version", "latest", true);
      capability.AddAdditionalCapability("name", "BStack-[Jenkins] Sample Test", true); // test name
      capability.AddAdditionalCapability("build", buildName, true); // CI/CD job name using BROWSERSTACK_BUILD_NAME env variable
      capability.AddAdditionalCapability("browserstack.user", username, true);
      capability.AddAdditionalCapability("browserstack.key", accessKey, true);
            driver = new RemoteWebDriver(
              new Uri("https://hub-cloud.browserstack.com/wd/hub/"), capability
            );

            // test steps
        }
    }
}
$username = getenv("BROWSERSTACK_USERNAME");
$accessKey = getenv("BROWSERSTACK_ACCESS_KEY");
$buildName = getenv("BROWSERSTACK_BUILD_NAME");

$caps = array(
  "os" => "Windows",
  "os_version" => "10",
  "browser" => "chrome",
  "browser_version" => "latest",
  "name" => "BStack-[Jenkins] Sample Test", // test name
  "build" => $buildName, // CI/CD job name using BROWSERSTACK_BUILD_NAME env variable
);

$web_driver = RemoteWebDriver::create(
  "https://" . $username . ":" . $accessKey . "@hub-cloud.browserstack.com/wd/hub",
  $caps
);
username = os.getenv("BROWSERSTACK_USERNAME")
access_key = os.getenv("BROWSERSTACK_ACCESS_KEY")
build_name = os.getenv("BROWSERSTACK_BUILD_NAME")

caps = {
 'os': 'Windows',
 'os_version': '10',
 'browser': 'chrome',
 'browser_version': 'latest',
 'name': 'BStack-[Jenkins] Sample Test', # test name
 'build': build_name, # CI/CD job name using BROWSERSTACK_BUILD_NAME env variable
 'browserstack.user': username,
 'browserstack.key': access_key
}

driver = webdriver.Remote(
    command_executor='https://hub-cloud.browserstack.com/wd/hub',
    desired_capabilities=caps)
username = ENV["BROWSERSTACK_USERNAME"]
access_key = ENV["BROWSERSTACK_ACCESS_KEY"]
build_name = ENV["BROWSERSTACK_BUILD_NAME"]

caps = Selenium::WebDriver::Remote::Capabilities.new
caps["os"] = "Windows"
caps["os_version"] = "10"
caps["browser"] = "chrome"
caps["browser_version"] = "latest"
caps["name"] = "BStack-[Jenkins] Sample Test" # test name
caps["build"] = build_name # CI/CD job name using BROWSERSTACK_BUILD_NAME env variable
caps["browserstack.user"] = username
caps["browserstack.key"] = YOUR_ACCESS_KEY

driver = Selenium::WebDriver.for(:remote,
  :url => "https://hub-cloud.browserstack.com/wd/hub",
  :desired_capabilities => caps)
Use the following example code snippet to set environment variables and capabilities in your app tests:
String userName = System.getenv("BROWSERSTACK_USERNAME");
String accessKey = System.getenv("BROWSERSTACK_ACCESS_KEY");
String buildName = System.getenv("JENKINS_LABEL");
String app = System.getenv("BROWSERSTACK_APP_ID");

public static void main(String args[]) throws MalformedURLException, InterruptedException {
    DesiredCapabilities caps = new DesiredCapabilities();
    caps.setCapability("app", app);
    caps.setCapability("device", "Samsung Galaxy S8");
    caps.setCapability("os_version", "13.0");
    caps.setCapability("build", buildName);
}

driver = new AndroidDriver(new URL("https://"+userName+":"+accessKey+"@hub-cloud.browserstack.com/wd/hub", caps);
userName = process.env.BROWSERSTACK_USERNAME
accessKey = process.env.BROWSERSTACK_ACCESS_KEY
buildName = process.env.JENKINS_LABEL
app = process.env.BROWSERSTACK_APP_ID

var capabilities = {
    "browserstack.user" : userName,
    "browserstack.key" : accessKey,
    "app" : app,
    "build" : buildName,
    "device" : "Samsung Galaxy S23",
    "os_version" : "13.0",
}

driver = wd.promiseRemote("https://hub-cloud.browserstack.com/wd/hub");

driver
  .init(capabilities)
  //Write your code here
  .fin(function() { return driver.quit(); })
  .done();
userName = Environment.GetEnvironmentVariable("BROWSERSTACK_USERNAME");
accessKey = Environment.GetEnvironmentVariable("BROWSERSTACK_ACCESS_KEY");
buildName = Environment.GetEnvironmentVariable("JENKINS_BUILD_LABEL");
app = Environment.GetEnvironmentVariable("BROWSERSTACK_APP_ID");

DesiredCapabilities caps = new DesiredCapabilities();
caps.SetCapability("browserstack.user", userName);
caps.SetCapability("browserstack.key", accessKey);
caps.SetCapability("app", app);
caps.SetCapability("device", "Samsung Galaxy S23");
caps.SetCapability("os_version", "13");
caps.SetCapability("build", buildName);

AndroidDriver driver = new AndroidDriver(new Uri("https://hub-cloud.browserstack.com/wd/hub"), caps);
$user_name = getenv("BROWSERSTACK_USERNAME")
$access_key = getenv("BROWSERSTACK_ACCESS_KEY")
$buildName = getenv('JENKINS_LABEL');
$app = getenv("BROWSERSTACK_APP_ID")


$capabilities = new DesiredCapabilities();
$capabilities->setCapability("app", app);
$capabilities->setCapability("device", 'Samsung Galaxy S23');
$capabilities->setCapability("os_version", '13');
$capabilities->setCapability("build", buildName);


$driver = RemoteWebDriver::create("https://"+user_name+":"+access_key+"@hub-cloud.browserstack.com/wd/hub", $capabilities);
user_name = os.getenv("BROWSERSTACK_USERNAME")
access_key = os.getenv("BROWSERSTACK_ACCESS_KEY")
build_name = os.getenv("JENKINS_LABEL")

app = os.getenv("BROWSERSTACK_APP_ID")

desired_cap = {
    'app': app,
    'device': 'Samsung Galaxy S23',
    'os_version': '13'
    'build': build_name
}

driver = webdriver.Remote("https://"+user_name+":"+access_key+"@hub-cloud.browserstack.com/wd/hub", desired_cap)
user_name = ENV["BROWSERSTACK_USERNAME"]
access_key = ENV["BROWSERSTACK_ACCESS_KEY"]

build_name = ENV["JENKINS_LABEL"]

app = ENV["BROWSERSTACK_APP_ID"]

desired_caps = {
    'app': app,
    'device': 'Samsung Galaxy S23',
    'os_version': '13.0',
    'build': build_name
}


appium_driver = Appium::Driver.new({
    'caps' => desired_caps,
    'appium_lib' => {
        :server_url => "https://#{user_name}:#{access_key}@hub-cloud.browserstack.com/wd/hub"
    }}, true)
Step 2: Add commands in Jenkinsfile to run test
Add commands in your Jenkinsfile to run your test using the following steps:
- Go to the
Jenkinsfileof your project. - Add the commands and wrap all the test commands inside the
browserStackstatement, as follows. To run parallel tests, add the command used to run parallel tests.
Step 3: Enable reporting in Jenkins
Enable reporting in Jenkins using the following steps:
- Go to the
Jenkinsfileof your project. - Add the following code statement after the
browserstackblock in the Jenkinsfile:// Enable reporting in Jenkins browserStackReportPublisher 'automate'
A sample Jenkinsfile that uses the browserStackReportPublisher 'automate' statement is as follows:
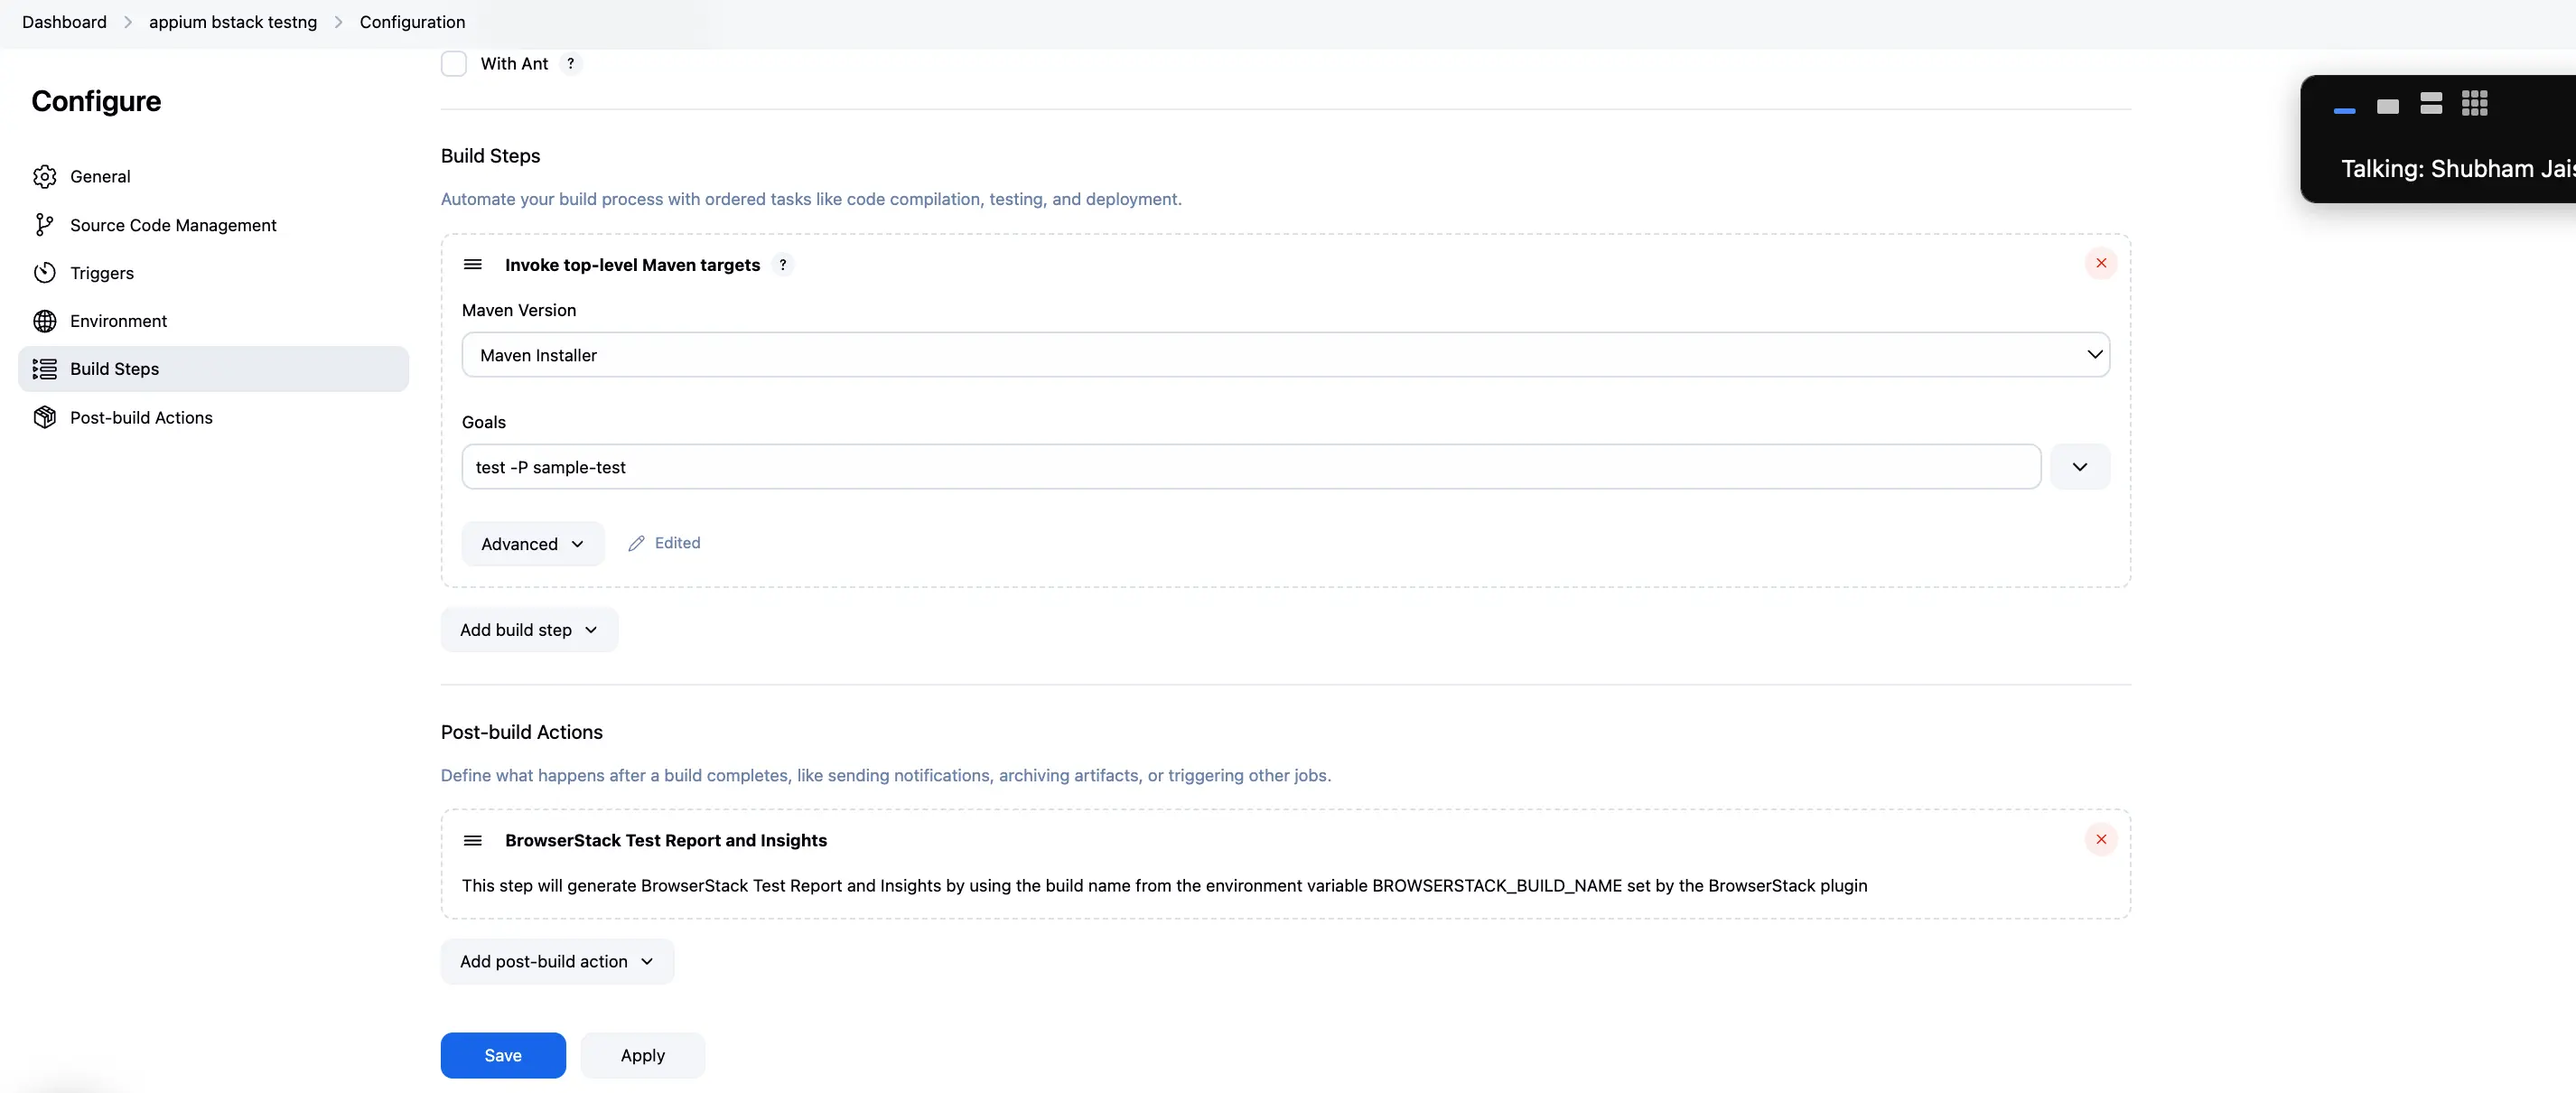
Integrate BrowserStack TRA with Jenkins using post-build actions in Jenkins
In Jenkins, you can set up post-build actions for BrowserStack Report Integration. To do this, complete the following steps:
- In Jenkins, click Configure.
- In the Post-build Actions section, click Add post-build action.
- Select BrowserStack Test Report and Insights.
View test reports in Jenkins
The BrowserStack Jenkins plugin enables you to embed the test results from BrowserStack TRA into Jenkins. The report gives an overall summary of the test build and its sessions.
Ensure that you set the build capability to the BROWSERSTACK_BUILD_NAME environment variable in your test script without which the plugin fails to generate and embed reports in Jenkins. Check out the Using Environment variables section to learn about environment variables.
With this integration, you can now view the results of your tests run on BrowserStack within Jenkins.

Click either View Full BrowserStack Report or BrowserStack Test Report link in the left navigation bar to view the list of test sessions.
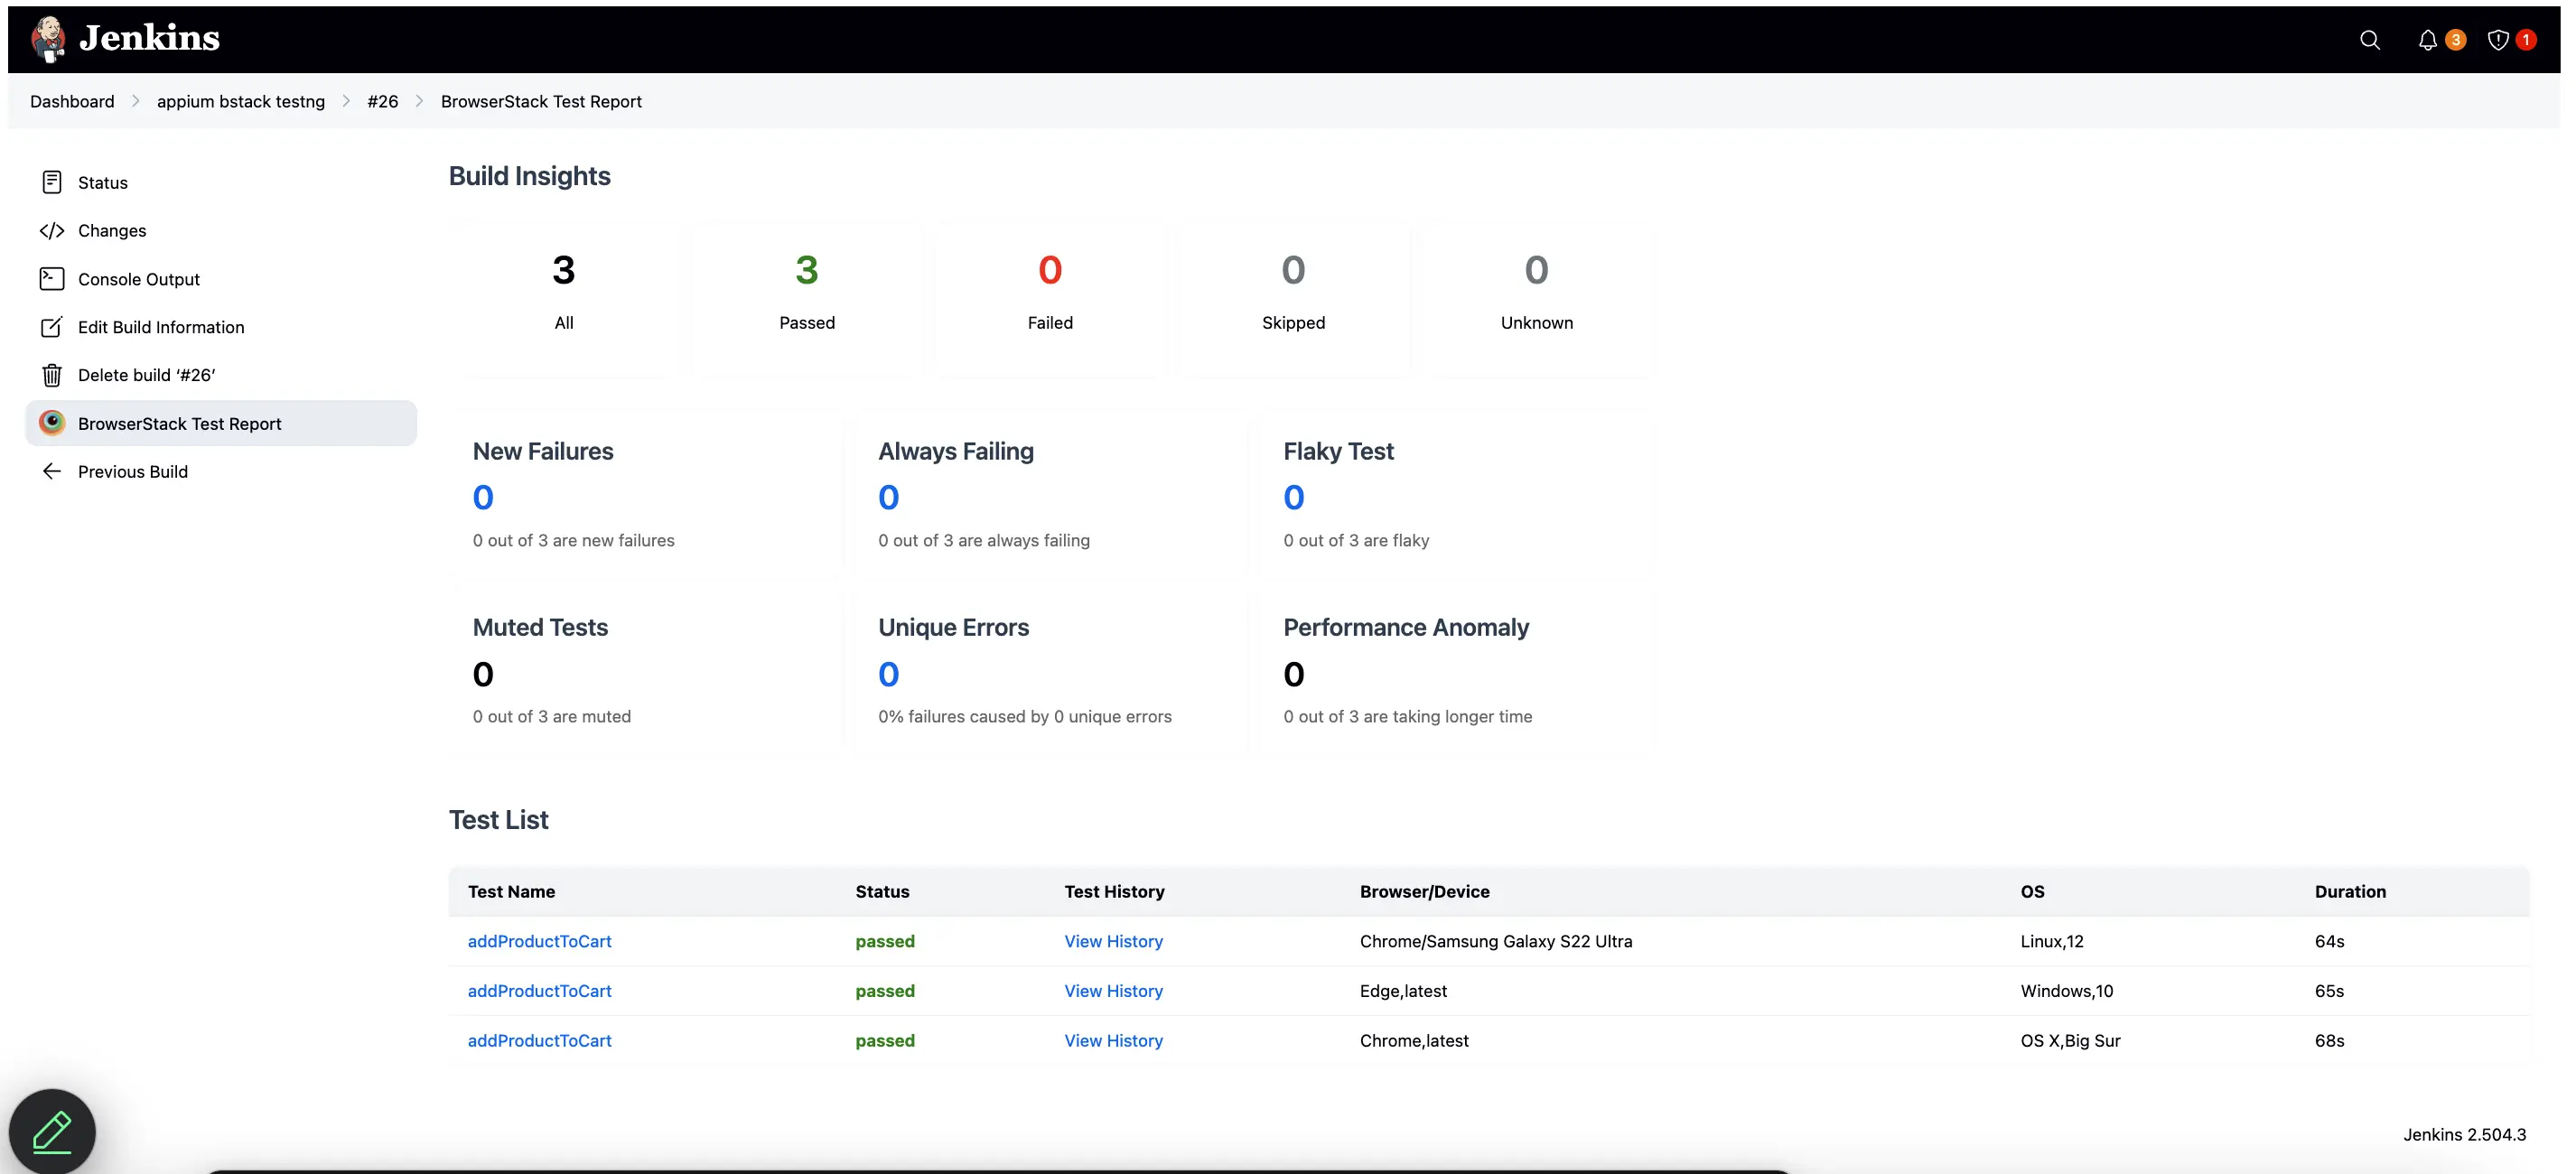
Selecting any session from this table redirects you to the dashboard where you can view video recording, text logs, and other debugging options for a session.
This plugin also supports integration with the reporting framework in Java - TestNG and JUnit & NodeJS - Protractor and WebdriverIO. Check out the integrate Jenkins with reporting frameworks section to learn about the integration steps.
Rerun failed tests
You can rerun failed tests from the BrowserStack Test Reporting & Analytics dashboard after integrating Jenkins. For more information, refer to rerun failed tests using Jenkins
We're sorry to hear that. Please share your feedback so we can do better
Contact our Support team for immediate help while we work on improving our docs.
We're continuously improving our docs. We'd love to know what you liked
We're sorry to hear that. Please share your feedback so we can do better
Contact our Support team for immediate help while we work on improving our docs.
We're continuously improving our docs. We'd love to know what you liked
Thank you for your valuable feedback!