Integrate Appium tests using Python SDK
Integrate your Appium tests written in Python SDK on real iOS and Android real devices with BrowserStack App Automate
Ready to integrate your existing Python Appium test suite with BrowserStack? This document walks you through the simple steps to connect your tests to our cloud infrastructure and start running them on real devices. You’ll learn how to configure your environment, upload your app, and execute tests seamlessly on BrowserStack’s device cloud.
Prerequisites
Looking for a starter project? Get started with our Python sample project.
Integration steps
Complete the following steps to integrate your Python test suite using BrowserStack SDK.
Install BrowserStack Python SDK
Execute the following commands to install BrowserStack Python SDK for plug-and-play integration of your test suite with BrowserStack.
Unable to install BrowserStack SDK?
If you can’t install BrowserStack SDK due to sudo privilege issues, create a virtual environment and execute the adjacent installation commands again.
python3 -m venv env
source env/bin/activate
python3 -m venv env
.\env\Scripts\Activate.ps1
Upload app
Upload your Android (.apk) or iOS (.ipa) apps to BrowserStack servers using one of the following ways:
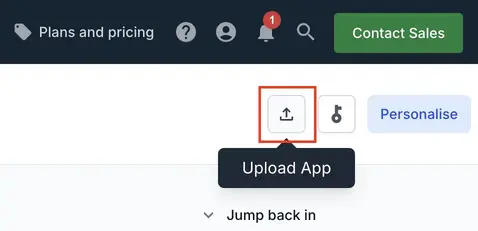
Upload app using the App Automate dashboard
On the App Automate dashboard, click the Upload button on the top-right corner. Select the app you want to upload from your filesystem.
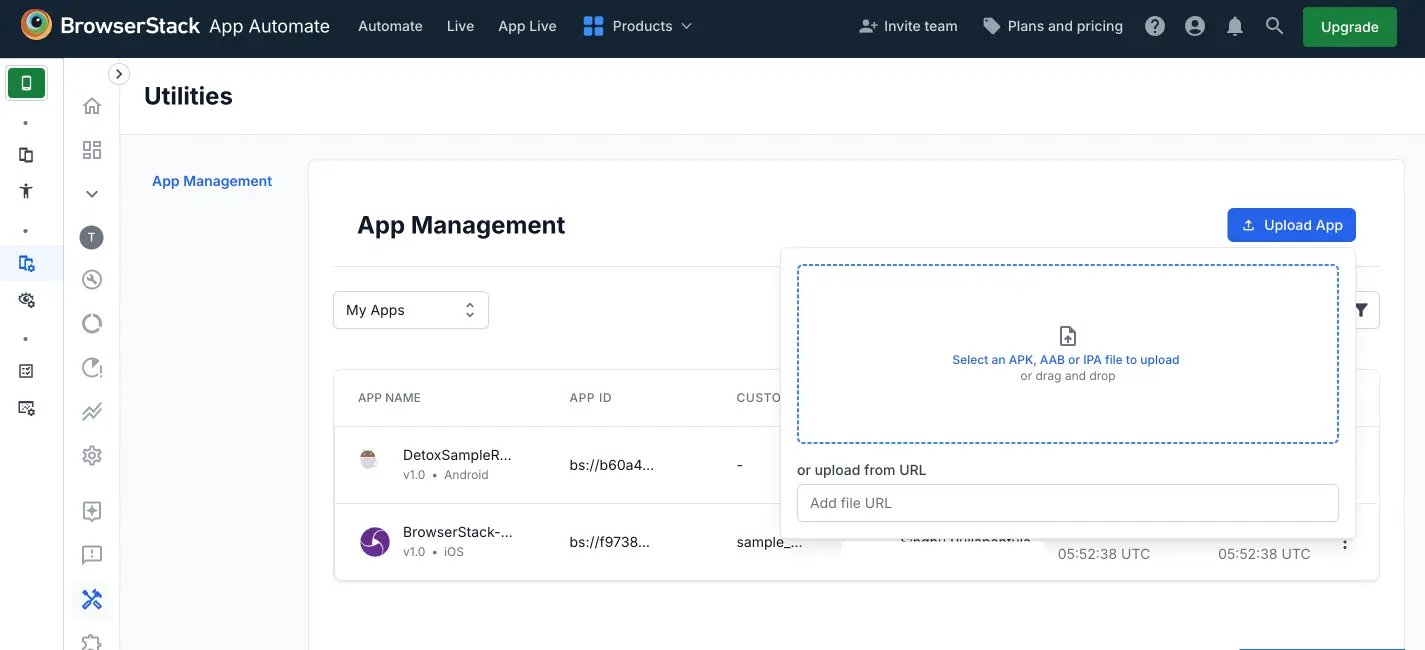
Upload app using App Management UI
To upload an app using the App Management UI, follow the steps below:
-
Navigate to App Automate dashboard, on the sidebar, click App Management.
-
On the App Management UI, click Upload App.
-
Select the app you want to upload from your filesystem. If you are uploading the app using a public URL, paste the URL of your app in the or upload from URL box.
-
After selecting the app, choose the App Automate framework you want to use for testing. You can optionally add flags and a custom ID.
-
Click Upload. The app is uploaded to the BrowserStack servers. You’ll receive an App ID, which you can use to run tests.
To manage your apps, refer to the documentation on managing apps using App Management UI.
Facing issues with app upload? Visit the Troubleshooting section at the bottom of this page.
Create your BrowserStack config file
Once you have installed the SDK, create a browserstack.yml config file at the root level of your project. This file holds all the required capabilities to run tests on BrowserStack.
Set app to be tested
The app property determines the app to be tested. You can upload an Android app (.apk or .aab file) or an iOS app (.ipa file) from your local filesystem.
| Supported method | Description |
|---|---|
| path(Recommended) | SDK uploads the app using the specified relative or absolute path. Eg: app: ./SampleApp.apk. |
Check out how to create IPA files for iOS app testing on BrowserStack.
Set the path to your app. Or, if you have already uploaded your app, provide one of the other acceptable app property values here

Other acceptable app property values
You can use BrowserStack REST API to upload your app.
Following is a sample response that is generated when you upload an app using any of the mentioned methods:
 {
    "app_url":"bs://f7c874f21852ba57957a3fdc33f47514288c4ba4",
    "custom_id":"SampleApp"
 }
The following table explains the other acceptable app property values:
| Supported method | Description |
|---|---|
| app_url | Uploaded app’s app_url is a valid value for app property.Eg: app: bs://45e1c1473b17b7643aed1761f51cb5cdf3d3e334
|
| custom_id | If you’ve defined a custom_id while uploading your app, the same value can be used as app property value.Eg: app: CalculatorApp
|
Check out how to specify the application under test to understand the above options better.
Set platforms to test on
Set the devices you want to test under the platforms object.
Do you want to dynamically configure platforms?
To dynamically configure platforms across different tests, you can comment out the platforms capability while still passing platform-specific capabilities.
For a complete list of available devices and their versions, refer to the App Automate supported devices page.
 Configure AI Agents
You can enable the following AI agents by adding the respective configurations in your browserstack.yml file:
BrowserStack Reporting (part 1/2)
You can leverage BrowserStack’s extensive reporting features using the following capabilities:
Set a name to your build (usually the same as the build ID that’s on your CI/CD platform).
Accepted characters: A-Z, a-z, 0-9, ., :, -, [], /, @, &, ', _. All other characters are ignored.
Character limit: 255
Set a project name for your project
The projectName and buildName config must be static and not change across different runs of the same build. This is a deviation in approach as specified by BrowserStack Automate or App Automate as Test Reporting & Analytics will automatically identify different build runs.
Restrict the characters in your projectName and buildName to alphanumeric characters (A-Z, a-z, 0-9), underscores (_), colons (:), square brackets ([, ]), and hyphens (-). Any other character will be replaced with an underscore (_).
Enable Local Testing and debugging features
To enhance your testing experience on BrowserStack, you can enable additional features such as Local Testing and debugging features by adding the respective capabilities in your browserstack.yml file.
Enable BrowserStack Local
To enable testing of apps hosted on your local machine or behind a firewall, you can use BrowserStack Local Testing. This feature creates a secure tunnel between your local machine and the BrowserStack cloud, allowing you to test your apps in real-time. For more information, refer to the Local Testing documentation.
browserstackLocal: true
Enable debugging features
- Visual logs enable you to automatically capture screenshots for various Appium commands executed in your test session.
- Network logs help you to get a clear picture of all the network requests (e.g. REST API calls) originating from your app, and the time taken for each of these requests. For more information, refer to the documentation on view logs and debug tests.
By default, BrowserStack provides prettified session logs, screenshots on every failed Appium command, and a video of the entire test. Additionally, you can enable the following logs by setting the respective capabilities in yourbrowserstack.ymlfile:
debug: true
networkLogs: true
Create browserstack.yml file
Copy the code snippet to create browserstack.yml file in the root folder of your test suite.
You can also pass regular expressions (regex) in deviceName and platformVersion capabilities if your device selection is more flexible. Check out how to use regular expressions to specify device attributes.
Use our Capability Generator to select from a comprehensive set of options you can use to customize your tests.
BrowserStack Reporting (part 2/2)
Test assertions are specific to selected language frameworks. BrowserStack requires explicit instruction to determine whether your tests have passed or failed based on the assertions in your test script.
Mark session name
You can use the sessionName capability to give your session a name (usually describing the test case) so that it is easy for you to debug later.
Mark test as passed or failed
To mark whether your test has passed or failed on BrowserStack, use the following Javascript executor in your test script.
The arguments passed in the Javascript method for setting the status and the corresponding reason of the test are status and reason.
-
statusaccepts eitherpassedorfailedas the value -
reasonaccepts a value in string datatype
Run your test suite
Your test suite is now ready to run on BrowserStack. Execute the following command from the project’s root directory(android/ios) to run your test suite with BrowserStack.
To find out the location of the BrowserStack SDK log files, refer to BrowserStack SDK Log Files. If you are looking for more information, see FAQ documentation.
- After you run your test, visit the App Automate dashboard to view your test results.
- If you want to toggle between BrowserStack and your Local device grid when using BrowserStack SDK, refer to the commands here.
Facing issues with your project? Try running a sample build here.
Advanced features and use cases
Here’s a list of features and capabilities you may find useful.
Accept insecure certificates
The acceptInsecureCerts capability suppresses warning about self-signed certificates usually found in staging environments.
| Capability | Expected values |
|---|---|
acceptInsecureCerts |
A boolean. Default is False.True if you want to accept all SSL certificates. |
Change device orientation
The deviceOrientation capability changes the default mobile screen orientation for your tests on BrowserStack infra.
- If the parameter is set at the root level, its applicable to all the devices in the test.
- If you wish to apply it to a specific device, set it at the platform level which has the device details.
| Capability | Description | Expected values |
|---|---|---|
deviceOrientation |
Set the orientation of your app before beginning your test | A string. Default orientation is portrait. Supported orientations: portrait and landscape. |
Simulate IP geolocation
The geoLocation capability lets you test your app across different countries.
Note that this capability is supported on the Enterprise plan only. You can contact sales to get an Enterprise plan for your account.
| Capability | Description | Expected values |
|---|---|---|
geoLocation |
Set the country code you want your test to detect | A string. An ISO 2 country code FR for France, CN for China Check out the complete list of 45+ countries we support. |
Simulate network conditions
The networkProfile capability lets you test your app under different network conditions.
| Capability | Description | Expected values |
|---|---|---|
networkProfile |
Set the network profile to start the test with | A string. 2g-gprs-good, 4g-lte-advanced-lossy |
Others
Following are a few additional links to documentation pages that might help with your test scenarios:
Troubleshooting
Here’s a list of troubleshooting options you may find useful.
Errors faced during app upload
When you upload your app to BrowserStack, make sure that the app file and its path or URL are valid. If you see an error during app upload, first check the following:
- The file path is correct and the app file exists on your machine.
- The app URL is publicly accessible and not behind a firewall or authentication.
- The app file type is supported by BrowserStack. You can upload your app from the App Automate dashboard, App Management UI, or by using the REST API. For detailed information on uploading and managing apps, refer to Uploading and managing apps.
Invalid device OS combination errors
If you face errors related to invalid device OS combinations, ensure that the device and OS version combinations you are trying to run your tests on are supported on BrowserStack.
- For detailed information on selecting devices, refer to the Select devices documentation.
- To use regular expressions to specify device attributes, refer to the Using regex to select devices documentation.
- To check the list of supported OS versions for devices on BrowserStack, refer to the App Automate supported devices documentation.
Resigned Apps and Third-Party Library Integration Issues
-
Uploading an unsigned version of an Android app will require us to sign it with our certificates before installing it on our devices. In the same manner, any uploaded
.aabfiles will be converted into a universal APK and signed with our certificates. -
If BrowserStack resigns the apps, third-party library integrations such as Google Firebase services, Google Maps SDK, Facebook SDK, etc., may not function properly if the use of API keys is restricted based on the SHA-1 certificate fingerprint of the app’s signing key.
-
To prevent this issue, it’s recommended to sign the APK with your own certificates before uploading it to BrowserStack.
Disabling Re-Signing for iOS Apps
- If you upload an iOS app, we will re-sign the app with our own provisioning profile to be able to install your app on our devices during test execution.
- However, if your app is signed using the Apple Developer Enterprise Program, you can disable this behavior to test features such as push notifications on BrowserStack devices.
| Capability | Expected values |
|---|---|
resignApp |
A boolean. To disable re-signing, set the capability to false in your Appium test scripts. |
Next steps
Once you have successfully integrated your test suite with BrowserStack, you might want to check the following:
- Generate a list of capabilities that you want to use in tests
- Find information about your Projects, Builds and Sessions using our REST APIs
- Set up your CI/CD: Jenkins, Bamboo, TeamCity, Azure, CircleCI, TravisCI.
We're sorry to hear that. Please share your feedback so we can do better
Contact our Support team for immediate help while we work on improving our docs.
We're continuously improving our docs. We'd love to know what you liked
We're sorry to hear that. Please share your feedback so we can do better
Contact our Support team for immediate help while we work on improving our docs.
We're continuously improving our docs. We'd love to know what you liked
Thank you for your valuable feedback!