Data-driven testing
Learn how to use test datasets in App Low Code Automation to run a single test against multiple data combinations from a CSV file or a database.
Data driven testing lets you run a single test against multiple sets of data without duplicating the test. Instead of building a separate test for each scenario, you create a test dataset, map its columns to variables in your test steps, and App Low Code Automation runs the test once for every row in the dataset.
Sample use case:
Suppose you want to verify the login flow with several username and password combinations. Instead of creating a separate test for each combination, you create one test dataset with a username column and a password column, add a row for each combination, and reference those columns in your login steps. App Low Code Automation runs the test once per row, covering every combination in a single run.
Use a test dataset when you want to validate the same flow across different inputs. Data driven testing helps you:
- Test multiple scenarios efficiently with a single test.
- Expand test coverage by adding more rows to a dataset.
- Reduce maintenance by keeping data separate from test steps.
- Automate repetitive flows such as login, search, and form submission.
You can build a test dataset in two ways:
Create a test dataset
To create a test dataset:
- In the left pane, expand Data configuration and click Test dataset.
-
Click + Add Test Dataset. The Upload test dataset dialog appears.
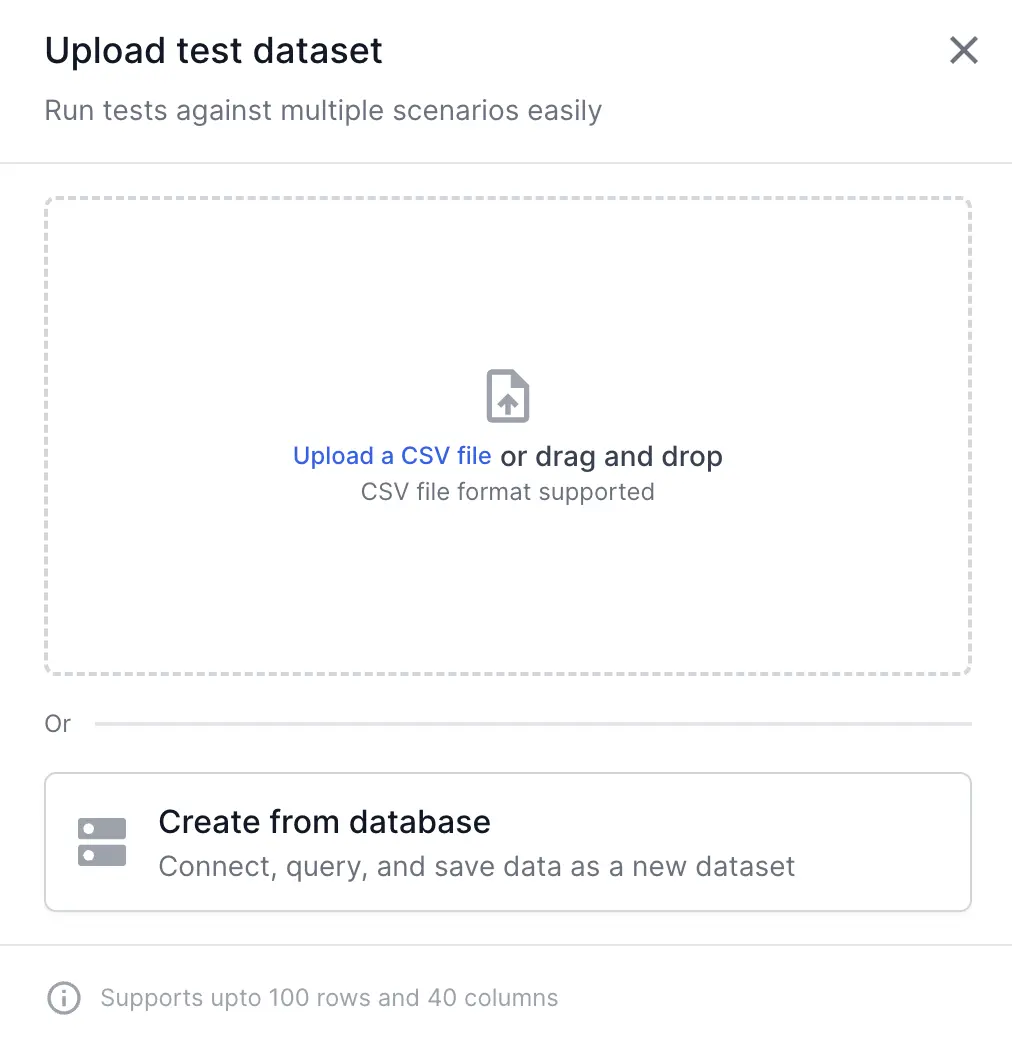
- Choose one of the following methods:
- Upload a CSV file to build a dataset from a file.
- Create from database to build a dataset from a connected database.
Upload a CSV file
In the Upload test dataset dialog, click Upload a CSV file or drag and drop the file into the upload area. The CSV file must meet the following requirements:
- Use the CSV file format.
- Keep the same number of columns in every row.
- Keep each value within 1,000 characters.
- Include a maximum of 100 rows and 40 columns.
- Use the first row as the header row. App Low Code Automation treats the header values as variable names.
- Include at least one row of data in addition to the header row.
After the upload completes, the dataset appears in the Test dataset list. Click a dataset row to open it and verify the data. The dataset view shows the imported rows and columns, and you can use Add Row, Add Column, or Update csv to modify the data.
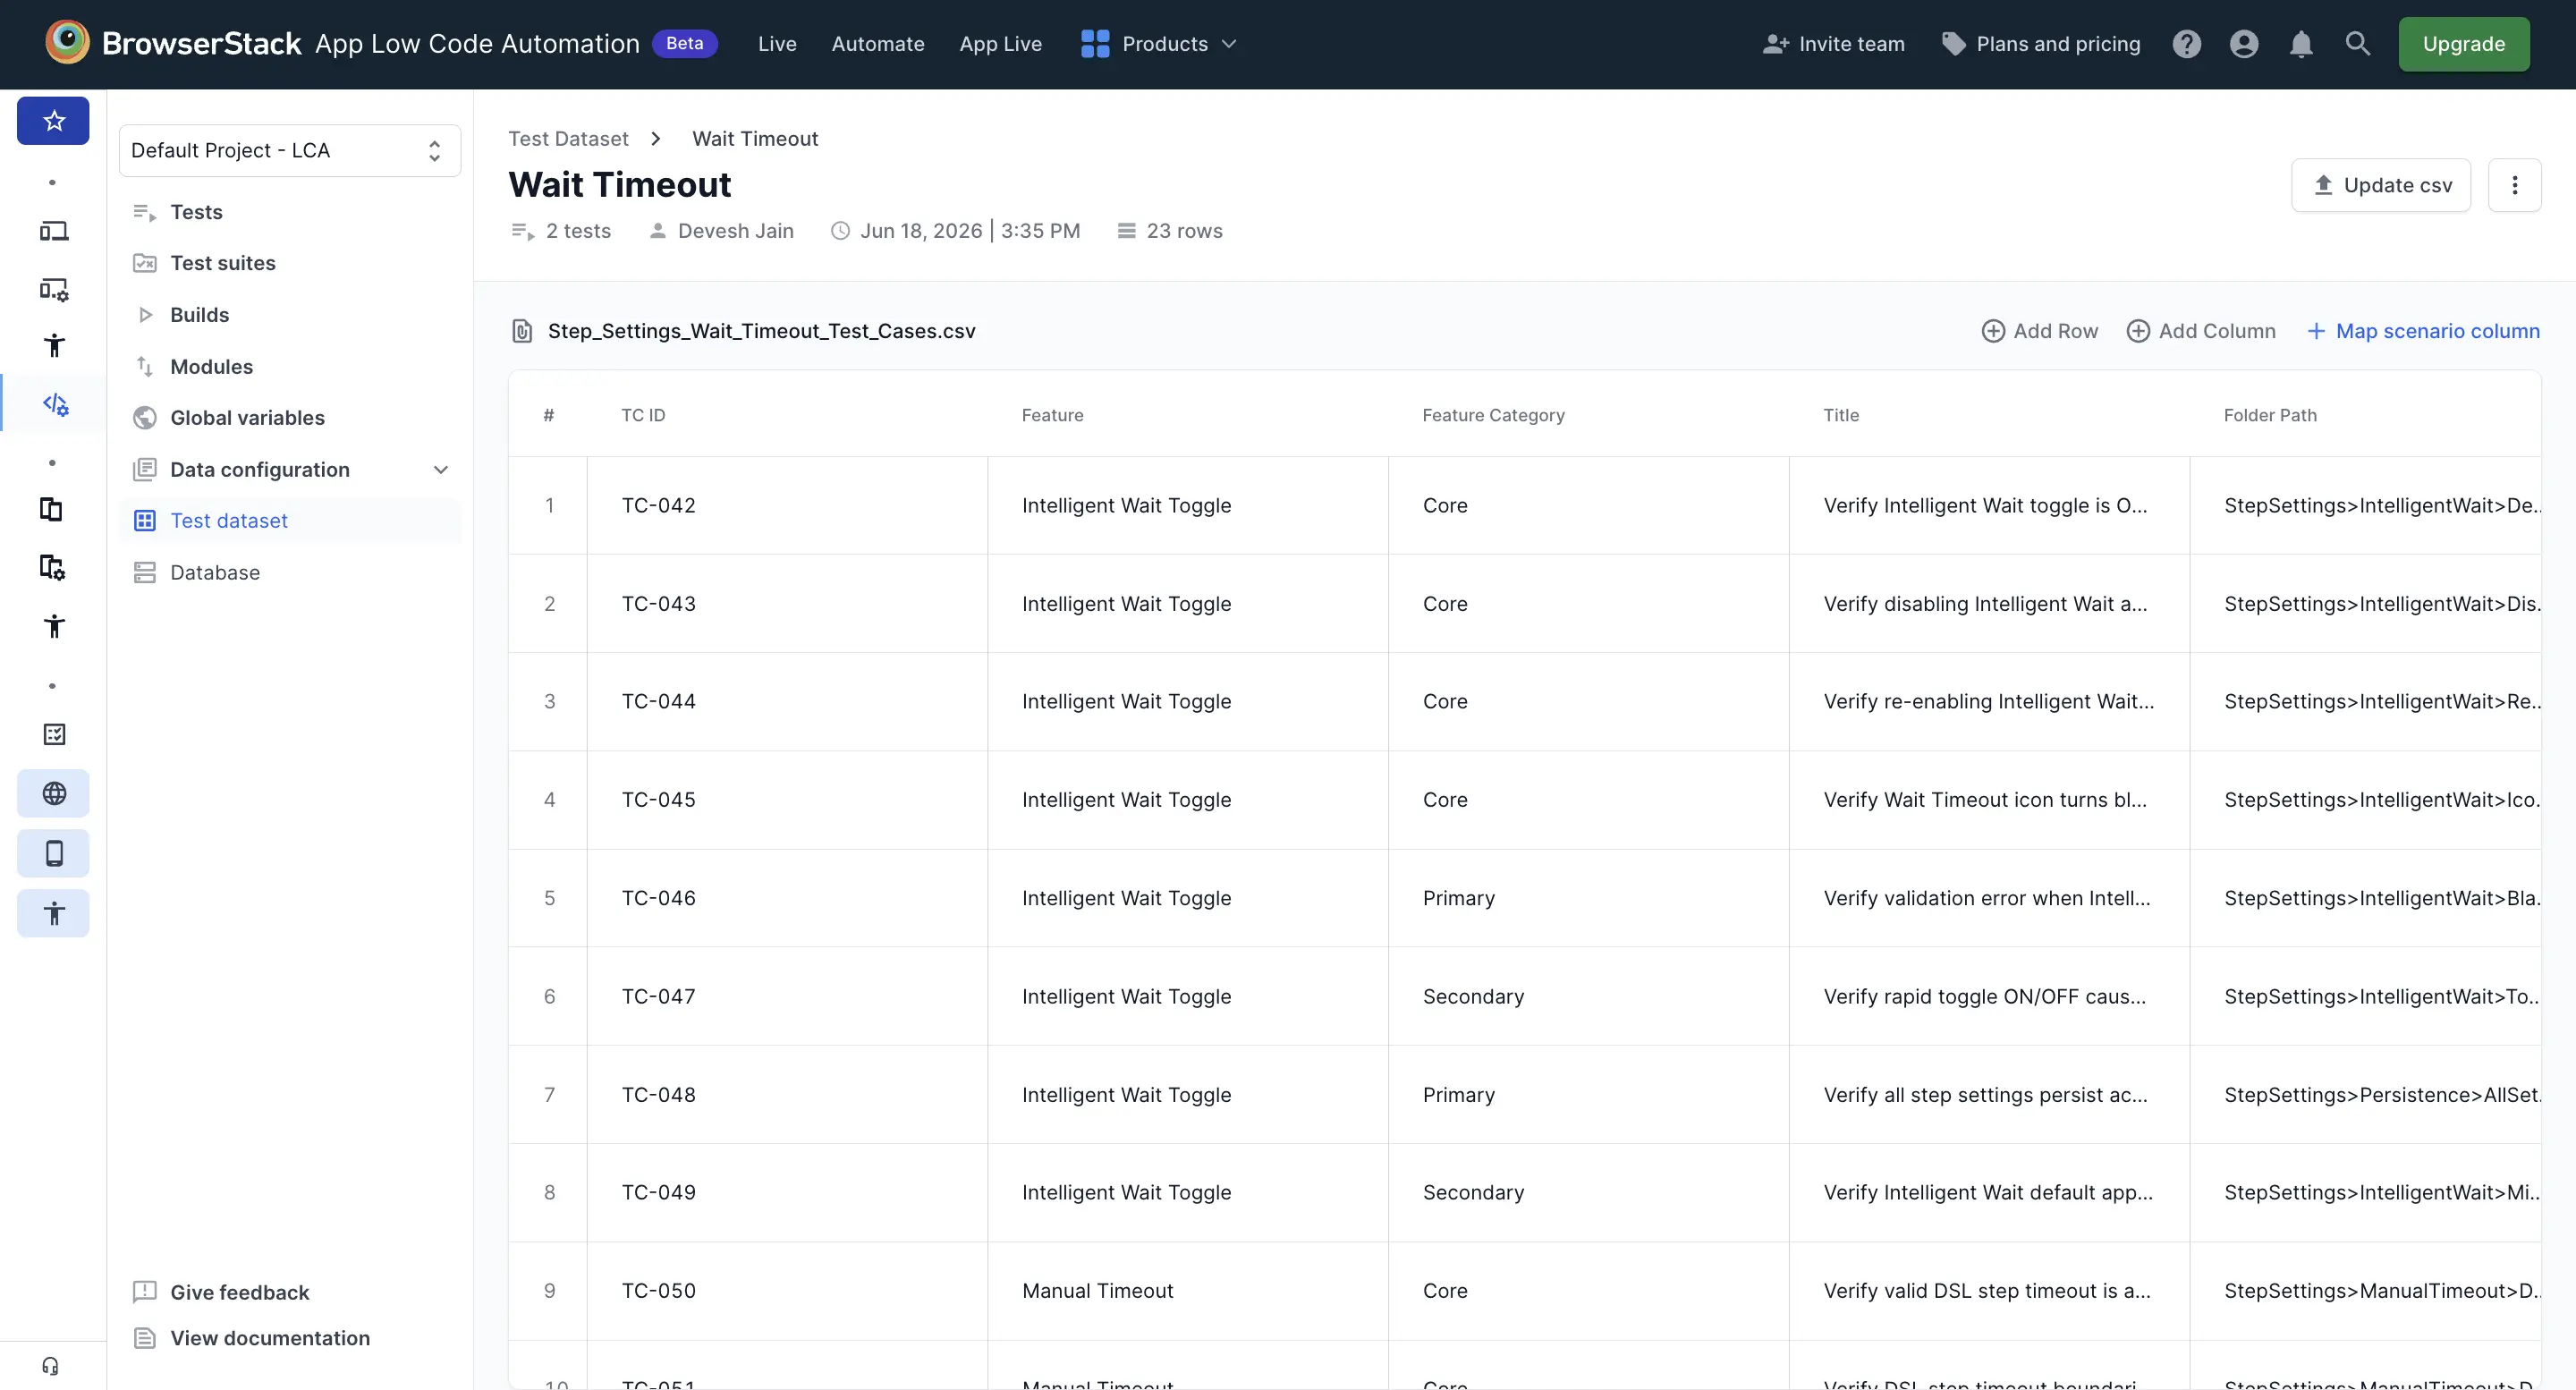
The first row of the CSV file is always treated as the header row. The header values become the variable names you reference in your test steps, so use clear, descriptive column names.
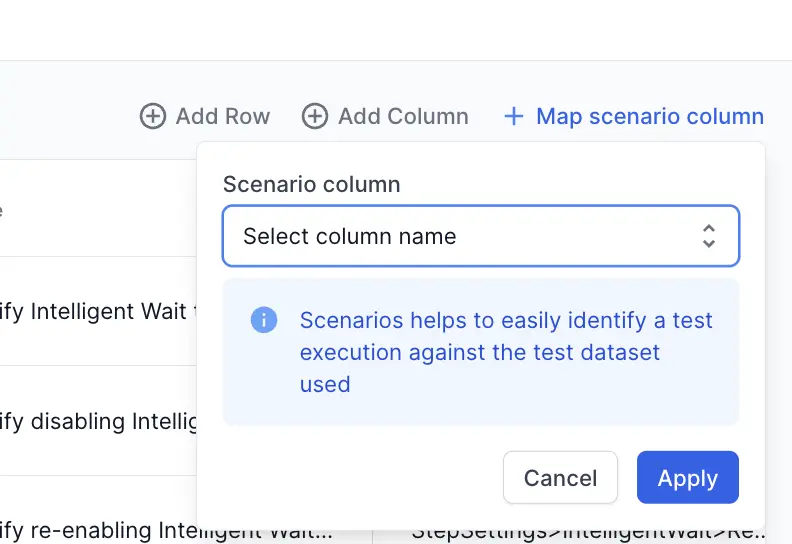
Map a scenario name column
A scenario name column labels each row so you can identify it in build reports and execution logs. After you create a dataset, you can map any column as the scenario name column.
To map a scenario name column, open the dataset and click + Map scenario column, then select the column you want to use as the label. App Low Code Automation uses the values in that column to represent each row in the build report.
Create a dataset from a database
You can build a dataset directly from a connected database instead of uploading a CSV file. App Low Code Automation supports MySQL and PostgreSQL databases.
Only connections to public databases are supported. Database credentials are stored securely, and network connections might require firewall configuration or IP allowlisting.
To create a dataset from a database:
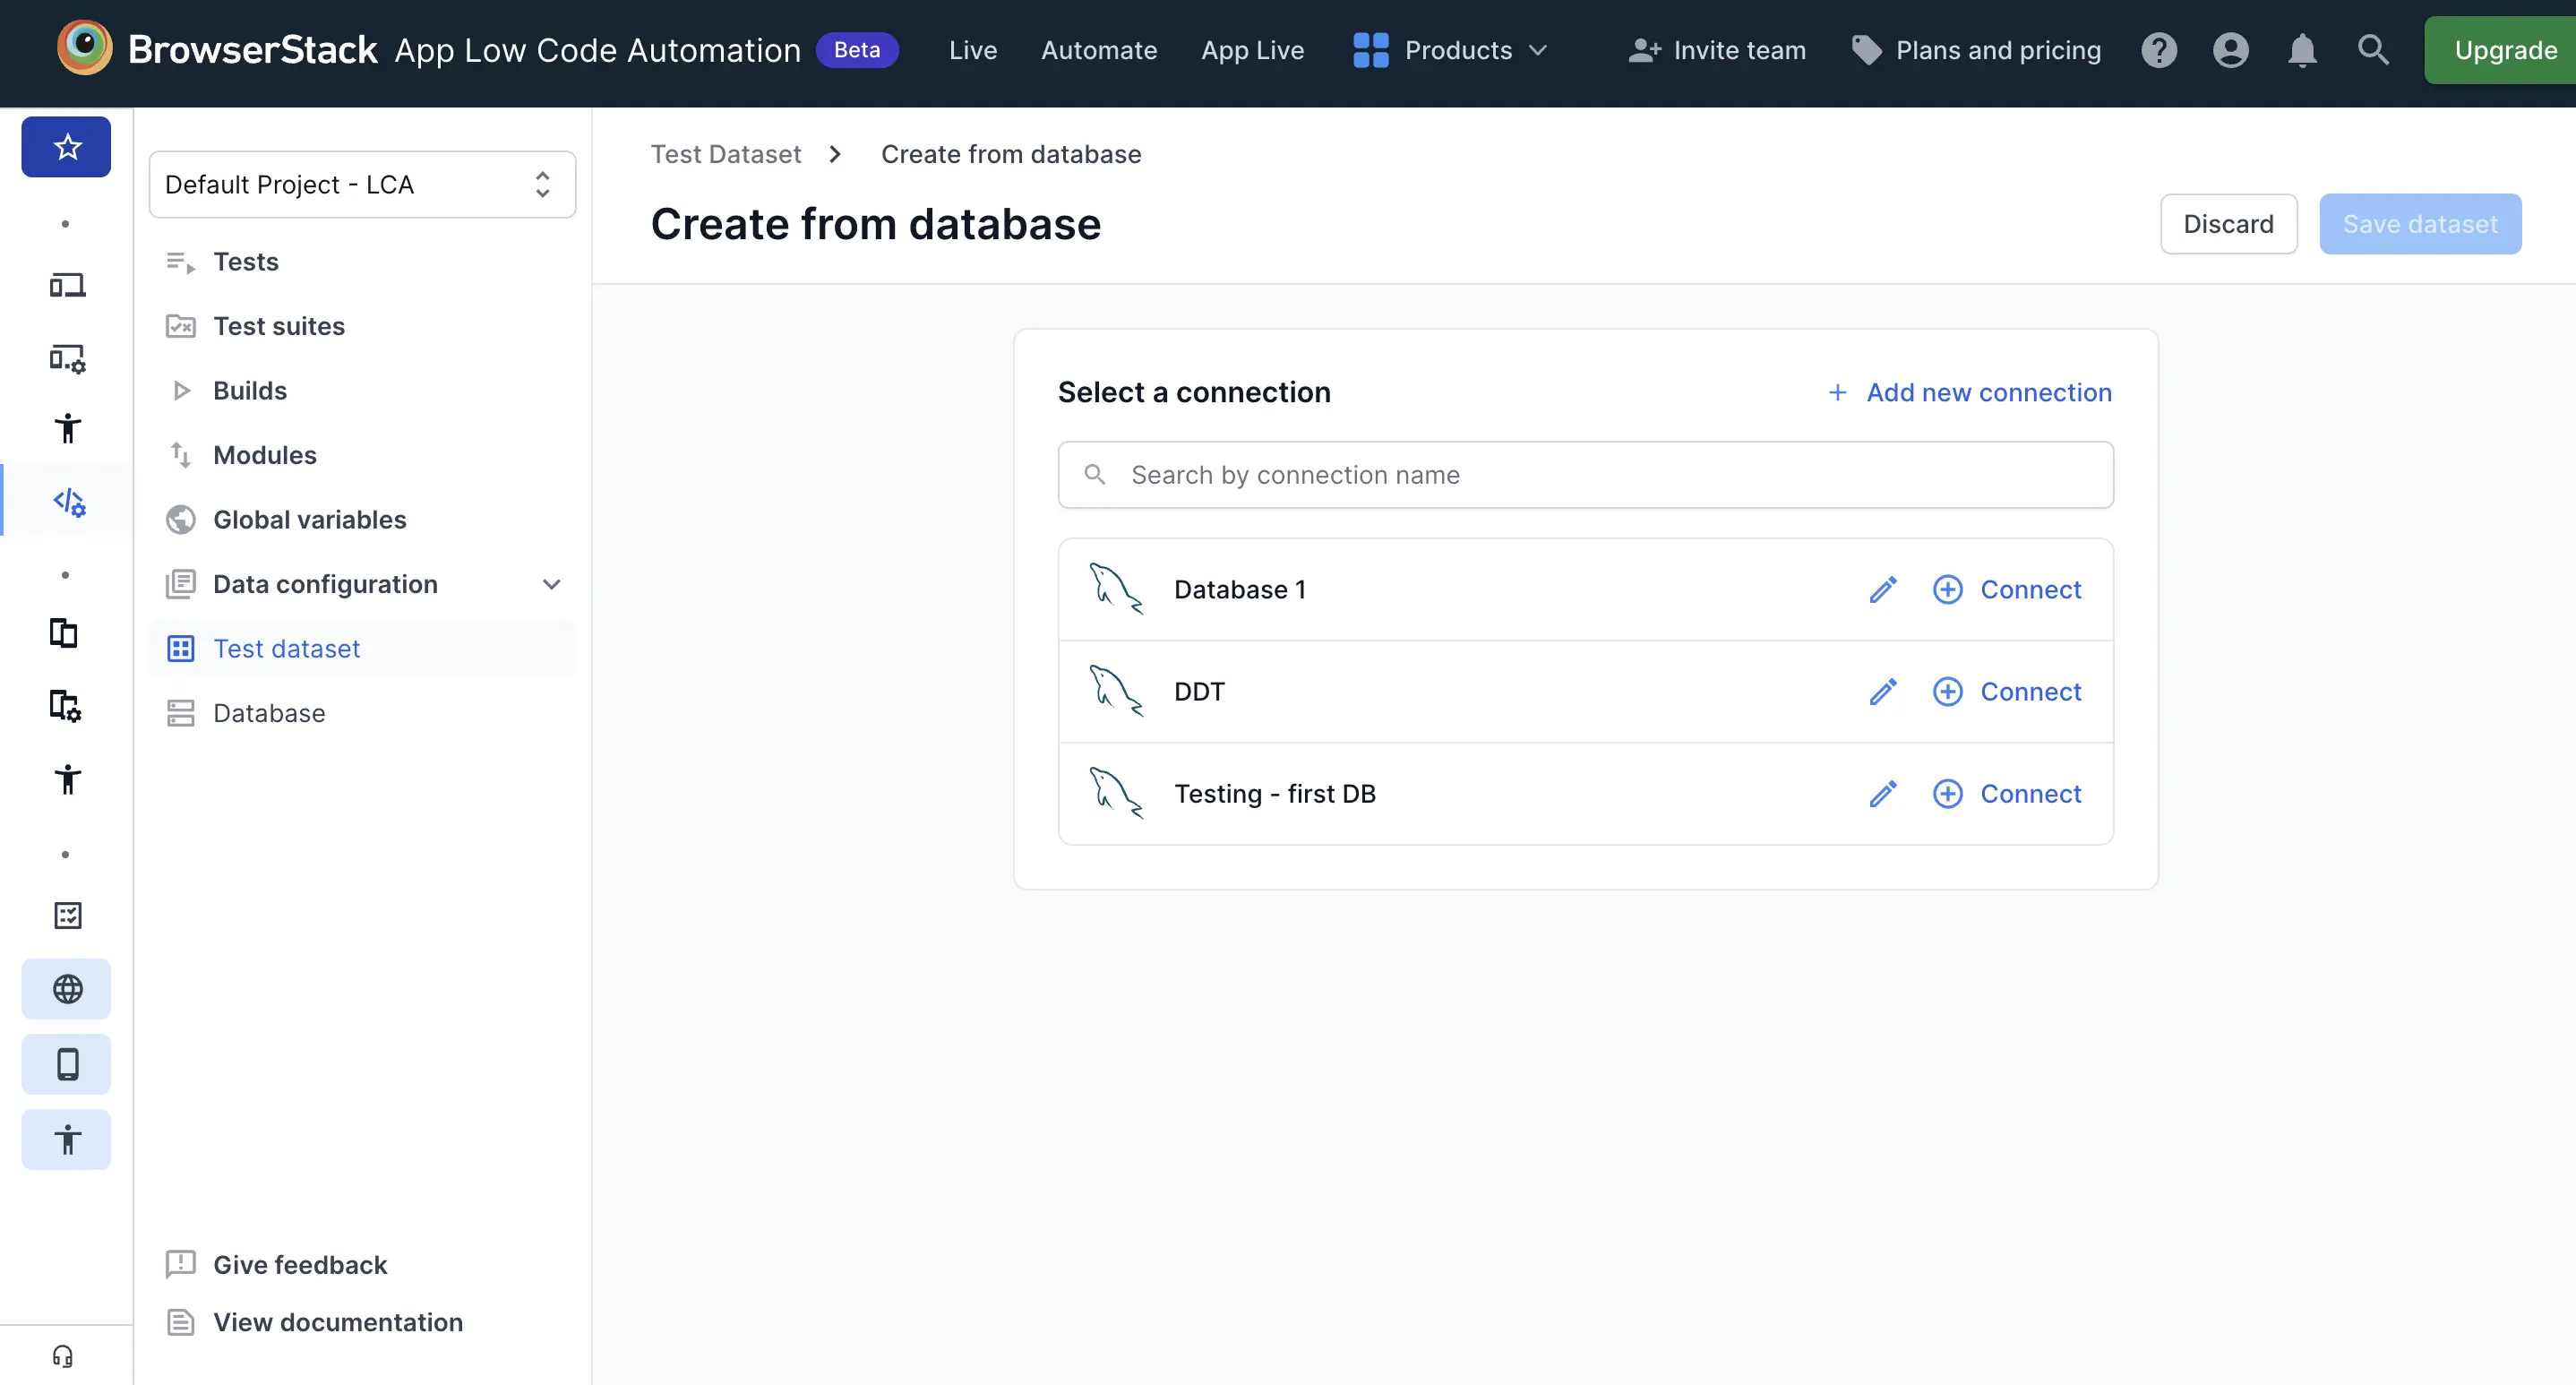
- In the Upload test dataset dialog, click Create from database.
- On the Create from database page, select an existing connection from the list, or click + Add new connection to configure a new one.
-
Click Connect next to the connection you want to use, query the data, and click Save dataset. The query results are saved as a new test dataset.
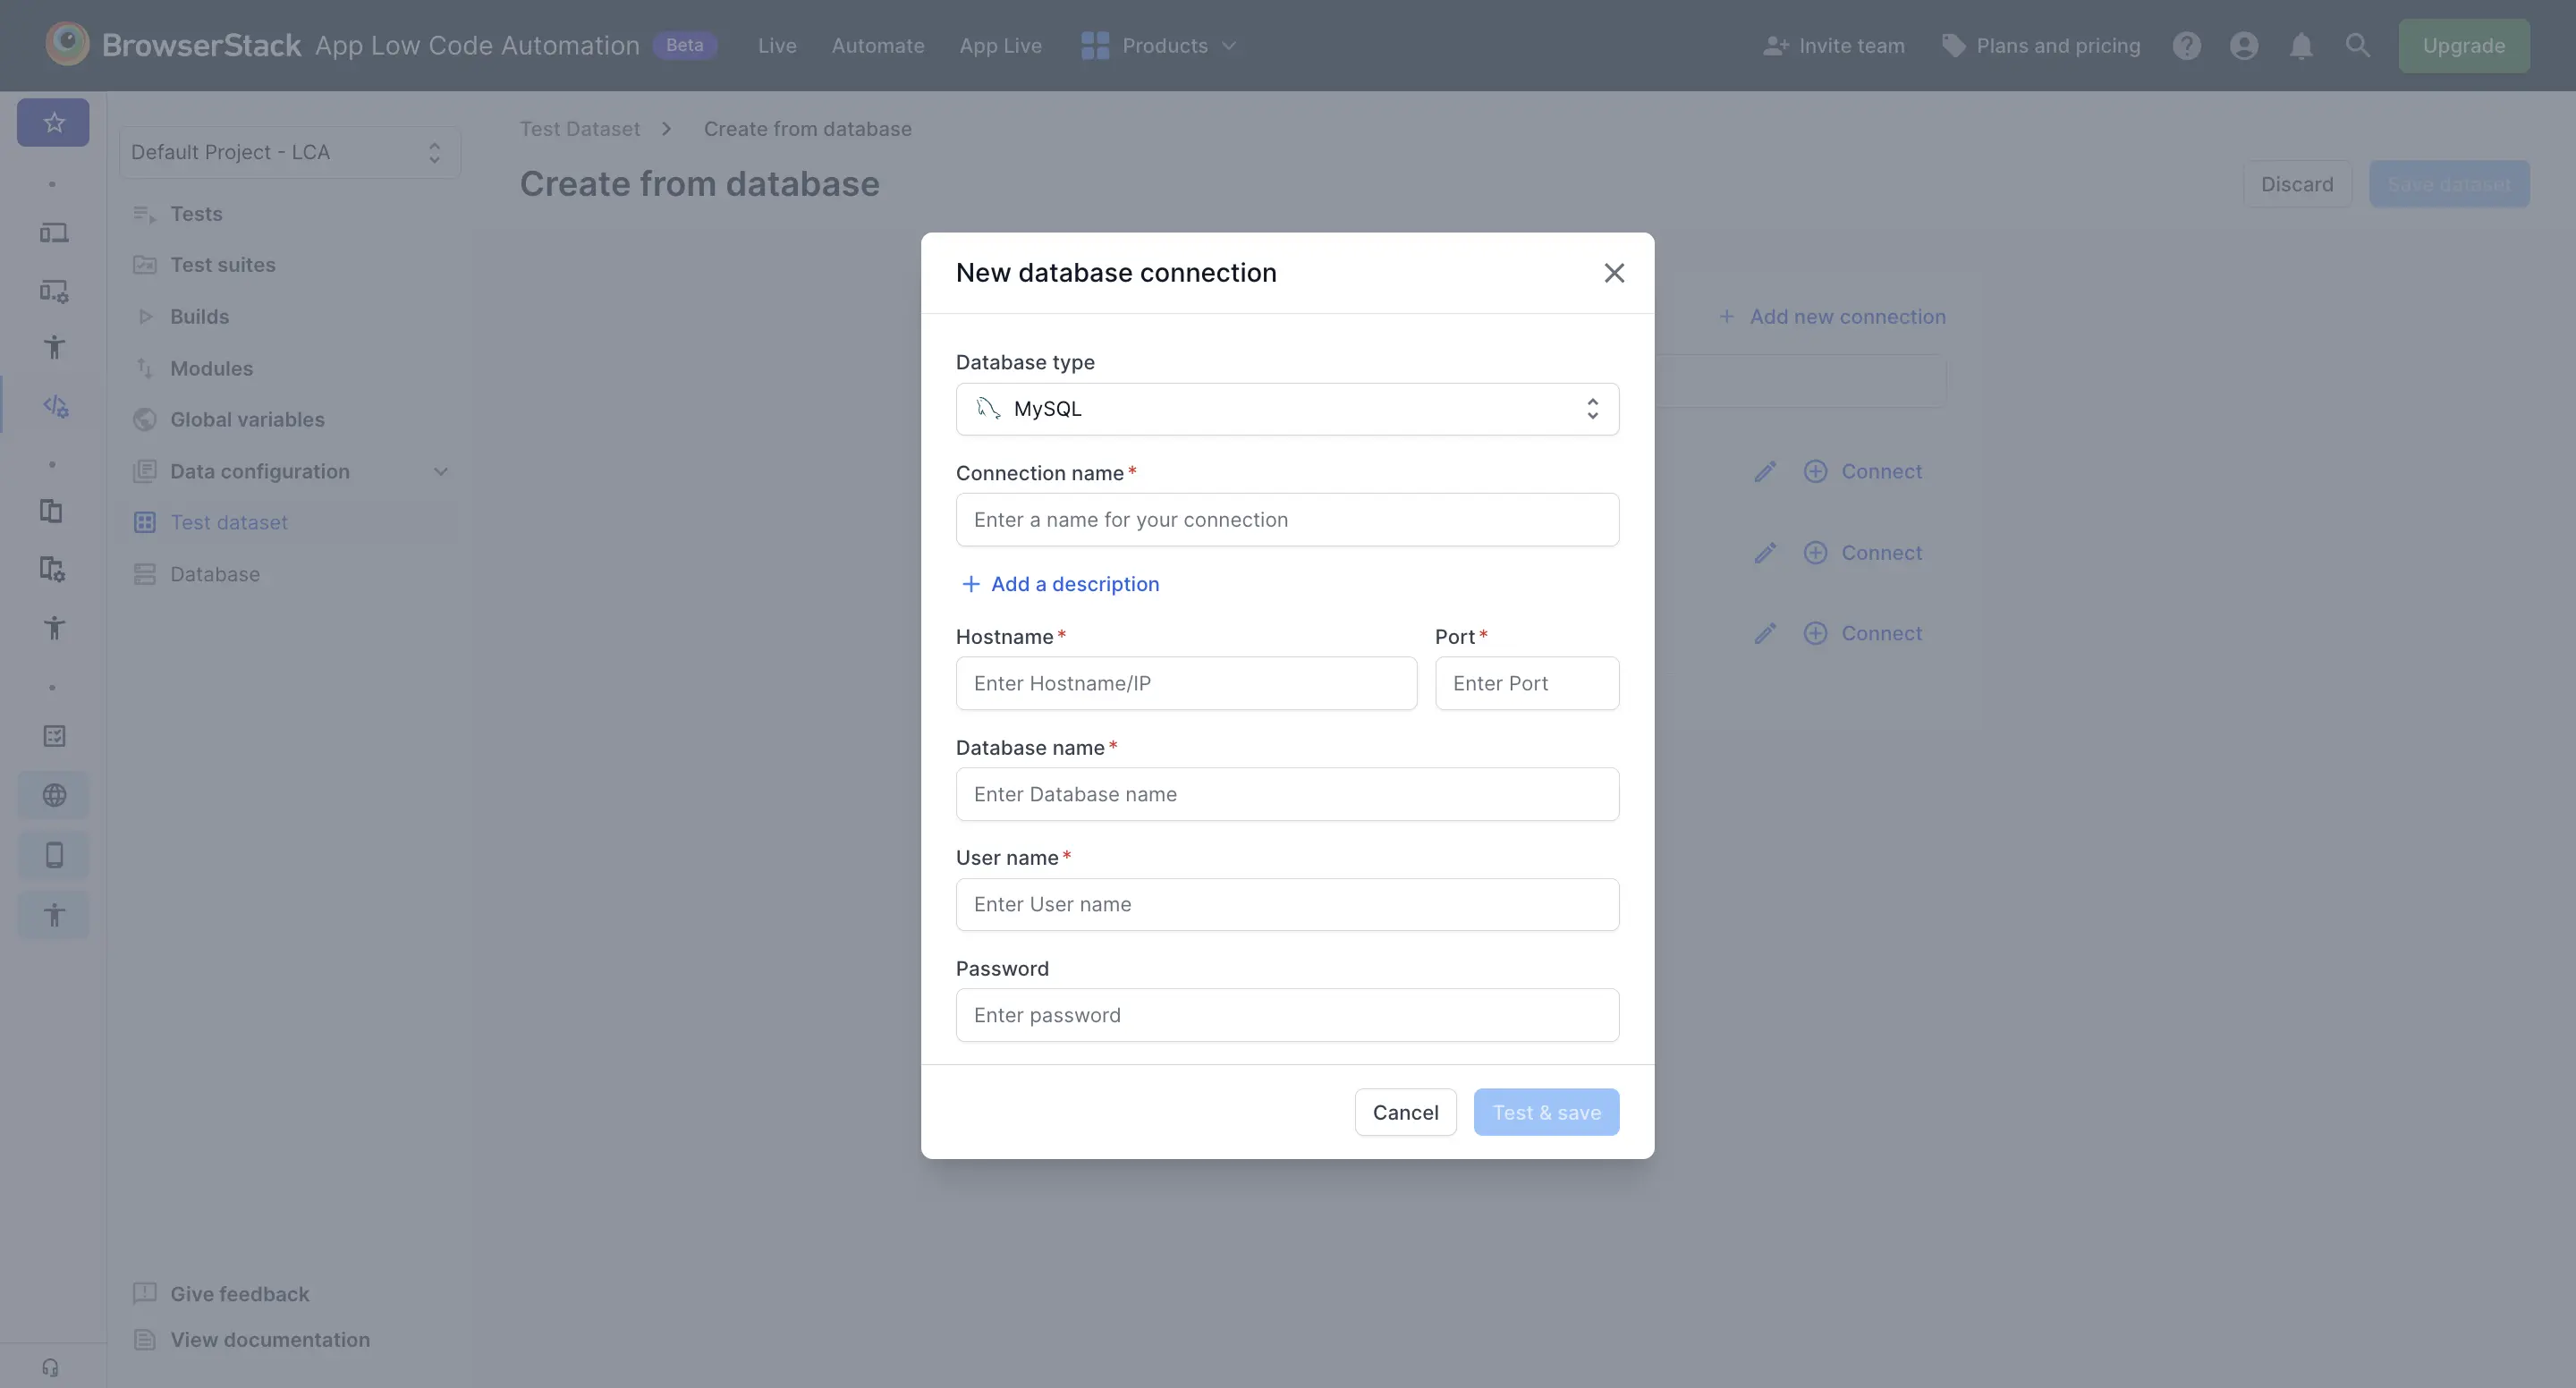
Configure a new database connection
To configure a new database connection, click + Add new connection and provide the following details in the New database connection dialog:
- Database type: Select MySQL or PostgreSQL.
- Connection name: Enter a name to identify this connection.
- Description (optional): Click + Add a description to add context, such as the environment or module the connection is used for.
- Hostname: Enter the hostname or IP address of your database server.
- Port: Enter the port number used to connect to the database.
- Database name: Enter the name of the database you want to connect to.
- User name: Enter the username with access to the database.
- Password (optional): Enter the password for the username.
Click Test & save. If the connection is successful, the database is linked and ready to use in your tests.
You can also configure a connection from the Database section. In the left pane, expand Data configuration, click Database, click + Create new connection, and follow the same steps.
Use a test dataset in a test
After you create a test dataset, you can import its columns into your test steps the same way you import variables:
- In the test editor, type the
Typecommand and select Type value. - Type
@where you want to use a dataset value. A dialog appears with the local variables, Global variables, Media files, and Test dataset tabs. -
Open the Test dataset tab and select the dataset you want to use.
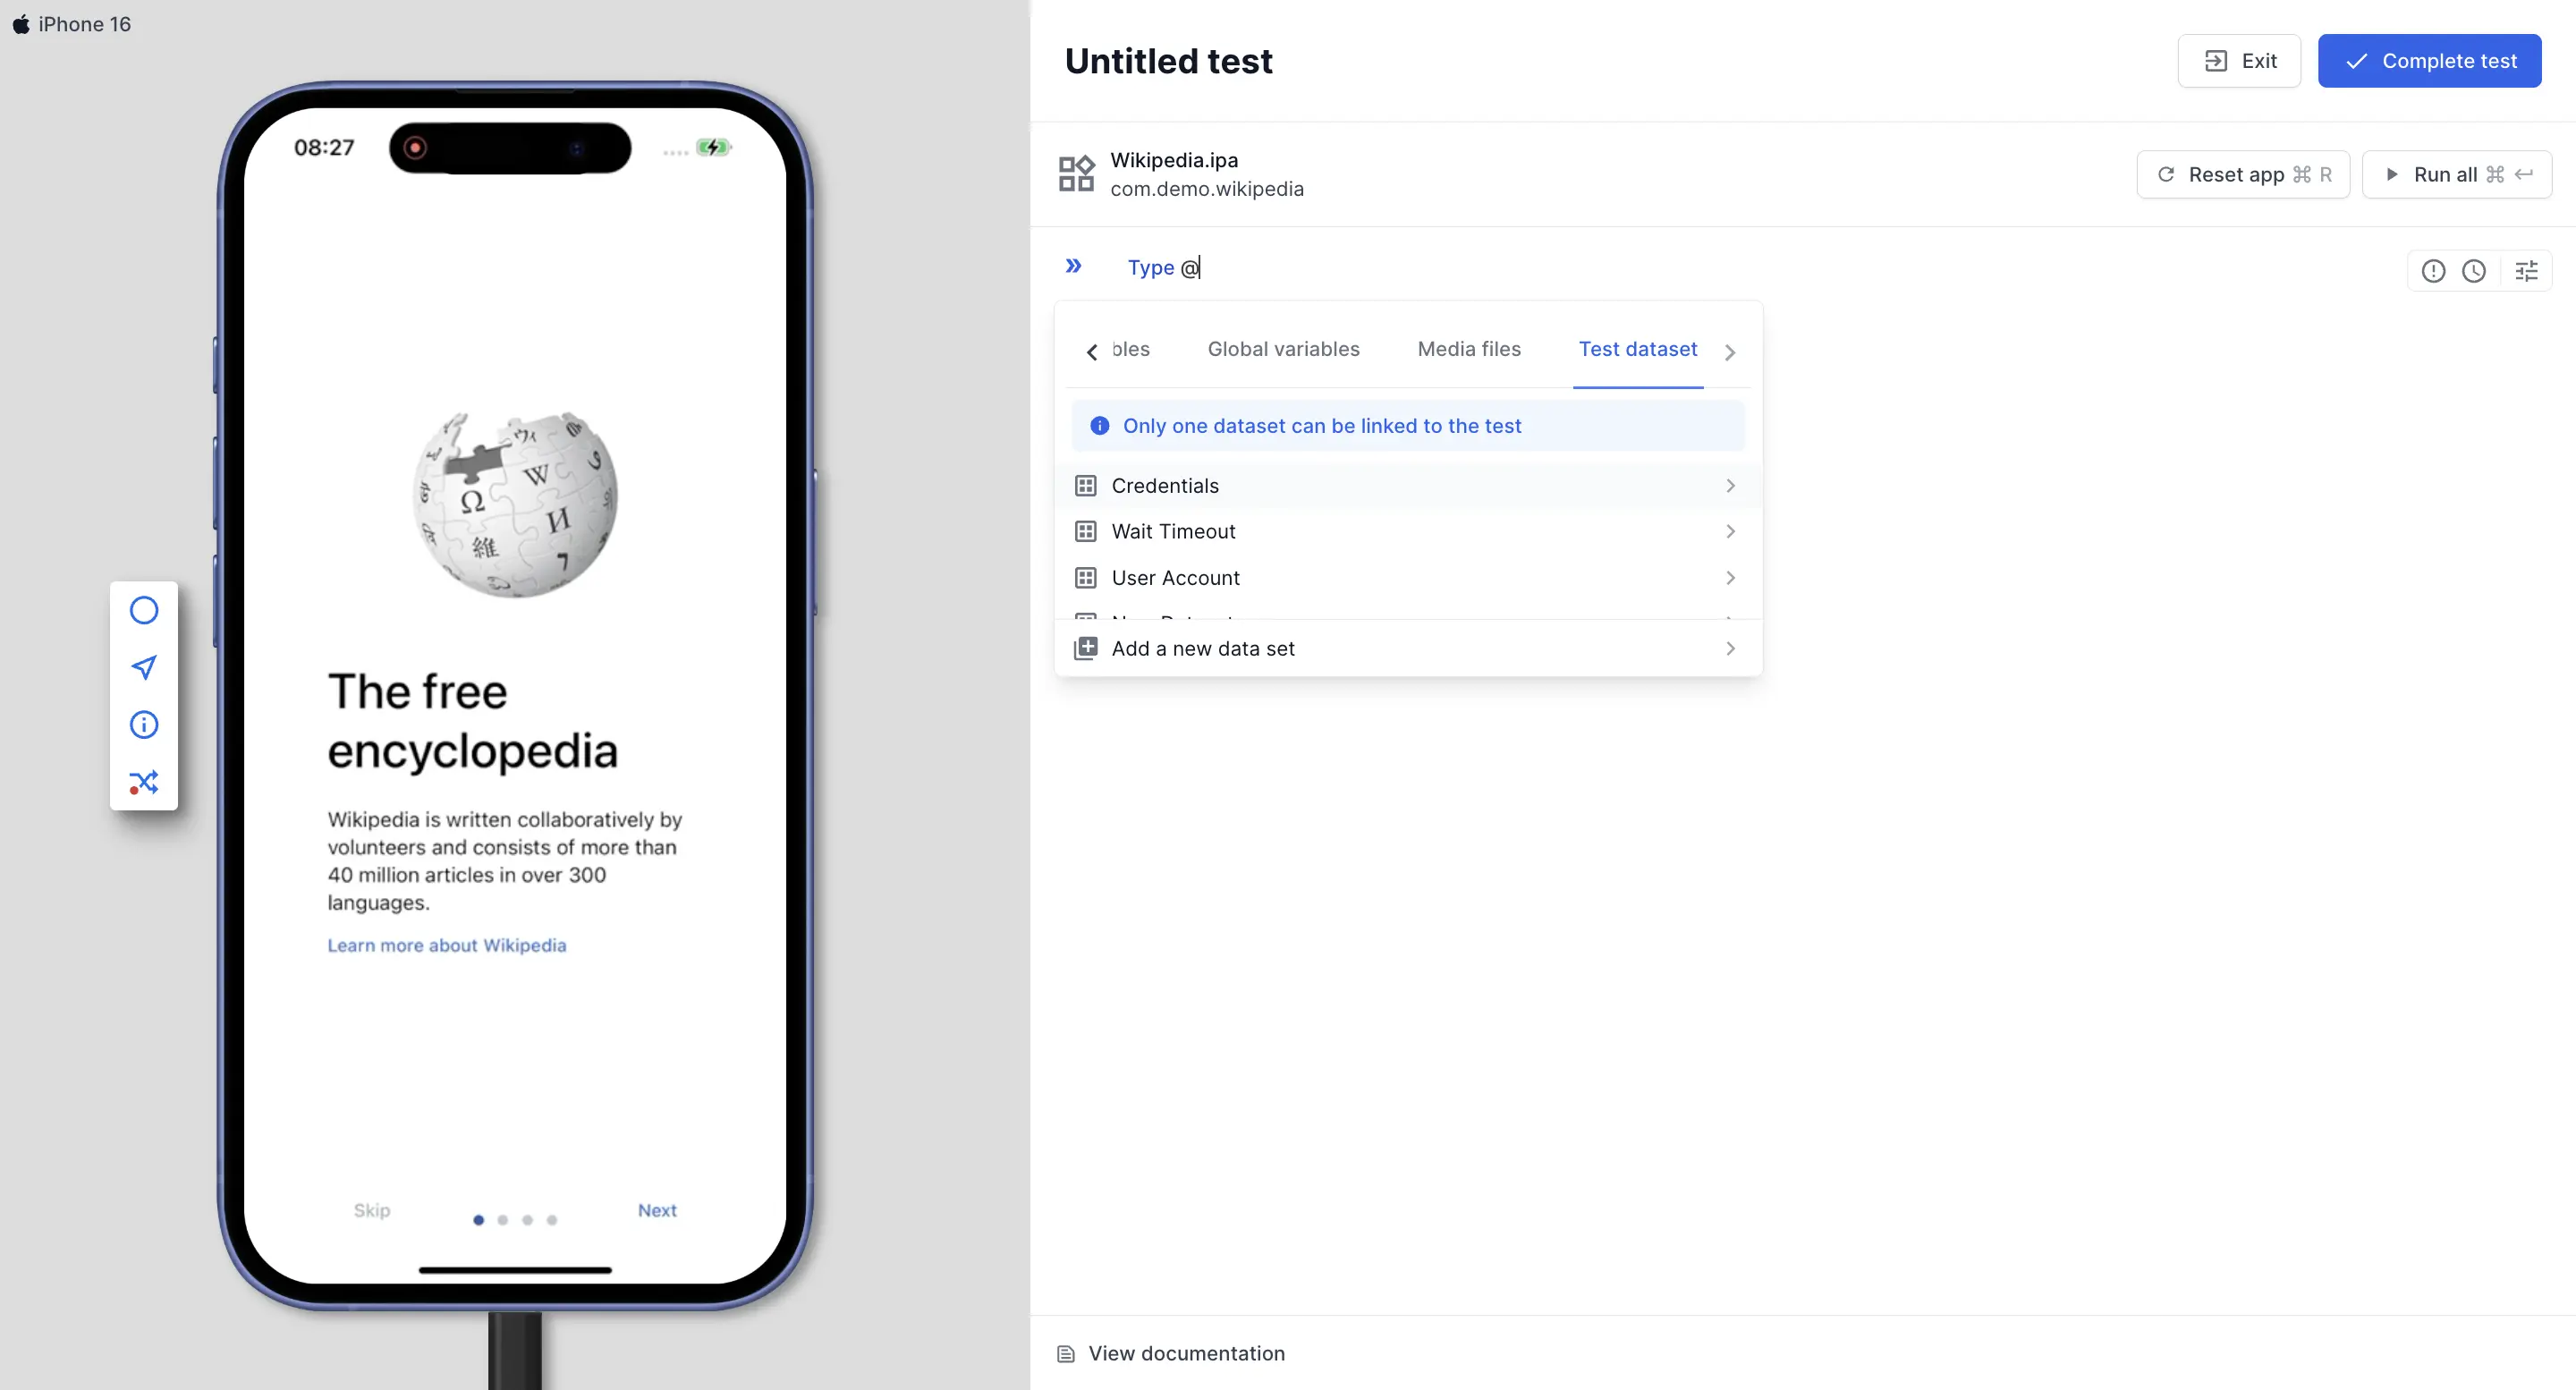
- In the dataset variables dialog, select the variable (column) you want to insert.
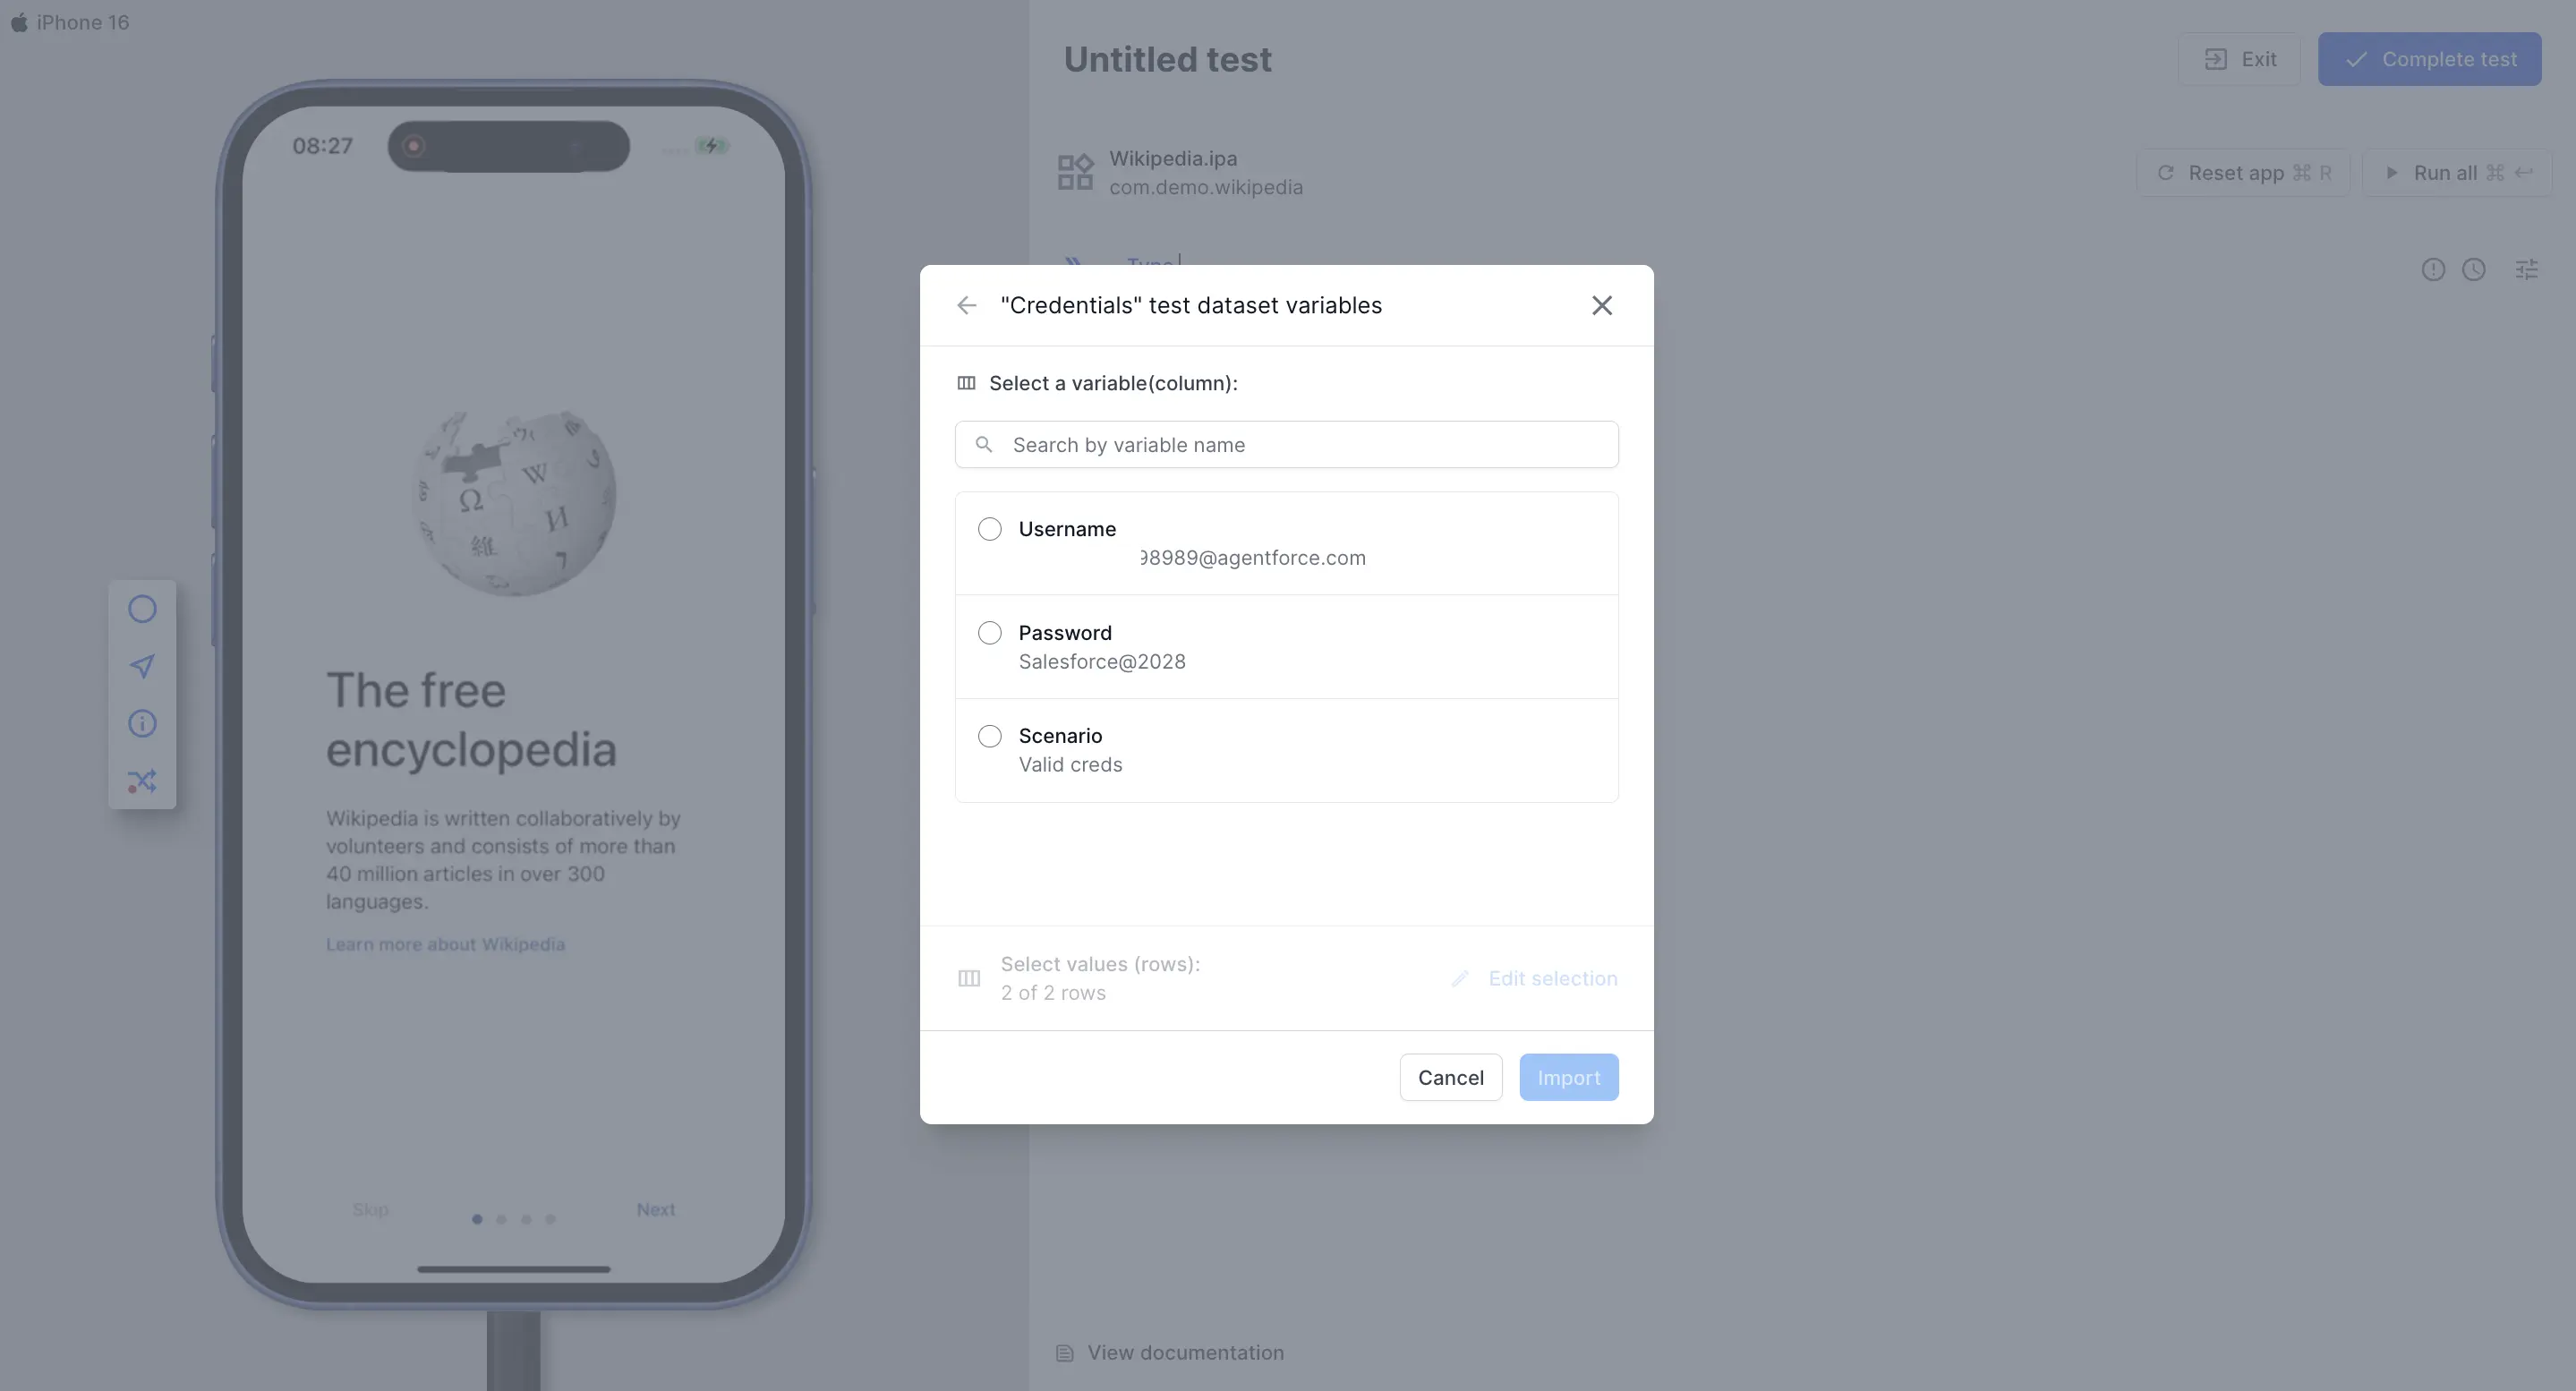
- Under Select values (rows), all rows are selected by default. To use a subset, click Edit selection. Then click Import.
- In the Select values of dataset dialog, choose the rows to use in one of the following ways, then click Save & import:
-
Enter row no.: Click Edit row no. to specify a row number or range, such as
1-25. - Add condition: Filter rows by a column value.
- Search row by values: Search for rows that match a value.
- Select or clear individual row checkboxes in the table.
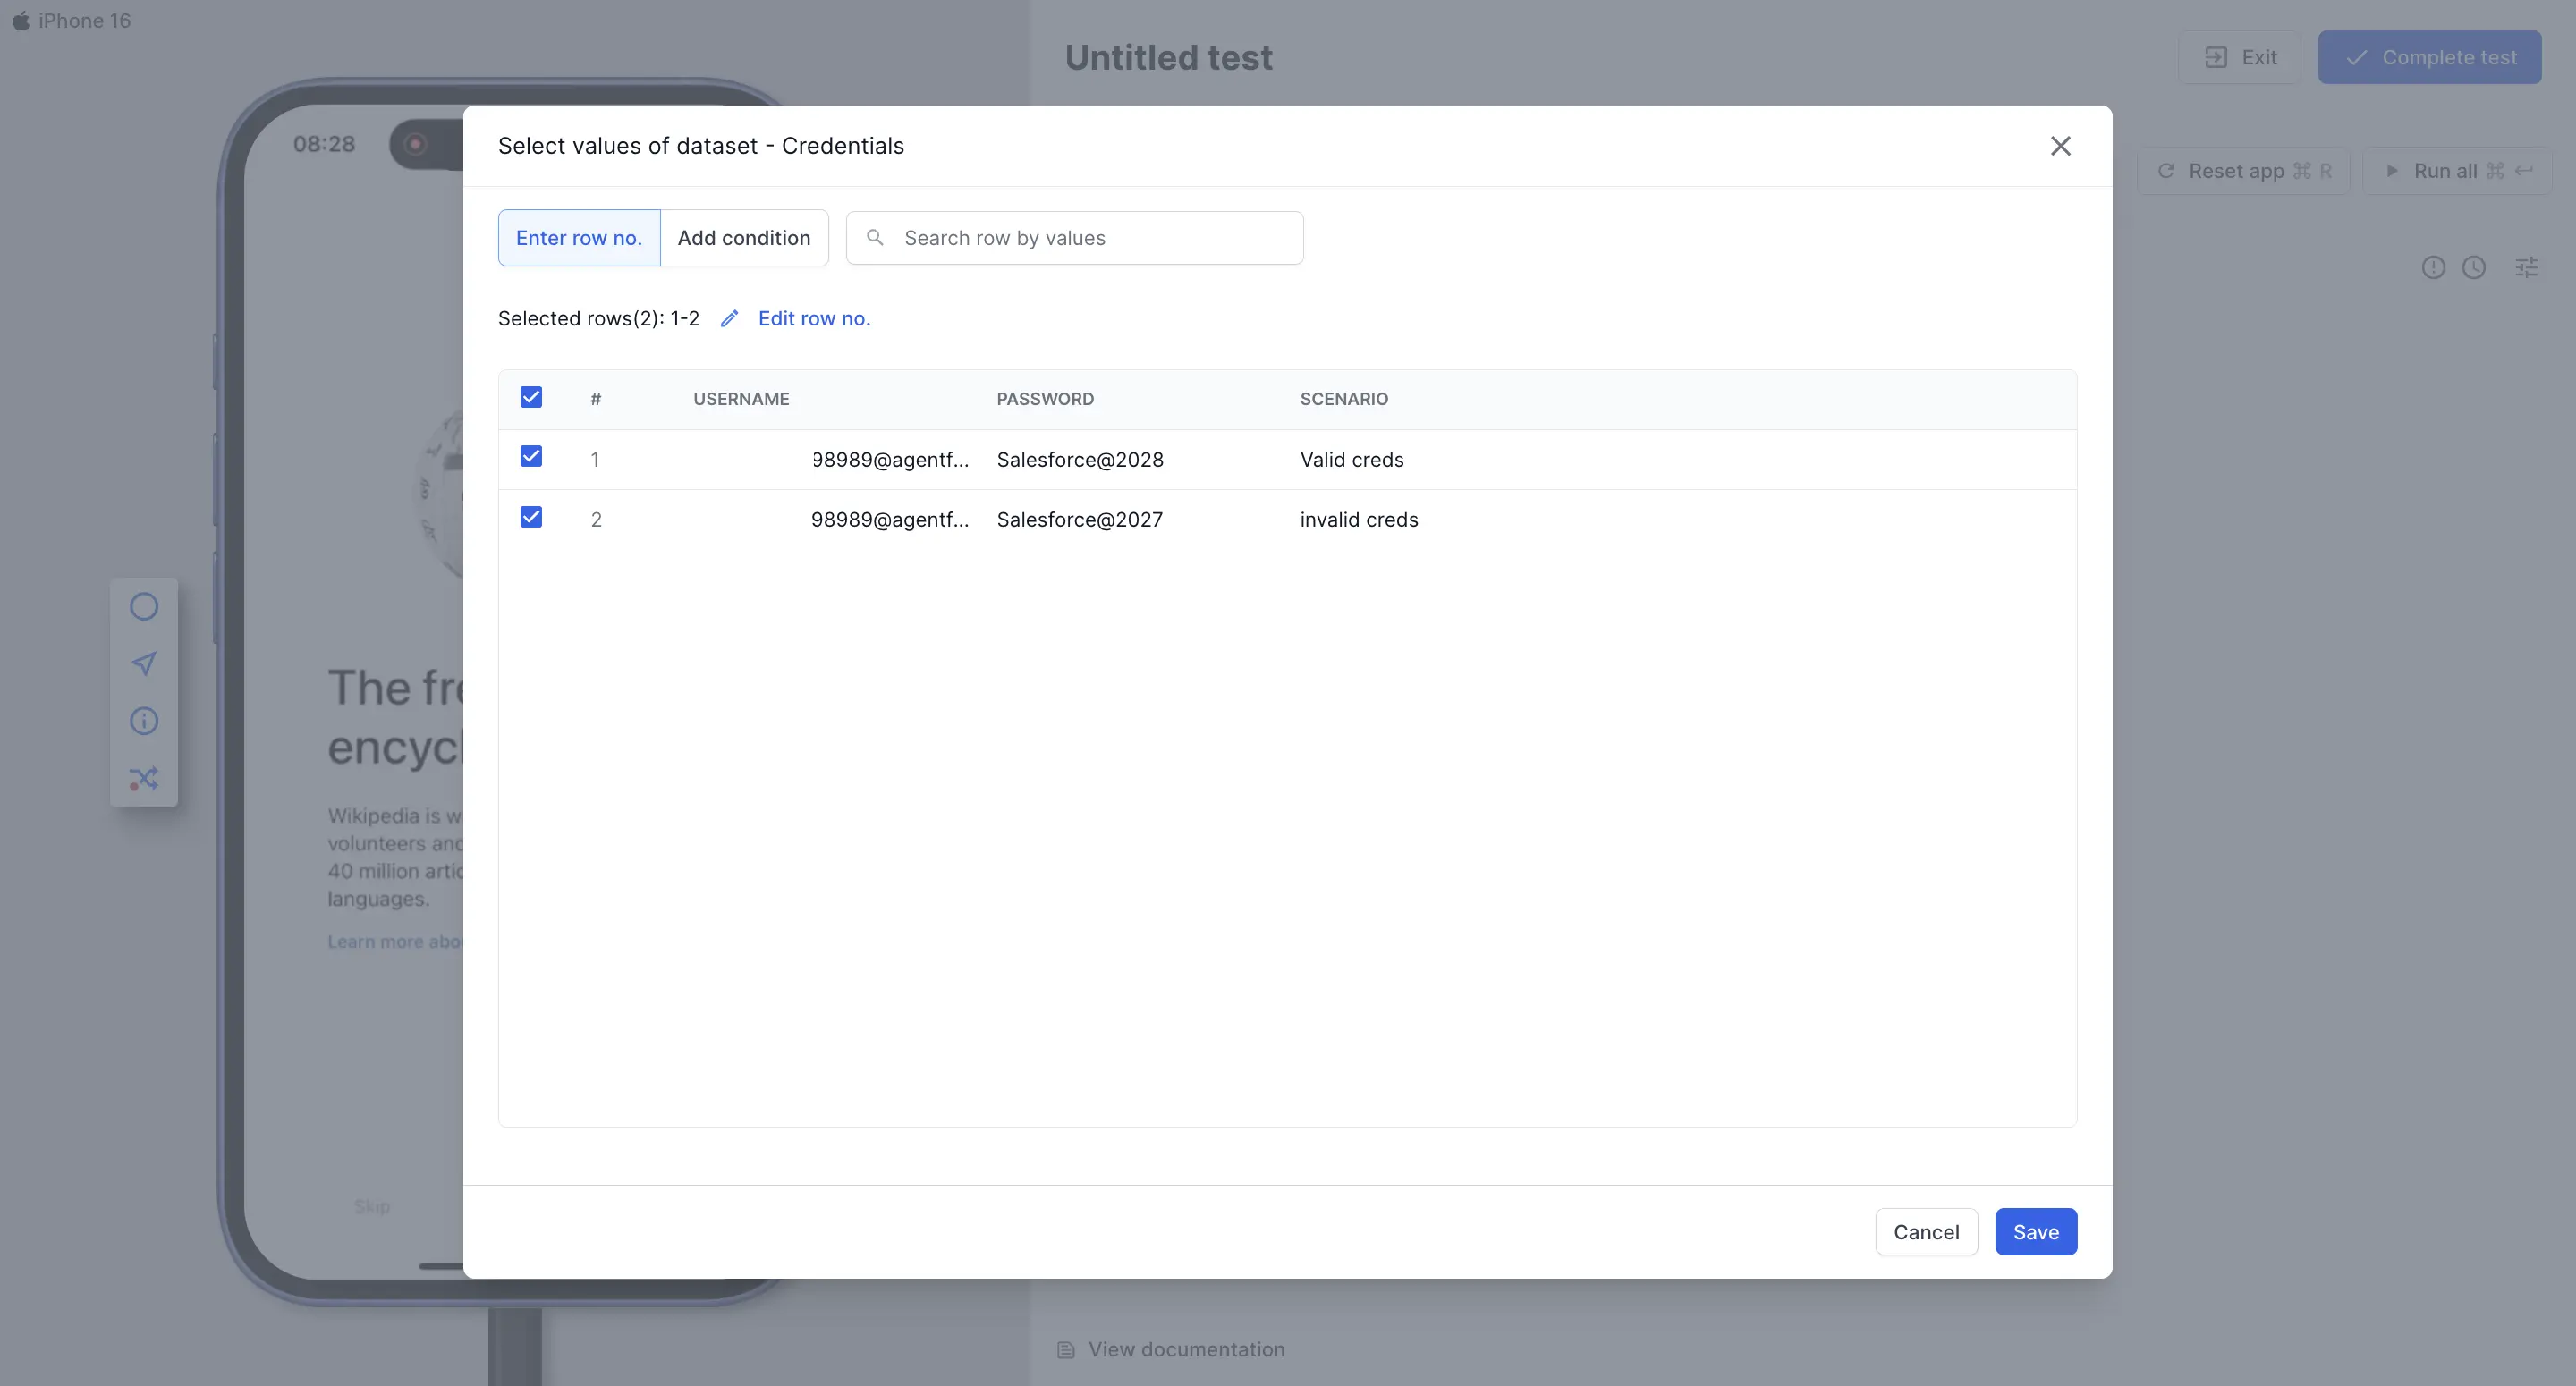
-
Enter row no.: Click Edit row no. to specify a row number or range, such as
A test can use only one dataset. Within that dataset, you can select the specific columns and rows to use for a test run.
Run a test with a dataset
How App Low Code Automation uses the dataset depends on how you run the test:
- While authoring a test: The test runs once using the first row of data, excluding the header row.
- On the cloud: The test runs once for every row in the dataset.
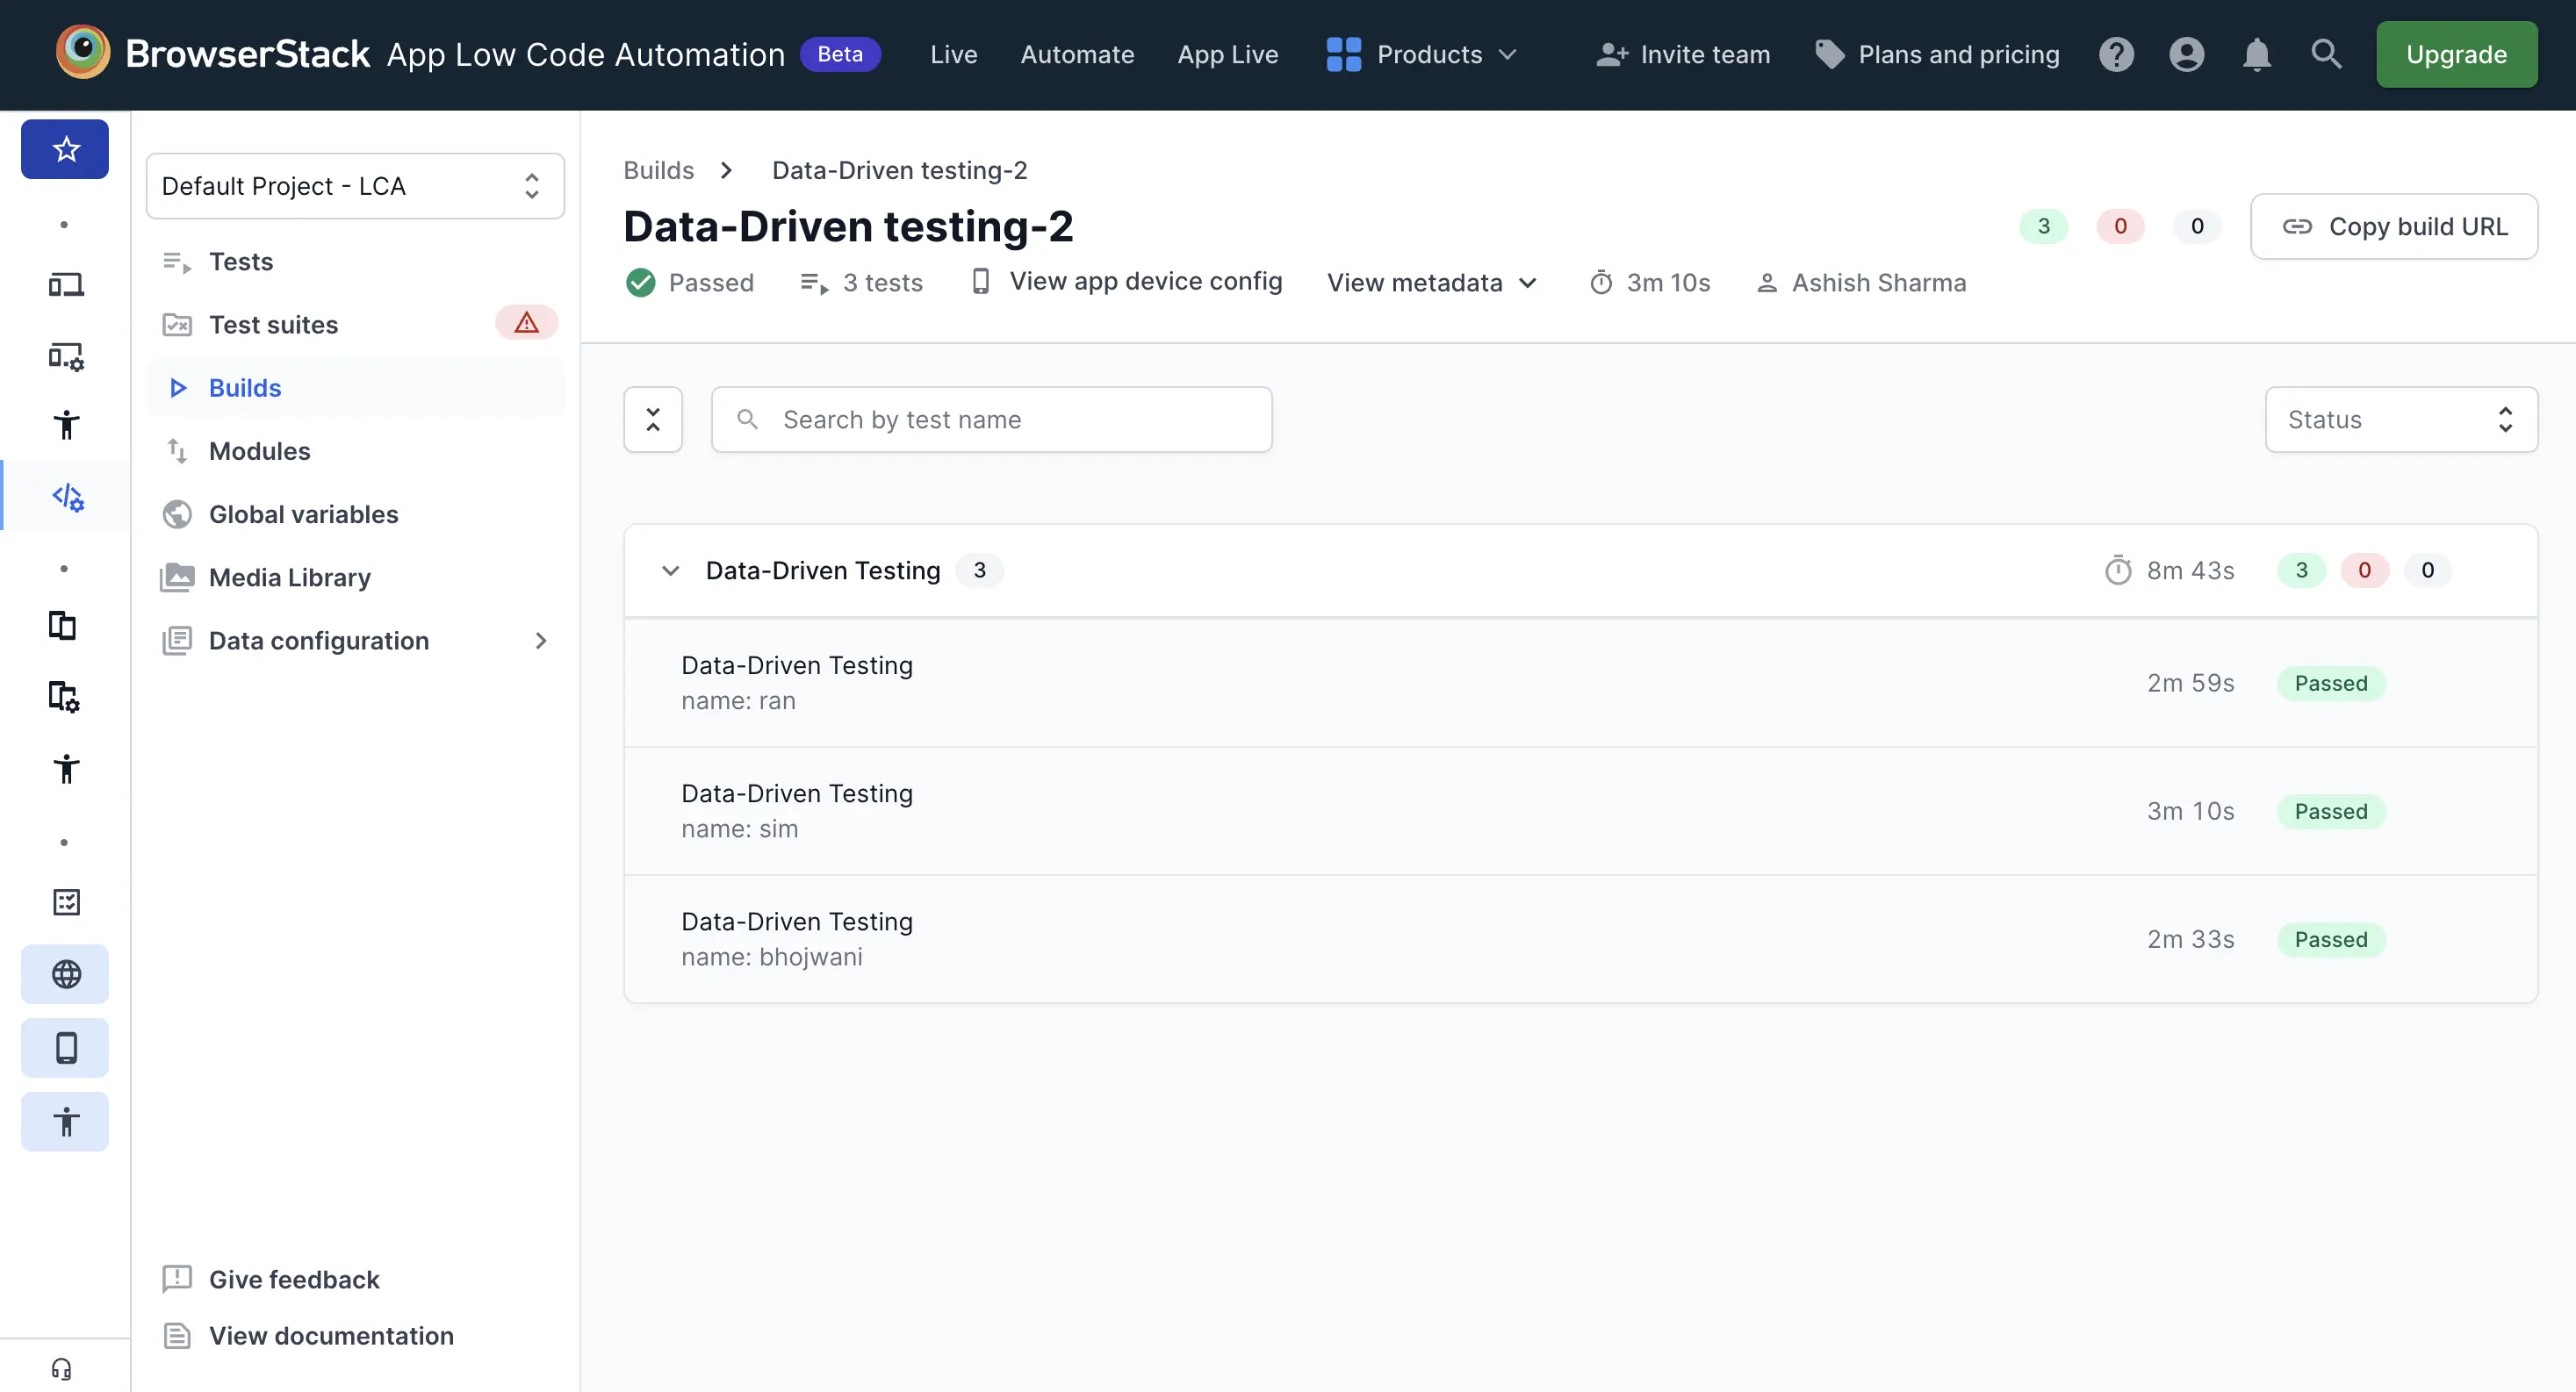
In the build report, each row runs as a separate execution, and the executions for a test are grouped together. The scenario name column you mapped appears as the label for each execution, making it easy to identify which row produced which result.
Each row in the dataset runs as a separate execution and counts toward your test execution usage for billing purposes.
Manage database connections
To view and manage your database connections:
- In the left pane, expand Data configuration and click Database. The page lists all database connections, along with the linked tests and details of when and by whom each connection was last updated.
- Click the ︙ icon next to a connection to perform one of the following actions:
- Edit connection: Modify the connection details. Editing a connection affects all tests linked to it.
- Delete connection: Remove a connection. You can delete a connection only if it is not linked to any test.
Limitations
- A dataset supports a maximum of 100 rows and 40 columns.
- Database connections support only public MySQL and PostgreSQL databases.
- When you use database connections in high-concurrency scenarios such as data driven testing, make sure the database can support the expected connection load.
Test datasets help you cover more scenarios with fewer tests and keep your data separate from your test steps.
We're sorry to hear that. Please share your feedback so we can do better
Contact our Support team for immediate help while we work on improving our docs.
We're continuously improving our docs. We'd love to know what you liked
We're sorry to hear that. Please share your feedback so we can do better
Contact our Support team for immediate help while we work on improving our docs.
We're continuously improving our docs. We'd love to know what you liked
Thank you for your valuable feedback!