Configure environment for test suites
Learn how to configure environments for your test suites to use different domain URLs and environment-specific values with same tests.
BrowserStack Low Code Automation allows you to create multiple environments such as Development, Staging, and Production without duplicating suites. Specify the domain URL of the environment where you want to run the test suite. During execution, the domain URL for all tests within the test suite is overridden based on the selected environment configuration.
Environments also allow you to manage different sets of global variables and secrets. You can define global variables and secrets once and assign different values per environment.
At execution time, selecting an environment automatically applies the corresponding host URL, variable and secret values without requiring test duplication or manual updates. This lets you use the same variables across multiple test suites, reduces test maintenance, and ensures consistency.
This feature is available for Pro and Ultimate plans. Upgrade your plan to access this feature.
Workflow
The following workflow illustrates how to configure and use environments in your test suites:
- Create a new environment (from the Global Variables, Secrets section, or a Test Suite).
- Set the host URL and update the existing global variables and secrets for the environment as needed.
- Create or edit a test suite and select the configured environment.
- Run the test suite. It uses the selected environment’s variable and secret values.
- During execution, the host URL for all tests within the test suite is overridden.
Create an environment
You can create a new environment using any of the following methods:
- From the Global variables or the Secrets section
- While creating a test suite
Create an environment and override global variables and secrets
You can create a new environment to manage variables and secrets. When you create an environment, the default values for global variables and secrets are copied to it. You can override these values for each environment as needed.
To create an environment and override the values
- In Data Configuration, click Global variables or Secrets.
- Click + Environment. The Create environment dialog opens.
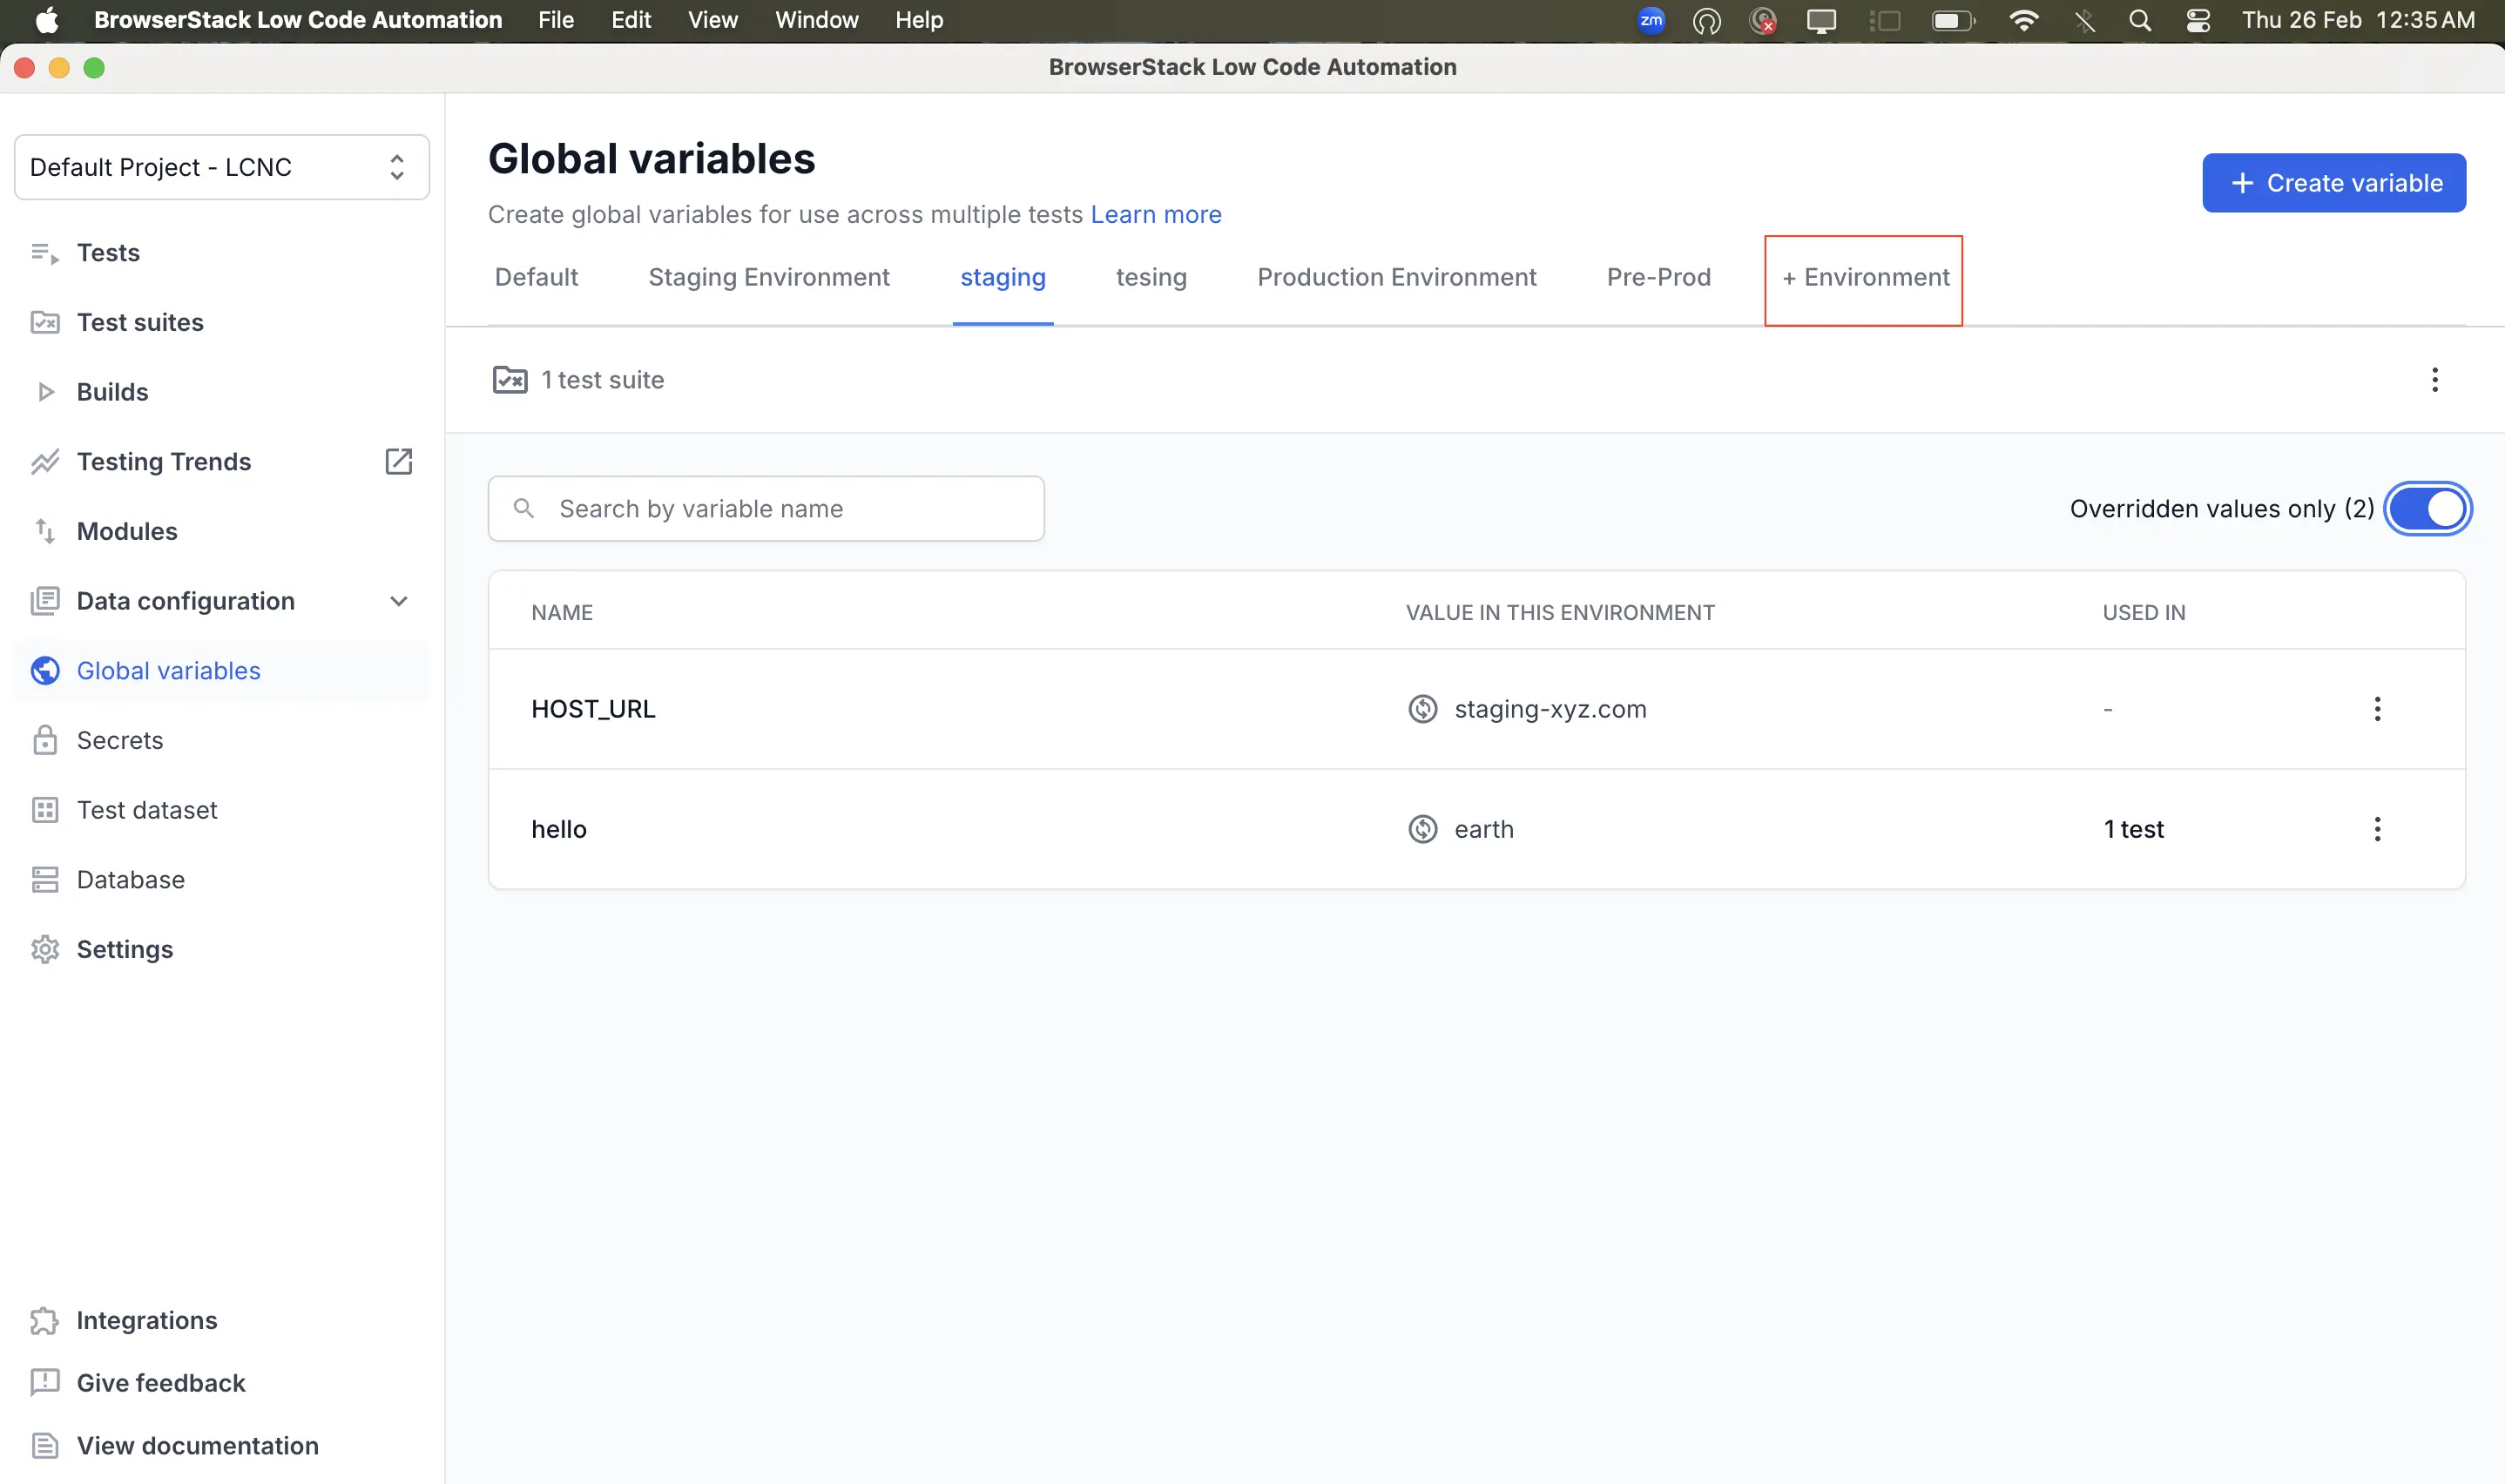
- In the Environment name field, enter a name for your environment (for example,
staging). - (Optional) Click + Add description to add a description for the environment.
- (Optional) In the Host URL field, enter your environment URL (for example,
example.com). Use the URL type drop-down next to the field to select one of the following:- Only domain (default): Overrides only the domain and port of each recorded test URL with the host URL, while preserving the original path, query parameters, and fragments. For more information, refer to Add host domain name to run tests.
-
Full URL: Preserves the complete URL string, including sub-directories (for example,
/v1/build/index.html), query parameters (for example,?lang=en), and fragments (for example,#home).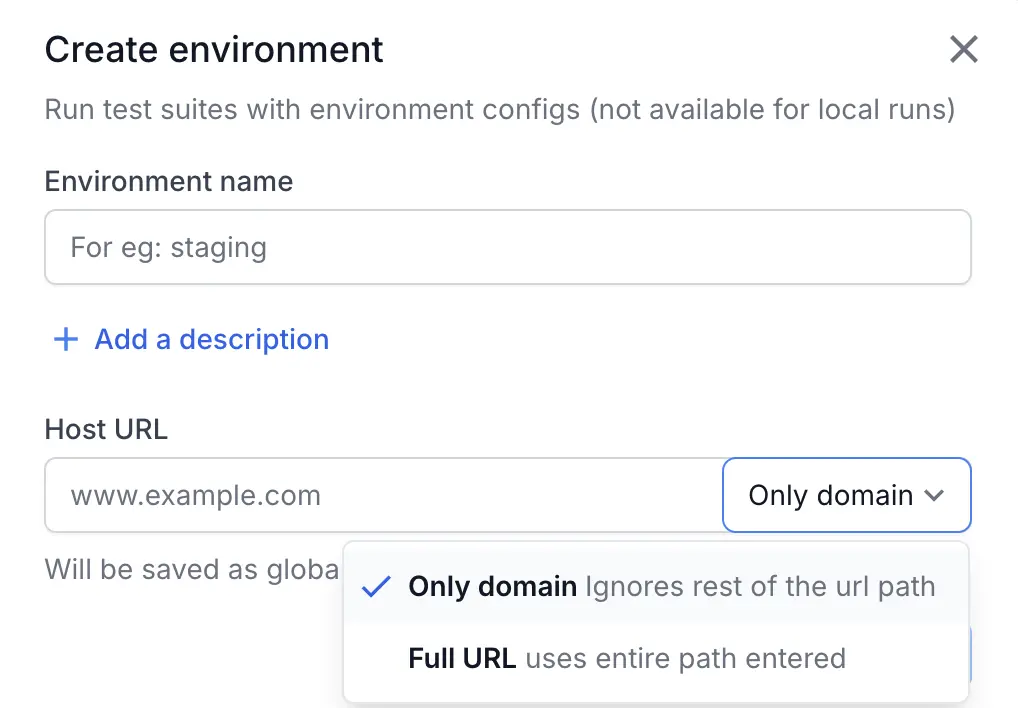
- Click Create environment.
- To override a specific value, click the three dots icon next to the variable or secret and select Edit variable or Edit secret. Update the value as needed:
-
Name of the variable or secret: For example,
UsernameorAPI_KEY. -
Value: For example,
John123Smithor your API key. This step applies to both variables and secrets, depending on which section you are editing.
-
Name of the variable or secret: For example,
- Click Save.
When you use this environment, the overridden values are automatically applied during execution.
- If you do not select an environment for a test suite, the system uses the default values for global variables and secrets.
- Name of the host URL cannot be changed.
If you do not select an environment for a test suite, the system uses the default values for secrets.
Create an environment from test suite
To create an environment:
- Navigate to Test Suites and click Create test suite.
- Add tests to your test suite and configure the test suite details.
- In Step 2: Additional configurations, under Configure environment, and click Create environment. The Create environment dialog opens.
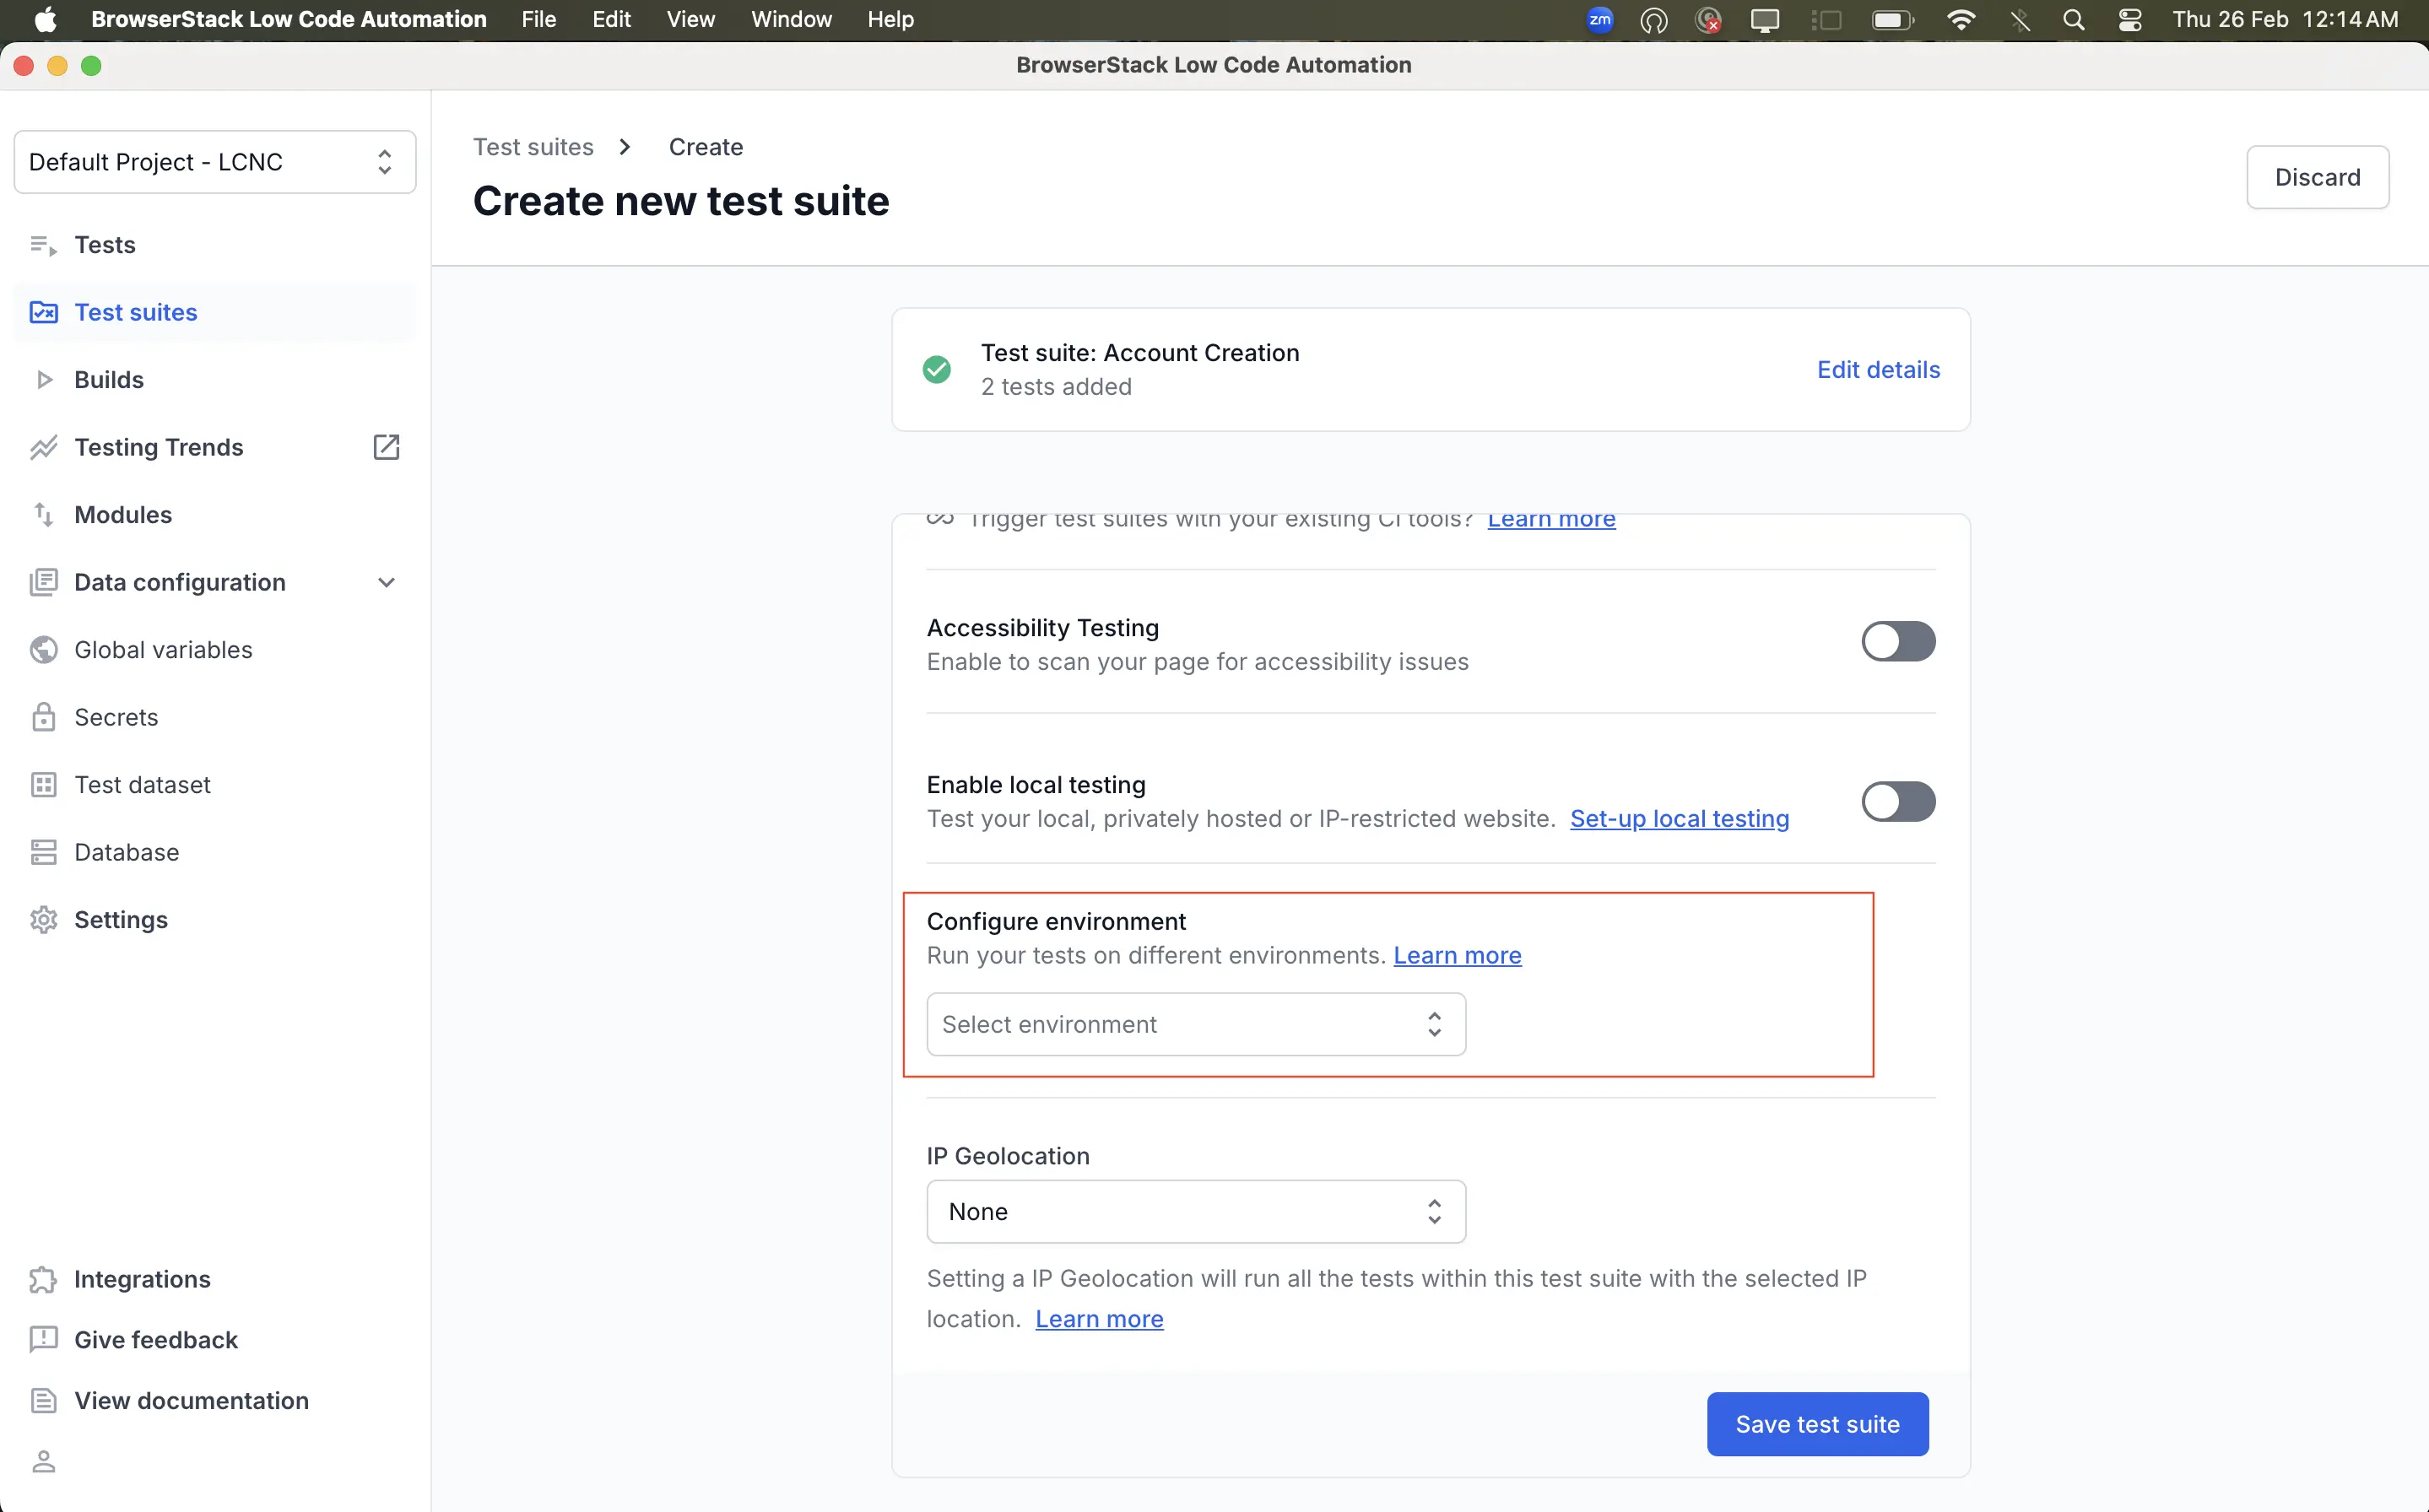
- In the Environment name field, enter a name for your environment (for example,
Staging).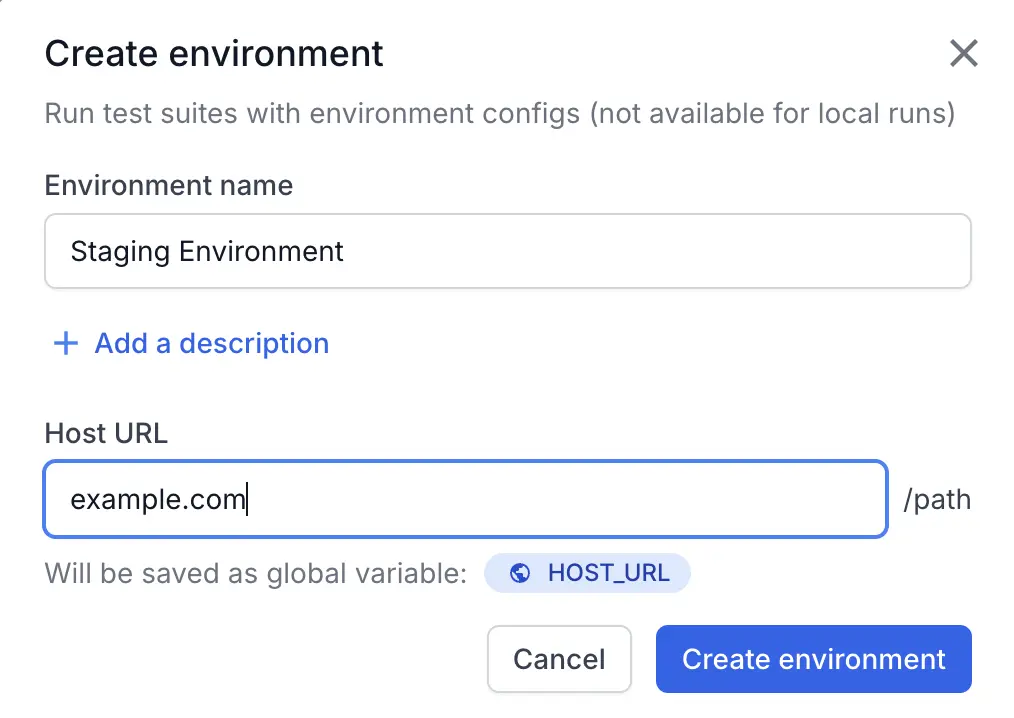
- (Optional) Click + Add description to add a description for the environment.
- (Optional) In the Host URL field, enter your environment URL (for example,
example.com). Use the URL type drop-down next to the field to select one of the following:- Only domain (default): Overrides only the domain and port of each recorded test URL with the host URL, while preserving the original path, query parameters, and fragments. For more information, refer to Add host domain name to run tests.
-
Full URL: Preserves the complete URL string, including sub-directories (for example,
/v1/build/index.html), query parameters (for example,?lang=en), and fragments (for example,#home).
- Click Create environment. The new environment is created and automatically selected for your test suite.
- Click Save test suite to save your test suite with the configured environment.
- Alternatively, you can open an existing test suite and create a new environment by following the same steps.
- To select an existing environment for your test suite:
- In the Select environment dialog, choose the desired environment (for example, Production, Staging, or UAT).
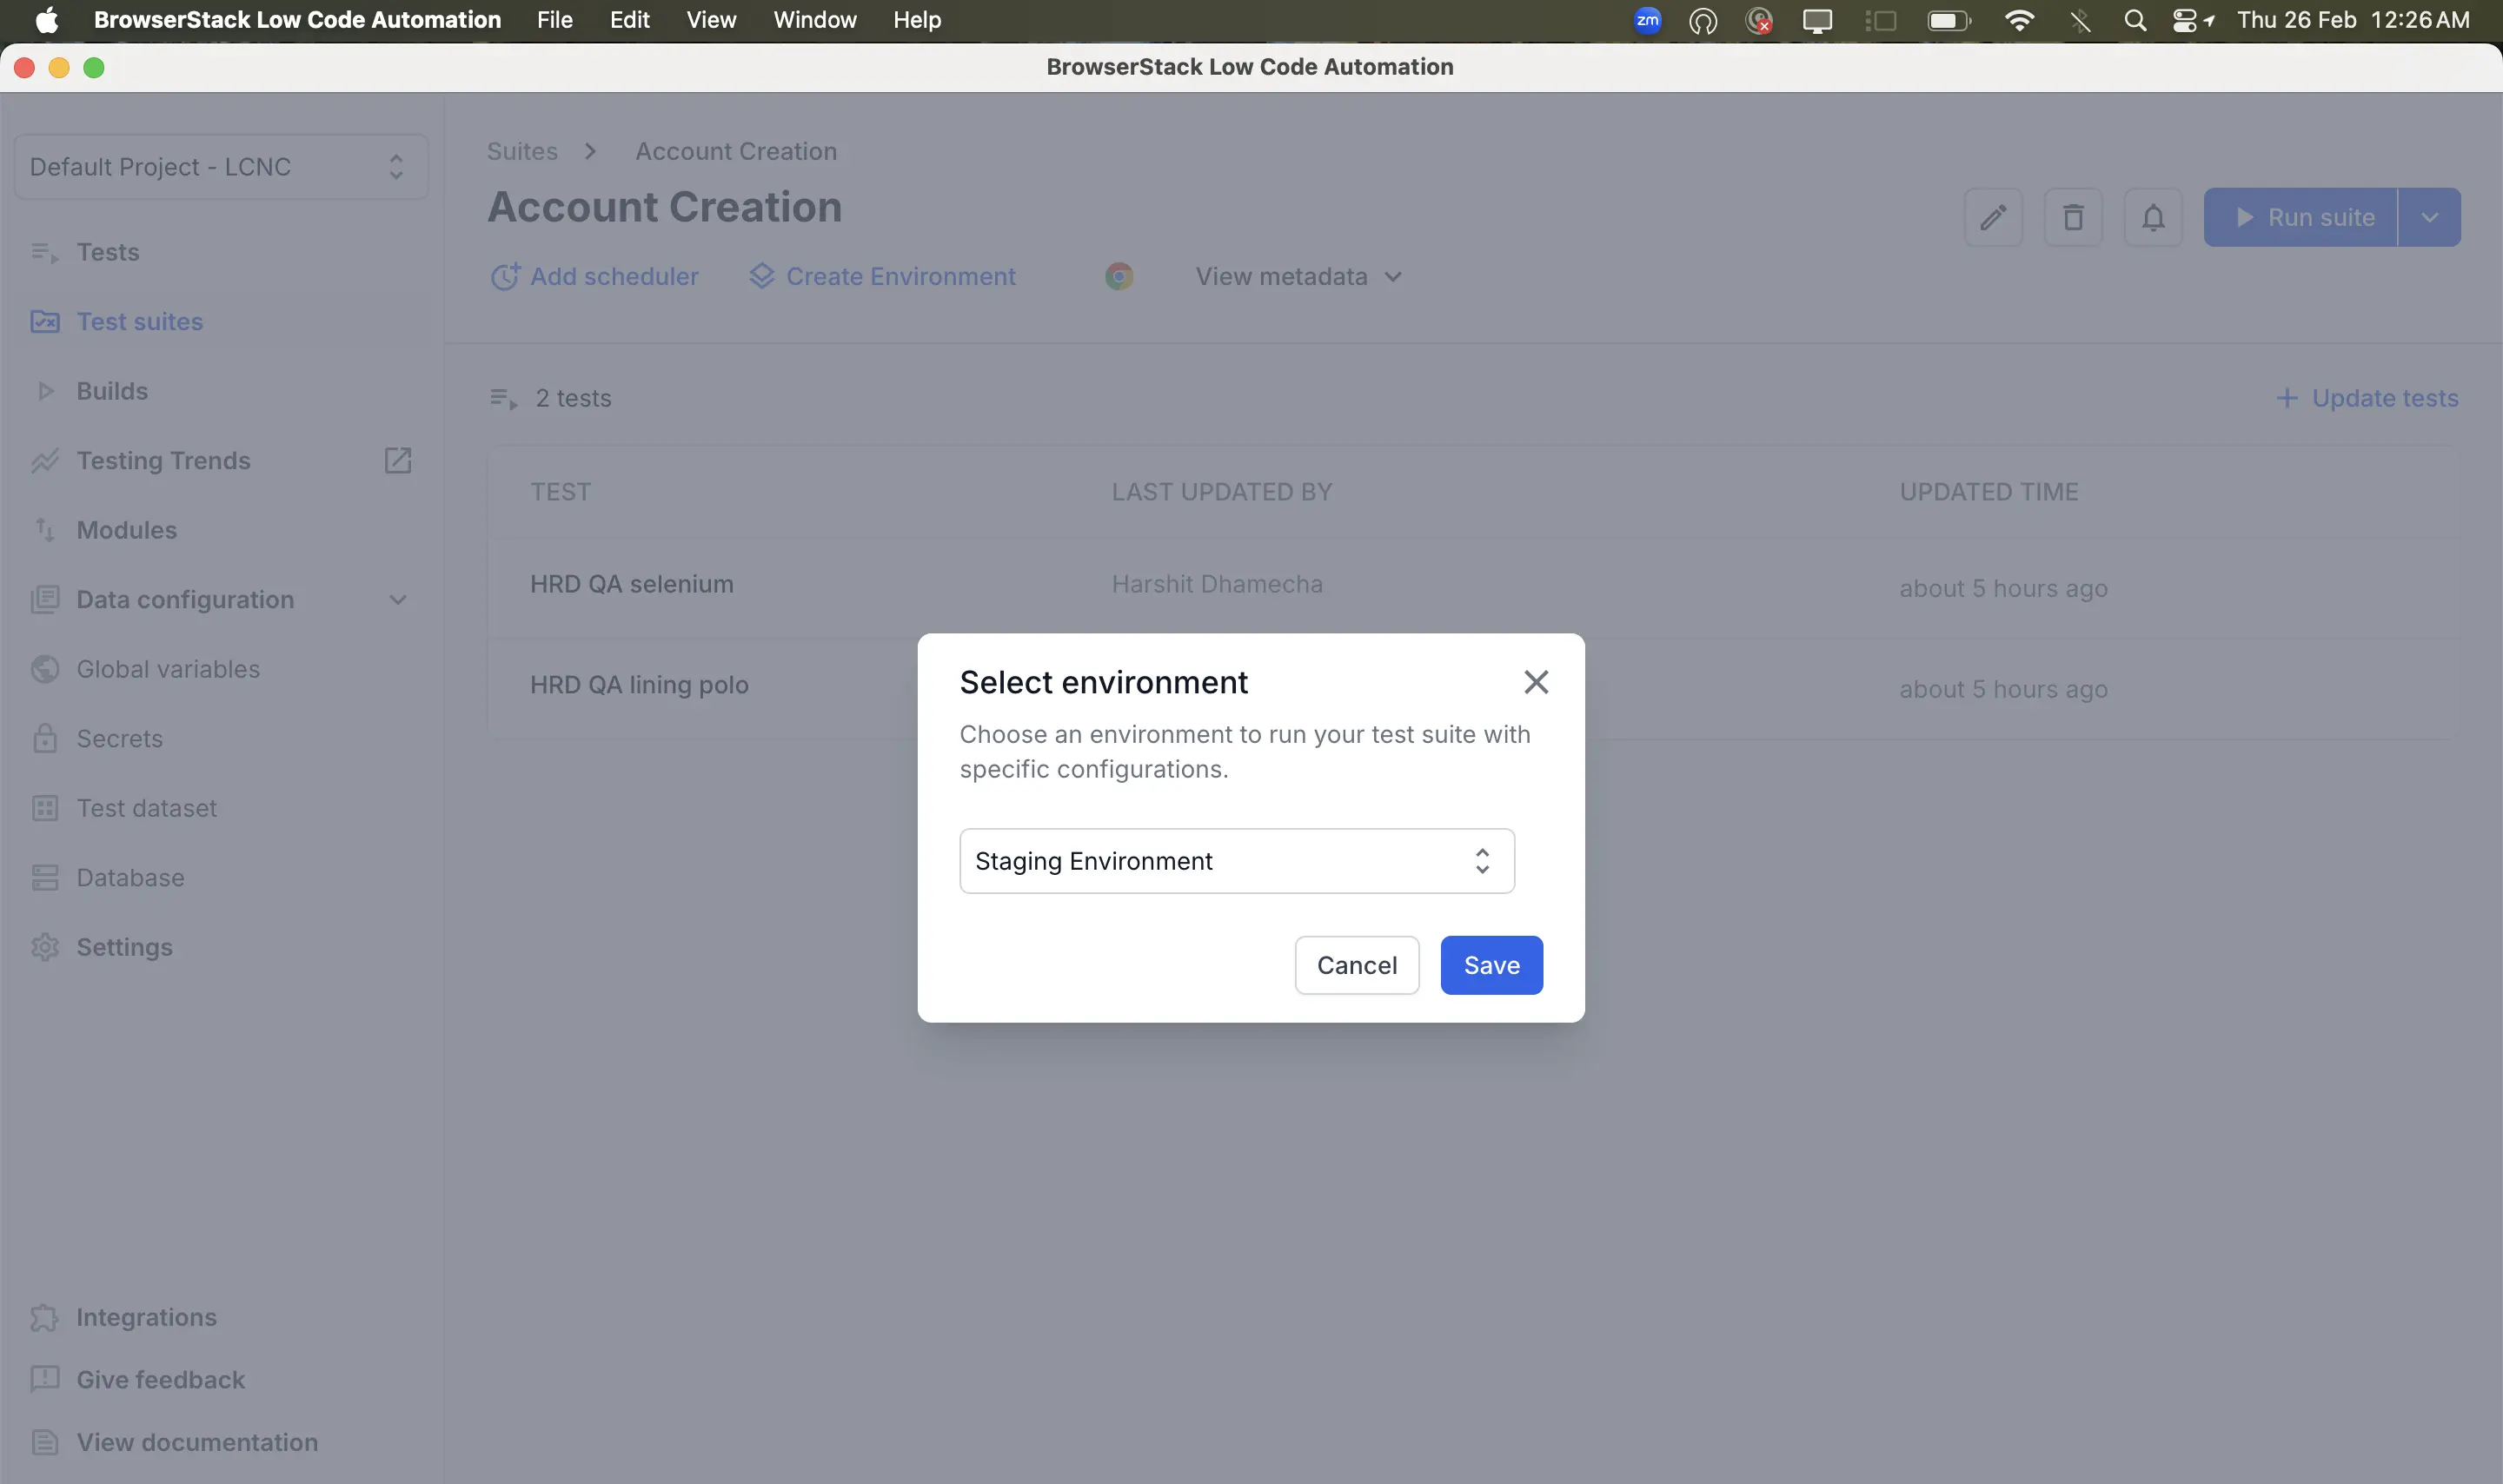
- The selected environment is now applied to your test suite.
- In the Select environment dialog, choose the desired environment (for example, Production, Staging, or UAT).
When you use this environment, the overridden values are automatically applied during execution.
You can also run tests on different environments using the Trigger test suite API. Pass the environment parameter to specify which environment to use.
Edit or delete environments
You can edit or delete an environment from the Global variables or Secrets section:
- Select the environment tab you want to modify.
- Click the three dots icon.
- To edit, click Edit environment. In the Edit environment dialog, update the environment name as needed and click Update.
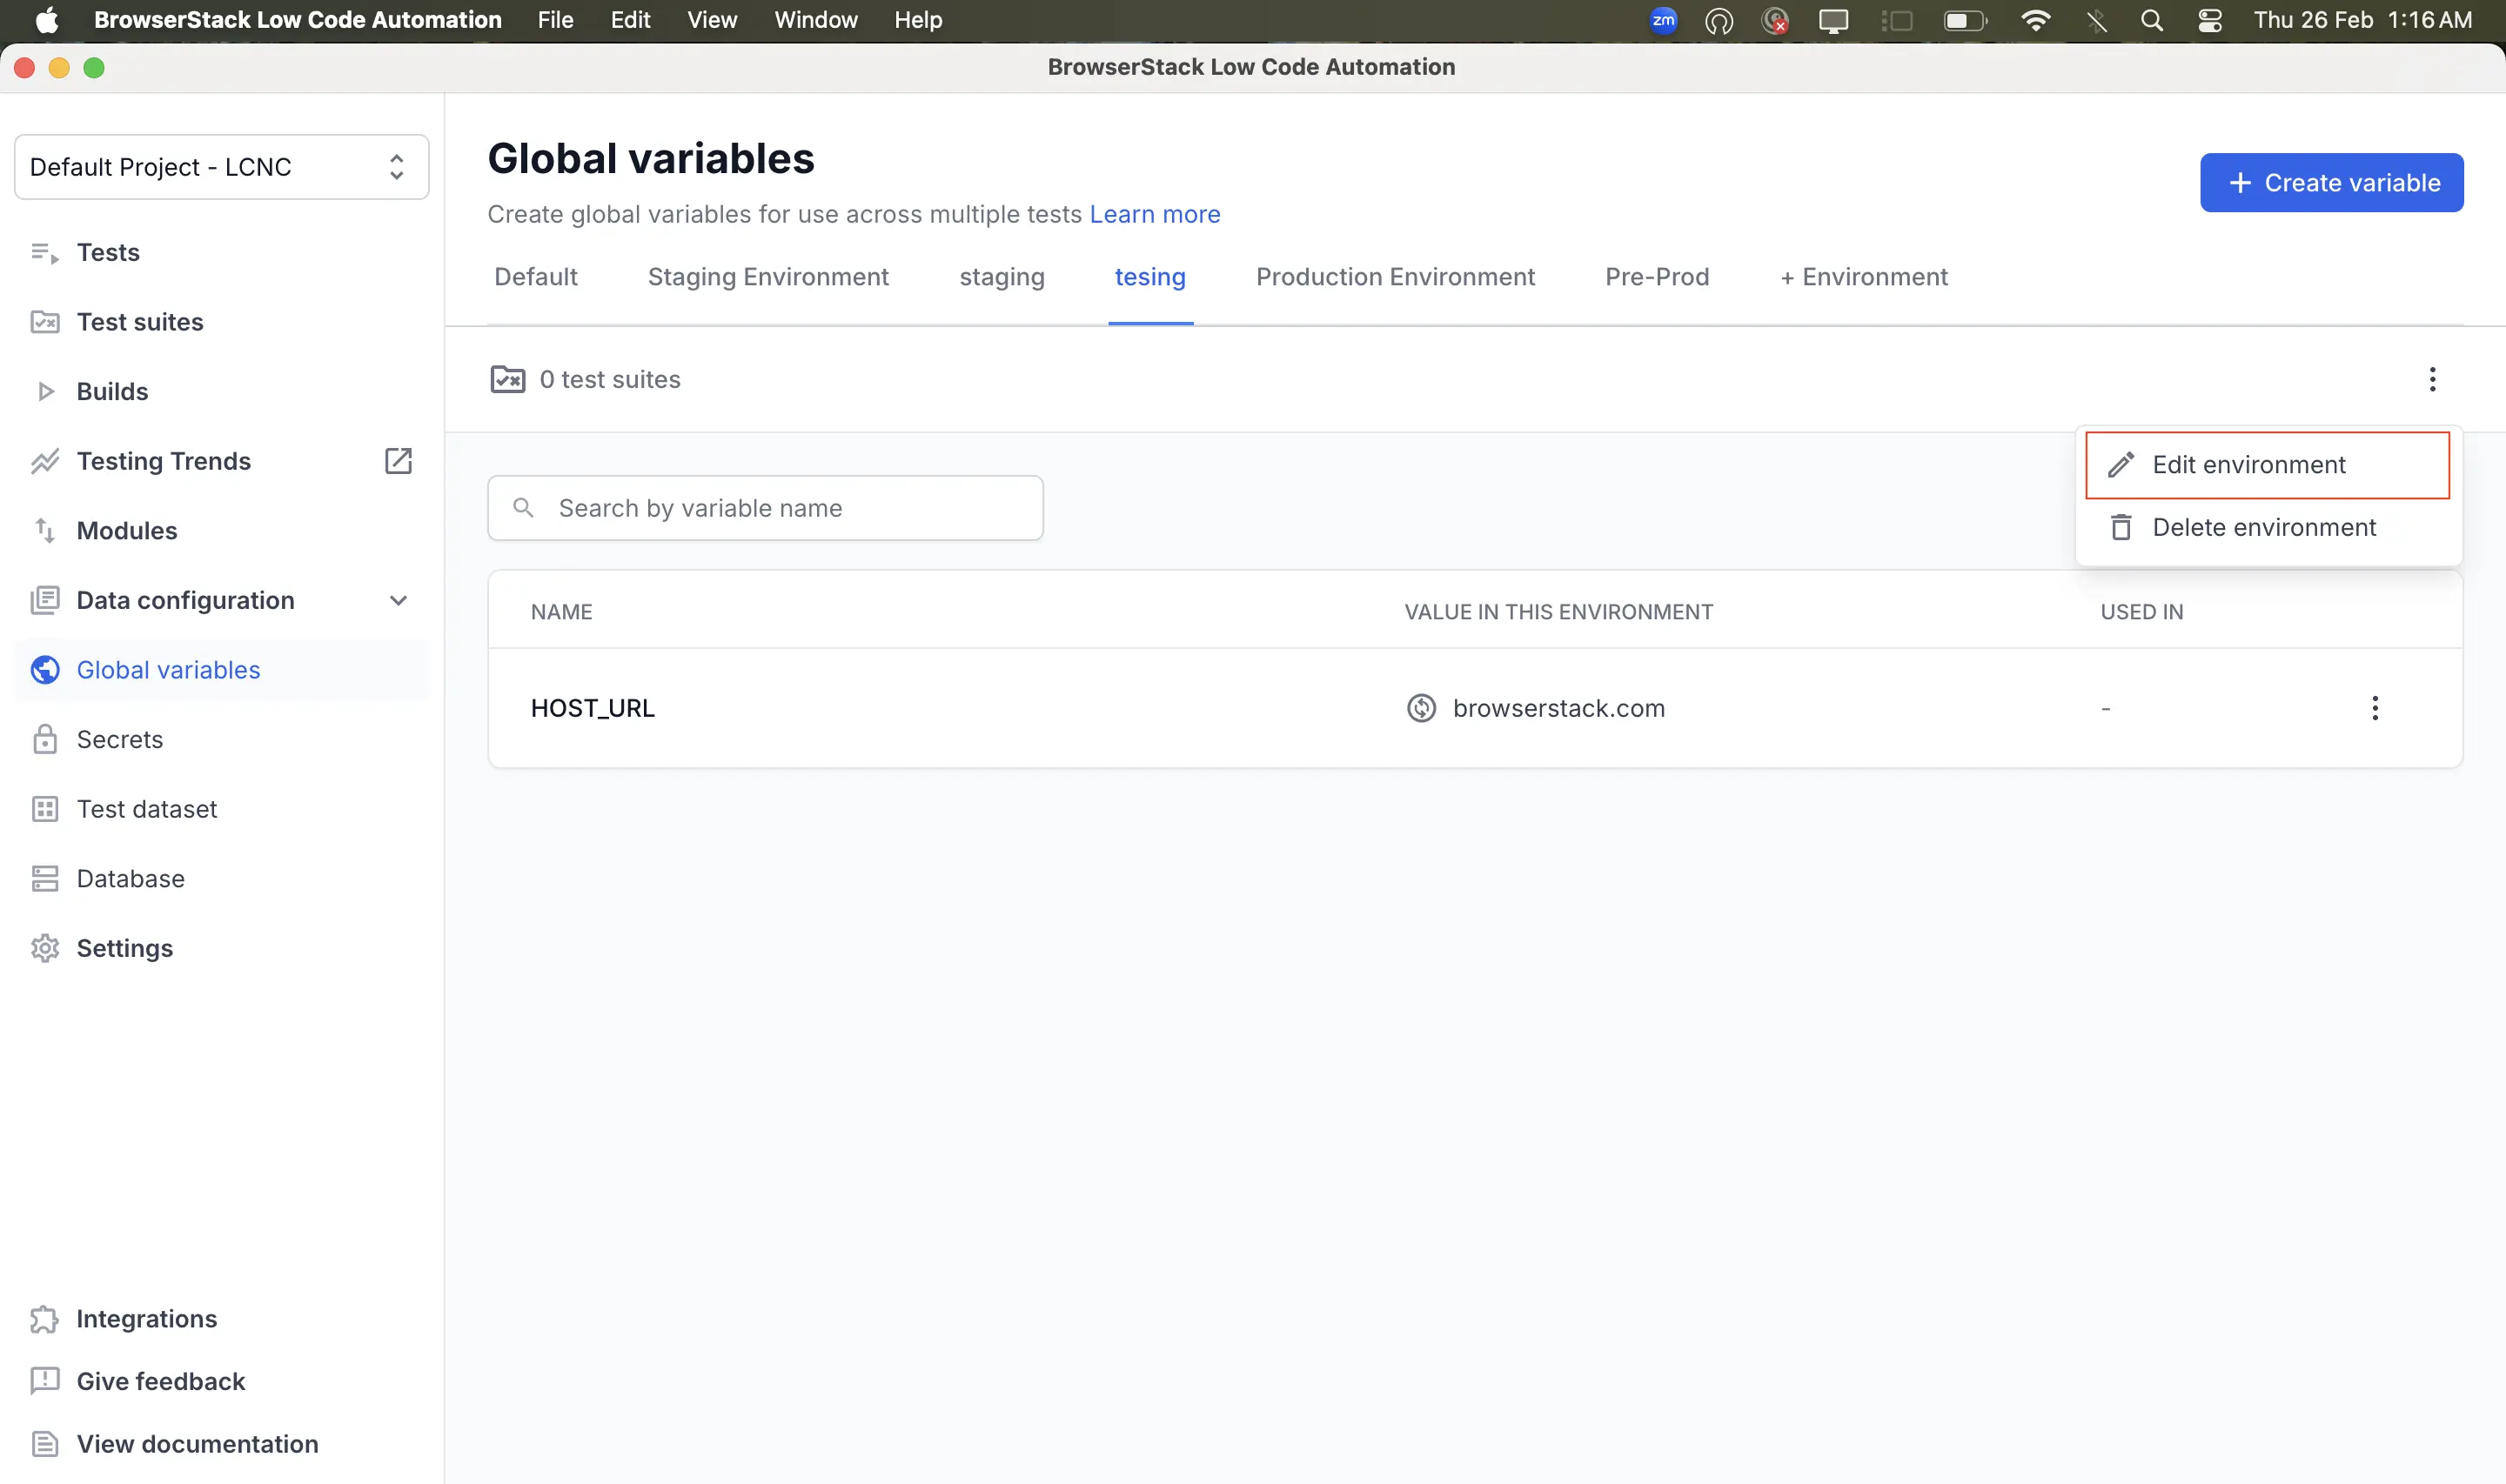
- To delete, select Delete environment. In the confirmation dialog, click Delete.

- To edit, click Edit environment. In the Edit environment dialog, update the environment name as needed and click Update.
You cannot delete environments where active test suites depend on that environment.
Add host domain name to run tests
Configure environment allows you to run tests across multiple environments with ease. This is achieved by specifying the base URL of the environment where you want to run the test suite. During execution, the base URL for all tests within the test suite is overridden based on the selected environment configuration.
The host URL is applied during execution based on the selected URL type:
- When the URL type is set to Only domain, the system overrides only the domain portion of the host URL. Refer to the following table to understand how the domain name gets overridden in different cases.
| Recorded Test URL | Test Suite Host URL | URL during Execution |
|---|---|---|
| staging.example.com | preprod.example.com | preprod.example.com |
| staging.example.com | preprod.example.com:3000 | preprod.example.com:3000 |
| staging.example.com:3000 | preprod.example.com | preprod.example.com |
| staging.example.com:3000 | preprod.example.com:3000 | preprod.example.com:3000 |
| staging.example.com/pricing | preprod.example.com | preprod.example.com/pricing |
| staging.example.com/pricing | preprod.example.com:3000 | preprod.example.com:3000/pricing |
| staging.example.com:3000/pricing | preprod.example.com | preprod.example.com/pricing |
| staging.example.com:3000/pricing | preprod.example.com:3000 | preprod.example.com:3000/pricing |
- To avoid overriding the domain, use the full URL. When the URL type is set to Full URL, the host URL is used as-is during execution and is not truncated.
We're sorry to hear that. Please share your feedback so we can do better
Contact our Support team for immediate help while we work on improving our docs.
We're continuously improving our docs. We'd love to know what you liked
We're sorry to hear that. Please share your feedback so we can do better
Contact our Support team for immediate help while we work on improving our docs.
We're continuously improving our docs. We'd love to know what you liked
Thank you for your valuable feedback!