Customize the Web SDK widget
Learn how to customize the Web SDK widget to match your website
BrowserStack offers several options to customize the Web SDK widget. This page showcases these options. For a full set of customization options, see the Options page.
Default flow and screens
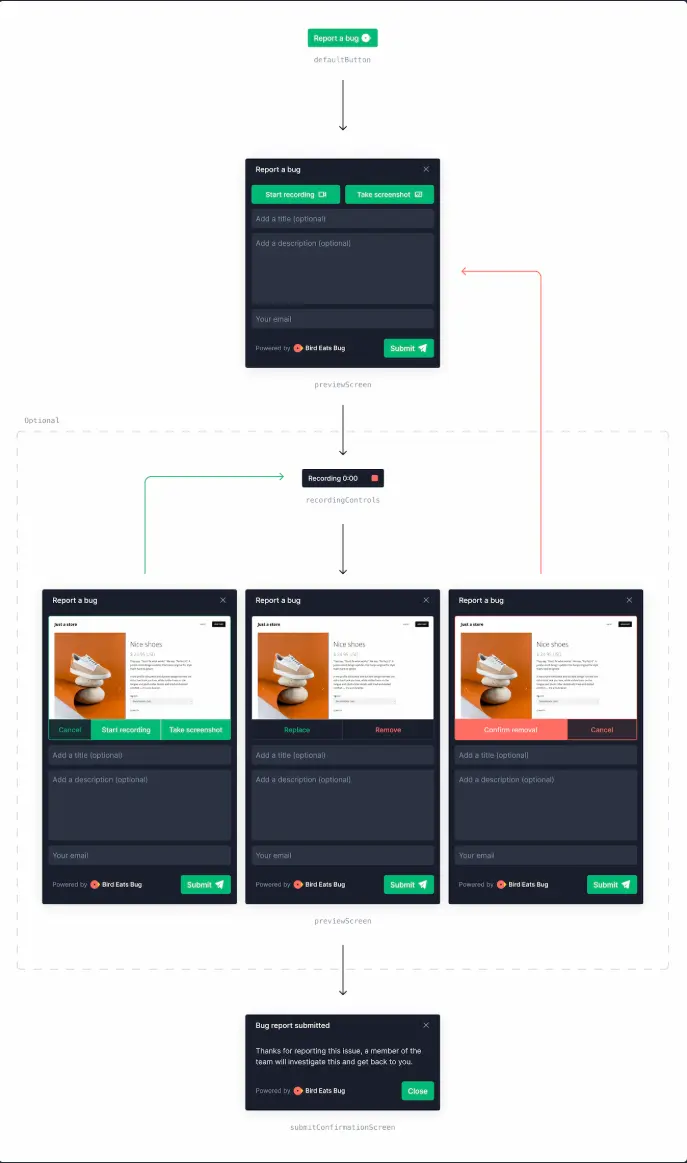
The SDK comes pre-configured with default screens, allowing it to be used without any further customization. The default flow (in the dark theme) is shown in this diagram below:
Choose a theme
Bug Capture offers a dark and a light theme for the default screens. You can change it by setting the ui.theme option to the desired variant:
Customize the default button
You can position the default button in one of the four corners of the browser. You can set its position using the following property:
The distance to the viewport edges can be defined by overriding the CSS custom properties --distance-to-window-edge-vertical and --distance-to-window-edge-horizontal.
The icon on the button can be disabled with false:
Change UI text
You can define every UI element’s copy by setting the text option object’s keys to custom string values:
All available UI text keys are documented here.
Disable the watermark
To disable the “Bird Eats Bug” branding, set the following option:
Customize the trigger action
By default, the session preview screen is shown when the default button is clicked, which allows the user to describe the issue and attach a screen recording or a screenshot. If you use SDK in an internal system and your colleagues want to submit reports as quickly as possible, you could enable Instant Replay, or configure the default button to trigger a screen recording or a screenshot right away on button click.
To start screen recording right away:
To take a screenshot:
By default, window.birdeatsbug.stopSession is called. Besides the options shown above, any valid function can be passed to the onTrigger hook as click event handler for the default trigger button.
Add additional triggers
Any HTML element with the attribute data-birdeatsbug="trigger" that is present in the DOM when the SDK is initialized triggers the SDK flow. For example:
<button data-birdeatsbug="trigger">Share feedback</button>
While this approach works well for static or server side rendered sites, single page applications might add triggers only later. To trigger the SDK flow programmatically, call window.birdeatsbug.trigger(), e.g. in the click handler of a button. Before making a call to window.birdeatsbug.trigger(), check whether the end-user’s browser is supported, by checking if window.birdeatsbug.isBrowserSupported is true (and, of course, only add triggers programmatically if that’s the case). Example:
Disable the default button
To hide the default button and only use custom triggers, set the ui.defaultButton option to false:
Customize the form
You can configure which input fields users can / need to fill to submit the form on the session preview screen. The following inputs can be configured with client side SDK options:
- “Visual proof”, a term which refers to screenshots / screen recordings
- Email address
- Title
- Description
Each one of these input fields can be set as required, optional, or hidden:
There are also two input fields that are configured from the server side:
- The collection to which the session will be uploaded
- Labels
These inputs are configured in the SDK settings of the web app: Inputs to choose a selection or labels will be displayed automatically in the SDK, if at least two collections or labels are marked as selectable in the web app. Both inputs are optional. The default collection for SDK sessions is also configured in the web app.
Set the user email
If you know the user’s email address, you can pass it to the SDK. If the session preview screen is configured to show the email input, it will be pre-filled with the user’s email. If the email field is hidden on the session preview screen, the email will still be included in the submission, but the user will not be able to change it.
Skip or customize the success screen after session upload
After a successful session upload, the submitConfirmationScreen is shown to inform the user about the success. The screen is automatically skipped when the Intercom or Zendesk integration is enabled. Even without integration the screen can be skipped using the following code snippet:
Especially in internal use-cases it is handy to allow end-users to copy the session link:
Exclude recording of select data types
Data-rich bug reports are more efficient to debug and resolve. However, there’s valid reasons to exclude some events from the bug report, e.g. to protect the privacy of end-users. That’s why each recordable event type can be ignored by the recorder when setting its specific recordedEventTypes property to false.
Mutate recorded data before upload
The authorization header in network requests is scrubbed automatically. To exclude additional private information, use the beforeUpload hook. The example below removes the password field from network request bodies:
The same hook can also be used to e.g. prefix all session titles reported with SDK:
We're sorry to hear that. Please share your feedback so we can do better
Contact our Support team for immediate help while we work on improving our docs.
We're continuously improving our docs. We'd love to know what you liked
We're sorry to hear that. Please share your feedback so we can do better
Contact our Support team for immediate help while we work on improving our docs.
We're continuously improving our docs. We'd love to know what you liked
Thank you for your valuable feedback!