Manage invitations
Invite members to start collaborating on BrowserStack
You can collaborate with your team members by inviting them to your organization account on BrowserStack. Your ability to invite people depends on your role and your organization’s settings.
This page applies to organizations on the legacy RBAC model. If centralized RBAC is enabled for your organization, see Centralized RBAC.
Permissions to invite user members
The ability to invite members to the organization as well as the access provided to them is dependent on the role of the invitor as shown in the table below:
| Invitor Role | Can Invite | Can provide |
|---|---|---|
| Owner | Any Role | Any Product Access |
| Admin | Any Role (except owner) | Any Product Access |
| Team Admin | Team Admin/Team User | Any Product Access |
| User | User | All Product Access (Default) |
Note:
- Owner can restrict members with User role from inviting people to the organisation by restricting permission through Custom Permissions
- Teams is an Enterprise Feature. Learn more about Enterprise plans.
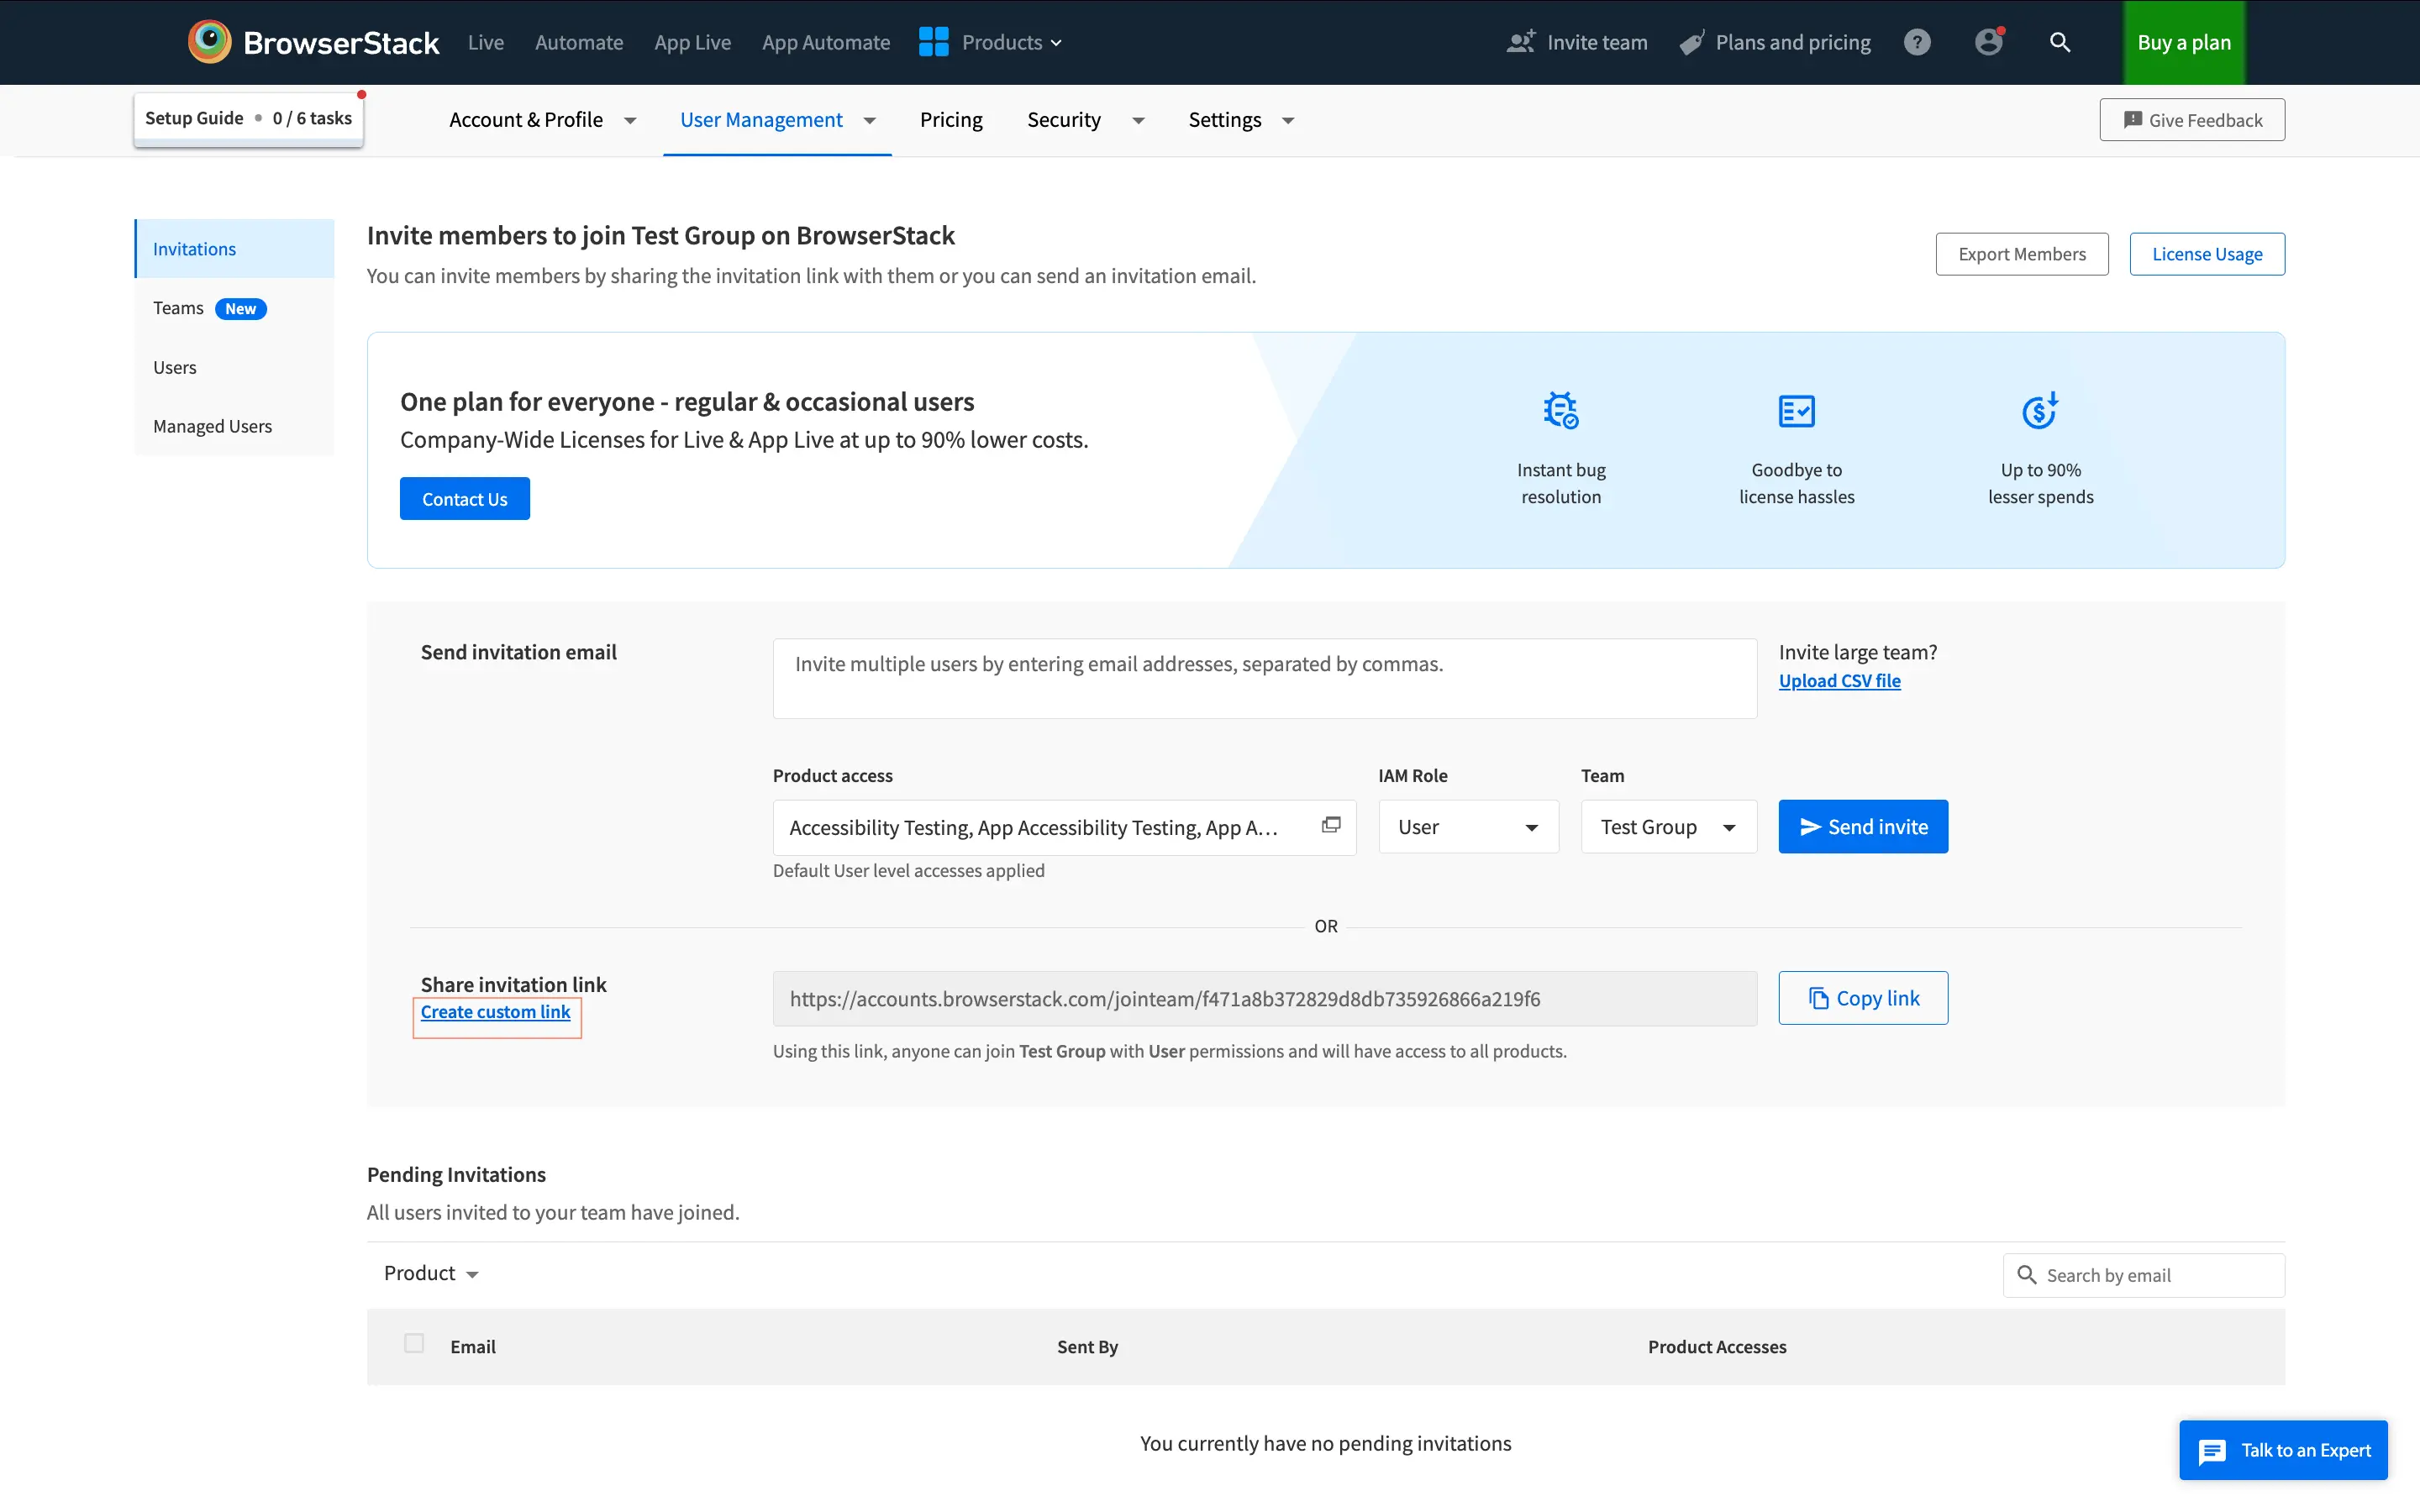
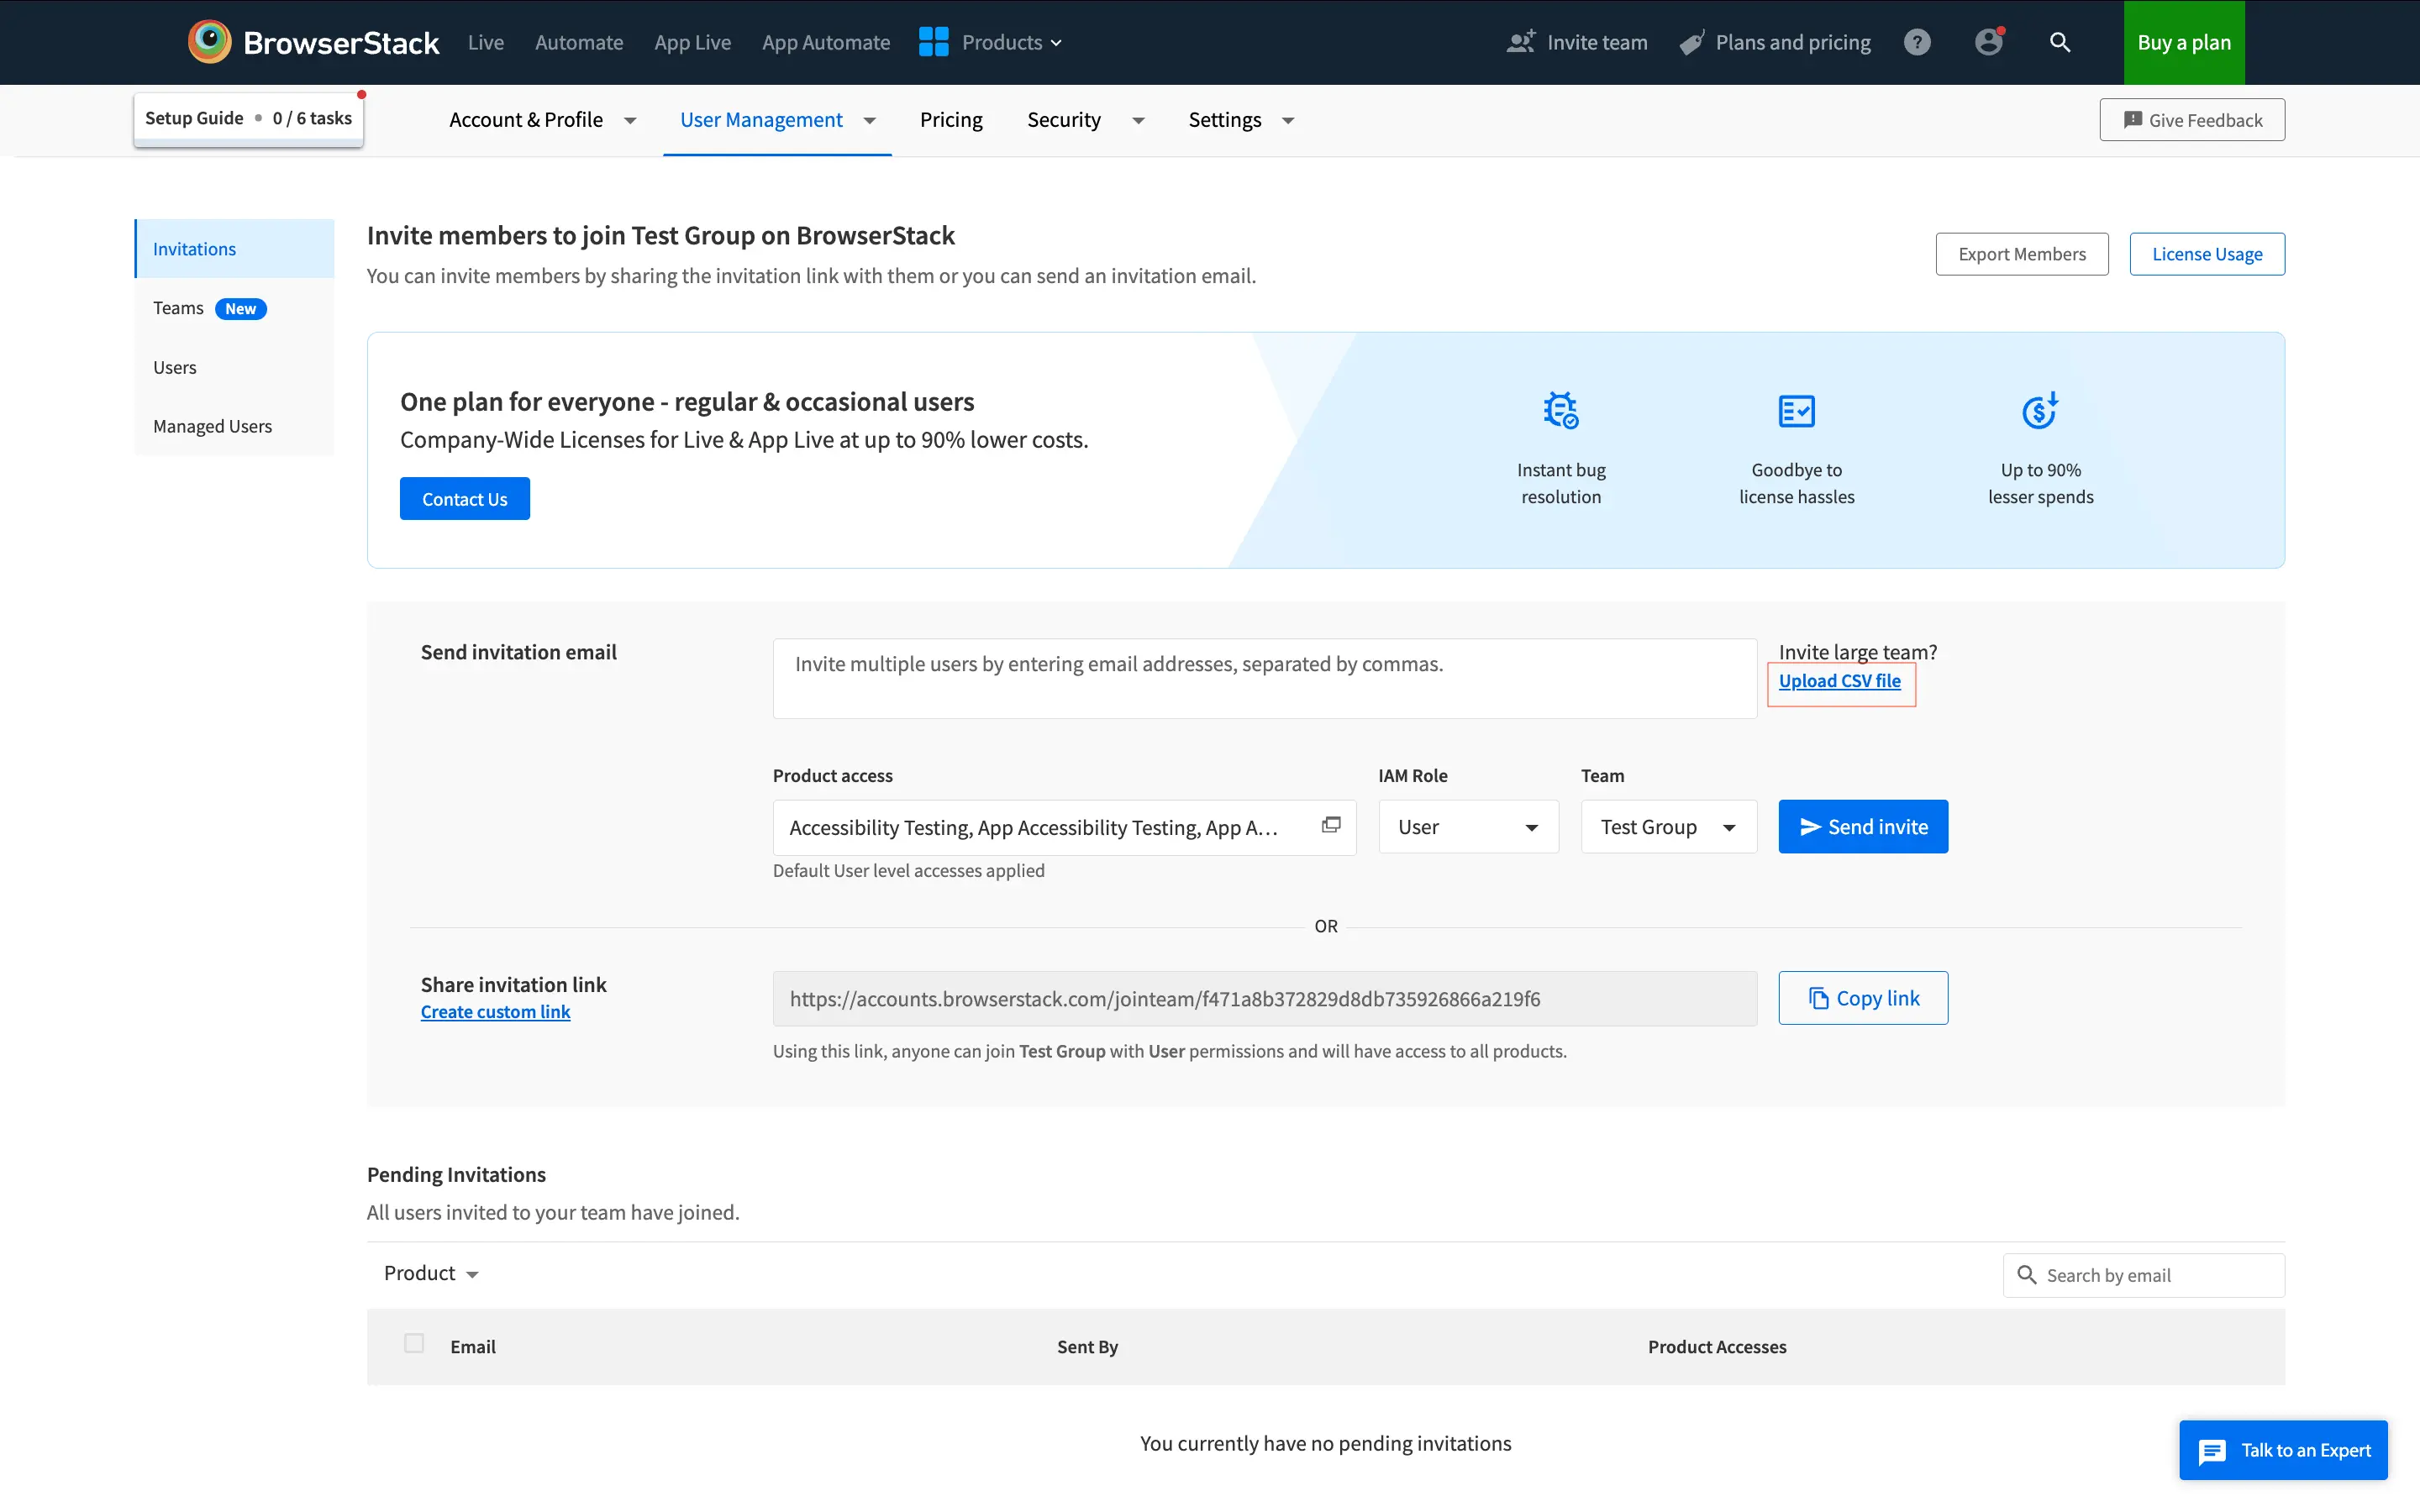
Invite users
There are a three ways to invite User Members on BrowserStack:
- Send invitation email
- Share invitation link
- Invite via CSV
Default Invite Link
Anyone from the organisation can copy the default invite link and share it to onboard new users with ease. Anyone joining the organisation with the link with have User role and access to all the products
- Log in to your BrowserStack account.
- Click the User Profile icon in the top-right corner, then select User Management and click Invitations.

- Click the Copy link button in the Share invitation link section.
- Share the copied link via email, Slack, text, etc. Anyone who receives this link will be able to join your organization on BrowserStack.
Custom Invite Link
Apart from the Default Invite link, Owner and Admins can customize the invite link to modify the role, team as well as product access.
- Log in to your BrowserStack account.
- Click the User Profile icon in the top-right corner, then select User Management and click Invitations.
- Click the Create custom link option below the Share invitation link.
- Select the permissions you want to provide to the members.
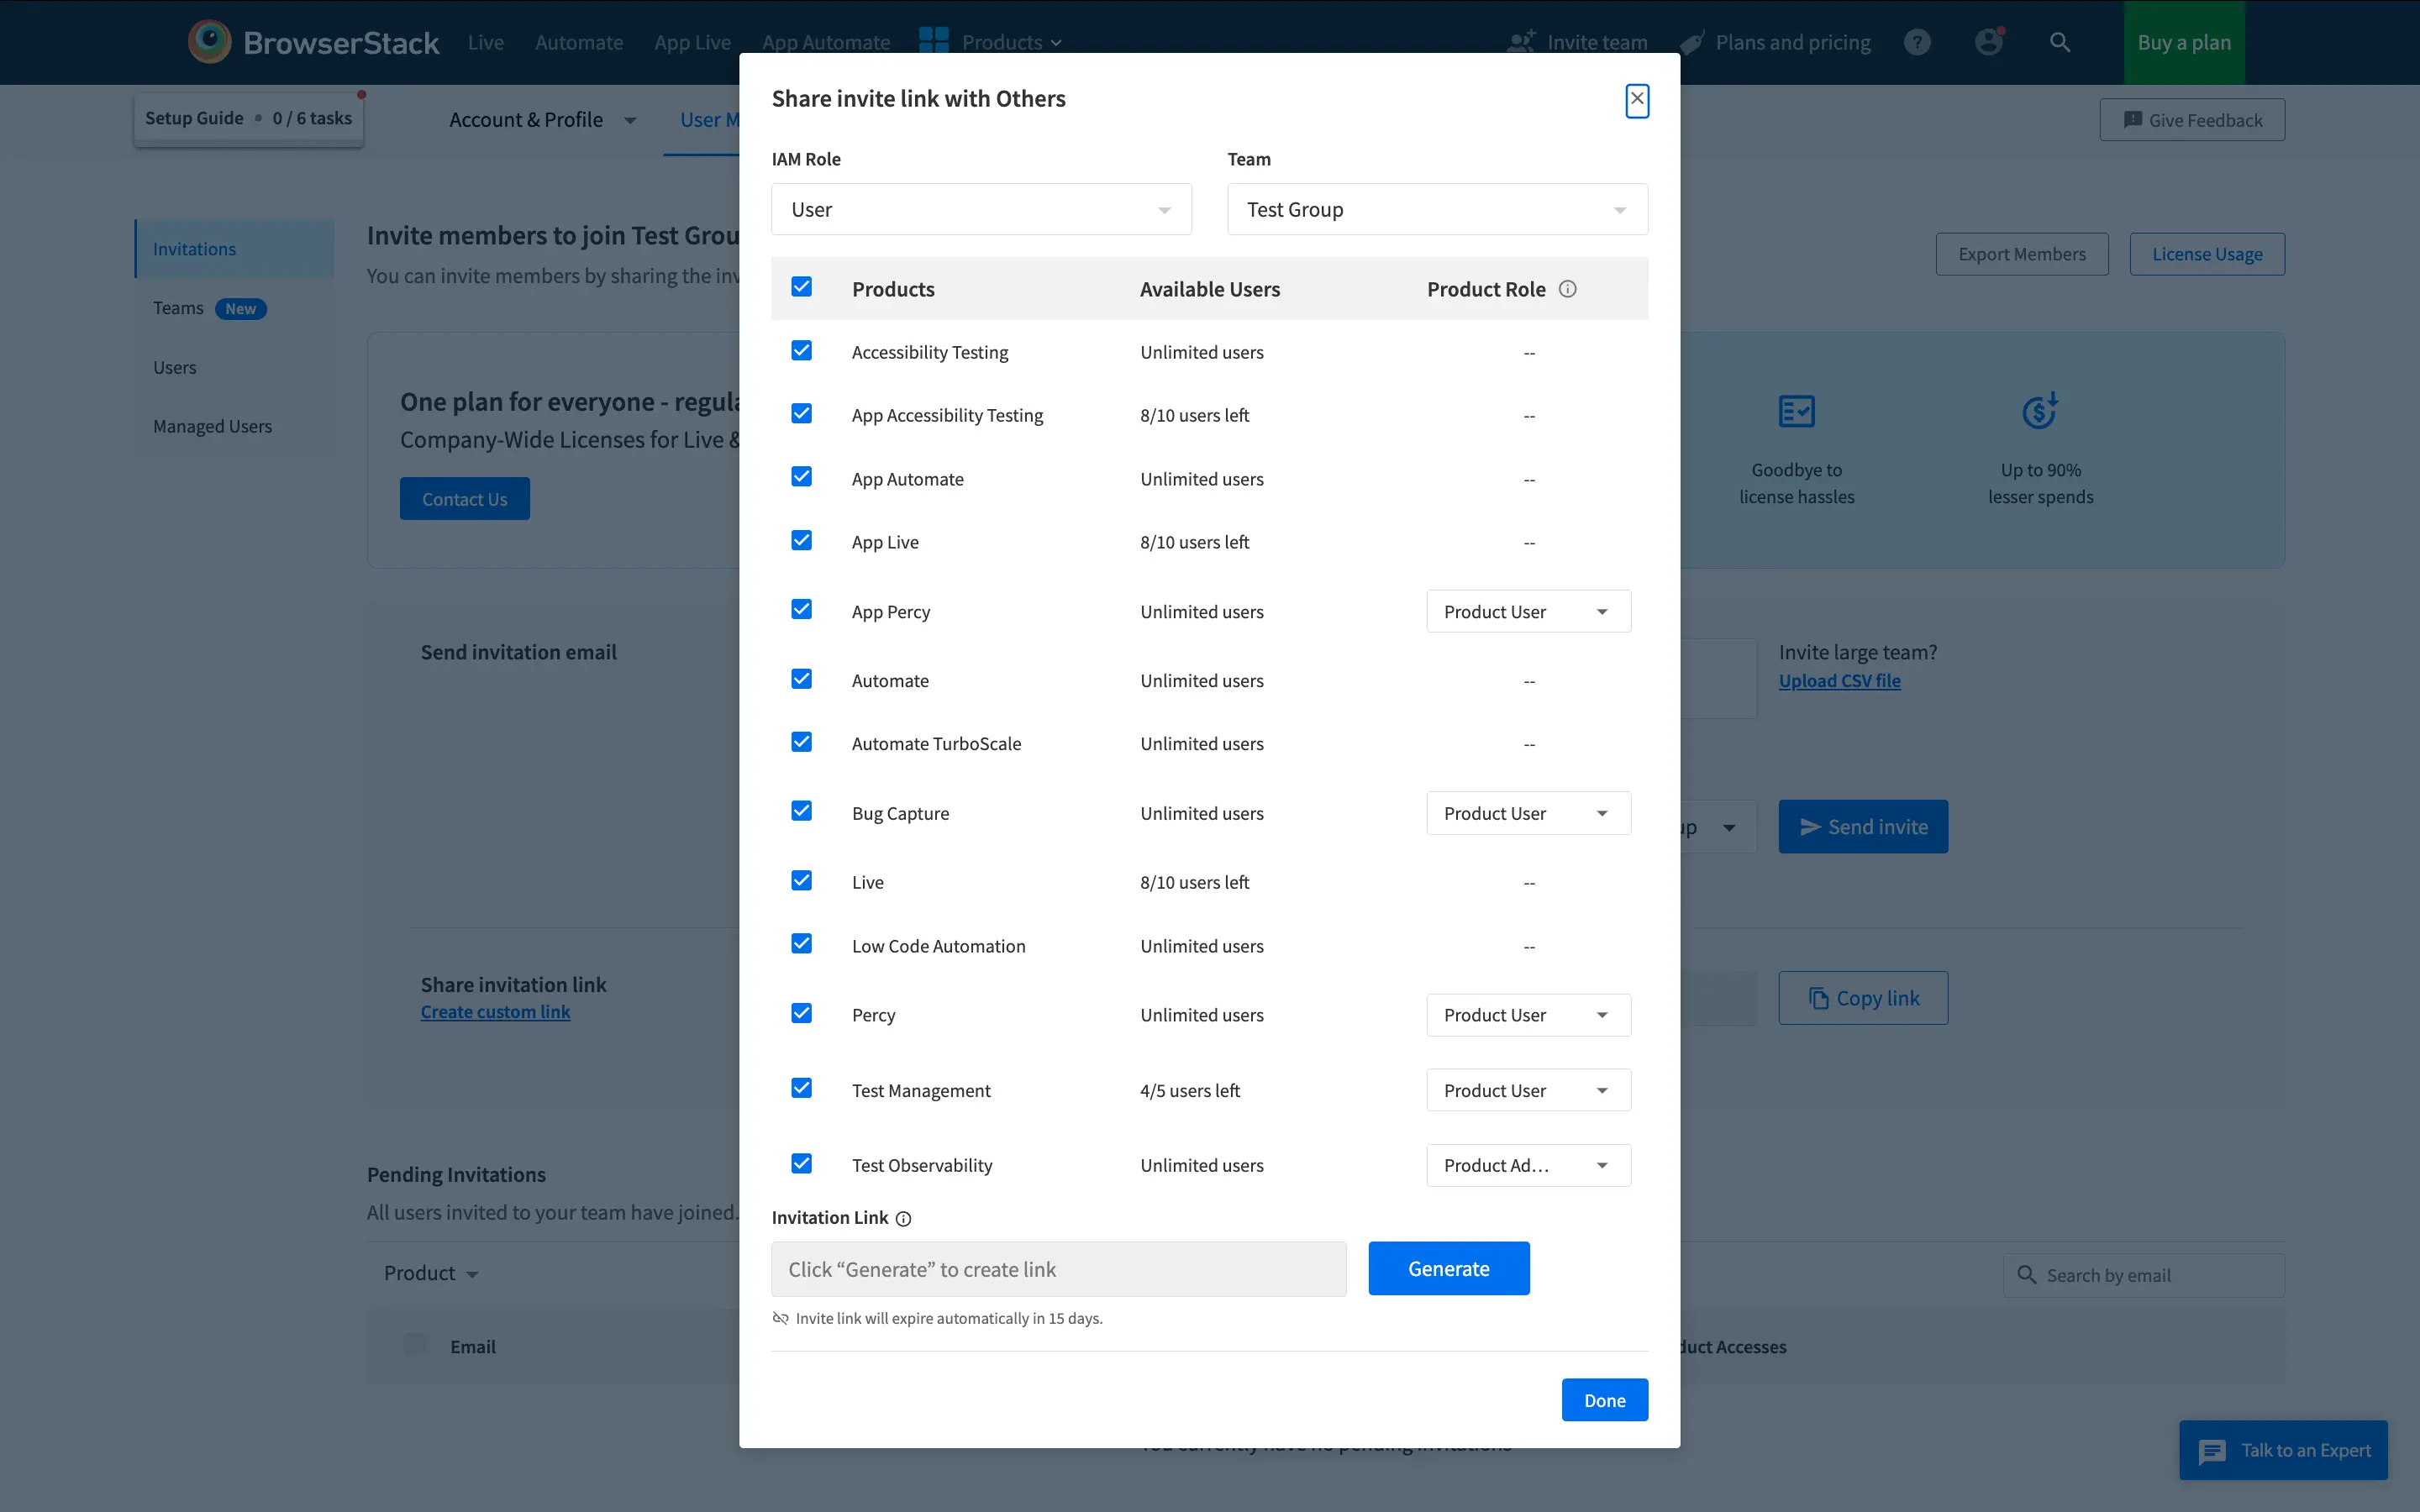
- Click Generate to create a custom link and click Done.
- Link with selected permission will be copied to the clipboard.
- Share the link with the members you want to invite to your organization with selected permissions.
Custom Invite Link is available only to Owners and Admins. Custom Invite link will expire in 15 days from the date of link generation.
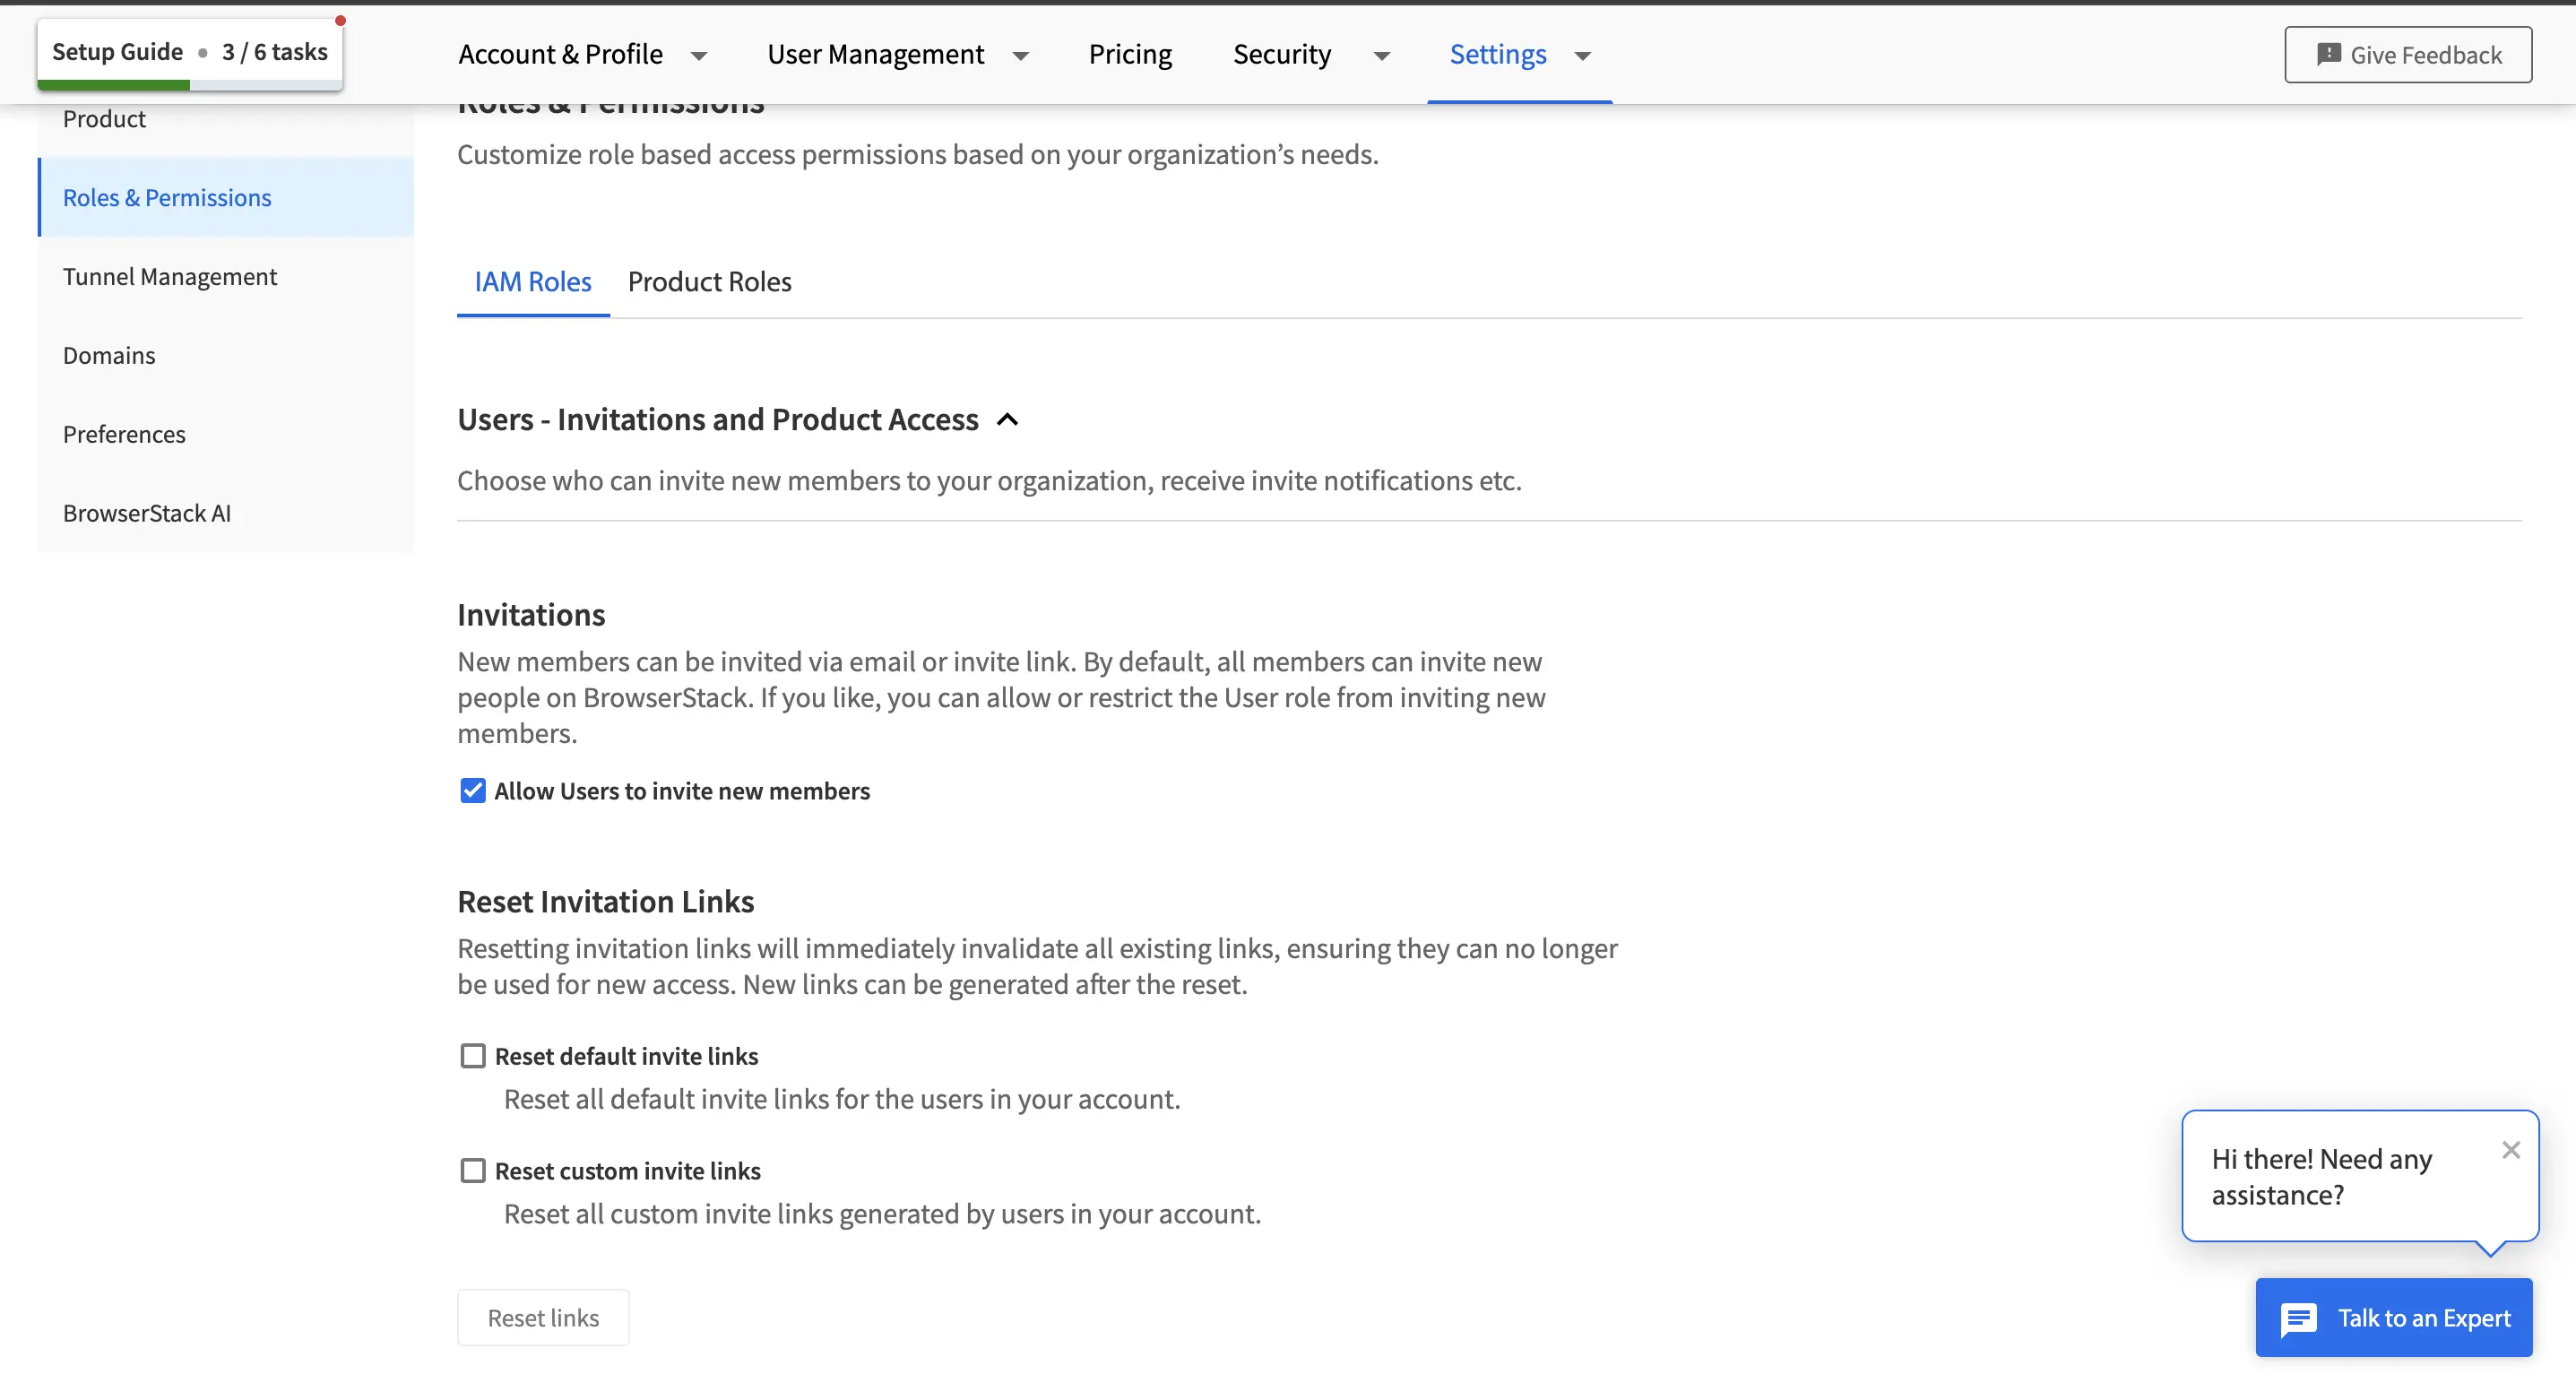
Reset invitation link
Only the Owner can reset invitation links for your organization.
You can reset invitation links to immediately invalidate all existing invite links, ensuring they can no longer be used for new access. New links can be generated after the reset.
- Log in to your BrowserStack account.
- Go to Settings > Roles & Permissions.
- Under the IAM Roles tab, expand the Users - Invitations and Product Access section.
- In the Reset Invitation Links area, select one or both options:
- Reset default invite links: Reset all default invite links for the users in your account.
- Reset custom invite links: Reset all custom invite links generated by users in your account.
- Click Reset links to confirm.
- Log in to your BrowserStack account.
- Click the User Profile icon in the top-right corner, then select User Management and click Invitations.

- Enter the email addresses of the member you want to invite to the organisation

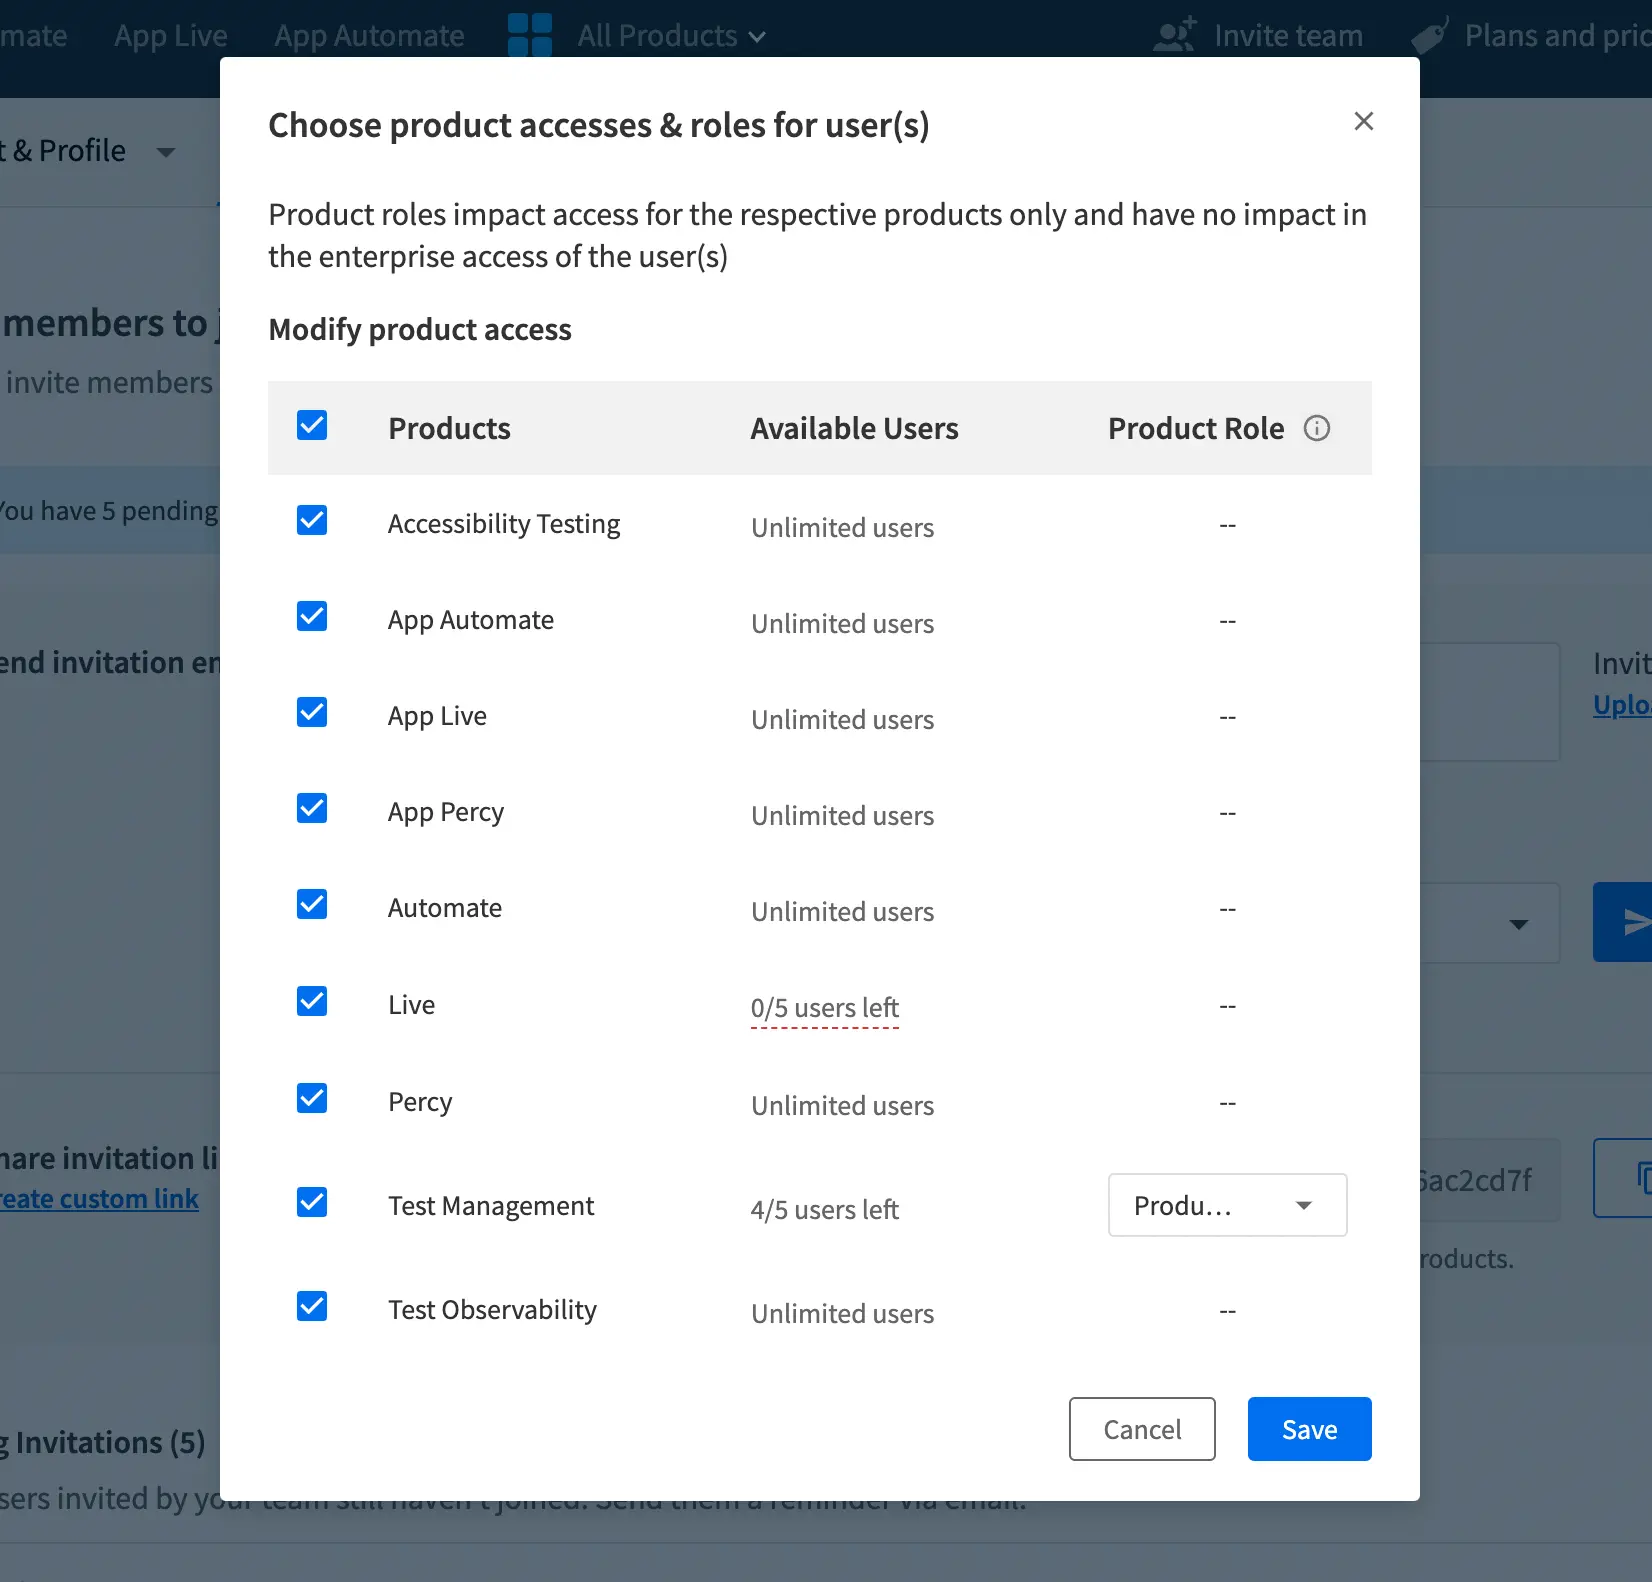
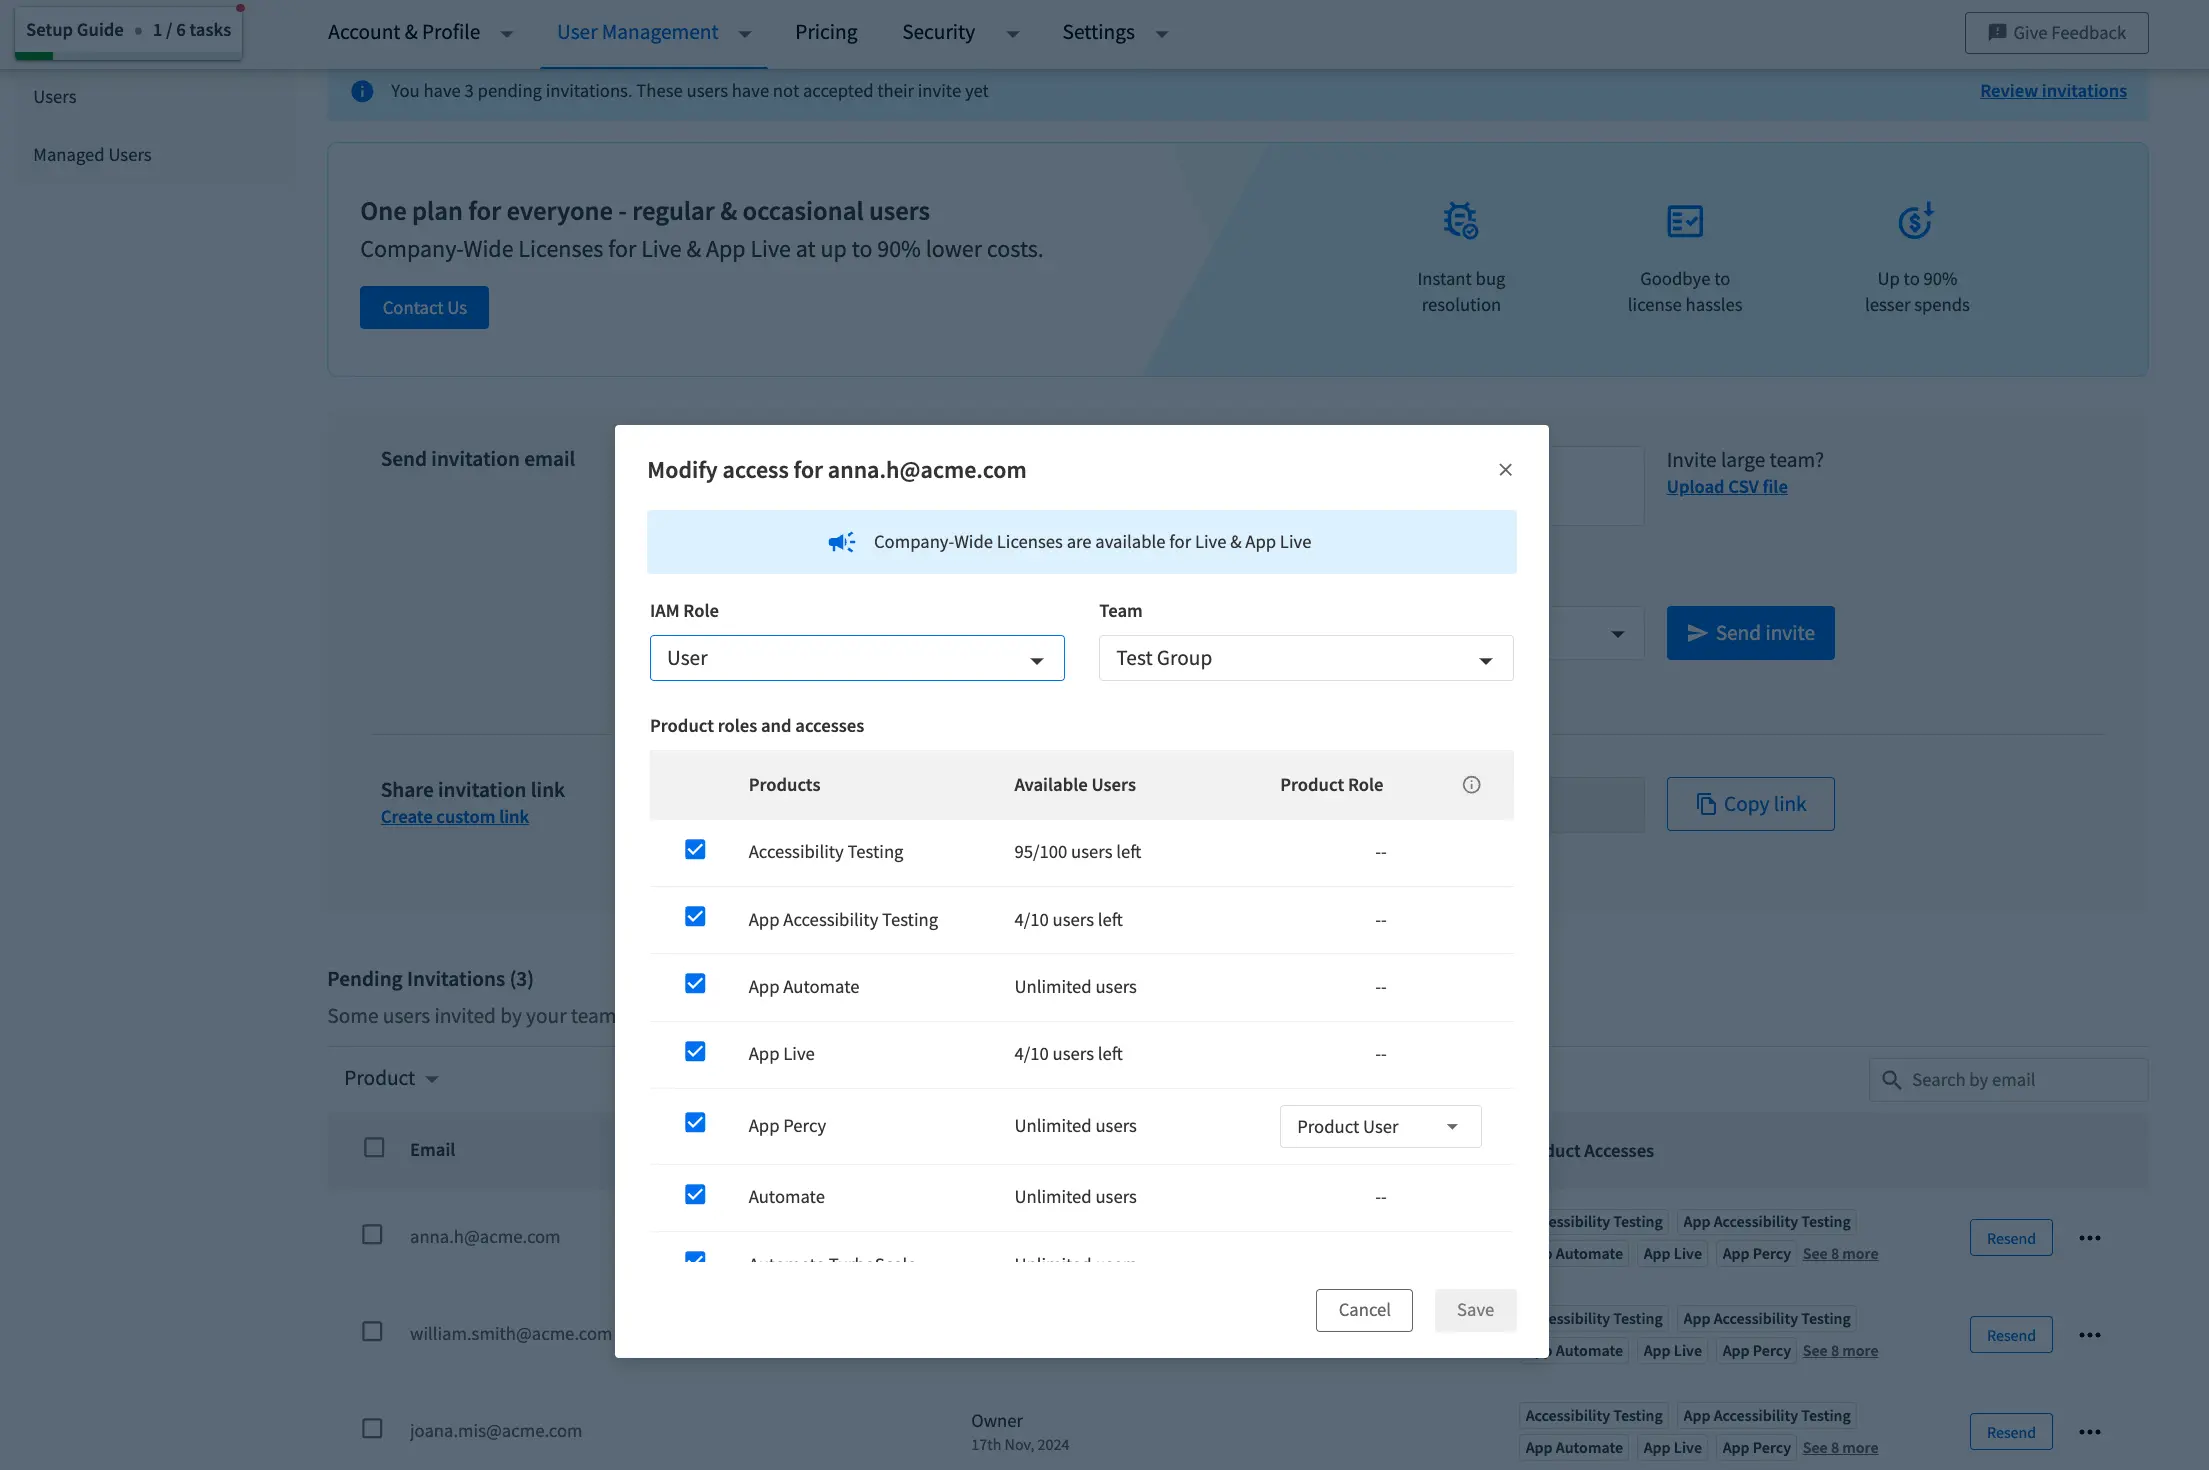
- Modify the product access or role if required from the dropdown. By default, members will be assigned an IAM role of
Useraccess are provided with access to all products (with default product roles for applicable products). - If you choose to modify the product role assignments, click the Product Access field to open the Modify product access dialog.

- On the dialog that opens, choose the role configuration that you wish to assign to the user and click Save.
- Click Send invites . The invited person will receive an email inviting them to the join the organization account on BrowserStack.
You won’t be able to invite members to the organisation if all the available license to any of the product is already consumed. In case, you want to invite more members, you can remove the product (for which the license has exhausted) from Product dropdown and send invite again.
To invite member(s) only for Administrative purpose, select the role as Admin and un-check all the product’s access from the Product dropdown and send the invite. As a result, the invited user will not consume any license.
- Log in to your BrowserStack account.
- Click the User Profile icon in the top-right corner, then select User Management and click Invitations.
- Click Upload CSV file below Send Invitation Email.
- Click Download template to download CSV format.
- By using the format provided in the downloaded file, add all details of the members you wish to invite.
- Click Upload CSV and select the CSV with user details in the provided format.
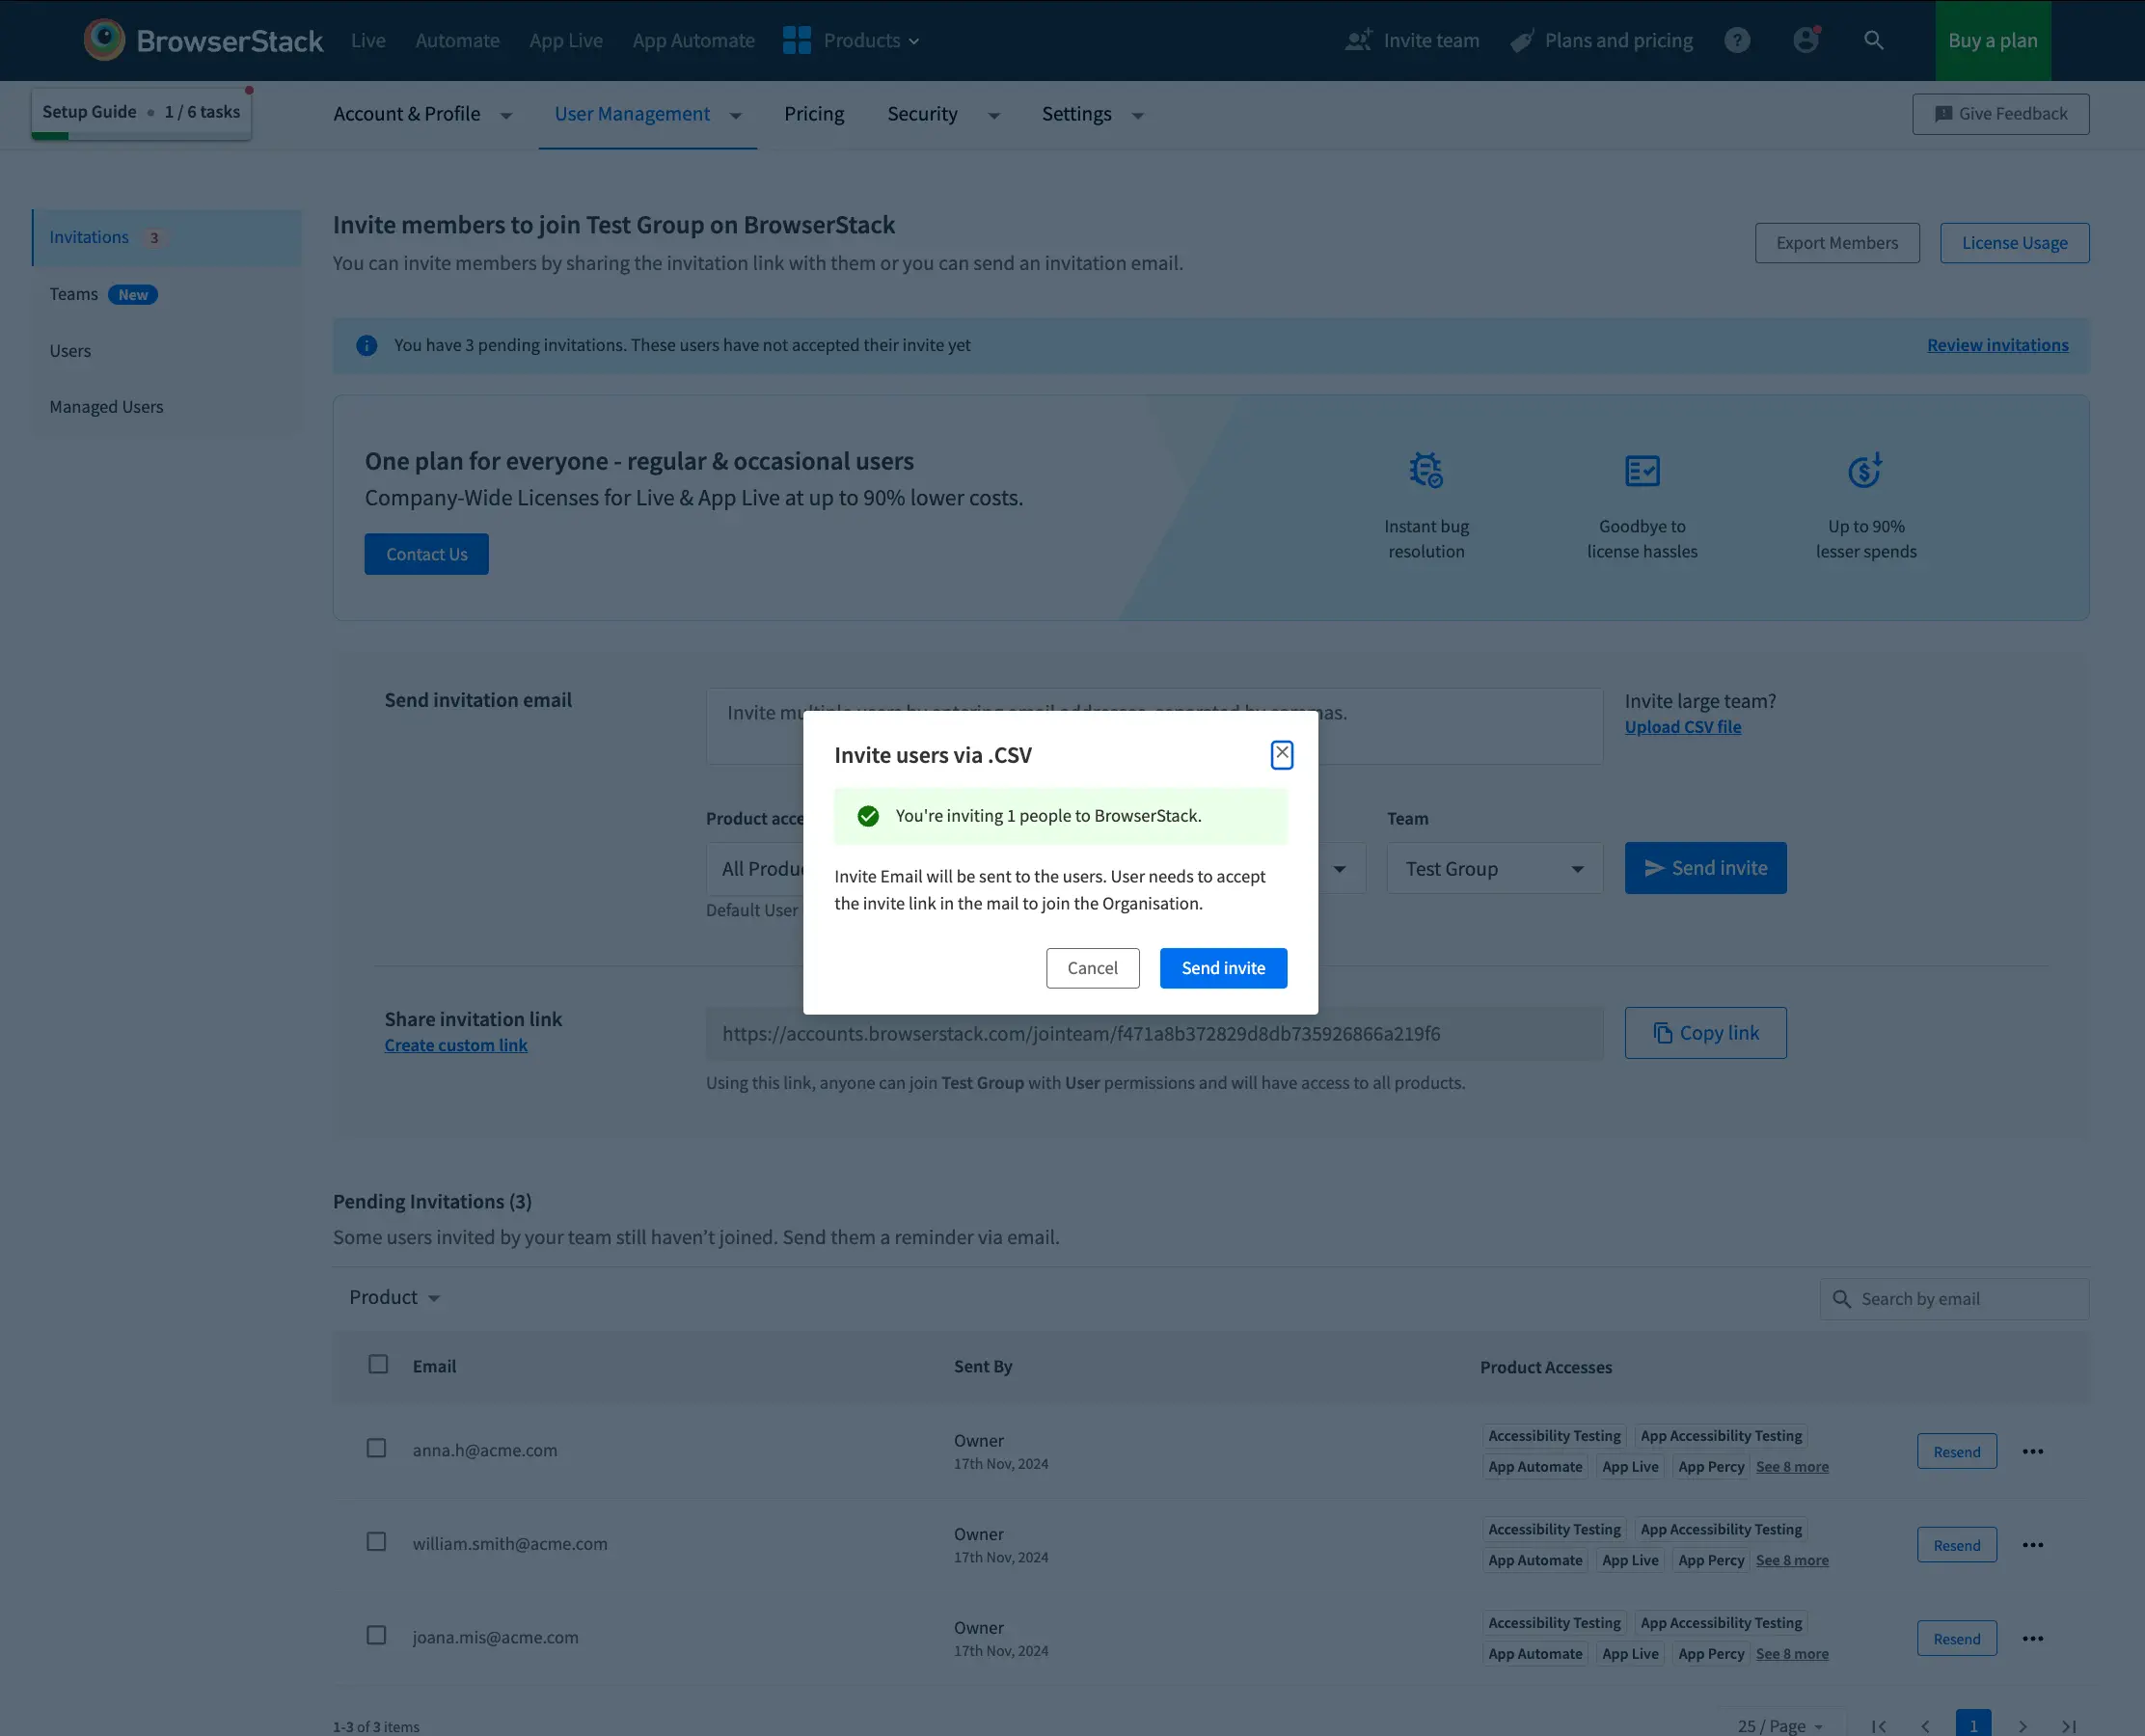
- Click Continue which will analyse the CSV for any errors.
- If any errors are present in CSV, click Download logs to download the CSV file with error details.
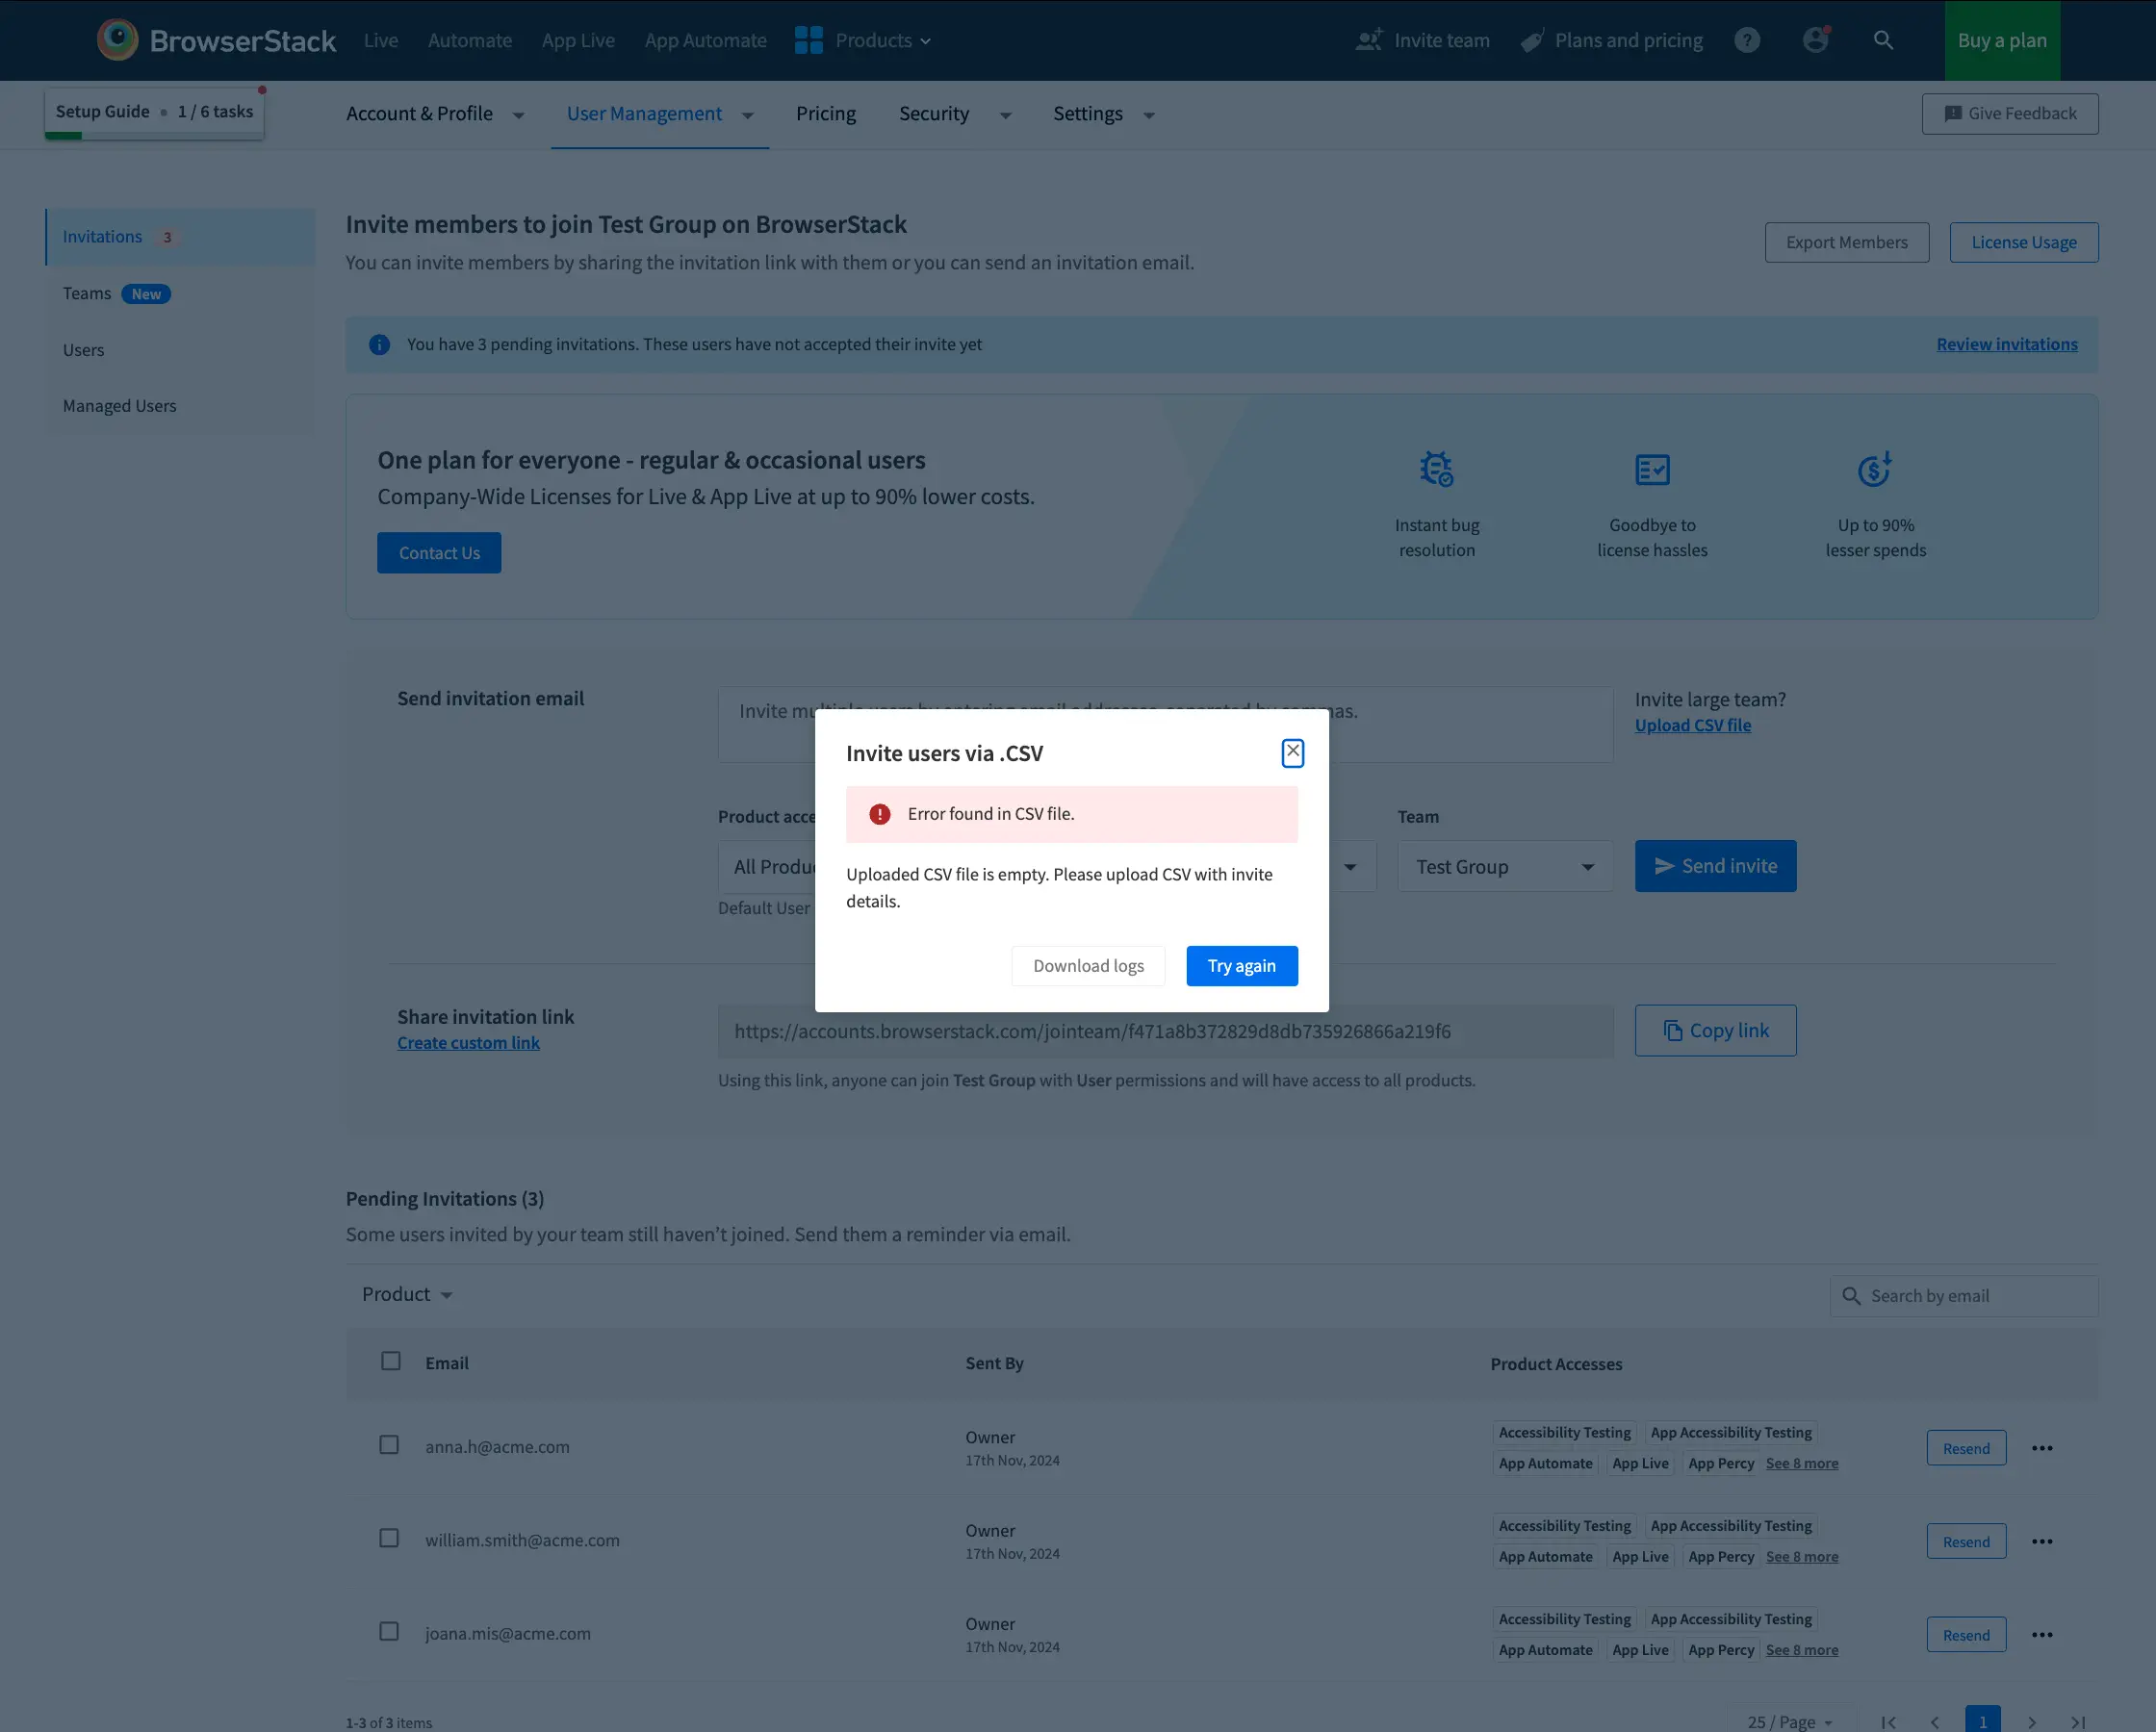
- Click Send invite to invite the members to the organization. Invited members will receive an email with the instructions to join the organization account on BrowserStack.
- Invite via CSV option is available only to the Owner and Admins of the Organisation.
- The maximum allowed limit is 100 users at a time.
To invite member(s) only for Administrative purpose, enter the Role as Admin and Product Access column as empty in the CSV. As a result, the invited user will not consume any license.
Restrict invitations from specific domain
Note:
- Domain Restriction is an Enterprise Feature. Learn more about Enterprise plans.
- Organizations with AUP enabled won’t be seeing Domain Restriction feature, since IDP is the source of truth for them
The owner can now restrict domains from which users can join their organization on BrowserStack.
- Log in to your BrowserStack account.
- Click the User Profile icon in the top-right corner, then select Settings and click Roles & Permissions.
- Click the IAM Roles tab and expand the Users - Invitation and Product Access section
- Select Restricted by domain option under Restrict invite from Domains heading
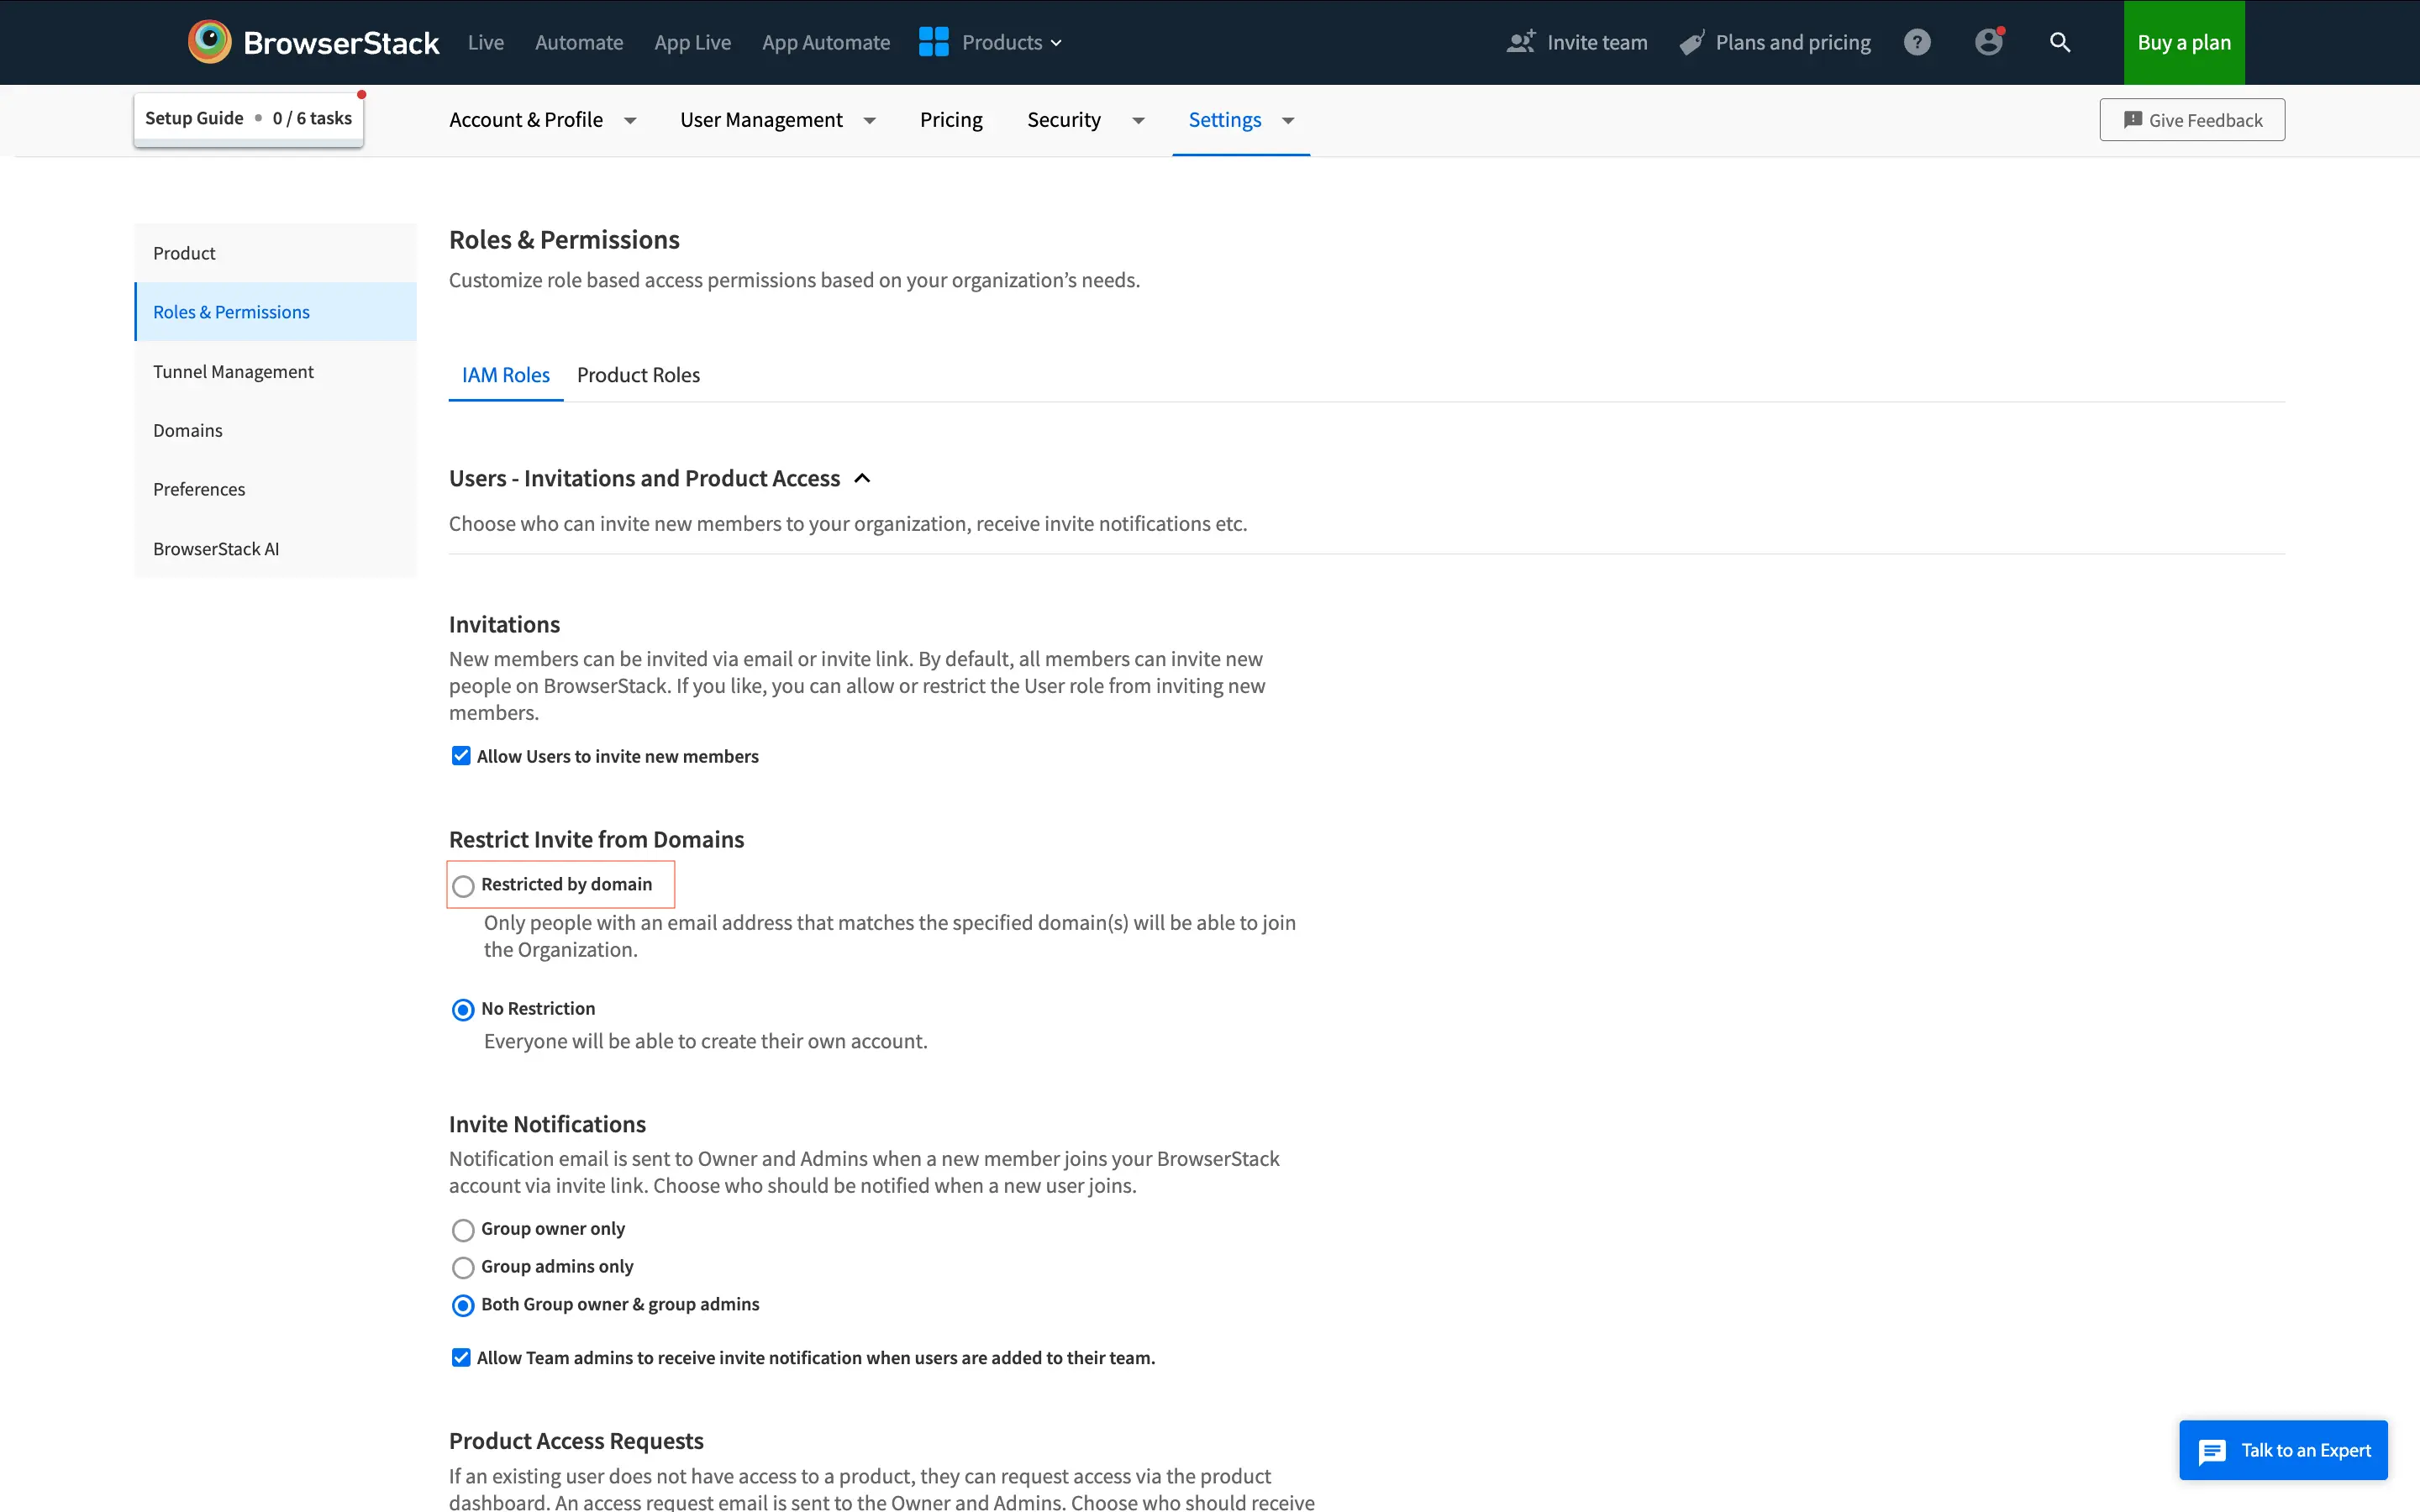
- Enter all the domains you want to restrict invitations on.
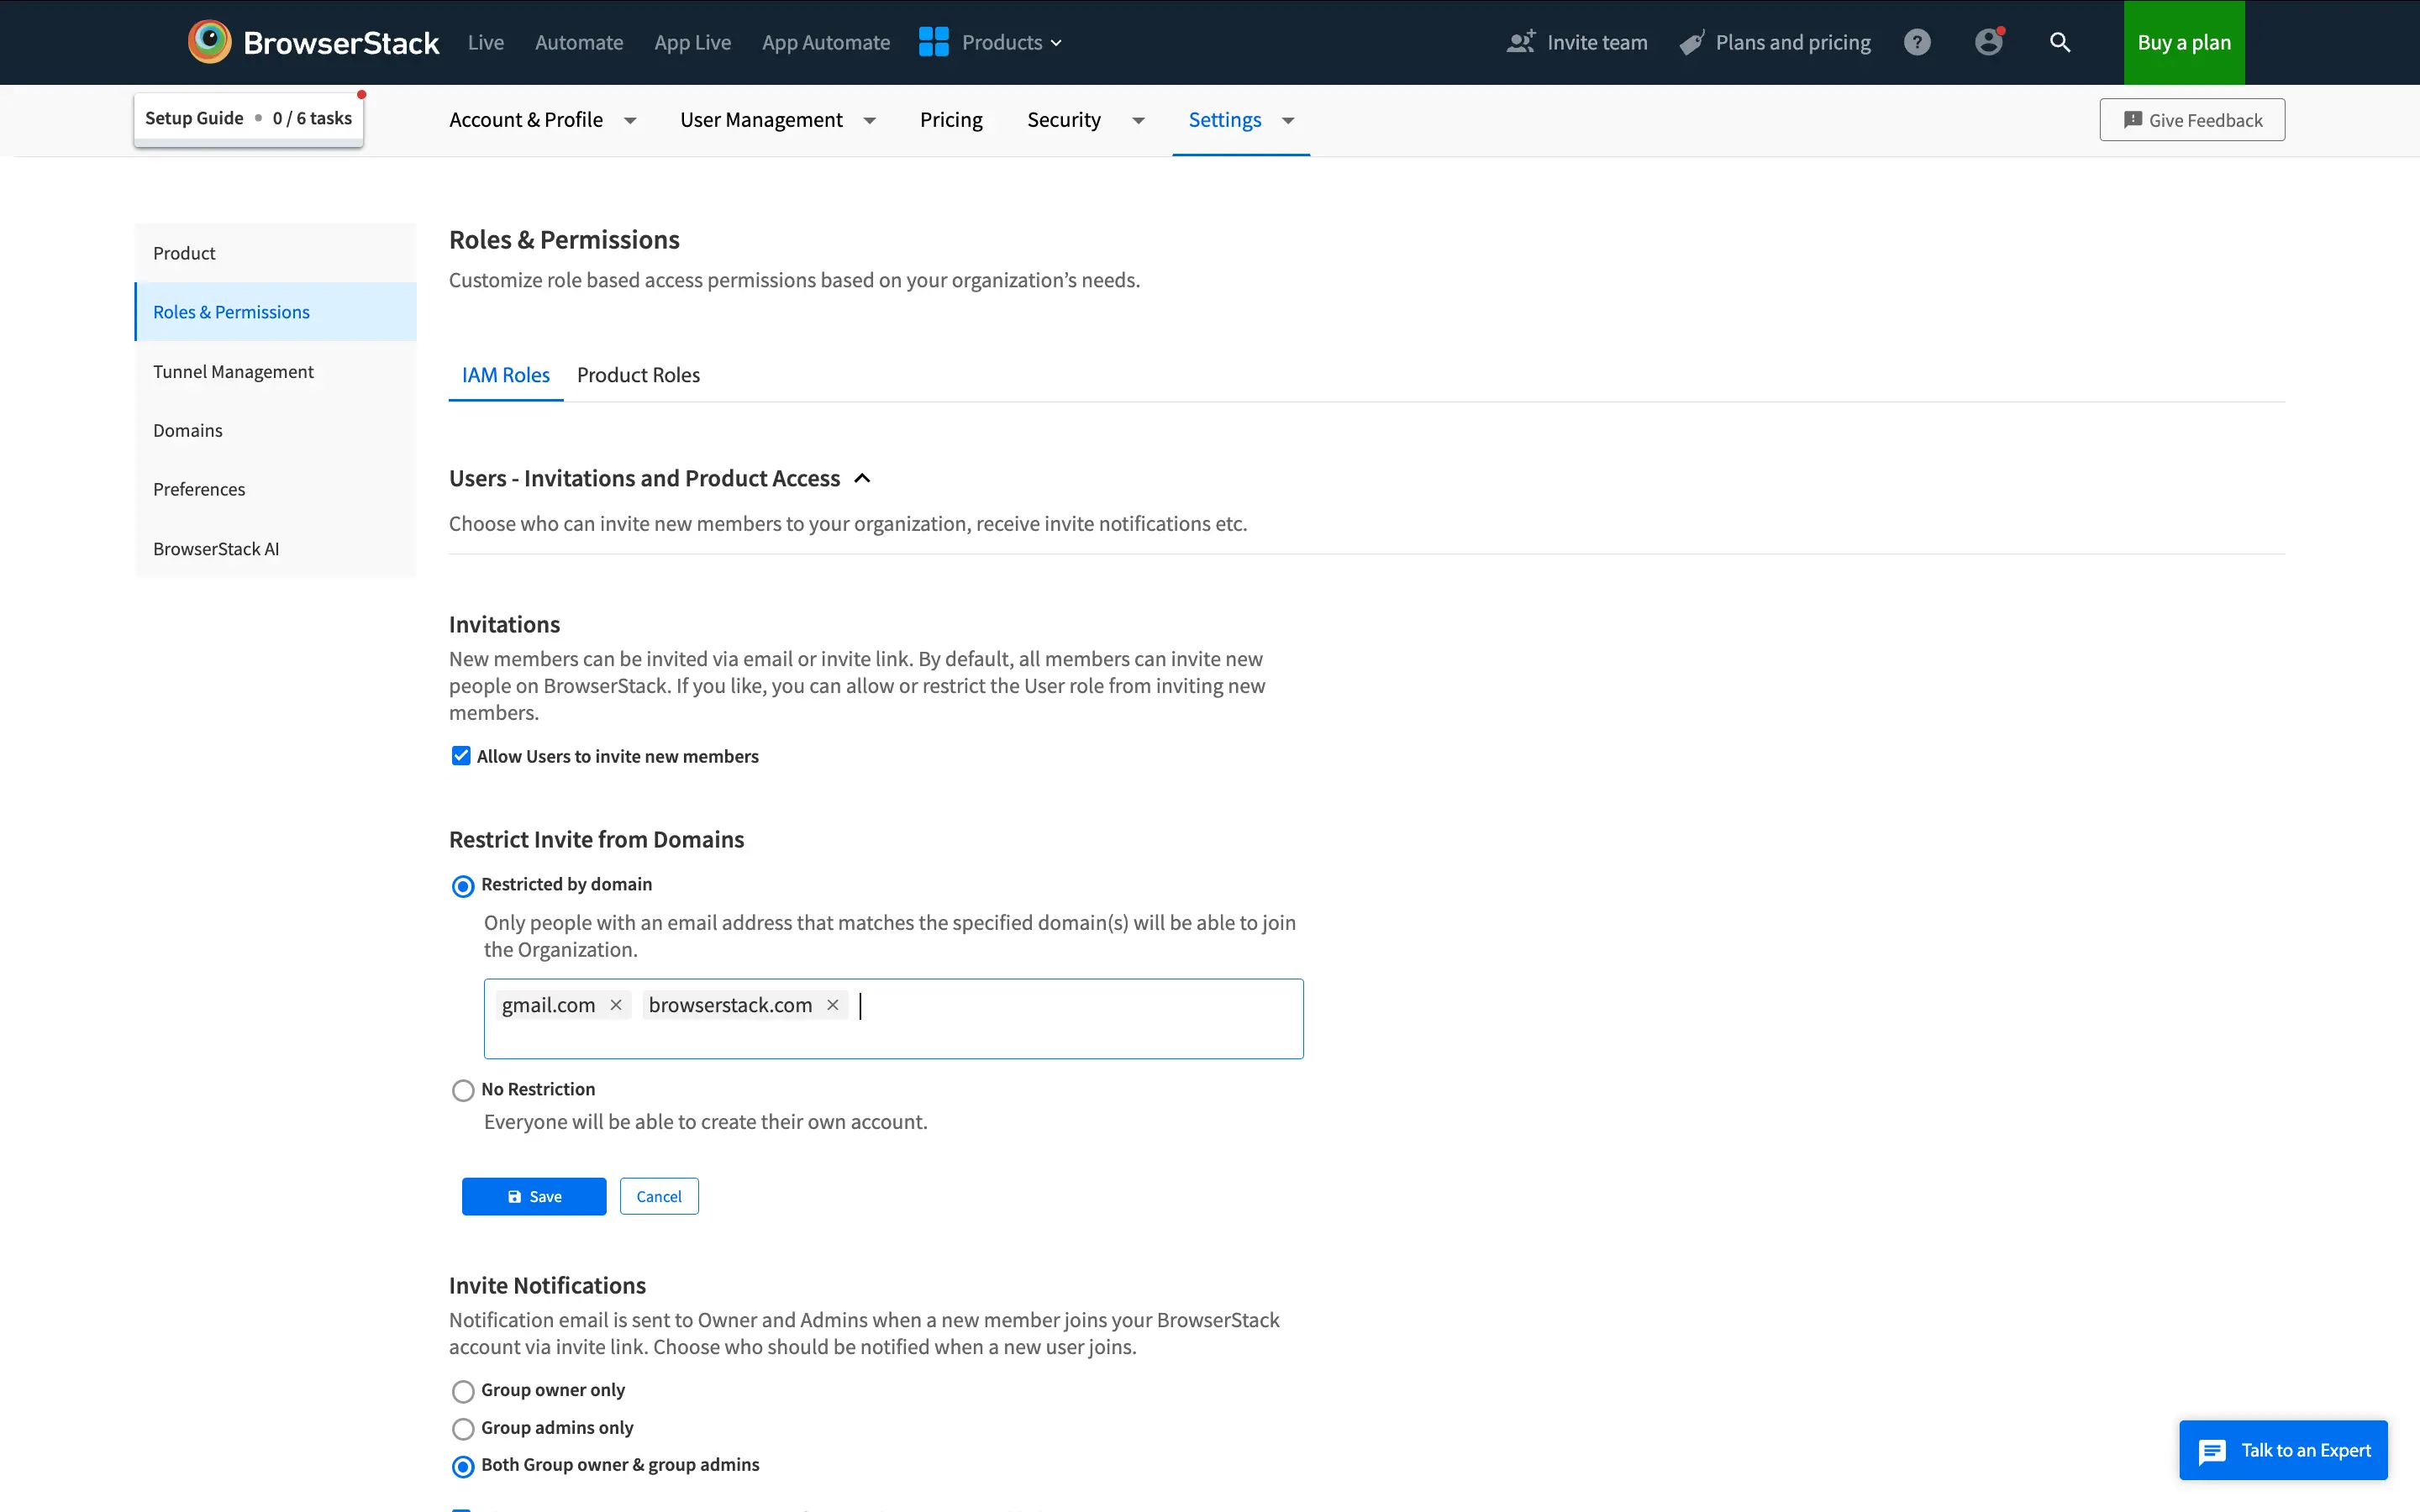
- Click Save to confirm
Effects of domain restriction activation
- Invitations can only be sent to the emails that belongs to restricted domains
- Pending Invitation belonging to unallowed domains will stand invalid
- Domain Restriction check will not be applied to existing members of the organization
- Updating Email is only possible to the emails that belong to the restricted domains
Accept invitations
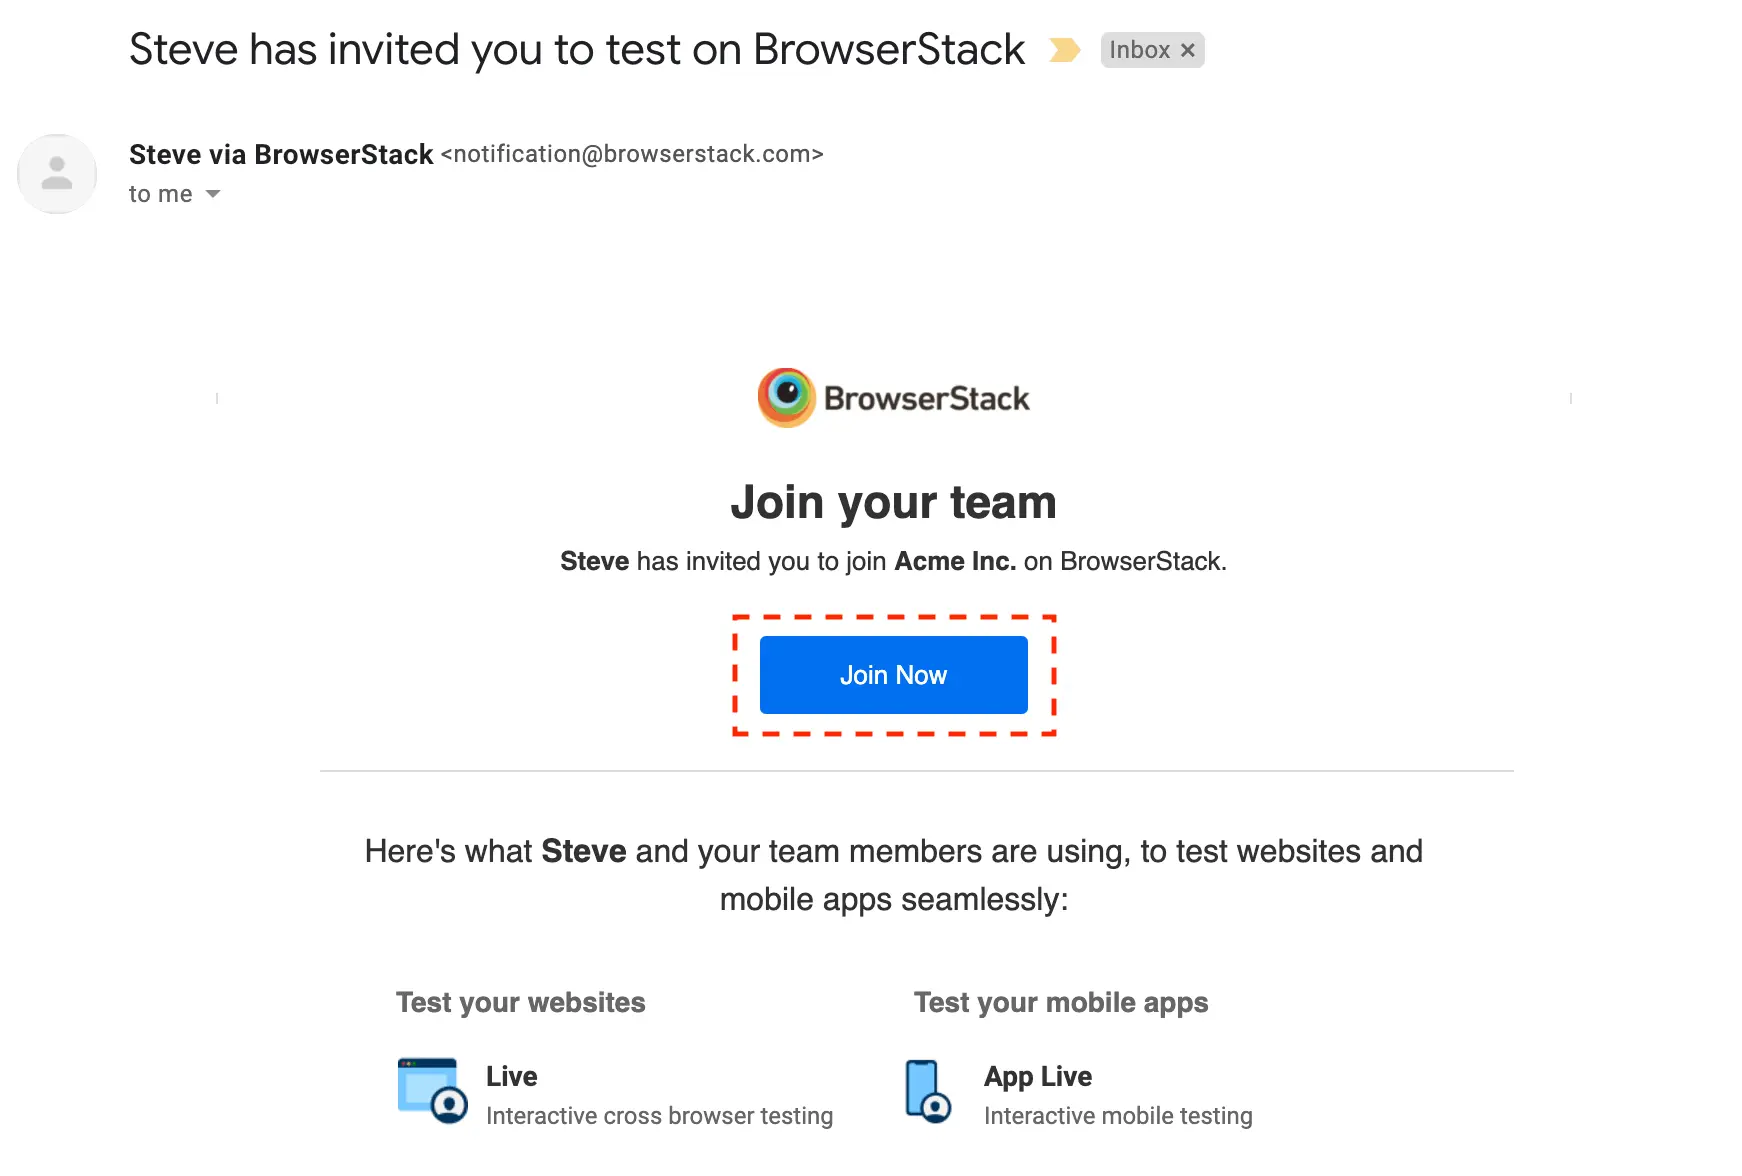
For members who have been invited by Send invitation email, they need to follow the below steps to join the organization account:
- The invitee will receive an e-mail informing that they have been invited to join BrowserStack.
- Click the Join now button in the invite e-mail. It will redirect to browserstack.com to accept the invite.
- The invited user will land on Sign-up or Sign-on page:
- If the invited user’s account already exists on BrowserStack, the Sign-in screen will be shown. In case the user does not remember their password, they can reset password.
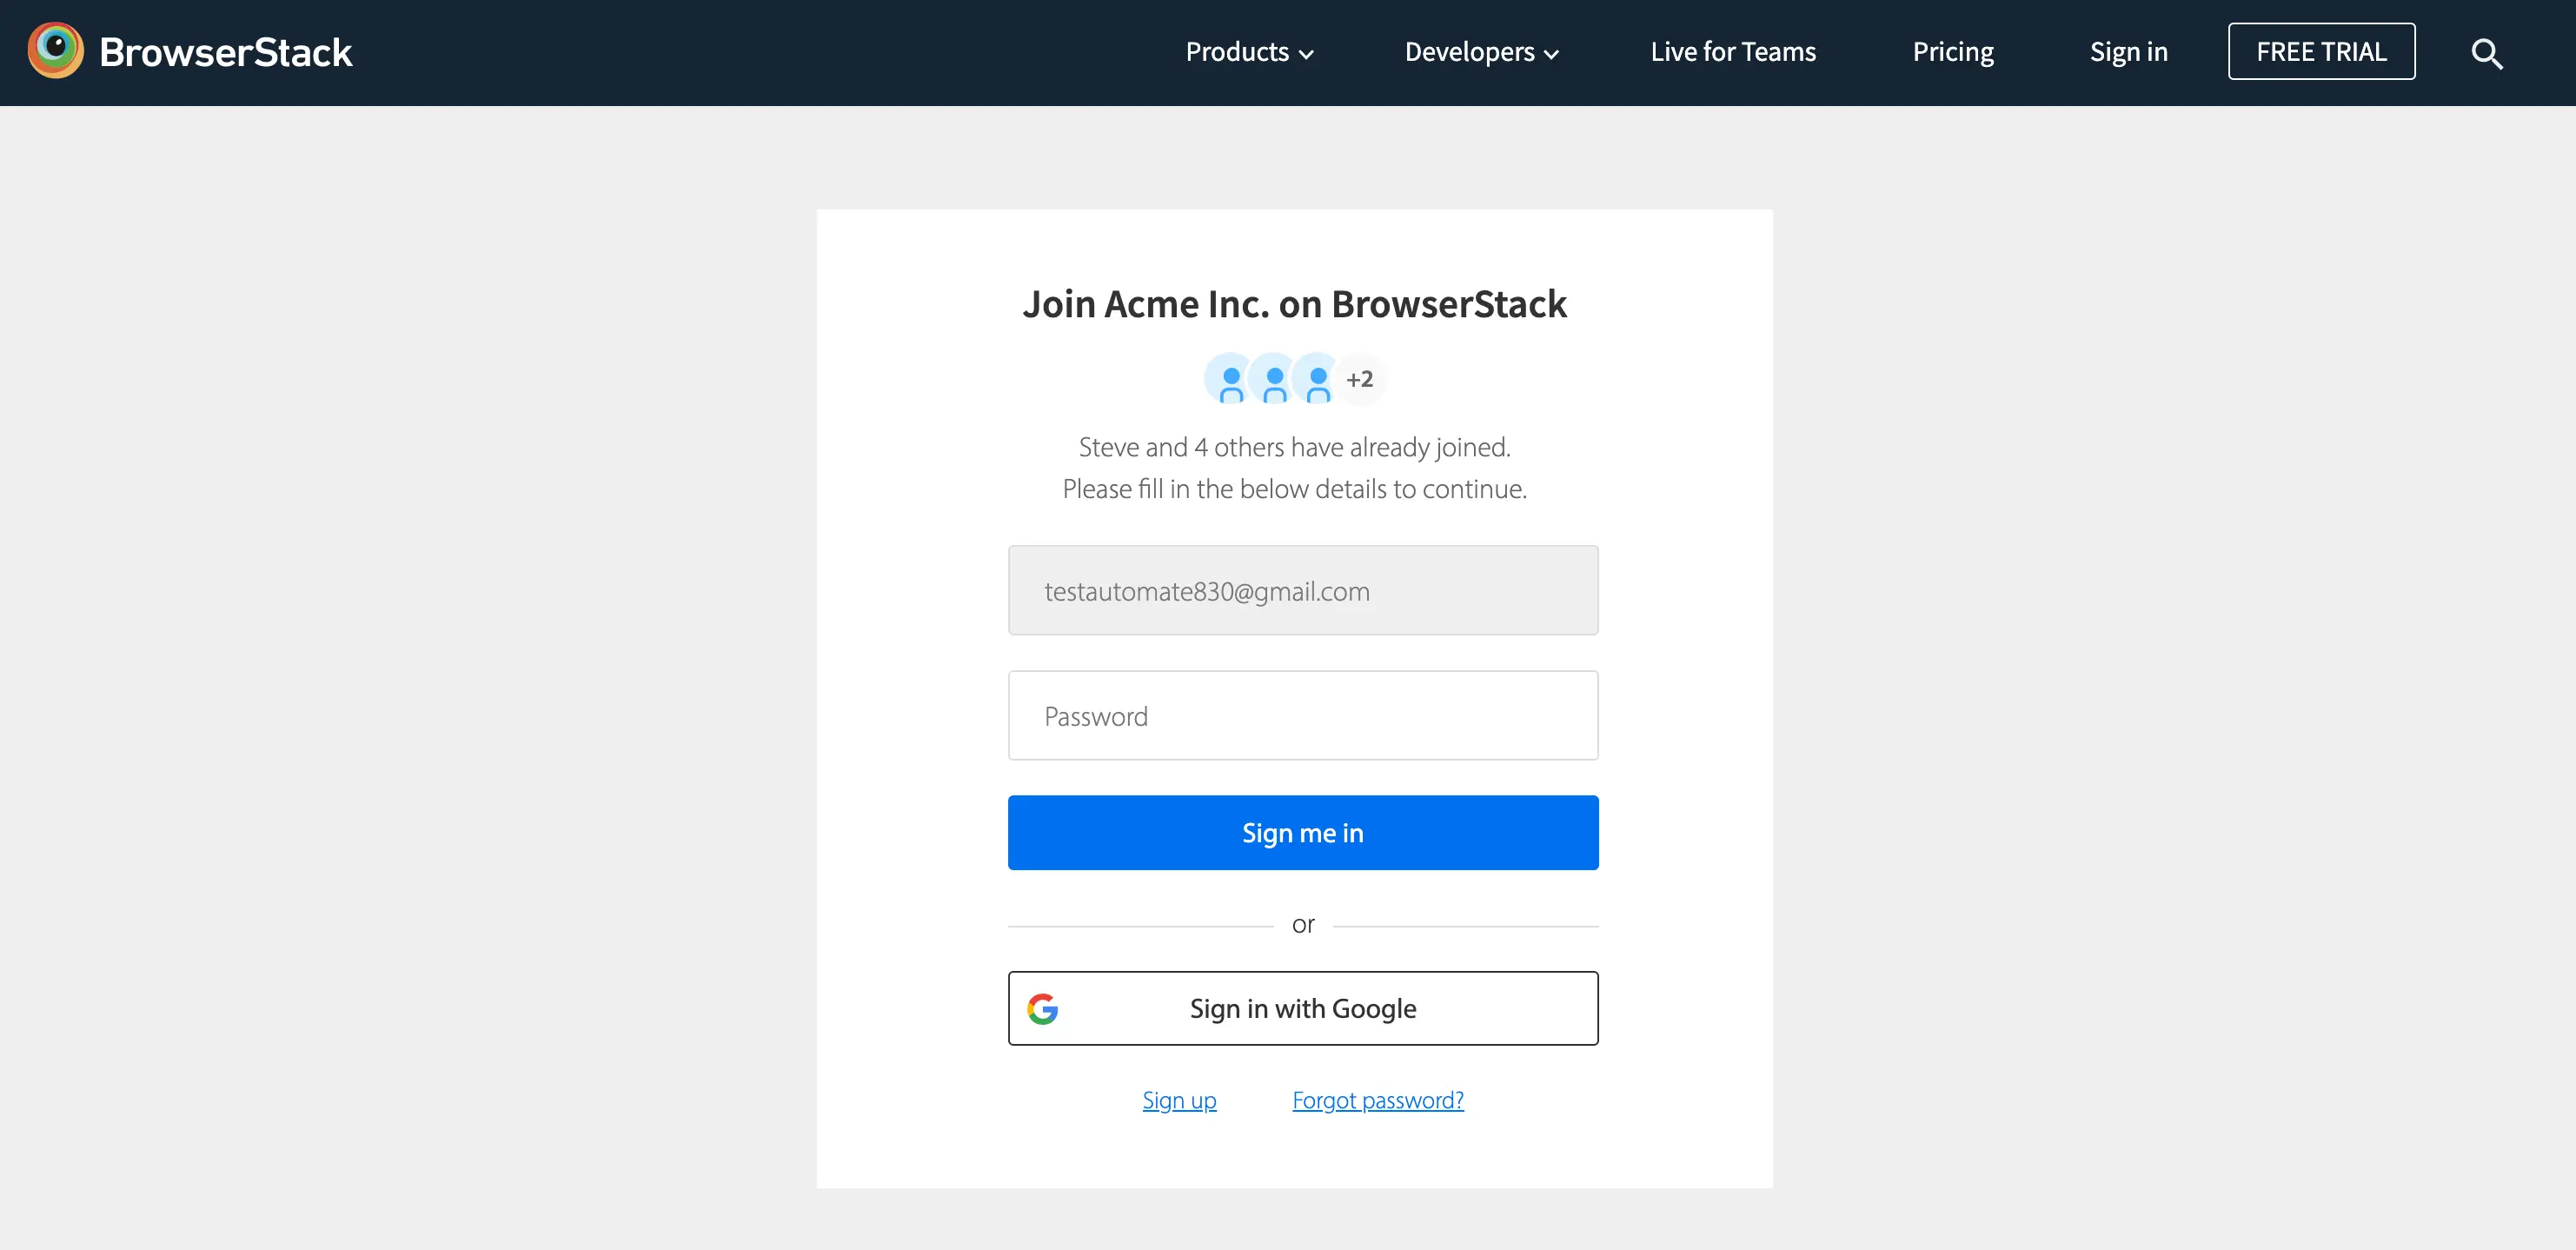
- If the invited user’s account does not exists on BrowserStack, the Sign-up screen will be shown.
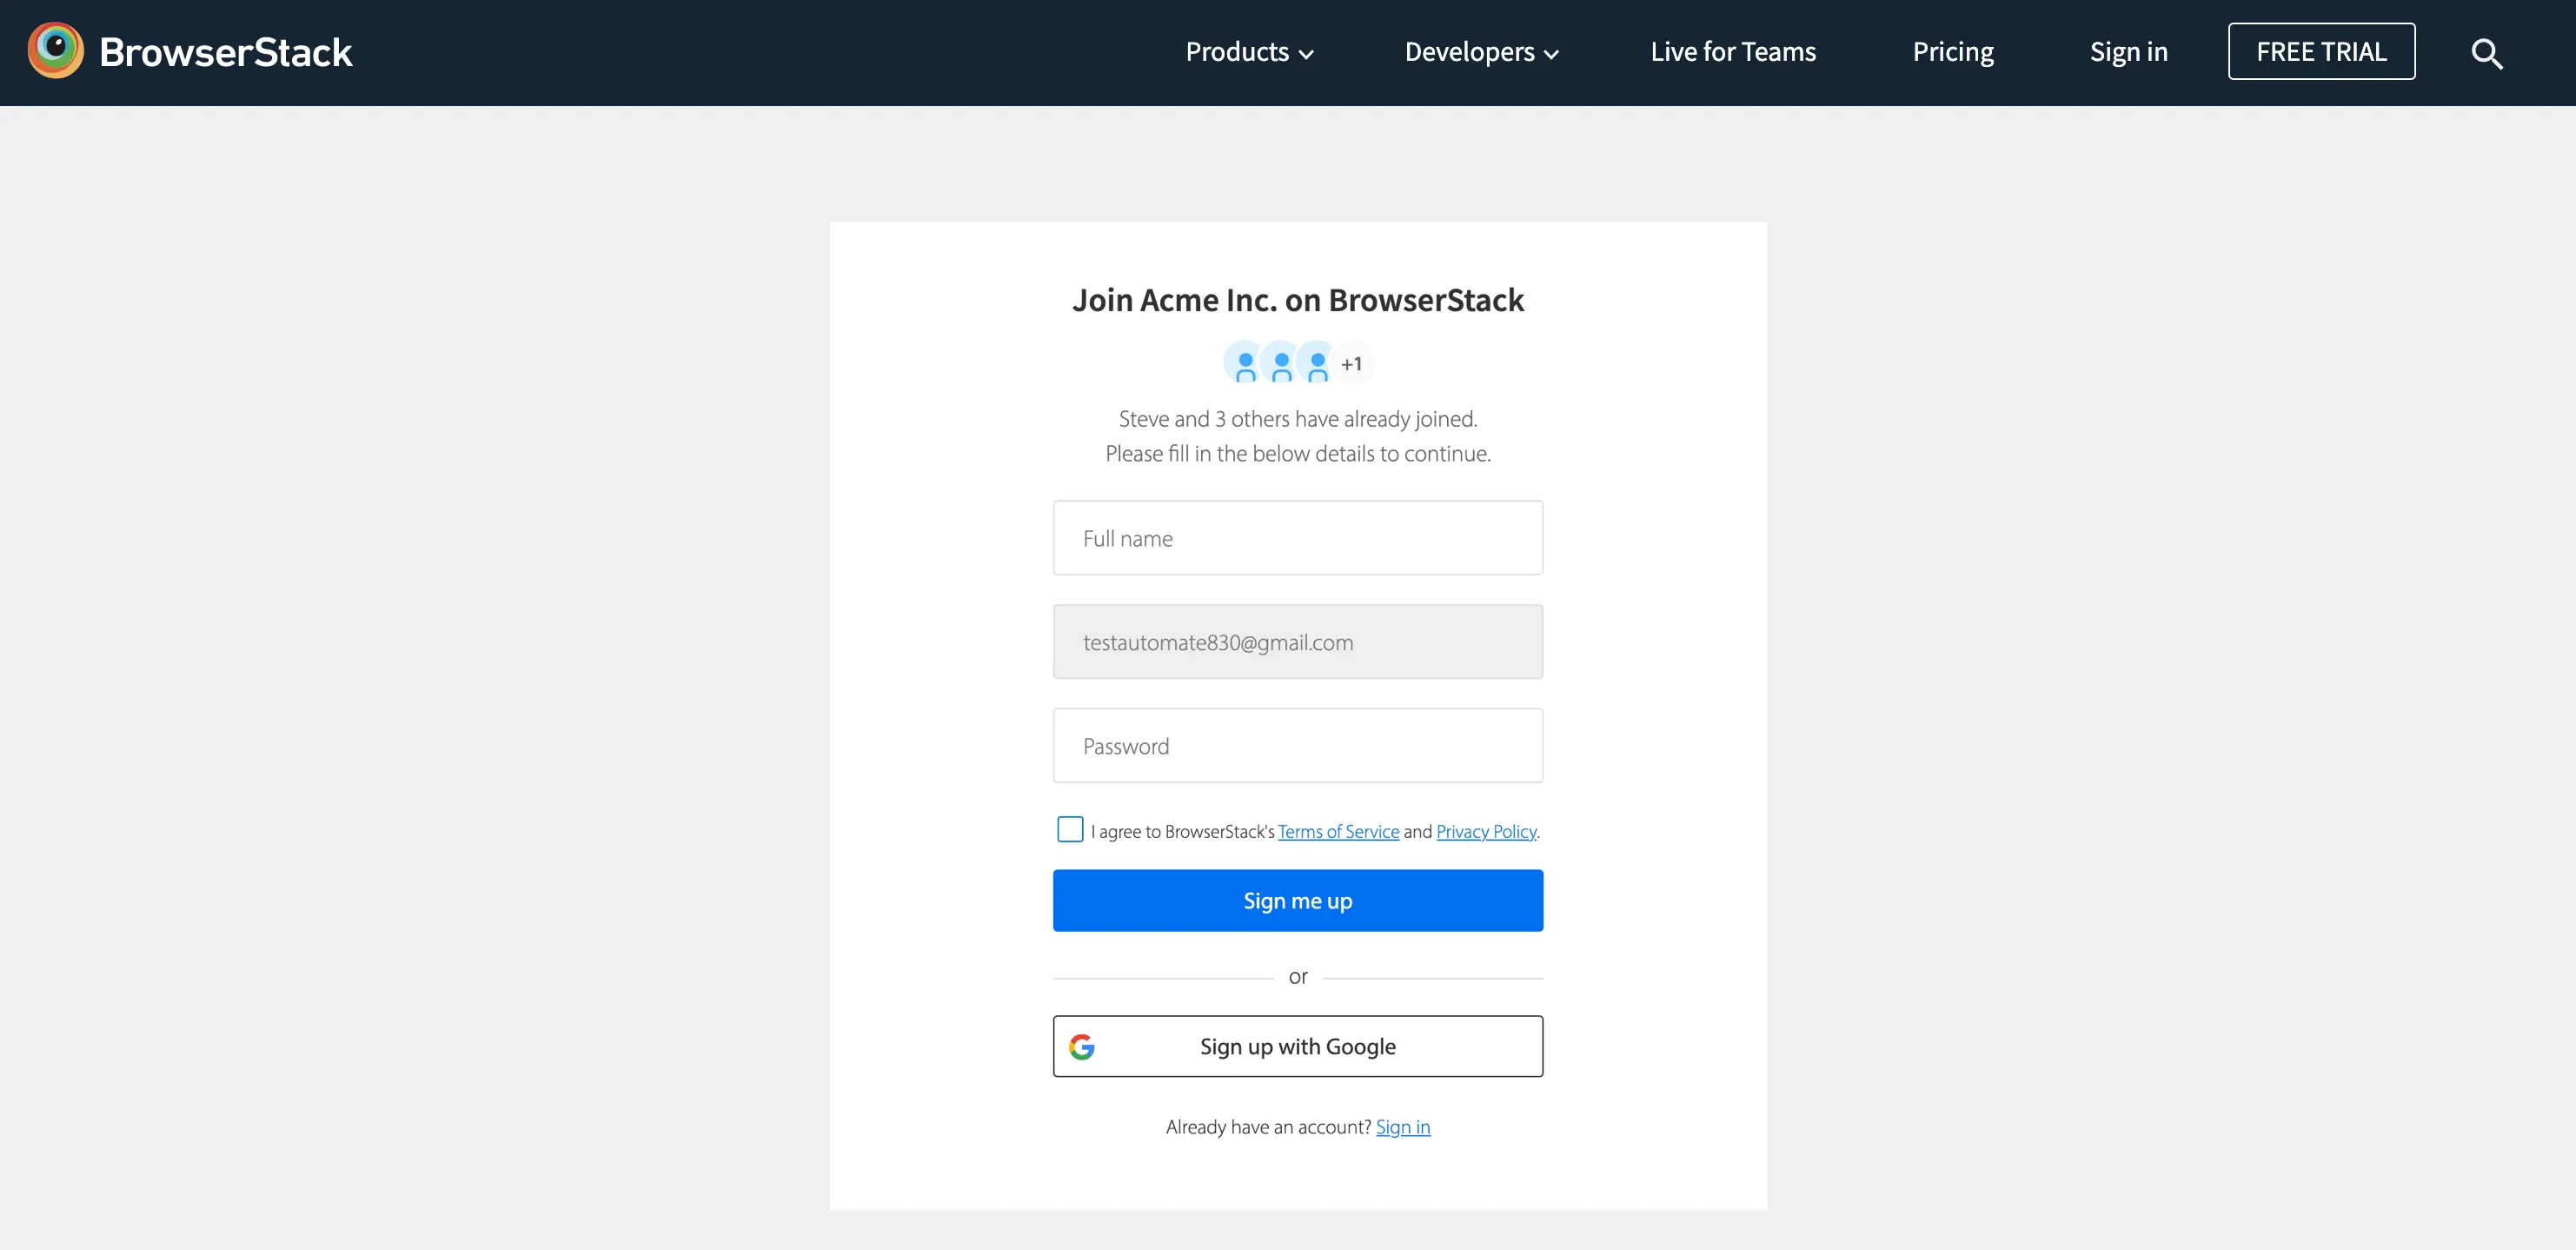
- If the invited user’s account already exists on BrowserStack, the Sign-in screen will be shown. In case the user does not remember their password, they can reset password.
- On successful completion, the invitee will get added to the Organisation account they were invited to.
Permissions to manage pending invites
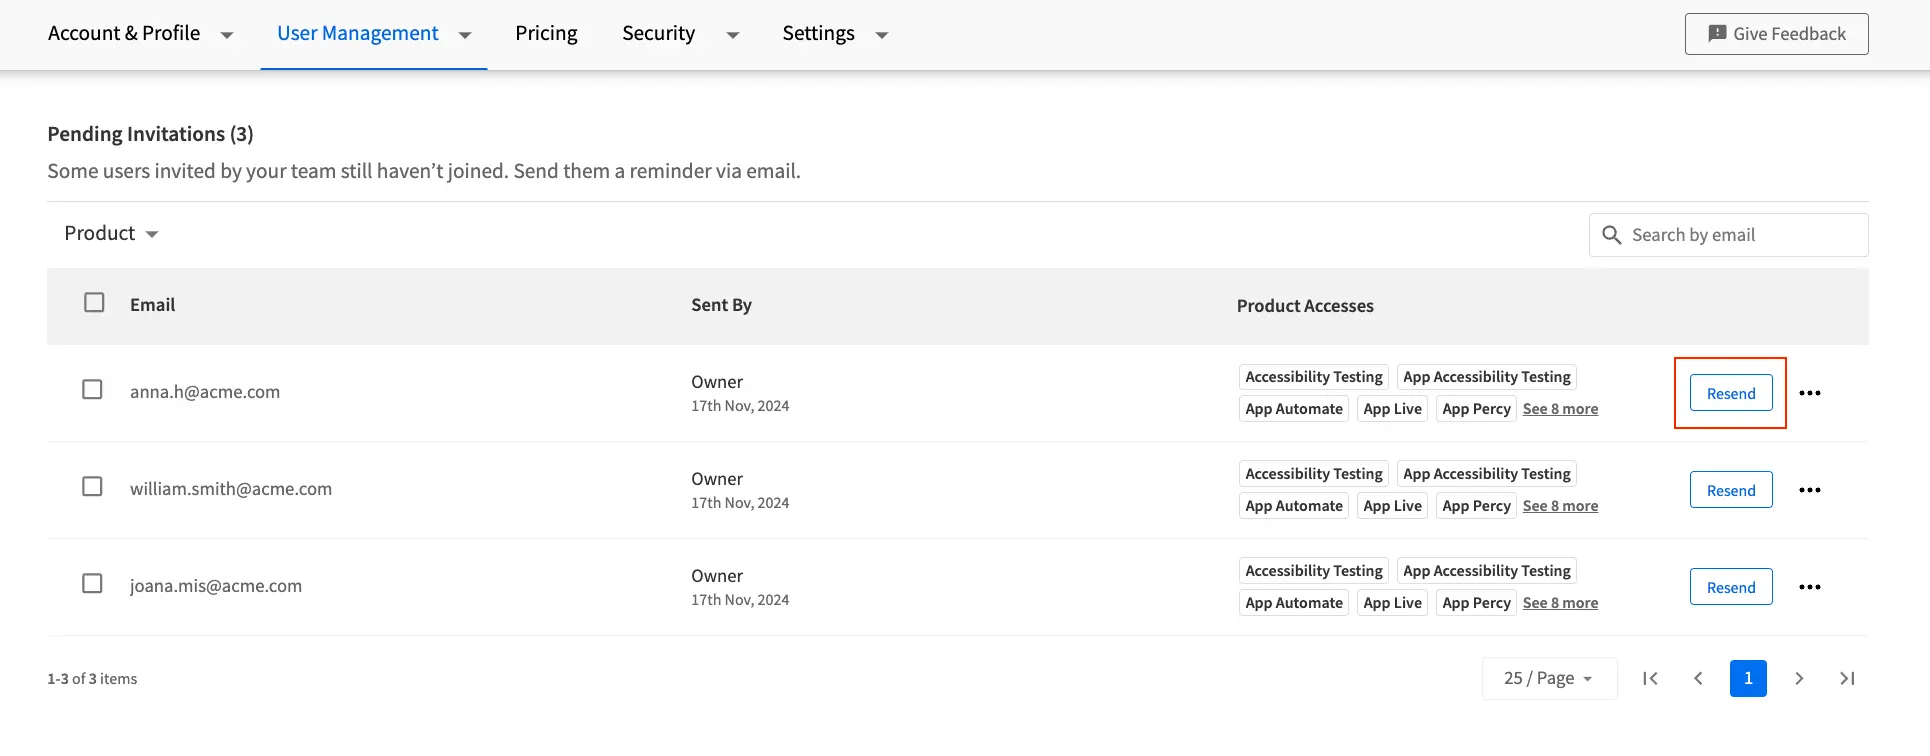
When a user is invited using Send invitation email, until they accept the invite, they will be visible under the Pending Invitations section in Invitations. The ability to perform any actions (Resend, Revoke or Modify) on pending invites is dependent on the role of the user as shown in the below table:
| Invitor Role | Can Resend Invite? | Can Revoke Invite? | Can Modify Access? |
|---|---|---|---|
| Owner | Yes | Yes | Yes |
| Admin | Yes | Yes | Yes |
| Team Admin | Yes (only own Team Invites) | Yes (only own Team Invites) | Yes (only own Team Invites) |
| User | Yes (only own Team Invites) | Yes (only own Team Invites) | No (view-only) |
Manage pending invites
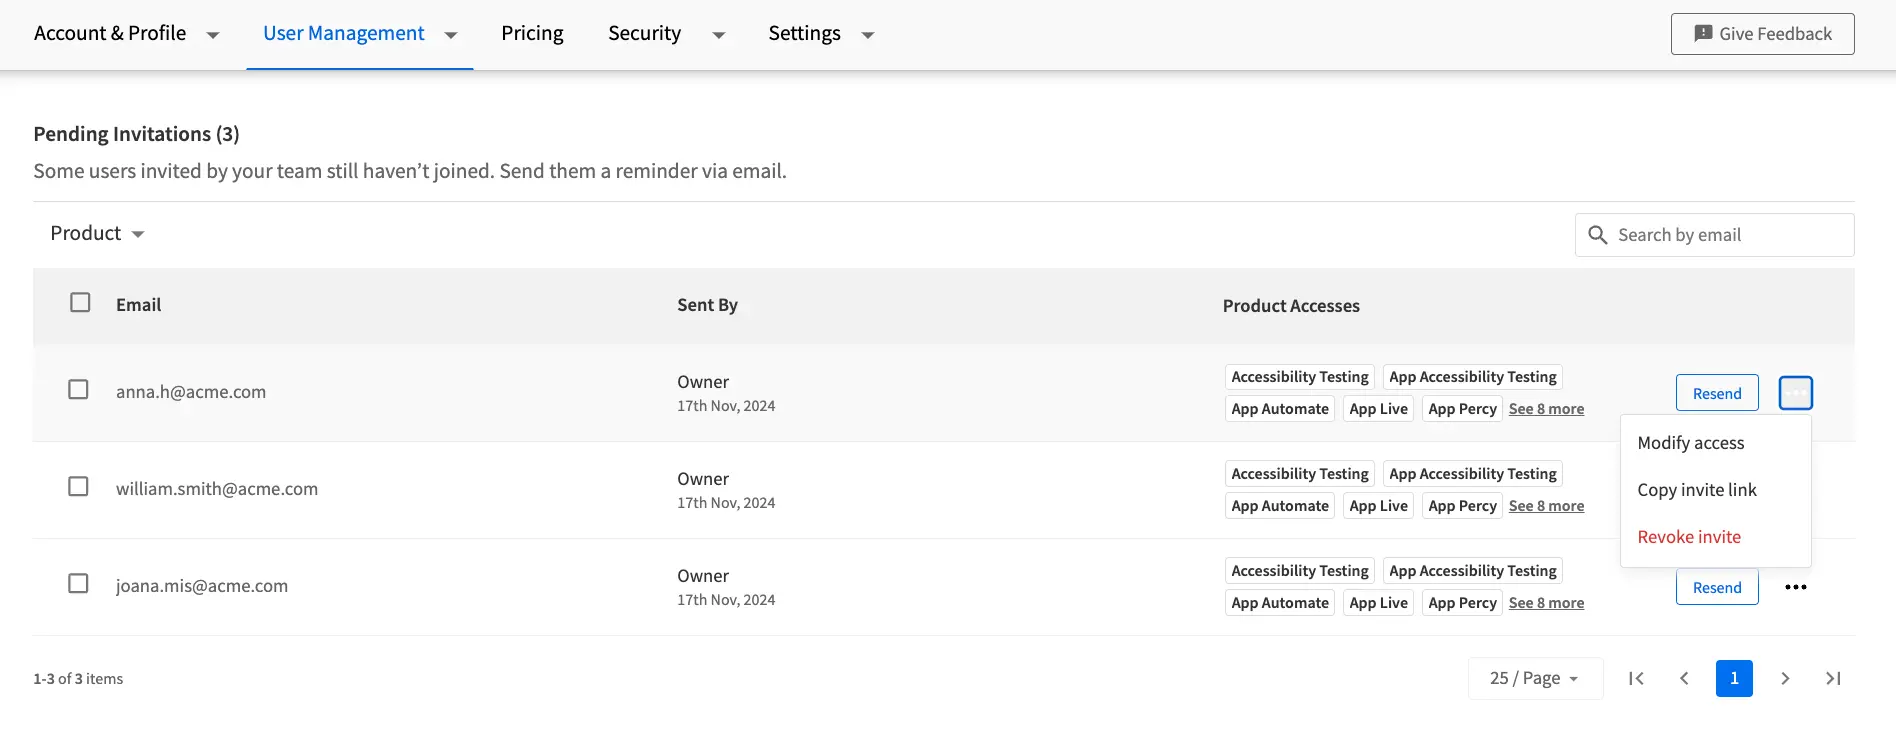
BrowserStack provides the ability to perform following actions on pending invitations:
- Resend invites
- Revoke invites
- Modify access of invited users
For any pending invites, you can resend an invite email by performing the following steps:
- Log in to your BrowserStack account.
- Click the User Profile icon in the top-right corner, then select User Management and click Invitations.
- Find the user whose invite needs to be resent from the Pending Invitations table.
- Click Resend in the entry of the user to resend the invite.
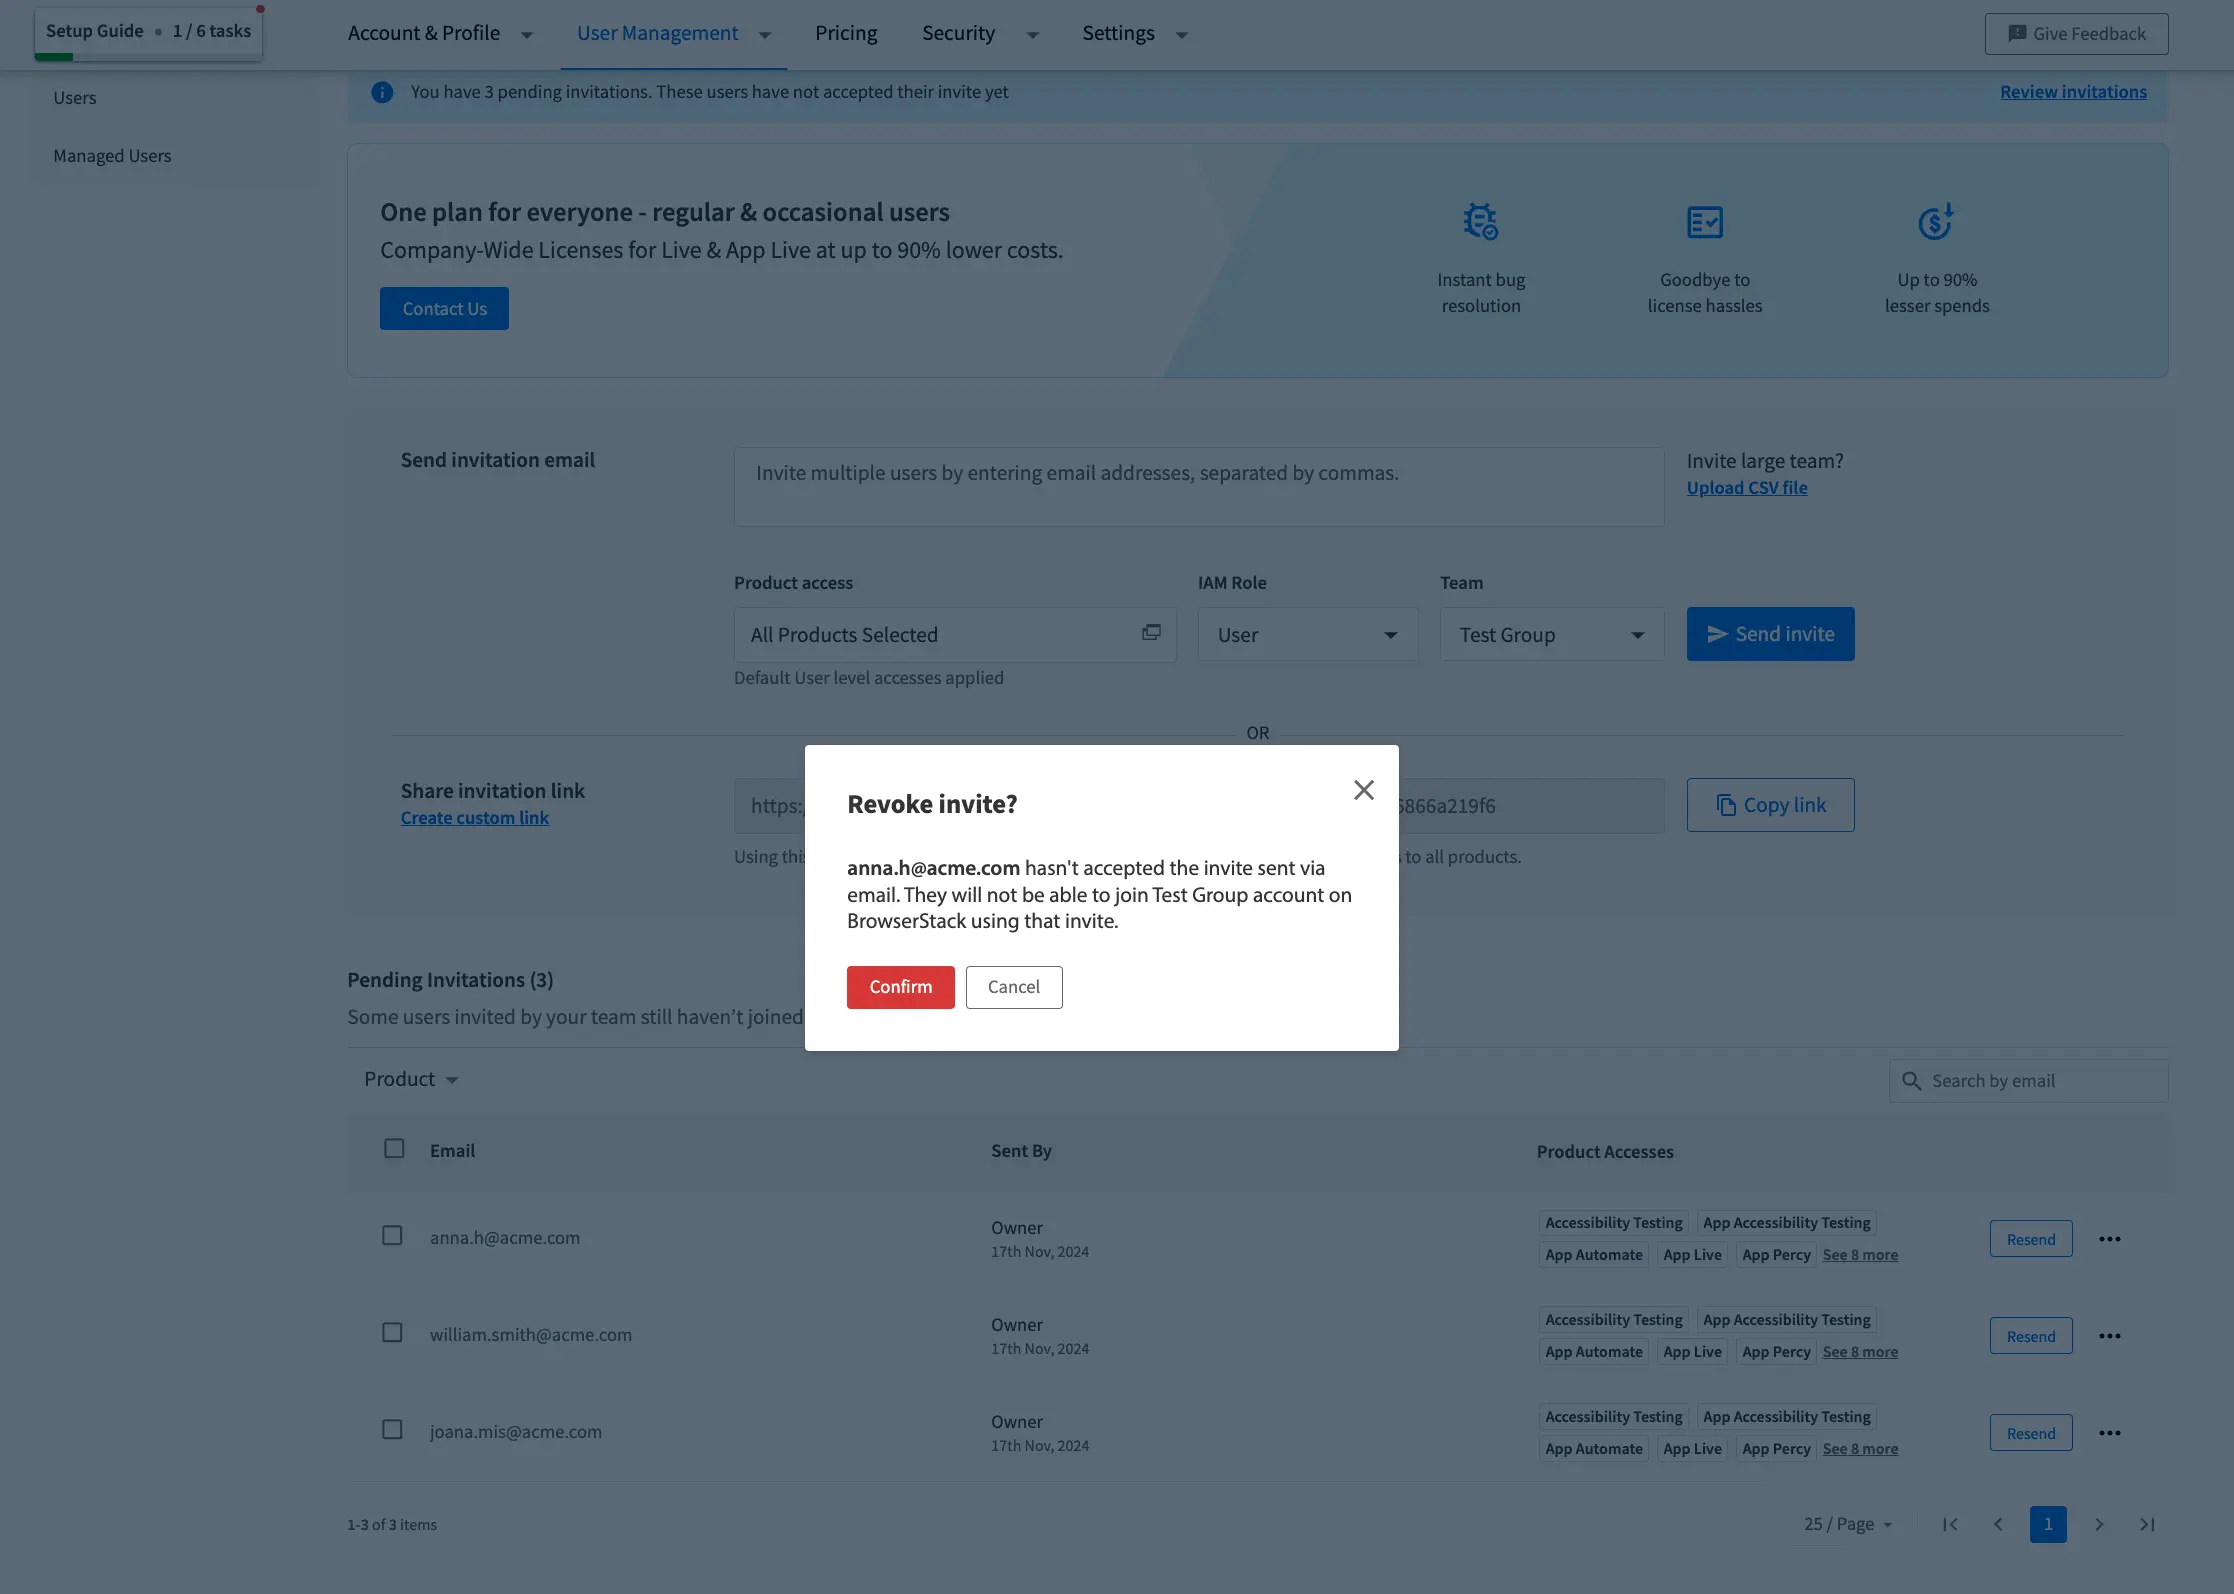
For any pending invites, you can revoke their invitation in order to prevent them from accepting it and joining your organization account on BrowserStack. Invites can be revoked by performing the following steps:
- Log in to your BrowserStack account.
- Click the User Profile icon in the top-right corner, then select User Management and click Invitations.
- Find the user whose invite needs to be revoked from the Pending Invitations table.
- Click the ︙ icon for the user and click Revoke invite.
- Click Confirm.
Invites can be revoked by performing the following steps:
- Log in to your BrowserStack account.
- Click the User Profile icon in the top-right corner, then select User Management and click Invitations.
- Find the user whose invite needs to be resent from the Pending Invitations table.
- Click the three dot (…) icon in the entry of the user and click Modify access.
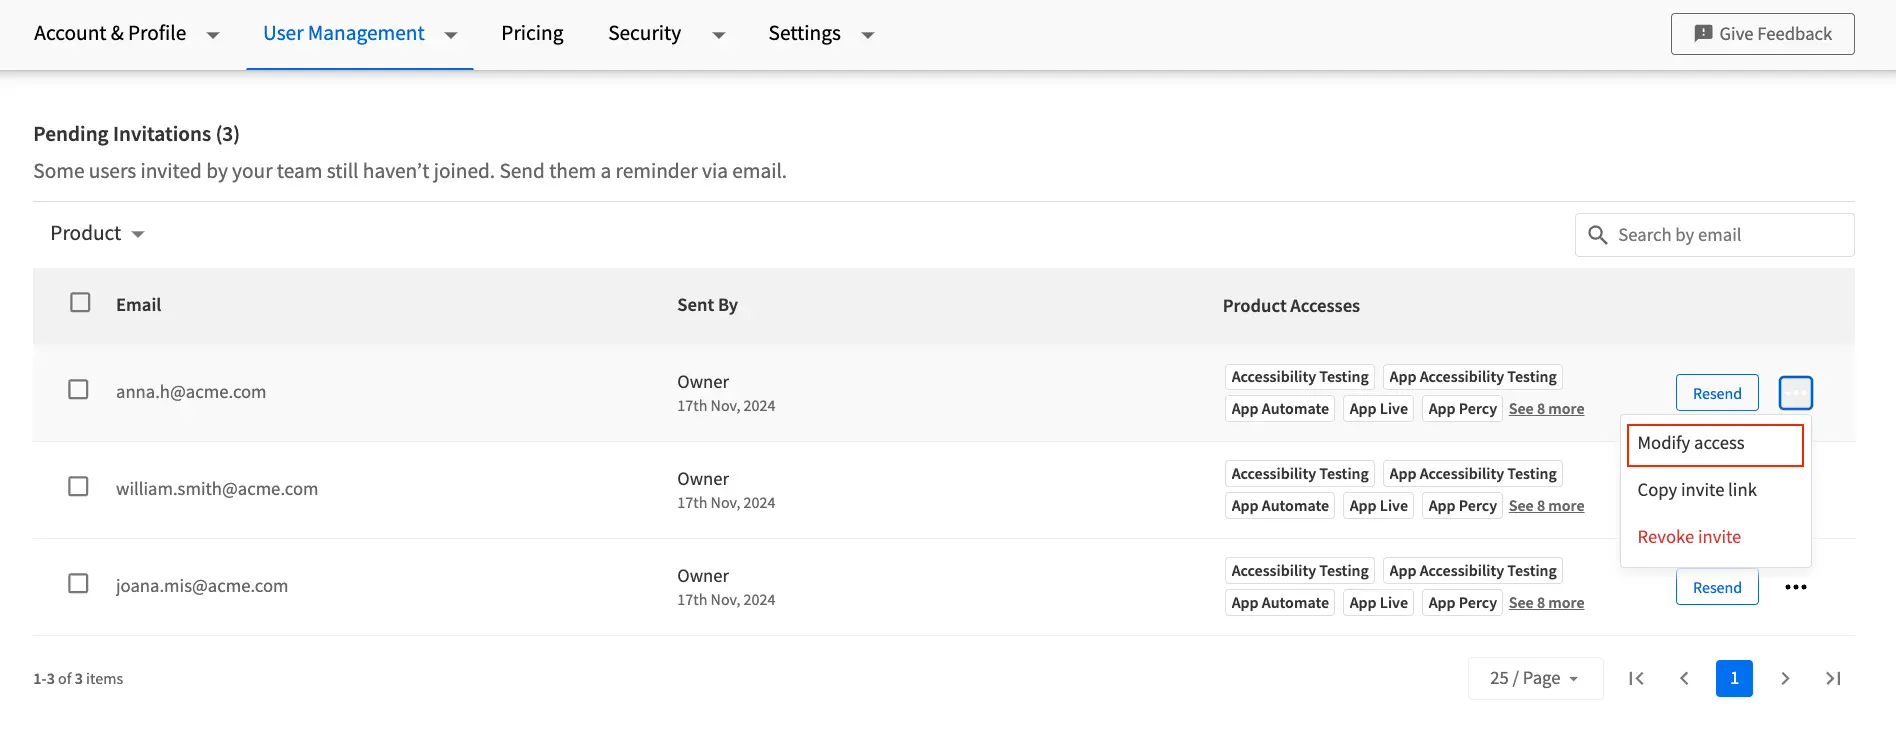
- Modify the required access for the invite and click Save.
We're sorry to hear that. Please share your feedback so we can do better
Contact our Support team for immediate help while we work on improving our docs.
We're continuously improving our docs. We'd love to know what you liked
We're sorry to hear that. Please share your feedback so we can do better
Contact our Support team for immediate help while we work on improving our docs.
We're continuously improving our docs. We'd love to know what you liked
Thank you for your valuable feedback!