
 Join our Discord
Chat settings
Control how Test Companion interacts with you during a conversation and how it connects to your test automation environment.
Chat settings control how Test Companion interacts with you during a conversation and how it connects to your test automation environment. This is one of the most important configuration areas, covering the AI’s level of autonomy and your environment context.
How to open settings
To open the chat settings:
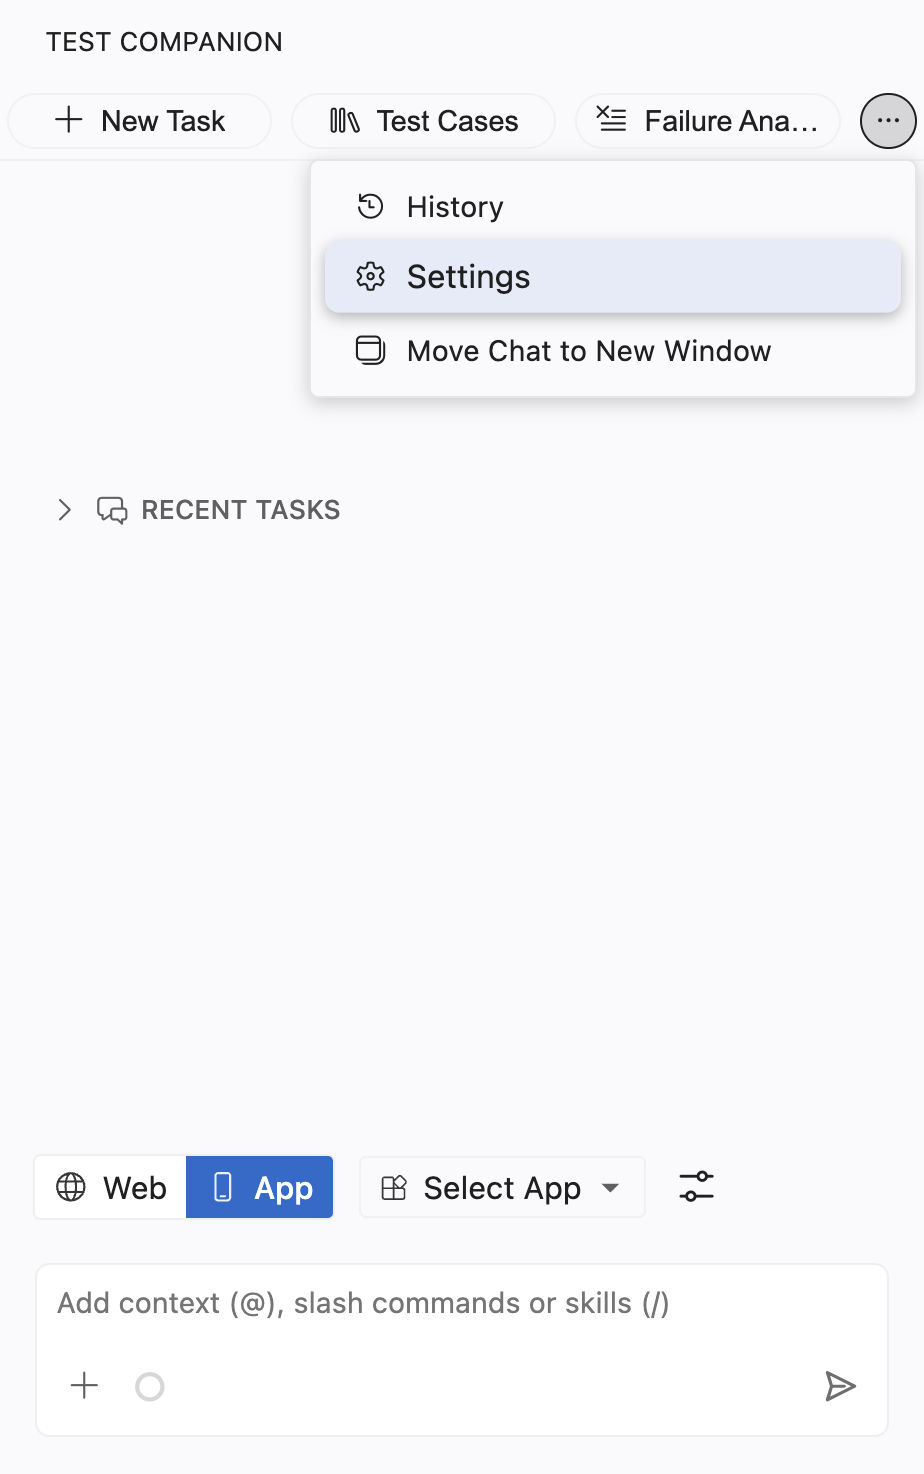
Click the ... (more options) button at the top-right corner of the Test Companion panel, then select Settings.
Select the Chat Settings tab.
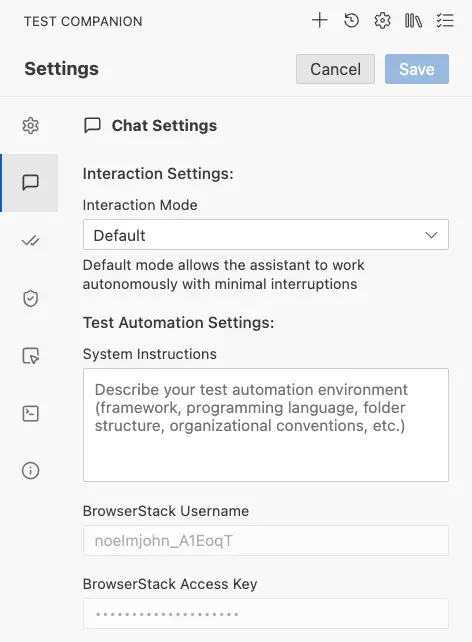
Configure your interaction settings, then click Save.
Interaction settings
Use the following settings to control how Test Companion behaves during conversations:
Interaction mode
The Interaction Mode determines how much independence the AI has when working on your tasks. This is one of the first things you should configure, because it fundamentally changes the experience of using Test Companion.
| Setting | Details |
|---|---|
| Field type | Dropdown |
| Options | Default, Guided |
| Default value | Default |
Default mode
When set to Default, the assistant works autonomously with minimal interruptions. It reads files, writes code, runs commands, and moves through the steps of a task on its own, only stopping when it encounters something it cannot resolve or when it needs information from you.
Default mode is best for:
- Experienced users who are comfortable with AI-generated code changes.
- Well-defined, routine tasks like generating boilerplate test files or running standard test suites.
- Situations where you want to hand off a task and review the result at the end.
Example: You ask Test Companion to “Write Selenium tests for the checkout page.” In Default mode, the AI reads your existing page objects, creates a new test file, adds assertions for each form field, and presents the finished file to you in one go.
Guided mode
When set to Guided, the assistant pauses at each major step and asks for your confirmation before proceeding. This gives you more control over every action the AI takes.
Guided mode is best for:
- New users who are still learning how Test Companion works and want to understand each step.
- Critical or sensitive projects where you need to review each file change before it happens.
- Complex tasks with ambiguous requirements where the AI might need direction at each step.
- Training and onboarding scenarios where you want to walk a colleague through the AI’s decision-making process.
Example: You ask Test Companion to “Fix the flaky login test.” In Guided mode, the AI first identifies the likely cause (a missing wait condition), shows you its analysis, and asks if you agree. Once you confirm, it shows the proposed code change and asks for approval before writing the file. Finally, it asks whether you’d like it to run the test to verify the fix.
Choose a mode
You can switch between modes at any time. The change takes effect on the next task you start (it does not affect a task that is already in progress).
| Scenario | Recommended mode |
|---|---|
| Generating test cases from a requirements document | Default |
| Debugging a complex intermittent failure | Guided |
| Bulk-creating page object files | Default |
| First time using Test Companion | Guided |
| Running a well-tested workflow template | Default |
| Reviewing AI-suggested changes to CI/CD pipeline config | Guided |
Test automation settings
Use the following settings to configure your test automation environment:
System instructions
System Instructions let you describe your project’s testing environment, so the AI produces code and suggestions that fit your setup from the very first message. Think of this as giving the AI a “cheat sheet” about your project before any conversation starts.
Without System Instructions, the AI works only from what it can infer from your repository, so it misses the conventions your team follows by agreement rather than by code. For example, it cannot know which files to leave untouched, which staging environment your tests should target, or other team-specific rules that the codebase does not reveal.
| Setting | Details |
|---|---|
| Field type | Multi-line text area |
| Default value | Empty |
What to include
Write your System Instructions in plain language. The AI does not need formal syntax or special markup. It reads your description and applies it from then on.
Here are the areas you should consider covering:
1. Framework and language
We use Selenium WebDriver with Java 17. Our test runner is TestNG.
2. Folder structure
Test files go in src/test/java/com/myapp/tests/. Page objects live in src/test/java/com/myapp/pages/. Test data is stored in src/test/resources/testdata/.
3. Naming conventions
Test class names end with Test (e.g., LoginPageTest). Test methods start with test followed by a camelCase description (e.g., testSuccessfulLoginWithValidCredentials). Page object classes end with Page (e.g., LoginPage).
4. Coding standards and patterns
Always use explicit waits (WebDriverWait), never Thread.sleep(). Use the Page Object Model pattern. Each page object should have a constructor that accepts a WebDriver instance. Assertions should use TestNG’s Assert class.
5. Environment details
Our staging URL is https://staging.myapp.com. We use BrowserStack for cross-browser testing. Our CI runs on Jenkins with parallel test execution across 5 nodes.
6. What the AI should avoid
Do not modify the BaseTest.java file. Do not generate tests for the admin panel. A separate team handles those.
Example
Here is a complete System Instructions entry for a mid-size e-commerce project:
Our project is an e-commerce web application.
Framework: Selenium WebDriver with Python 3.11 Test runner: Pytest with pytest-html for reporting Browser: Chrome (headless in CI, headed locally)
Folder structure:
- tests/ → test files (one file per feature area)
- pages/ → Page Object classes
- utils/ → helpers (custom waits, data generators)
- conftest.py → shared fixtures
Naming:
- Test files: test_
.py (e.g., `test_checkout.py`) - Test functions: test_
(e.g., `test_guest_checkout_with_credit_card`) - Page objects:
Page class (e.g., `CheckoutPage`)
Standards:
- Use explicit waits, never time.sleep()
- All selectors should use data-testid attributes when available
- Each test must be independent and not rely on other tests’ state
- Use @pytest.mark.parametrize for data-driven tests
BrowserStack:
- Run cross-browser tests on BrowserStack using our existing conftest fixtures
- Target browsers: Chrome latest, Firefox latest, Safari latest, Edge latest
You do not need to write perfect System Instructions on your first attempt. Start with the basics (framework, language, folder structure) and add more detail over time as you notice the AI making incorrect assumptions.
Test Companion fills in your BrowserStack username and access key automatically from the account you sign in to.
We're sorry to hear that. Please share your feedback so we can do better
Contact our Support team for immediate help while we work on improving our docs.
We're continuously improving our docs. We'd love to know what you liked
We're sorry to hear that. Please share your feedback so we can do better
Contact our Support team for immediate help while we work on improving our docs.
We're continuously improving our docs. We'd love to know what you liked
Thank you for your valuable feedback!