Execute tests
Test your application on real devices using Maestro on BrowserStack’s App Automate
This page is a step-by-step guide on how to run your Maestro tests on BrowserStack App Automate. It shows you how to upload your mobile application and your Maestro test suite. Finally, it explains how to execute the test build on real devices and view the detailed results on your BrowserStack App Automate dashboard.
Prerequisites
- BrowserStack Username and Access key, which you can find in your account profile. If you have not created an account yet, you can sign up for a Free Trial.
- Check supported Maestro versions
- Your Android application (
.apkfile) or iOS application (.ipafile) to test. Maestro supports React Native, Flutter, and Webview-based applications. - Your Maestro test suite (a
.zipfile containing your Flow files).
Refer to supported devices list for the list of supported Android and iOS devices. For more details on the supported APIs, refer to our REST API reference page.
iOS devices below version 15 are not supported.
Here is a video of the workflow:
Follow the steps below to execute tests using Maestro:
Upload app
Upload your Android (.apk) or iOS (.ipa) apps to BrowserStack servers using either the REST API or App Management UI (available only in the new dashboard). Maestro supports React Native, Flutter, and Webview-based applications.
- You can only delete apps that you uploaded.
- You do not have the option to recover or restore an app once it has been deleted from our servers.
To upload an app using filesystem/public URL via the REST API, use the following cURL example:
Here’s a cURL command that uses sample values to upload an app to BrowserStack:
When you run the sample cURL command, the BrowserStack server returns the following response:
{
    "app_name": "debug.apk",
    "app_url": "bs://c8ddcb5649a8280ca800075bfd8f151115bba6b3",
    "app_version": "1.2.0",
    "app_id": "c8ddcb5649a8280ca800075bfd8f151115bba6b3",
    "uploaded_at": "2020-05-05 14:52:54 UTC",
    "custom_id": "SampleApp",
    "expiry" : "2020-06-05 14:52:54 UTC"
}
Note the app_url key in the response. Its value is the unique url that BrowserStack has created for the app. Use this value to denote the app you want to test in your API call.
The App Management UI is available only in the new dashboard and not in the legacy (old) dashboard.
To upload an app using the App Management UI, follow the steps below:
-
On the App Automate dashboard, go to the sidebar and click on App Management.
-
On the App Management UI, click Upload App.
-
Select the app you want to upload from your filesystem. If you are uploading the app using a public URL, paste the URL of your app in the or upload from URL box.
-
After selecting the app, choose the App Automate framework you want to use for testing. You can optionally add flags and a custom ID.
-
Click Upload. The app is uploaded to the BrowserStack servers. You’ll receive an App ID, which you can use to run tests.
To view your uploaded apps, apply the My Apps filter.
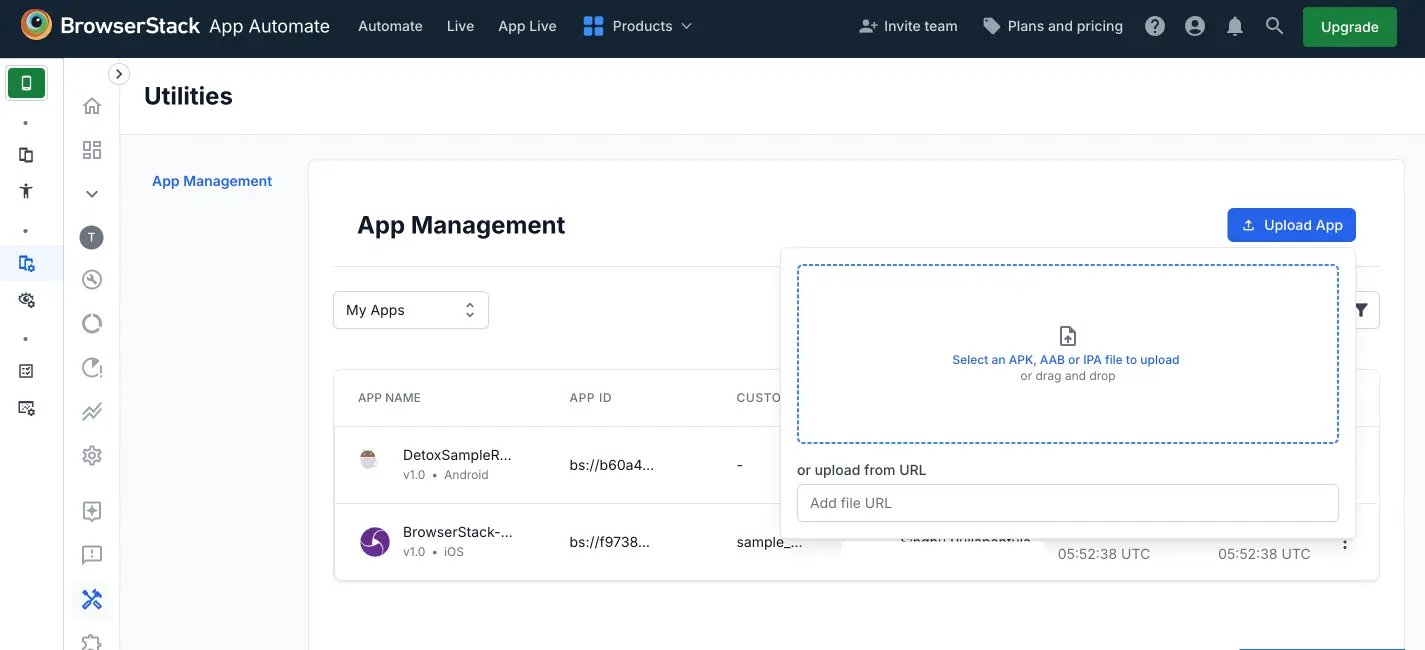
Also note the expiry date. It indicates that the app you uploaded gets deleted from the server after 30 days.
To manage your apps, refer to the documentation on managing apps using App Management UI.
Upload test suite
First, ensure your test suite is structured correctly. To avoid errors, it’s critical that your test suite is zipped correctly within a parent folder. For detailed instructions on structuring your test suite, see the prepare your Maestro test suite documentation.
Upload your Maestro test suite (.yml) file to BrowserStack servers using the following REST API request:
Here is a sample response:
{
    "test_suite_name": "Flows.zip",
    "test_suite_url": "bs://89c874f21852ba57957a3fdc33f47514288c4ba1",
    "test_suite_id": "89c874f21852ba57957a3fdc33f47514288c4ba1",
    "uploaded_at": "2020-09-09 15:35:00 UTC",
    "custom_id": "SampleTest",
    "framework": "maestro",
    "expiry": "2020-10-09 15:35:00 UTC"
}
Incorrect folder structure may cause Maestro to fail in locating your flow files, resulting in test execution failures.
Execute tests
You can execute tests on both Android and iOS devices.
When executing tests, Maestro needs to locate your flow files. Ensure your test suite follows the correct folder structure as shown in the previous step. An incorrect structure may prevent Maestro from finding the flows, causing test failures.
Starting a build
To initiate test execution on BrowserStack, your API request must include:
-
Application under test
-
Maestro test-suite
Optional parameters can customize test execution. Each build receives a unique build_id in the response. For more information on executing tests, refer to our REST API reference page.
To run the entire test suite, run the below request:
If you run your Maestro tests without the execute parameter, you must have a main.yaml file in the parent folder of your test suite.
To run the a specific test suite, add the path to the specific test suite in the execute parameter and run the cURL request:
For an explanation of how to target specific files and folders, see the running your tests: the execute parameter documentation.
Here is a sample response:
{
    "message": "Success",
    "build_id": "5c5ab4338cec13aeb78f7a6977344556ac00bccd6"
}
If a test run stops due to a crash, you can stop the build by clicking the stop build button on the App Automate dashboard or using the REST API.
View test results
After initiating your Maestro test execution via the REST API:
-
Navigate to your App Automate dashboard and select your test.
-
You can access the following on the dashboard:
-
Live test results
-
Debugging logs (network, device, video etc.)
-
Comprehensive execution details
-
We're sorry to hear that. Please share your feedback so we can do better
Contact our Support team for immediate help while we work on improving our docs.
We're continuously improving our docs. We'd love to know what you liked
We're sorry to hear that. Please share your feedback so we can do better
Contact our Support team for immediate help while we work on improving our docs.
We're continuously improving our docs. We'd love to know what you liked
Thank you for your valuable feedback!