Use Requestly environment variables
Attach a Requestly environment when importing a collection into a BrowserStack load test so variables resolve at run time without copying any values.
When you import a Requestly collection into a load test, you can also attach one of that project’s environments, so values like BASE_URL, API_KEY, or AUTH_TOKEN resolve at run time without you copying them anywhere.
This works for both UI-driven and CLI-driven load tests. It applies to Requestly API load tests and to hybrid load tests that pair Requestly API requests with a browser script.
Your secrets stay in Requestly. BrowserStack stores only the environment’s ID, never the variable values. The values are fetched live from Requestly at the start of each run.
Prerequisites
- A BrowserStack account with Load Testing enabled.
- A linked Requestly account. If you don’t have one, sign up at requestly.com using the same email. Your account links automatically the first time you use it.
- A Requestly project that contains at least one collection, which holds the requests to run, and at least one environment, which holds the variables to attach. Every Requestly project has a Global Variables environment by default, so this always counts.
How an attached environment works
When the test runs, BrowserStack:
- Fetches the environment from Requestly using your linked account.
- Fills in any
{{variable}}references in your requests with that environment’s values.
You never paste a value into BrowserStack, and the values never appear on the dashboard or in any exported config. BrowserStack stores only the environment’s ID, not the values. If you update a value in Requestly, your next run picks it up automatically.
Use a dedicated Requestly environment for load testing, such as lt-staging, so that production credentials never appear in the environment picker.
Attach a Requestly environment
Select your preferred interface to attach an environment:
Attach an environment from the UI Builder
Follow these steps to attach a Requestly environment:
Open Load Testing and select Create Load Test, or open an existing test and select Edit.
On the Load Sources step, open the Sources tab. Under Select API Load Source, select Import API Collection to show the Import from Requestly panel.
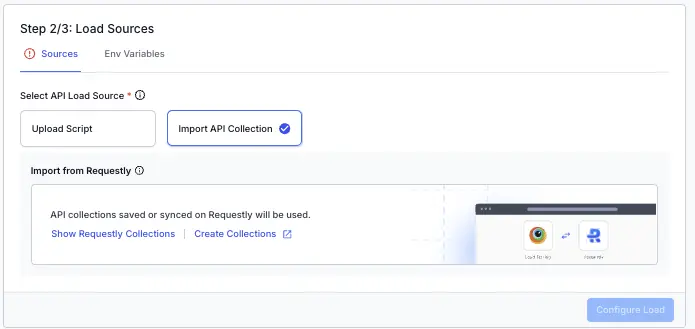
Select Show Requestly Collections and pick the collection you want to run. If you don’t have one yet, select Create Collections to set one up in Requestly.
In the same Load Sources step, select the Requestly environment whose variables you want to inject. If the project has a Global Variables environment, it’s selected by default. You can change it or clear it back to Global at any time.
(Optional) Configure virtual users (VUs), duration, and regions as usual.
Select Save or Run.
The selected environment ID ships with your test config, and the values are fetched at run time.
Attach an environment from the CLI
In your browserstack-load.yml config, set requestlyProjectEnvId to the environment whose variables you want to inject. This field sits alongside requestlyProjectId and requestlyCollectionId and is optional, so add it only when you want to attach an environment. All three IDs must come from the same Requestly project. Where you place these fields depends on whether you run an API or a hybrid load test.
API load test
Set the fields at the top level of your config:
Hybrid load test
Add the fields to the Requestly entry inside the tests list:
When you run the test, BrowserStack fetches the environment from Requestly using your linked account and resolves any {{variable}} references in your requests. To switch environments later, change requestlyProjectEnvId and run the test again.
Verify the environment was attached
You can confirm the attachment in two places:
- Test detail page: Open Other Configurations. You should see a Requestly environment chip with the environment name and a View in Requestly link that opens the environment in Requestly.
-
Test results: The
{{variable}}placeholders in your requests resolve to the environment’s values during the run. If a placeholder didn’t resolve, the request fails with the literal{{variable}}reaching the target.
Troubleshooting
Use the following table to resolve common issues:
| Issue | Resolution |
|---|---|
| Requestly account not found | Your BrowserStack account isn’t linked to a Requestly account. Sign up at requestly.com using the same email. The link is automatic on first sign-in. |
| The Environment dropdown is empty after picking a collection | The project has no environments. In Requestly, go to Settings > Environments, create one, then refresh. |
| Environment not found at run time | The environment ID doesn’t exist in the project you specified, or you don’t have access to it. Confirm that requestlyProjectId and requestlyProjectEnvId are from the same project and that your Requestly account has read access. |
| You want to swap environments without editing every test | Edit the test, change the environment in the picker, and save. The next run uses the new environment. |
Related topics
-
Environment variables: Pass variables to your tests using
.envfiles or key-value pairs. - Configure load parameters: Overview of all available load configuration options.
We're sorry to hear that. Please share your feedback so we can do better
Contact our Support team for immediate help while we work on improving our docs.
We're continuously improving our docs. We'd love to know what you liked
We're sorry to hear that. Please share your feedback so we can do better
Contact our Support team for immediate help while we work on improving our docs.
We're continuously improving our docs. We'd love to know what you liked
Thank you for your valuable feedback!