
 Join our Discord
Configure step behaviour
Enhance your testing with Low Code Automation by customizing step behavior like locators, wait timeouts, and failure logic.
Low Code Automation by default handles finding the right unique element and waiting for a specific duration before performing the actions on the browser intelligently. It also sets appropriate failure logic for validation and action steps such that multiple validations can be executed in a single test even if one validation fails. There are use-cases where it may need these configurations to be adjusted to meet the specific requirement of the workflow automation. This document outlines how you can override the default configurations and customize the behavior of each step.
Configure step locator
Enhance the resilience and flexibility of your tests involving complex elements by configuring custom locators for steps. Low Code Automation now allows you to configure your own locators for recorded steps. This is usually helpful when dealing with elements that:
- Do not have any meaningful attributes
- Have dynamic class names, IDs, and other attributes
- Can only be identified in relation to other element on the page
How to configure
- Navigate to the corresponding step for which you want to configure your own locator
- Click on the step to open the configuration details
- Toggle the setting Override default locator
- Select XPath or CSS from the dropdown
- Provide your locator corresponding to the element which uniquely identifies that element.
Locator concatenation syntax
To specify locators within iframes and Shadow DOMs, we use a concatenation syntax to distinguish between different levels. The syntax includes the following separators:
-
<<: Denotes the transition between iframes. -
||: Denotes the transition between Shadow DOMs.
Locators are defined in a hierarchical manner, first identifying the iframe or Shadow DOM and then specifying the element within.
Steps to locate elements
- Iframe example
- Shadow DOM example
- Import variables in custom locators
Iframe example
In this example, we want to target an input element with the class credit-card-number within the iFrame with the ID payment-form.
- To find an element inside an iframe, we need to first find the iframe using the locator.
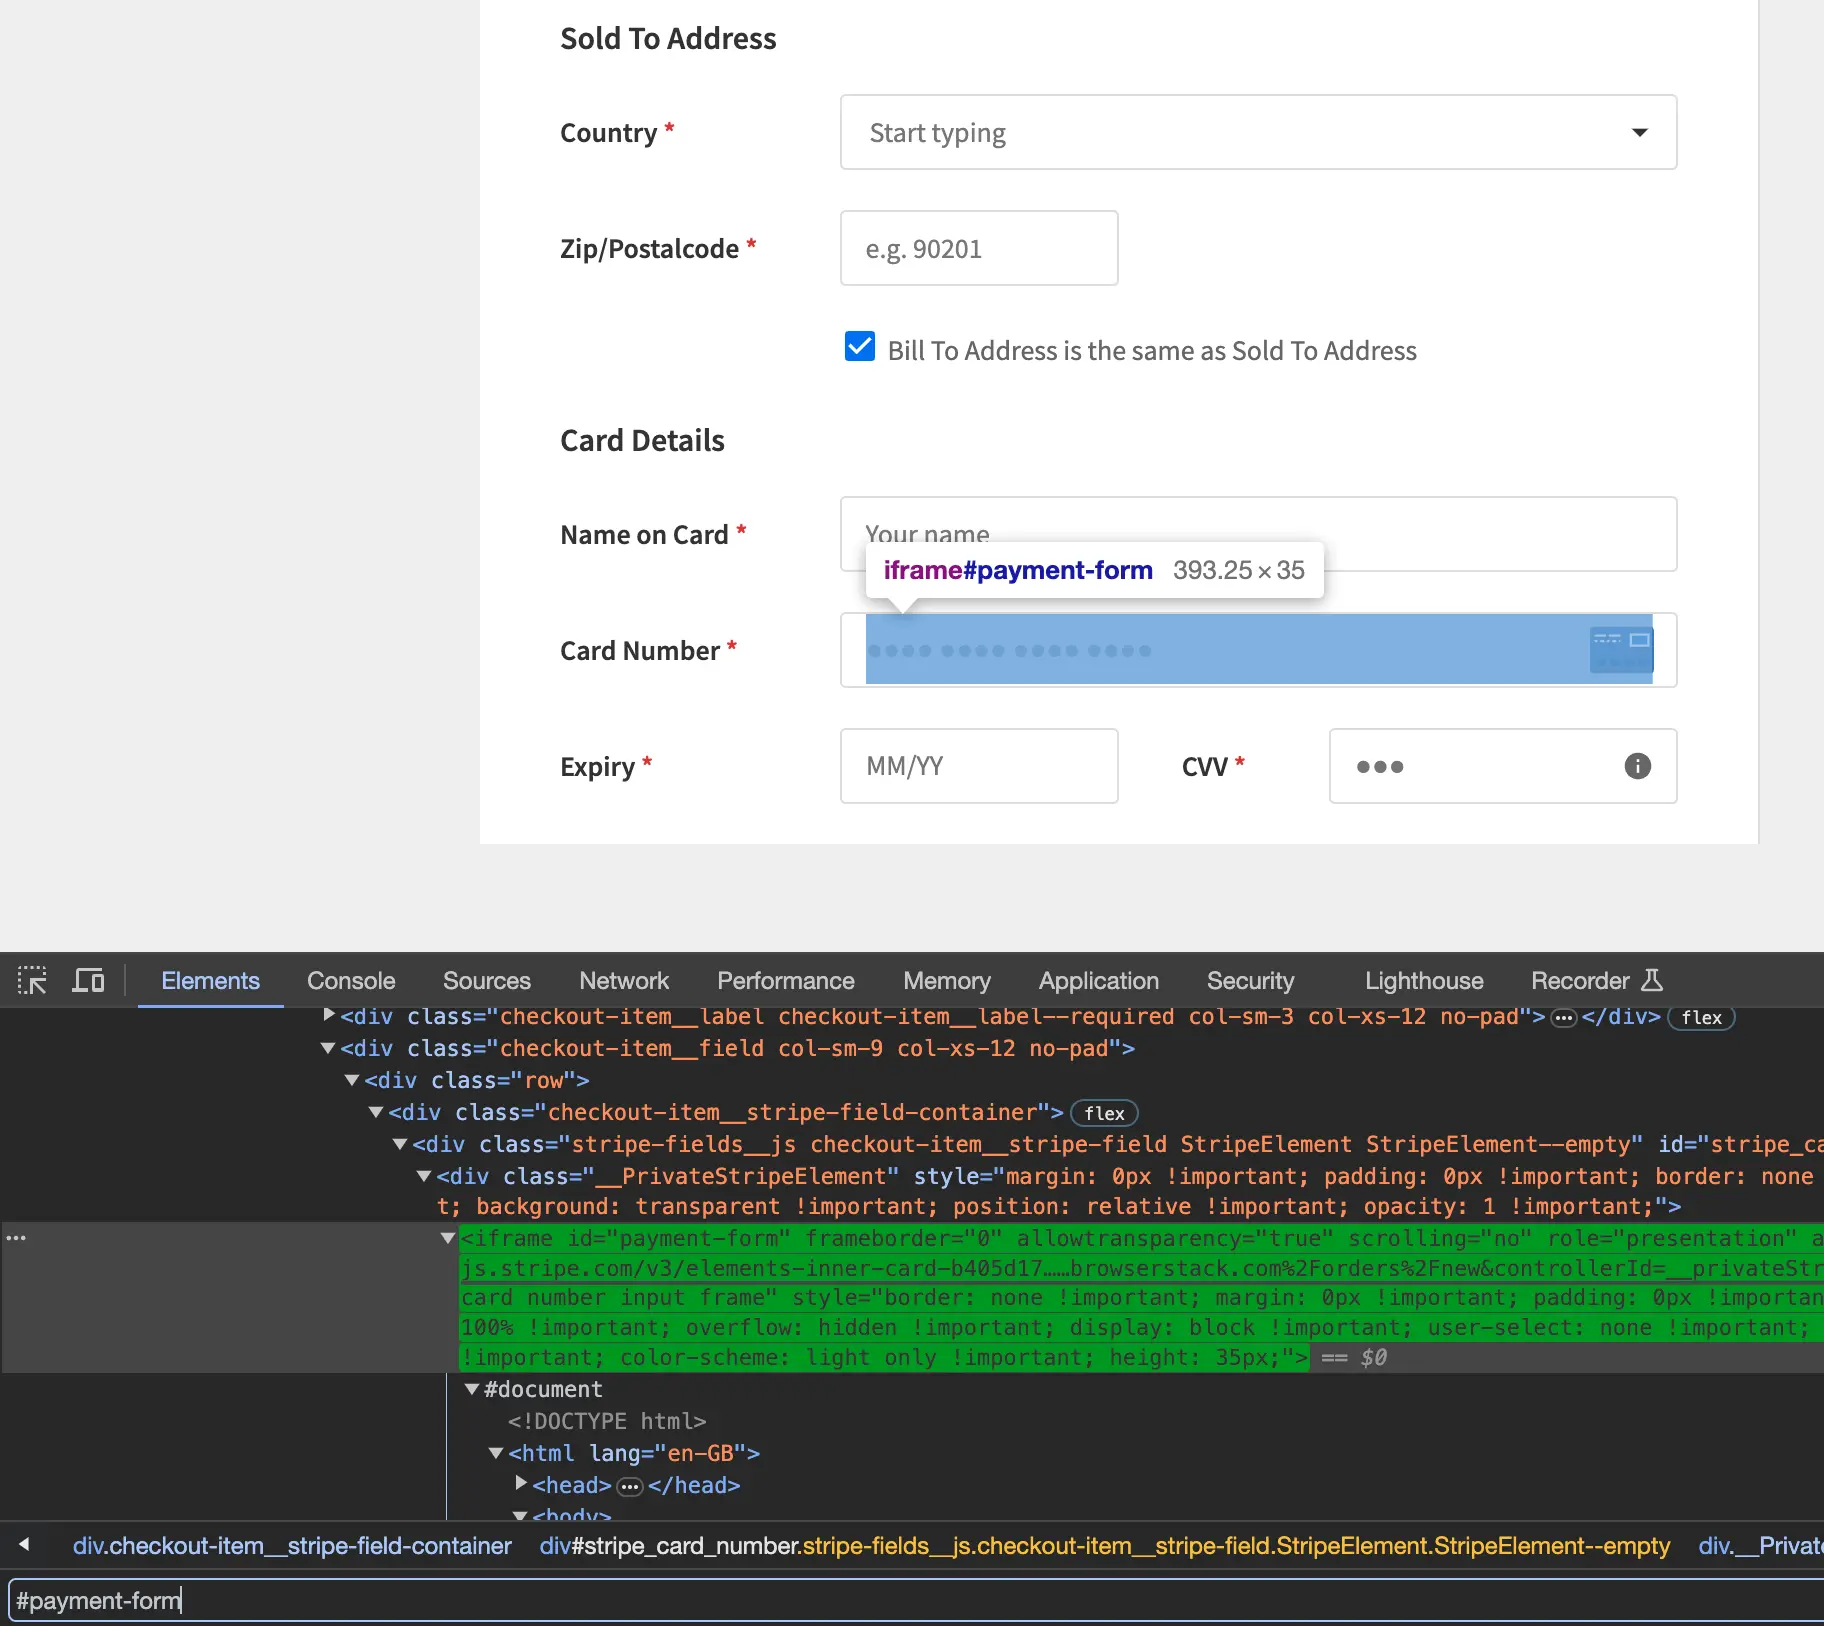
- The iframe element in the provided image is identified by the ID payment-form, and its corresponding CSS selector is #payment-form
- Now, find the targeted element inside this iframe
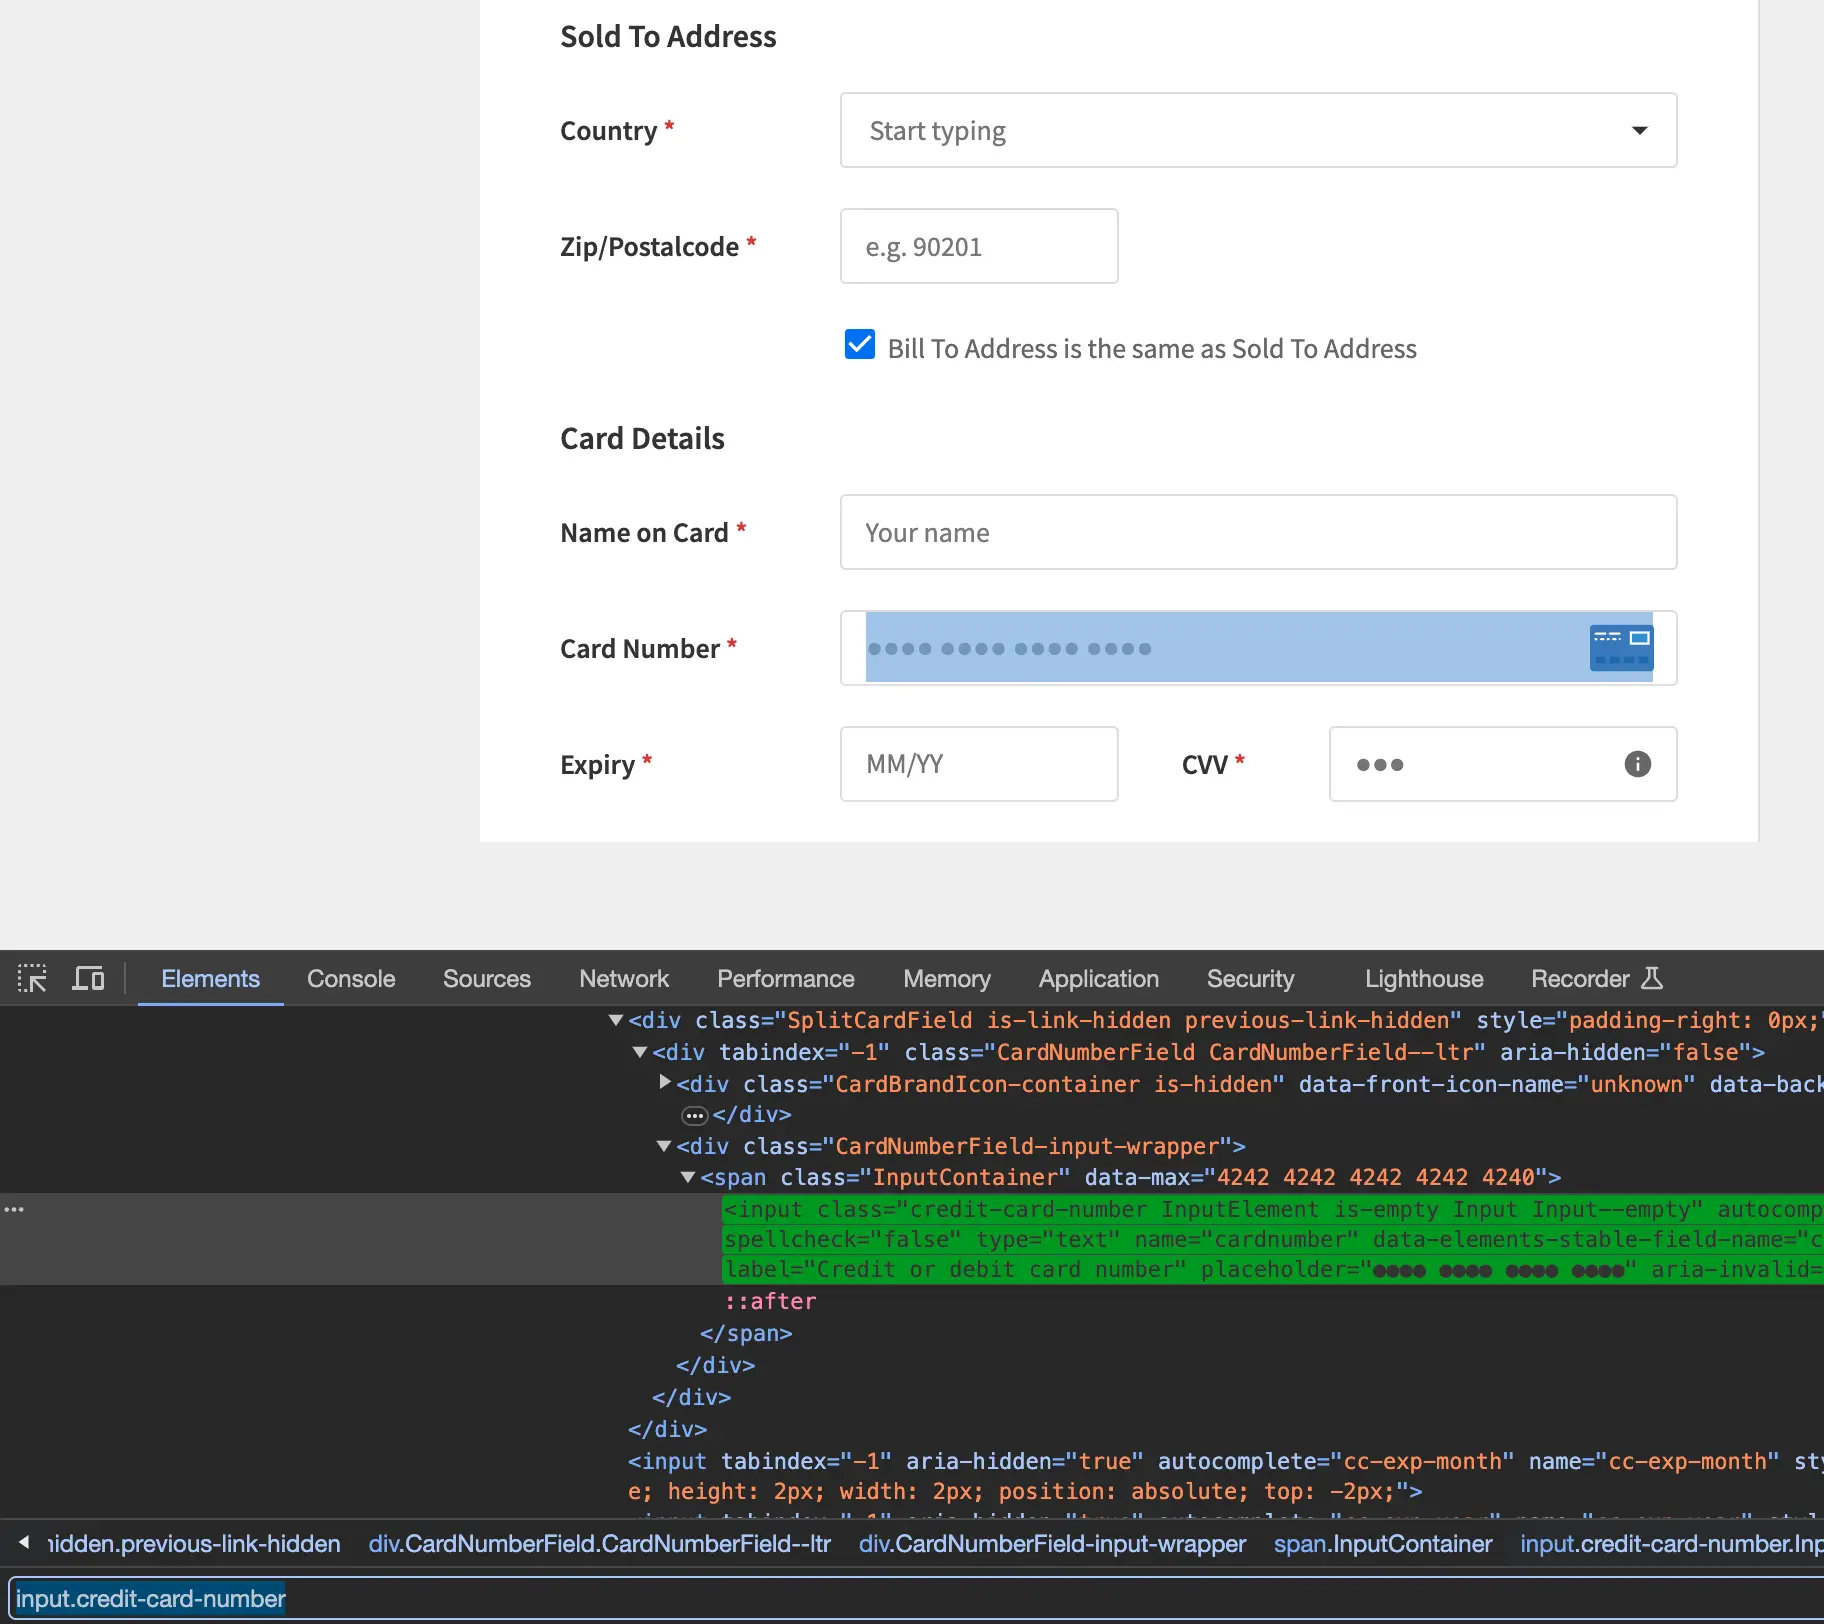
- The input element in the provided image is identified by the class credit-card-number, and its corresponding CSS selector is input.credit-card-number.
- Concatenate the two locators using separator
<<to form the final locator value as below#payment-form << input.credit-card-number
Shadow DOM example
In this example, we want to target an input element with id cardholder-name which is inside a shadow-root having parent element with id cart-checkout.
- To find an element inside a shadow-root, we need to first find the element which contains the shadow-root element.
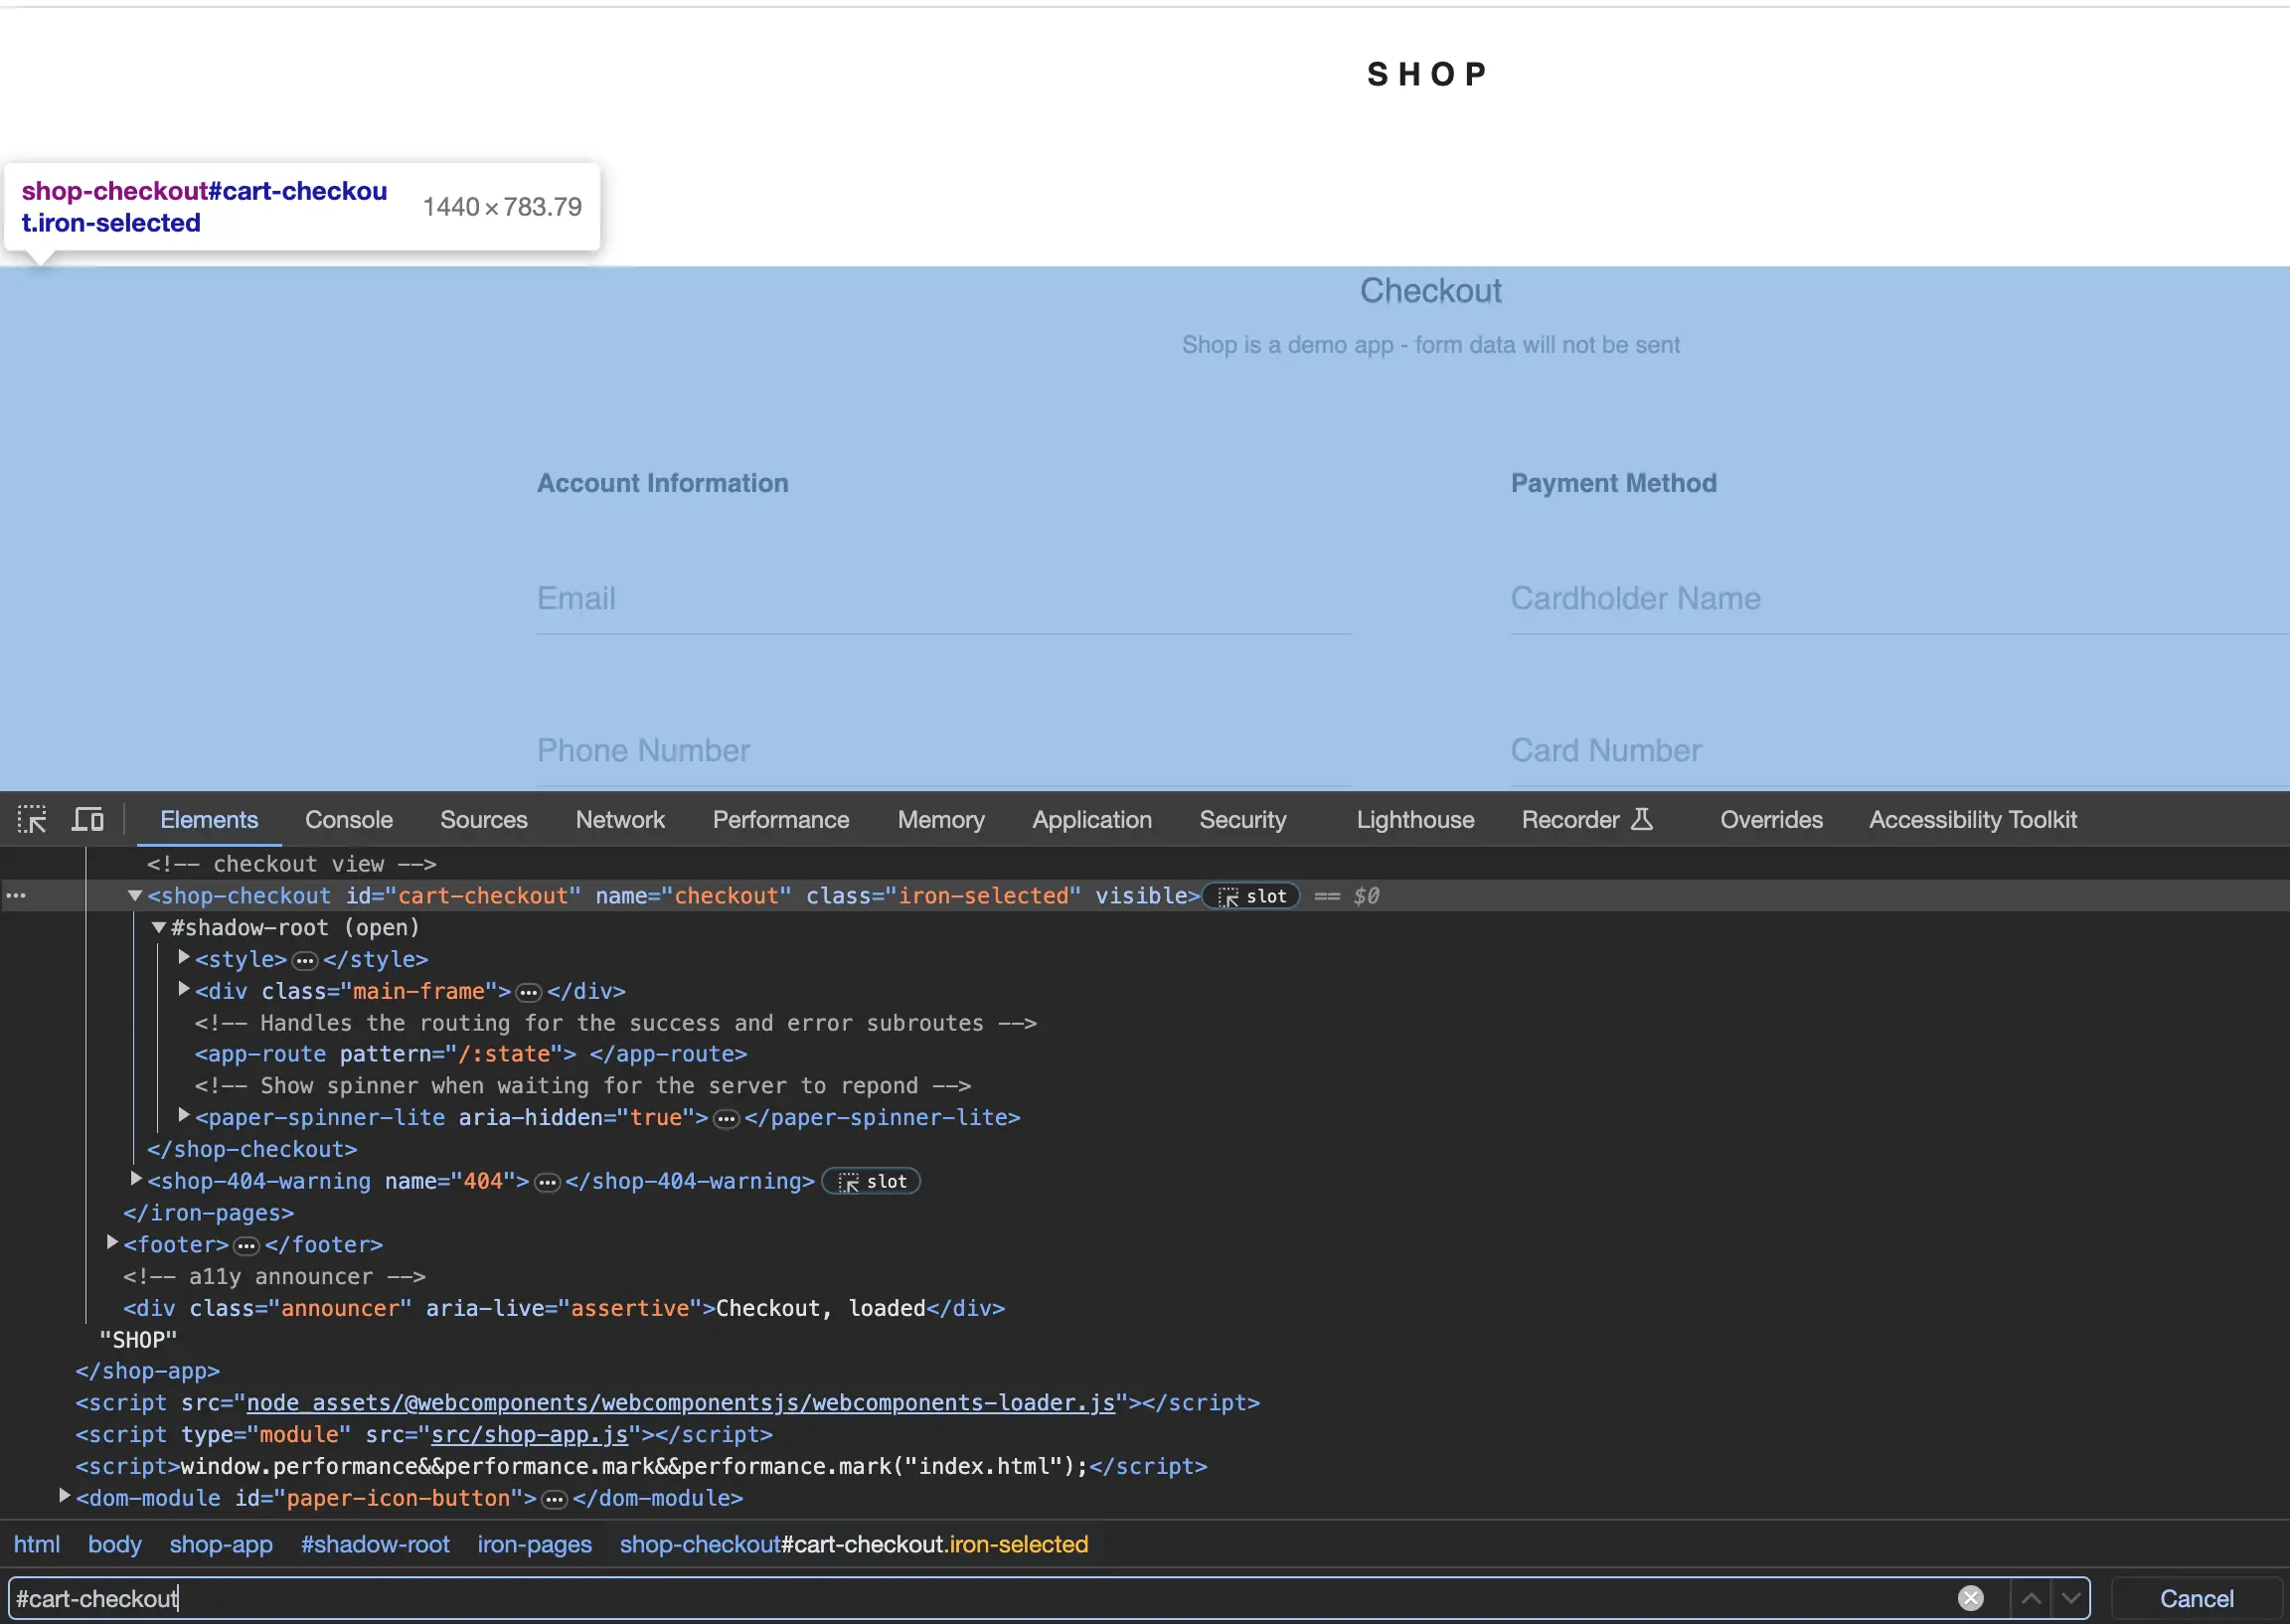
- The shadow-root element in the provided image is present under element with ID cart-checkout, and its corresponding CSS selector is #cart-checkout
- Now, find the targeted element inside the shadow-root element.
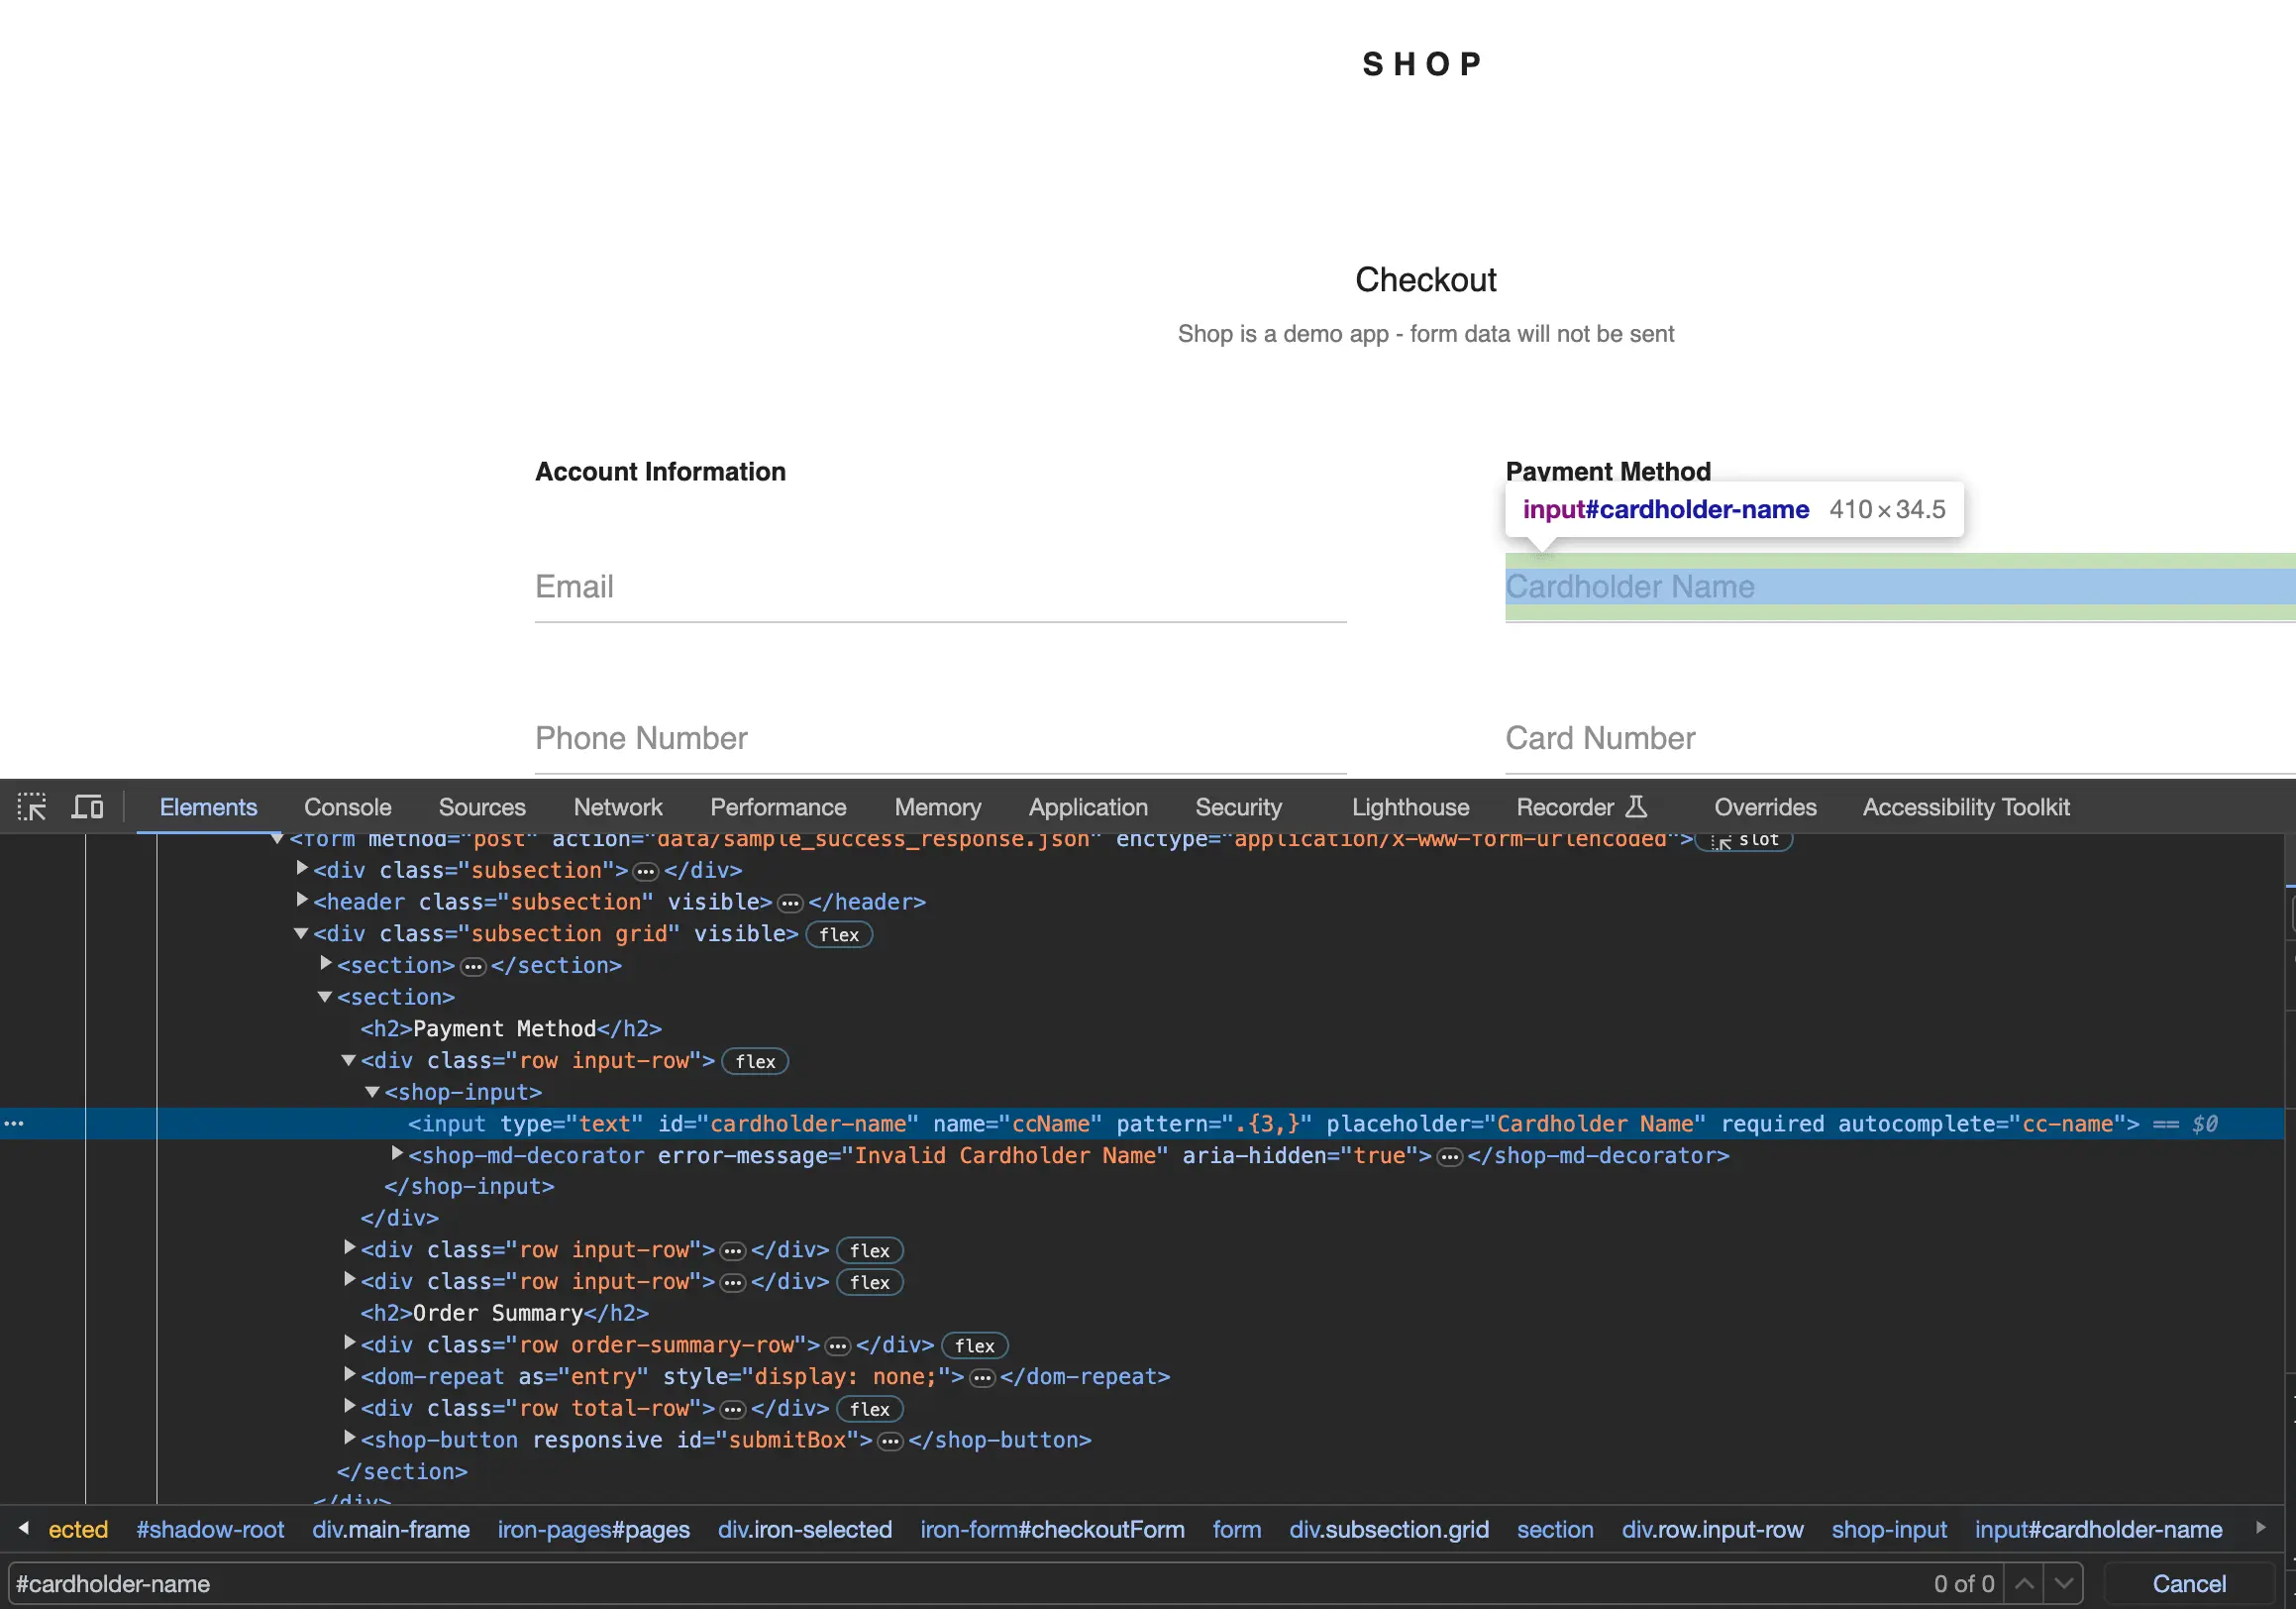
- The input element in the provided image is identified by the ID cardholder-name, and its corresponding CSS selector is #cardholder-name.
- Concatenate the two locators using separator
||to form the final locator value as below#cart-checkout || #cardholder-name
Import variables in custom locators
- You can now also import variables in your custom locators. Click the + icon next to the locator text input box.
- Import any local or dataset variable in your custom locators.
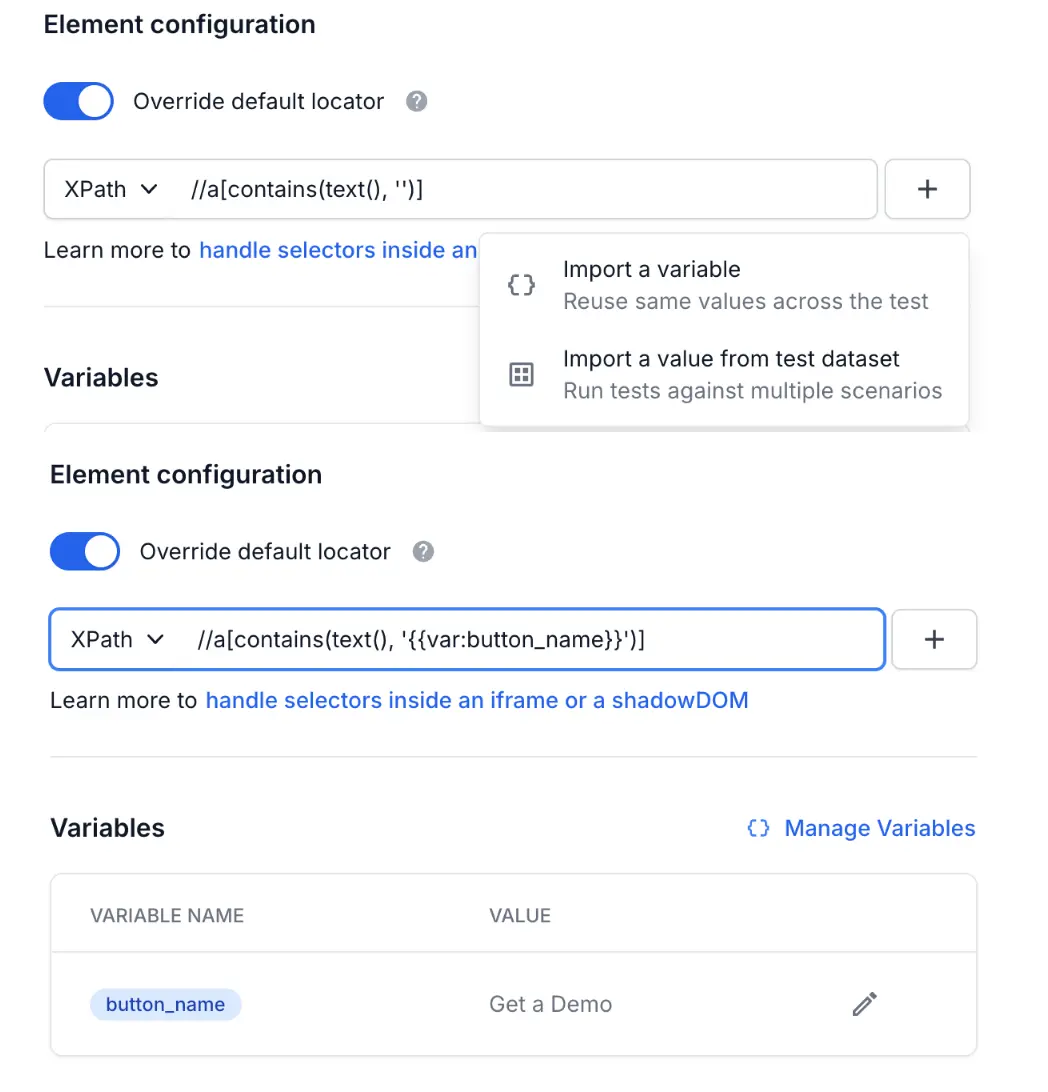
Custom locators don’t apply to canvas steps, because content drawn on a canvas has no selectors to target. For more information, see Locators for canvas steps.
Intelligent wait timeout
If the browser elements don’t load in time during test execution, the test might encounter incorrect results. Here’s where BrowserStack’s Low Code Automation offers a smart solution to set wait timeouts for different steps. By default, it intelligently detects the best wait time based on network requests and page navigations during the recording process. This ensures that the test is more stable even if the element sometimes takes slightly longer time to load during execution.
During test execution, Low Code Automation’s element selection algorithm finds the unique element and performs different actionability checks on the element to ensure it is actionable before executing the step. It retries multiple times if the element is not found or not actionable until the timeout of the step is reached.
By default, the intelligent wait timeout is enabled for each step. To override the setting and provide your own timeout value, you can disable the Intelligent timeout toggle for a particular step and adjust the wait timeout according to your use case.
The maximum allowed timeout for any step is 240 seconds (4 minutes). Values above this limit are not accepted.
Override intelligent timeout
You can override the intelligent timeout settings for all steps in your project from the Settings page. This allows you to set timeout values that apply across your entire project, providing consistent timeout behavior without configuring each step individually.
To override the intelligent timeout:
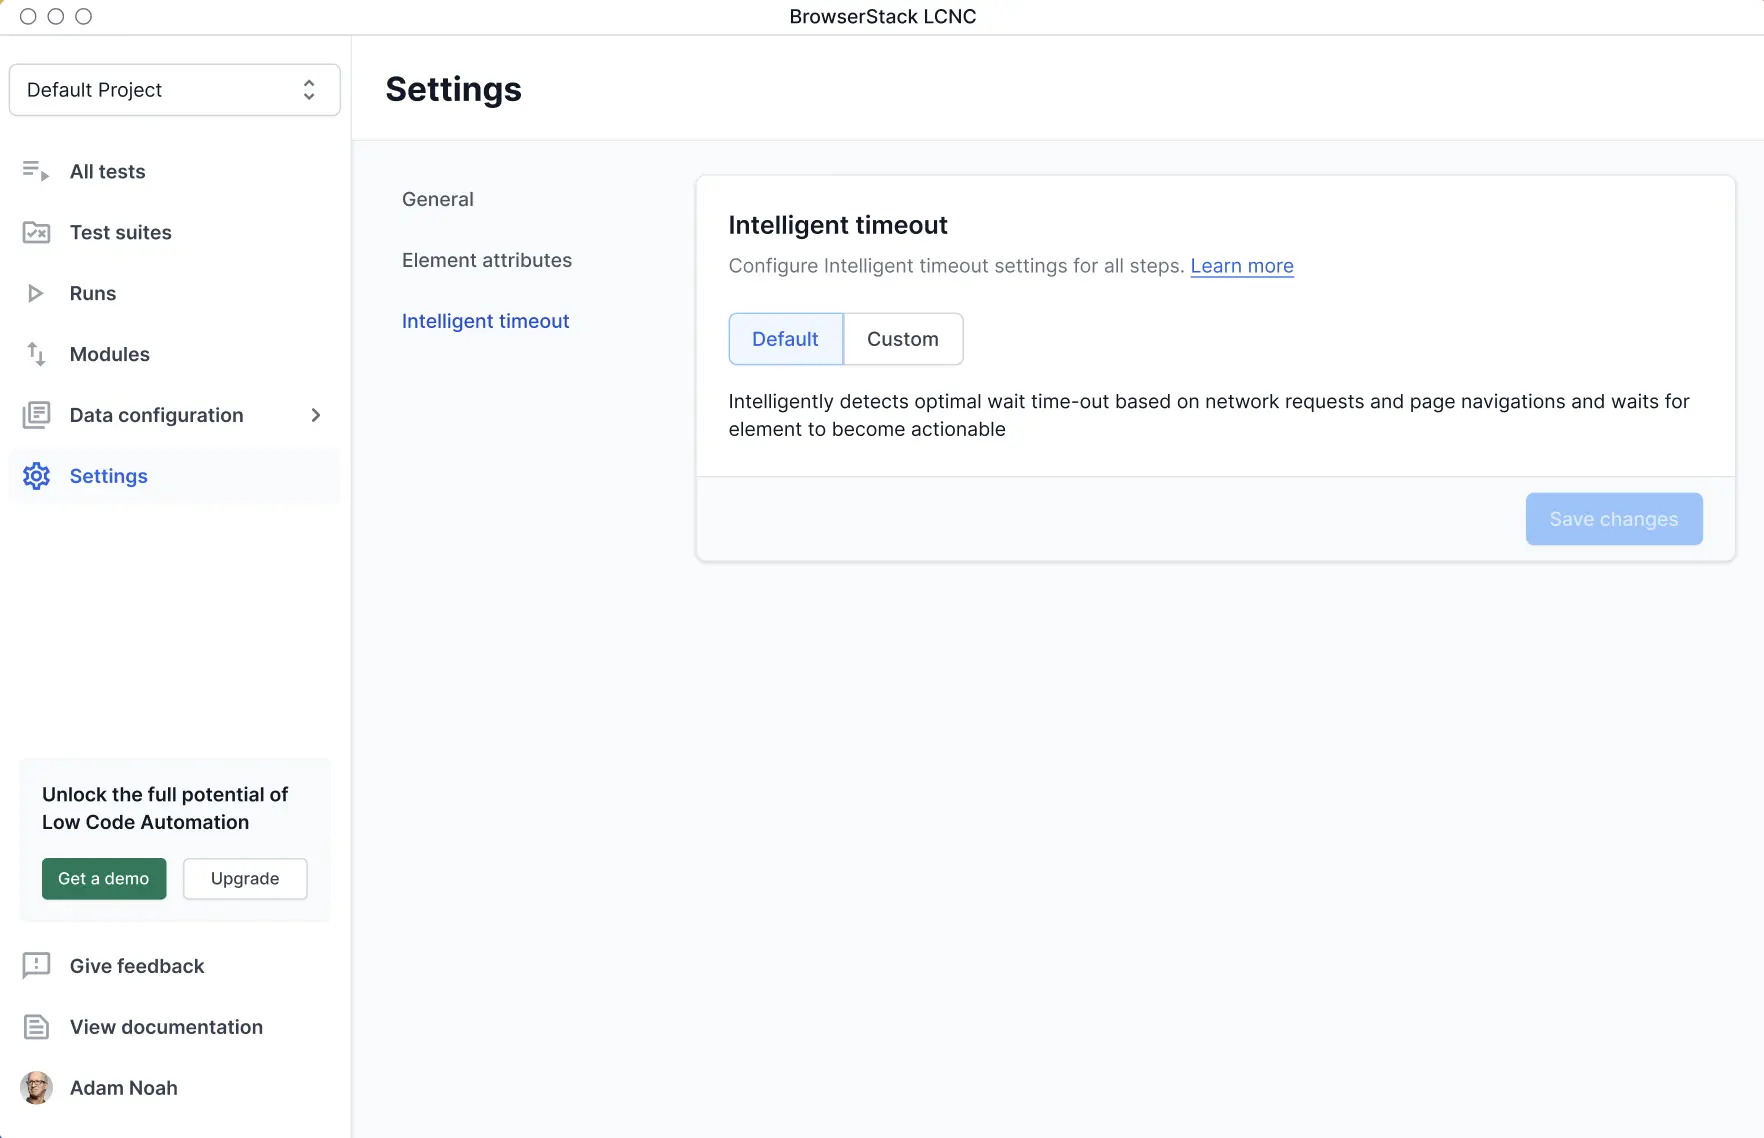
- Navigate to Settings from the left sidebar.
- Click Intelligent timeout from the settings menu.
- Choose between Default or Custom mode:
-
Default: Uses BrowserStack’s intelligent timeout detection, which automatically determines optimal wait times by monitoring network requests and page navigations. This eliminates the need for manual timeout configuration while ensuring elements are fully loaded and actionable before test steps proceed.
-
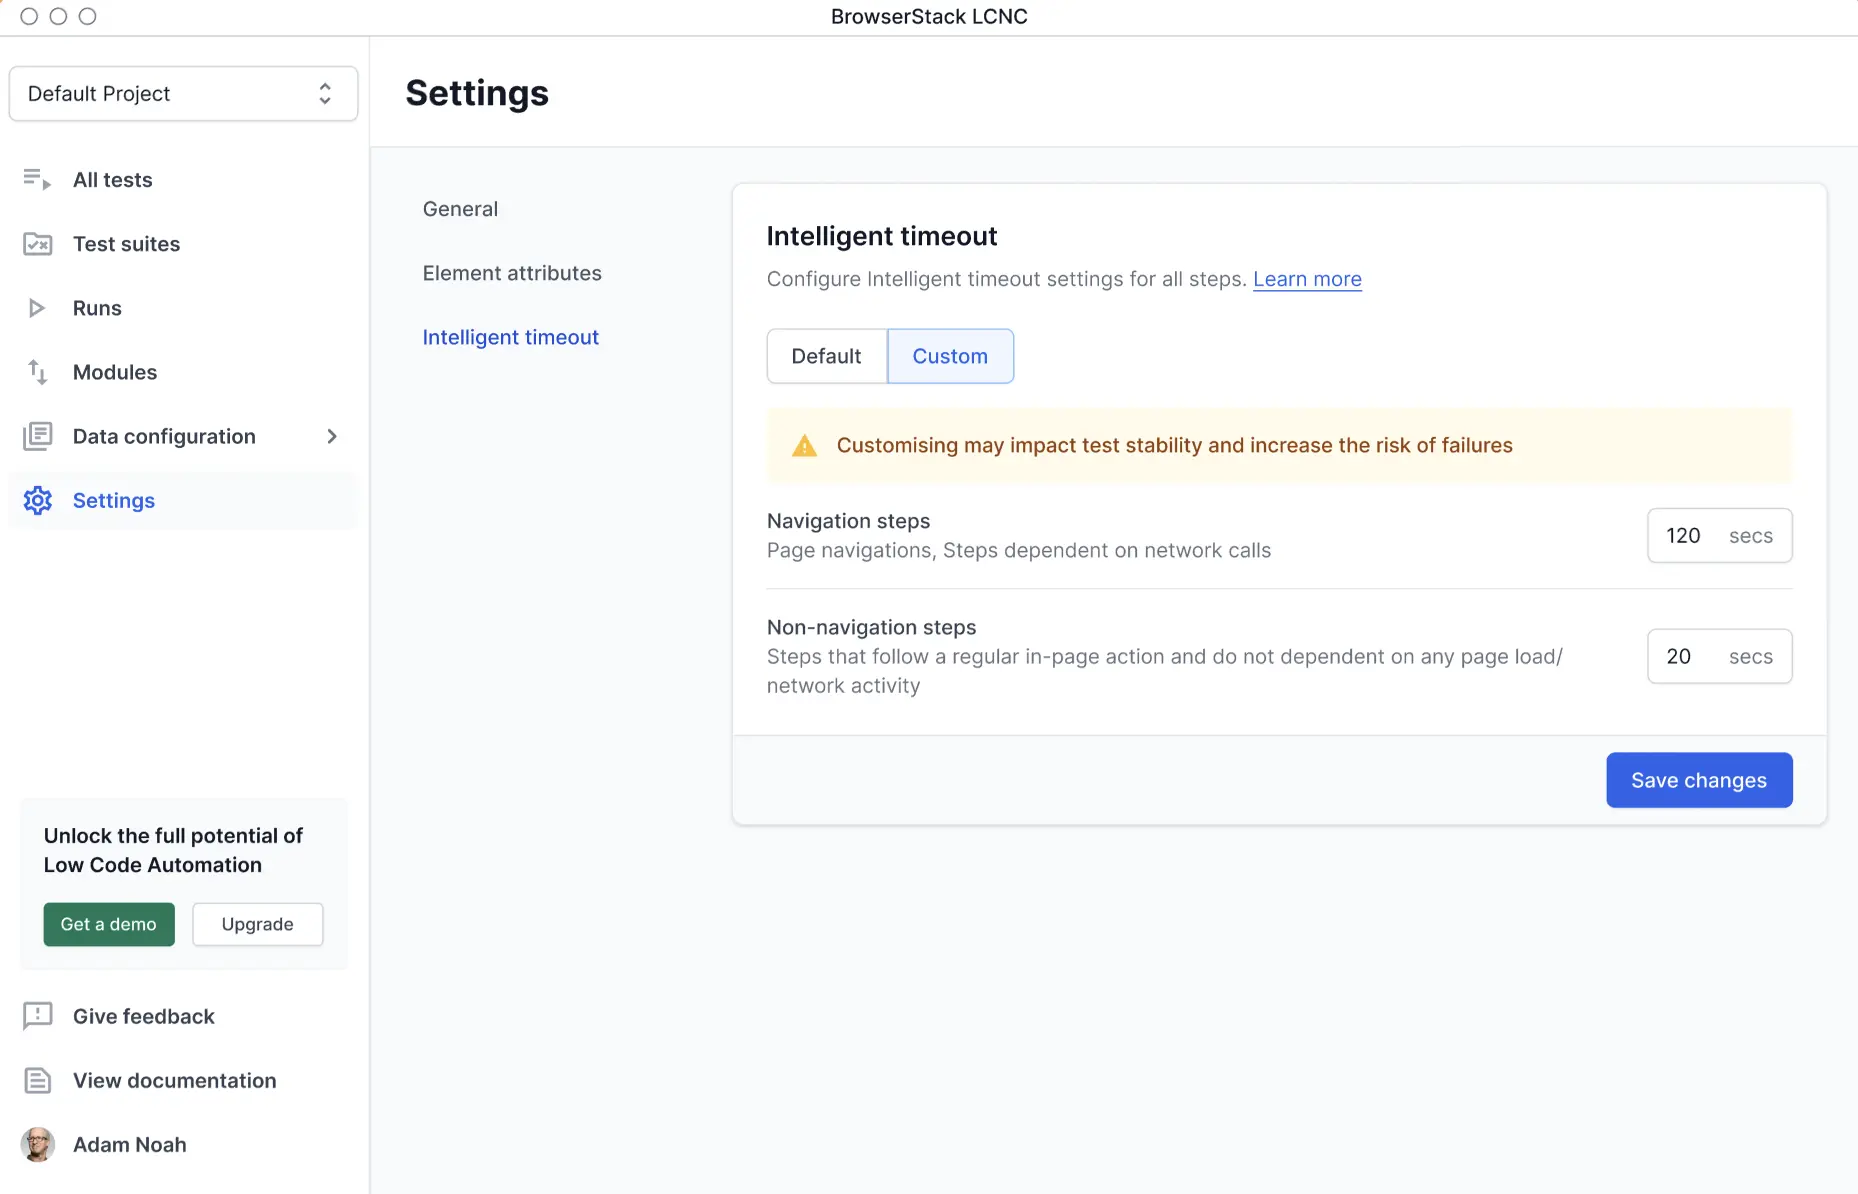
Custom: Allows you to set specific timeout values for different types of steps.
-
Default: Uses BrowserStack’s intelligent timeout detection, which automatically determines optimal wait times by monitoring network requests and page navigations. This eliminates the need for manual timeout configuration while ensuring elements are fully loaded and actionable before test steps proceed.
- If you select Custom, configure the following timeout values:
- Navigation steps: Set timeout (in seconds) for page navigations and steps dependent on network calls. Default is 120 seconds.
- Non-navigation steps: Set timeout (in seconds) for validations, clicks, and hover actions. Default is 20 seconds.
- Click Save changes.
If a step is preceded by a navigation, it uses the navigation timeout (120 seconds by default); otherwise, if it’s preceded by any other action like a hover, it uses the non-navigation timeout (20 seconds by default).
Timeout precedence
Timeout values are applied in this order:
- Step-level custom timeout: Overrides all other settings if wait time is set for a step.
- Intelligent timeout override: Used if no step-level timeout is set and override values are configured in Settings.
- Default intelligent timeout: Used if neither step-level nor override timeouts are set.
Configure step failure logic
Low code automation provides you with options for handling test failures. You can decide what action to take when a test step fails.
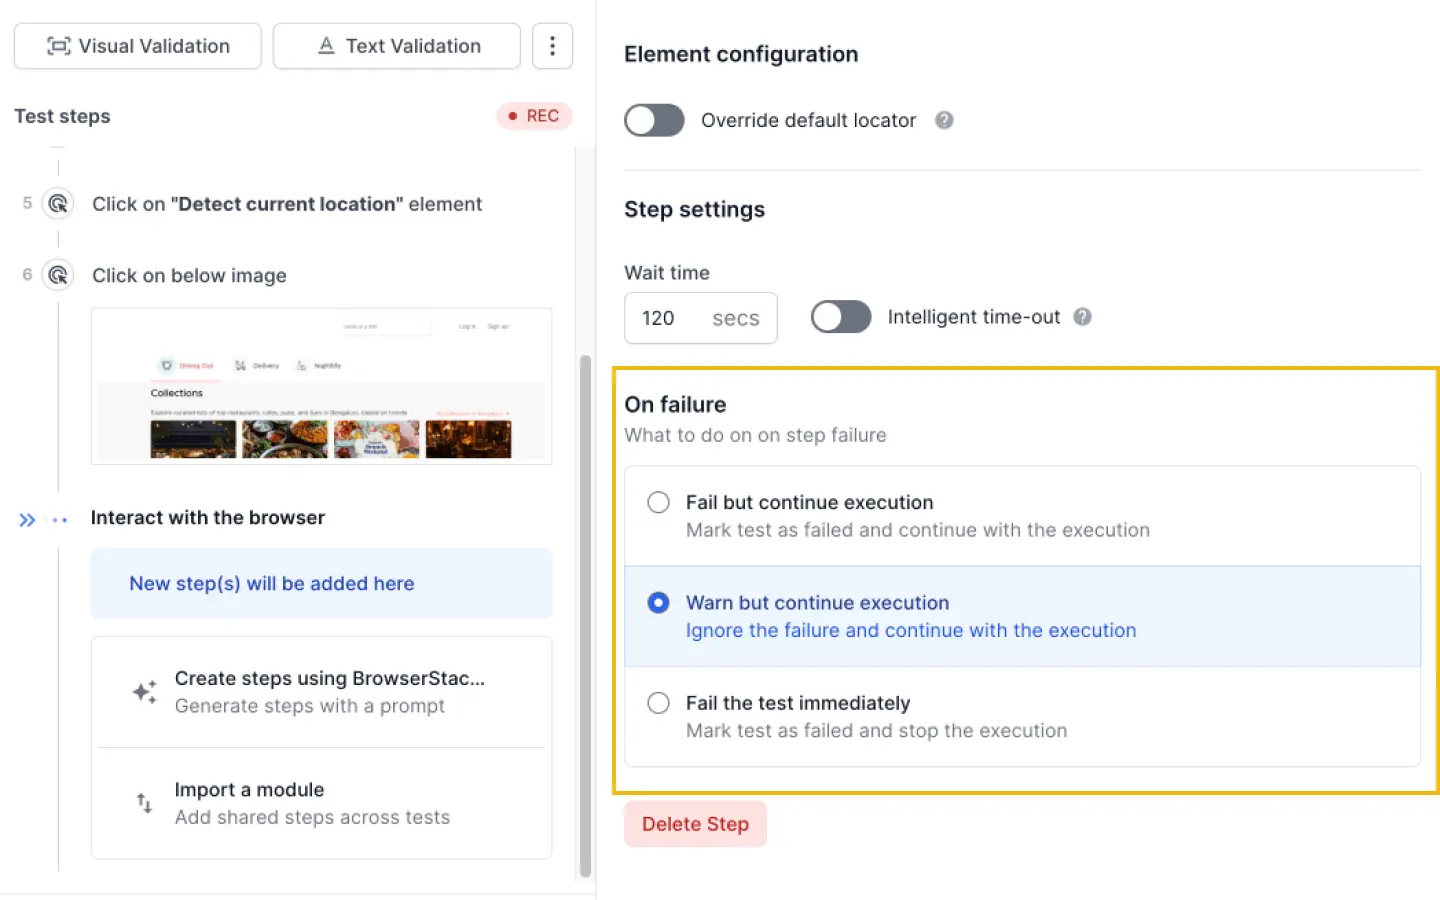
Choose one of the following options to be executed:
-
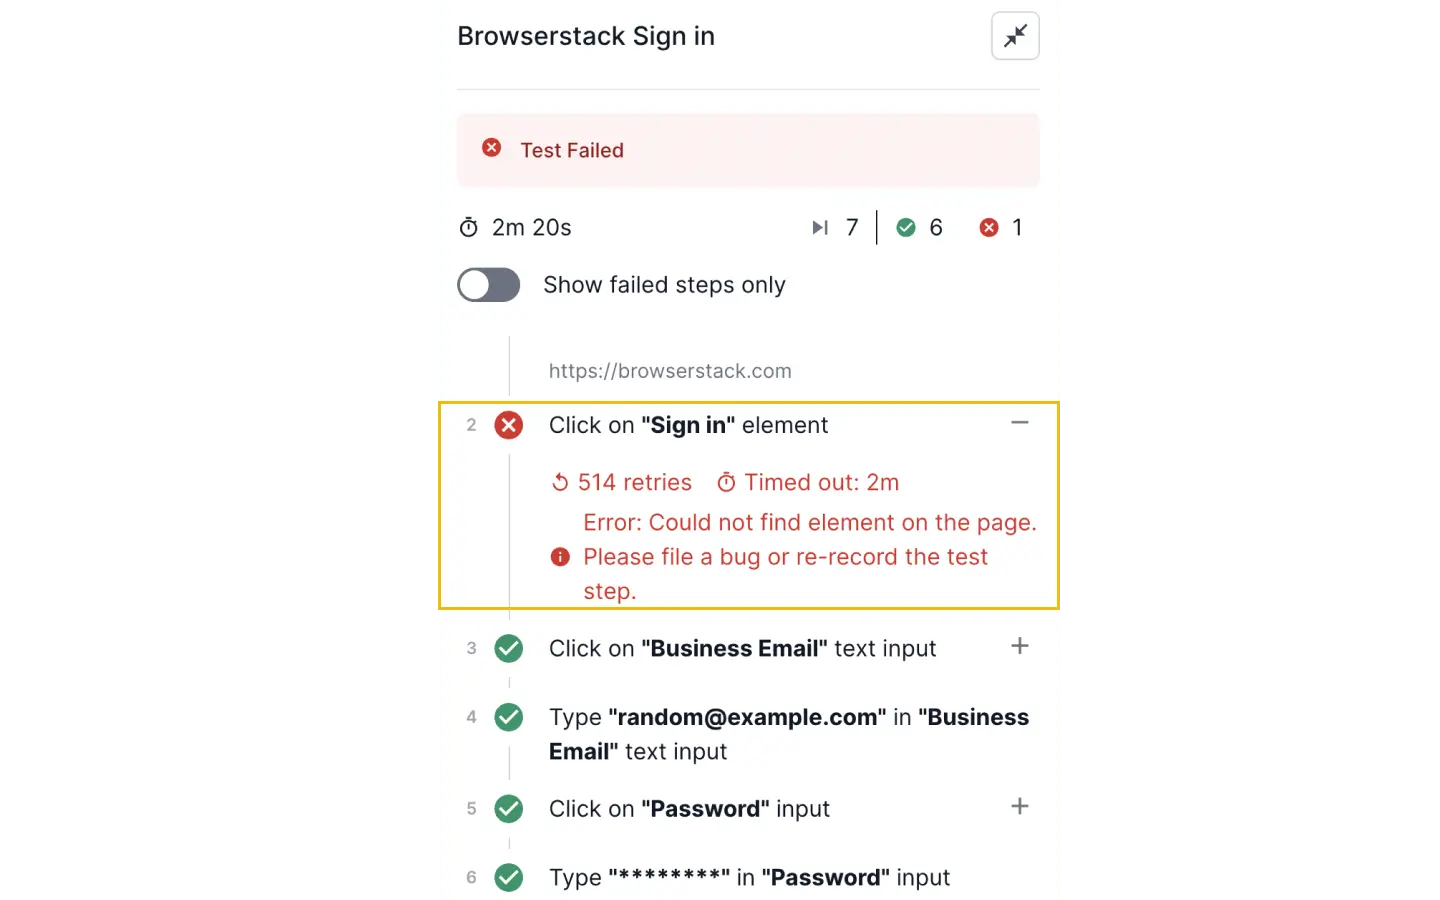
Fail but continue execution: Choose this option when you want to mark the step as failed but still continue with the execution. You can use this to perform the remaining validations even if current validation fails.
-
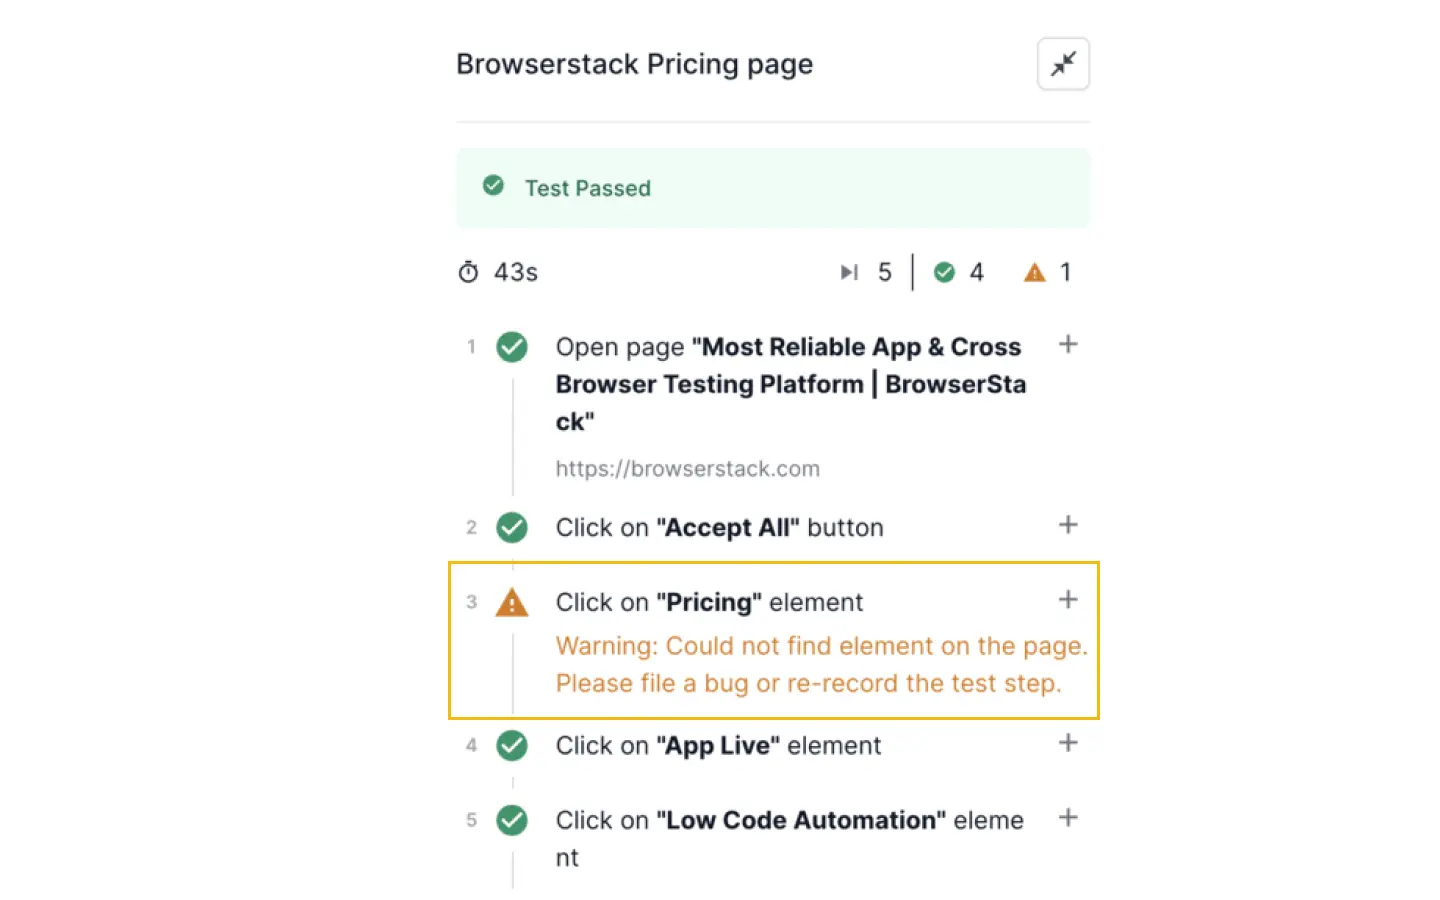
Warn but continue execution: Choose this option when you want to ignore the step failure and continue with the execution. Failure of this step does not affect the overall test status. You can view the summary of the test execution report as shown below:
-
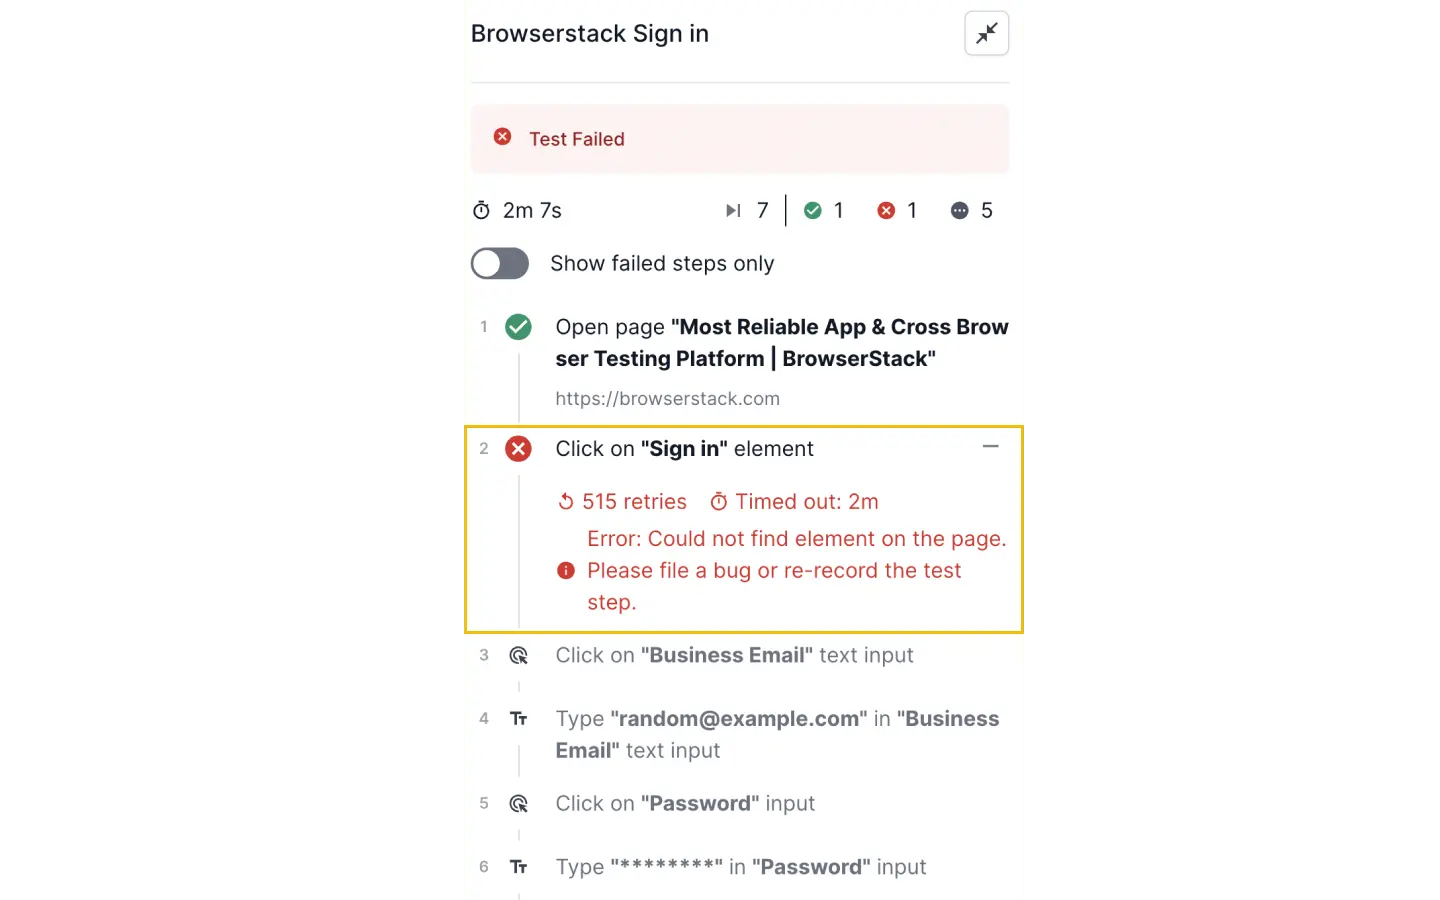
Fail the test immediately: Choose this option when you want to mark the step and test as failed and halt the test execution right away.
We're sorry to hear that. Please share your feedback so we can do better
Contact our Support team for immediate help while we work on improving our docs.
We're continuously improving our docs. We'd love to know what you liked
We're sorry to hear that. Please share your feedback so we can do better
Contact our Support team for immediate help while we work on improving our docs.
We're continuously improving our docs. We'd love to know what you liked
Thank you for your valuable feedback!