Rules
Give Test Companion persistent, always-on instructions that shape how it works across every conversation, so you never repeat the same guidance.
A rule is a standing instruction you write once. Test Companion reads every active rule at the start of a conversation and applies it to each task, without you asking. You set the preference one time. It holds for every new conversation.
Unlike a skill, a rule is never invoked. You do not type a slash command to run it. It works in the background on everything you do in that workspace.
If you keep typing the same guidance into the chat before every task, that guidance belongs in a rule.
Example rules:
- Always use explicit waits.
- Follow the Page Object pattern.
- Never modify files in the
configdirectory.
How rules work
A rule is a plain-text file. You can give it a .md or .txt extension, or no extension at all. You write the instructions in natural language, the way you would brief a teammate on their first day.
When you start a conversation, Test Companion reads every active rule and adds its instructions to the context for that session. The AI follows them as if you had typed them yourself. Because the rules stay active, you never repeat them.
Rules use no special markup. Write in plain sentences. Test Companion reads them top to bottom.
Rule scope
Every rule lives at one of two scopes. The scope decides which projects the rule applies to. Pick the scope by asking whether the rule names project-specific details.
Global rules
Global rules apply to every project you open with Test Companion, whatever workspace is active. Test Companion stores them at the user level on your machine. Use global rules for preferences you want everywhere:
- Personal coding style: indentation, naming, and comment conventions.
- General quality standards, such as always include an assertion or never hard-code a wait.
- Language preferences, such as writing all code comments in English.
- Framework defaults you reuse across projects.
Workspace rules
A workspace rule applies only to the project that is open now. Test Companion stores it inside the project directory, so you can commit it to version control and share it with your team. Use workspace rules for guidance tied to one codebase:
- The testing framework and language for this project.
- Folder structure and naming conventions unique to this codebase.
- Integration details, such as staging URLs, API endpoints, or BrowserStack capabilities.
- Files or directories the AI must never modify here.
- Team agreements on test design patterns for this codebase.
How global and workspace rules interact
Test Companion reads and applies both at the same time. When a workspace rule and a global rule give conflicting instructions, the workspace rule takes precedence over the global one. You keep personal defaults global. Each project overrides them only where it needs to.
Create a rule
You create a rule from the Test Companion panel. Follow these steps:
-
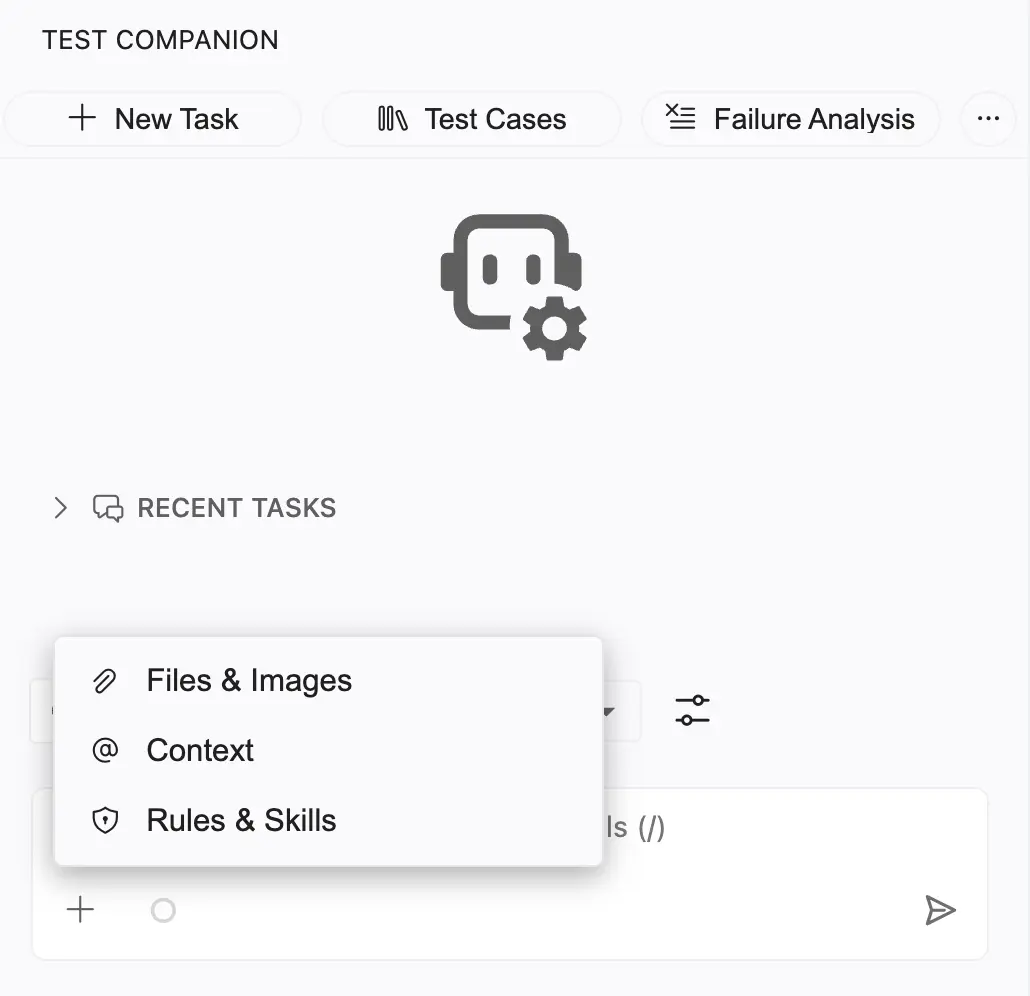
Click + at the bottom of the chat field.
-
Select Rules & Skills. The panel opens on the Rules tab.
-
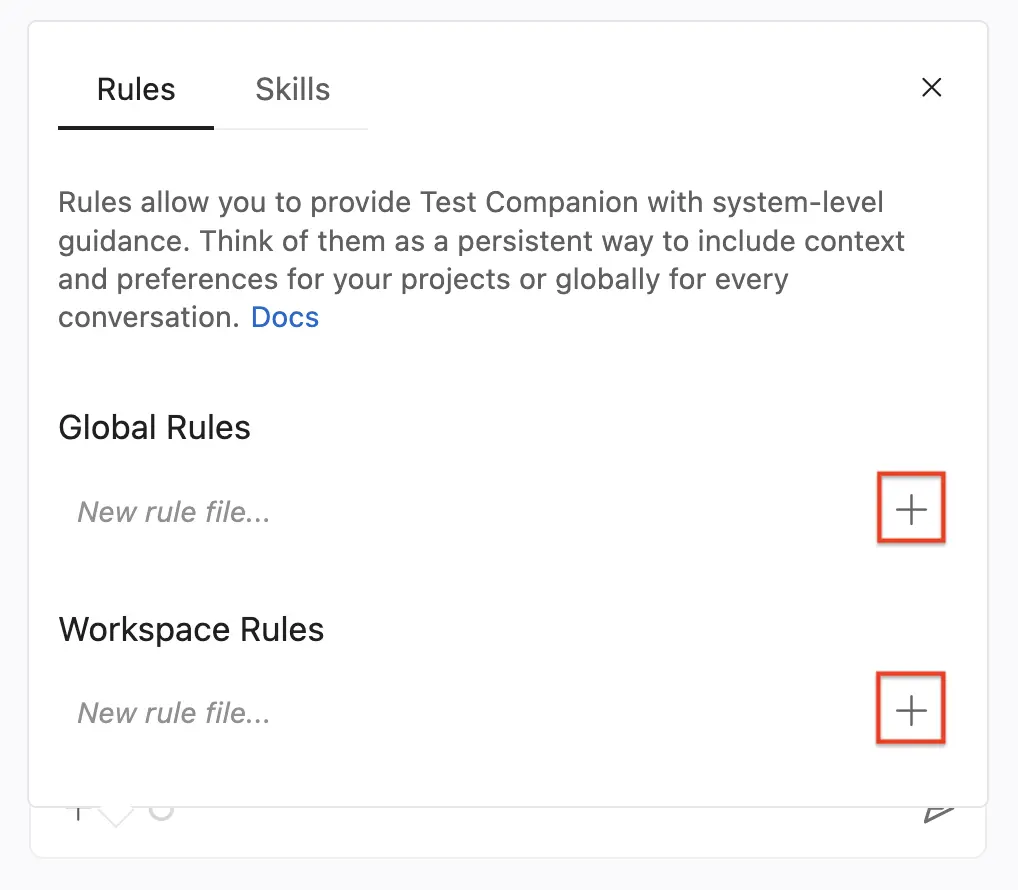
Under Global Rules or Workspace Rules, type a file name in the New rule file… field.
-
Click the + button next to the field.
-
The new rule file opens in your editor. Write your instructions, then save the file.
File format
Rules are plain-text files. You can use Markdown for readability. Test Companion does not require it. The AI reads the content either way.
Write effective rules
The most useful rules are specific, short, and direct. The guidelines below help you write rules that behave the same way every time.
Be specific, not vague
Test Companion reads a rule literally. A vague rule produces inconsistent behaviour.
| Weak rule | Strong rule |
|---|---|
| Write good tests | Every test method must contain at least one assertion. Use descriptive assertion messages that explain what the expected outcome is. |
| Use proper waits | Use WebDriverWait with ExpectedConditions for all element interactions. Never use Thread.sleep() or implicit waits. Set the default wait timeout to 10 seconds. |
| Follow our structure | Place test files in src/test/java/com/myapp/tests/. Place Page Object classes in src/test/java/com/myapp/pages/. Name test classes with the Test suffix (e.g., LoginPageTest). |
Tell the AI what to do and what not to do
State the limit next to the instruction. An explicit prohibition prevents the most common mistakes.
Always:
- Use
@FindByannotations for element locators in Page Objects. - Return the Page Object class from action methods, so you can chain methods.
- Add JavaDoc comments to public methods in Page Objects.
Never:
- Use
Thread.sleep()to wait. Use explicit waits instead. - Hard-code test data inside test methods. Use data providers or external files.
- Modify files in the
/configor/infrastructuredirectories.
Keep rules focused
Keep each rule file on a single topic. When a file mixes unrelated areas like coding standards, folder structure, the CI pipeline, and API guidelines, split those concerns into separate rule files. That keeps each file easy to maintain. It also makes the AI easier to debug when it behaves unexpectedly.
Example rules for common scenarios
Each example below is a complete rule file. Copy one as a starting point, then adjust it for your stack and conventions.
Example 1: Selenium and Java coding standards
File name: selenium-java-standards
# Selenium Java test standards

## Framework
- Use Selenium WebDriver 4.x with Java 17.
- Use TestNG as the test runner.
- Use the Page Object Model (POM) for all UI interactions.

## Assertions
- Use TestNG Assert for all assertions.
- Every test method must contain at least one assertion.
- Provide a descriptive message: Assert.assertEquals(actual, expected, "Login page title should match").

## Waits
- Use WebDriverWait with ExpectedConditions for element interactions.
- Set the default timeout to 10 seconds.
- Never use Thread.sleep() under any circumstances.
- Never use implicit waits.

## Element locators
- Prefer data-testid attributes over CSS classes or XPaths.
- If data-testid is not available, use CSS selectors.
- Use XPath only as a last resort, and add a comment explaining why.

## Test independence
- Each test must run fully independent of any other test.
- Use @BeforeMethod for setup and @AfterMethod for teardown.
- Do not share mutable state between test methods.
Example 2: Pytest project conventions
File name: pytest-conventions
# Pytest project conventions

## Language and framework
- Python 3.11 with Pytest.
- Use pytest-html for reporting.
- Use pytest-xdist for parallel execution.

## File and naming
- Test files: test_<feature>.py (example: test_checkout.py).
- Test functions: test_<action>_<expected_result>.
- Page Object classes: <Name>Page (example: CheckoutPage).
- Define shared fixtures in conftest.py at the tests/ root.

## Folder structure
- tests/ holds all test files.
- tests/pages/ holds Page Object classes.
- tests/utils/ holds helper functions and custom waits.
- tests/data/ holds test data files (JSON, CSV).
- tests/conftest.py holds shared fixtures.

## Patterns
- Use @pytest.fixture for setup and teardown, not setup_method or teardown_method.
- Use @pytest.mark.parametrize for data-driven tests.
- Group related tests into classes when they share fixtures.
- Use explicit waits with WebDriverWait, never time.sleep().
Example 3: Enforce accessibility testing standards
File name: accessibility-rules
# Accessibility testing standards

When generating or reviewing test cases for any web page, always include these accessibility checks:

1. Verify that all images have meaningful alt text. Empty alt="" is acceptable only for decorative images.
2. Verify that all form inputs have associated <label> elements.
3. Verify that the page can be navigated with the keyboard alone (Tab, Shift+Tab, Enter, Space, Escape).
4. Verify that focus indicators are visible on interactive elements.
5. Verify that colour contrast ratios meet WCAG 2.1 AA (minimum 4.5:1 for normal text, 3:1 for large text).

When writing automation code that checks accessibility:

- Use axe-core as the accessibility scanning engine.
- Run scans after the page has fully loaded and all dynamic content has rendered.
- Tag known third-party widget violations as "third-party" for tracking, but do not fail the test.
Example 4: Protect sensitive areas of the codebase
File name: off-limits
# Protected files and directories

Do not read, modify, create, or delete files in any of these locations:

- /infrastructure/ is managed by the DevOps team.
- /config/production/ holds production configuration. Staging config is fine.
- /.github/workflows/ holds CI/CD pipelines.
- /database/migrations/ requires DBA review.

If a task needs changes in any of these areas, stop and explain what changes are needed, so I can make them manually.
Manage rules
View and edit rules
Open the Rules & Skills panel from the chat + menu, then open the Rules tab. All your active rules appear there. Click a rule file name to open it in your editor. Your edits apply the next time you start a task.
Disable or delete a rule
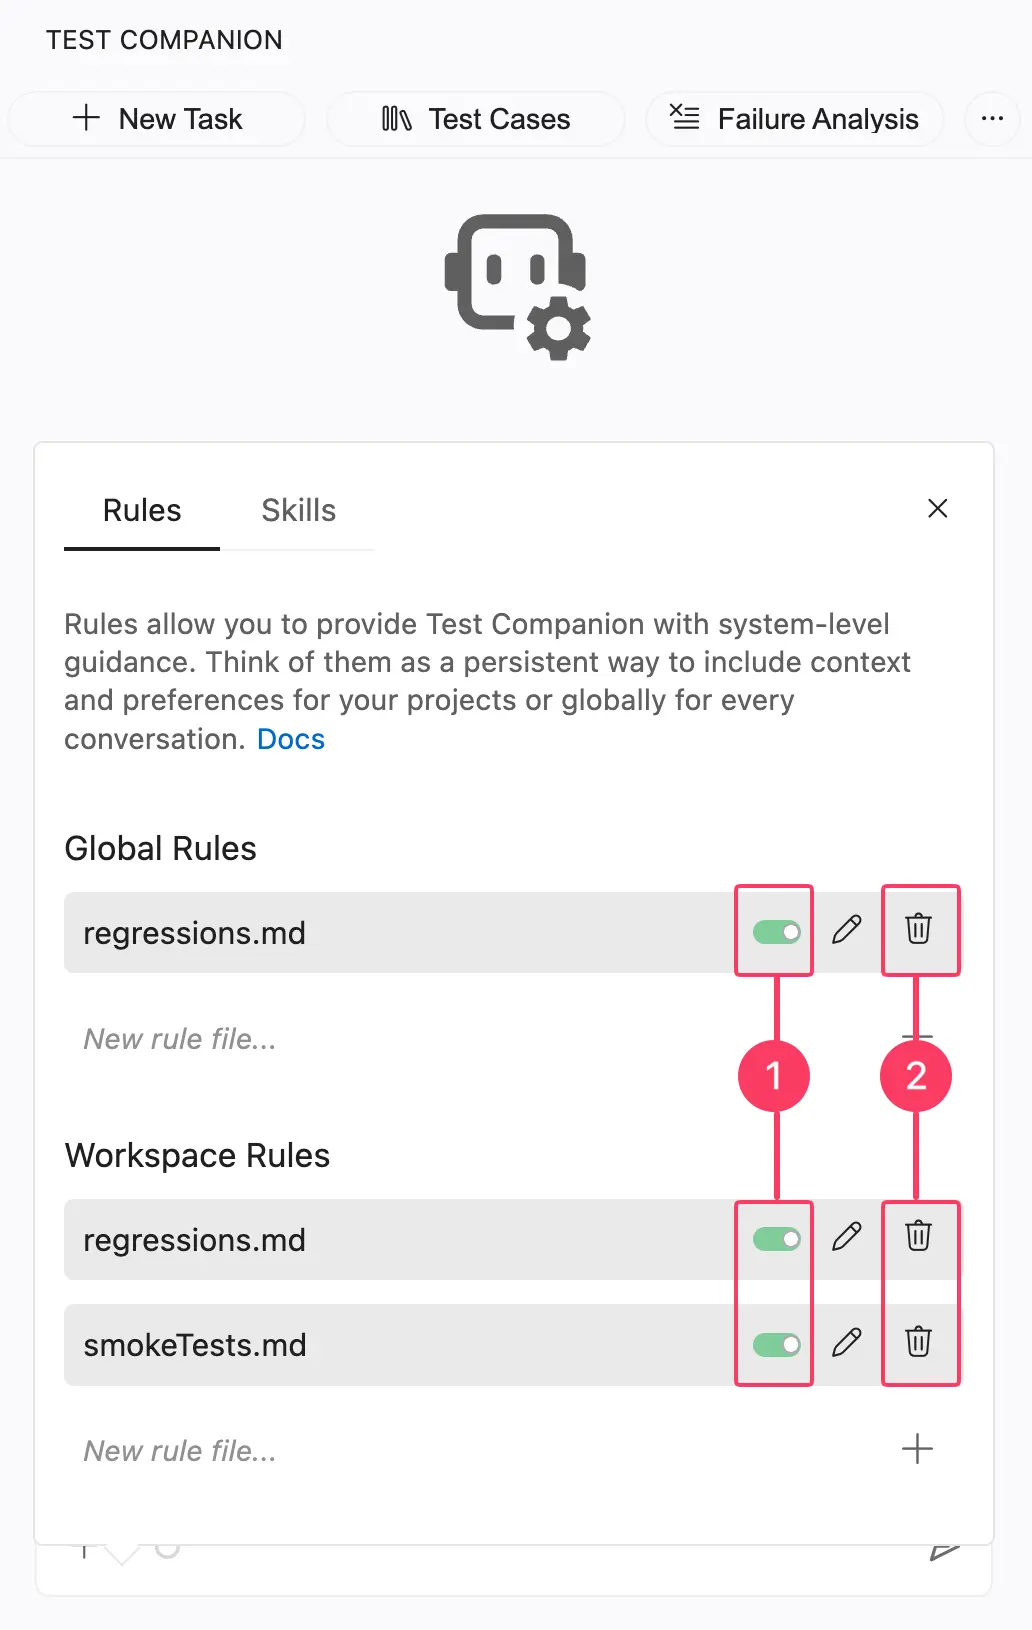
To disable a rule, click the toggle next to its name (see annotation 1). A disabled rule stays in the list but no longer applies to your conversations. Turn it back on at any time with the same toggle.
To delete a rule, click the trash icon next to its name (see annotation 2). Test Companion removes the rule file. You cannot recover it from the panel. If the rule was committed to version control, restore it from there.
Rules vs. System Instructions
Both rules and System Instructions give the AI background context. Each does a different job:
| Rules | System Instructions | |
|---|---|---|
| Where defined | Separate files managed from the Rules panel | A single text field in Settings → Chat Settings |
| Scope | Global (all projects) or Workspace (one project) | Applies to all conversations in the extension |
| Best for | Specific, actionable instructions (coding standards, naming conventions, prohibitions) | High-level environment description (framework, language, folder structure) |
Use System Instructions to describe your environment, the tools and stack you work with. Use Rules to describe your standards, the way you want work done. Test Companion combines both when it generates output.
Next steps
-
Skills: Author reusable prompts you invoke on demand with
/skill-name. - Configuration and preferences: Set interaction mode, auto-approve, viewport, terminal behaviour, and account options.
We're sorry to hear that. Please share your feedback so we can do better
Contact our Support team for immediate help while we work on improving our docs.
We're continuously improving our docs. We'd love to know what you liked
We're sorry to hear that. Please share your feedback so we can do better
Contact our Support team for immediate help while we work on improving our docs.
We're continuously improving our docs. We'd love to know what you liked
Thank you for your valuable feedback!