
 Join our Discord
Skills
Author reusable prompts that shape how Test Companion handles repeatable testing tasks, auto-invoked when your chat matches or manually invokable with the /skill-name command.
A skill is a reusable prompt you author once and invoke on demand. It bundles your context, conventions, and step-by-step instructions for a recurring task. When invoked, Test Companion loads the skill’s instructions and shapes its next response around them, so a fresh chat starts with the setup and lessons your team has already worked through.
Skills sit alongside two other customization layers in Test Companion:
- Rules tell Test Companion how to behave on every task. They apply automatically and never need to be invoked.
- Built-in capabilities are what Test Companion can do out of the box, including Generate Test Cases, Write Automation Code, Fix Flaky Tests, Test the Code Changes, and Fix Accessibility Issues. You do not author them.
If you keep retyping the same setup, context, or step-by-step instructions before a recurring task, that instruction belongs in a skill.
Skills are available in Test Companion v1.13.1 and later.
How a skill is structured
Test Companion stores four pieces of information for every skill:
| Field | Who writes it | What it controls |
|---|---|---|
| Name | You | The slug typed after / to invoke the skill (kebab-case, for example bug-report-from-failure). |
| Prompt | You | The full instruction set Test Companion follows when the skill is invoked. |
| Description | Test Companion, then you review | A one-sentence summary shown in skill lists and used to match the skill against your chat. Maximum 200 characters. |
| Keywords | Test Companion, then you review | A comma-separated list of phrases your team would type to ask for this task. Used to match the skill against your chat. 3 to 7 keywords work best. |
You write the Name and the Prompt. After you click Create skill in the creation modal, Test Companion drafts the Description and Keywords from the prompt you wrote. Both fields are editable. Edit them before you save. Their wording is what later makes Test Companion suggest the skill at the right scenario.
Invoke a skill
Following are the two ways to invoke a skill. Each one fits a different scenario.
Explicit invocation
Type / followed by the skill name in the Test Companion chat, for example /regression-run. Test Companion loads the skill’s prompt and works through it. Use explicit invocation when you already know which skill you want.
Automatic invocation
When your chat message matches a skill’s Description or Keywords, Test Companion uses the skill automatically. You describe the task in your own words and Test Companion applies the matching skill without you typing a slash command.
You can always invoke a skill directly with /skill-name when you want to be specific. If a skill matches the kind of message you send often, fine-tune its Description and Keywords so Test Companion can pick it up next time.
Skill scope
Each skill lives at one of two scopes. Pick the scope based on whether the skill names project-specific details.
Global skills
Global skills are available in every project you open with Test Companion. They are stored at the user level on your machine. Use global skills for tasks that are not tied to a single codebase:
- Personal code-review checklists.
- Pull-request preparation routines you run regardless of project.
- Generic patterns like “summarize this test failure” or “convert this manual case to Gherkin”.
Workspace skills
A workspace skill lives inside the project directory. It is available only when that project is open. Use workspace skills for tasks that reference project-specific details:
- A staging URL, an API base, or a service name.
- A folder structure or framework choice unique to this project.
- A named test suite or build command that only exists here.
If the prompt mentions any path, command, or URL that would not make sense in another repository, make it a workspace skill.
Create a skill
Skills are created from the Test Companion panel. Follow these steps to create a skill:
-
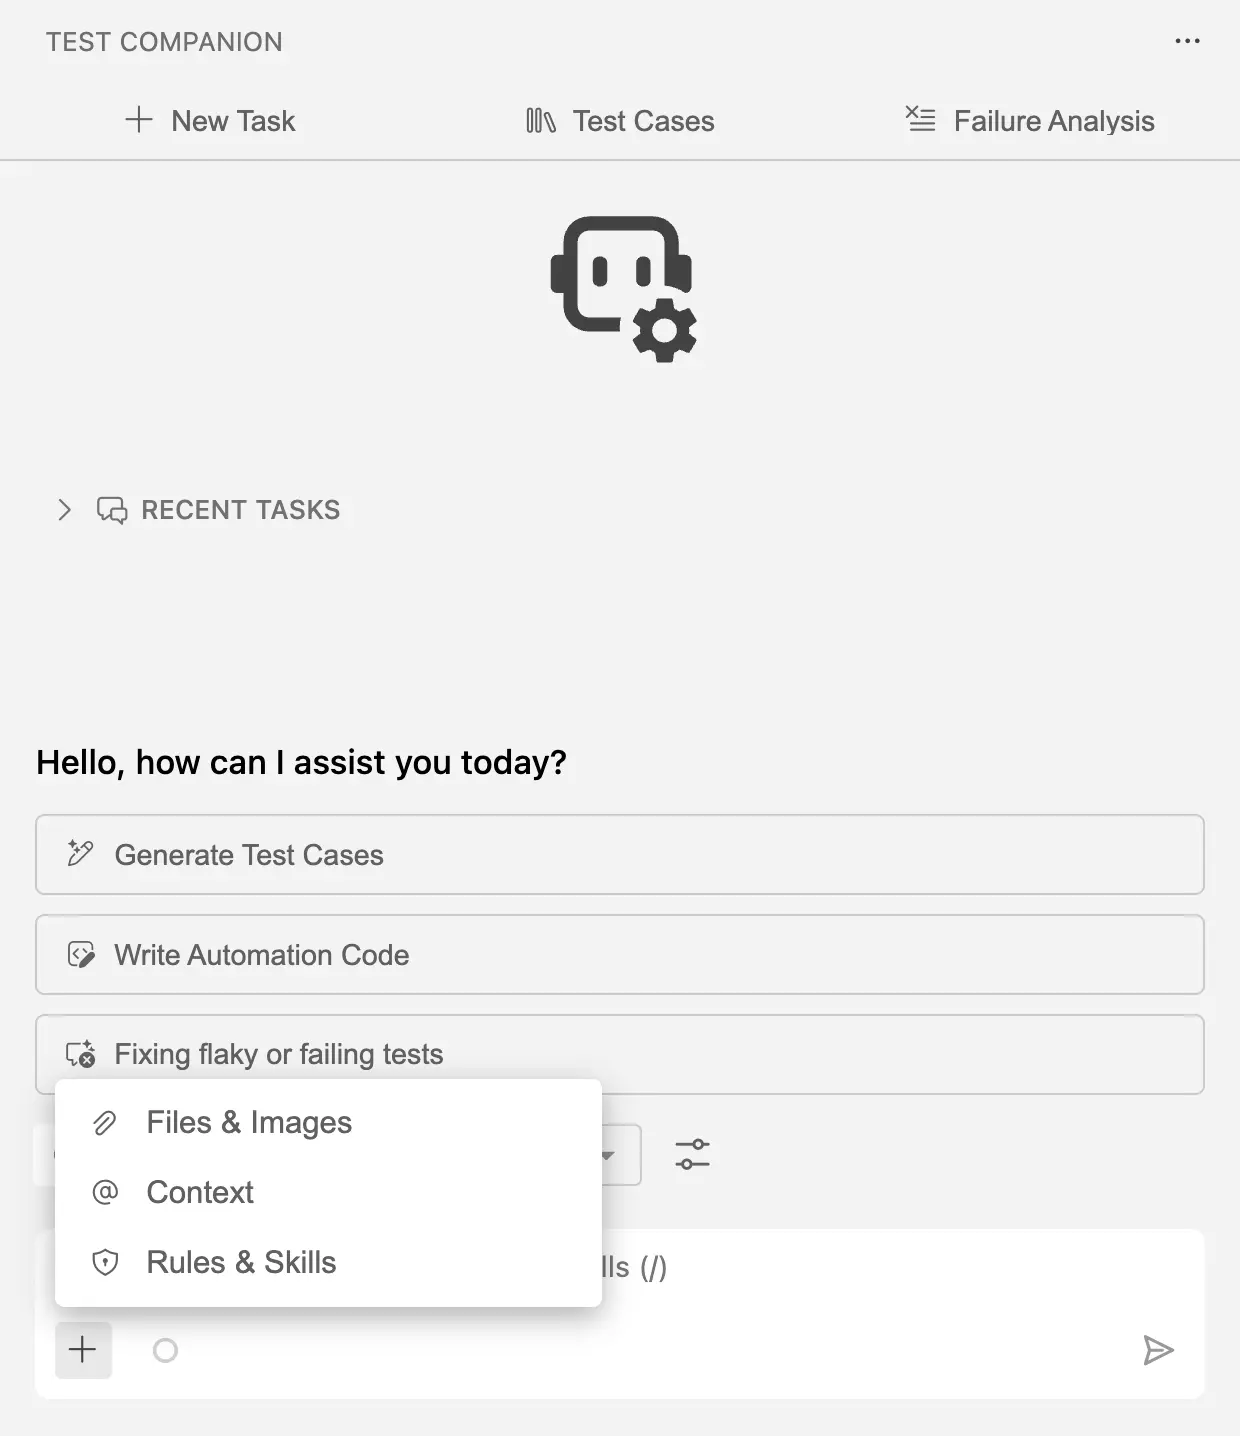
Click + at the bottom of the chat field.
-
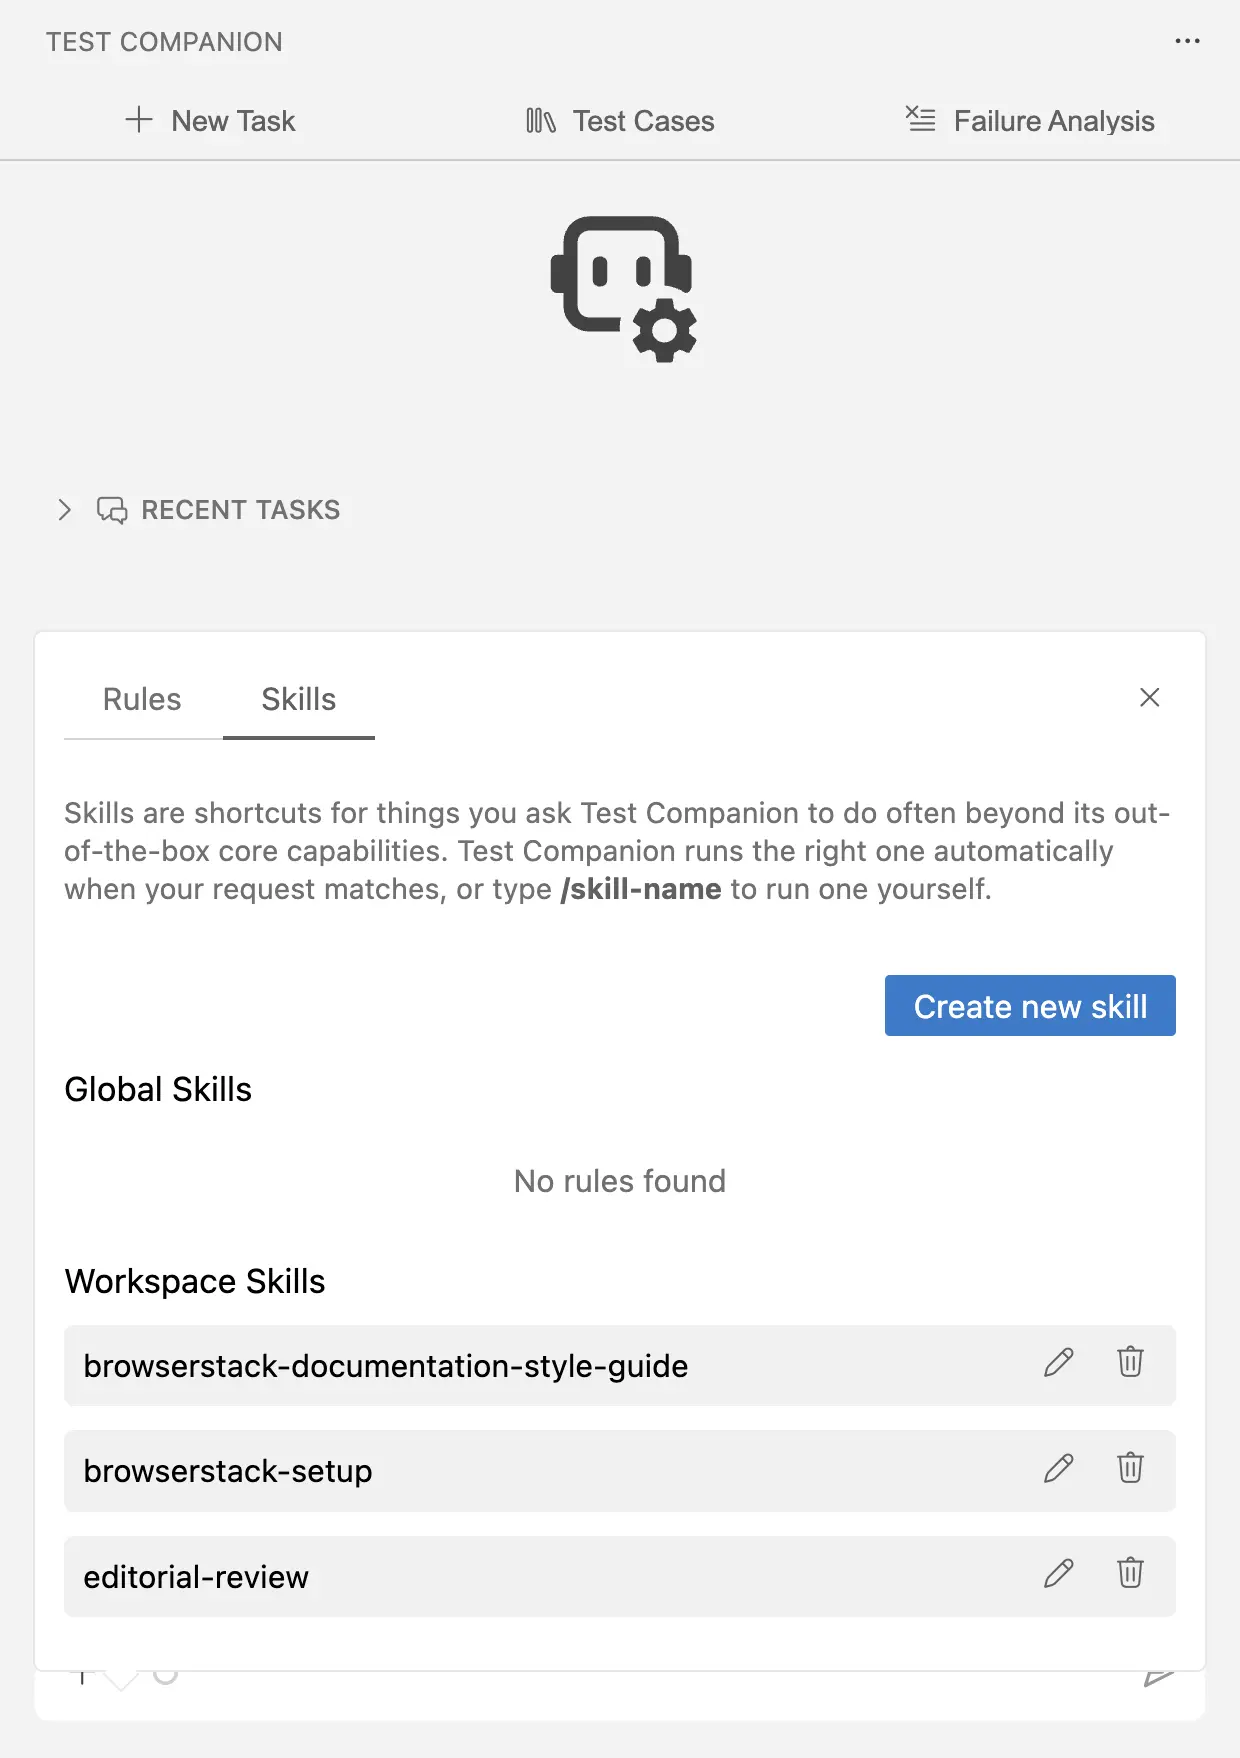
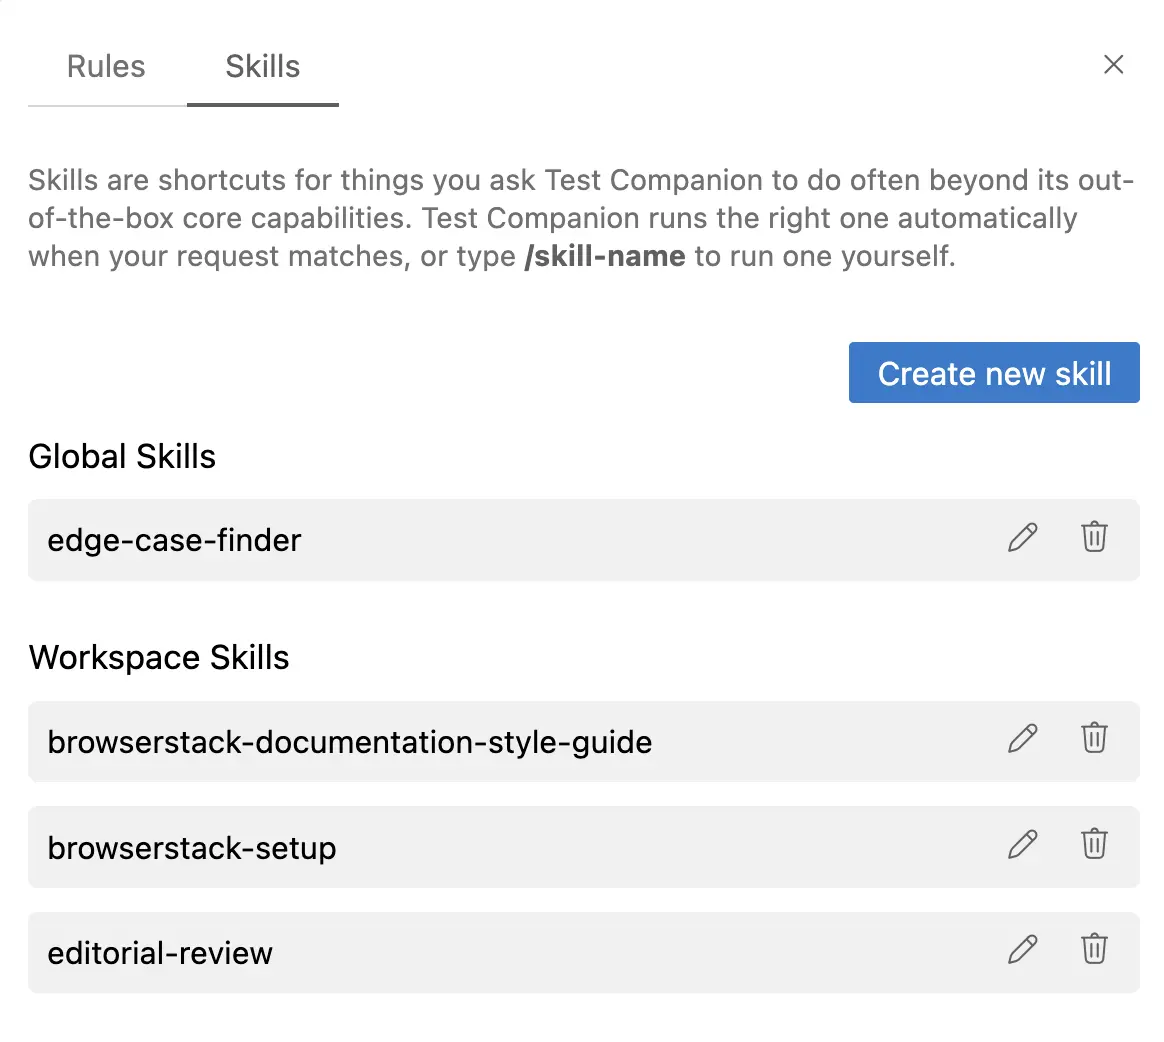
Switch to the Skills tab. Existing global and workspace skills are listed here.
-
Click Create new skill.
-
Enter a Name in kebab-case.
- Type or paste the Prompt as complete instructions you want Test Companion to follow when this skill runs.
- Write the prompt the way you would brief a colleague:
- State the context
- List the steps
- Describe what done looks like.
- Write the prompt the way you would brief a colleague:
- Pick a Scope:
- Global to make the skill available everywhere, or
- Workspace to keep it inside the current project.
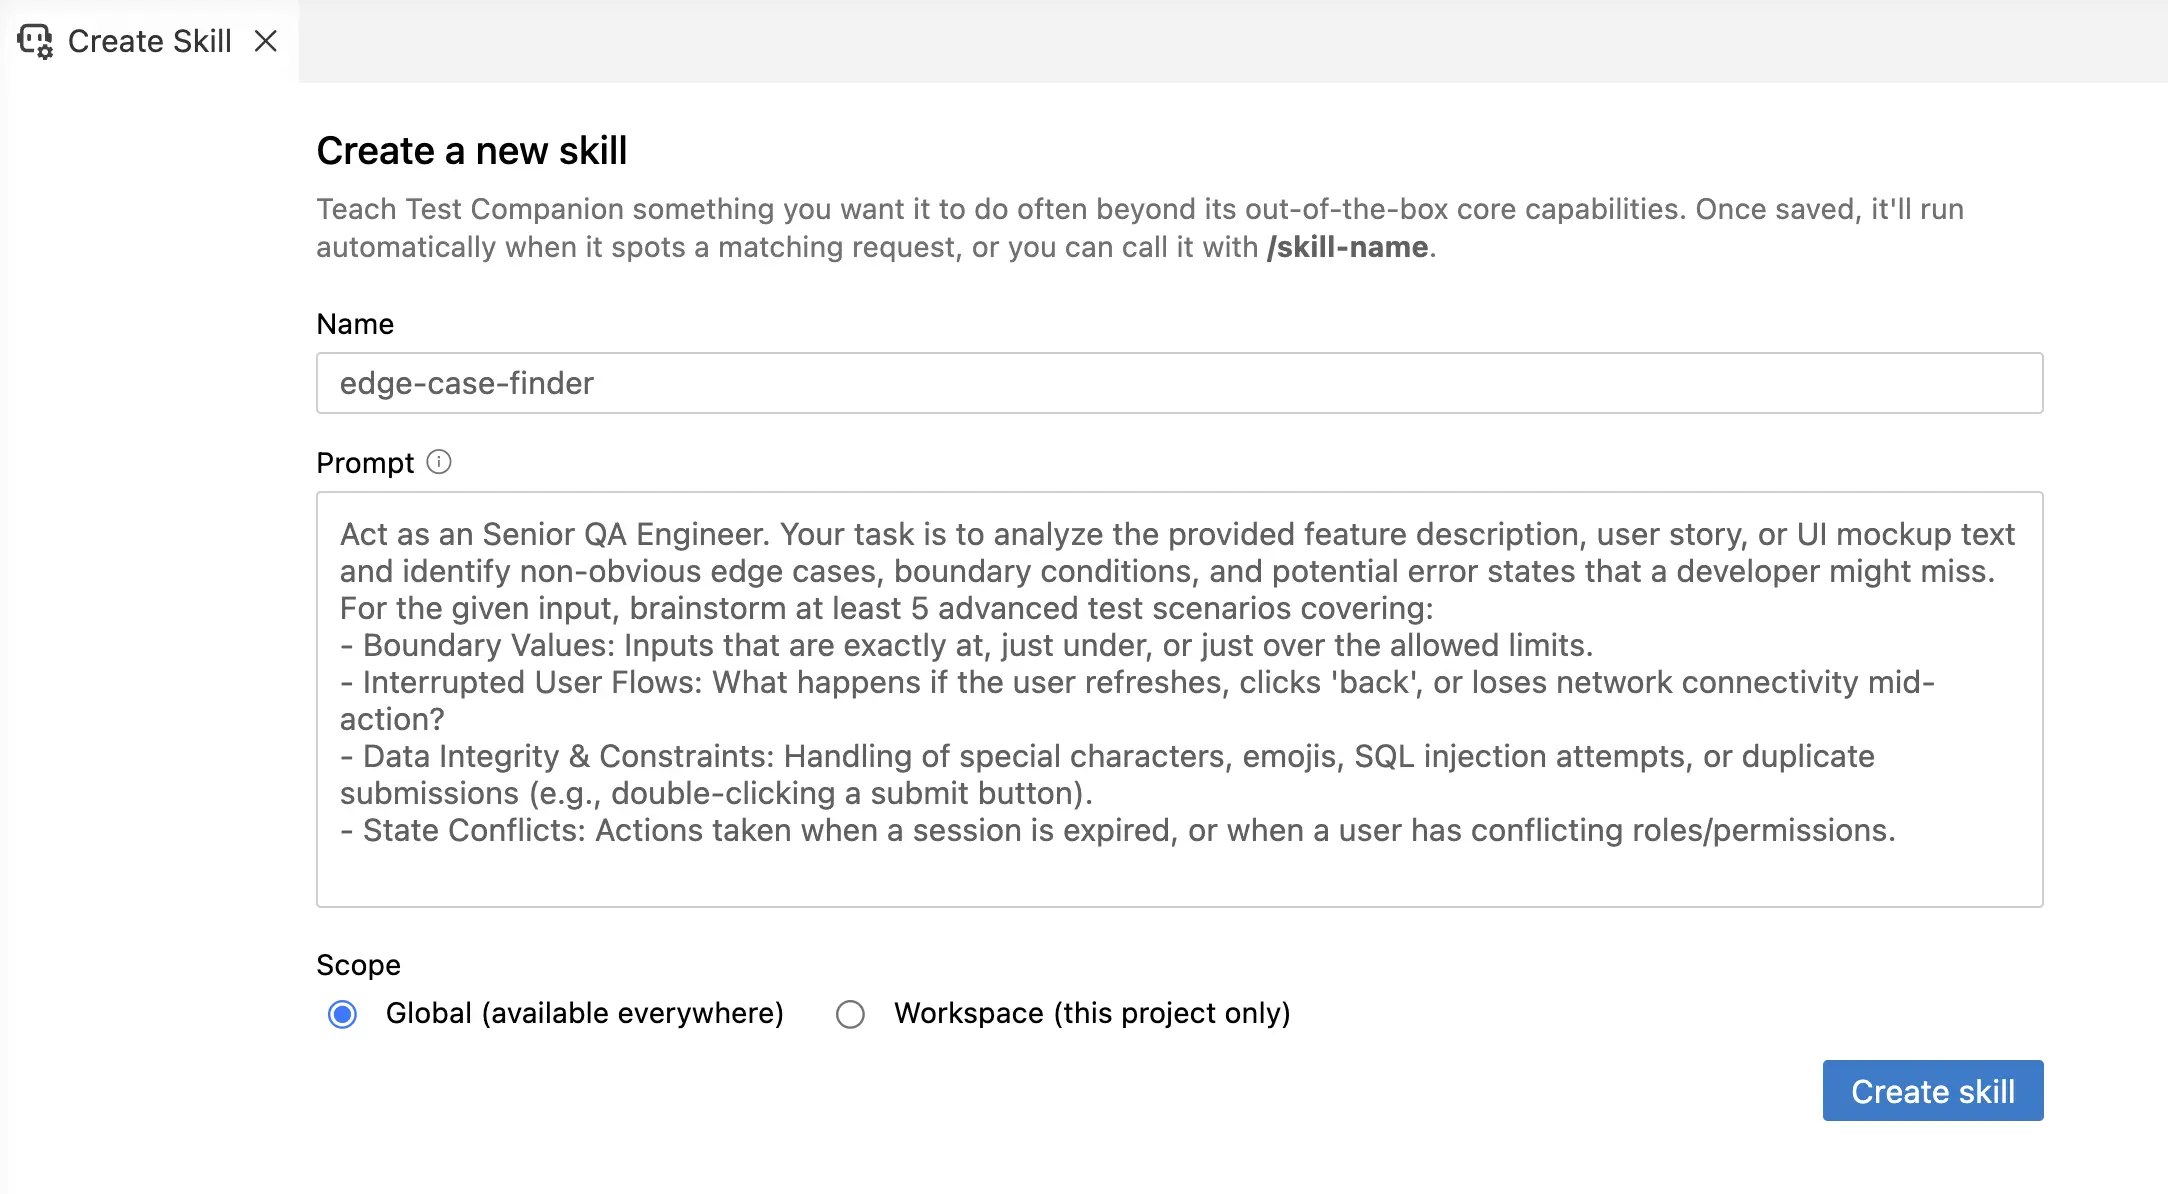
7 . Click Create skill.
- Test Companion reads your prompt and proposes a Description (up to 200 characters) and a list of Keywords.
8 . Review and edit both fields as necessary.
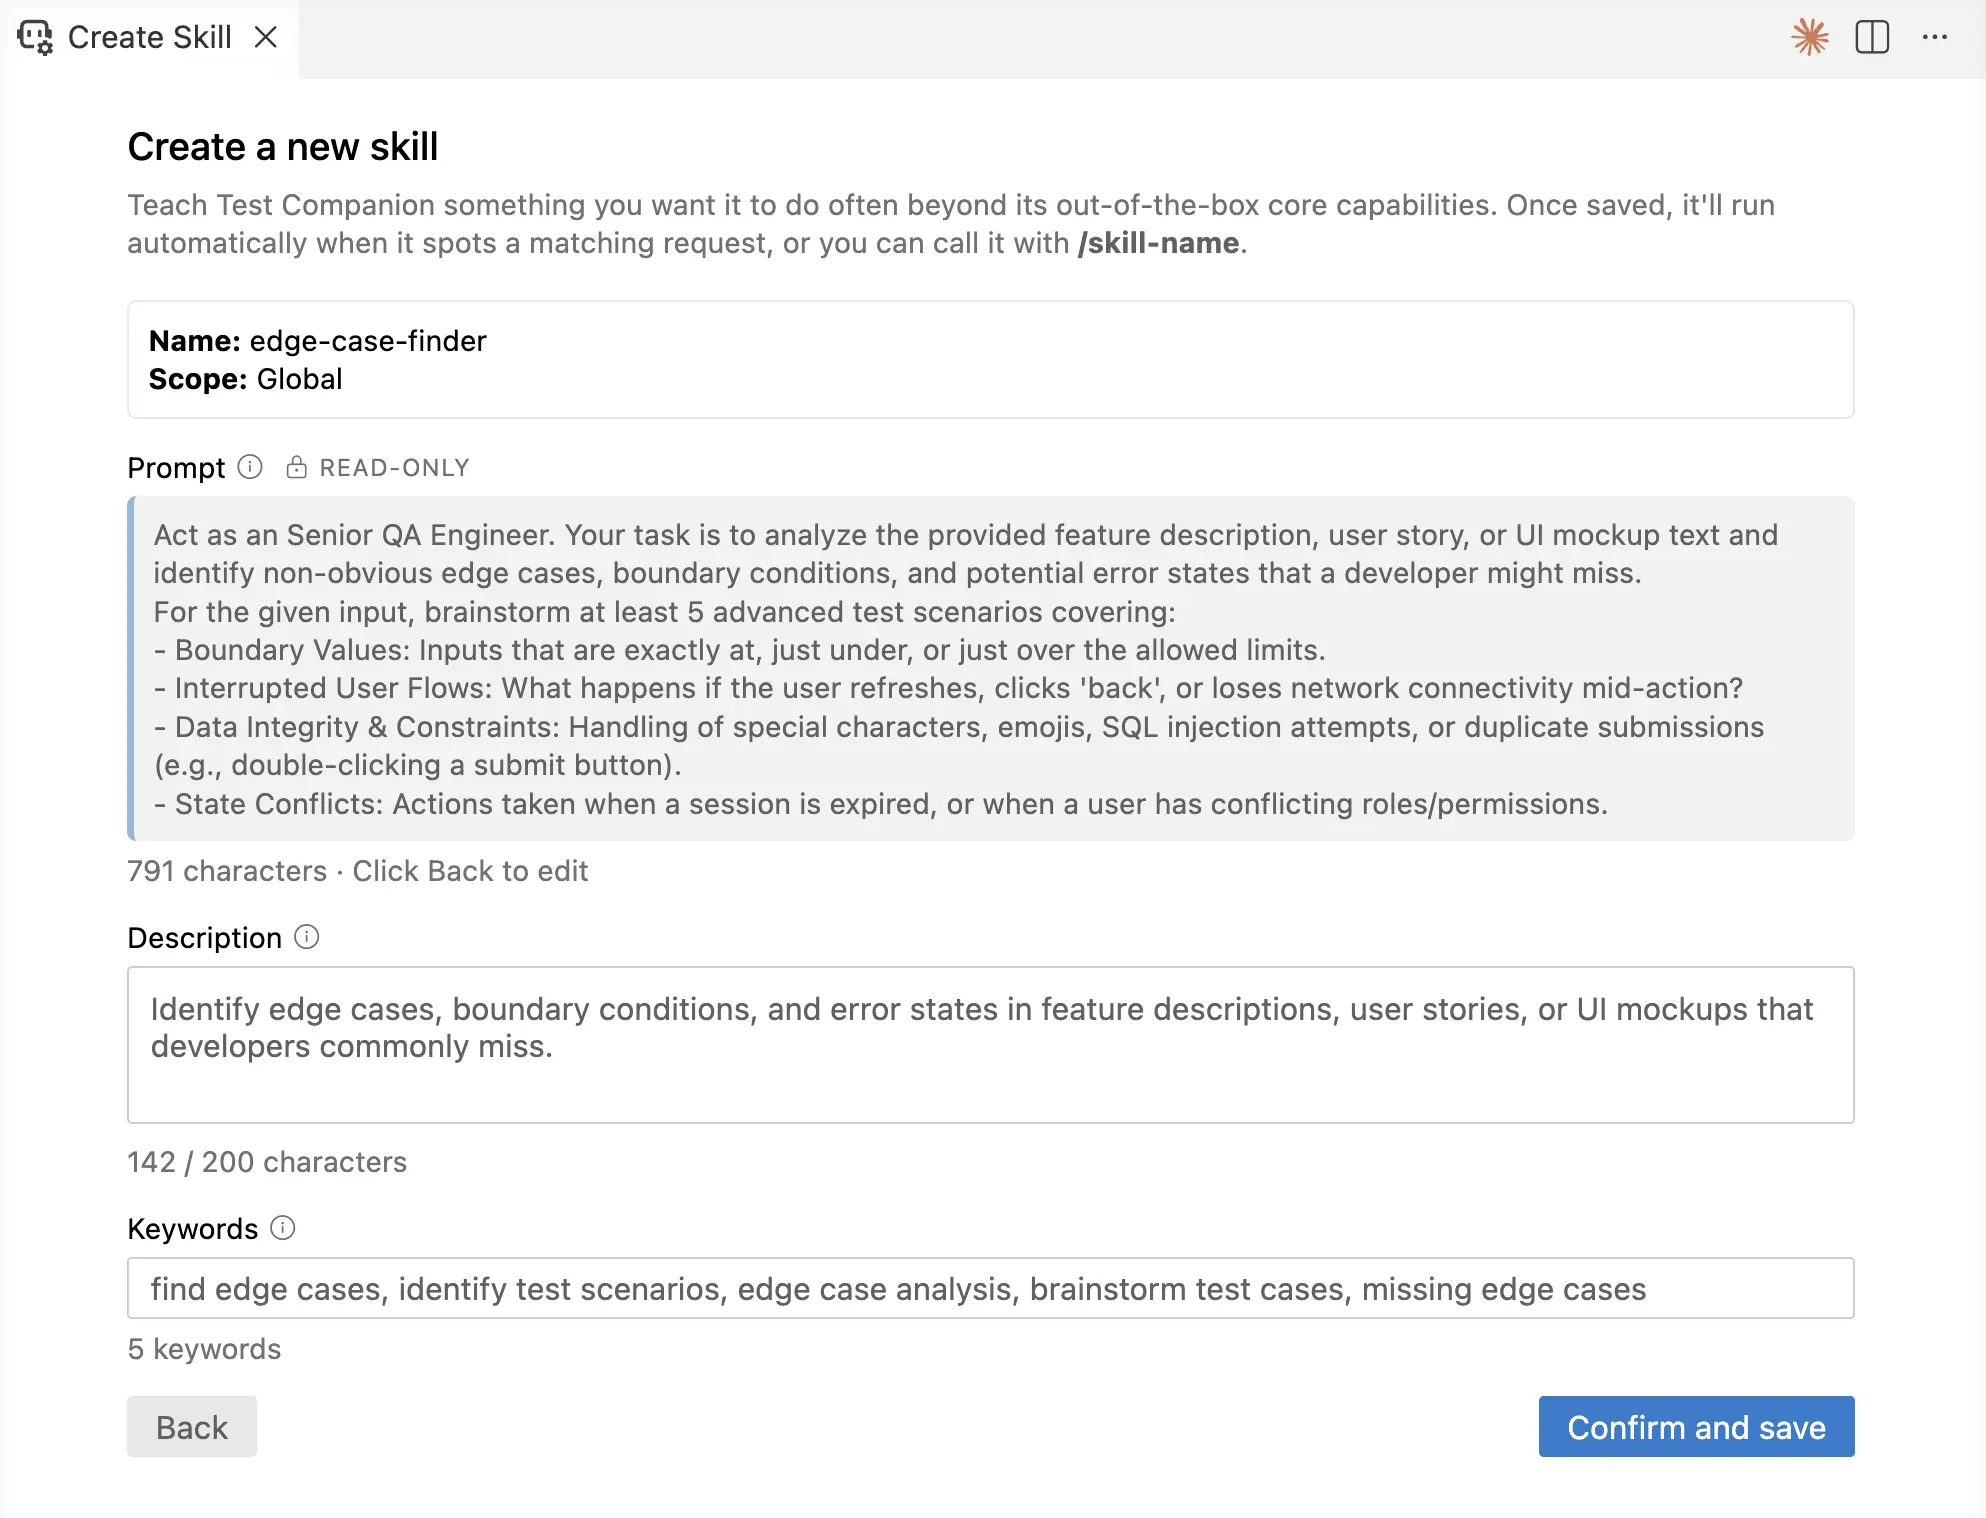
The Description appears in skill lists. The Keywords are the phrases Test Companion matches against your chat, so rewrite them to use the words your team types.
9 . Click Confirm and save.
The skill is now available. Invoke it by name, or let the matching prompt surface it.
Write effective skills
An effective prompt adds what Test Companion does not already know. It captures your project’s context, your team’s conventions, and the gotchas you find with use. Skip generic testing knowledge Test Companion already has. Skills get sharper with iteration. When Test Companion makes the same mistake twice, add a line to the prompt that tells it exactly what to avoid.
The following habits make skills predictable and discoverable.
- One skill, one outcome. Keep each prompt focused on a single task with a single exit condition. If you find yourself writing two unrelated procedures into one prompt, split them into two skills.
- Brief like a teammate. State the context first, then the steps, then what counts as done. Plain prose works better than bullet trees five levels deep.
- Number ordered steps. When the result of step two changes step three, number the steps so Test Companion follows them in the intended order.
-
Use placeholders for variable inputs. Mark values the user fills in at invocation time with placeholders such as
<URL>,<PR_NUMBER>, or<BUILD_ID>. The skill stays reusable instead of hard-coding one run’s details. - Edit the Description deliberately. The Description drives auto-suggestion. Include the words your team types for this task: “flaky,” “smoke,” “regression run,” “release prep.” Test Companion matches these against real chat messages.
- Choose keywords your team types. Keywords are intent triggers, not SEO. Add the phrases someone would type into chat when they want this skill.
- Commit workspace skills to version control. Review workspace skills in pull requests like any other code change. Update them when the project’s folder structure, framework choice, or build commands change.
Example skills
The three examples below show common shapes a skill can take. Copy any of them as a starting point, then tune the prompt, Description, and Keywords for your team.
Example 1: Draft a bug report from a failing test
Name: bug-report-from-failure
Prompt:
## Draft a bug report from a failing test

I will share a failing test name, the assertion that failed, and the stack trace. Build a structured bug report from that input.

Project context:
- Bug tracker: Jira
- Default project: QA-WEB
- Severity scale: S1 (blocker), S2 (major), S3 (minor), S4 (trivial)
- Required labels on every ticket: `automation`, `regression`

Output a structured ticket with these sections:

### Summary
One sentence stating the user-visible symptom, not the test name. Write "Cart total recalculates incorrectly when a coupon is removed," not "test_cart_total_after_coupon_remove failed."

### Steps to reproduce
The minimum steps a developer needs to recreate the failure. Pull these from the test body, not the framework setup. Number each step.

### Expected vs. actual
Two short blocks. State what the test expected and what it observed. Quote the actual values from the assertion error.

### Environment
- Browser and OS from the test config.
- Build or commit SHA if available in the run context.
- The exact test file and line number.

### Severity
Propose a severity from the scale above. Justify the call in one sentence.

### Labels
Always include `automation` and `regression`. Add any feature-area label that matches the test file's folder. For example, a test under `tests/checkout/` gets the `checkout` label.

Output the full ticket in chat as markdown so I can copy it into our bug tracker.
Suggested description: Turns a failing test, its assertion, and its stack trace into a structured bug report with repro steps, severity, and labels ready to paste into your bug tracker.
Suggested keywords: bug report, file a bug, ticket from failure, jira ticket, draft a bug
How to use it: Paste a failing test’s output into the chat and type /bug-report-from-failure. Test Companion drafts the ticket in chat using the project’s required shape. Review the draft and copy it into your bug tracker.
Example 2: Audit test coverage against a spec
Name: coverage-gap-analysis
Prompt:
## Identify test coverage gaps against a spec

I will share a feature spec, PRD, or user story. Compare it against the tests in `tests/` and produce a coverage gap report.

Project context:
- Test folder: `tests/`
- Spec format: Markdown PRDs or Jira ticket descriptions
- Coverage scope: unit, integration, and end-to-end tests

For the spec I provide:

### 1. Extract requirements
List every testable requirement from the spec. Phrase each as "the system should..." Number them.

### 2. Map existing coverage
For each requirement, search `tests/` for cases that verify it. Use the test name, docstring, and assertions to decide. List the file and test function for every match.

### 3. Classify each requirement
Tag each requirement as one of:
- **Covered:** at least one existing test verifies it.
- **Partial:** an existing test touches the area without verifying this specific behavior.
- **Missing:** no test verifies it.

### 4. Output a gap report
Produce a markdown table with columns: Requirement, Status, Existing tests, Notes. Save the report to `docs/coverage-gap-<feature-name>.md`.

### 5. Recommend next steps
After the table, write a short list of the highest-risk gaps to close first. Justify each ranking in one sentence.

Do not write the missing tests in this run. Wait for me to confirm which gaps to close.
Suggested description: Compares a feature spec against existing tests in tests/ and produces a markdown gap report tagging each requirement as covered, partial, or missing.
Suggested keywords: coverage gaps, test gap analysis, what to test, spec coverage, find missing tests, audit coverage
How to use it: Paste a PRD into the chat or share a path to the spec, then type /coverage-gap-analysis. Test Companion reads tests/, maps existing coverage to the requirements, and saves a gap report. Review the report and tell Test Companion which gaps to close next.
Example 3: Generate a project onboarding doc for new QA engineers
Name: qa-onboarding-doc
Prompt:
## Generate a QA onboarding doc for this project

Read the repository and produce a markdown doc a new QA engineer could use on their first day. Save the output to `docs/qa-onboarding.md`. Do not invent details. If a value cannot be read from the repo, write "Confirm with the team" on that line.

The doc must contain these sections in order.

### 1. Testing stack
List the test framework, language version, runner, and any assertion or mocking libraries. Read these from `package.json`, `requirements.txt`, `pyproject.toml`, or the equivalent. Name the file you read each value from.

### 2. Folder layout
Show the structure of the `tests/` directory two levels deep. Explain in one sentence what each top-level folder holds.

### 3. How to run tests locally
Pull commands from the project's `Makefile`, `package.json` scripts, or CI config. Cover at least: run a single test, run a folder, run the full suite, run with a debugger attached.

### 4. Page Objects and shared fixtures
Locate the Page Object base class and the shared fixtures file. State where they live and what the new hire should reuse before writing anything new.

### 5. CI behavior
Read the CI config. State which suites run on every pull request and which run on merge to main. Point the new hire to where CI results appear.

### 6. Conventions to know
Pull any project-specific conventions from existing rules and skills (naming patterns, wait strategies, data setup). Quote the rule that enforces each one.

### 7. Who to ask
Leave a placeholder for three contacts: the QA lead, the on-call rota, and the relevant Slack channels. Mark each with "Confirm with the team."
Suggested description: Audits the repo’s testing setup and produces a markdown onboarding doc covering stack, folder layout, run commands, CI behavior, and conventions.
Suggested keywords: onboarding doc, new hire guide, testing setup doc, qa primer, project orientation
How to use it: Type /qa-onboarding-doc when a new QA engineer joins the team. Test Companion reads the repo and writes docs/qa-onboarding.md. Review the draft, fill in the “Confirm with the team” placeholders, and share it on their first day.
Manage skills
Edit a skill
From the Skills tab, click the edit icon next to the skill you want to change. You can update the Name, Prompt, Description, Keywords, and Scope. Updates take effect the next time you invoke the skill.
Editing the prompt does not regenerate the Description and Keywords. If you change the Prompt significantly, update both fields by hand so auto-suggestion keeps working.
Delete a skill
Click the trash icon next to the skill name and confirm the deletion. The skill is removed and cannot be restored from the panel. If it was a workspace skill committed to the repository, restore it from version control.
Rules vs. skills
Rules and skills both customize Test Companion, but they pull on different levers. Use this guide if you are unsure which one fits:
| Rules | Skills | |
|---|---|---|
| Purpose | Define how Test Companion should behave on every task. | Capture the prompt for a recurring task so you do not retype the same context each time. |
| When active | Always, applied silently to every conversation. | On demand. Invoke explicitly with /skill-name, or let Test Companion auto-invoke when your chat matches the Description or Keywords. |
| Authoring | A plain-text file with natural-language guidance. | A modal where you enter the Name, Prompt, and Scope. Test Companion generates the Description and Keywords from your Prompt for you to edit and save. |
| Examples | “Always use explicit waits.” “Never modify files under config/.” |
“Draft a bug report from a failing test.” “Audit test coverage against a spec.” |
| Think of it as | The standing instructions your team would write into an onboarding doc. | The playbook your team would otherwise paste into chat every time the same task comes up. |
Most teams end up using both. Rules keep every output in line with team standards. Skills automate the recurring tasks where you would otherwise retype the same context every session.
Next steps
- Rules: Set persistent guidance Test Companion applies to every conversation.
- Configuration and preferences: Tune interaction mode, auto-approve, viewport, terminal behavior, and account settings.
We're sorry to hear that. Please share your feedback so we can do better
Contact our Support team for immediate help while we work on improving our docs.
We're continuously improving our docs. We'd love to know what you liked
We're sorry to hear that. Please share your feedback so we can do better
Contact our Support team for immediate help while we work on improving our docs.
We're continuously improving our docs. We'd love to know what you liked
Thank you for your valuable feedback!