Workflows
Create custom workflow templates to provide reusable context for common testing tasks and avoid repeating basic inputs.
Workflows in Test Companion allow you to define a series of steps that guide the AI through a repeatable process. Instead of repeatedly typing the same multi-step instructions into the chat for familiar tasks, you can write those instructions once in a workflow file and invoke it with a single command.
Test Companion features two types of workflows:
- Built-in workflows: Which handle essential testing tasks right out of the box.
- Custom workflow templates: Which you can create for your own repetitive processes.
Built-in workflows
Test Companion comes with pre-built workflows designed for the most common testing tasks. These workflows are fully integrated into the system and optimized for quality output. You do not need to create or configure them—they are available as soon as you install the extension.
These workflows are already built into the system. Do not create separate workflow files with detailed instructions for these tasks, as they may conflict with the default workflows.
The following built-in workflows are available:
| Built-in Workflow | Description |
|---|---|
| Generate Test Cases | Converts a product requirements document (PRD), user story, or feature description into structured test cases. |
| Write Automation Code | Takes existing test cases and generates executable automation scripts in your chosen framework and programming language. |
| Fix Flaky or Failing Tests | Analyzes a failing or intermittent test, identifies the root cause, and proposes (or implements) a fix. |
| Test Code Changes (Dev Testing) | Reviews code changes (diffs, pull requests) and generates or updates tests to cover the modified functionality. |
| Fix Accessibility Issues | Identifies accessibility violations and generates fixes or additional tests to ensure compliance. |
You can activate the built-in workflows by selecting them from the quick-action buttons on the Test Companion home screen or by describing the task in chat, allowing the AI to route it to the appropriate workflow.
Do not create custom workflow files that duplicate built-in workflows, as they can cause conflicts and inconsistent results. Built-in workflows handle the main tasks, so use custom templates only for extra context like URLs, credentials, or project-specific parameters.
Custom workflow templates
Custom workflows are Markdown files (with a .md, .txt extension, or no extension) that contain step-by-step instructions for processes specific to your team or project. They are ideal for tasks that the built-in workflows do not cover or for wrapping a built-in workflow with project-specific context, ensuring you do not have to retype the information every session.
When to create a custom workflow
Consider creating a custom workflow when you find yourself doing any of the following repeatedly:
- Providing the same URLs, credentials, or environment details before every task
- Following a multi-step process that requires specific commands in a specific order
- Onboarding new team members who need a guided, standardized process
- Combining multiple actions into a single trigger (for example: pulling the latest code → running tests → summarizing results → creating a Jira ticket)
How to invoke a workflow
There are two ways to invoke a custom workflow:
-
From the chat: Type
/followed by the workflow’s file name in the Test Companion chat (for example, /regression-run.md). - From the UI: Open the Manage Test Companion Rules & Workflows panel, switch to the Workflows tab, and click the toggle of the workflow you want to run.
Test Companion reads the file and follows the instructions step by step. Depending on your interaction mode, the AI either works through the steps autonomously (Default mode) or pauses at each step for your confirmation (Guided mode).
Global workflows vs. Workspace workflows
Workflows can be stored at two different scopes:
- Global workflows
- Workspace workflows
Global workflows
Global workflows are available in every project you open. Use these for processes that are not tied to a specific codebase, such as general code review checklists, PR preparation steps, or personal productivity routines.
Workspace workflows
Workspace workflows are stored within a specific project directory and are available only when that project is open. Use these for project-specific processes, such as deploying that particular service, running its unique test suite, or setting up its development environment.
Create a custom workflow
From the extension panel, follow these steps to create a new custom workflow:
-
Click the Manage Test Companion Rules & Workflows button (see annotation 1).
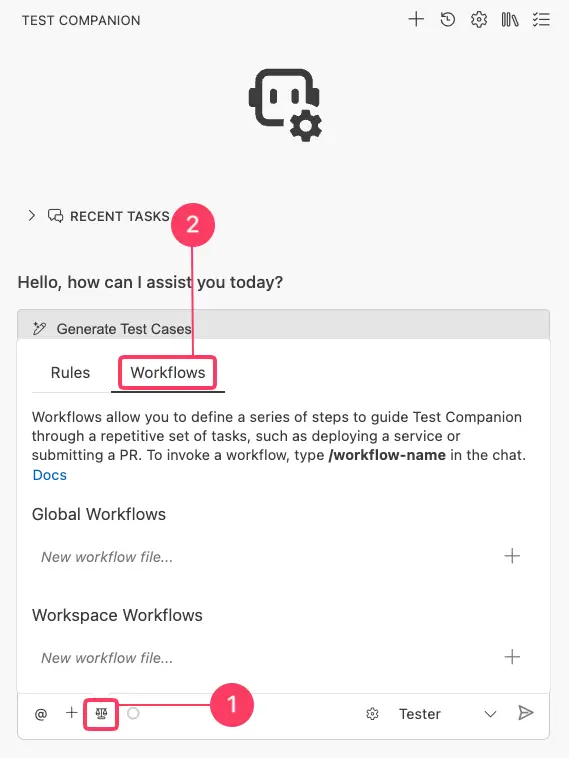
- Switch to the Workflows tab (see annotation 2).
- Under either Global workflows or Workspace workflows, type a descriptive file name in the input field.
-
Click the + button.
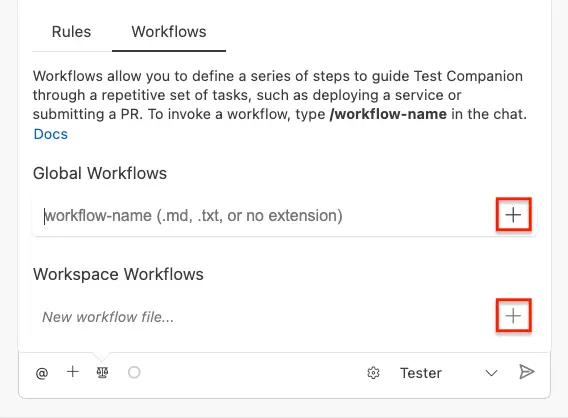
- A new file will open in your editor. Write your workflow instructions and save the file.
Writing a workflow file
Workflow files are written in plain language with numbered or sequential steps. The AI reads them from top to bottom and follows each instruction. You can include:
- Descriptive instructions: Clearly communicate to the AI what to do using natural language.
- Specific commands: Include terminal commands that you want the AI to execute.
- Decision points: Prompt the AI to present options and wait for your input.
- References to files: Direct the AI to specific files that it should read from or modify.
-
Placeholders: Use placeholder text (such as
<URL>or<PR_NUMBER>) that you fill in when invoking the workflow.
Example workflows
Example 1: Supplying context for automation code generation
This is the simplest and most common type of custom workflow. It wraps a built-in workflow (Write Automation Code) with your project-specific context so you do not have to retype it each time.
File Name: write-tests.md
Write automation tests
Context
- Application URL: https://staging.myapp.com
- Login Credentials: testuser@example.com / examplePassword!
- Framework: Selenium WebDriver with Python + Pytest
- Browser: Chrome (headless)
Instructions
Write automation test scripts for the test cases I provide. Use the credentials above for any tests that require authentication. Place new test files in the tests/ directory following our existing naming convention (test_
Run the tests after writing them to verify they pass. If any tests fail, fix the issues and re-run until all tests pass.
How to use it: Type /write-tests.md in the chat, then paste or describe the test cases you want to be automated. The AI already has your URL, credentials, and framework details, allowing you to skip the setup and go straight to the work.
Example 2: Regression test suite execution and reporting
File Name: regression-run.md
Regression test suite run
Step 1: Pull latest code
Run these commands to ensure we are testing against the latest version:
- git checkout main
- git pull origin main
Step 2: Install dependencies
Run: pip install -r requirements.txt
Step 3: Execute the regression suite
Run: pytest tests/regression/ –html=reports/regression-report.html –self-contained-html -v
Step 4: Analyze results
Read the test output and summarize:
- Total tests run
- Tests passed
- Tests failed (list each failure with a one-line description of the cause)
- Tests skipped
Step 5: Suggest fixes
For each failed test, analyze the failure and suggest a fix. Ask me whether I want to apply the fixes before making any changes.
Example 3: New feature test scaffolding
When your team starts work on a new feature, this workflow creates the entire test scaffolding in one step.
File Name: new-feature.md
New feature test scaffolding
I will describe a new feature. For that feature, please do the following:
Step 1: Create the Page Object
Create a new Page Object class in tests/pages/ following our existing patterns. Include locators for all interactive elements I describe and action methods for common user interactions.
Step 2: Generate test cases
Write at least 10 test cases covering:
- Happy path (primary user flow)
- Negative cases (invalid input, missing required fields)
- Boundary cases (min/max values, empty strings, special characters)
- Accessibility (keyboard navigation, screen reader compatibility)
Step 3: Create the test file
Create a test file in tests/ that automates all the test cases from Step 2 using our Selenium + Pytest setup.
Step 4: Verify
Run the new test file and report which tests pass and which need adjustments (some may fail if the feature is not yet fully implemented, which is expected).
How to Use It: Type /new-feature.md in the chat, then describe the feature. The AI will create the page object, write the test cases, generate the automation code, and run it—all in one flow.
Example 4: Cross-browser test run on BrowserStack
File Name: cross-browser.md
Cross-browser test run on BrowserStack
Configuration
- BrowserStack username: (use the value from Settings)
- BrowserStack access key: (use the value from Settings)
Target Environments
Run the specified tests on each of these configurations:
- Chrome (latest) — Windows 11
- Firefox (latest) — Windows 11
- Safari (latest) — macOS Sonoma
- Edge (latest) — Windows 11
- Chrome (latest) — Samsung Galaxy S23 (Android 14)
- Safari — iPhone 15 (iOS 17)
Instructions
- Take the test file or test cases I provide.
- Generate BrowserStack-compatible automation code using W3C capabilities.
- Run the tests against each target environment.
- Collect and summarize the results in a table showing pass/fail status per browser and any browser-specific failures.
- For any browser-specific failures, suggest a fix.
Example 5: Daily test health check
File Name: health-check.md
Daily test health check
Step 1: Run the Smoke Test Suite
Run: pytest tests/smoke/ -v –tb=short
Step 2: Check for New Flaky Tests
Run: pytest tests/ –count=3 -v (This runs each test 3 times to detect intermittent failures.)
Step 3: Report
Create a summary with:
- Smoke suite status (all pass / X failures)
- Newly detected flaky tests (any test that passed some runs but failed others)
- Recommended priority fixes
Step 4: Ask what to do next
Based on the results, ask me whether I want to:
- Fix the flaky tests now
- Create tickets for the failures (list what each ticket should contain)
- Skip and continue with other work
Best Practices for writing workflows
-
Start simple: Your first workflow should be brief—aim for 5 to 10 lines of context for a built-in workflow (like Example 1). Once that functions well, you can create more complex multi-step workflows.
-
Use descriptive file names: The file name is what you type after the
/to invoke the workflow. Choose names likeregression-run.mdorpr-review.mdthat are easy to remember. Avoid generic names likeworkflow1.md. -
Be explicit about order: Number your steps. The AI follows them sequentially, and numbered steps clarify which actions depend on previous results.
-
Include decision points: For workflows where the outcome of one step determines the next action, instruct the AI to present options and wait for your input. This keeps you in control at critical junctions.
-
Test your workflows: After creating a new workflow, run it once and observe the results. Adjust the instructions if the AI misinterprets a step or misses context.
-
Version control your workspace workflows: Commit Workspace Workflows to your repository so the entire team can benefit from them. Changes to workflows should go through code review, just like modifications to test code.
Manage workflows
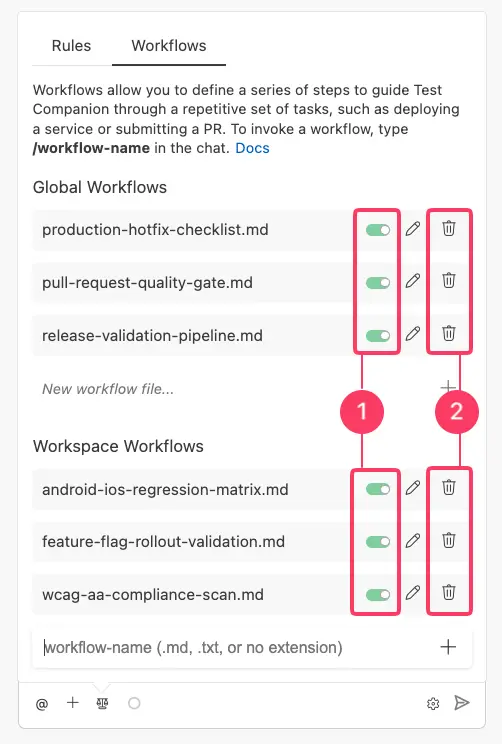
View and edit workflows
Click the Manage Test Companion Rules & Workflows button and switch to the Workflows tab to see all your active workflows. Click any workflow file name to open it in the editor. Changes are applied the next time you invoke the workflow.
Disable or delete a workflow
To disable a workflow, click the toggle switch (see annotation 1) next to the workflow name in the Workflows panel. A disabled workflow remains in your list but cannot be invoked. You can re-enable it at any time by clicking the toggle again.
To permanently delete a workflow, click the delete icon (see annotation 2) next to the workflow name. You will be prompted to confirm the deletion. Once deleted, the workflow file is removed and cannot be recovered.
Rules vs. Workflows
If you are unsure whether your instructions belong in a rule or a workflow, refer to this guide:
| Rules | Workflows | |
|---|---|---|
| Purpose | Define how the AI should behave | Define what specific task to perform |
| When Active | Always—applied to every conversation automatically | On demand—invoked when you type /workflow-name
|
| Examples | Always use explicit waits, Never modify config files | Run the regression suite and summarize failures |
| Think of Them As | The team’s coding standards | A repeatable standard operating procedure |
In many cases, you will use both together. Your rules ensure that any code the AI writes meets your standards while your workflows automate the process of producing that code for specific scenarios.
We're sorry to hear that. Please share your feedback so we can do better
Contact our Support team for immediate help while we work on improving our docs.
We're continuously improving our docs. We'd love to know what you liked
We're sorry to hear that. Please share your feedback so we can do better
Contact our Support team for immediate help while we work on improving our docs.
We're continuously improving our docs. We'd love to know what you liked
Thank you for your valuable feedback!