
 Join our Discord
Add your own MCP server to Test Companion
Add your own MCP server to Test Companion, such as a server your company runs, from the Add Server tab or by asking for it in chat.
You can connect Test Companion to an MCP server that is not in the catalog. For example, you can add the following servers:
- A server that your company hosts.
- A private npm package that your company publishes.
You add a server from the Add Server tab, or by asking for it in chat.
Test Companion connects to two kinds of server. A local server runs on your machine as a command, such as an npm package started with npx. A remote server is hosted at a URL, such as https://mcp.example.com/mcp. Both kinds get the same controls for tools, approvals, and sign-in after you add them.
Prerequisites
Ensure you have the following:
- Test Companion is installed in Visual Studio Code and you are signed in.
- For a local server, the command, its arguments, and the runtime the command needs. For example,
npxneeds Node.js on yourPATH. - For a remote server, its URL, and any header or token the server requires.
MCP servers are available in Visual Studio Code only. Support for JetBrains IDEs, Visual Studio, and Eclipse is in progress.
Connect a server from chat
Test Companion can also set up a server from a chat request, whether the server is local or remote. It finds the setup details and asks you only for what it cannot find, such as an API token.
To connect a server from chat:
- In the Test Companion chat, ask for the server you want. For example:
Connect the Sentry MCP server.Connect our Jenkins MCP server at https://jenkins.example.com/mcp-server/mcp.
- Answer any questions, such as a request for an API token. Test Companion finds the URL and the sign-in type on its own.
- Click Approve on the settings change.
- Check the result in chat. A connected server reports its tool count. A server that needs sign-in shows an Authenticate button in the Installed tab.
Test Companion checks that a remote URL answers as an MCP server before it asks for your approval. Approval is always required, even for a server that passes the check. Plain http:// is allowed only for a server on your machine. If a server fails, the chat reports why, so you can correct the details and ask again.
Test Companion declines browser and mobile automation servers, such as Playwright, Selenium, and Appium. It has that automation built in. For help with a specific setup, contact BrowserStack support.
Add a local server
To add a server that runs on your machine:
-
Open the MCP Servers view. Click
...(more options) on the Test Companion panel, then select MCP Servers.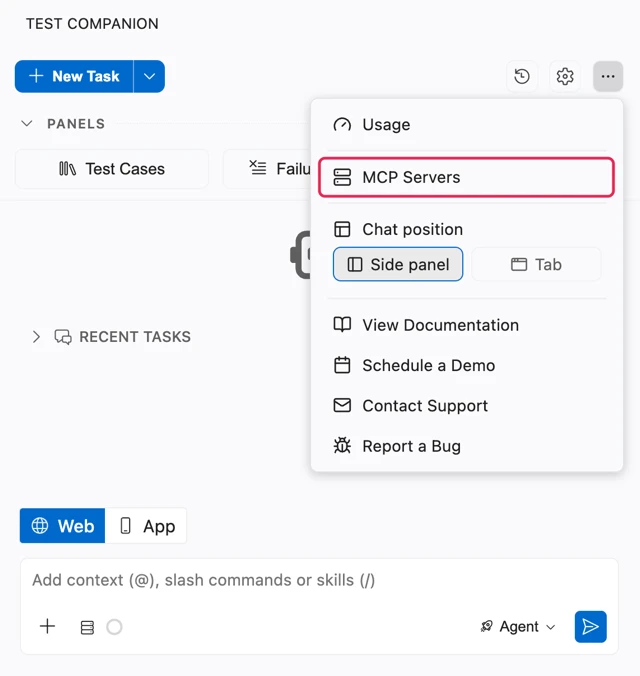
-
Select the Add Server tab, then select Local.
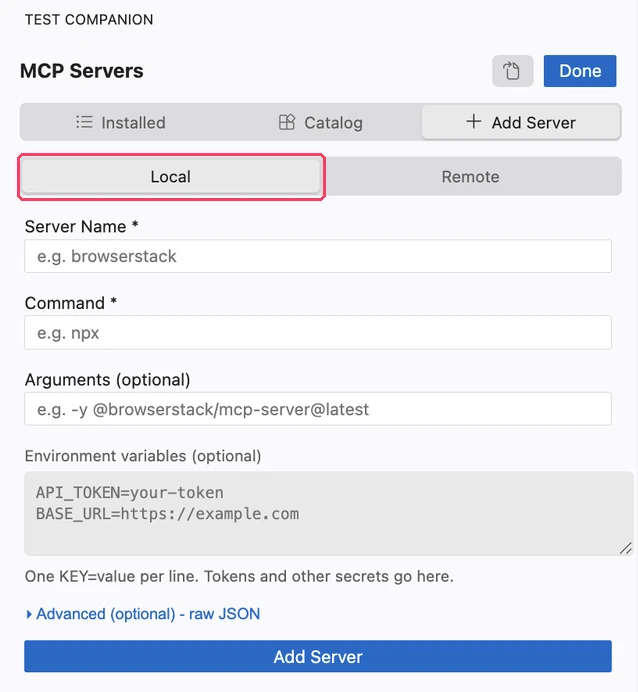
- Fill in the form. For each field, see Local form fields.
- Click Add Server. Test Companion starts the server and switches to the Installed tab. The server shows a green dot and a badge with its tool count.
An npx server downloads its package the first time it starts. The first connection can therefore take longer than the request timeout of 60 seconds. If Test Companion reports that the server did not finish connecting in time, wait a minute and click Retry Connection.
If you already have the server entry in JSON, expand Advanced (optional) - raw JSON and paste it there instead. Test Companion then ignores the other form fields.
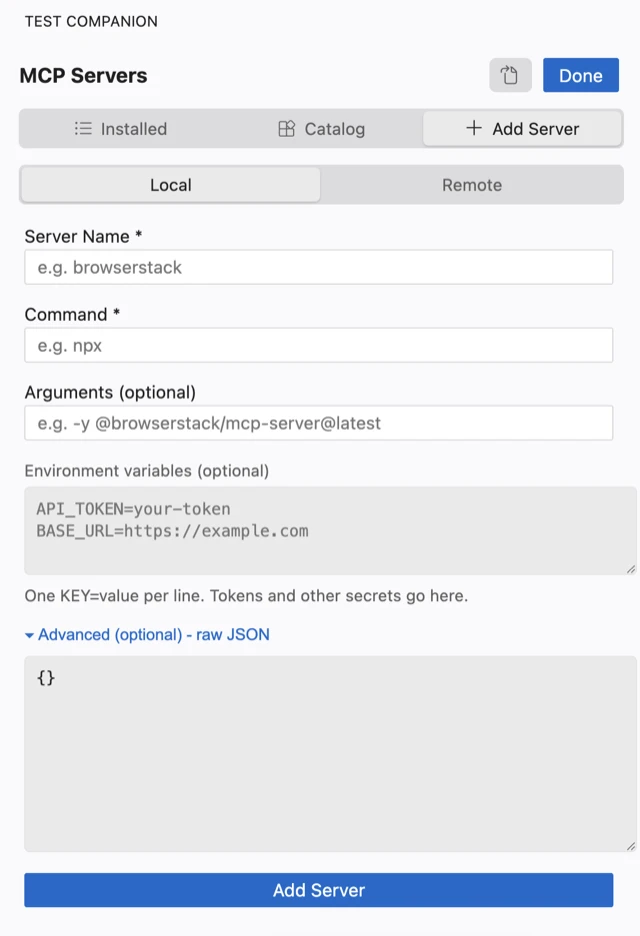
The entry needs a command key and can carry args and env keys, for example:
{
  "command": "npx",
  "args": ["-y", "@your-org/mcp-server@latest"],
  "env": {
    "API_TOKEN": "your-token"
  }
}
Local form fields
The Local form takes the command that starts the server and the values the server needs at start:
| Field | Value |
|---|---|
| Server Name | A name that identifies the server, such as my-team-tools. Required. |
| Command | The program that starts the server, such as npx. Required. |
| Arguments (optional) | The arguments for the command, such as -y @your-org/mcp-server@latest. |
| Environment variables (optional) | Values the server reads at start, such as an API token. Enter one KEY=value pair per line. |
| Registry | Appears when the command is npx or npm. Select Public npm for a public package. Select Private and enter the Registry URL for a package on your company’s npm registry. Your ~/.npmrc file supplies the registry sign-in. |
Add a remote server
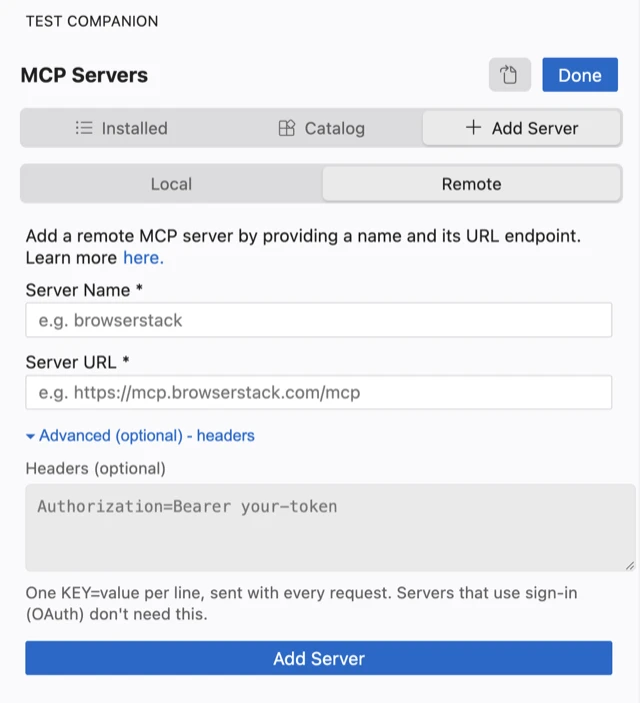
To add a server that is hosted at a URL:
- Open the MCP Servers view and select the Add Server tab.
-
Select Remote.
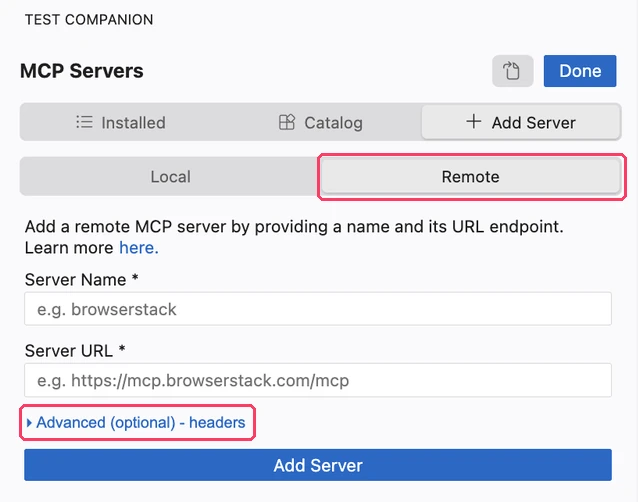
- Fill in the form. For each field, see Remote form fields.
- Click Add Server. The form reads Connecting to server… for a few seconds. Test Companion then switches to the Installed tab. The server shows a green dot and a badge with its tool count.
A server that uses OAuth shows a yellow dot and an Authenticate button instead. Click Authenticate and finish the sign-in in your browser.
Remote form fields
The Remote form takes the server URL and any headers the server expects with each request:
| Field | Value |
|---|---|
| Server Name | A name that identifies the server, such as my-team-tools. Required. |
| Server URL | The MCP endpoint of the server, such as https://mcp.example.com/mcp. Required. |
| Headers (optional) | Expand Advanced (optional) - headers to enter headers that Test Companion sends with every request, such as Authorization=Bearer your-token. Enter one KEY=value pair per line. A server that uses OAuth sign-in does not need a header. |
Use a token with only the permissions the server needs. Tokens and secrets that you enter in the form or share in chat are saved as plain text. Test Companion stores them in its MCP settings file on your machine. Anything you type in chat also becomes part of your conversation. A local server runs with the same access as your user account. Add only servers you trust.
Rules for a server entry
Test Companion checks every entry before it connects. An entry that fails a check is not saved, and the form shows the reason:
- A remote URL must use
https://. Plainhttp://works only for a server onlocalhostor127.0.0.1. - For a local
npxornpmcommand, the only flags allowed are-yand--yes. Package specs that start withnpm:,git+, orfile:are refused. - A local entry cannot set a working directory. It also cannot set
PATH,NODE_OPTIONS,LD_PRELOAD,LD_LIBRARY_PATH, or any environment variable that starts withDYLD_. - Server names must be unique.
Troubleshoot a server you added
| Message or symptom | Fix |
|---|---|
| Server URL is required or Invalid URL format | Enter the complete URL, including https://. |
| An MCP server with the name “my-team-tools” already exists | Choose a different Server Name, or delete the existing server in the Installed tab. |
| Command “npx” was not found. Install it, or make sure it is on your PATH. | Install the runtime the command needs, such as Node.js for npx. Restart your IDE, then click Retry Connection. |
| Package “@your-org/mcp-server” was not found in the configured npm registry. | For a package on a private registry, select Private under Registry and enter your company’s Registry URL. Check that your ~/.npmrc file signs in to that registry. |
| Missing required environment variable: API_TOKEN. | Add the variable in the Environment variables field, one KEY=value pair per line. |
| This server requires Node 20 but it was started with Node 18. | Install the Node.js version the message names, then add the server again. |
| The server did not finish connecting in time. | An npx server downloads its package on the first run. Wait a minute, then click Retry Connection. For a slow server, raise Request timeout in the Installed tab. |
| The server hostname could not be resolved, The server refused the connection, or Could not reach the server URL | Check the URL and port, your network, and any proxy or VPN. Then click Retry Connection. |
| The server’s TLS certificate could not be verified. | A proxy on your network may be intercepting HTTPS. Ask your network administrator to allow the server’s host. |
| The server shows a yellow dot and an Authenticate button | The server uses OAuth and you have not signed in yet. Click Authenticate and finish the sign-in in your browser. |
| Test Companion says the URL is not an MCP server | The URL points to a web page, returns an error, or cannot be reached. Check the server’s documentation for its MCP endpoint, then ask again with the correct URL. |
| Test Companion already has capabilities inbuilt that would conflict with the MCP. | The server provides browser or mobile automation, which Test Companion has built in. Use the built-in automation. For help, contact BrowserStack support. |
Next steps
- Manage MCP servers in Test Companion: Control tools and auto-approval, restart, sign out, and delete servers.
- Connect an MCP server to Test Companion: Connect a server from the catalog.
We're sorry to hear that. Please share your feedback so we can do better
Contact our Support team for immediate help while we work on improving our docs.
We're continuously improving our docs. We'd love to know what you liked
We're sorry to hear that. Please share your feedback so we can do better
Contact our Support team for immediate help while we work on improving our docs.
We're continuously improving our docs. We'd love to know what you liked
Thank you for your valuable feedback!