
 Join our Discord
Fix failed tests
Analyze failed web tests and apply suggested code fixes for one test, a selection, or a whole build, without leaving the IDE.
Test Companion connects to BrowserStack Test Reporting and Analytics and pulls failure data into your IDE. The tool reads the root cause of each failure and suggests a code fix. You can fix one failing test, a selection of them, or every failure in a build.
Most fixes start in the Failure Analysis panel. You can also import an Allure or JUnit report from a local run or a CI job, or start from the BrowserStack Automate dashboard. You do not have to reproduce a CI failure locally. Paste the failed GitHub Actions or Jenkins URL into the chat, or paste the failure details yourself.
Fix tests from the Failure Analysis panel
The Failure Analysis panel lists every test in a build run. Set up the view once, then fix one test, a selection, or all the failures in the build.
To get started, follow these steps:
-
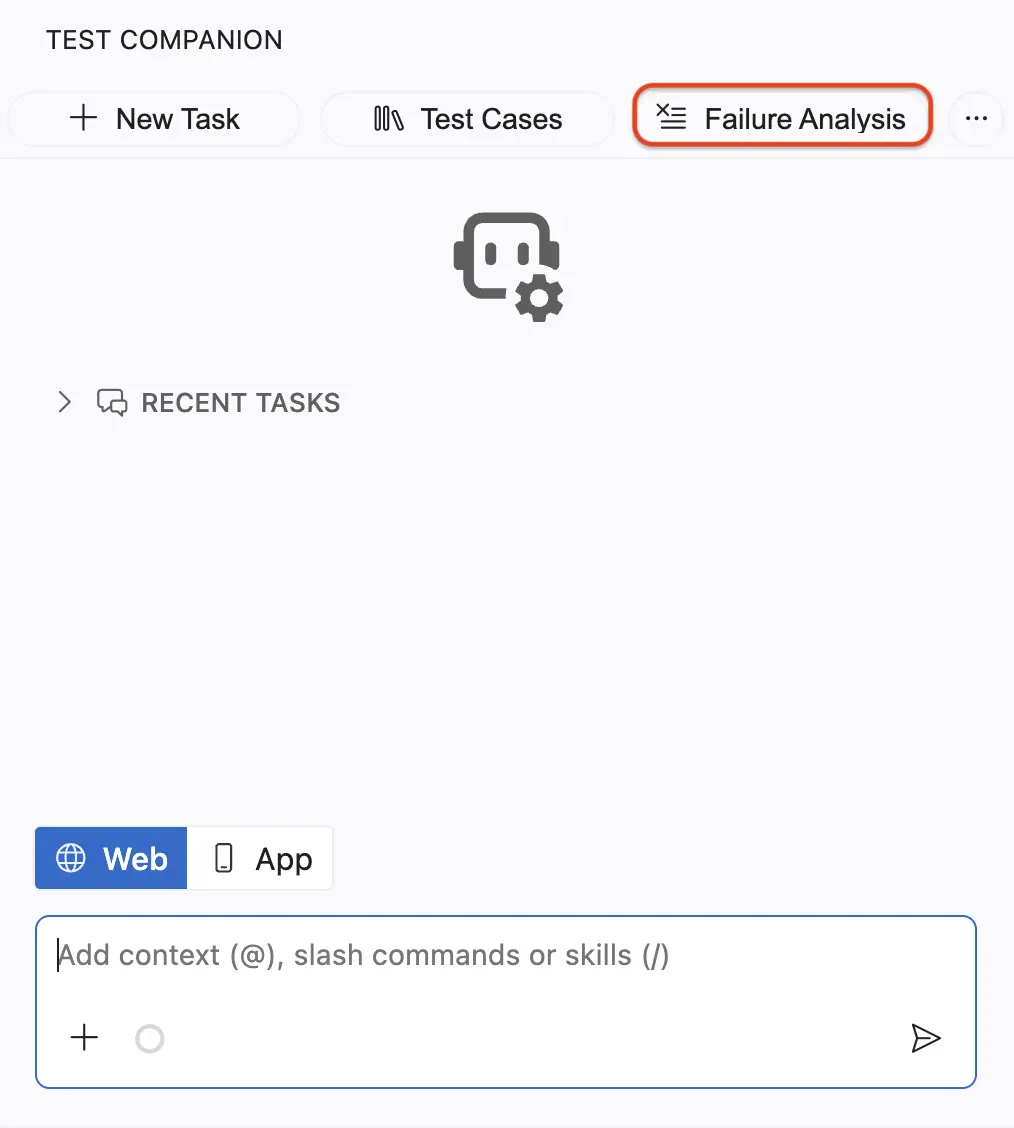
Click the Failure Analysis icon in the Test Companion panel.
-
From the project dropdown, select the project that contains your build.
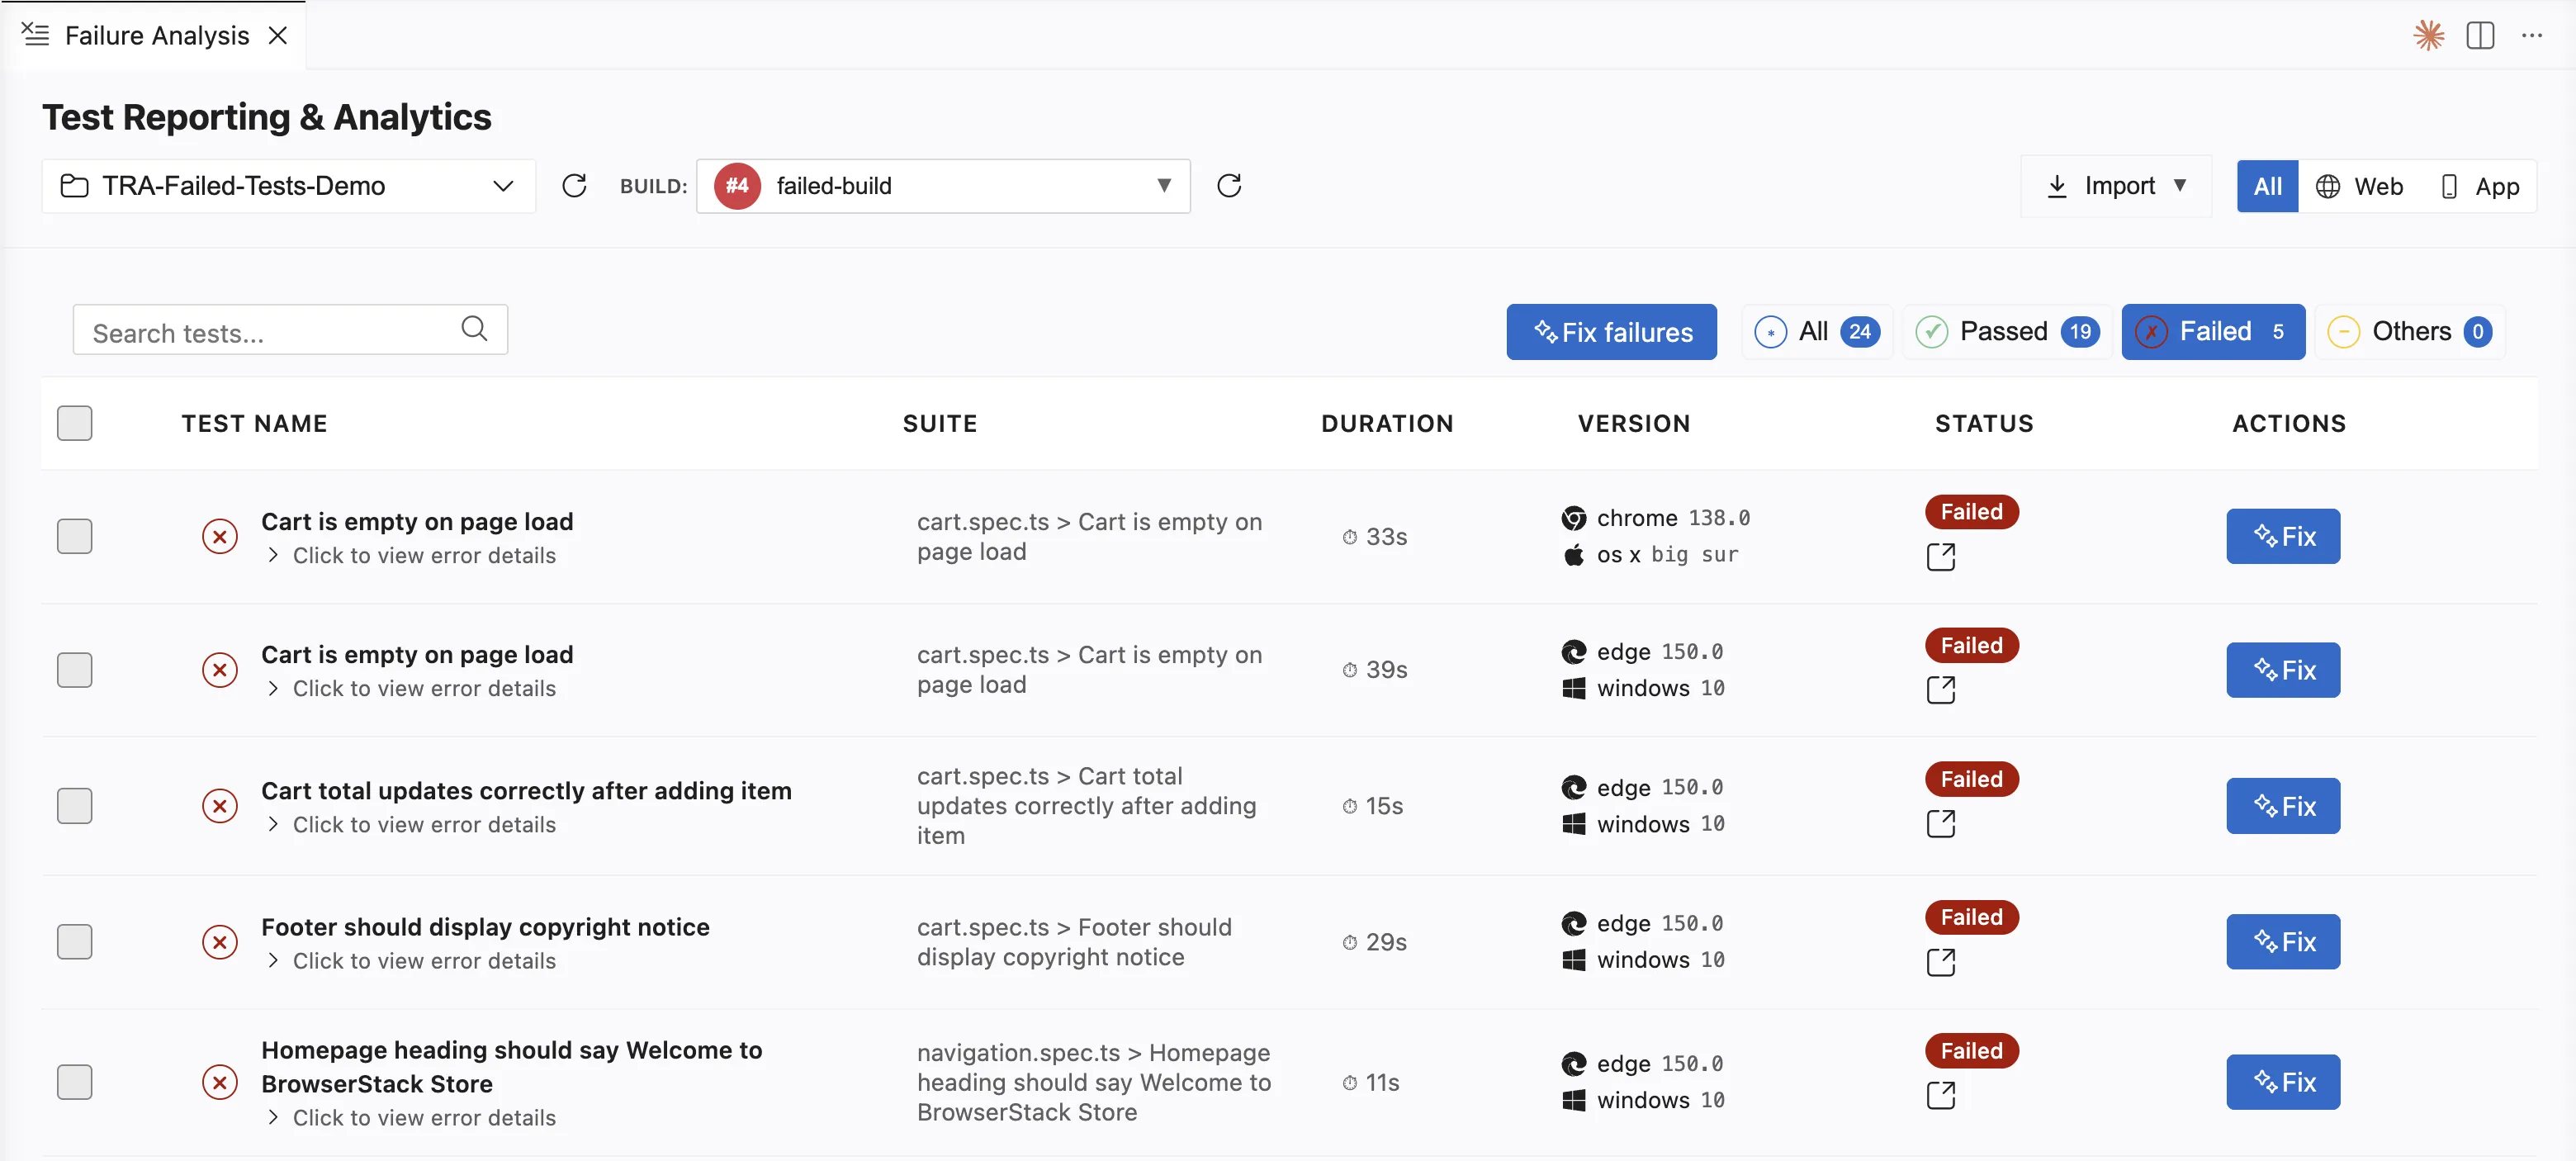
- From the Build dropdown, select the build run that contains your failures.
- Click All, Web, or App to filter the list by platform.
- Click Failed to show only the failed tests.
After the failed tests are listed, choose the scope of your fix:
| Task | What to click | Result |
|---|---|---|
| Fix one test | The Fix action in that test’s row | A prompt for that single test |
| Fix selected tests | The checkboxes, then the Fix button that shows your count | One prompt covering the tests you picked |
| Fix all failed tests | Fix failures, with no test selected | One prompt that groups the failures by shared root cause |
Fix one test
In the row of the test you want to fix, under Actions, click Fix.
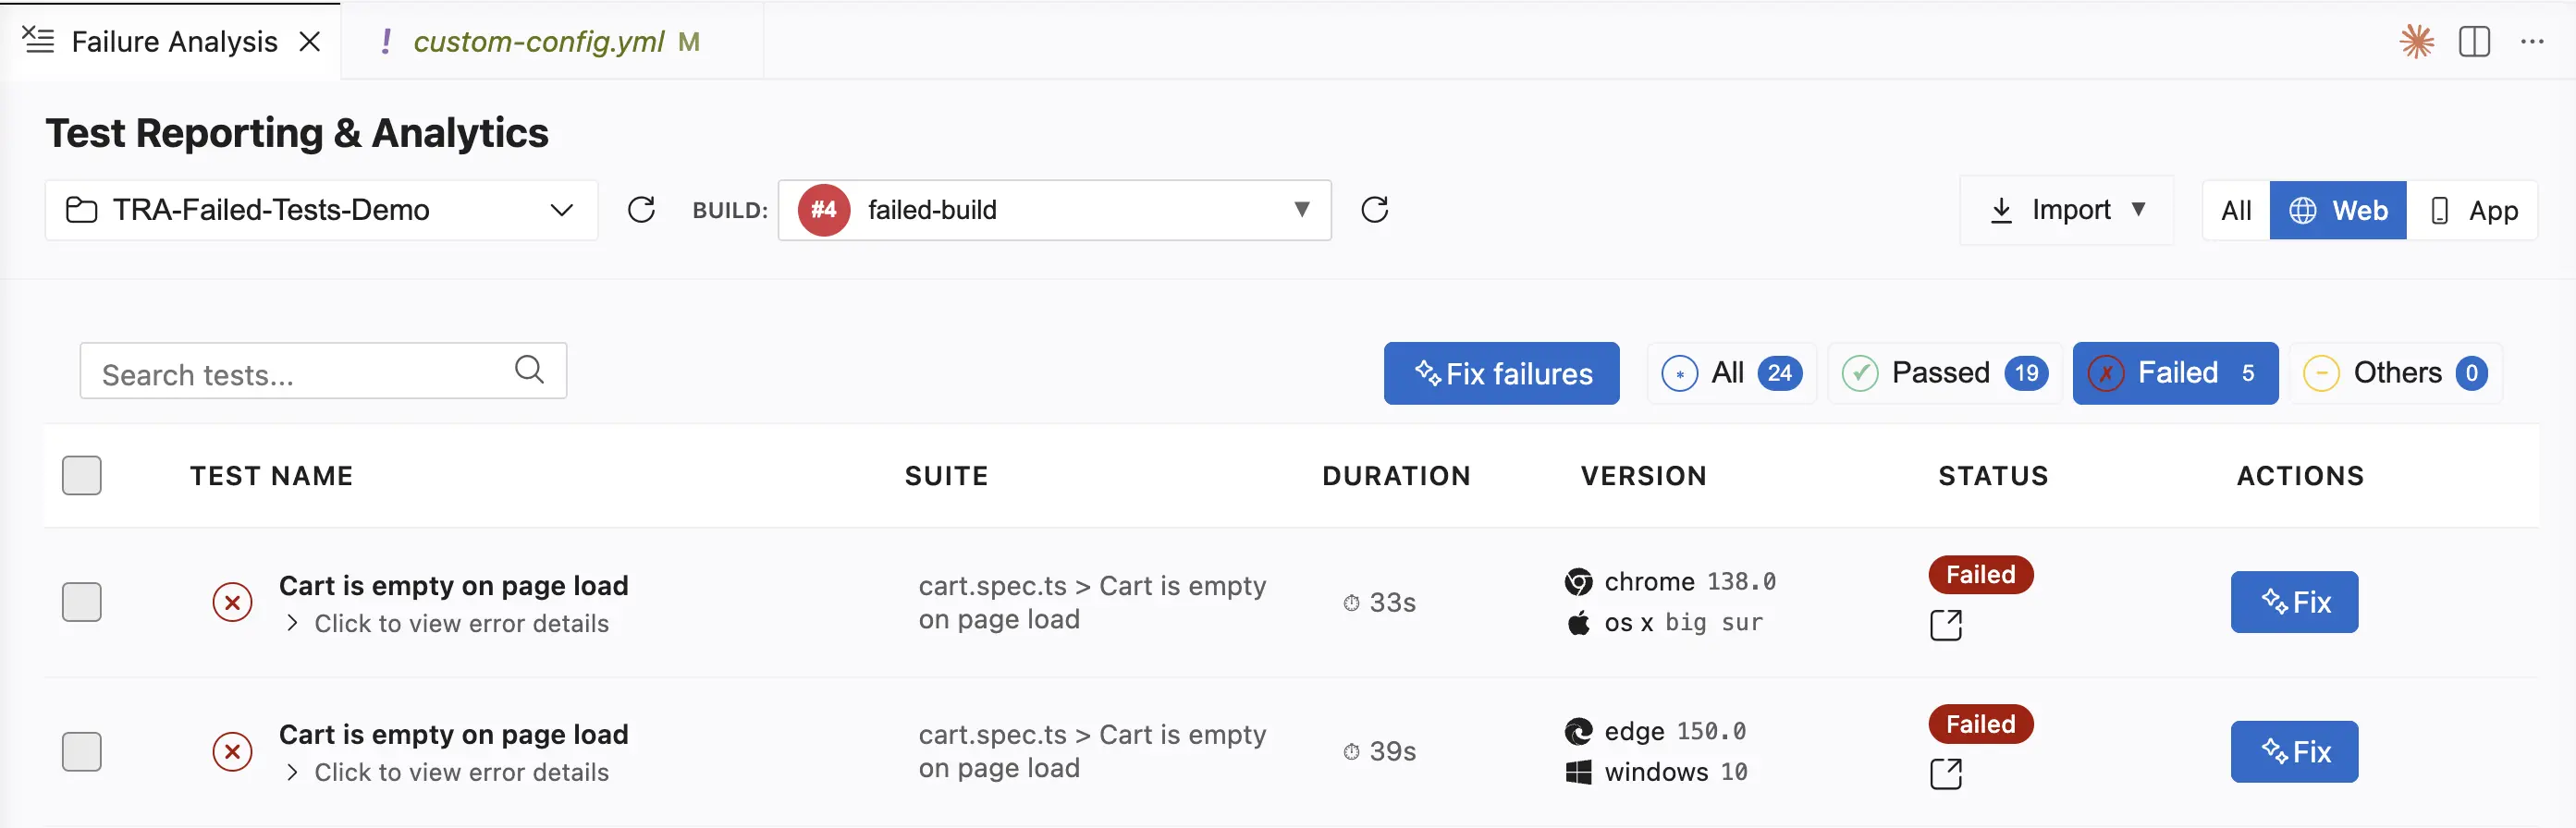
A Fetching RCA indicator appears while Test Companion retrieves the root cause analysis. Test Companion then switches to the chat and pre-fills a prompt. The prompt includes the test name, suite path, error logs, failure type, root cause, evidence, and a suggested fix. Review the generated details, then press Enter.
Fix selected tests
-
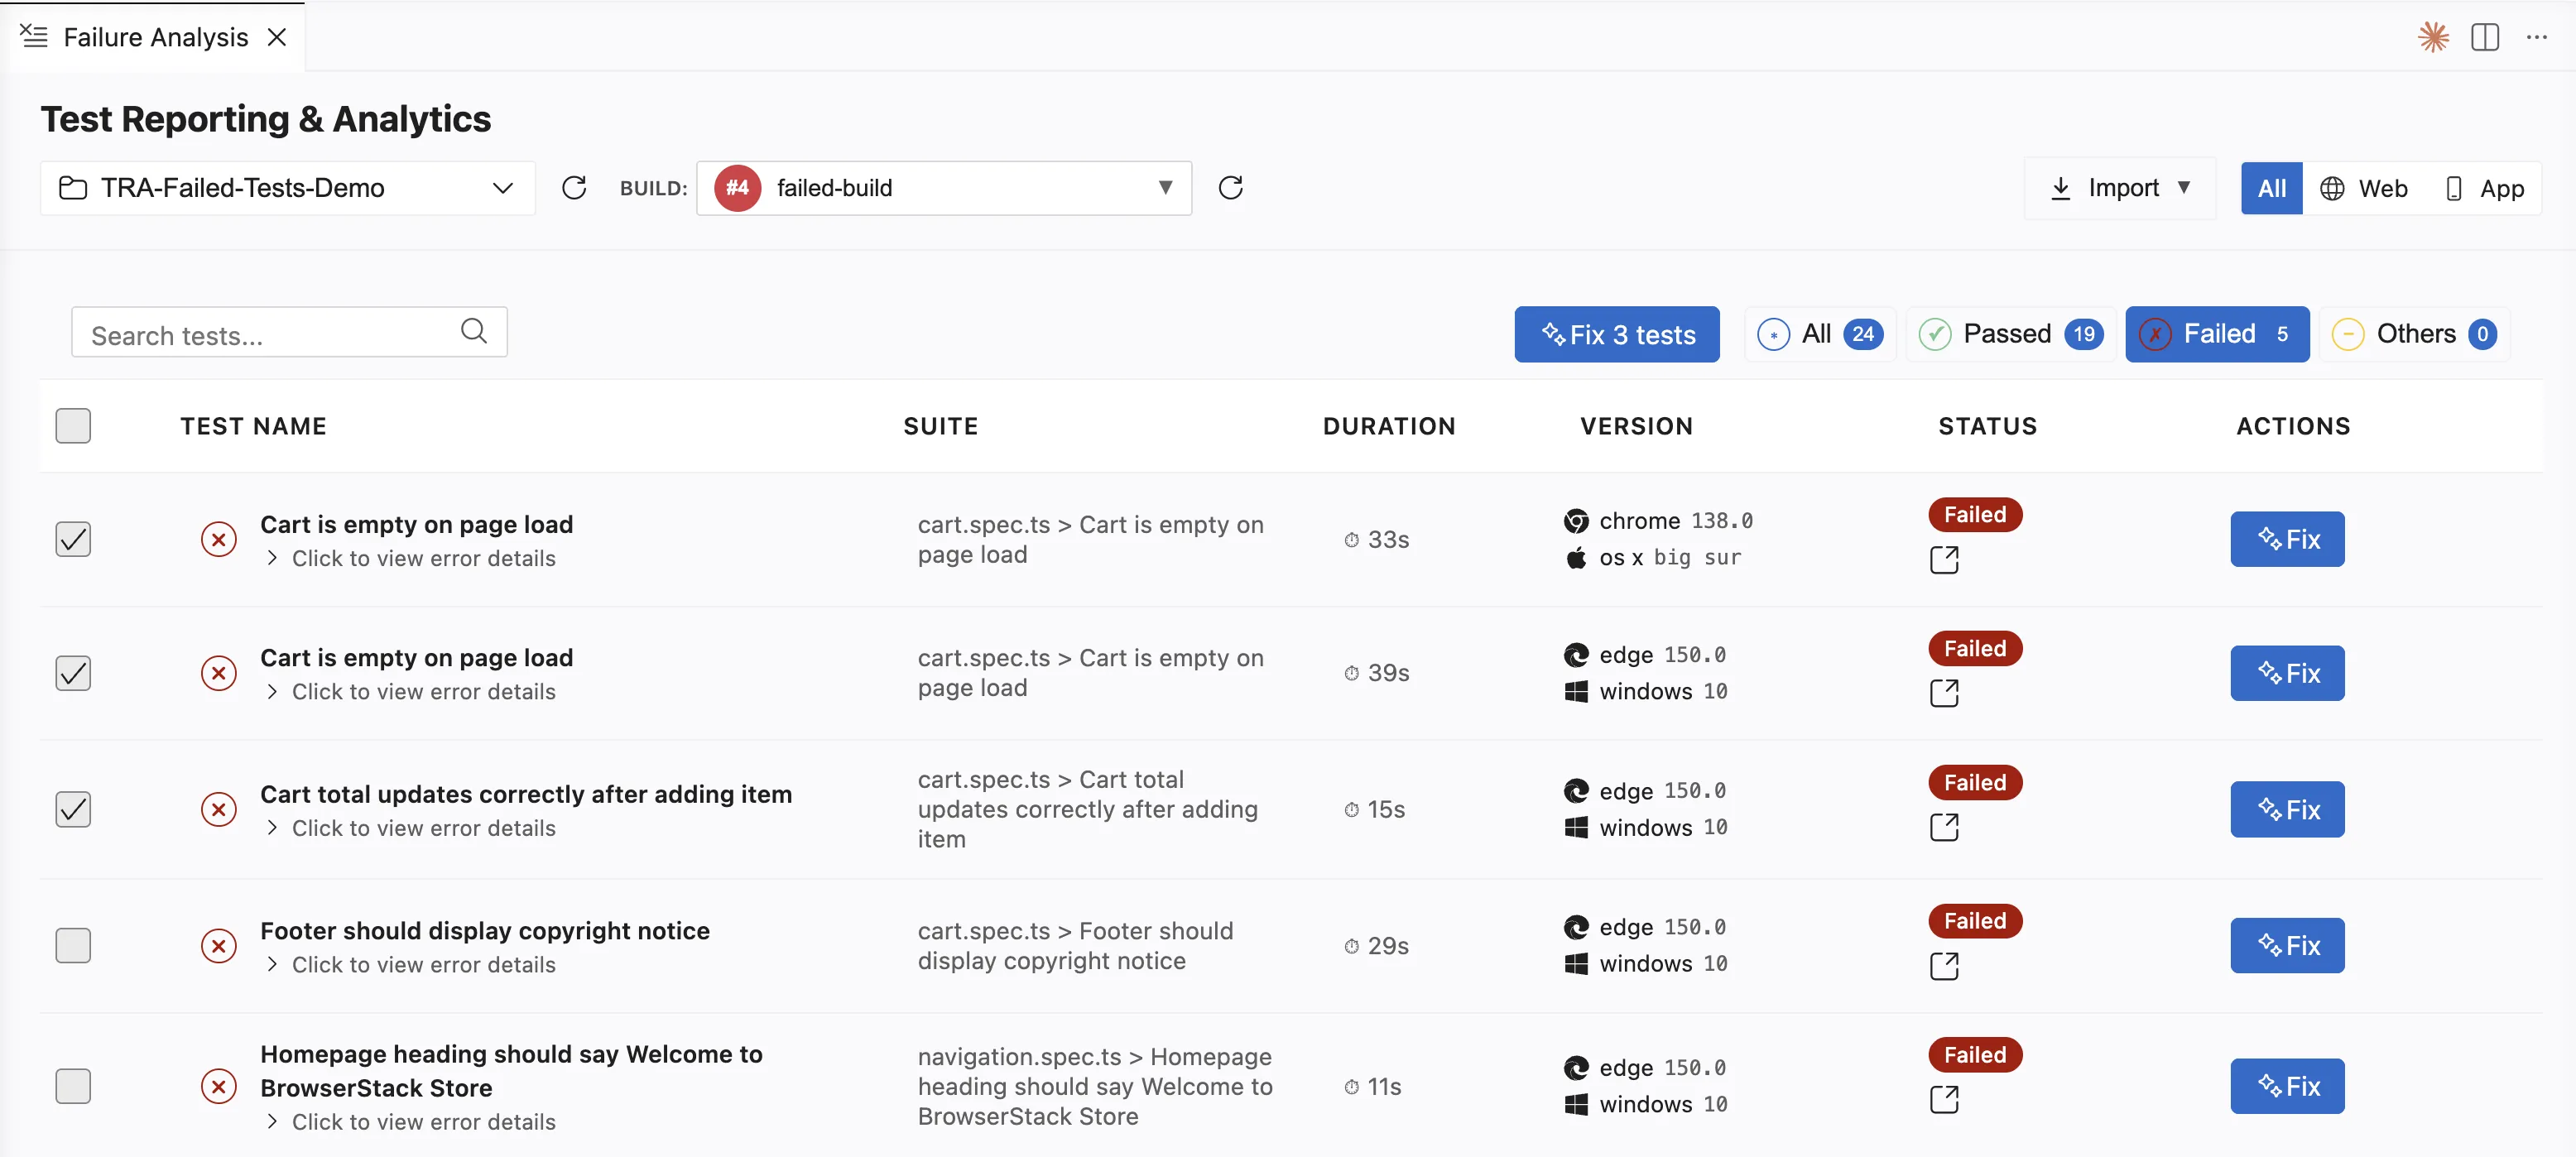
Select the checkbox next to each test you want to fix. To select all of the listed tests, select the checkbox in the header row of the list table.
-
Click the Fix button that shows your count, for example, Fix 3 Failures. The selected tests appear as chips in the chat. The prompt box pre-fills with each test’s failure details.
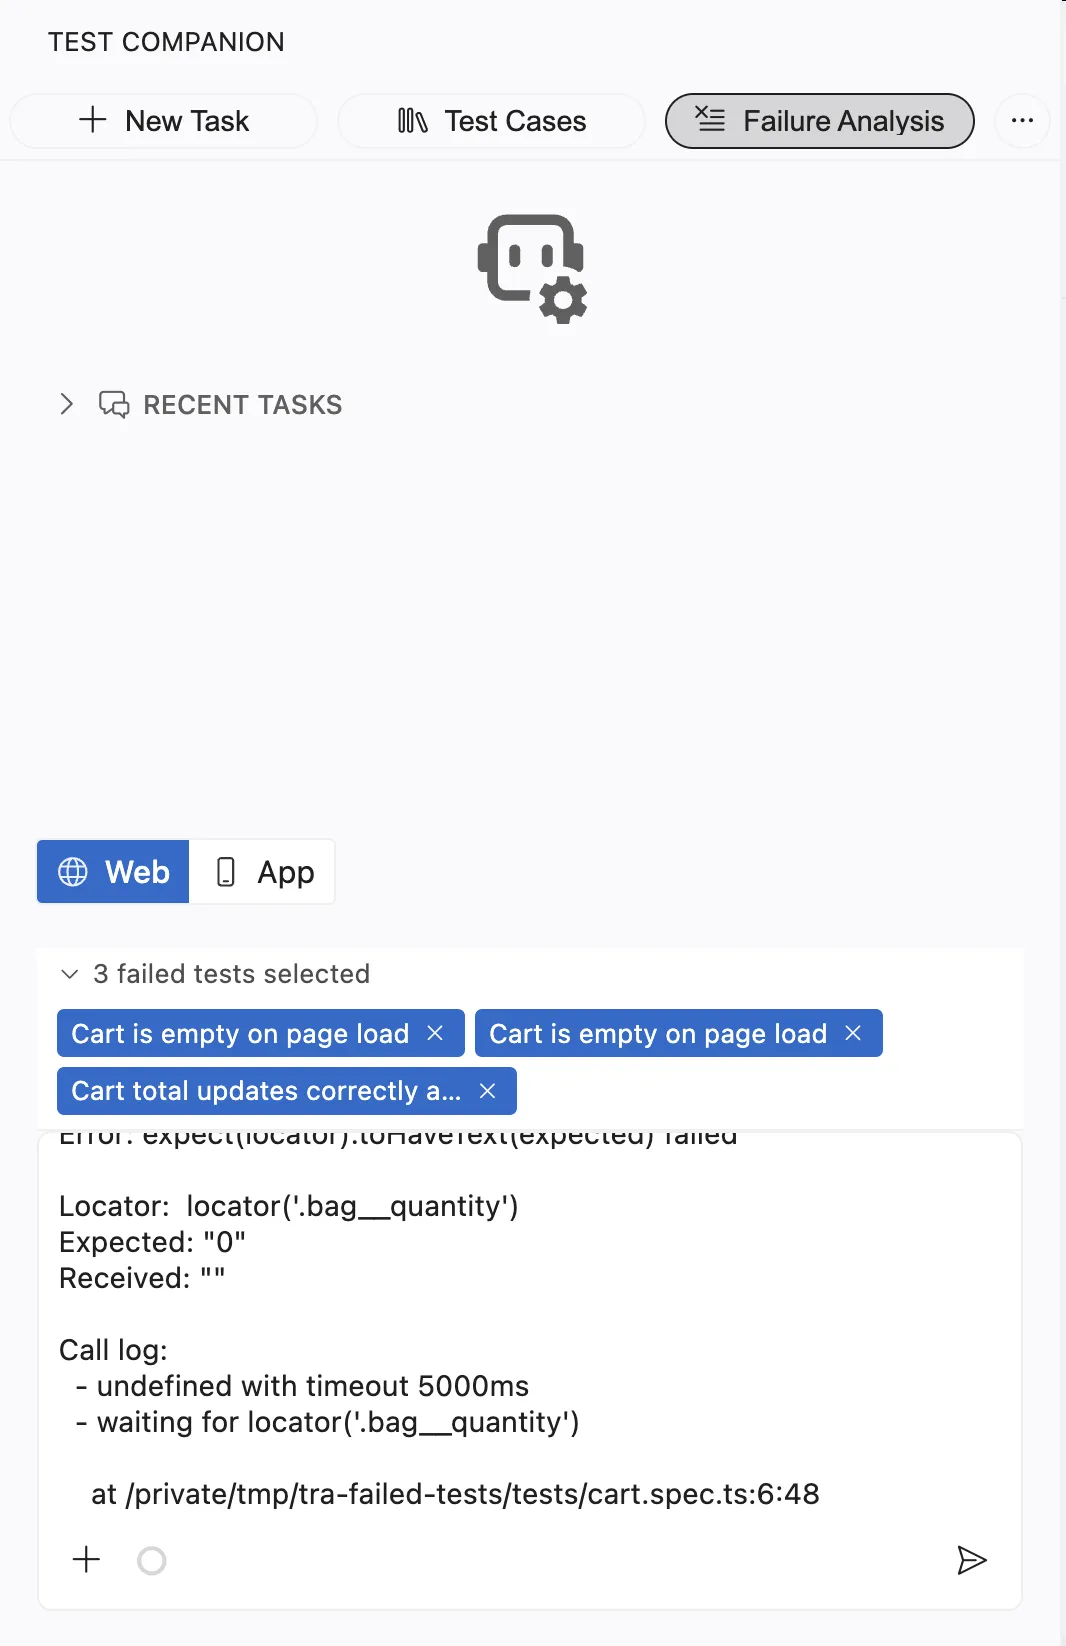
- To drop a test from the batch, click the X on the chip for that test. You can also leave the batch unchanged.
- Press Enter.
Fix all failed tests in the build
This method differs from selecting every test with the header-row checkbox. Test Companion groups the failures before it fixes them.
-
Without selecting any test, click Fix failures. Test Companion pre-fills a prompt that lists every failing test.
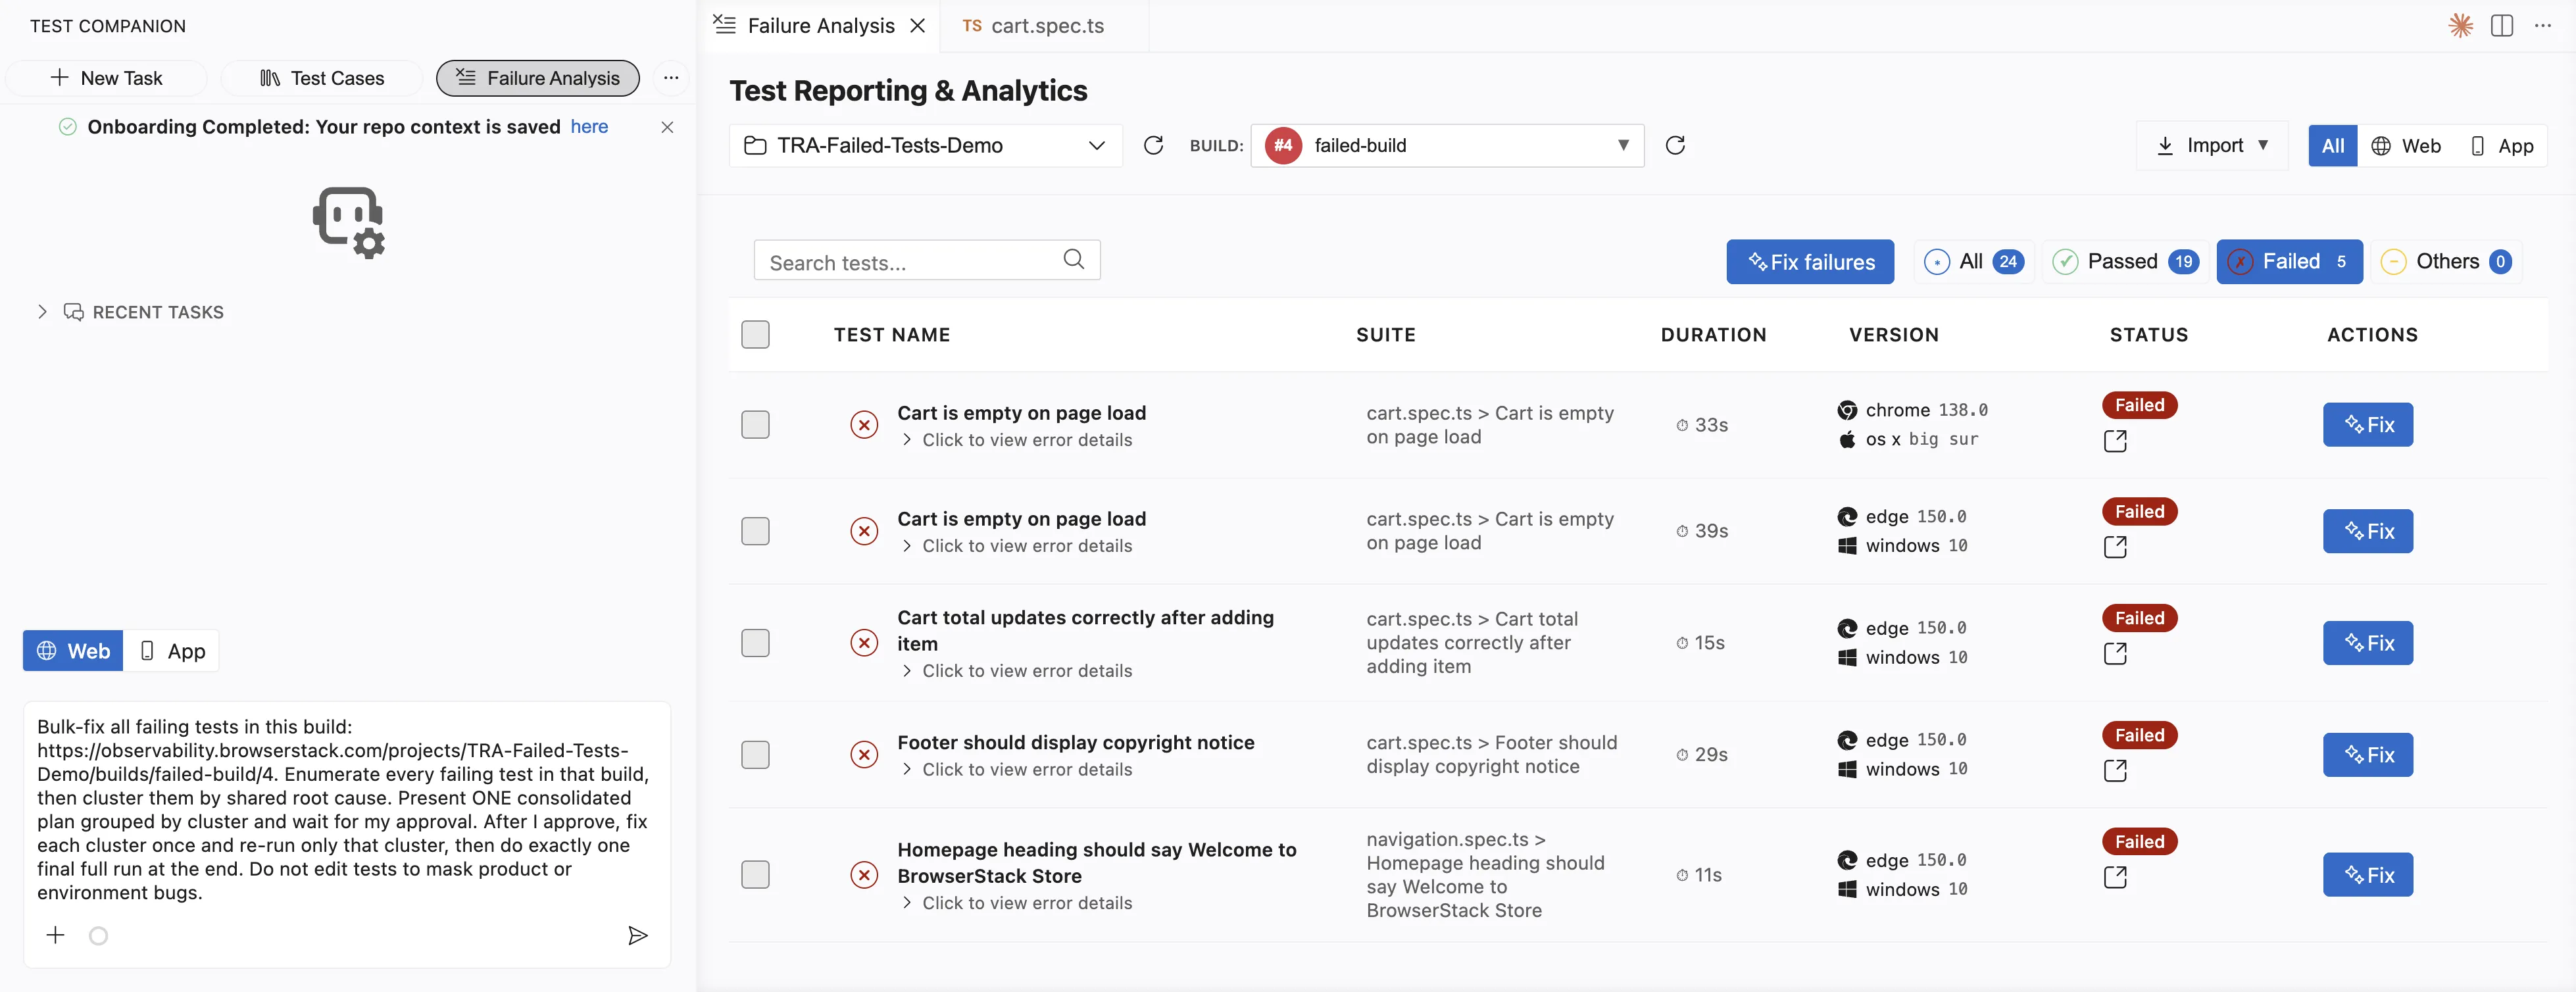
- Review the prompt, then press Enter.
- Review and approve the consolidated fix plan. Test Companion re-runs each group’s tests, then ends with one full test run.
How Test Companion fixes the tests
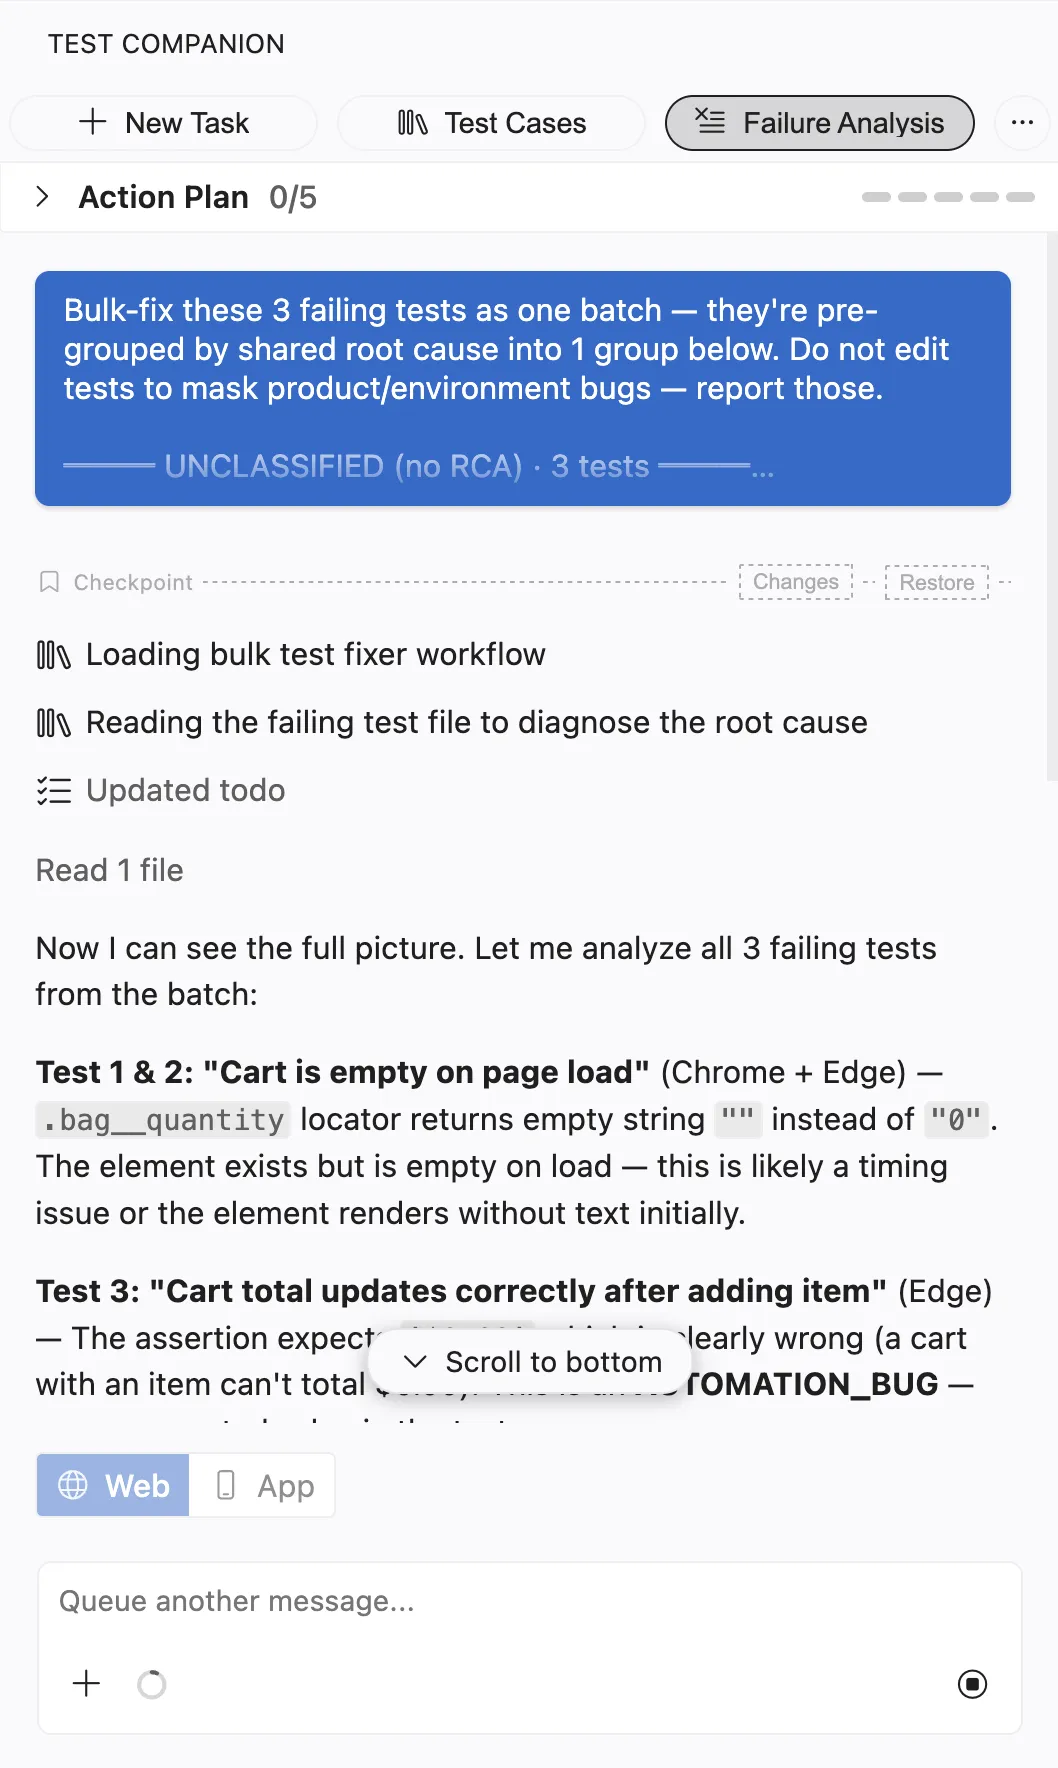
Test Companion turns your request into a single action plan. For an individual test, it analyzes the root cause and generates a fix. For a batch, the tool groups the tests by a shared root cause so that one fix covers every test that failed for the same reason. The tool flags product and environment bugs rather than patching them. Test Companion does not edit a test to mask a real defect.
As the plan runs, the panel shows each stage: loading the workflow, reading the failing test files, and diagnosing each root cause. Before modifying any files, Test Companion creates a checkpoint of your workspace. You can use Changes to review the edits or Restore to revert them.
Review and apply fixes
After the action plan completes, Test Companion posts a summary in the chat. The summary states the root cause for each test, for example, an automation bug, and the fix that was applied. The chat lists each changed file with a count of added and removed lines.
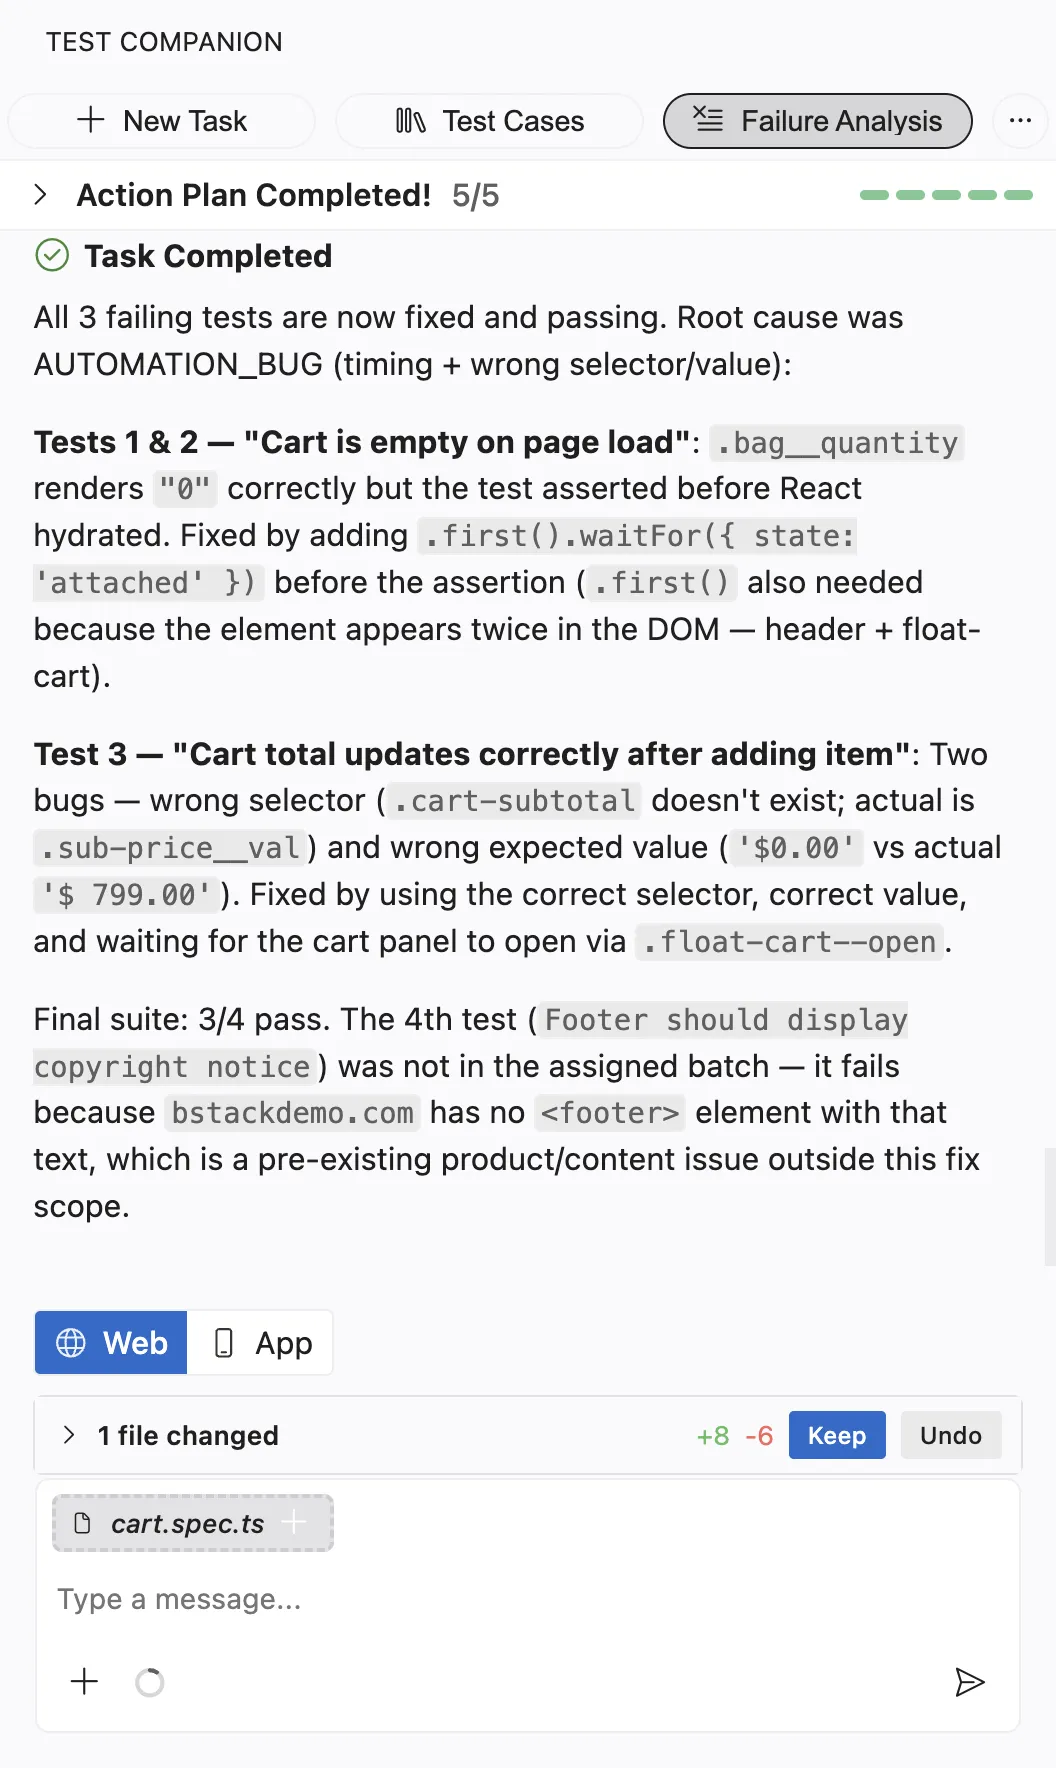
Review the changes, then choose one of the following actions:
- Click Keep to accept the changes.
- Click Undo to revert them.
Run the build again to confirm that the fixed tests pass.
Fix from an imported Allure or JUnit report
Use this method when a local run or a CI job has already produced Allure or JUnit results. Test Companion imports the report into a Test Reporting project. The imported tests then appear in the Failure Analysis panel, where you fix them with the same flow as any other build. You do not have to rerun the suite.
Test Companion reads two kinds of report output:
- An
allure-resultsdirectory that holds*-result.jsonfiles. - JUnit XML written to a directory such as
target/surefire-reports,target/failsafe-reports, orjunit-results.
To import a report:
-
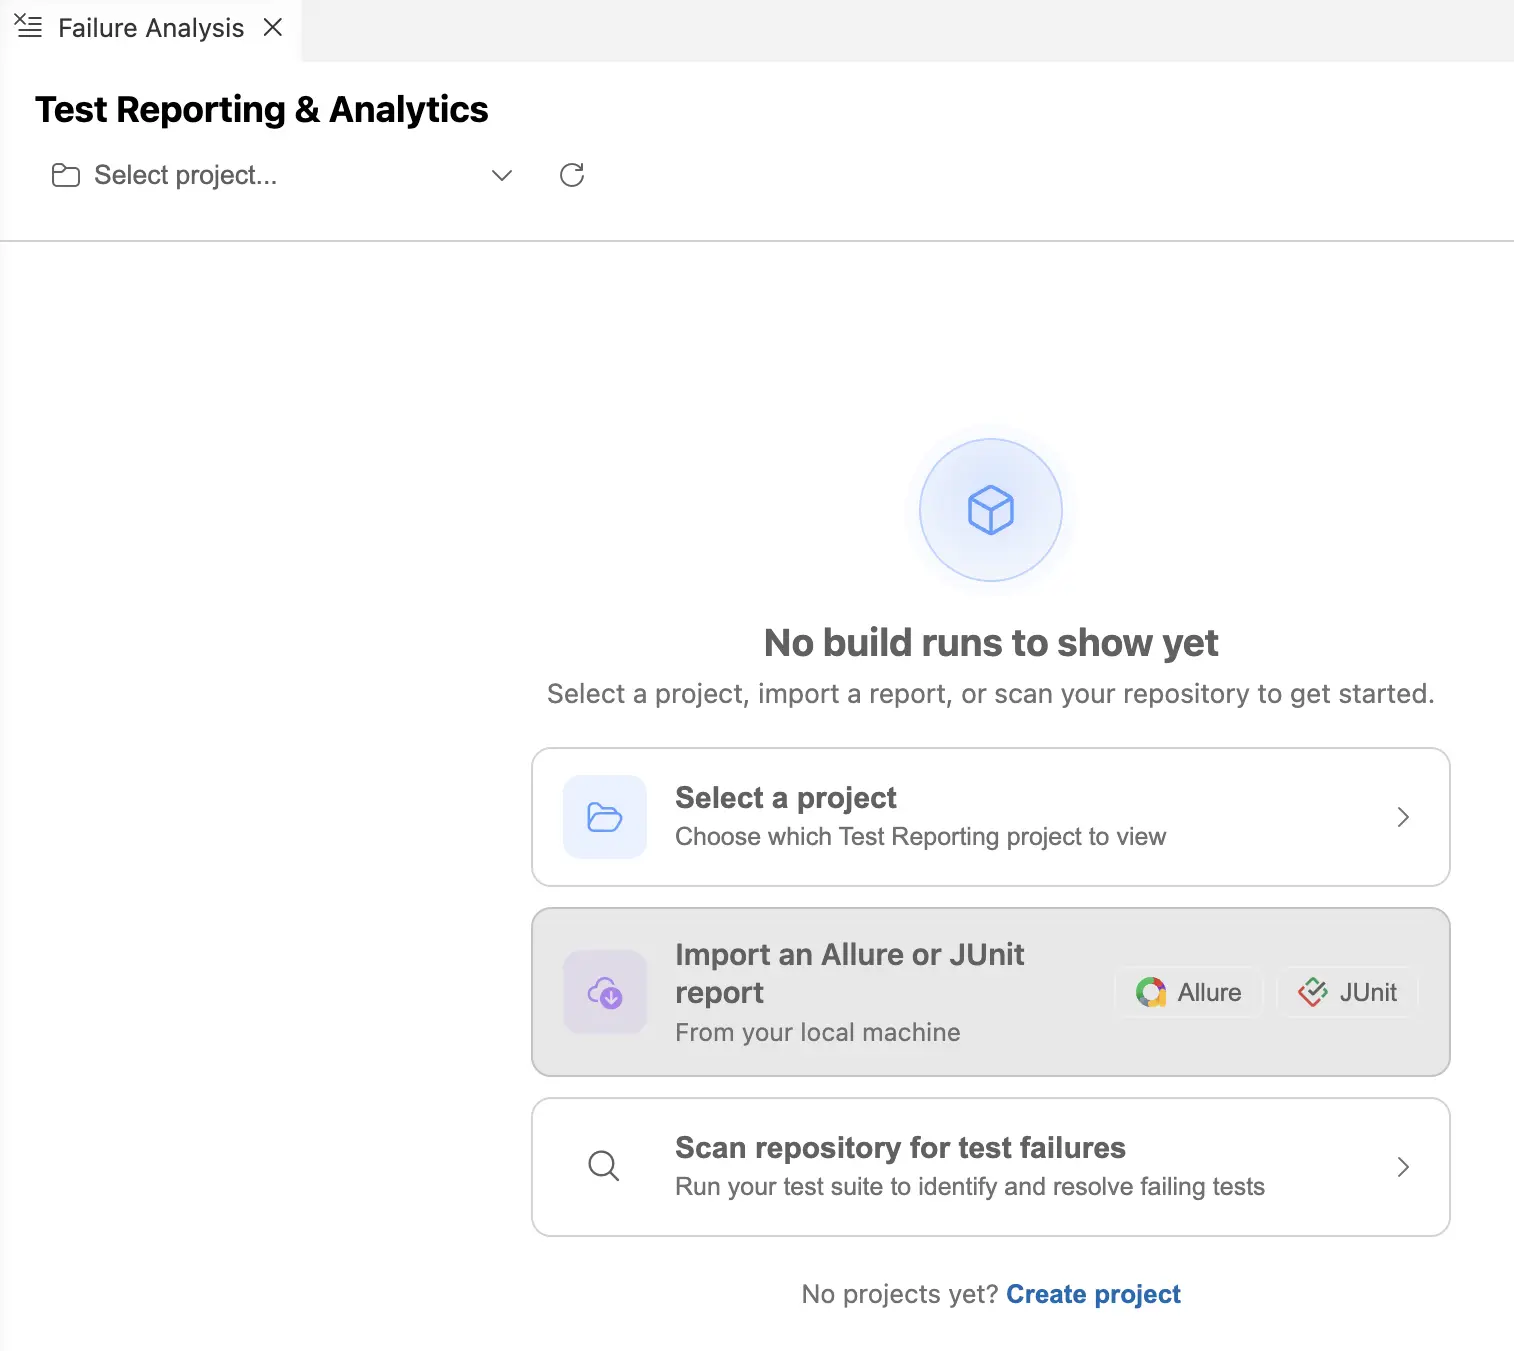
In the Failure Analysis panel, open the import options:
- When the panel shows no build runs, click Allure or JUnit on the Import an Allure or JUnit report card.
- When a build is already open, click Import in the panel toolbar, then choose From Allure or From JUnit.
-
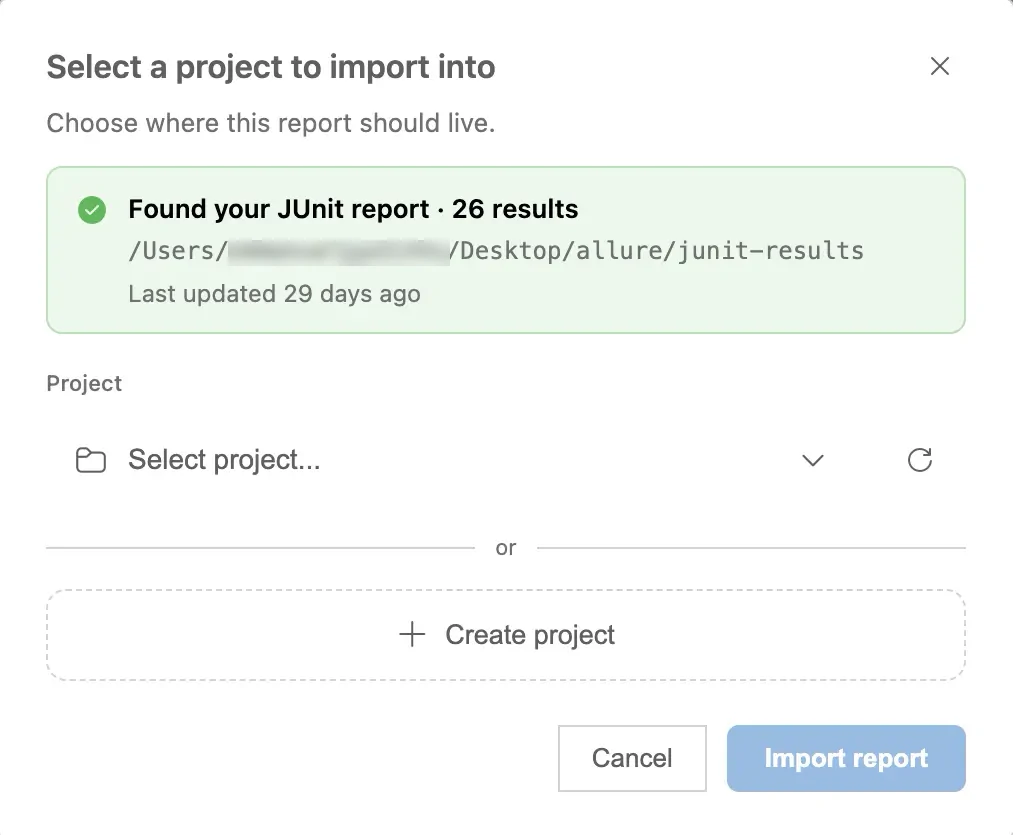
In the Select a project to import into dialog, check the detected report. The banner names the report type, the result count, the folder path, and the last update time.
-
Choose one of the following options:
- From the Project dropdown, select an existing Test Reporting project.
- Click Create project to add a new project.
- Click Import report. Test Companion uploads the results. The imported build then appears in the panel.
- Fix the failures with the panel flow in Fix tests from the Failure Analysis panel. You can fix one test, a selection, or every failure in the build.
If Test Companion cannot find or read the report, it explains what to check. For example, the folder might not be a valid, unmodified allure-results directory. You can then click Browse to select a different folder, or paste the failure logs into the chat.
Fix from the Automate dashboard
Use this method when you review build results in the Automate dashboard and want to fix a failure without switching context manually.
- Open the Automate dashboard in your browser.
- Select the build that contains the failed test.
- Click the Tests tab to view the test list.
- Select the failed test. The test detail panel opens.
- Click the AI Analysis tab.
The AI Analysis tab shows a root cause analysis. This analysis includes a failure summary, a failure type such as an automation bug or a product bug, and a detailed breakdown.
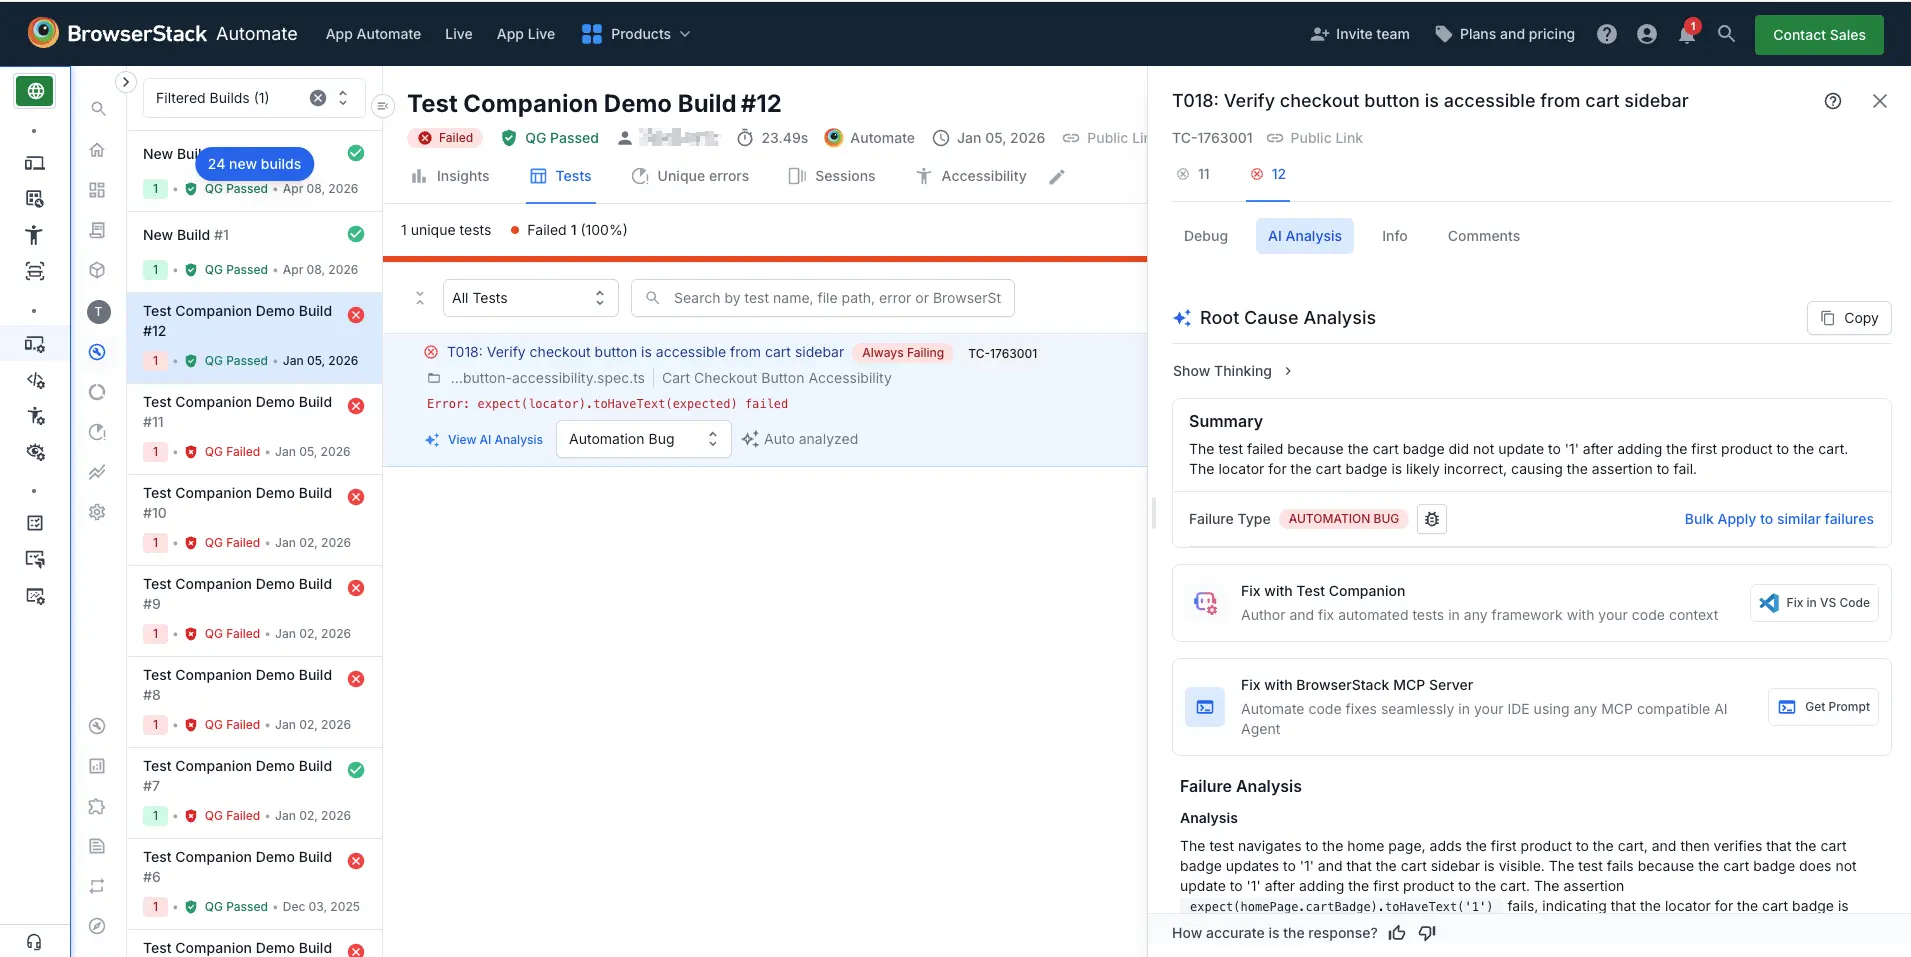
To fix the failure in your IDE, click Fix in VS Code. Test Companion opens with the failure context loaded. It reads the root cause analysis, locates the test file in your project, and suggests a code fix.
If the same root cause affects several tests, click Bulk Apply to similar failures. Test Companion applies the failure type classification across all matching tests. Then fix the shared root cause once in your test code.
Fix from a CI run
When a test fails in your CI pipeline, you do not have to reproduce the failure locally first. Paste the failed run URL into the chat. Test Companion reads the CI logs and the test artifacts, then compares them with the code in your workspace. It explains why the test failed.
Check out the branch that CI ran before you paste the URL. Test Companion can only write a fix to a file that exists on your current branch.
Each CI/CD tool needs a one-time setup on your machine. Refer to the page for your tool:
- Connect GitHub Actions to Test Companion: Sign in through the GitHub CLI, then paste a failed run URL.
- Connect Jenkins to Test Companion: Add a Jenkins API token, then paste a failed build URL.
Fix from the chat
Use this method to start failure analysis from the Test Companion chat box. The chat accepts several input types, alone or in combination. This method works for failures captured in Test Reporting and for failures you hit locally.
- Open the Test Companion panel in the IDE.
-
In the chat box, paste any of the following:
- A Test Reporting session URL or ID, which pulls the test name, error, stack trace, and metadata.
- An error message or stack trace from your test output.
- A description of the failure in plain language.
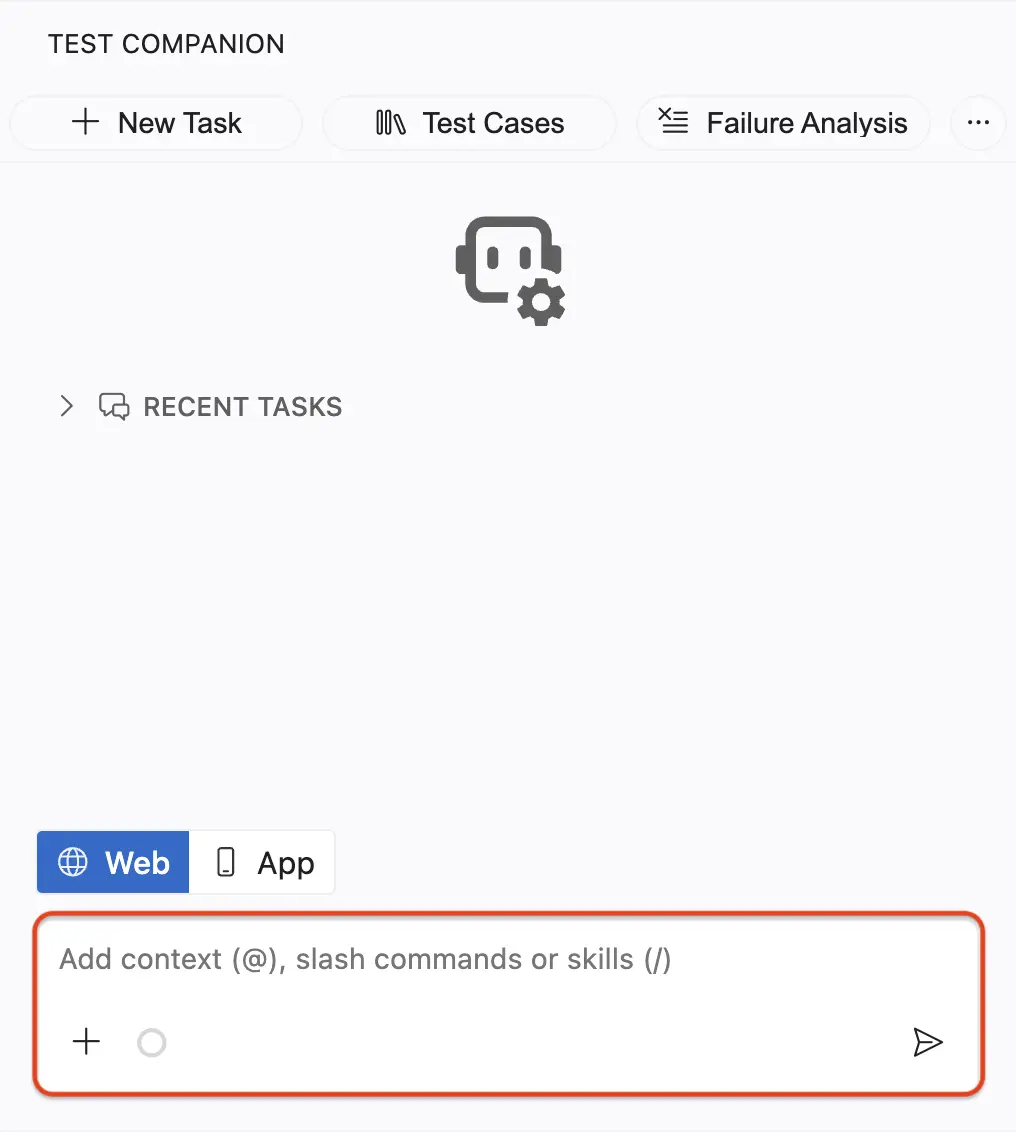
- For more accuracy, type
@and attach the relevant test file, source file, or terminal output. - Press Enter.
Test Companion analyzes the failure context, identifies the likely cause, and suggests a code fix in the chat. When you provide a Test Reporting session URL or ID, Test Companion fetches the same structured failure data the panel flow uses.
Paste one session link or ID per message. To analyze multiple failures, send them in separate messages so Test Companion can keep each diagnosis distinct.
Example prompts
The chat accepts several kinds of input. The following examples show common ways to start a fix.
- From a GitHub Actions job URL:
https://github.com/<org>/<repo>/actions/runs/<run-id>/job/<job-id>
- From a Jenkins build URL:
https://<jenkins-host>/job/<job-name>/<build-number>/
- From a Test Reporting session URL or ID:
https://automation.browserstack.com/builds/<BUILD_ID>/sessions/<SESSION_ID>
Or paste the ID alone on its own line:
<SESSION_ID>
- With pasted error context:
Fix this test failure:
Error: expect(received).toBe(expected) // Object.is equality
Expected: 200
Received: 401
The test file is @tests/api/auth.spec.ts
- Describing the failure:
My login test is failing because the redirect URL changed from /home to /dashboard
after our last release. Update the test assertion.
Common failure types
Test Companion helps fix the following common failure types:
- Stale selectors: An element ID or class changed after a UI redesign. Test Companion updates the selector to match the new element.
- Timing issues: A test runs before an element is visible or clickable. Test Companion adds an explicit wait or adjusts the wait strategy.
- Flaky behavior: A test passes intermittently because of a race condition. Test Companion identifies the race and adds stabilization logic.
- Genuine application bugs: The application behavior is broken. Test Companion confirms the bug and explains what is wrong, rather than patching around it.
Example scenarios
These scenarios show how Test Companion handles real-world failure patterns.
UI redesign breaks selectors
Your navigation header was redesigned. Now 23 Selenium tests fail with element-not-found errors because the button IDs changed. Paste the error output and reference the test files with @. Test Companion maps each old selector to its new equivalent and generates a patch with all the updated selectors.
Intermittent flaky failure
A test passes 70% of the time. It fails the other 30% with an element-not-visible error. Test Companion finds a race condition where the test clicks a button before an API call completes. It replaces the fixed wait with an explicit wait for network idle and adds a retry on the assertion.
API contract change breaks assertions
The backend team split the full_name field into first_name and last_name. Three test files that assert full_name now fail. Reference the test files with @ and describe the API change. Test Companion updates every affected assertion across the three files and adjusts the test data fixtures.
Test fails only in CI, passes locally
Your checkout test passes locally. In CI, it times out. Test Companion finds that the test relies on a local environment variable for the API base URL that is not set in CI. It suggests adding the variable to the CI configuration and updating the test to fail fast when the variable is missing.
Best practices
Use these practices to get the most accurate fixes from Test Companion:
- Provide full error output: The more context you give, including the stack trace, error message, and logs, the more accurate the diagnosis.
- Prefer a Test Reporting session URL or ID over typed error text: A session link or ID gives Test Companion the full structured failure context in one paste. Typed or summarized errors often drop detail that affects the diagnosis.
-
Reference the test file with
@: The error message describes the failure. The failing test file gives Test Companion the code that produced it. - Let bulk fix group related failures: When many tests fail together, fix them as a batch. Test Companion clusters failures by shared root cause and fixes each cluster once.
- Paste a CI run URL for CI-only failures: When a test fails in CI but passes locally, paste the GitHub Actions run URL or the Jenkins build URL. Test Companion compares the CI logs against your workspace, then reports what differs in the CI environment.
Next steps
- Automate tests: If the failed test needs a rewrite, generate the automation script again.
- AI settings: Configure auto-approve to let Test Companion apply fixes automatically.
We're sorry to hear that. Please share your feedback so we can do better
Contact our Support team for immediate help while we work on improving our docs.
We're continuously improving our docs. We'd love to know what you liked
We're sorry to hear that. Please share your feedback so we can do better
Contact our Support team for immediate help while we work on improving our docs.
We're continuously improving our docs. We'd love to know what you liked
Thank you for your valuable feedback!