Refine your test cases with Iterative prompting
Use iterative prompting to refine AI-generated test cases in a conversational workflow over multiple rounds for a tailored final output.
Generating the perfect test cases from a single prompt or document can be difficult. Iterative prompting solves this. After BrowserStack AI generates your initial set of test cases, you can refine, restructure, or prune them using Iterative Prompting. This feature lets you guide the AI agent with natural language to ensure the final output aligns with your specific testing strategy.
Think of this as a conversation. After the initial generation, you can provide follow-up instructions to refine and shape the output until it perfectly matches your testing strategy.
What you can do with iterative prompts
Use iterative prompts to steer the agent to do the following:
| What you want to do | Prompt examples |
|---|---|
| Restructure your test scenarios |
By feature / functionality: Group test cases by feature name. Create one scenario per feature. Put all test cases under one scenario. By test type: Separate test cases into Functional (happy, negative, edge, boundary) and Non-functional (UI, performance, security). By clearly defined attribute: Group test cases by attribute (for example platform, role, region). Create a scenario for each value. |
| Prune unnecessary test cases |
Delete by kind: Remove all negative test cases. Keep only happy path and boundary. Delete by feature: Keep only <FEATURE> test cases. Remove everything else.Delete by priority: Remove all low priority test cases (P3 and below). Delete by test type: Remove all UI/UX test cases. Keep only Accessibility tests. Delete by role: Remove admin-only test cases. Keep end-user flows. |
| Combine related test cases |
Explicit merge: Combine <TC1> and <TC2> into one test case. Preserve coverage from both.Type-based consolidation: Merge all browser compatibility tests into one cross-browser test case. Flow-based combination: Create an end-to-end test that combines login → navigation → logout.Scenario consolidation: Combine happy path and negative cases for the <FLOW> flow into a single scenario with clearly labeled test cases. |
| Expand your test coverage |
Add new areas: Add test cases for <NEW_AREA> that is not covered yet.Add missing types: Add edge and negative test cases for <FEATURE>. Keep existing happy path.Add NFR coverage: Add UI, performance, and security test cases for <FEATURE>. Keep functional tests unchanged. |
| Apply cosmetic changes |
Naming convention: Rename all test cases to follow: [<TYPE>], and [<PRIORITY>] <FEATURE> – <ACTION> .Terminology alignment: Replace ‘sign in’ with ‘log in’ across titles and descriptions. |
How iterative prompting works
The process is a simple loop:
- Generate an initial set of test cases from a prompt, file, or linked requirement.
- Review the generated scenarios and test cases.
- Refine with iterative prompts.
After you generate your first set of test cases from a document, your test case list becomes interactive. You now have new options to guide the AI for the next prompt.
How to refine your test cases
Use this loop each time you want to steer the output:
Step 1: Generate your first test cases
Follow this documentation to generate your test cases. Provide your PRD, image, or other requirements to the Test Case Generator agent.
Step 2: Review and categorize your results
Review the output and use these actions:
- Select test cases (for modification): Click the checkbox next to the test cases you want to change. Your next prompt will only apply to these selected test cases.
- Add: Click the Add icon for test cases that you want to retain. The AI saves these, protect them from future changes, and avoid creating duplicates of them later.
- Reject: Click the Reject icon for test cases that are irrelevant or wrong. The AI learns from this and will not generate similar, irrelevant test cases again.
Tests that you do not select, accept, or reject will be carried over unchanged to the next iteration.
Step 3: Write your refinement prompt
- Write specific, descriptive prompts. The AI Agent’s output quality depends directly on the clarity of your instructions. Use highly descriptive language to guide specific iterations.
- You can only use one integration (like Jira, Confluence, or Azure) in a single generation journey. After you generate test cases from a source, you cannot add more from that same source or switch to another integration within that same cycle.
- You can add as many as 5 files to provide context to the AI.
-
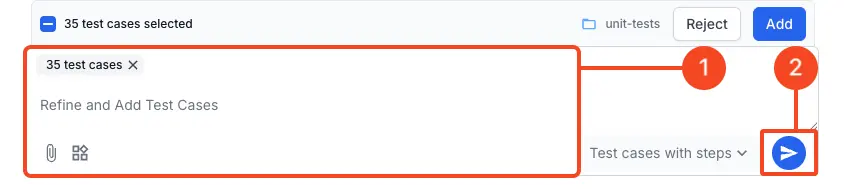
Write a new prompt in the Refine and Add Test Cases field (see annotation 1). The AI agent reads this prompt along with the context of which test cases you have selected, accepted, and rejected.
-
You can add new files (like a Confluence page or Jira ticket) or just provide a simple text command. What selection means:
- If you select test cases, your prompt should describe how to change only those selected items.
- If you do not select anything, write prompts that add or restructure broadly.
-
Click Generate icon again (see annotation 2).
The AI agent processes your new request and updates the test case list. You can repeat this review and refine loop as many times as you need.
We're sorry to hear that. Please share your feedback so we can do better
Contact our Support team for immediate help while we work on improving our docs.
We're continuously improving our docs. We'd love to know what you liked
We're sorry to hear that. Please share your feedback so we can do better
Contact our Support team for immediate help while we work on improving our docs.
We're continuously improving our docs. We'd love to know what you liked
Thank you for your valuable feedback!