Puppeteer was initially released only with functional testing and Chromium-based browsers in mind. However, as the demand increased, Puppeteer started to support many other browsers and their versions.
Overview
What is Puppeteer?
Puppeteer is a NodeJS-based test Automation tool that supports JavaScript and TypeScript. It is a completely open-source tool managed by Google Team and active contributors.
Puppeteer Supported Browsers
- Chromium
- Google Chrome
- Microsoft Edge
- Firefox
This article discusses in detail about puppeteer supported browsers, covering the list of browsers and browser versions, how to implement cross-browser tests, and more.
What is Puppeteer?
Puppeteer is a NodeJS-based test Automation tool that supports JavaScript and TypeScript. It is a completely open-source tool, managed by Google Team and active contributors.
High Level Architecture of Puppeteer
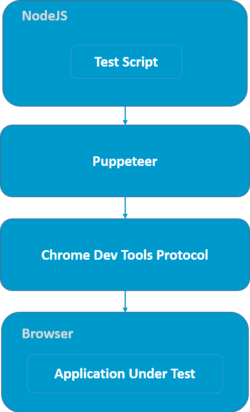
Puppeteer is primarily used for browser automation, web scraping, performance testing, and UI testing. Here are the components of Puppeteer architecture that facilitate its capabilities:
- Test script: Puppeteer Test Script needs to be written in Java. The test script mainly contains, calling Puppeteer commands or API functions, and the assertions. In Puppeteer, you can use assertion libraries such as Jest, Mocha, Chai, etc.
- Puppeteer: Puppeteer in the above diagram is simply a node package, which is installed by the QA. Puppeteer npm module provides various wrapper functions.
- Chrome DevTool Protocol: Chrome DevTools Protocol also known as CDP in short, allows other tools to instrument, debug and inspect Chromium-based browsers.
- Browser and Application: Browser renders the Application Under Test. Puppeteer then communicates to the browser over CDP protocol and executes the action, events, etc. The process continues throughout the test script code.
Read More: Understanding Puppeteer Headless
Key Features of Puppeteer in the Browsers
Puppeteer supports several robust features for automation and testing while running in a browser. Here are the key features:
- WebSocket Connections: You can use WebSockets to connect to an existing browser instance. However, direct browser launching or downloading may not be possible since it relies on Node.js APIs.
- Script Evaluation: Executes JavaScript code within the browser’s context. This helps in page element interaction, data extraction, or dynamic content modification.
- Document Manipulation: This feature produces PDFs and screenshots of full web pages or specific sections for documentation or reports.
- Page Management: Supports the creation, opening/closing, and management of multiple pages within a session, along with the navigation between pages and pop-up handling.
- Cookie Handling: Enables inspecting, modifying and managing cookies within the browser session. It can also be levergaed for authentication testing and session management.
- Network Control: Facilitates real-time monitoring of network activity and traffic. Intercepts and modifies network requests to simulate various conditions.
Read More: Cookie Testing in Software Testing
Puppeteer Supported Browsers
Puppeteer Supports Chromium-Based Browsers and Firefox. Below are the supported browsers.
- Chromium
- Google Chrome
- Microsoft Edge
- Firefox
Read More: How to run Tests in Puppeteer with Firefox
Supported browser version list
| Puppeteer | Chrome | Firefox |
|---|---|---|
| Puppeteer v24.3.0 | Chrome for Testing 133.0.6943.126 | Firefox 135.0.1 |
| Puppeteer v24.2.1 | Chrome for Testing 133.0.6943.98 | Firefox 135.0 |
| Puppeteer v24.2.0 | Chrome for Testing 133.0.6943.53 | Firefox 135.0 |
| Puppeteer v24.1.1 | Chrome for Testing 132.0.6834.110 | Firefox 134.0.2 |
| Puppeteer v24.1.0 | Chrome for Testing 132.0.6834.83 | Firefox 134.0.1 |
| Puppeteer v24.0.0 | Chrome for Testing 131.0.6778.264 | Firefox 134.0 |
| Puppeteer v23.11.1 | Chrome for Testing 131.0.6778.204 | Firefox 133.0.3 |
| Puppeteer v23.10.4 | Chrome for Testing 131.0.6778.108 | Firefox 133.0.3 |
| Puppeteer v23.10.1 | Chrome for Testing 131.0.6778.87 | Firefox 133.0 |
| Puppeteer v23.10.0 | Chrome for Testing 131.0.6778.85 | Firefox 133.0 |
| Puppeteer v23.9.0 | Chrome for Testing 131.0.6778.85 | Firefox 132.0.2 |
| Puppeteer v23.8.0 | Chrome for Testing 131.0.6778.69 | Firefox 132.0.2 |
| Puppeteer v23.7.1 | Chrome for Testing 130.0.6723.116 | Firefox 132.0.1 |
| Puppeteer v23.7.0 | Chrome for Testing 130.0.6723.91 | Firefox 132.0 |
| Puppeteer v23.6.1 | Chrome for Testing 130.0.6723.69 | Firefox 131.0.3 |
| Puppeteer v23.6.0 | Chrome for Testing 130.0.6723.58 | Firefox 131.0.3 |
| Puppeteer v23.5.3 | Chrome for Testing 129.0.6668.100 | Firefox 131.0.2 |
| Puppeteer v23.5.2 | Chrome for Testing 129.0.6668.91 | Firefox 131.0 |
| Puppeteer v23.5.0 | Chrome for Testing 129.0.6668.89 | Firefox 131.0 |
For the complete list of supported browser versions, you can refer to Puppeteer’s official documentation.
What is Cross Browser Testing?
Cross Browser Testing also called as Multi-Browser Testing, ensures that the set of functionalities will be tested across multiple browsers. The main advantage of cross-browser testing is, that it ensures the Application works seamlessly across the browsers without any glitches.
How to perform Cross Browser Testing using Puppeteer?
Puppeteer supports cross-browser testing. The same tests can be executed in Chromium, Chrome, Edge, and Firefox. In this article, we are explaining how to perform cross-browser testing using Pupeteer + Jest framework.
Pre-Requisite:
Let’s consider Simple Testcase
- Navigate to the Browsestack Home page
- Click on Pricing Menu
- Verify All the Plans are listed
Create a new Javascript file and write puppeteer code to verify the above scenario
//demo.test.js
describe('Browserstack Demo', () => {
jest.setTimeout(50000);
beforeAll(async () => {
await page.goto('https://www.browserstack.com/')
})

it('Verify Product Plans Pricing', async () => {
await page.waitForTimeout(1000);
await page.waitForSelector('a[href="/pricing"]');
await page.click('a[href="/pricing"]');
await page.waitForXPath('//div[@id="live-plans"]/div/div[@data-mobile-view="false"]/div/div/div[@class="plan-name"]');
const planList = await page.$x('//div[@id="live-plans"]/div/div[@data-mobile-view="false"]/div/div/div[@class="plan-name"]');
let plan1 = await page.evaluate(el => el.textContent, planList[0])
let plan2 = await page.evaluate(el => el.textContent, planList[1])
let plan3 = await page.evaluate(el => el.textContent, planList[2])
expect(plan1.trim()).toBe('Desktop')
expect(plan2.trim()).toBe('Desktop & Mobile')
expect(plan3.trim()).toBe('Team')
})
})
In this tutorial we are executing the above test case, in multiple browsers without modifying the test script, just modifying the config file
Puppeteer Tests on Chromium Browser
Once you install the Puppeteer npm package, with the above-mentioned framework set up link the puppeteer by default installs the chromium binaries.
Navigate to jest-puppeteer.config.js
Mention the product name as chrome
// jest-puppeteer.config.js
module.exports = {
launch:{
headless:false,
product: 'chrome',
args:['--start-maximized'],
defaultViewport: {width: 1800, height: 1000},
},
}
Execute your test
Execute your test with the below command
npx jest -c ./jest.config.js
Note: If you have configured package.json shortcut you can also use npm run test
Once you Enter the above command, the test starts executing in Chromium Browser
How to Execute Puppeteer Test in Microsoft Edge
As Microsoft Edge is built with Chromium Engine, the Puppeteer supports executing tests in Microsoft Edge
To execute the Puppeteer test in Microsoft Edge, you need to specify the absolute path.
To Execute the puppeteer test in Microsoft Edge, you need to modify jest-puppeteer.config.js.
Add the executable remove the product and add executablePath. Specify the absolute path of Microsoft Edge as below
// jest-puppeteer.config.js
module.exports = {
launch:{
headless:false,
executablePath:'<path_to_edge>',
args:['--start-maximized'],
defaultViewport: {width: 1800, height: 1000},
},
}
//Example Absolute Path


// executablePath: 'C:\\Program Files (x86)\\Microsoft\\Edge\\Application\\msedge.exe'
Step 2: Execute your Puppeteer test using the below command
npx jest -c ./jest.config.js
Note: if you have configured the package.json shortcut you can also use npm run test
How to Execute Puppeteer Test in Google Chrome Browser
As mentioned earlier Puppeteer supports chromium-based browsers so it does support Google Chrome too. Here’s how you can run Puppeteer test in Google Chrome:
Step 1: Open the jest-puppeteer.config.js
Step 2: Remove the product option and add the new value channel: chrome as discussed below.
// jest-puppeteer.config.js
module.exports = {
launch: {
headless: false,
channel: 'chrome',
args: ['--start-maximized'],
defaultViewport: { width: 1800, height: 1000 },
},
}
Alternate Method to Execute Puppeteer Test in Chrome
In the above-mentioned method, we are adding the channel name as chrome. However, alternatively, you can just mention the executable path the same way as you mentioned for Microsoft edge.
// jest-puppeteer.config.js
module.exports = {
launch:{
headless:false,
executablePath:'C:\\Program Files\\Google\\Chrome\\Application\\chrome.exe',
args:['--start-maximized'],
defaultViewport: {width: 1800, height: 1000},
},
Step 3: Execute your Puppeteer test using the below command
npx jest -c ./jest.config.js
Note: If you have configured the package.json shortcut you can also use npm run test
How to Run Puppeteer test in Firefox browser
Puppeteer also supports running tests in the Firefox browser. Puppeteer added firefox support as an experimental feature. Since it’s still an experimental state the test might not behave as expected.
Read More to Learn: How to run Tests in Puppeteer with Firefox
However, you can run the Puppeteer ctest with Firefox or Firefox Nightly build using the steps below:
Run Puppeteer Test with Firefox Nightly build
Change the jest-puppeteer.config.js configuration as described below
// jest-puppeteer.config.js
module.exports = {
launch:{
headless:false,
product:'firefox',
args:['--kiosk'],
defaultViewport: {width: 1800, height: 1000},
},
}
Run Puppeteer Test with Firefox
Method 1:
Change the jest-puppeteer.config.js configuration as described below
// jest-puppeteer.config.js
module.exports = {
launch:{
headless:false,
product:'firefox',
args:['--kiosk'],
defaultViewport: {width: 1800, height: 1000},
},
}
Run Puppeteer Test with Firefox
Method 1:
Change the jest-puppeteer.config.js configuration as described below
// jest-puppeteer.config.js
module.exports = {
launch:{
headless:false,
channel:'firefox',
args:['--kiosk'],
defaultViewport: {width: 1800, height: 1000},
},
}
Method 2:
Instead of the channel, you can also specify the Executable absolute location just like how you have done for Microsoft edge. Like below
// jest-puppeteer.config.js
module.exports = {
launch: {
headless: false,
executablePath: 'C:\\Program Files\\Mozilla Firefox\\firefox.exe',
args: ['--kiosk'],
defaultViewport: { width: 1800, height: 1000 },
},
}
Execute your Puppeteer test
Use the below command to run Puppeteer test
npx jest -c ./jest.config.js
Note: If you have configured the package.json shortcut you can also use npm run test
Puppeteer Cross Browser Testing Using BrowserStack
BrowserStack provides access to 3500+ real devices for testing, so that you can perform Puppeteer Cross Browser testing under real user conditions and get better accuracy in test results.
To run Puppeteer tests on BrowserStack, you just need to modify your jest-puppeteer.config.js using the below steps:
Step 1: Get your AccessKey and Username from BrowserStack Accounts Page.
Step 2: Construct Configuration for BrowserStack
Open jest-puppeteer.config.js, Mention the details as described below
// jest-puppeteer.config.js
const caps = {
'browser': 'edge', // Change the browser name chrome, firefox
'browser_version': 'latest', // Specify browser version
'os': 'windows', // Operating System os x, windows
'os_version': '10', // os version 10, 11 etc. (For windows), big sur, catalina etc. for Mac
'name': 'Puppeteer-jest',
'build': 'puppeteer-jest-build-8',
'browserstack.username': process.env.BROWSERSTACK_USERNAME || 'your_username',
'browserstack.accessKey': process.env.BROWSERSTACK_ACCESS_KEY || 'your_accesskey'
};
module.exports = {
launch: {
headless: false,
defaultViewport: { width: 1800, height: 1000 },
},
browserContext: 'default',
connect: {
browserWSEndpoint: `wss://cdp.browserstack.com/puppeteer?caps=${encodeURIComponent(JSON.stringify(caps))}`,
}
}Note: You can change the configuration, such as browser name, browser name, Operating System, and Operating System version, according to your need.
Finally, Execute your Puppeteer test with the below command
npx jest -c ./jest.config.js
Note: If you have configured the package.json shortcut, you can also use npm run test
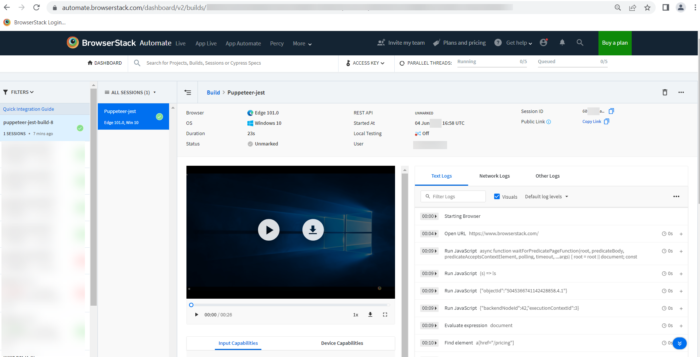
Once Test execution is complete you can navigate to BrowserStack Automate Dashboard, it will show you the detailed result.
Conclusion
Cross browser testing is important for any organization as it ensures that the application works seamlessly across different browsers and operating system combinations. Testing process of a web application is incomplete without performing cross-browser testing. One can’t deny the fact that cross browser and cross platform testing needs high-cost infrastructure when built-in house. Hence, the team has to make a choice between build vs buy by analyzing the Test Automation ROI for the project.
While building an in-house browser farm is very expensive and it even requires a lot of maintenance, players like BrowserStack can be helpful as you can buy a subscription to access its real device cloud with 3500+ devices and browsers.
BrowserStack provides the cloud-based testing infrastructure that eases the challenges related to cost and set up time. You can easily integrate your existing Puppeteer tests and run them under real user conditions for more accurate test results.
Useful Resources for Puppeteer
Understanding Puppeteer:
- Puppeteer Framework Tutorial: Basics and Setup
- How to start with Puppeteer Debugging
- How to install and setup Puppeteer with npm (NodeJS)
- Puppeteer Type Command: How to type a text in input box in Puppeteer
- Cross Browser Testing in Puppeteer: Tutorial
- Understanding Puppeteer Headless
- How to run UI Automation Testing using Puppeteer
- How to capture Lazy Loading Images for Visual Regression Testing in Puppeteer
- How to use Proxy in Puppeteer?
- How to run Tests in Puppeteer with Firefox
- How to Perform Visual Regression Puppeteer
- Handling Alerts and Popups in Puppeteer
- Pyppeteer Tutorial: Guide to Puppeteer in Python (with Examples)
Tools Comparisons:


