Cypress 10 was a major update to the Cypress testing framework implemented in 2022. This update included many significant enhancements and changes in the project structure that simplified developer experiences and improved their testing capabilities. This included standout functionalities like extensive configuration options, component testing, and more.
This guide teaches you how to upgrade and migrate from Cypress Version 9 to Cypress Version 10.
Why Update and Migrate Your Automation Project to Cypress Version 10?
As there are breaking changes in the Cypress 10, if you don’t update the project to align with it, you must continue to use the Cypress version 9 or below.
Cypress doesn’t release any new features or bug fixes to the lower version hence, you will not receive any new features. Also, if any breaking issues and challenges, for whatever reason, you will not be able to resolve them.
So it’s recommended to update and migrate your project to the latest Cypress Version.
Features of Cypress 10
Here are the standout features of Cypress 10:
- Unified Testing Experience: Cypress 10 comes with a unified interface that merges end-to-end testing (E2E) and component testing to reduce the need for separate configurations.
- New Cypress App UI: The redesigned Cypress app delivers an intuitive interface, facilitating easy navigation between test modes and configure settings.
- Project-level Configuration: Cypress 10 introduces centralized configuration options via project-level configuration, which allows test settings to be managed from a single place.
- Improved ‘cy.intercept’: cy.intercept contains additional capabilities, like conditional stubbing, that allow you to customize network request stubs according to conditions, thus enhancing flexibility in test setups.
- Auto-Updating Configuration Files: Cypress 10 lets you auto-update configuration files to retain compatibility with the latest Cypress version, making the upgrade smoother.
How to Update and Migrate Your Test Automation Suite to Cypress 10
Cypress version 10 many unique features and bug fixes released. So, If you update your dependency with Cypress’s version 9 and try to execute without migrating, then your project will not work.
Once you update the Cypress latest version, you need to migrate your existing project. Cypress provides an automatic migration option all you need to do, is the review and add it to your project.
A step-by-step guide to migrating Cypress 9 or below to the latest version of Cypress 10.
Step 1: Update Cypress dependency in your project
The Cypress dependency needs to be updated to migrate your project to version 10. Use the below command to update the Cypress Version.
npm install cypress@latest
Step 2: Open Cypress
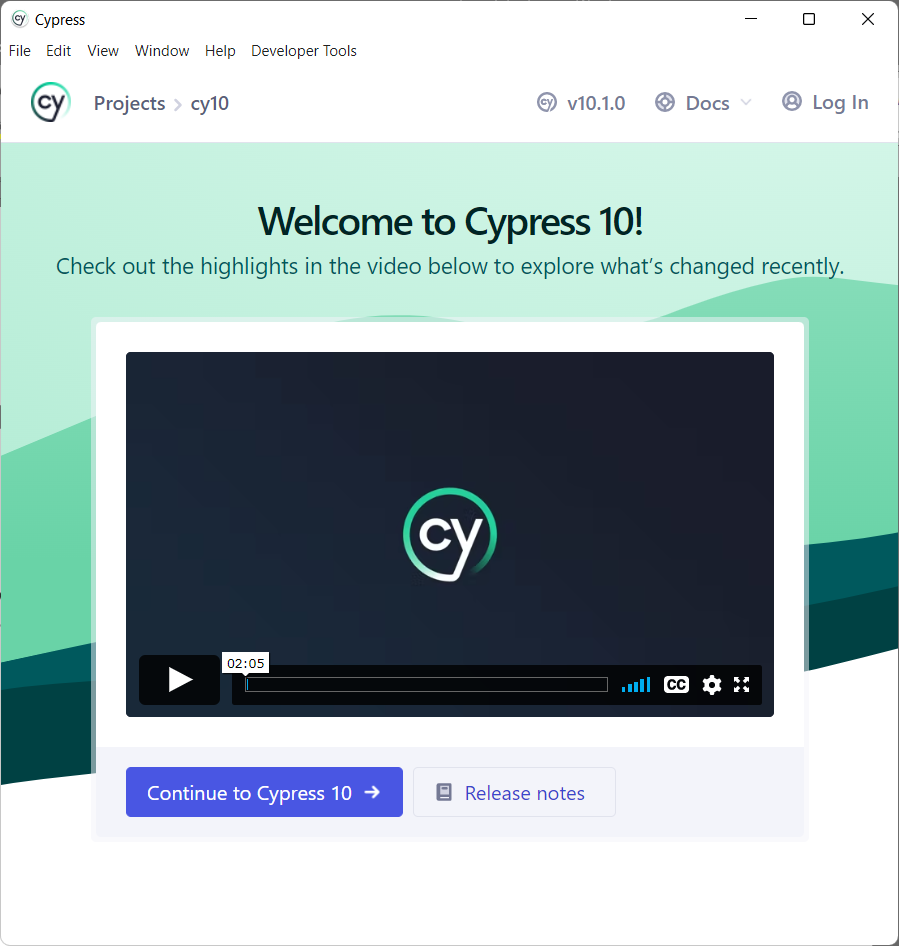
Open the Cypress, which will launch the introduction video. Optionally, you can watch the video and Just click on Continue then.
npx cypress open
Note: Some users are facing errors while executing the above command. If you face any issues, try to reinstall the Cypress using the command npx cypress install –force and then repeat step 2.
Step 3: The new Cypress window opens, watch the video (optional), and click on Continue to Cypress 10
Step 4: Migration Helper window opens up
Once you click on Continue to Cypress 10, the migration helper opens up.
Step 5: Rename existing Specs
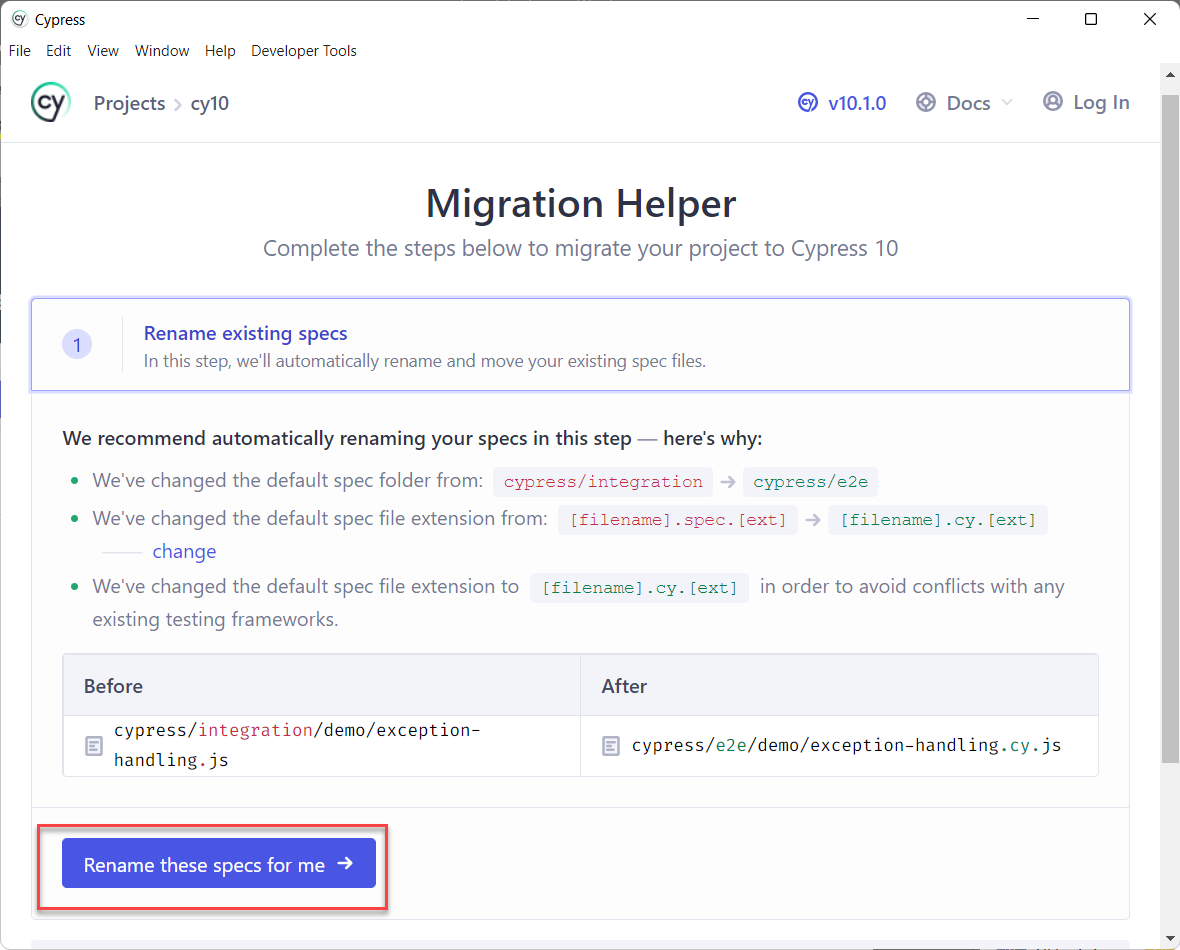
The migration window suggests a change in the spec files folder name from integration to e2e. Next, the naming conventions from xyz.js to xyz.cy.js file.
Click on Rename these specs for me
Step 6: Change the Cypress support file
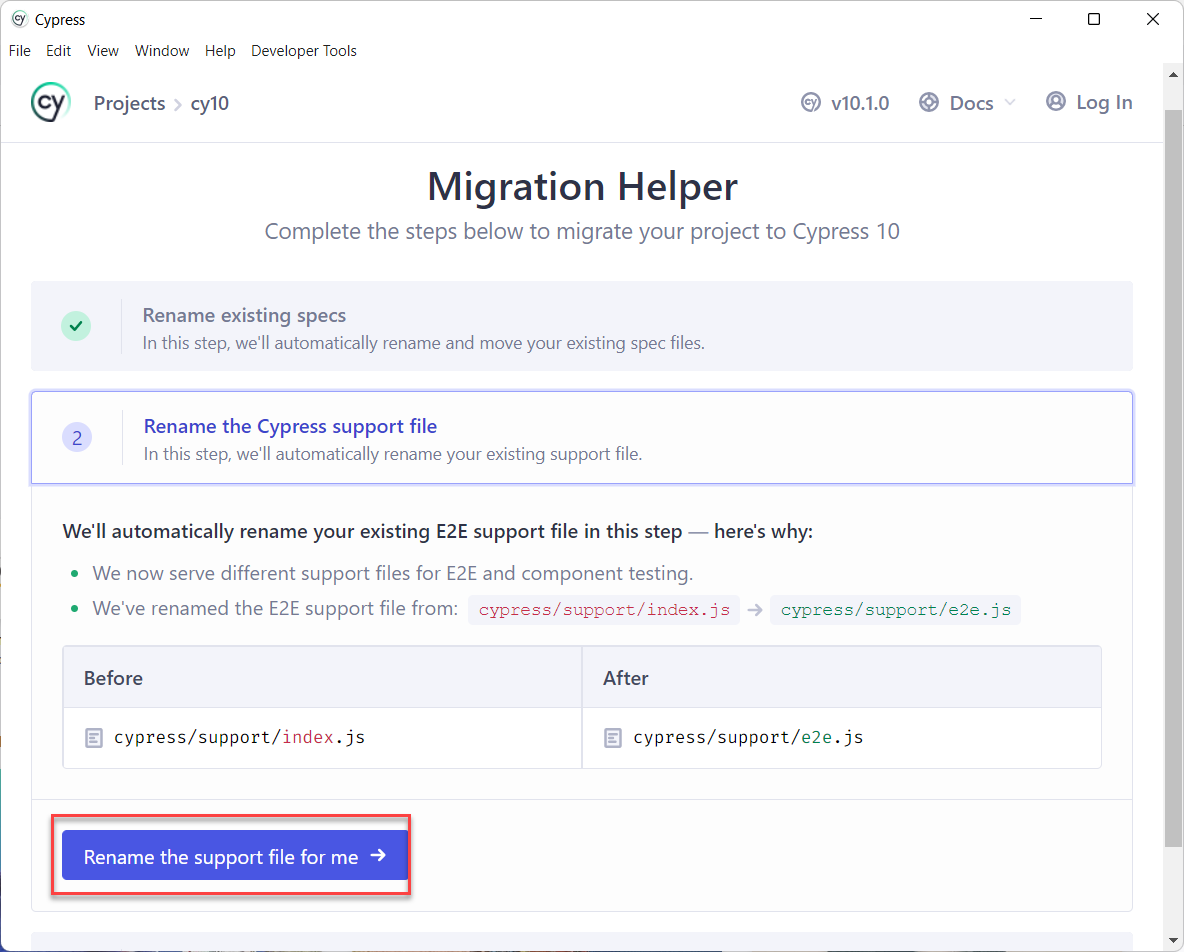
The latest version of Cypress has changed the support files. cypress/support/index.js is changed to cypress/support/e2e.js, so you need to change them accordingly. Click on Rename support file for me, as seen below.
Step 7: Update Configuration Settings
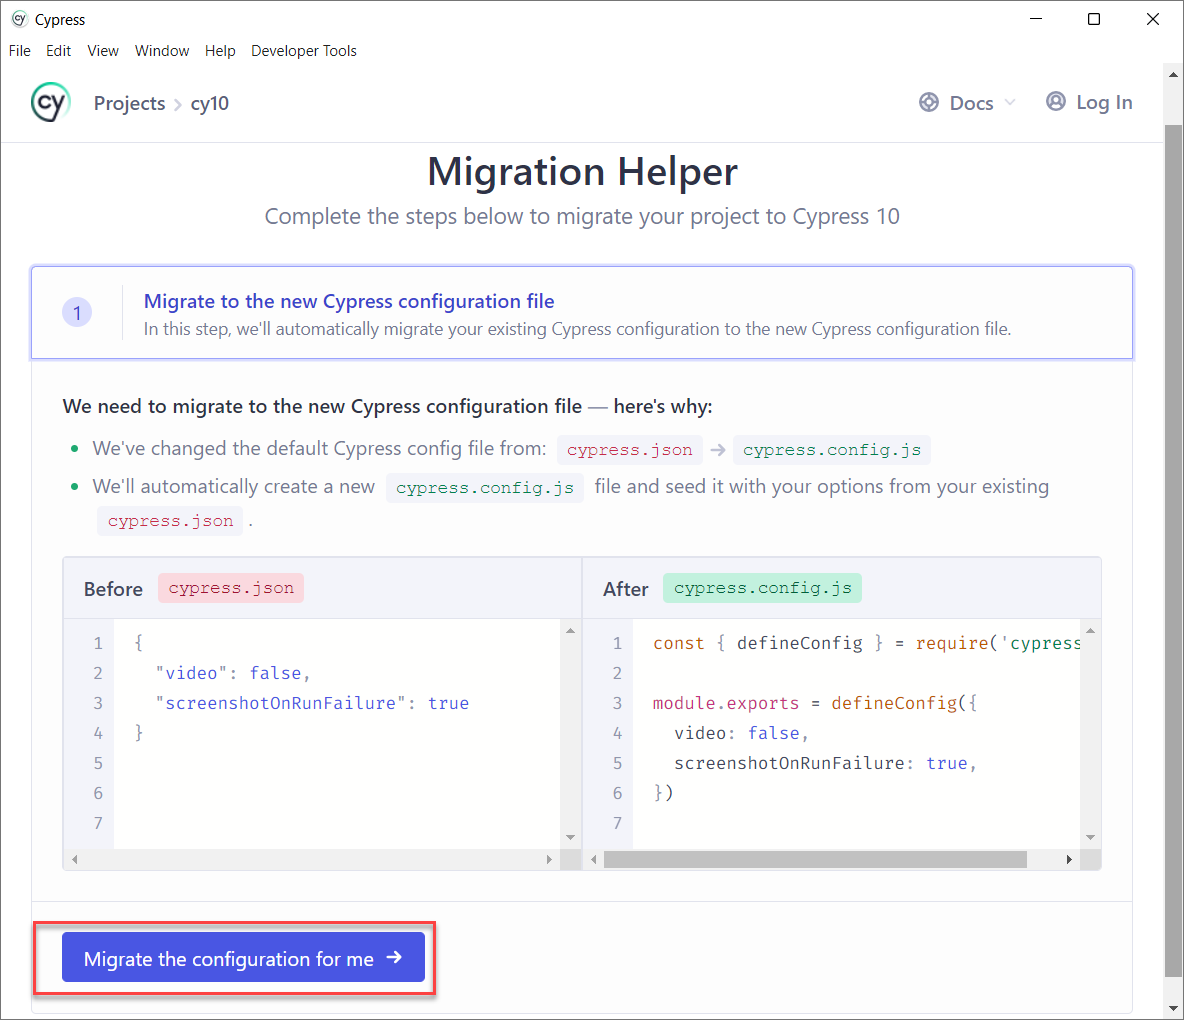
One of the major changes in Cypress’s latest version is the configuration file. The latest version doesn’t support .json extension, and also introduces the dedicated configuration settings for e2e and component testing. However, you don’t have to worry about modifying these. The migration helper makes it for you. To adopt all these changes Click on Migrate the Configuration File For me.
Step 8: Configure End-to-End Tests
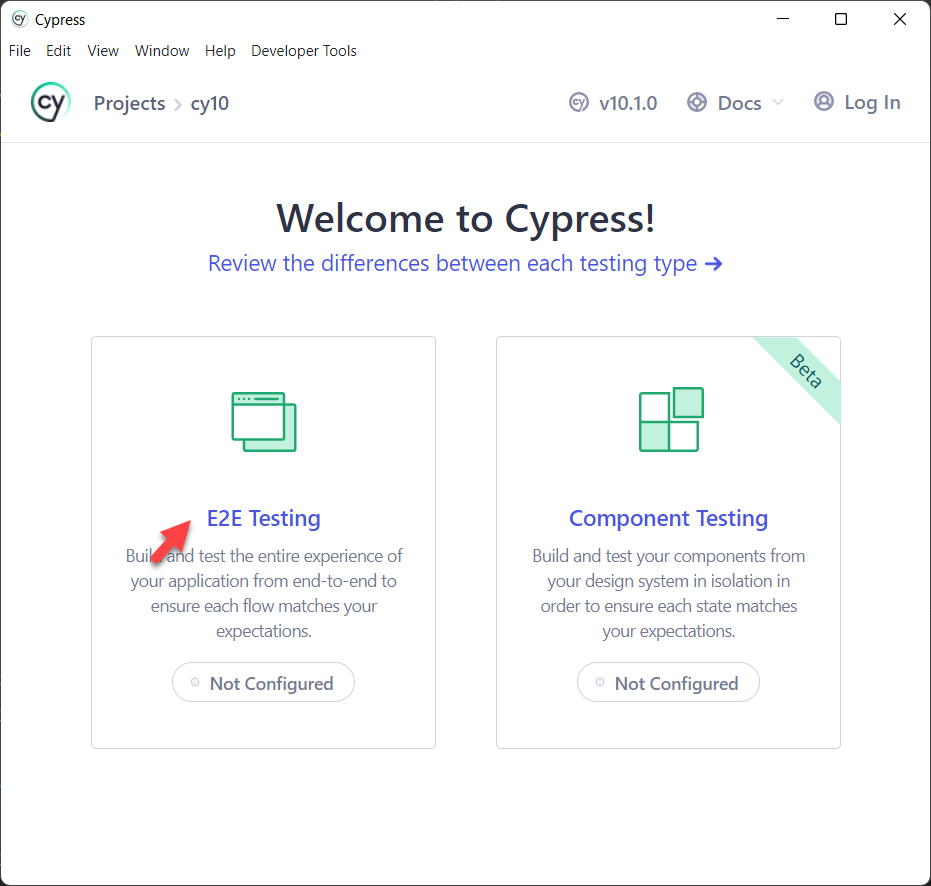
Once you complete the above Tests, you will be landed on the welcome page. Click on the E2E Testing tile to Configure end to end Tests.
Step 9: Review migrated files
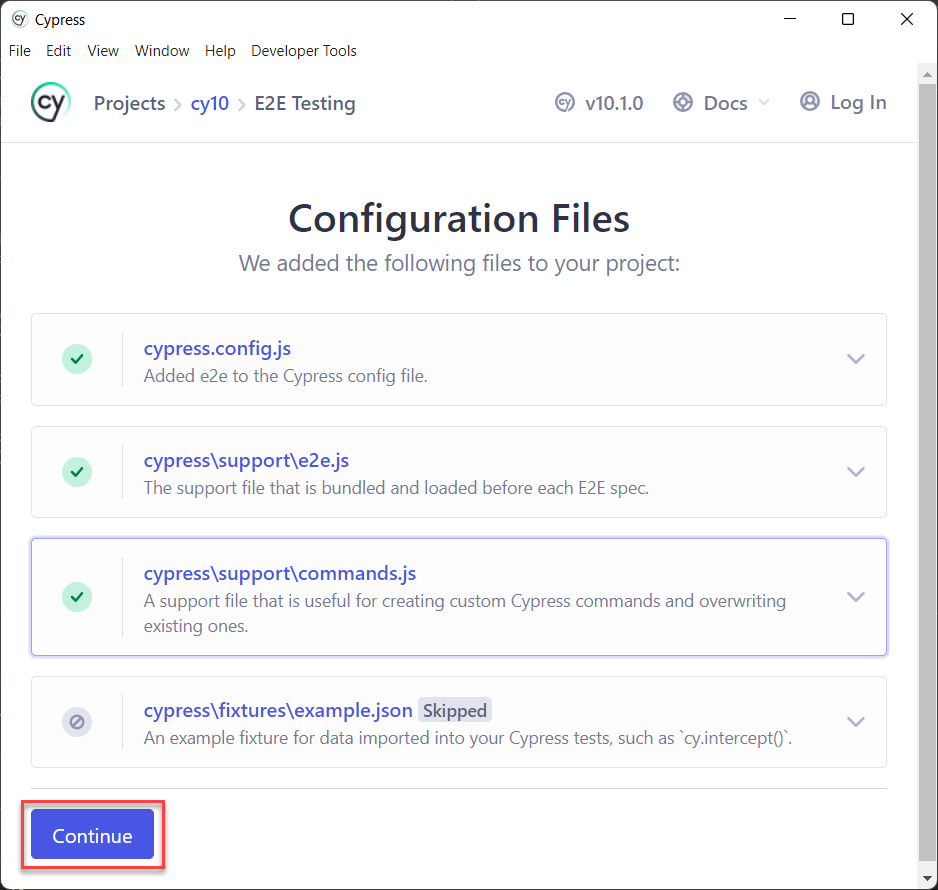
Cypress windows Open up with the Title “Configuration Files”. Now review all the files and folder names, then click on Continue.
Step 10: Select the browser
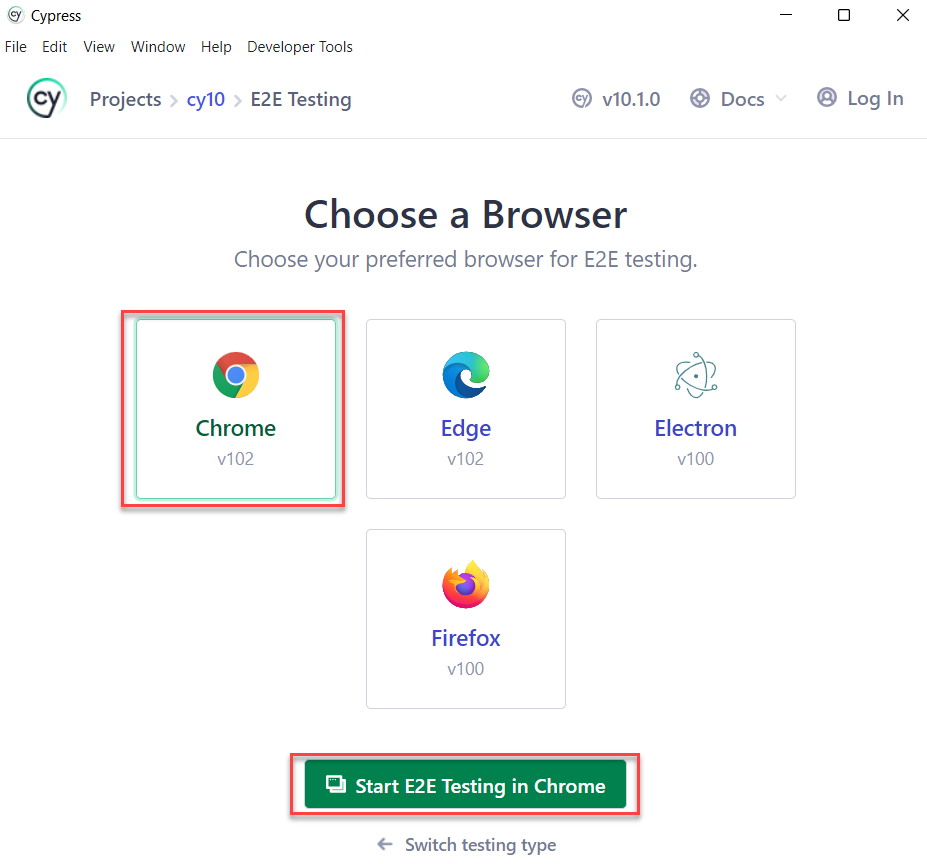
Cypress lists all the installed browsers. Click on the Browser of your choice and Click on Start E2E Testing.
Step 11: Choose Cypress Specs to run tests
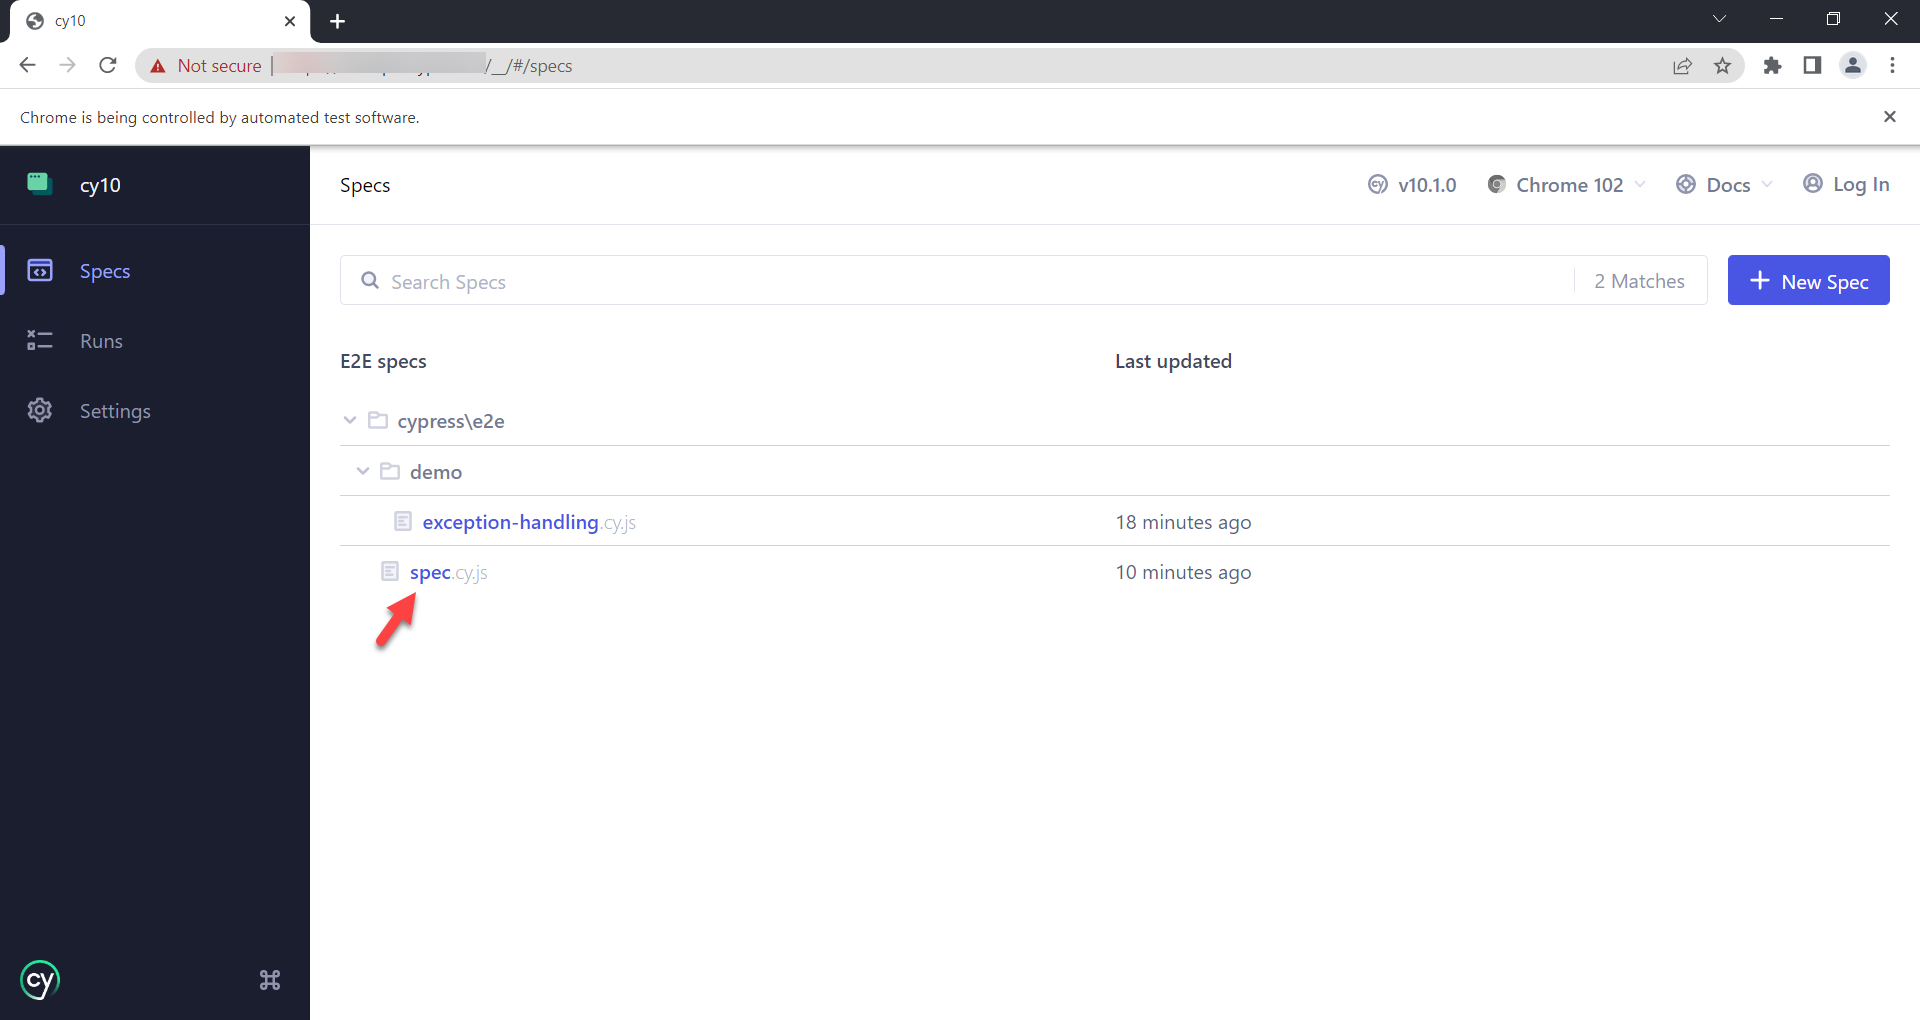
Once the Cypress Specs window opens up, choose the Spec from the available list. Cypress Test runner starts executing tests.
Cypress Command Line (CLI) option changes in Cypress Version 10
Cypress CLI option continues to work the same as before. However, Cypress has introduced new options. As Cypress is now supporting Component and End to End testing, your project might have both types of tests. You can use the CLI commands (provided by Cypress out of the box) based on your need.
- Execute all e2e tests in Cypress CLI
npx cypress run --e2e
- Execute all component tests in Cypress CLI
npx cypress run --component
Cypress Test Automation Best Practices
- If your application is using third-party APIs for login functionality, do not use the UI-based login, instead, use the programmatic way of login. For example, Using API calls.
- Ask your developers to add data-* attributes that help in the stable execution of automation scripts.
- Do not target text content if they are dynamic.
- Choose the best locators. Attributes like class, id, etc., may change dynamically if you are using a modern framework, so choose the best-suited locator for your project.
- If there is code if you want to reuse it in many tests, use it in the before and beforeEach blocks.
- Avoid using static waits (cy.wait()), which may cause slowness in your tests. Instead, wait for the element dynamically.
Why Run Your Cypress Tests with BrowserStack
Here’s why you should use BrowserStack for running your Cypress tests:
- Cross-browser testing: Cypress runs on limited browsers, mainly Chrome-based ones. BrowserStack helps you expand your Cypress tests to many other browsers, such as Safari, Edge, IE, and more.
- Cloud Infrastructure: BrowserStack is a cloud-based platform that doesn’t require setting up or maintaining browsers or physical devices locally.
- Parallel Testing: With parallel testing, you can run multiple Cypress tests concurrently, speeding up test execution and eventually the release cycles.
- Real-device testing: BrowserStack offers you a vast real-device cloud, letting you run Cypress tests on 3500+ real device, browser, and OS combinations, thus allowing you to test under real user conditions.
- Integrations: BrowserStack offers seamless integrations with several CI/CD tools like Jenkins, Travis CI, Circle CI, Bamboo and more.
- Scalability: By supporting real-device and parallel testing on a cloud-based infrastructure, BrowserStack lets you run hundreds of Cypress tests across different environments.
Conclusion
When you launch a product, the user might use any platform and browser of his choice and your application should work seamlessly, irrespective of the platform or browser combination.
Read More: How to run Cypress Tests on Firefox Browser
Though Cypress supports major OS and browsers such as firefox, chrome, and chromium family browsers, you need a supportive infrastructure if you want to execute the tests in different combinations.
This brings up the question of Build vs Buy. Setting up your own infrastructure always involves cost and is difficult to maintain in the long term.
The modern web is moving towards cloud-based options. BrowserStack Automate is one such platform it provides thousands of real devices, multiple operating systems, and browser combinations without any hassles of maintenance anymore. Cypress with BrowserStack is the best choice for the organization to achieve a high-quality result at less cost.
Run Cypress Tests on BrowserStack for free
Useful Resources for Cypress
Understanding Cypress
- Cross Browser Testing with Cypress : Tutorial
- Run Cypress tests in parallel without Dashboard: Tutorial
- Handling Test Failures in Cypress A Comprehensive Guide
- Cypress Test Runner: Tutorial
- Handling Touch and Mouse events using Cypress
- Cypress Automation Tutorial
- CSS Selectors in Cypress
- Performance Testing with Cypress: A detailed Guide
- Cypress Best Practices for Test Automation
- Test React Native Apps with Cypress
- Cypress E2E Angular Testing: Advanced Tutorial
- Cypress Locators : How to find HTML elements
- Maximizing Web Security with Cypress: A Step-by-Step Guide
- Conditional Testing in Cypress: Tutorial
- Cypress Web Testing Framework: Getting Started
- Cypress Disable Test: How to use Skip and Only in Cypress
- What’s new in Cypress 10? How it will change your current testing requirements
Use Cases
- How to Record Cypress Tests? (Detailed Guide)
- How to run your first Visual Test with Cypress
- How to Fill and Submit Forms in Cypress
- How to Automate Localization Testing using Cypress
- How to run Cypress Tests in Chrome and Edge
- How to use Cypress App Actions?
- How to Run Cypress Tests for your Create-React-App Application
- How to Run Cypress Tests in Parallel
- How to handle Click Events in Cypress
- How to Test React using Cypress
- How to Perform Visual Testing for Components in Cypress
- How to run UI tests in Cypress
- How to test redirect with Cypress
- How to Perform Screenshot Testing in Cypress
- How to write Test Case in Cypress: (with testing example)
Tool Comparisons

