Unit testing in React applications using Jest helps you verify that your components work as intended and is bug-free.
Overview
What is Unit testing React with Jest?
Unit testing React with Jest refers to the testing of individual components or functions of a React application in isolation using the Jest testing framework to validate their expected functionality.
What to test in Unit Testing for React Apps?
- Component rendering
- State and props
- Event handling
- Lifecycle methods
Benefits of Unit Testing of React Apps using JEST
- Faster Feedback Loop
- Isolated Testing of Components
- Built-in Test Runner and Assertions
- Snapshot Testing Support:
- Mocking Capabilities
- Enhanced Code Quality and Maintainability
In this guide, you will learn in detail about unit testing of react apps using JEST, covering prerequisites, implementation, benefits, best practices and more.
What is Unit Testing in React?
Unit testing is a type of testing where individual units or components of software are tested. In the context of React applications, a unit could be a React component, a helper function, or any other JavaScript module. The goal is to verify that each unit of the software performs as designed.
What is Unit testing React with Jest?
Unit testing React with Jest refers to testing individual components or functions of a React application in isolation using the Jest testing framework to validate their expected functionality.
It helps verify that each unit (like a button component) performs as intended without relying on other parts of the app.
Why Unit Testing in React is important?
Unit testing is important for several reasons:
- It helps in maintaining code quality and ensuring that modules behave as expected.
- It makes the process of debugging easier and faster.
- It serves as documentation, providing a detailed description of the system’s design and functionality.
What to test in Unit Testing for React Apps?
In a React application, we can test various aspects such as:
- Component rendering: Ensure that the component renders correctly under different conditions.
- State and props: Test the state changes and the props being received.
- Event handling: Check if the events (like click, and input change) are handled correctly.
- Lifecycle methods: Validate if the lifecycle methods are working as expected.
Prerequisite (Project Setup) of React Unit Testing in JEST
Before starting with testing, a project setup is required. Here are the steps for the same:
1. Install Node.js and npm
Node.js is a JavaScript runtime that is required to run React applications. npm (Node Package Manager) is a package manager for Node.js. It can be downloaded and installed from the official Node.js website.
2. Create a new React application
Once Node.js and npm are installed, a new React application can be created using the create-vite command. The following commands can be run in the terminal or command prompt:
npm init vite@latest jest-react-app --template react
This command creates a new directory named jest-react-app with a new React application.
3. Navigate to the project directory
The current directory can be changed to the newly created React application directory:
cd jest-react-app
4. Install Jest and jest-axe
Jest can be installed as a development dependency using the following command:
npm install --save-dev jest jest-axe
5. Verify Installation
The installation of Jest can be verified by running the following command:
npx jest --version
This command should print the installed version of Jest.
6. Install other required dependencies
Install Axios package
npm i axios
7. Setup running environment
a) Run the following command to install dev dependencies:
npm i –save-dev @babel/preset-react @babel/preset-env @testing-library/jest-dom jest-environment-jsdom
b) Create babel.config.js file at the root of the project and paste the following code:
module.exports = {

    presets: [

      [

        '@babel/preset-env',

        {

          targets: {

            node: 'current',

          },

        },

      ],

      '@babel/preset-react', // Adds support for JSX

    ],

    plugins: [],

  };
c) Create jest.config.js file at the root of the project:
module.exports = {

   testEnvironment: "jsdom",

    transform: {

      '^.+\\.(js|jsx|ts|tsx)$': 'babel-jest',

    },

    setupFilesAfterEnv: ['@testing-library/jest-dom'],

  };
d) Update package.json
Add “test” command in the package.json file,
"scripts": {

                     //other scripts

                   "test": "jest"

                  },
How to perform Unit testing of React Apps using JEST?
Unit testing involves creating test cases for components and running them using Jest. Here are the high-level steps:
- Identify what to test: Determine the functionality that needs to be tested. This could be a function, a component, or an entire feature.
- Write the test: Write a test that checks if the identified functionality works as expected. This involves setting up the necessary environment, executing the functionality, and checking the result.
- Run the test: Use Jest to run the test and check if it passes or fails.
- Analyze the result: If the test fails, analyze why it failed and fix the issue. If it passes, move on to the next functionality to test.
React Testing Library is a lightweight solution for testing React components. It provides simple and complete React DOM testing utilities that encourage good testing practices. The main utilities involve querying for nodes in a way that’s similar to how users would find them. This means tests will be more maintainable and resilient to component structure or styling changes.
Here’s an example of a simple test case using Jest and the React Testing Library:
import React from 'react';

import { render, screen } from '@testing-library/react';

import App from './App';


test('renders learn react link', () => {

  render(<App />);

  const linkElement = screen.getByText(/learn react/i);

  expect(linkElement).toBeInTheDocument();

});
This test checks if the App component renders a link with the text ‘learn react’. This is a simple example of how the React Testing Library can be used with Jest to write unit tests for React applications.
Mocking Data in React Unit Testing with Jest
Mocking in unit testing is like using stand-ins or substitutes for the real parts of your code. This helps you control and check how these parts behave during testing, making your tests more dependable and easier to handle.
Jest, a testing tool, has built-in features that let you create these substitutes for any part of your code, from simple functions to complex parts. This is especially handy when you’re testing parts of your code that need data from outside sources like APIs.
Here’s an example of how to mock data with Jest in a React application:
Consider a User component that fetches user data from an API when it’s mounted:
// User.js

import React, { useEffect, useState } from 'react';

import axios from 'axios';


const User = () => {

  const [user, setUser] = useState(null);


  useEffect(() => {

    const fetchData = async () => {

      const response = await axios.get('https://api.example.com/user');

      setUser(response.data);

    };


    fetchData();

  }, []);


  if (!user) {

    return 'Loading...';

  }


  return <div>{user.name}</div>;

};


export default User;
Now, let’s write a test for this component, mocking the axios module to control the data that’s returned by the API:
// User.test.js

import React from 'react';

import { render, screen, waitFor } from '@testing-library/react';

import axios from 'axios';

import User from './User';


// Mocking axios module

jest.mock('axios');


test('fetches and displays user data', async () => {

  // Create a mock response

  const mockResponse = { data: { name: 'John Doe' } };

  axios.get.mockResolvedValue(mockResponse);


  // Render the User component

  render(<User />);


  // Check if the mocked response is used in the component

  const userNameElement = await waitFor(() => screen.getByText(/John Doe/i));

  expect(userNameElement).toBeInTheDocument();

});
In this test, the axios module is mocked using jest.mock(). Then, a mock response is created and axios.get is set to return this mock response when called. The User component is then rendered, which is expected to call axios.get and use the returned data. Finally, it’s checked if the user name from the mock response is present in the document.
Code Coverage during React Unit Testing using Jest
Code coverage is a measure of the extent of code that is covered by tests. It’s a useful metric that can help understand the degree to which the application is tested. Jest can generate a code coverage report by adding the –coverage flag to the test command.
Here’s how the code coverage for the User component test from the previous example can be found:
1. Update the test command:
In the package.json, add the test command in the scripts section.
"scripts": {

  "test": "jest --coverage",

  // other scripts...

}
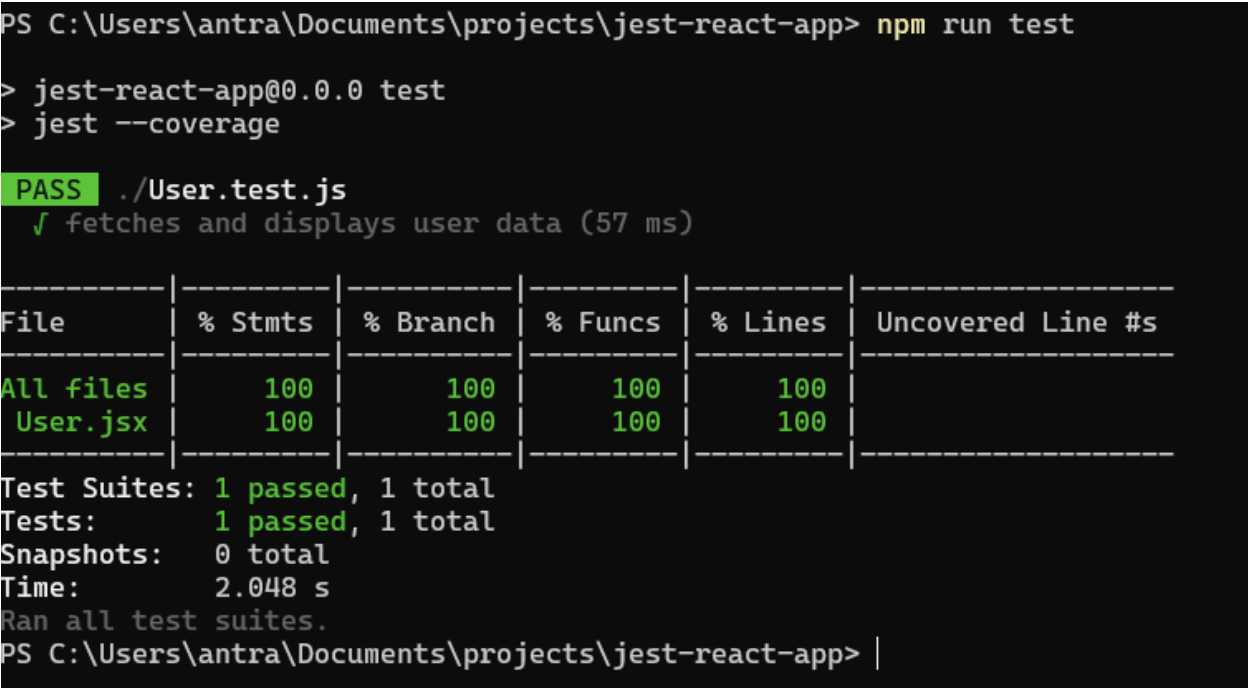
2. Run the tests:
The tests can be run with the updated command:
npm run test
3. Check the coverage report:
After the tests have run, Jest will output a code coverage report in the terminal. This report will show the percentage of the code that is covered by tests.
Performance Optimization in React Unit Testing
Performance optimization in testing refers to improving the speed and efficiency of your test suite. Here are some strategies that can be used to optimize the performance of tests:
- Avoid unnecessary rendering: In React, unnecessary rendering can slow down your tests. Make sure to only render the components that are necessary for the test.
- Use shallow rendering: Shallow rendering is a feature provided by libraries like enzyme that renders a component “one level deep” and prevents unnecessary rendering of child components.
- Mock out heavy dependencies: If your component depends on other components or modules that are heavy or slow (like network requests), consider mocking them out using Jest’s mocking features.
- Run tests in parallel: Jest runs tests in parallel by default, which can significantly speed up the test suite. Make sure your tests are not dependent on each other, so they can run in any order.
- Limit the number of snapshots: While snapshot tests can be useful, they can also slow down your test suite and make it harder to maintain if overused. Consider limiting the number of snapshot tests, and prefer explicit assertions whenever possible.
Accessibility Testing in React using Jest Axe
Accessibility testing ensures that your application is usable by all people, including those with disabilities. Jest Axe is a library that integrates with Jest and allows you to run accessibility checks on your React components using the Axe accessibility testing engine.
Here’s an example of how to use Jest Axe for accessibility testing:
//Input.js

import React from 'react';

import PropTypes from 'prop-types';


const Input = ({ label, ...props }) => {

  return (

    <div>

      <label htmlFor="input-field">{label}</label>

      <input id="input-field" {...props} />

    </div>

  );

};


Input.propTypes = {

  label: PropTypes.string.isRequired,

};


export default Input;


//Input.test.js

import React from 'react';

import { render } from '@testing-library/react';

import { axe, toHaveNoViolations } from 'jest-axe';


import Input from './Input';


// Add a Jest matcher to check for accessibility violations

expect.extend(toHaveNoViolations);


test('Input component should have no accessibility violations', async () => {

  const { container } = render(<Input label="Test input" />);

  const results = await axe(container);


  // Assert that there are no accessibility violations

  expect(results).toHaveNoViolations();

});
In this test, the Input component is rendered with a label. Then, the axe function from jest-axe is used to run accessibility checks on the rendered component. Finally, the toHaveNoViolations matcher from jest-axe is used to assert that there are no accessibility violations.
Common Challenges and Solutions of Testing React Apps with Jest
Given below are the challenges of testing React Apps with Jest and ther solutions:
1. Testing behavior that depends on hooks can be tricky, especially when it comes to effects and asynchronous updates.
Solution: Use utilities from React Testing Library like waitFor and act()
import { waitFor } from '@testing-library/react';2. React components can rely on external APIs or services. Testing these without real calls is crucial.
Solution: Leverage jest.mock() to mock modules, functions, or network calls.
jest.mock('../api/fetchUser');3. Tests may fail or pass inconsistently if async operations aren’t managed correctly.
Solution: Use async/await, waitFor, or findBy* queries to handle async behavior properly.
4. Snapshots can fail even for small, intentional UI changes.
Solution: Update snapshots only when changes are intentional via u key in watch mode or:
jest -u
Advanced Testing Techniques [With Example]
Here are the advanced testing techniques that can used for unit testing of React Apps using Jest:
Snapshot testing:
Snapshot testing captures the rendered output of a React component and saves it as a snapshot file. During later test runs, Jest compares the current output to the saved snapshot to spot unexpected UI changes.
// Button.js

const Button = ({ label }) => <button>{label}</button>;

export default Button;
// Button.test.js
import React from 'react';
import { render } from '@testing-library/react';
import Button from './Button';
test('renders Button correctly', () => {
const { asFragment } = render(<Button label="Click Me" />);
expect(asFragment()).toMatchSnapshot();
});In the first run, the output is saved by Jest. Later, if the output changes, the test will fail
Testing Props and State
This technique verifies a component’s behavior when different props are passed or its internal state changes. It sees to it that the component responds properly to different input scenarios and updates as expected.
// Counter.js

import { useState } from 'react';

const Counter = () => {

  const [count, setCount] = useState(0);

  return (

    <div>

      <p data-testid="count-value">{count}</p>

      <button onClick={() => setCount(count + 1)}>Increment</button>

    </div>

  );

};

export default Counter;
// Counter.test.js
import React from 'react';
import { render, fireEvent } from '@testing-library/react';
import Counter from './Counter';
test('increments counter on click', () => {
const { getByText, getByTestId } = render(<Counter />);
fireEvent.click(getByText('Increment'));
expect(getByTestId('count-value').textContent).toBe('1');
});This checks if the component’s state (count) updates correctly when the button is clicked.
Benefits of Unit Testing of React Apps using JEST
Here are the benefits of unit testing React apps using Jest:
- Faster Feedback Loop: Since Jest is optimized for speed, teams can execute test rapidly and quickly identify and fix issues.
- Isolated Testing of Components: Unit tests focus on individual functions or components. Thus, you can ensure that each component of the app functions as expected.
- Built-in Test Runner and Assertions: Jest is a comprehensive testing framework that has a test runner, assertion library, and mocking capabilities. You don’t have to integrate multiple libraries as Jest works out of the box.
- Snapshot Testing Support: Jest offers snapshot testing to help spot unexpected UI changes.
- Mocking Capabilities: Jest facilitates easy mocking of functions, modules, and API calls, driving controlled testing of components in isolation.
- Enhanced Code Quality and Maintainability: Unit tests with Jest ensure code works as expected and encourage clean, modular code. This makes it easier to refactor components without breaking functionality.
Best Practices for testing React Apps with JEST
Here are the best practices for testing React app with Jest:
- Write clear, descriptive test cases.
- Test the component behavior, not implementation details.
- Keep tests isolated and independent of each other.
- Regularly update tests when updating component functionality.
Conclusion
Unit testing is a vital part of software development. It ensures code works as expected and helps maintain high-quality standards. With Jest and React, comprehensive unit tests can be written that help build robust, reliable web applications.
By integrating with tools like BrowserStack, teams can also test their React components across real browsers and devices, ensuring consistent performance and UI behavior in real-world conditions.
Frequently Asked Questions
1. Is Jest for unit testing or integration testing?
Jest is mainly used for unit testing, but it supports integration testing and basic end-to-end testing too.
2. How do you skip unit test in Jest?
You can use .skip modifier on a test to skip unit test in Jest
test.skip('should not run this test', () => {

  // This code will not run

  expect(true).toBe(false);

});
Useful Resources for Jest
- How to Debug Jest Tests?
- Understanding Jest Mock Hook
- How to Configure Jest
- it.each function in Jest
- Snapshot Testing with Jest
- How to write Snapshot Tests for React Components with Jest?
- How to Run Jest Tests for a Specific File/Folder
- Jest Framework Tutorial: How to use it?
- Understanding Testing Library Jest DOM
- Understanding Jest-Globals
- Unit Testing of React Apps using JEST : Tutorial
- How to test React App using Jest
- Understanding Jest beforeEach Function
- Performing NodeJS Unit testing using Jest
- Jest vs Mocha: Comparing NodeJS Unit Testing Frameworks
- Jest vs Mocha vs Jasmine: Which JavaScript framework to choose?


