Multiple teams in BrowserStack Enterprise
Learn how to assign multiple teams to users, and switch between multiple teams in BrowserStack Enterprise.
In BrowserStack Enterprise, you can create Teams within your organization and assign users to teams based on your business or client structure. With the Multiple Teams feature, you can assign users to more than one team within the same organization. Although users may belong to multiple teams, they can only view and access data for one active team at a time.
This multiple teams feature is in beta and available to some customers.
Teams concepts
BrowserStack Enterprise supports multiple team associations for each user:
- Primary team: The main team that governs the member’s resource allocation. For instance, If you belong to Team A (Primary) and Team B (Additional), Your license allocation is deducted from Team A, regardless of what Team B has. This ensures that quotas are not double-counted across multiple teams.
-
Additional teams: You can assign multiple teams to a user beyond their primary team. This allows users to collaborate across different teams within your organization.
- Do not override the primary team’s resource allocation. For example:
- A tester’s primary = Mobile QA (where their license allocation comes from),
- Additional team = Web QA + Automation Team (so they can access those teams’ projects and data).
- Their license allocation still comes only from Mobile QA.
- Do not override the primary team’s resource allocation. For example:
- Active team: This is the team on which you are currently working on. You can select an active team from a list of all the teams you are part of. After you select a team, BrowserStack displays only the data specific to that team for the product you use.
- Only an Admin or Owner can assign a primary team and additional teams to a user.
- A user can belong to only one active team at a time.
- The above concepts do not apply to users assigned to an Organization.
Assign teams while inviting users
You can assign users to a primary team and also add them to additional teams.
- Go to User Management and select Invitations from the sidebar.
- In the Send invitation email section, enter the email addresses of users you want to invite. You can invite multiple users at once, separated by commas.
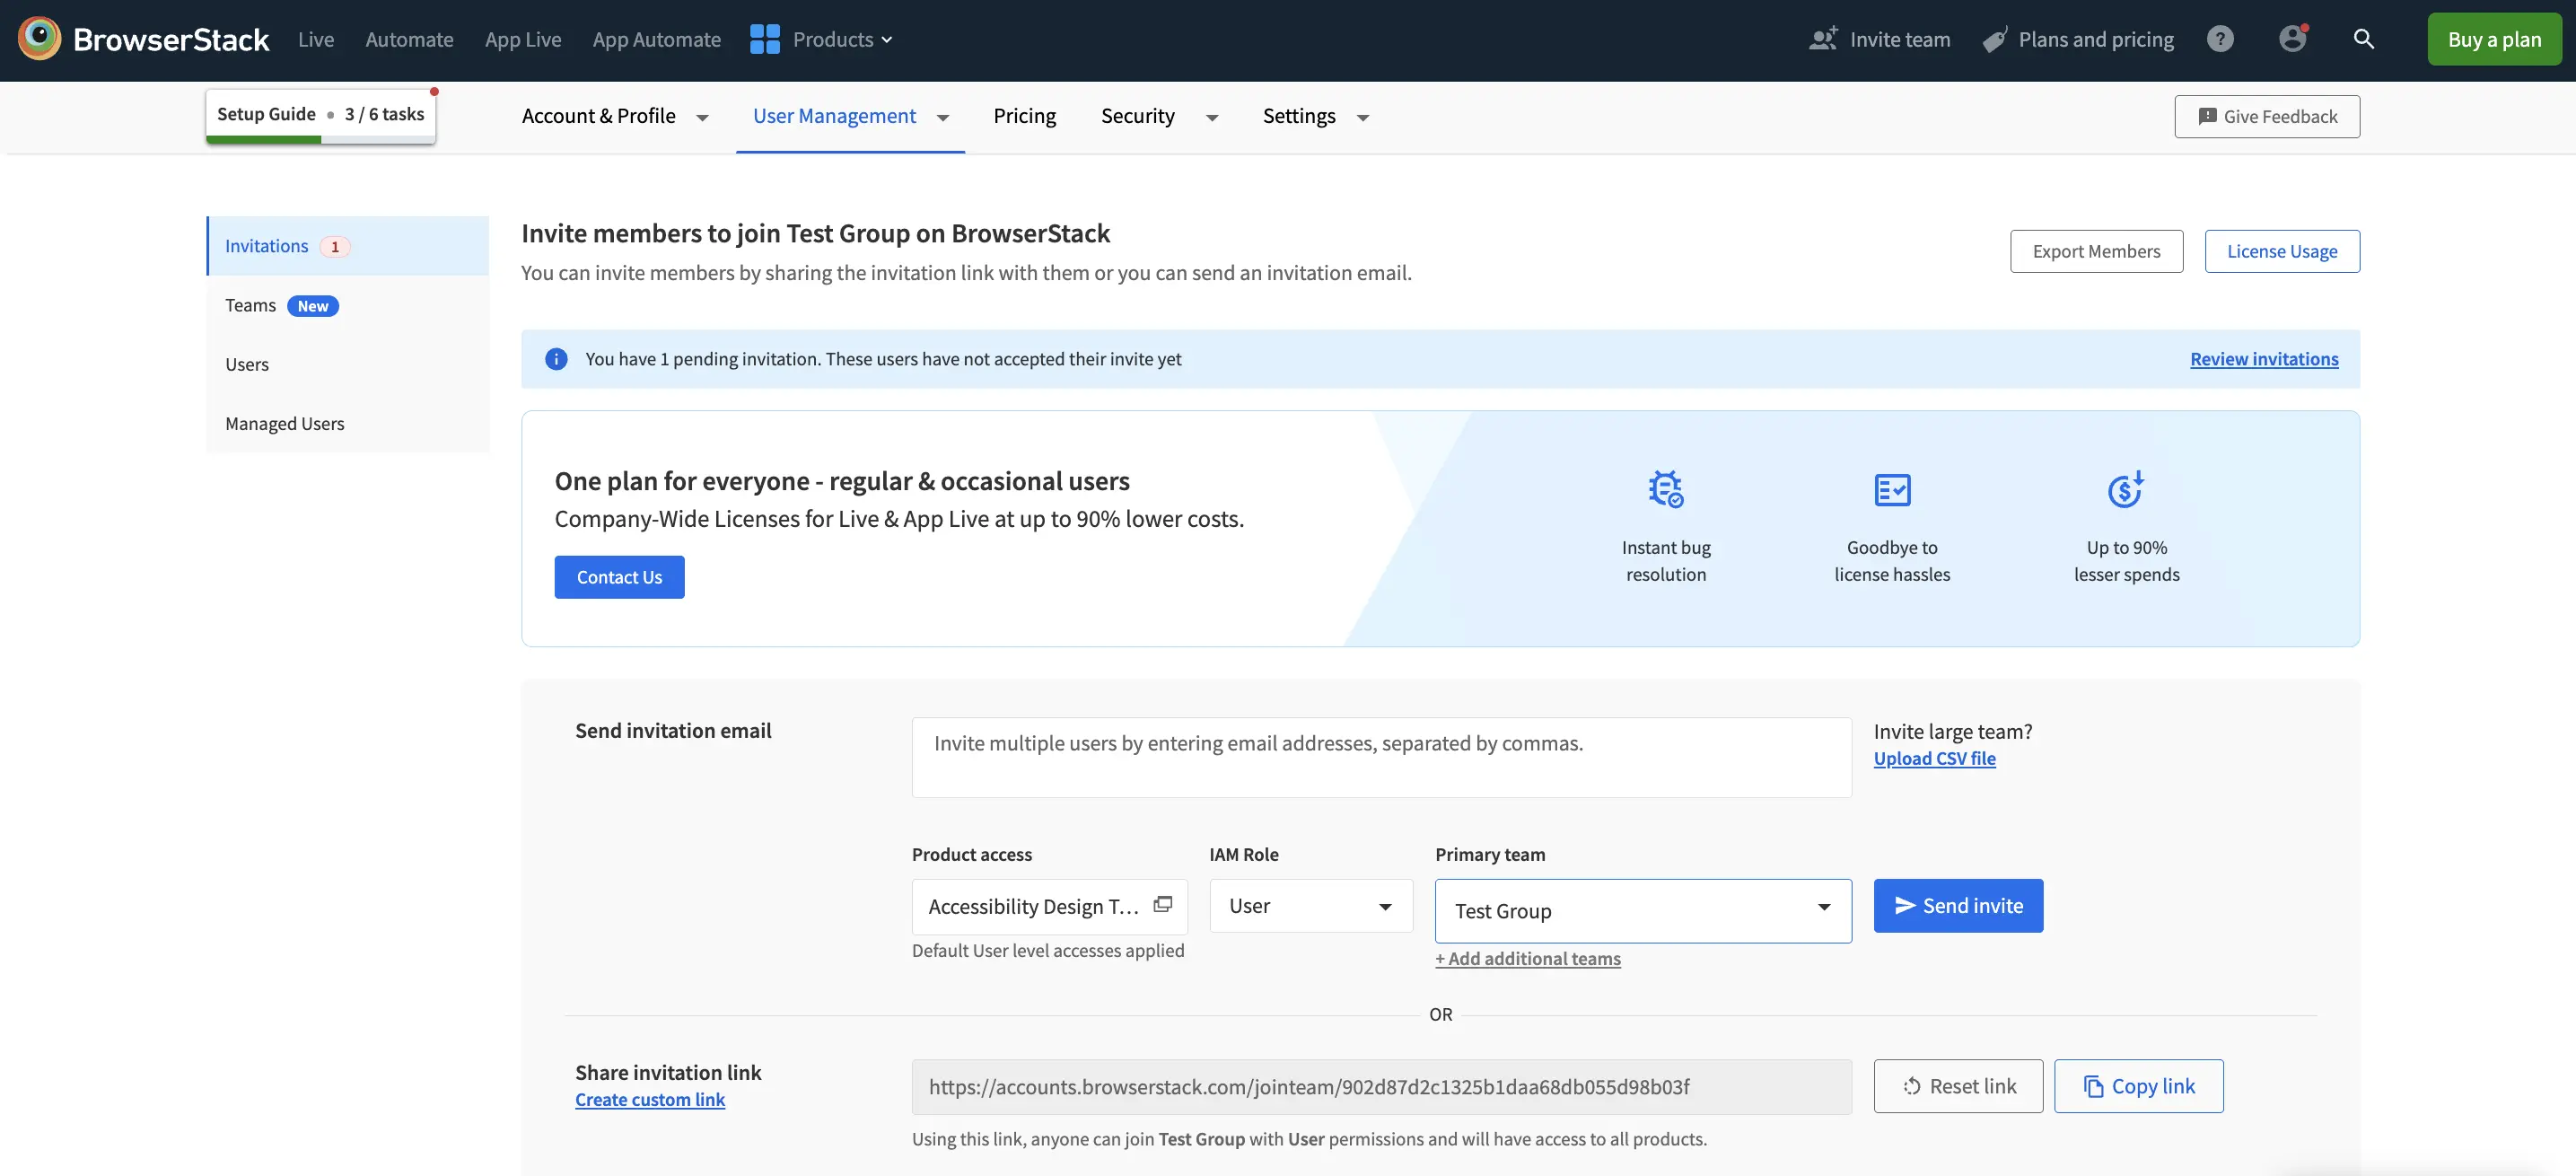
- Select the Product access & roles and choose the IAM Role for the invited users.
- Use the Primary team dropdown to assign the main team for each user. You can select from available teams.
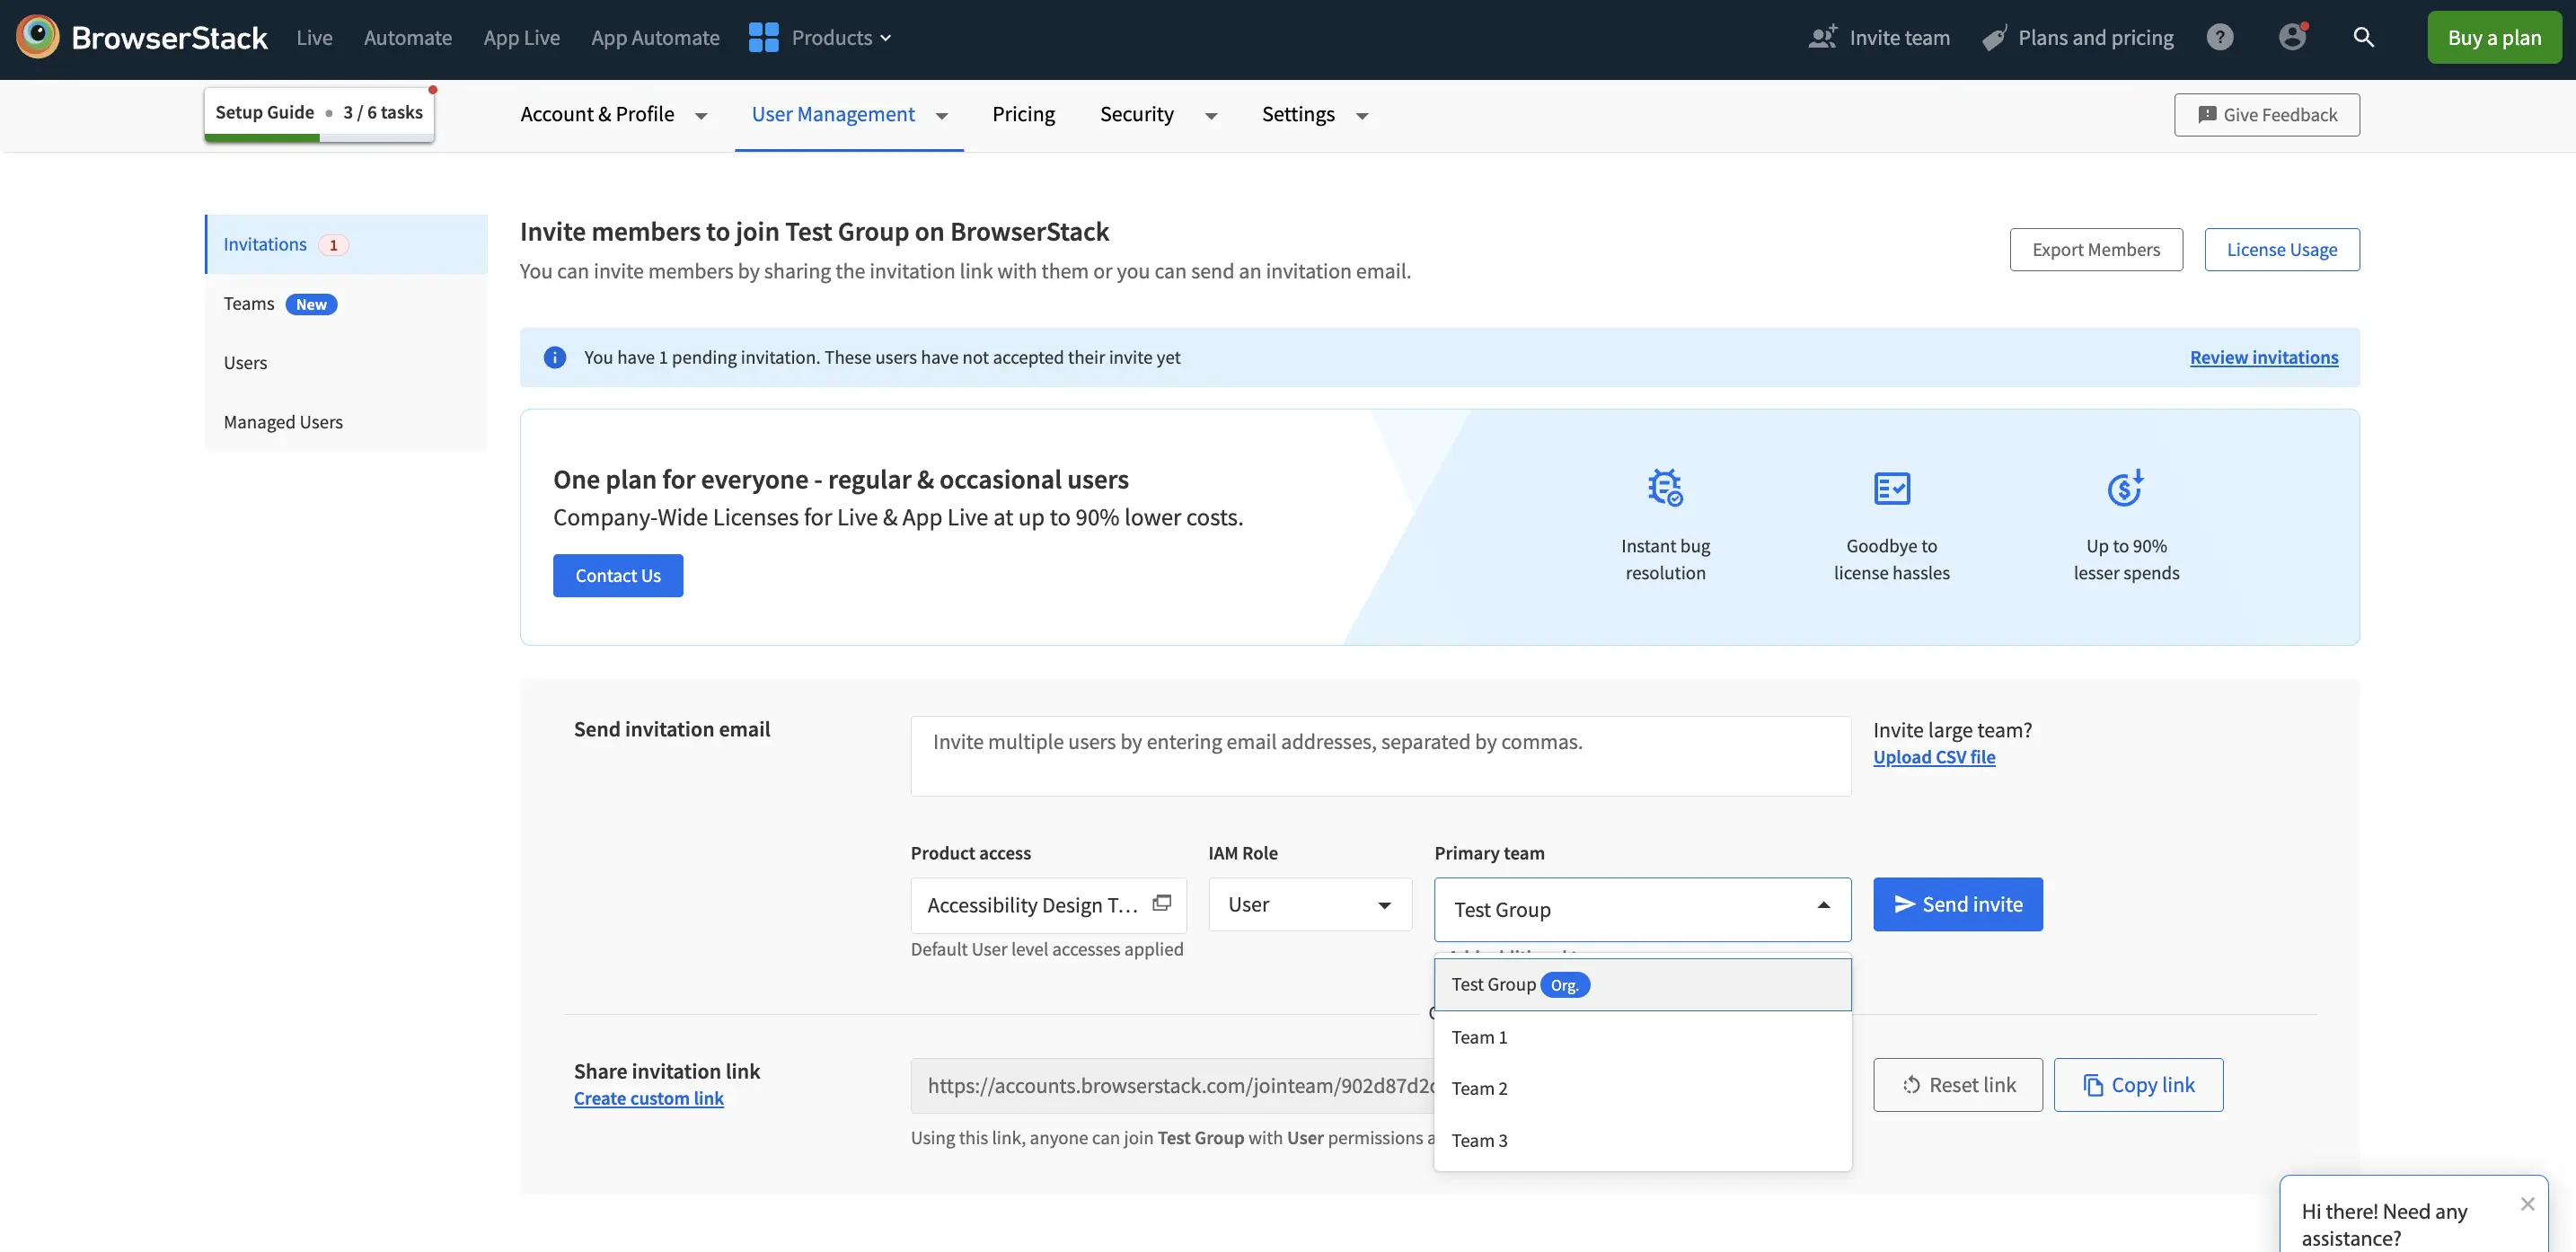
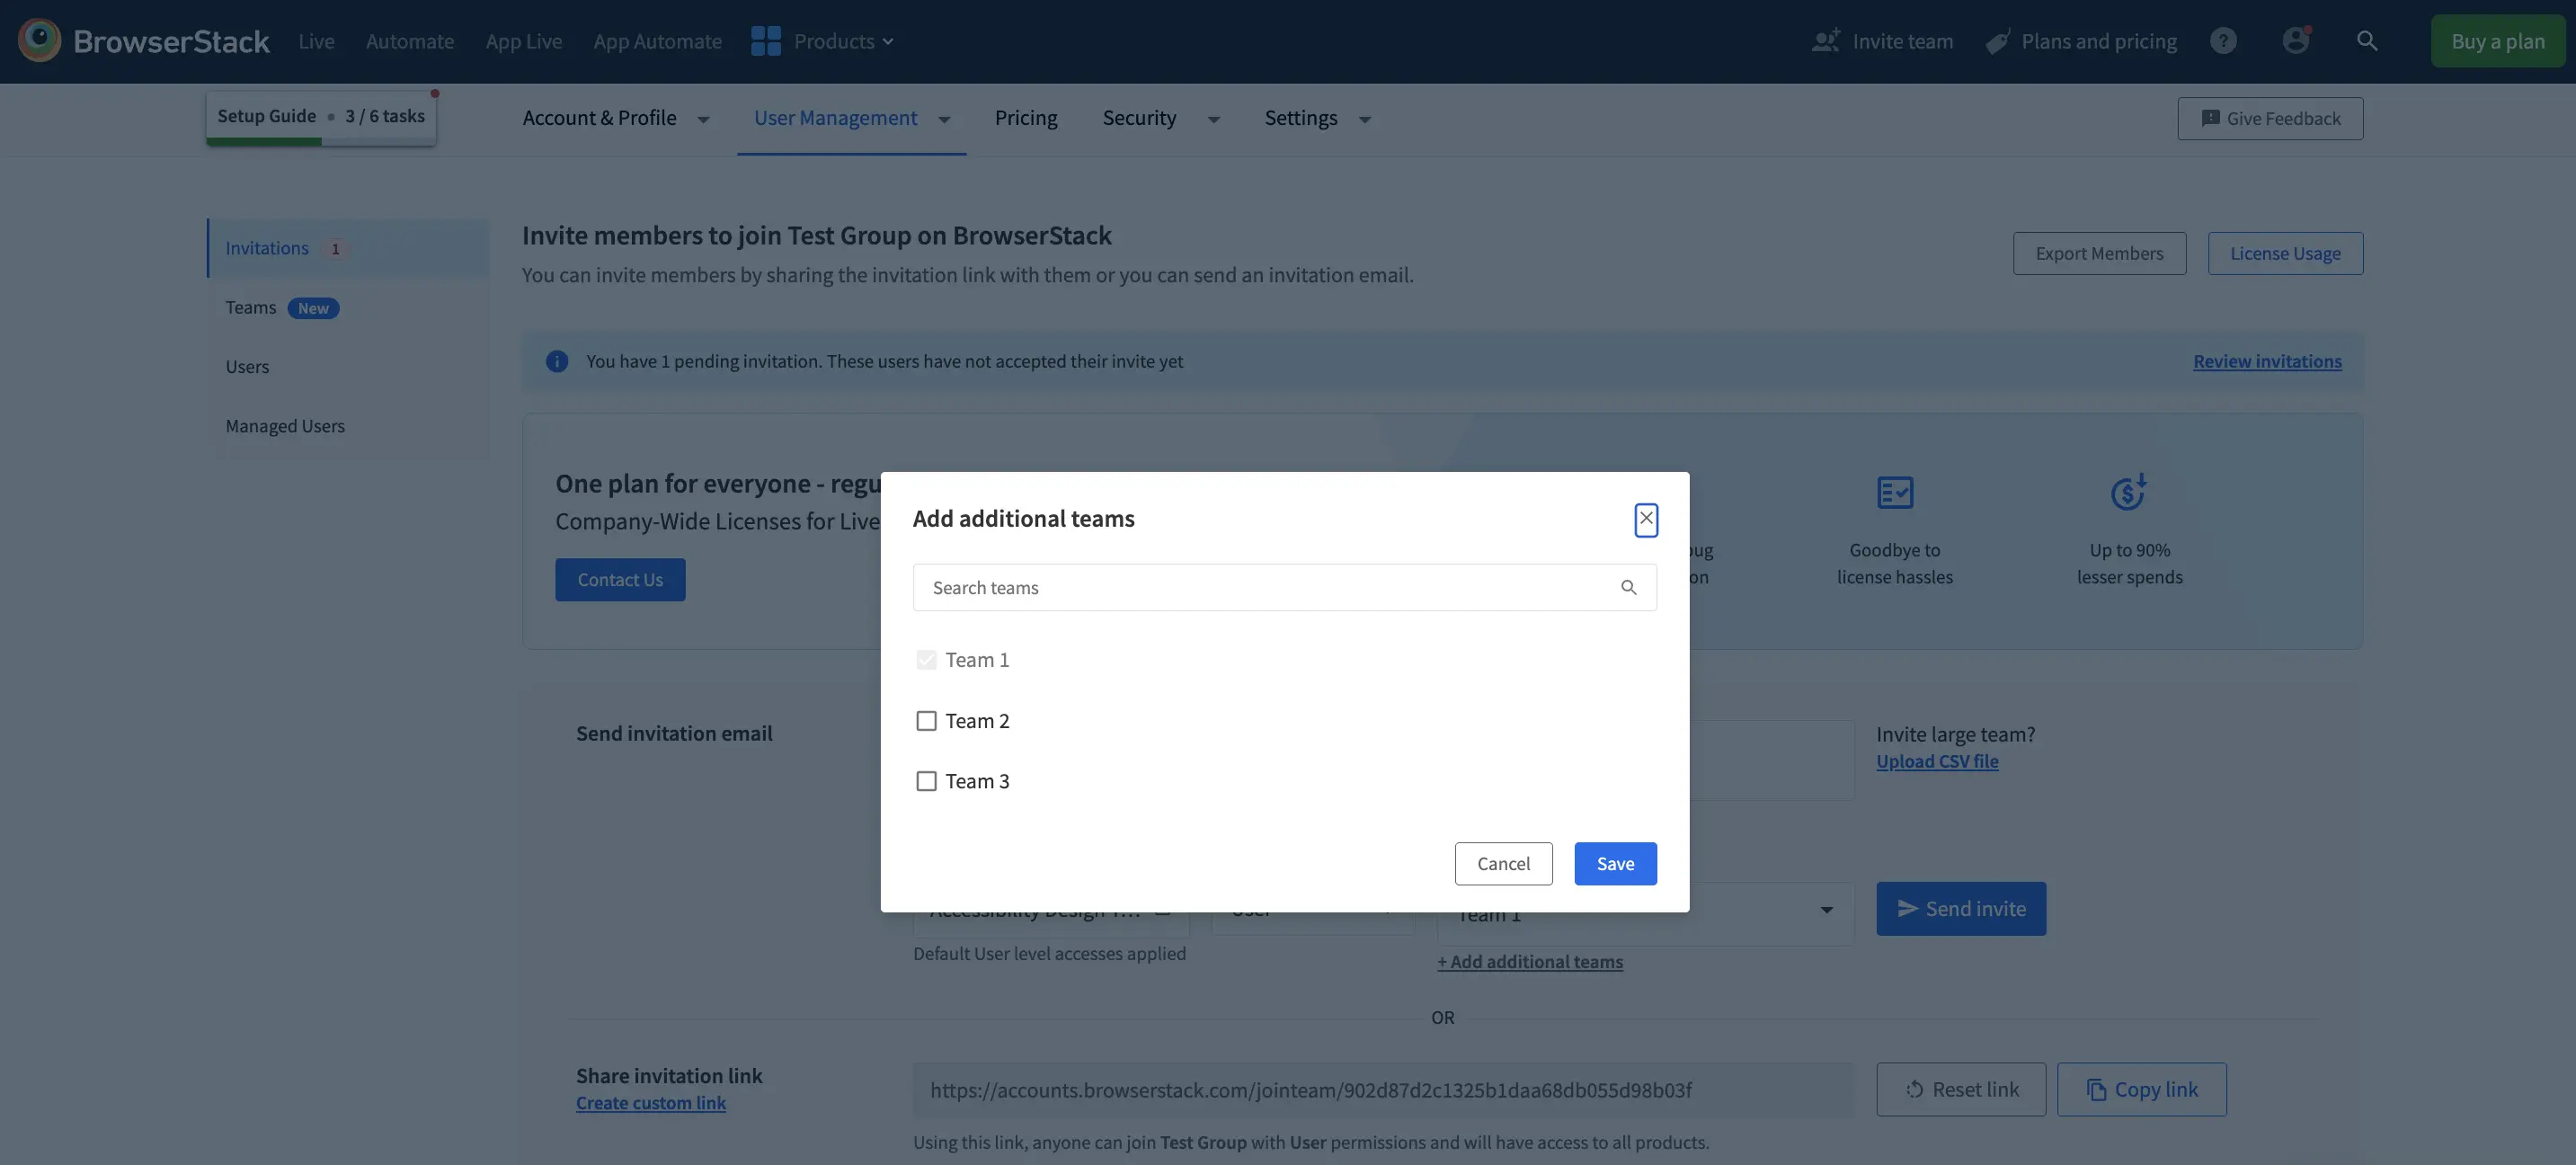
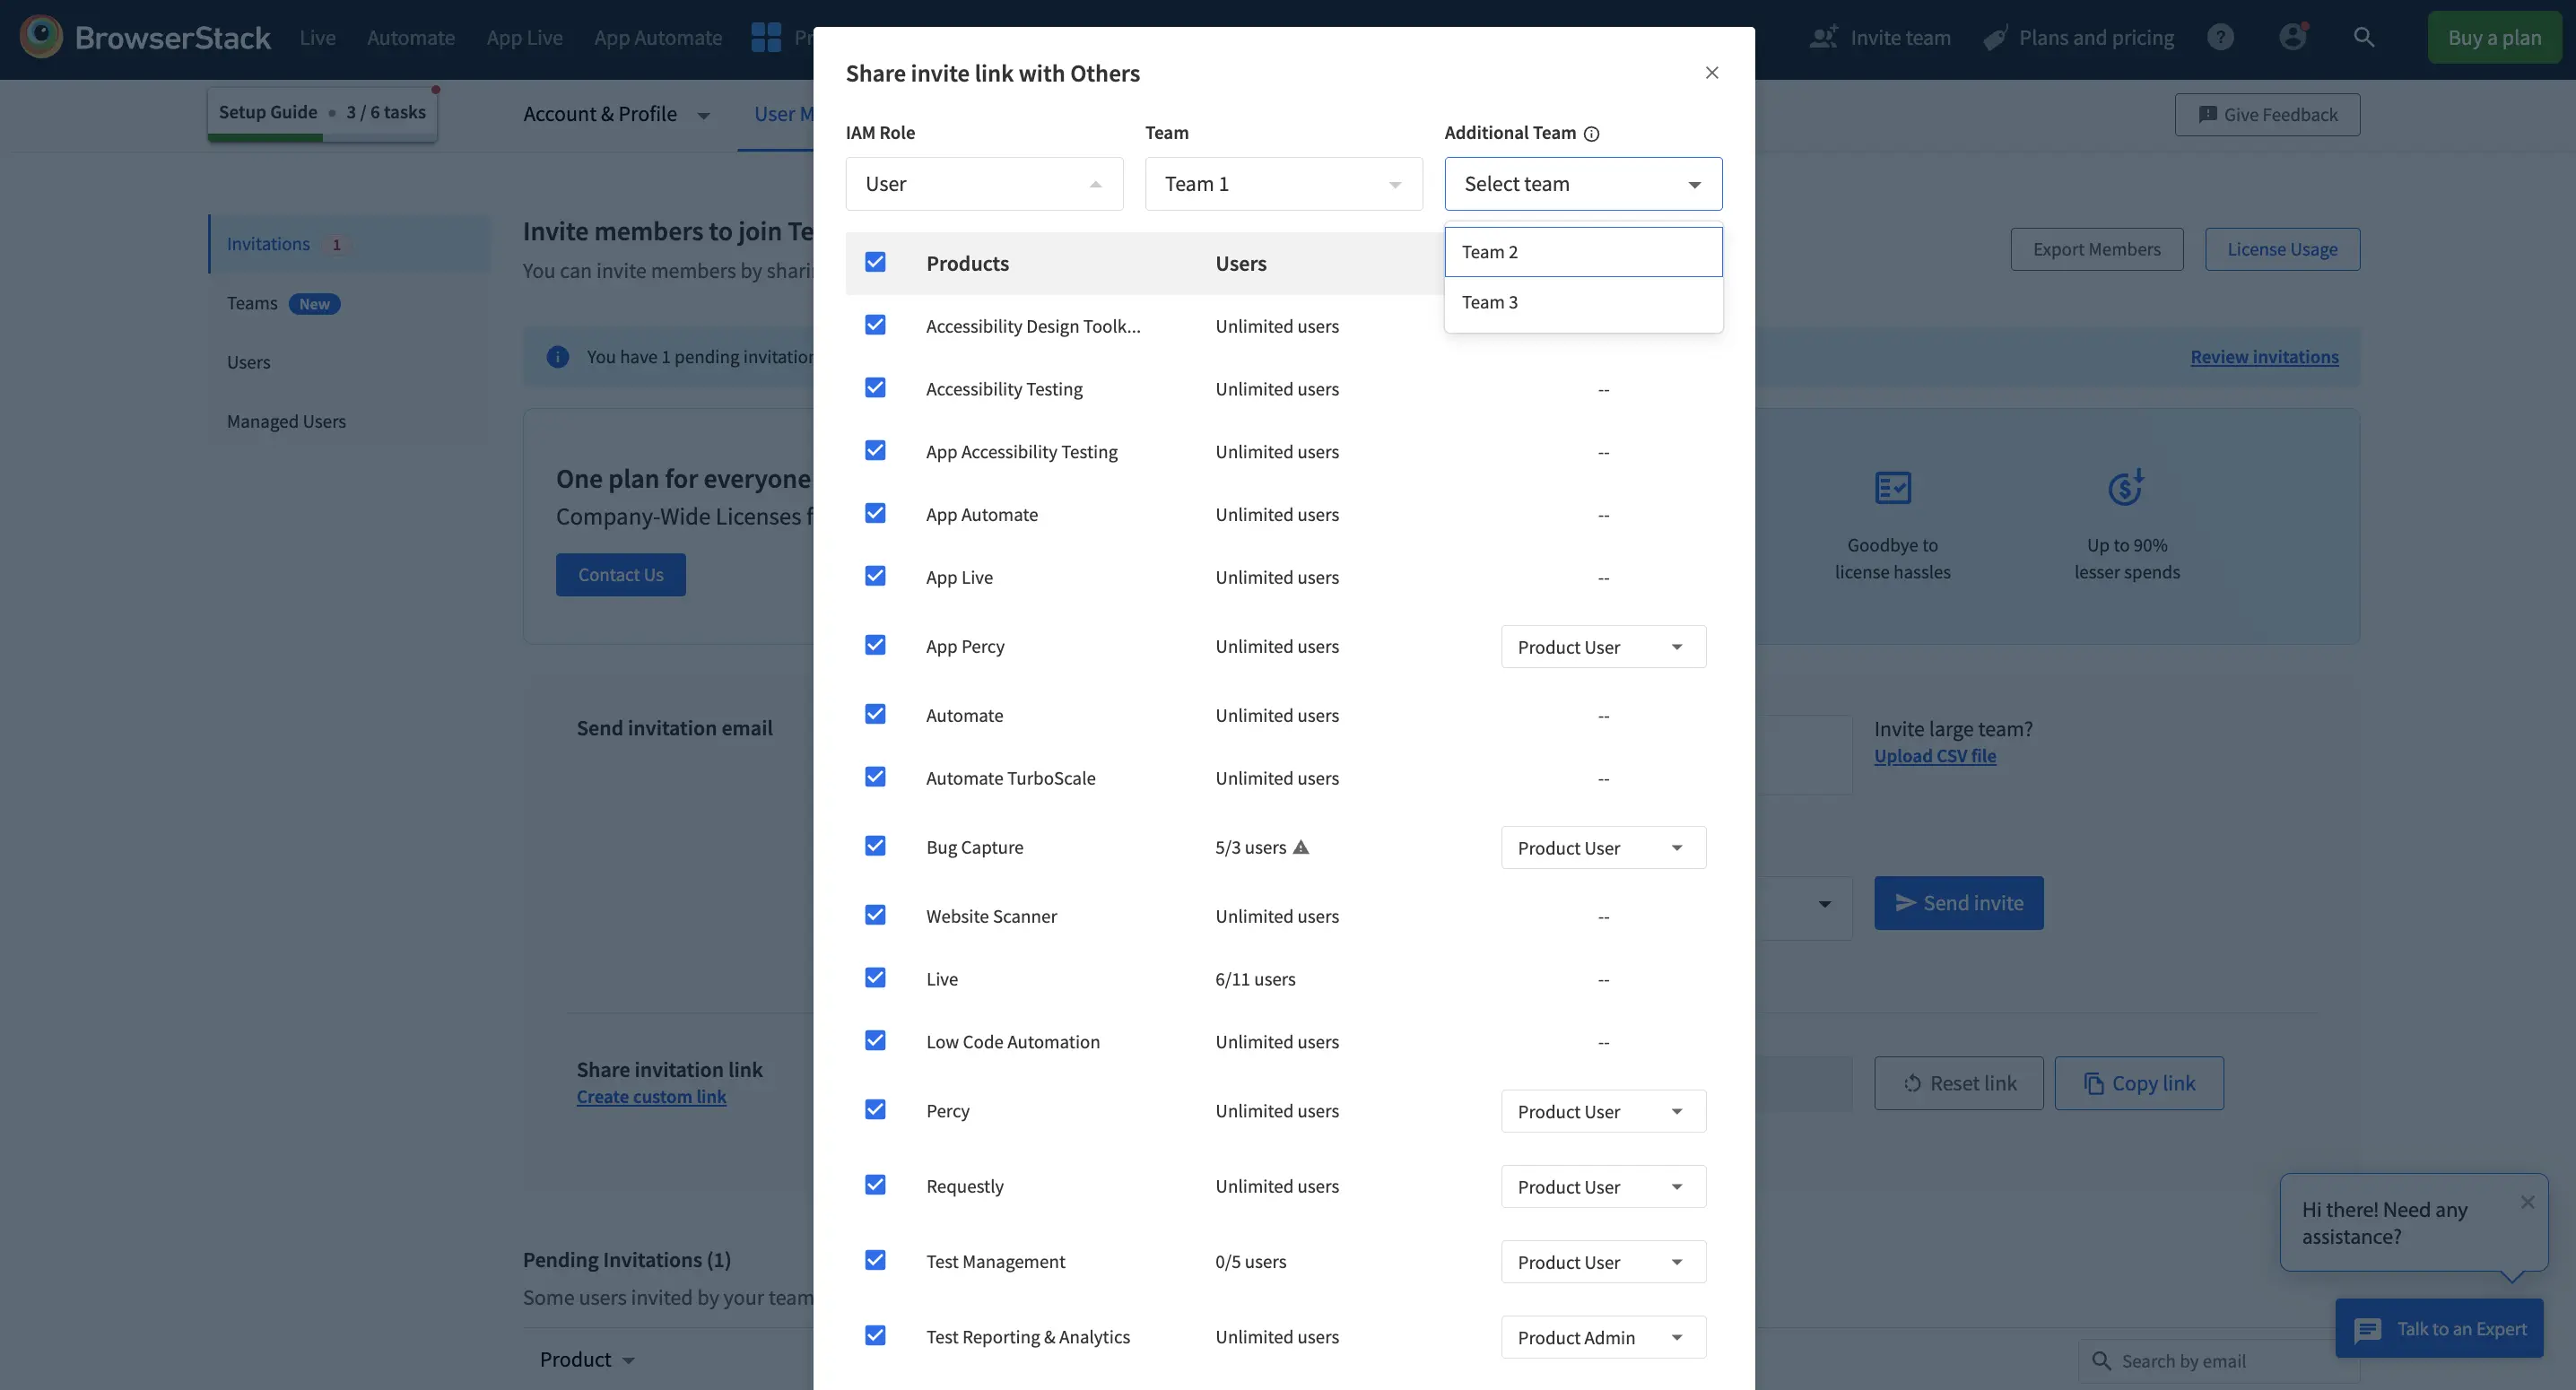
- To assign users to additional teams, click +Add additional teams.
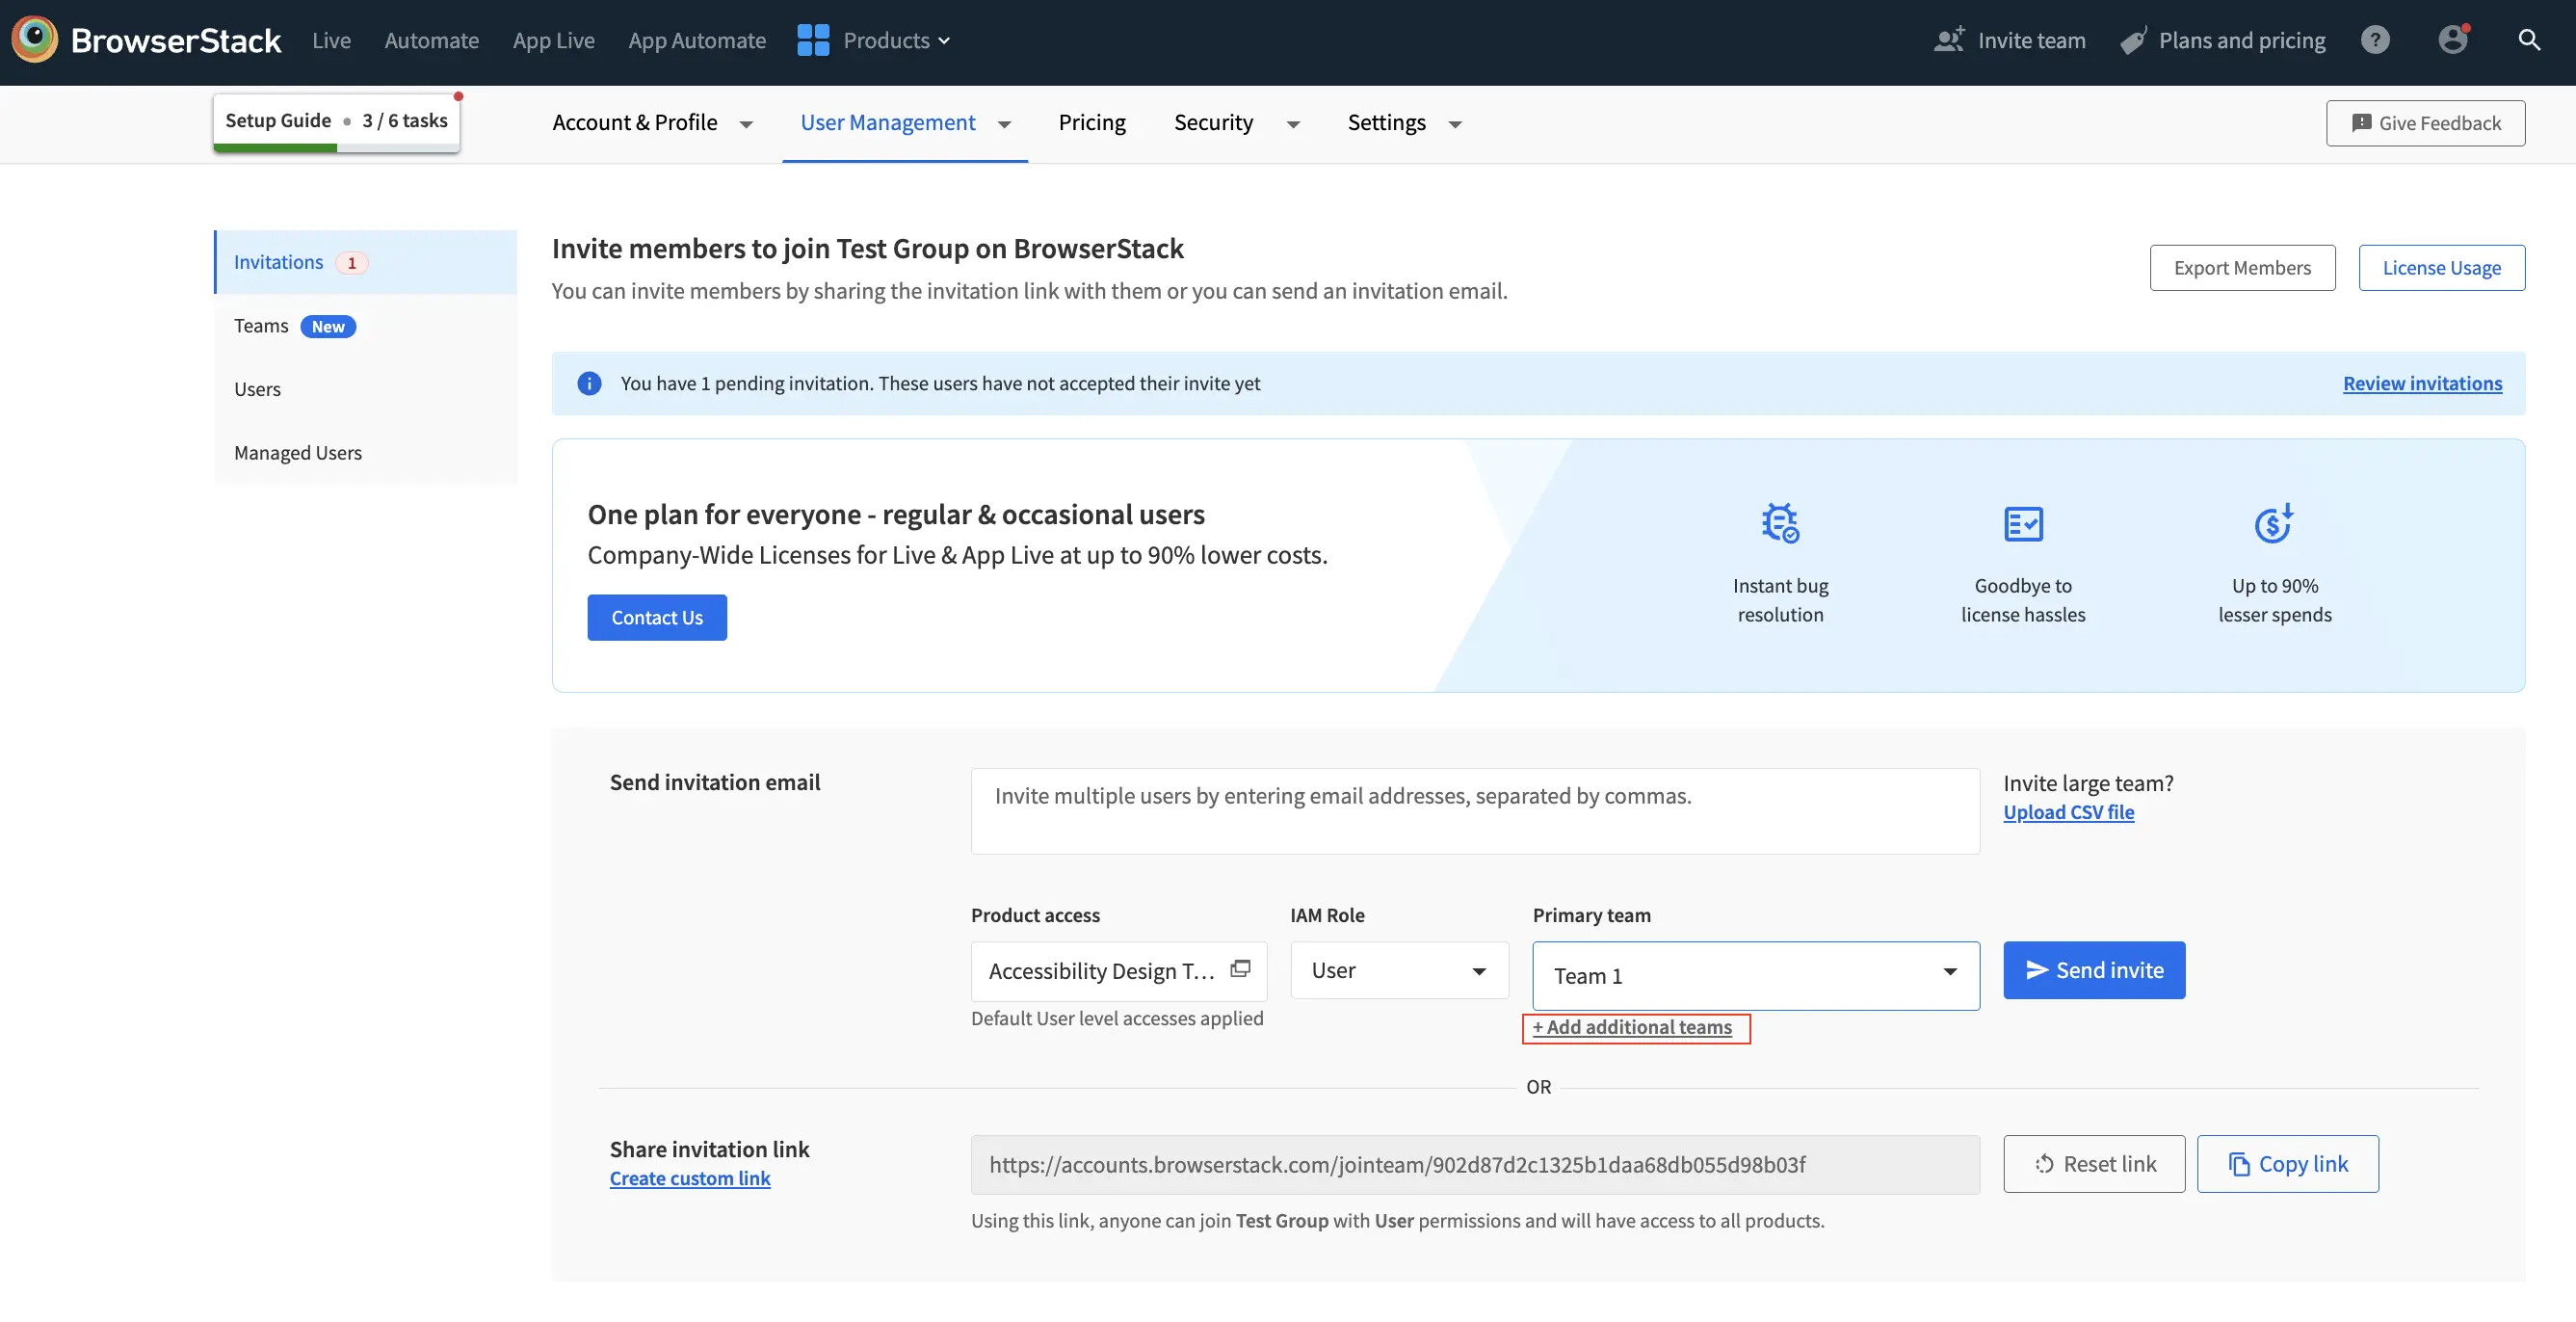
- Select one or more teams from the dropdown.
- Click Send Invite to send the invitation email to selected users.
- Alternatively, you can share a custom invitation link by clicking Create custom link and copying the generated link.
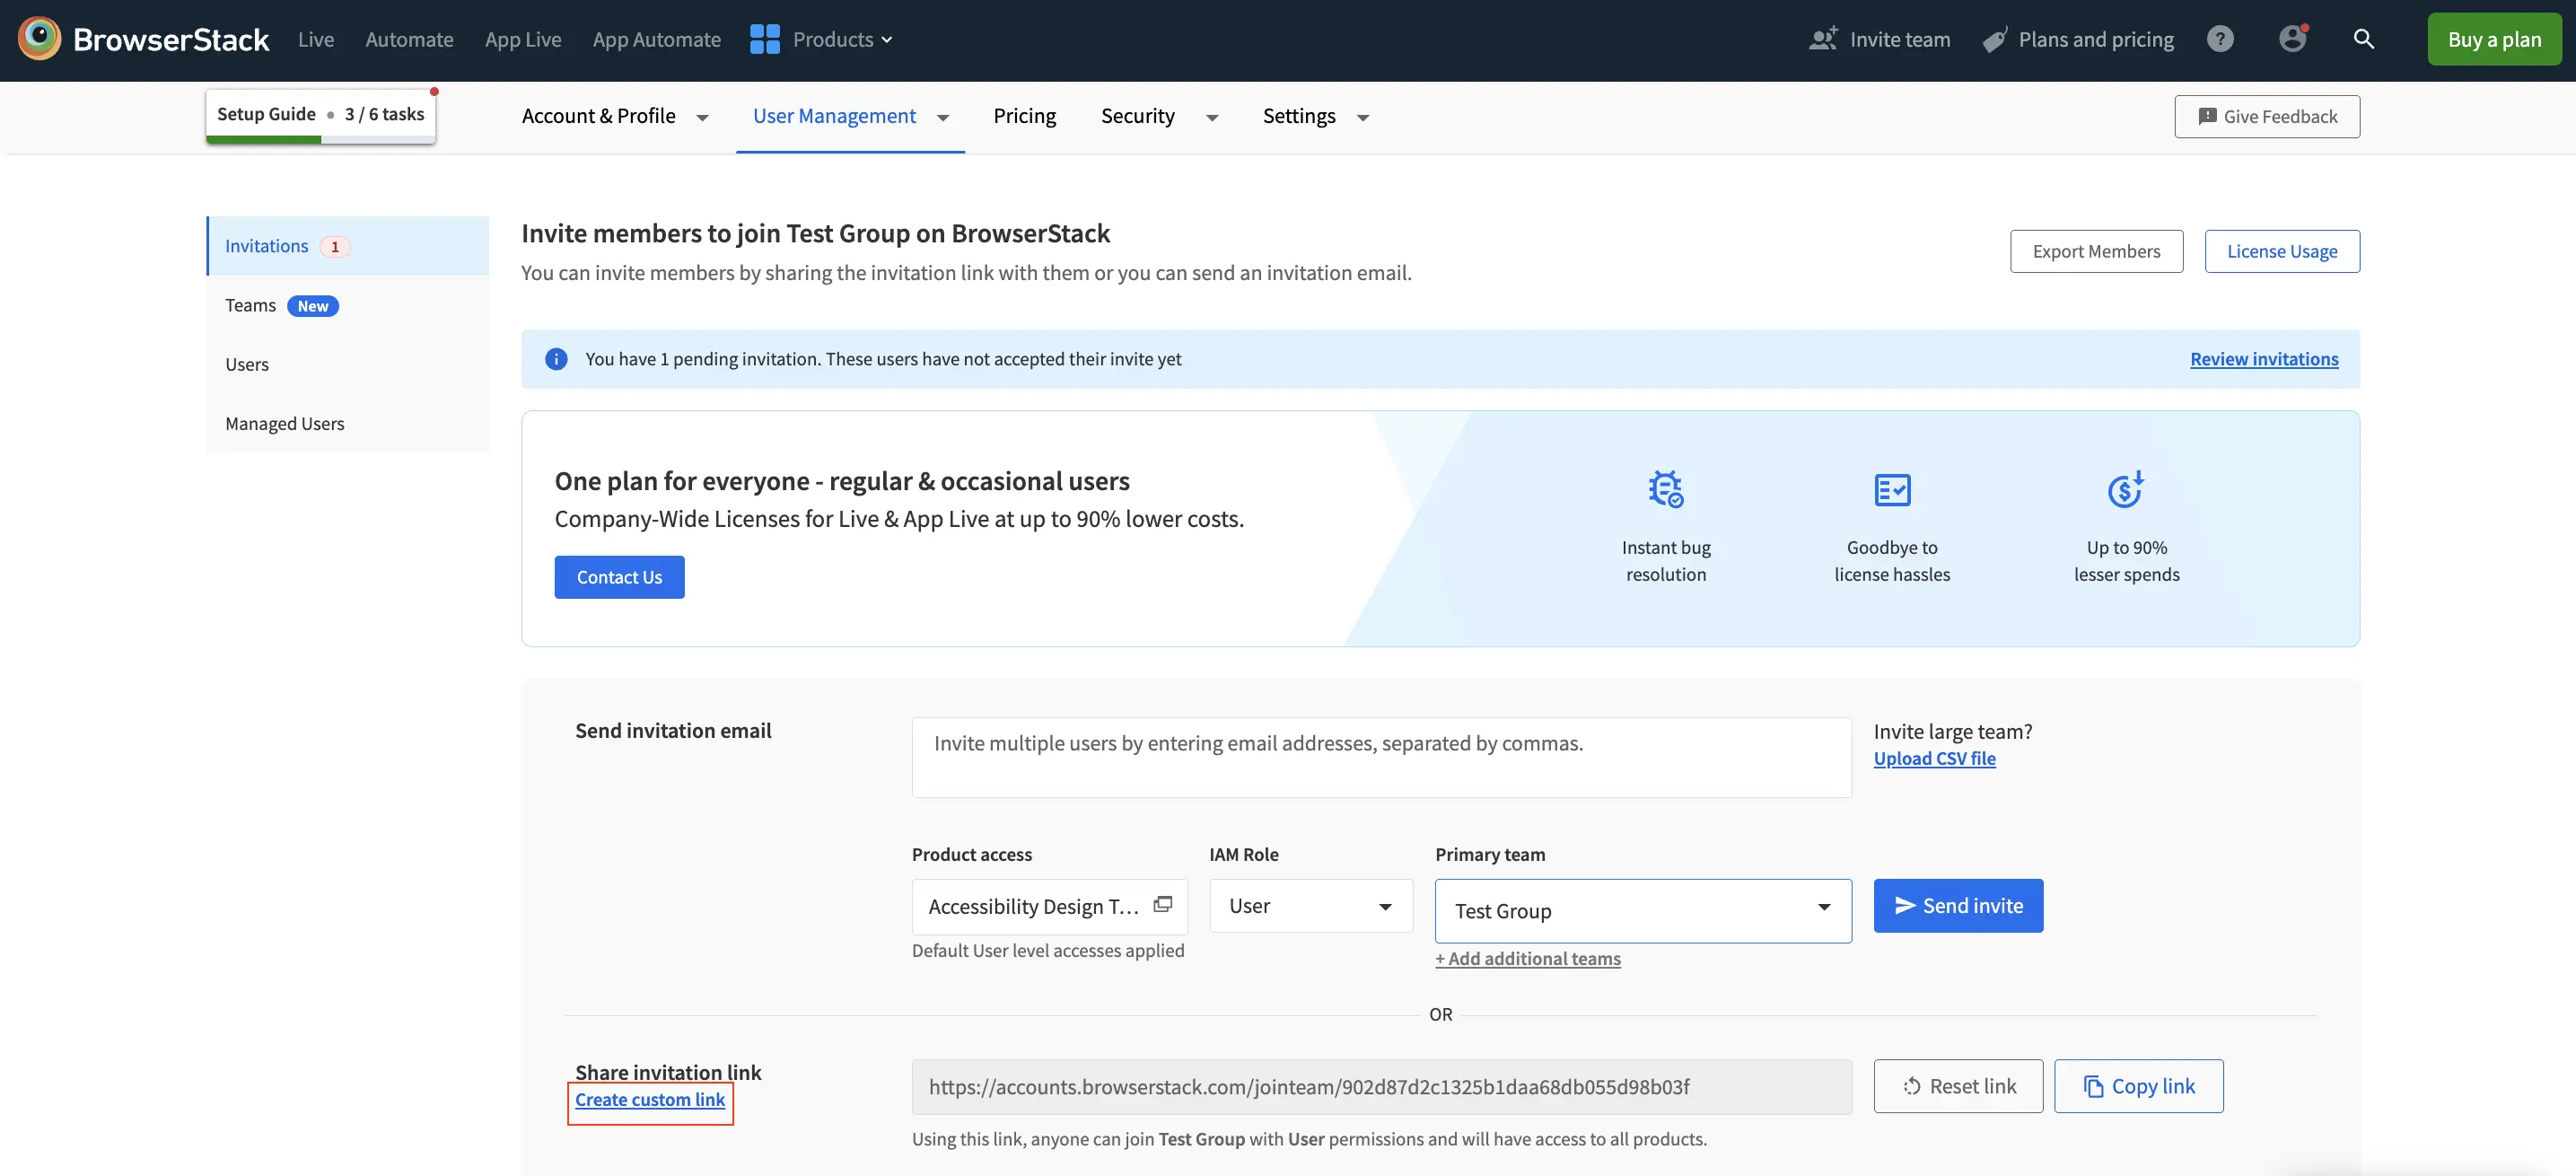
- In the Share invite link with users dialog, assign the team by selecting from the available options. Click Generate Link.
A user’s role assignment persists across teams. For example, if you are an Admin in Team X and you join Teams Z, Y, and A, you’ll also be an Admin in those teams.
Modify or re-assign teams
After you send an invitation, you can update or change team assignments for any user. Use the Pending Invitations table in User Management to re-assign or modify teams as needed.
Updates to your team may take a few minutes to take effect across all products.
- In the User Management section, go to Invitations in the sidebar.
- Locate the user in the Pending Invitations table. Click the three-dot menu (⋮) next to the user’s entry and select Modify access.
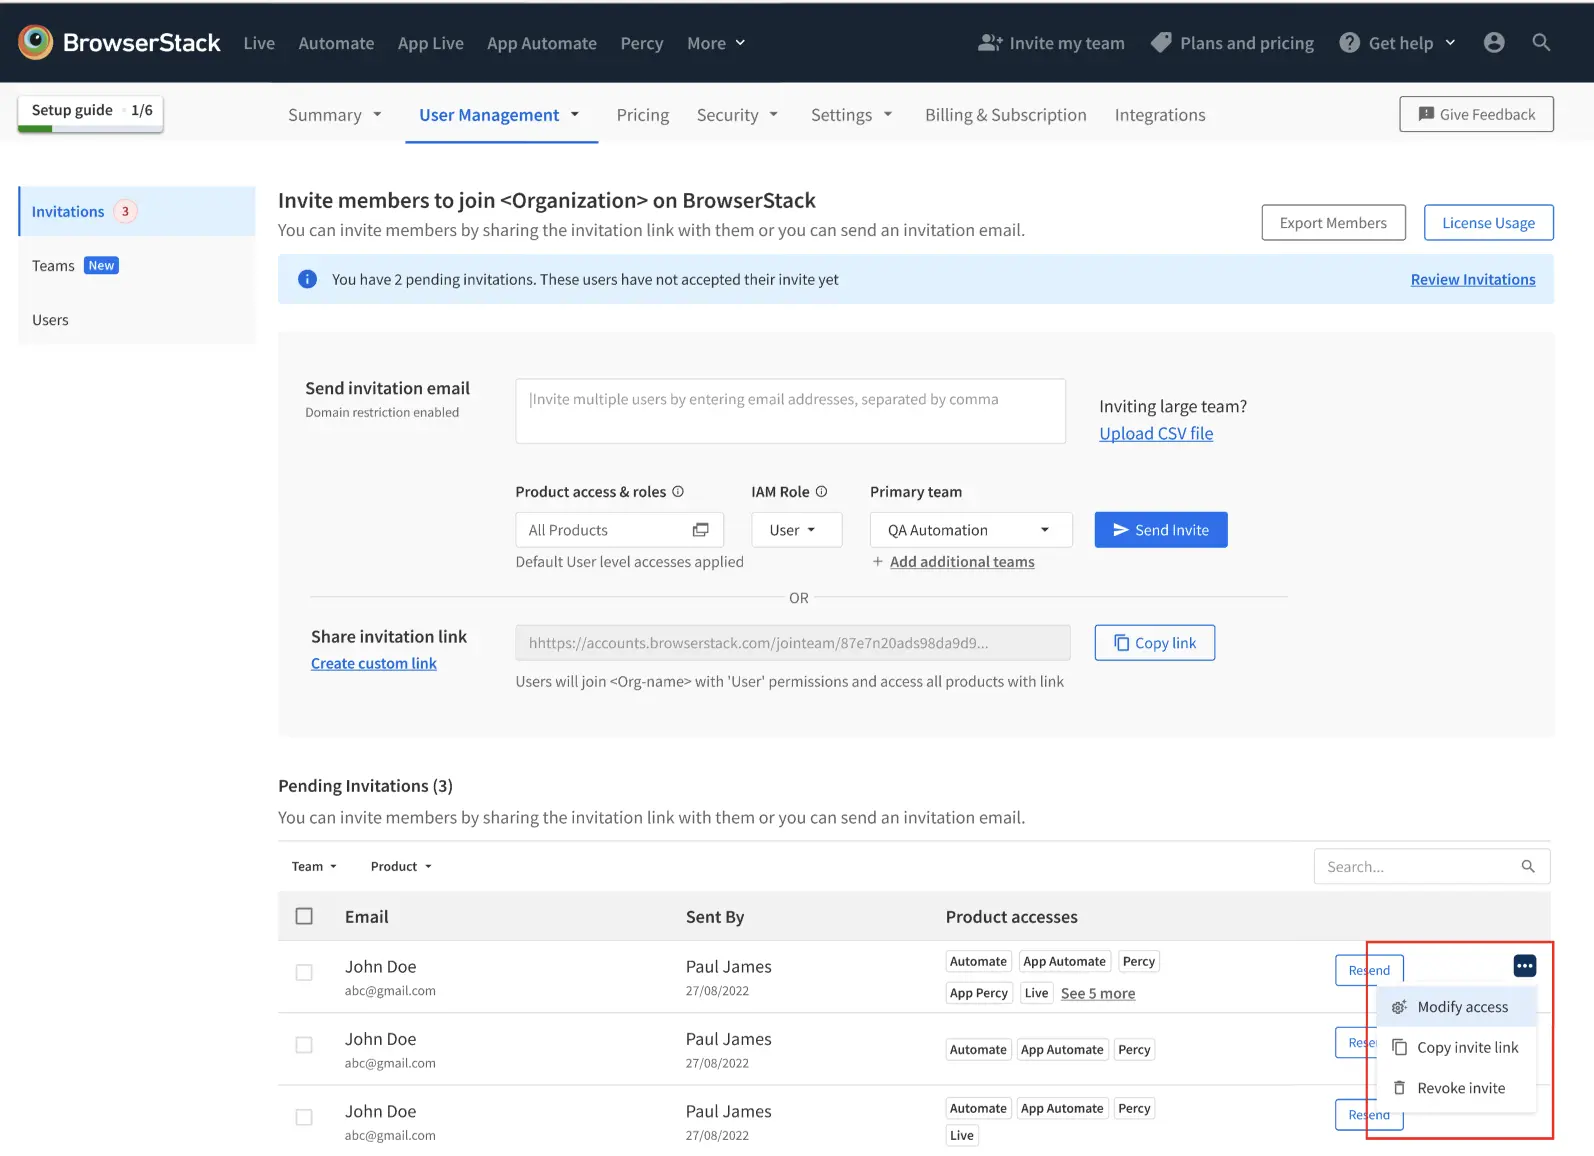
- In the Modify access dialog, update the IAM Role, Primary Team, and select Additional Teams as needed. You can also adjust product access and roles for each product.
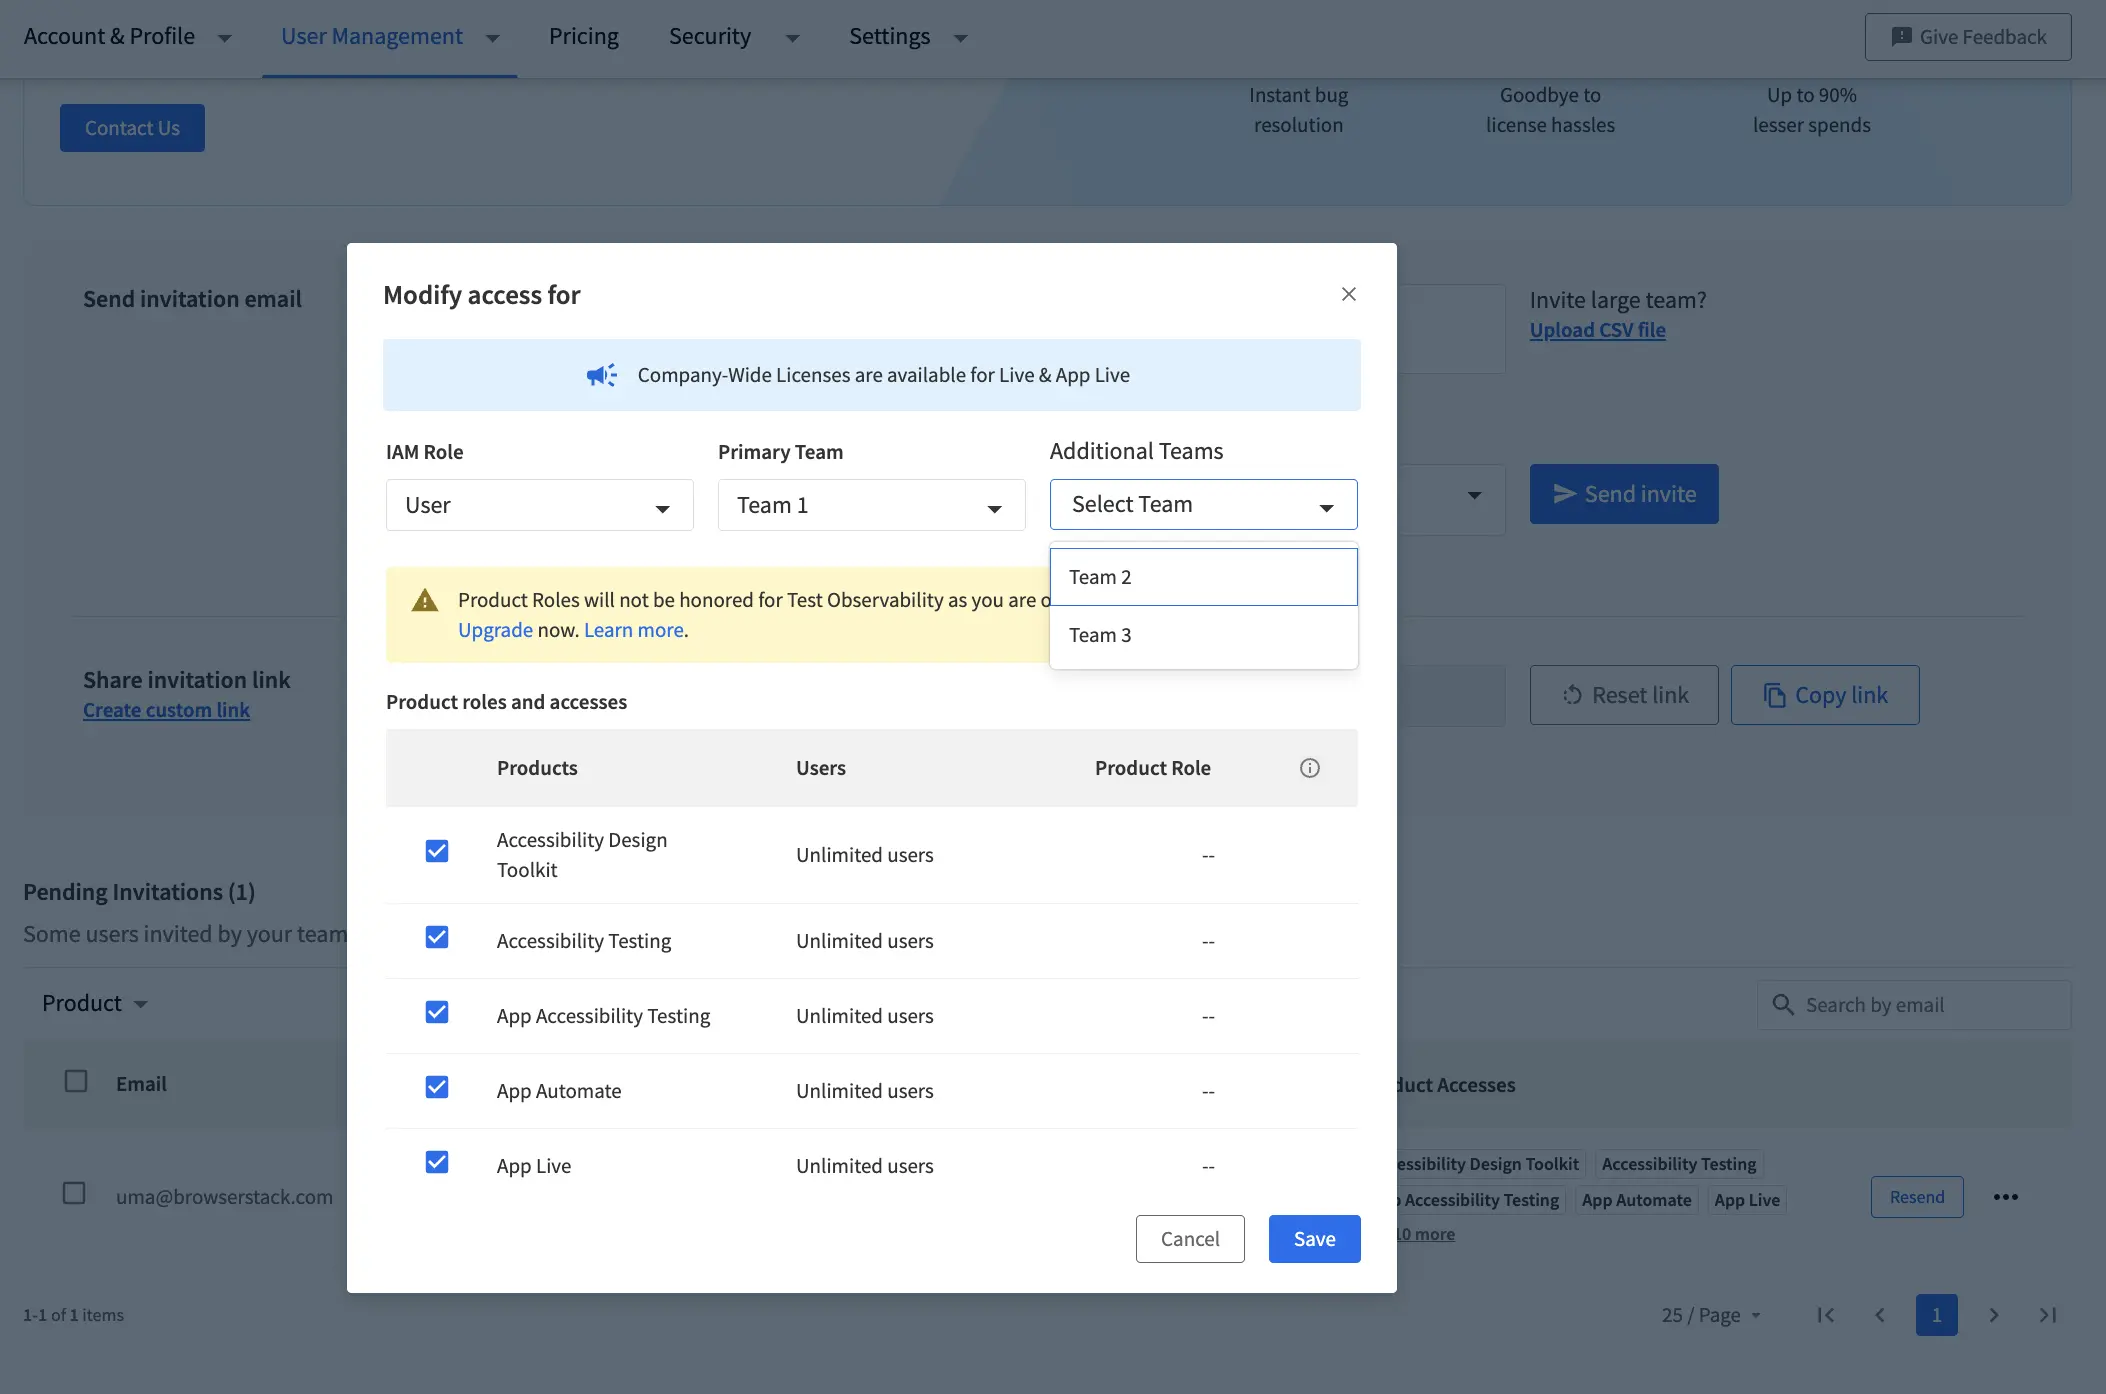
- Click Save. The user’s team assignments and product access is updated immediately.
You can repeat these steps to update team assignments for any user with a pending invitation.
View assigned teams
You can view the teams assigned to each user in the User Management section:
- Go to User Management and select Users from the sidebar.
- The Users table displays each user’s email, IAM role, assigned teams, and product accesses.
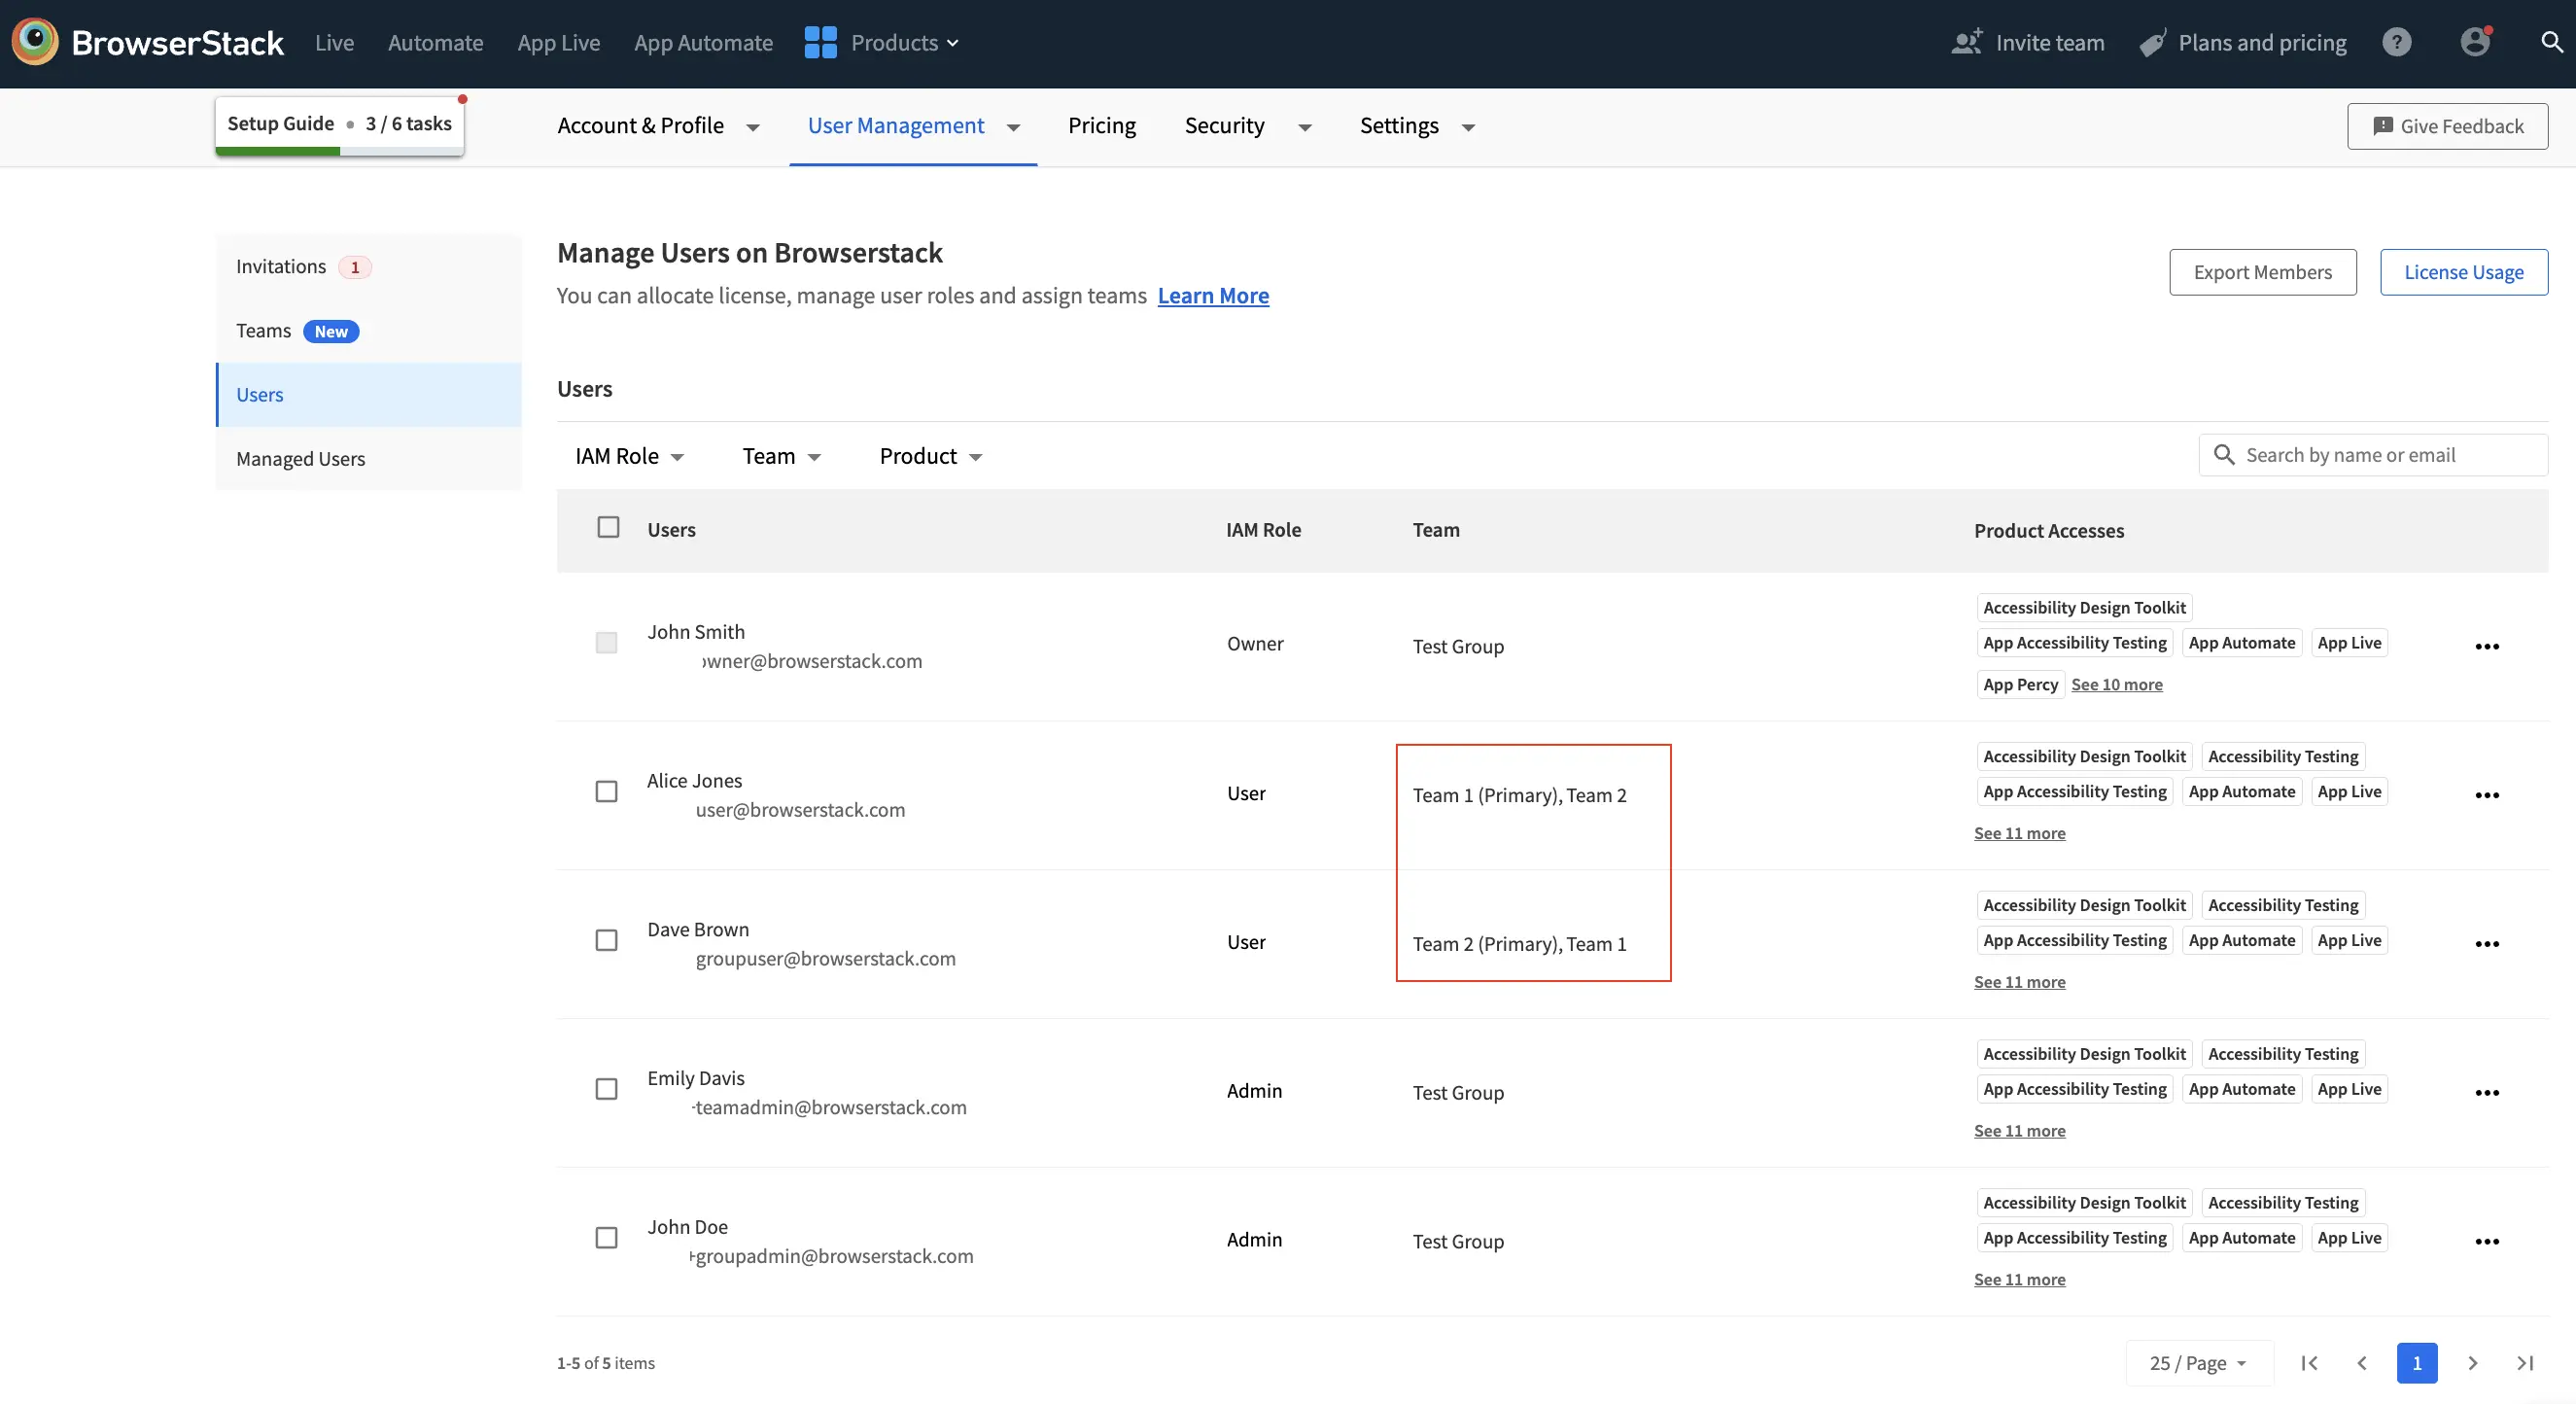
- In the Team column, hover over the team names to see details about primary and additional teams for each user. Teams marked as Primary indicate the user’s main team.
Use the search and filter options to quickly find users by team, role, or product access.
Switch active teams
Switch your active team anytime to access its projects and resources. You only see data for your current active team.
Updates to active team may take a few minutes to take effect across all products.
- Go to Account Profile > Overview. Go to the top navigation bar and locate the Active Team dropdown next to your profile name.
- Click the Active Team dropdown to view all teams you are assigned to.
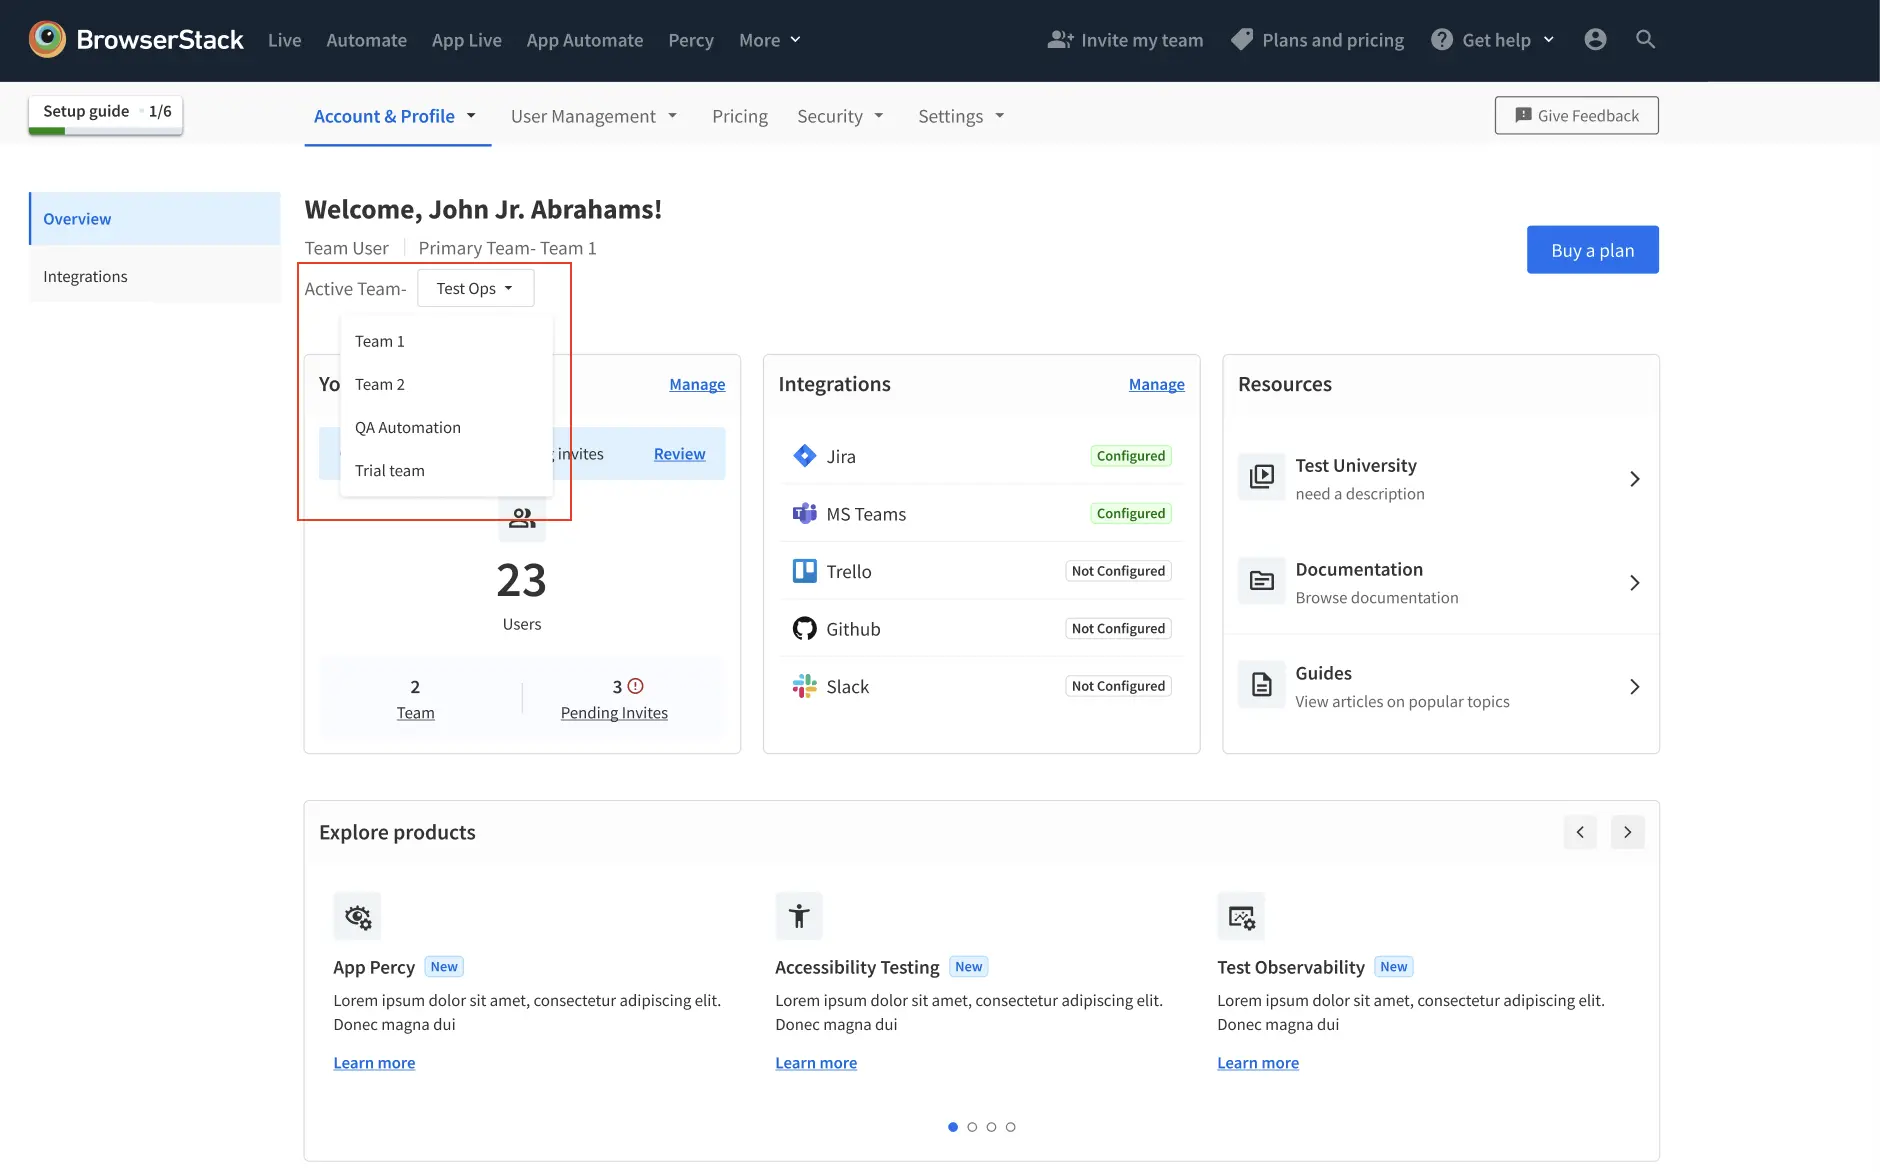
- Select the team you want to switch to. Your dashboard and resources update to reflect the selected team.
How does resource capping work?
Resource capping is governed by your primary team. If you belong to Team A and Team B, your license is assigned to your primary team (for example, Team A). You can access other teams you are assigned to. Each user’s license is linked to their primary team.
For more information, refer to the Allocate user license page.
User management APIs
You can assign additional teams to a user by using the below API endpoints. To do this, include the additional_teams parameter in the request body. When you specify additional_teams, you must also include the team parameter.
Before you delete a team, use the following endpoint to check which team associations will change for affected users:
After you use the above endpoint to review team associations, you can delete the team with the following API:
The following endpoints let you retrieve details about your active and non-active teams, and switch your active team:
Assign teams using Automated User Provisioning
If you use Automated User Provisioning (AUP) with your identity provider, you can assign teams to users using the BrowserStack attribute. This allows you to manage team assignments directly from your identity provider (IdP) instead of manually assigning teams in BrowserStack.
Attribute Name: primary_team
External Name: bstack_team
BrowserStack attribute: urn:ietf:params:scim:schemas:extension:Bstack:2.0:User:bstack_team
Default assignment: By default, a user is added to the organization on BrowserStack in the following scenarios:
- Empty or no value specified.
- Team attribute controlled from BrowserStack account section.
Expected values when attribute is controlled from your identity provider:
| Attribute Value | Team Update |
|---|---|
team_name1,team_name2,team_name3 |
Use comma-separated values to assign multiple teams to a user. The first value represents the primary team, and the remaining values represent additional teams. For example, team_web_testing,team_app_testing assigns team_web_testing as the primary team and team_app_testing as an additional team. |
| No value/Empty | The user is assigned as part of the organization. |
We're sorry to hear that. Please share your feedback so we can do better
Contact our Support team for immediate help while we work on improving our docs.
We're continuously improving our docs. We'd love to know what you liked
We're sorry to hear that. Please share your feedback so we can do better
Contact our Support team for immediate help while we work on improving our docs.
We're continuously improving our docs. We'd love to know what you liked
Thank you for your valuable feedback!