
 Join our Discord
Local Testing for Salesforce
Set up BrowserStack Local to run Low Code Automation tests against Salesforce orgs that restrict access by IP address.
If your Salesforce organization restricts logins to a trusted IP range, it rejects requests from the BrowserStack cloud. BrowserStack Local tunnels those requests through a machine inside your own network, so Salesforce sees them arriving from an IP address it already trusts.
Prerequisites
You need your BrowserStack username and access key, which you can find in your account settings. If you have not created an account yet, sign up for a free trial.
To enable Local Testing, complete the following steps.
Configure and set up Local Testing
Step 1: Set up the Local binary
Low Code Automation supports Local Testing only with the Local binary, not with the local desktop app.
Follow the setup instructions for your OS:
Step 1: Download the BrowserStack Local binary for Windows.
The download links are secure. The binaries are digitally signed, identifying the publisher as BrowserStack Ltd.
Step 2: Unzip the file to a folder on your system, open the command line, and navigate to the folder containing the Local binary.
Step 3: Run the Local binary using the following command:
BrowserStackLocal.exe --key YOUR_ACCESS_KEY --enable-logging-for-api
If you trigger the test suite on a schedule, make sure of the following:
- Use the access key associated with the group owner of your BrowserStack account. If the group owner’s access key is not shareable, configure a Service Account and use its access key to run the Local binary.
- Run the binary on a machine that can reach your Salesforce organization and that stays up during the build execution.
Step 2: Test Salesforce orgs behind a firewall or VPN
With Local Testing, you can test Salesforce organizations that are behind a firewall or a VPN.
If your Salesforce organization, VPN, firewall, or proxy accepts connections only from certain IP addresses or subnet addresses, you must enable Force Local. You can enable it in either of the following ways:
- If the binary is already running, go to http://localhost:45454 and turn on Force Local.
- Pass the
--force-localflag directly while running the binary, as shown below:-
For Windows
BrowserStackLocal.exe --key YOUR_ACCESS_KEY --force-local --enable-logging-for-api -
For macOS and Linux
./BrowserStackLocal --key YOUR_ACCESS_KEY --force-local --enable-logging-for-api
-
To set up Local Testing for other environments and network configurations, refer to our complete list of flags.
Step 3: Select the IP address restriction option for your organization
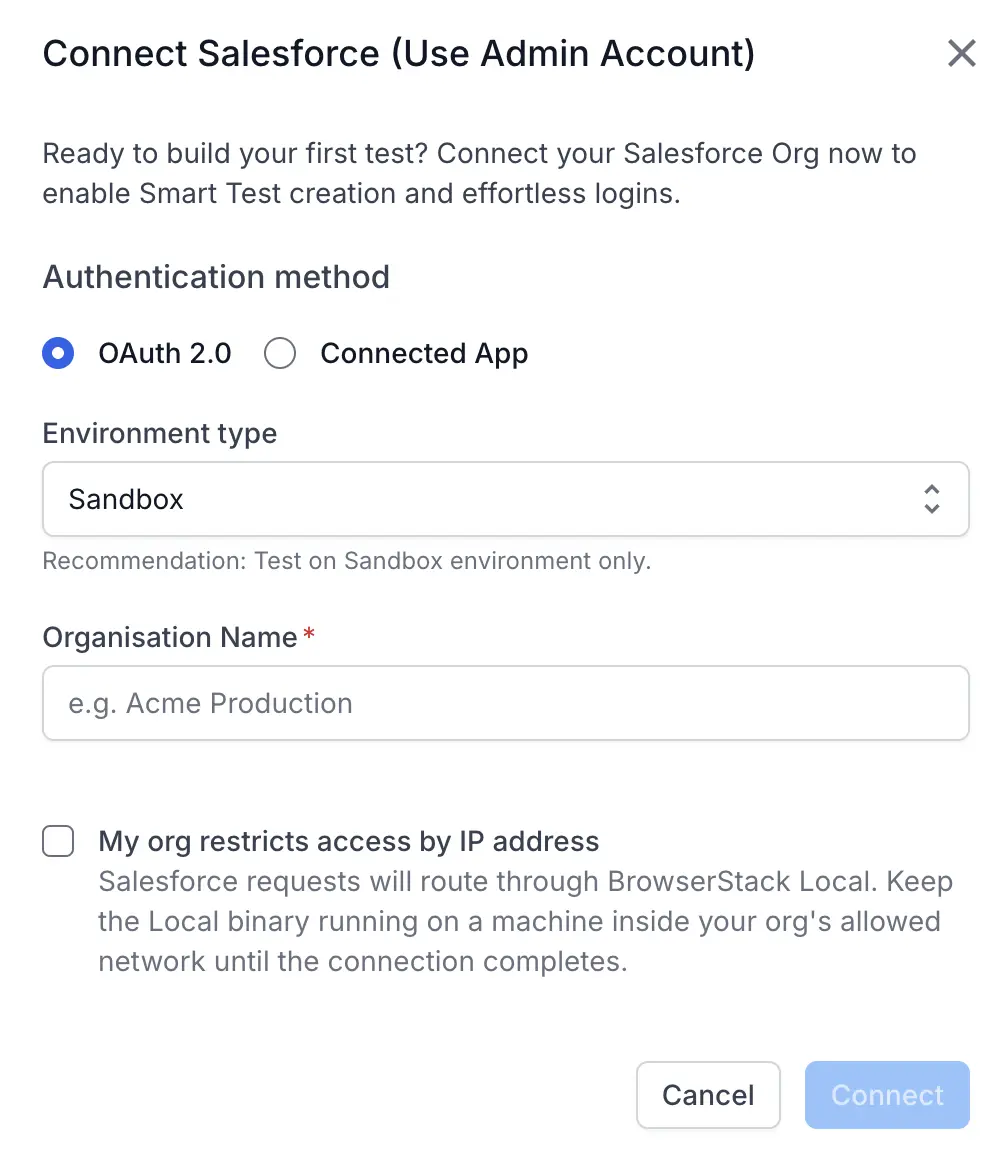
After Local is running, connect your Salesforce organization and select My org restricts access by IP address in the Connect Salesforce (Use Admin Account) dialog. This option routes the Salesforce requests for that organization through BrowserStack Local.
Inbound IP whitelisting
Inbound IP whitelisting is a BrowserStack solution where, instead of resolving local assets through the binary, the BrowserStack cloud accesses your assets directly through a limited and secure set of machines whose IP addresses your network administrator has whitelisted. Use this solution if you want the BrowserStack cloud to reach your IP-restricted Salesforce organization without passing through the binary.
To learn how inbound IP whitelisting works and what it requires, see Inbound IP whitelisting.
Inbound IP whitelisting is an Enterprise feature. If you are not already on an Enterprise plan, contact sales for details.
Follow these steps to set up inbound IP whitelisting for your Salesforce tests:
- Get in touch with our Support team to enable inbound IP whitelisting.
- After Support enables the feature and the IP addresses are whitelisted, add those addresses to the trusted IP ranges of your Salesforce organization.
- Select My org restricts access by IP address for your Salesforce organization, as described in Step 3.
Next steps
We're sorry to hear that. Please share your feedback so we can do better
Contact our Support team for immediate help while we work on improving our docs.
We're continuously improving our docs. We'd love to know what you liked
We're sorry to hear that. Please share your feedback so we can do better
Contact our Support team for immediate help while we work on improving our docs.
We're continuously improving our docs. We'd love to know what you liked
Thank you for your valuable feedback!