HTTPS (Hypertext Transfer Protocol Secure) and SSL (Secure Socket Layer) certifications help you secure your website from threats and enhance credibility.
However, this means you cannot send requests to the server from any source unprotected through HTTPS.
This becomes an issue for developers who wish to test the website using the local environment, as the server will reject any development request sent through the local development environment.
Chrome might send an error code as given below:
NET::ERR_CERT_COMMON_NAME_INVALID
This guide provides some solutions to solve this problem and test an HTTPS website from a local host.
What Does it Mean to Test an HTTPS Website from a Local Environment?
Testing an HTTPS Website from localhost means to run and test a website on a local machine using HTTPS to recreate the secure and encrypted connection typically used in a production environment. This process ensures the proper functioning of the HTTPS aspects (like SSL/TLS encryption) in a secure environment.
Read More: How to access local host on a mobile device?
How to Test HTTPS Websites from Local Host : Prerequisites
Here is a step-by-step process of how you can test HTTPS Websites from Local Host:
Providing SSL Certificates to Test HTTPS Website
For HTTPS, an SSL certificate is required to build a secure connection. A self-signed/locally generated certificate might be flagged as ‘non-secure’ as it is not from a trusted Certificate Authority.
Here OpenSSL will be used to create certificates for your HTTPS websites. Then, your website will be tested from a local host.
Follow the below steps to generate all the SSL certificates:
Step 1: Rooting SSL Certificate
- You need to develop a Root Secure Sockets Layer (SSL) certificate, which will be used to sign certificates created for individual domains. Now create the RSA-2048 key and then save it to rootCA.key.
- We will now use this rootCA.key file to develop a Root SSL certificate. Now you will need a pass phrase to use every time you create a certificate.
openssl genrsa -des3 -out rootCA.key 2048
- Use the key you created to generate a new Root SSL certificate and save it to rootCA.pem.
- By default, the validity of this certificate will be for 1024 days. Change the number of days you want this certificate.
openssl req -x509 -new -nodes -key rootCA.key -sha256 -days 1024 -out rootCA.pem
Step 2: Trusting the Rooted SSL Certificate
Before you use the newly created root SSL certificate, use your system to trust the given certificate.
Step 3: Domain SSL Certificate
- Now you can use your root SSL certificate to issue a certificate for your local environment at localhost.
- Now develop an OpenSSL configuration file named server.csr.cnf to import settings when you are creating a certificate rather than entering them on the command line.
[req]
default_bits = 2048
prompt = no
default_md = sha256
distinguished_name = dn
[dn]
C=US
ST=RandomState
L=RandomCity
O=RandomOrganization
OU=RandomOrganizationUnit
emailAddress=hello@example.com
CN = localhost
- Now generate a v3.ext file to generate X509 v3 certificate. We will now specify the subjectAltName.
authorityKeyIdentifier=keyid,issuer
basicConstraints=CA:FALSE
keyUsage = digitalSignature, nonRepudiation, keyEncipherment, dataEncipherment
subjectAltName = @alt_names
[alt_names]
DNS.1 = localhost
- Now generate a key for the localhost using the configuration settings present in the server.csr.cnf with the key stored in the server.key.
openssl req -new -sha256 -nodes -out server.csr -newkey rsa:2048 -keyout server.key -config <( cat server.csr.cnf )
Now, a request for signing certificates will be issued via the Root SSL you created for generating the certificate for the local host. The output file will be a certificate called server.crt.
openssl x509 -req -in server.csr -CA rootCA.pem -CAkey rootCA.key -CAcreateserial -out server.crt -days 500 -sha256 -extfile v3.ext
Step 4: Using Your SSL Certificate
Place your server.crt and server.key files to a location that is accessible in your server and use them when starting your server. Use this only for your local environment and not for paroduction.
Starting Development in SSL Mode In Rails
Once you have your certificates with you, you can just start the Puma with the next command.
bin/rails s -b "ssl://127.0.0.1:3000?key=$HOME/certs/localhost.key&cert=$HOME/certs/localhost.crt
Now visit your desired browser with the address,
NOTE: Your browser might complain as this certificate is self-signed. But do not panic as we are using it for the development stage. Add an exception and then accept the provided certificate. You are all set to test HTTPS websites.
Test SSL Connections Using OpenSSL
Testing SSL connections locally isn’t just about generating and installing certificates—it’s also crucial to verify the server’s SSL behavior. OpenSSL provides a simple way to do this via the command line.
Basic Command
Use the following command to connect to your local HTTPS server and inspect its SSL/TLS configuration:
openssl s_client -connect localhost:3000
This initiates a TLS handshake with your server and prints detailed information about:
- The certificate chain
- Selected cipher suite
- TLS protocol version
- Certificate validity and subject
Common SSL Debugging Scenarios Using OpenSSL
Here are some common SSL debugging scenarios using OpenSSL:
1. Check for Hostname Mismatch
If you’re testing on localhost, ensure the certificate was issued for localhost and includes it in the subjectAltName.
Use:
openssl s_client -connect localhost:3000 -servername localhost
Look for errors like:
verify error:num=62:Hostname mismatch
2. Verify Certificate Trust
If you’re using a self-signed certificate or a custom root CA, you need to explicitly tell OpenSSL to trust it:
openssl s_client -connect localhost:3000 -CAfile rootCA.pem
This prevents trust-related errors like:
verify error:num=20:unable to get local issuer certificate
3. Inspect Full Certificate Chain
To view the entire certificate chain served by the server, use:
openssl s_client -connect localhost:3000 -showcerts
Check that:
- The full chain is present
- Each certificate is valid and in the correct order
Testing HTTPS Websites On Local Machine
You can always test your HTTPS websites with a local connection option behind the firewall. You may also choose to access web pages that are saved on your local machine. In a few moments, you can test your internal sites via the following methods:
Website Functionality Testing
Website Functional testing checks whether the website is functioning as per the specification of the requirement.
Link Testing
While link testing, you should check for:
- Outbound links and inbound links
- Admin email links
- Presence of any broken links
Forms Testing
Forms help to communicate with customers and capture important data for lead generation. They should be checked for:
- Validity of input data validity
- Allowed and invalid input values for all data fields
- Malfunctioning of forms
Cookies testing
Cookies are small temporary files stored on the user’s computer after visiting a web page. Cookie testing help in faster loading of web pages.
- Site testing with enabled and disabled cookies
- Verify the cookie encryption
- Security after cookie removal
HTML/CSS validation
It tests the code of the site for:
- HTML errors in syntax
- Site crawling enabled for search engines
- Accuracy of site map in both XML and HTML format
- Also ensure to the website site on all browsers – Mozilla Firefox, Microsoft Edge, Safari, Google Chrome and many others.
- You should also check the website at resolutions like 1024 x 768, 1280 x 1024.
- Additionally check the website when logged in by admin users or subscribers.
Read More: How to Create a Website using HTML and CSS
How Does BrowserStack Help test HTTPS Websites from Local Host
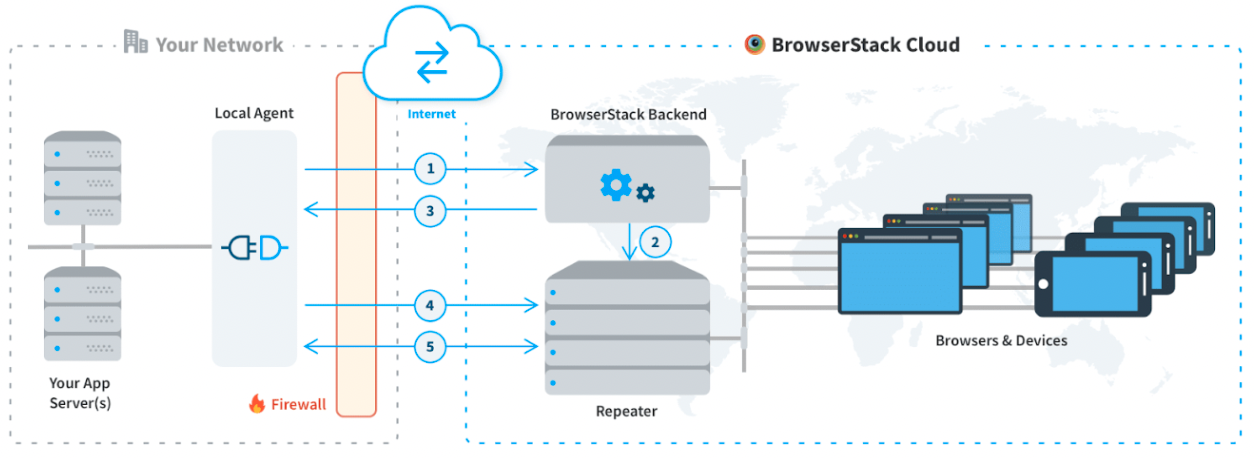
Using Local testing with BrowserStack enables your devs to run automated tests on your internal dev environments, on localhost, staging setups, or from behind a corporate firewall.
It establishes a secure connection between your machine and the BrowserStack cloud. After you set up Local testing, all your private URLs are automatically resolved, including HTTPS URLs and other URLs hosted behind a proxy or firewall.
Conclusion
Now that you have a clear idea of how to test HTTPS website and also generating SSL certificates for your website for localhost, you can build a robust website with all the tests performed from the internal environment and deliver a better user experience.
Don’t forget to use BrowserStack Automate to test websites hosted on localhost or in staging environments while running tests on an automated Selenium cloud.
With BrowserStack Local Testing, you can:
- Test websites and apps hosted on internal servers
- Create a secure tunnel between your local dev/staging environments and the BrowserStack Cloud
- Use language bindings to trigger build verification tests at every compile
- Use multiple binary instances to test different feature branches—at the same time


