While writing end-to-end tests with Playwright, selectors often feel straightforward at first. The problem shows up when a small UI change breaks multiple Playwright selectors, even though the feature still works. Tests fail, debugging time increases, and confidence in automation drops.
Overview
What are Playwright Selectors?
Playwright selectors are mechanisms used to locate and interact with elements on a web page, allowing tests to target elements based on attributes, text, roles, or accessibility properties.
Types of Playwright Selectors
- Basic Text Selectors: Locate elements by matching visible text content.
- Basic CSS Selectors: Use standard CSS syntax to target elements by tag, class, ID, or attribute.
- Selecting Visible Elements: Filter selectors to interact only with elements currently visible on the page.
- Selecting Elements Containing Other Elements: Identify parent elements that contain specific child elements using nested selectors.
- Selecting Elements in Shadow DOM: Access elements within Shadow DOM trees, which are otherwise hidden from standard selectors.
- Chained Selectors: Combine multiple selectors in sequence to precisely locate nested or complex element structures.
This article explains the different types of Playwright selectors and how to use each one to build stable and maintainable tests.
What are Playwright Selectors?
Playwright selectors are patterns or expressions used to identify and interact with elements on a web page during automated testing. They act as the bridge between the test script and the web page’s user interface by pinpointing specific elements, such as buttons, links, input fields, or any HTML element, that need to be tested or manipulated.
In Playwright, selectors are often used through the Locator API, which provides powerful methods to find, filter, and interact with elements while ensuring tests remain stable and easier to maintain.
According to Andrey Lushnikov, the creator of Playwright, selectors are designed to remain resilient through UI refactors and fail only when real user behavior breaks, which is why they should reflect user interactions rather than DOM structure.
Different Types of Playwright Selectors
Here are the different types of Playwright Selectors techniques:
- Basic text selectors: This allows you to select an element via its text content.
const submitButton = await page.locator('text="Submit"');- Basic CSS selectors: These are used to select elements based on their CSS properties.
const passwordField = await page.locator('input[type=password]');- Selecting visible elements: This is useful for selecting elements that are visible on the page.
const visibleDivs = await page.locator('div:visible');- Selecting elements that contain other elements: Playwright enables selection of parent elements based on child elements.
const parentDiv = await page.locator('div >> "child text"');- Selecting elements in Shadow DOM: Shadow DOM elements can also be selected using Playwright.
const shadowElement = await page.locator('css=div#shadow-root >> css=span');- Chained selectors: These are used when one selector needs to run relative to the previous one.
const chainedElement = await page.locator('div.parent >> css=span.child');Additionally, Playwright supports custom selector engines. This means you can define your own way of querying elements, for instance, based on a tag name.
Playwright-specific selectors, including text selectors and chained selectors, fill in the gaps where CSS and XPath selectors might fall short. They provide an even more powerful way to accurately locate and interact with elements on a webpage.
Since different browsers and devices may render elements differently, it’s important to validate selectors across environments.
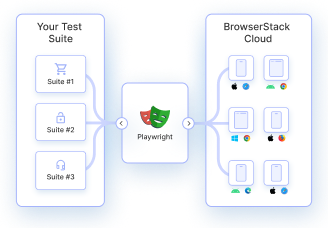
BrowserStack’s cloud platform provides instant access to real browsers and devices, making it easy to ensure your Playwright selectors work reliably everywhere.
Read More: Page Object Model with Playwright: Tutorial
Understanding Locator API in Playwright
The Locator API is a core feature in Playwright that provides a powerful and consistent way to find and interact with elements on a webpage. Instead of directly using raw selectors each time, Playwright encourages working with locators, abstractions that represent elements or groups of elements.
This approach offers several advantages:
- Reliability: Locators automatically wait for elements to be ready before performing actions, reducing flaky tests caused by timing issues.
- Reusability: Once defined, a locator can be reused multiple times across your test code without repeating selector logic.
- Clarity: Locators make test scripts easier to read and maintain by clearly representing page elements as objects.
- Rich Functionality: The Locator API supports chaining, filtering, and advanced querying, allowing fine-grained control over element selection and interaction.
In essence, the Locator API builds on top of selectors, wrapping them in a more robust interface that helps testers write stable and maintainable automation scripts. Understanding how to create and manipulate locators is essential for leveraging Playwright’s full potential.
Read More: Web Scraping with Playwright
Key Features of Playwright’s Locator API
Below are the core features and capabilities of Playwright’s Locator API that make it powerful and reliable for web automation testing.
- Creating Locators: Locators are created using the page.locator() method with selectors such as CSS or XPath. Playwright also auto-detects selector types when prefixes are omitted, simplifying element targeting.
- Auto-Waiting and Actionability Checks: Before any interaction, Playwright automatically waits for elements to be visible, enabled, and stable. This reduces flaky tests by ensuring the element is ready for action, closely mimicking real user behavior.
- Customizable Action Options: Actions like click and dblclick support options like position, timeout, and trial mode for readiness checks.
- Flexible Interaction Controls: Interaction methods allow configuring mouse buttons, click counts, delay intervals, and keyboard modifiers (e.g., Shift, Control) to simulate diverse user inputs.
Handling Multiple Elements with count(): The count() method returns the number of elements matching a locator, enabling assertions about element quantity and supporting tests involving lists or groups. - Advanced Element Targeting: Locators can select elements based on text, alt text, title, or test IDs.
- Shadow DOM Support: Playwright locators can access elements inside Shadow DOMs by default, allowing testing of encapsulated web components. However, XPath selectors cannot pierce shadow boundaries.
- Filtering and Chaining Locators: Locators can be refined by chaining or filtering based on text, child elements, or other conditions, enabling precise selection within complex or nested DOM structures.
CSS Selectors in Playwright
With Playwright, developers can leverage CSS selectors to locate and interact with web elements:
- Element Selector: Selects elements based on the tag name. Example, the below command selects all paragraph elements.
await page.locator('p');- Class Selector: Selects elements based on the class name. Example, the below command selects all elements with the class myClass.
await page.locator('.myClass');- ID Selector: Selects an element based on its ID. Example, select the element with the ID myID using the command
await page.locator('#myID');- Attribute Selector: Selects elements based on an attribute and its value. Example, the below command selects all text input elements.
await page.locator('input[type="text"]');Read More: Xpath Vs CSS Selector: Key Differences
- Combining Selectors: Combines different selectors for precision. Example, the below command selects a button with class myClass and text “Submit“.
await page.locator('button.myClass:has-text("Submit")');- Visible Pseudo-class: Selects elements that are visible on the page. Example, the below command selects all visible div elements.
await page.locator('div:visible');- Has Pseudo-class: Selects elements that contain specific other elements. Example, the below command selects div elements containing elements with class childClass.
await page.locator('div:has(.childClass)');- Not Pseudo-class: Selects elements that do not match a condition. Example, the below command selects div elements that do not have class excludeClass.
await page.locator('div:not(.excludeClass)');- FirstChild Pseudo-class: Selects the first child element. Example, the below command selects the first child div element.
await page.locator('div:first-child');- LastChild Pseudo-class: Selects the last child element. Example, the below command selects the last child div element.
await page.locator('div:last-child');- Shadow DOM Selector: Selects elements in the Shadow DOM. Example, the below command selects span elements inside a div with ID shadow-root.
await page.locator('div#shadow-root >> css=span');- Chained Selectors: Chains selectors for relative search. Example, the below command selects span with class child inside a div with class parent.
await page.locator('div.parent >> css=span.child');- CSS Equals: Specifies a CSS selector. Example, the below command selects div elements with class myClass.
await page.locator('css=div.myClass');- Visible Pseudo-class with Text: Selects visible elements with specific text. Example, the below command selects visible paragraph elements with the text “Hello“.
await page.locator('p:visible:has-text("Hello")');- Nth-match Pseudo-class: Selects the nth matching element. Example, the below command selects the second div with class myClass.
await page.locator('div:nth-match(2, .myClass)');- Playwright-specific selector: Playwright selectors provide additional functionality. Example, the below command selects a React component named MyComponent.
await page.locator('_react=MyComponent');- Has-text Pseudo-class: Selects elements containing specific text. Example the beloc command, selects paragraph elements containing the text “Hello“.
await page.locator('p:has-text("Hello")');- Is Pseudo-class: Matches an element if it matches any of the selectors. Example, the below command, selects paragraph elements that have either class1 or class2.
await page.locator('p:is(.class1, .class2)');- XPath Selector: Used to select elements using XPath expressions. Example the below command selects div elements with class myClass.
await page.locator('//div[@class="myClass"]');- Custom Selector Engine: Allows you to define your own selector engine. Example: Define a custom selector to select elements based on a specific data attribute:
// Define your custom selector engine
playwright.selectors.register('data-testid', {
create(root, target) {
return root.querySelector(`[data-testid="${target}"]`);
},
});
// Use your custom selector
await page.locator('data-testid=myTestId');
This example creates a custom selector engine to select elements based on a data-testid attribute and uses it to select an element with data-testid=”myTestId”.
Xpath Selectors in Playwright
In Playwright, XPath selectors offer a flexible way to pinpoint elements on a webpage, beyond just their tag, class, or ID. They allow developers to navigate through the webpage structure and select elements based on a range of conditions.
- Tag Selector: You can select all elements of a particular type. For example, you can select all paragraph elements using
//p
- Attribute Selector: XPath selectors can find elements with a specific attribute. For example, you can find all div elements with the class myClass.
//div[@class="myClass"]
- Text Content Selector: XPath can select elements based on their inner text. So, You can find paragraph elements that contain exactly the text “Hello” using
//p[text()="Hello"]
- Substring Selector: XPath’s contains() function can select elements whose text includes a certain substring. For example, you can find paragraph elements that contain “Hello” anywhere in their text using
//p[contains(text(), "Hello")]
- Sibling Selector: Using XPath, you can find elements in relation to others. For instance, you can select all div elements that directly follow another div using
//div/following-sibling::div
- Position Selector: XPath allows selecting elements based on their order in the webpage. For instance, you can select the first div element on the page using
//div[1]
In short, XPath selectors provide a versatile toolkit to navigate and select elements on a webpage when using Playwright, often proving handy when CSS selectors might not be enough.
Also Read: Cross Browser Testing using Playwright
How to Create Locators in Playwright
In Playwright, locators are used as labels put on web page elements to find them so as to interact with them. A locator helps you find an element example a button, and gives you unique information about the button that can be used by the Playwright to interact with and automate the said button.
You create a locator using the page.locator() function. You pass a selector into this function, which can be a description based on the element’s tag, class, or other attributes.
Here’s an example of how to create a locator using page.locator():
const button = page.locator('button.myButton');In this example, You’re telling Playwright to find a button with the class myButton and label it as button.
Once you have a locator, you can ask the Playwright to perform actions with it. For example, you can tell Playwright to click the button like this:
await button.click();
This is like saying, “Playwright, click on the element labeled as ‘button’.”
Find the number of elements for a given Locator
If you want to know how many elements match the locator, you can ask Playwright to count them:
const numberOfButtons = await button.count();
This is like saying, “Playwright, how many ‘button’ labels did you find?”
Create New Playwright Locator based on an existing Locator
You can even create new locators based on existing ones. This is like adding another sticker to the ones already there:
const smallButton = button.locator('.small');This is like saying, “Playwright, among the elements labeled button, find those with the class small and label them smallButton.”
In short, locators are a simple and powerful way to interact with web page elements in Playwright.
Know more about Playwright Capabilities
Best Practices for using Playwright Selectors
When using playwright selectors best practices, it’s kind of like you’re setting up directions for Playwright to find its way around a webpage. So, here are a few tips to keep in mind:
- Avoid overly specific selectors that rely too heavily on a specific structure or attribute values that may change.
- Be mindful of dynamic content: If parts of the webpage change often, like ads or timestamps, make sure not to tie your selectors to those to avoid exceptions and errors.
- Prioritize user-visible attributes since it’s easier to maintain tests if your selectors are based on text or other attributes that you can see when you look at the page, rather than hidden attributes.
- Use selector chaining: In Playwright, you can start with a broad locator and then chain more specific ones onto it. This makes your code easier to read and your selectors more robust.
- Use waitForSelector cautiously: When navigating, it’s good to wait for a landmark to show up before proceeding. But in Playwright, be cautious about using waitForSelector for every single action – it might slow your tests down a lot. Instead, use waitForLoadState after actions that cause navigation.
- Avoid using indexes in selectors because the order of elements can change.
Why Run Playwright Tests on Real Devices?
Playwright tests often pass in local or headless environments but fail when exposed to real browsers and devices. Differences in rendering, timing, and DOM behavior can affect selector reliability and UI stability, making real-device testing essential.
- Validate selector behavior across browsers: Playwright selectors depend on how browsers expose the DOM and accessibility attributes. Real-device testing ensures selectors target the correct elements across Chrome, Firefox, Safari, and Edge.
- Expose timing and interaction issues: Real devices reveal delays caused by actual hardware, browser rendering, and network conditions that are often missed in local or simulated runs.
- Ensure consistent user experience: Functional success does not guarantee visual correctness. DOM or selector changes can unintentionally impact layout, spacing, or alignment on different browsers.
To bridge this gap between local test results and real user conditions, BrowserStack provides access to 3,500+ real browsers and device combinations, allowing Playwright tests to be validated in environments that closely match how applications are actually used.
BrowserStack Automate enables running Playwright tests on real browsers and operating systems, validating selector reliability in production-like conditions. Percy complements this by catching visual regressions caused by DOM or selector changes, ensuring UI consistency across environments.
Conclusion
Playwright selectors play a major role in keeping tests stable as the UI evolves. Using the right selector type reduces flakiness, improves readability, and cuts down maintenance caused by small DOM changes.
Selector behavior can still vary across browsers, even when tests pass locally. Running Playwright tests on real browsers and devices with BrowserStack Automate helps confirm selector reliability in real user conditions and prevents unexpected failures later.


