The first time a Playwright test started growing beyond a few files, a familiar question surfaced in my mind—how long before this becomes hard to maintain? Locators were scattered, small UI changes broke multiple tests, and fixing one failure often created two more.
That discomfort is what pushed me to look closer at the Page Object Model in Playwright. Not as a pattern mentioned in passing, but as a way to regain control over test structure without slowing down execution.
Once I understood how Playwright POM reshapes test readability and change management, the difference became hard to ignore.
Overview
The Page Object Model in Playwright helps write clean, maintainable tests by separating page interactions from test logic. It reduces code duplication, improves readability, and makes large test suites easier to manage.
Advantages of Page Object Model in Playwright
- Easy Maintenance: Centralizes element locators and actions, simplifying updates when the UI changes.
- Increased Reusability: Allows reuse of page objects across multiple tests, reducing redundancy.
- Improved Readability: Makes test scripts more readable by abstracting complex interactions.
- Reduced Code Duplication: Encapsulates common actions in page objects, minimizing repetitive code.
- Better Test Management: Organizes test code logically, making it easier to manage and scale.
- Enhanced Debugging: Isolates issues within specific page objects, aiding in quicker identification and resolution.
This article breaks down how that shift happens and why the Page Object Model fits naturally into Playwright-based automation.
What is a Page Object Model?
Popularly known as POM, the Page Object Model is a design pattern that creates a centralized repository for storing web elements. It helps reduce code duplication and improves the maintainability of test scripts.
In Page Object Model, each web page of an application is represented as a separate class. These classes contain only the elements specific to their respective pages, along with methods to interact with them. Testers use these page objects to perform actions on the application, keeping tests clean and organized.
What is Page Object Model in Playwright?
The Page Object Model (POM) in Playwright is a design pattern that helps you organize test code by separating test logic from page interactions. Each page (or significant UI component) is represented as a class containing locators and actions, making tests easier to read, maintain, and scale.
- Encapsulates page elements and actions in reusable classes
- Keeps test files clean and focused on assertions, not selectors
- Reduces duplication by centralizing locators and workflows
- Makes tests more resilient to UI changes
- Improves collaboration between QA and developers
In Playwright, POM works naturally with the Page object, allowing you to define locators once and reuse them across multiple tests.
Example:
class LoginPage {

  constructor(page) {

    this.page = page;

    this.username = page.locator('#username');

    this.password = page.locator('#password');

    this.loginBtn = page.locator('#login');

  }


  async login(user, pass) {

    await this.username.fill(user);

    await this.password.fill(pass);

    await this.loginBtn.click();

  }

}
Using POM in Playwright leads to cleaner tests, faster updates, and more scalable automation, especially for large test suites.
Advantages of Page Object Model in Playwright
Here are the key advantages of using the Page Object Model in Playwright:
- Easy Maintenance: Since web automation relies heavily on the DOM structure and selectors, the Page Object Model simplifies maintenance. Changes in the DOM or selectors require updates only in the page object, avoiding modifications across multiple test scripts.
- Increased Reusability: POM promotes code reuse by allowing test scripts to share common page interactions. Custom helper methods can be created within page objects to reduce redundant code further, saving time and effort.
- Improved Readability: By keeping tests independent and focused, the model enhances the clarity and readability of test scripts.
- Reduced Code Duplication: Encapsulating common page actions within page objects prevents repetitive code, enabling multiple tests to reuse the same methods.
- Better Test Management: Organizing related elements and actions within dedicated page objects results in a more structured and manageable test suite.
- Enhanced Debugging: Clear separation of page logic provides better traceability. When a test fails, identifying and fixing issues is easier within the specific page object rather than searching through multiple test files.
Disadvantages of Page Object Model in Playwright
While the Page Object Model offers many benefits, it also comes with some drawbacks to consider:
- Initial Setup Time: Initial design and building framework take some time.
- Advanced Skillset: Good coding skills are required to set the POM framework
- Higher Risk: Elements are stored in a shared file, so even a tiny mistake in the page object file can lead to breaking the whole test suite.
- Increased Complexity: For simple applications or small test suites, the POM can introduce unnecessary complexity by requiring additional classes and methods.
- Tight Coupling of Interdependencies: If page objects are not well-designed, they can become tightly coupled, making it difficult to modify one without affecting others.
- Limited Flexibility: The rigid structured nature of POM can make it harder to adapt to new testing strategies or tools without significant rework.
Read More: Design Patterns in Automation Framework
Implementing Page Object Model in Playwright
Here are the prerequisites and steps to effectively implement the Page Object Model in Playwright:
Pre-Requisites:
- Install Visual Studio Code: Download and Install Visual Studio Code(VSCode).
- Install NodeJS: Download and Install Node JS
Steps to get started with Page Object Model in Playwright
Follow these steps get started with the POM in Playwright:
Step 1: Create a fresh new directory (ex: PlaywrightDemo) in VSCode
Step 2: Open Directory in Visual Studio Code. From VS code
Click on File > Open Folder > Choose newly Created Folder (PlaywrightDemo)
Step 3: From the VS Code, Click on Terminal Menu > Click on New Terminal
Step 4: Enter the below command to start the Playwright installation
npm init playwright@latest
Note: The above command asks a set of questions. Please provide appropriate inputs. In this tutorial, you are using typescript language.
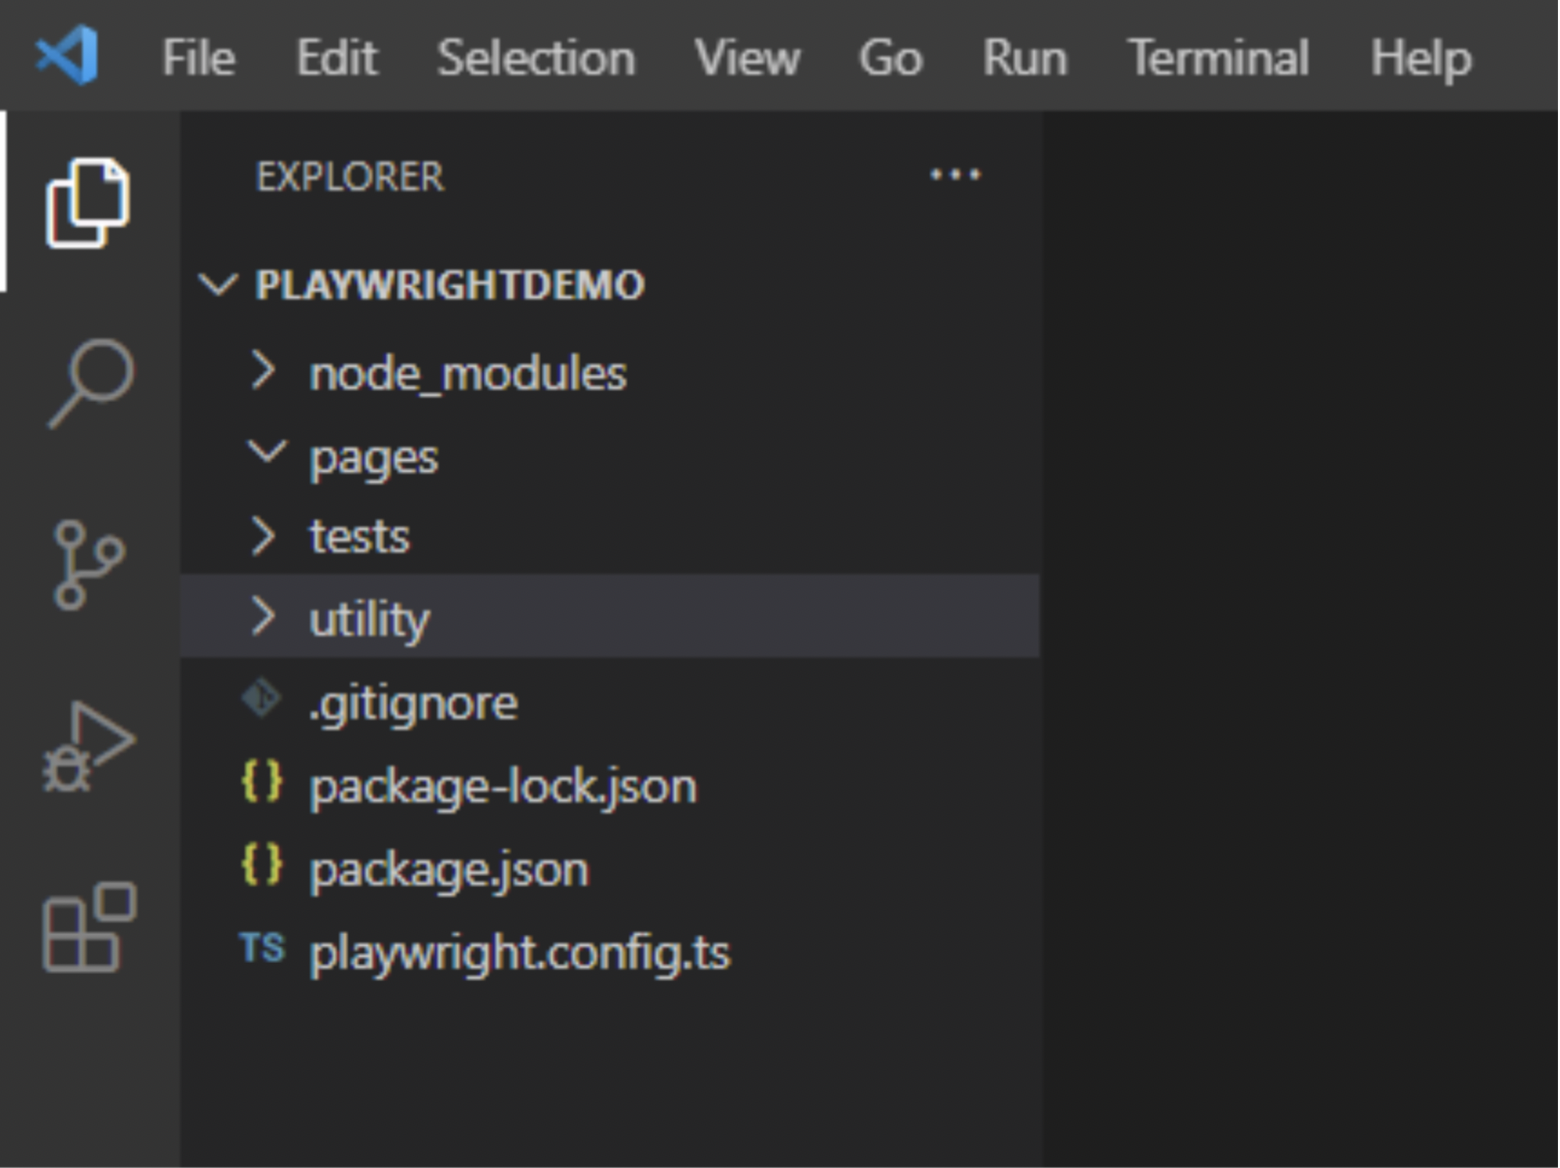
Once you run the above command, the below set of files and folders will be automatically created
- tests folder: This folder contains actual test scripts. By default, an example.spec.ts file will be created inside this folder.
- .gitignore: This file helps if you are using git repository
- package.json and package-lock.json: This file helps to track dependencies, create a shortcut for running tests, etc.
- playwright.config.ts: This is the global configuration file for the Playwright, which you can configure with available options.
Set up/Add additional folders for Playwright page object model
- pages folder: Since the POM pattern is being used, the pages folder contains all the relevant page objects.
- utility folder: The common code/function, which can be used in different tests can be placed here. For example, generating a random number, getting a date and time, etc.
Step 5: Install Browsers
Install browsers using the command
npx playwright install
Once you complete the above steps, your Playwright Test Automation Project/ Framework should look like the below.
Here is a simple scenario.
Navigate to the Browserstack home page.
Click on Products Menu
Verify All Submenus are Present
Step 6: Create a page object file inside the pages folder and name it home.page.ts
To achieve the above flow, you need a URL, menu element, etc.
//home.page.ts
import { expect, Locator, Page } from '@playwright/test';
export class BrowserstackHomePage {
readonly url ="https://www.browserstack.com/";
readonly page: Page;
readonly browserstackLogo: Locator;
readonly productsMenu: Locator;
readonly productmenudropdown:Locator

constructor(page: Page) {
this.page = page;
this.browserstackLogo = page.locator('#logo');
this.productsMenu = page.locator('#product-menu-toggle');
this.productmenudropdown = page.locator('#product-menu-dropdown >div > ul >li >a >div[class="dropdown-link-heading"]');
}

async goto(){
await this.page.goto(this.url);
}
async clickOnProducts(){
await this.productsMenu.waitFor({state:"visible"});
await this.productsMenu.click();
}
}
Step 7: Create a test using the above page object file.
Create a test file inside the tests folder and name it home.test.ts
To create a test, you need to import the page object file. Like below.
import { BrowserstackHomePage } from '../pages/home.page';Once you import, you need to write the script and verify the submenus.
// home.test.ts
import { test, expect } from '@playwright/test';
import { BrowserstackHomePage } from '../pages/home.page';
test('Browserstack homepage verification', async ({ page }) => {
const homepage = new BrowserstackHomePage(page);
await homepage.goto();
await homepage.clickOnProducts();
await expect(homepage.productmenudropdown).toContainText(["Live", "Automate", "Percy", "App Live", "App Automate"])
});
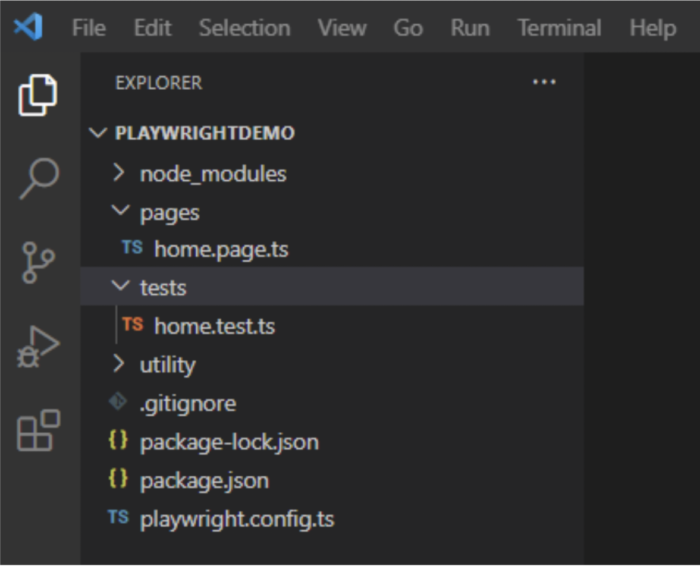
After the creation of the above test file, your project looks like below
Step 8: Execute your test.
Execute you are using the below command
npx playwright test
By default Playwright test runs in headless mode, to run in headed mode use -– headed flag.
npx playwright test -–headed
Now that you have the tutorial in place, know that Playwright is supported by Browserstack which provides thousands of real devices where you can verify applications on real devices. A few advantages of Playwright are:
- Easy Setup and Configuration
- Multi-Browser Support
- Multi-Language Support
- Parallel Browser Testingomes in handy when multiple web pages have to be tested simultaneously.
- Built-in Reporters:
- Typescript Support out of the box
- CI/CD Integration Support
- Debugging Tools Support
Using Browserstack Integration with Playwright you can integrate our Playwright tests and make automation testing easier through robust design patterns. Not only that, speed up your Playwright tests by 30x with parallel testing to expand your test and browser coverage without compromising on build times.
Run Playwright Tests On BrowserStack
When to Use Page Object Model in Playwright
Page Object Model is most effective when Playwright test suites begin to grow in size, scope, or team ownership. It introduces structure by separating UI interactions from test logic, making tests easier to read, update, and scale over time.
Key situations where Page Object Model fits best include:
- Multiple tests interacting with the same pages, forms, or components, leading to repeated locators and actions.
- Frequent UI changes where updating selectors in one place is preferable to fixing multiple failing tests.
- Collaboration across teams where consistent test patterns reduce onboarding time and review overhead.
- Complex user flows such as authentication, checkout, dashboards, or role-based access paths.
- Long-running test suites where maintainability and clarity are more important than quick scripting.
Playwright Page Object Model Folder Structure
A well-defined folder structure keeps Page Object Model maintainable as the Playwright test suite grows. It separates concerns clearly, ensuring that page logic, test logic, and shared utilities do not bleed into each other.
Common folders used in a Playwright Page Object Model setup include:
- pages/: Stores page object classes, with one file per page or major UI section. Each file encapsulates locators and user actions related to that page.
- tests/: Contains test files that focus only on test scenarios and assertions, without directly handling selectors or low-level browser actions.
- fixtures/: Holds custom Playwright fixtures used to initialize page objects, authenticated states, or shared contexts.
- utils/: Includes reusable helpers such as test data generators, configuration helpers, or common workflows that are not page-specific.
- config/: Optional folder for environment-specific settings, constants, or test configuration values.
This structure ensures that changes to the UI affect only page object files, while test files remain stable and easy to understand.
Creating Reusable Page Objects in Playwright
Reusable page objects are built around user behavior rather than UI structure. The goal is to expose meaningful actions that tests can reuse across different scenarios without duplicating logic or selectors.
Key principles for creating reusable page objects include:
- Encapsulate interactions, not steps: Page objects should provide methods such as login(), searchProduct(), or submitForm() instead of exposing individual clicks or fills.
- Parameterize actions: Methods should accept inputs so the same page object works for multiple test cases and data sets.
- Hide locators inside the page object: Locators should remain private to prevent tests from relying on implementation details that may change.
- Keep methods focused and composable: Small, single-purpose methods are easier to reuse and combine across different workflows.
- Avoid test-specific logic: Page objects should represent how the page behaves, not how a specific test expects it to behave.
By following these practices, page objects remain flexible, readable, and resilient as the application and test coverage evolve.
Handling Locators and Assertions in Page Objects
Managing locators and assertions correctly is critical to keeping Page Object Model clean and maintainable in Playwright. Clear boundaries prevent page objects from becoming tightly coupled to test logic.
Effective practices for handling locators and assertions include:
- Define locators inside page objects only: Locators should never appear in test files. Centralizing them inside page objects ensures UI changes require updates in one place.
- Use Playwright locators, not selectors: Playwright locators provide auto-waiting and resilience, making them better suited for dynamic UIs than raw selectors.
- Keep locators descriptive and readable: Naming locators based on purpose rather than structure improves clarity and reduces confusion when UI changes.
- Place assertions based on intent: Page-level assertions, such as verifying successful navigation or form submission, fit well inside page objects. Scenario-specific assertions belong in test files.
- Avoid overloading page objects with validations: Excessive assertions inside page objects reduce flexibility and make reuse harder across different test scenarios.
This separation ensures page objects stay focused on behavior, while tests retain control over validation logic.
Page Object Model with Playwright Test Fixtures
Playwright Test fixtures make Page Object Model cleaner by centralizing setup and injecting ready-to-use page objects into tests. This reduces repeated initialization code and keeps test files focused on scenarios rather than wiring.
Key ways fixtures improve Page Object Model usage include:
- Standardized page object initialization: Fixtures can create page object instances once per test and pass them into test blocks, avoiding repeated constructors in every file.
- Cleaner, more readable tests: Tests can directly use loginPage, dashboardPage, or similar objects without manual setup, making intent obvious.
- Shared context and authentication support: Fixtures can preload authenticated storage state or create a logged-in context, ensuring all page objects operate in the right session.
- Consistent environment configuration: Base URLs, timeouts, and runtime settings can be enforced through fixtures so page objects behave consistently across the suite.
- Scalable patterns for large suites: As more pages and flows are added, fixtures keep the suite organized by managing dependencies and lifecycle in one place.
Using fixtures with POM keeps Playwright tests modular, less repetitive, and easier to scale across multiple contributors and environments.
Page Object Model vs Screenplay Pattern in Playwright
Both Page Object Model (POM) and the Screenplay Pattern aim to reduce duplication and make Playwright tests easier to scale. The difference is where the abstraction sits: POM organizes automation around pages, while Screenplay organizes it around user roles and tasks.
Choosing between them depends on how complex the product workflows are and how much structure the test suite needs.
| Aspect | Page Object Model (POM) in Playwright | Screenplay Pattern in Playwright |
|---|---|---|
| Core idea | Encapsulates UI locators + actions inside page classes | Models users (actors) performing tasks using abilities |
| Primary abstraction | Pages/screens and their behaviors | Tasks, interactions, questions, and roles |
| Best suited for | UI flows with clear page boundaries (login, checkout, dashboard) | Complex workflows with multiple roles and reusable tasks |
| Test readability | Reads like “call methods on a page” | Reads like “actor attempts tasks and asks questions” |
| Reuse strategy | Reuse via shared page methods | Reuse via shared tasks/interactions across actors |
| Maintenance effort | Usually lower and simpler to adopt | Higher upfront structure and more moving parts |
| Team onboarding | Easier for most teams to understand quickly | Requires learning additional concepts and conventions |
| Risk of over-abstraction | Lower if kept focused on behaviors | Higher if tasks/actors become too granular |
| Fit with Playwright APIs | Natural alignment with page and locator usage | Works, but needs extra wrapper layers around Playwright primitives |
| Typical scaling approach | Add more page objects and keep tests scenario-focused | Build a task library and compose scenarios per role |
Conclusion
The POM or Page Object Model is a powerful design pattern that significantly improves the maintainability, readability, and scalability of Playwright test automation. By organizing page elements and actions into dedicated classes, it reduces code duplication and simplifies updates when application interfaces change.
Integrating Playwright tests with BrowserStack Automate further enhances automation efficiency by combining robust design patterns with a seamless cloud infrastructure. BrowserStack offers access to thousands of real devices and browsers, ensuring comprehensive test coverage across multiple platforms.
Features like parallel testing accelerate execution without compromising speed, while built-in debugging tools and detailed test reports facilitate faster issue identification and resolution. Support for CI/CD pipelines enables continuous testing and quicker delivery cycles, making Playwright automation more scalable and reliable.
Adopting this approach empowers teams to build resilient test suites that scale effortlessly with evolving web applications.


