When choosing a test automation framework, speed, stability, and ease of use often determine long-term success. TestCafe offers a strong balance of all three. It simplifies end-to-end testing by allowing developers and QA teams to write tests in JavaScript or TypeScript and run them directly in the browser, without needing WebDriver, browser plugins, or complex configurations.
This TestCafe tutorial will walk you through the fundamentals of setting up and using the framework for reliable TestCafe automation. It explores how to install TestCafe, write your first test, and scale your testing across browsers and platforms, including integration with platforms like BrowserStack.
What is TestCafe Framework?
TestCafe is an open-source, JavaScript-based framework used to automate end-to-end testing of web applications. It runs on Node.js and enables developers and QA professionals to write, execute, and maintain UI tests with minimal setup.
Unlike traditional automation tools that require WebDriver or browser-specific plugins, TestCafe executes tests directly in the browser, streamlining the testing process.
With a straightforward API, TestCafe allows developers to write tests quickly using JavaScript or TypeScript. Its intuitive design makes it accessible to experienced testers and those new to test automation, reducing the learning curve and allowing teams to run tests effortlessly.
It supports all major browsers, including Chrome, Firefox, Safari, and Microsoft Edge, and can run tests in headless mode for faster execution, especially in CI/CD pipelines.
While TestCafe offers multiple features, running tests on real devices is crucial for accuracy. To enhance test reliability and achieve broader coverage, integrate TestCafe with BrowserStack to run tests seamlessly on real devices and browsers in the cloud.
History of TestCafe Automation Framework
TestCafe was officially released in 2016 when Selenium was the most popular framework in the test automation industry. Setting up a robust testing framework using Selenium was never an easy task. One had to install JDK, TestNG/JUnit, and many other jars as per the requirement of the framework. The framework set up took a lot of time and effort, making it difficult for QAs especially those working as beginners in test automation. Moreover, even after setting up the framework, the results were not satisfactory due to test flakiness and slowness.
The DevExpress team wanted to find the solution for this to eliminate the complicated setup. Finally, in October 2016 the DevExpress team announced a NodeJS-based automation framework, which works out of the box. Till today they are maintaining its zero-configuration policy at TestCafe. This easy configuration made TestCafe liked by the QAs, as reflected by Github data that shows it is used by more than 10,000 users and 9000 stars.
Read More: TestCafe vs Cypress: Core Differences
Advantages of TestCafe Framework
TestCafe offers several advantages, making it a popular choice for developers and QA teams looking for an efficient and reliable test automation tool. Here are some of its key benefits:
- No WebDriver Required: Unlike many traditional testing frameworks, TestCafe doesn’t rely on WebDriver or browser plugins. It uses a proxy server to control browsers, simplifying setup and eliminating compatibility issues.
- Cross-Browser Support: TestCafe supports all major browsers, including Chrome, Firefox, Safari, Edge, and Internet Explorer. It can also run tests in headless mode, making it ideal for continuous integration environments and faster execution times.
- Easy to Set Up and Use: TestCafe’s straightforward installation and simple API make it easy for both experienced testers and beginners to start writing tests quickly.
- Parallel Test Execution: With TestCafe, you can run tests in parallel across multiple browsers, reducing the overall time needed for test execution. This feature is useful for large test suites and CI/CD pipelines, where speed is critical.
- Automatic Waiting: One of TestCafe’s standout features is its automatic waiting mechanism. It waits for elements to appear, animations to complete, and actions to finish before proceeding with the next step. This reduces the need for manual delays and ensures more reliable tests.
- Built-in Reporting and Debugging Tools: TestCafe provides built-in support for generating detailed test reports, screenshots, and videos of test runs. These features help developers and QA teams easily identify issues and debug problems quickly.
- Scalability and Flexibility: TestCafe can be integrated with CI/CD pipelines and cloud testing platforms like BrowserStack. This enables teams to scale their test execution and run tests on real devices and browsers for enhanced reliability.
Read More: TestCafe vs Cypress: Core Differences
Limitation of TestCafe Framework
Although TestCafe provides a range of powerful features, it does have some limitations that may affect certain testing needs. These include:
- Limited Mobile Device Testing: TestCafe doesn’t support testing on real mobile devices natively, requiring third-party integrations like BrowserStack for mobile testing.
- No Support for Older Browsers: It doesn’t support older versions of Safari and Internet Explorer, limiting compatibility testing for some applications.
- No Desktop Application Testing: TesCafe is designed for web applications and doesn’t support testing of native desktop applications.
- Supports only JavaScript/TypeScript: The framework is limited to JavaScript and TypeScript, which may pose a challenge for teams that prefer other programming languages for their automation tests.
- Assertion Library Limitations: Its built-in assertion library makes it challenging to integrate other libraries. While this can simplify setup and ensure stability, it may be restrictive for teams that require specific assertion features.
- Limited Selector Support: Only CSS selectors are supported by default. Using XPath selectors requires workarounds, which can complicate testing for users who rely on XPath for more complex queries.
- Performance with Large Test Suites: Running large test suites can result in performance degradation, especially when executing tests across multiple browsers simultaneously, requiring optimizations for smoother execution.
How to install and set up the TestCafe Framework
To get started with TestCafe, follow these steps to install and set up the framework on your system:
Pre-Requisites:
Step 1: Create a new folder. For example, testcafe-demo
Step 2: Open the newly created folder in Visual Studio Code
Step 3: Create a package.json. Open Visual Studio Code Terminal, Enter the command
npm init
Note: The npm init command asks a set of questions you can answer, to skip just hit Enter
Once the above command execution is successful, you will see the file named package.json. The package.json helps to track all installed dependencies and also helps to create a shortcut for your execution commands.
Step 4: Install TestCafe. TestCafe is available as a node package or node module. To install TestCafe use the below command.
npm i testcafe
Note: Based on your system configuration and an internet connection, it might take some time.
Step 5: Create a tests folder. Unlike other NodeJS-based frameworks, TestCafe doesn’t create any default folder. You need to create the tests folder. The purpose of the tests folder is just to group all relevant tests.
tests folder should be placed in the root of your project folder.
Step 6: Create the first test using TestCafe. Though TestCafe supports Javascript, Typescript, and CoffeeScript. JavaScript is used here, as it is easy to understand.
Consider a Simple Use Case.
- Navigate to https://www.google.com
- Search for BrowserStack
- Click on First Result
- Navigate to website
- Verify the website is BrowserStack
Step7: Create a sample TestCafe script, name it is demo-test.js. Add a JavaScript and TestCafe code for the above scenario.
import { Selector } from 'testcafe';

fixture`Getting Started`

    .page`https://google.com`;


test('Google Search Browserstack', async t => {

    await t

        .maximizeWindow()

        .typeText('input[name="q"]', 'Browserstack')

        .click('input[type="submit"][value="Google Search"]')

        .expect(Selector('#result-stats').exists).ok({ timeout: 5000 })

        .click(Selector('h3').parent('a'))

        .expect(Selector('title').innerText).eql('Most Reliable App & Cross Browser Testing Platform | BrowserStack')

        .wait(1000)

});
In the above code snippet:
- .maximizeWindow() maximizes the browser window.
- typeText() command does the typing job
- click() performs the click action
- expect is used for verification / test assertion.
Step 8: Create the TestCafe configuration file.
The TestCafe always looks for .testcaferc.json or .testcaferc.js file at the root of your project. All the TestCafe configurations will be placed inside this file.
Create .testcaferc.json in your project root directory.
For now, just add the browser name, in the future if you need any configuration for your project you can add it.
{

"browsers": ["chrome"]

}
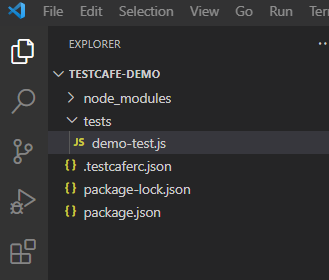
After creating TestCafe configuration file, your project folder structure looks like below.
Step 9: Execute your first TestCafe script by entering the below command in Visual Studio Code Terminal
npx testcafe
The tests start executing, the results will appear in the console as seen below
How to run TestCafe Automation Tests on BrowserStack
BrowserStack enhances TestCafe testing with real device support, a wide range of browsers and OS versions, and seamless CI/CD integration. Features like parallel test execution and automated video recording help improve test speed and debugging, ensuring more accurate results across diverse environments.
BrowserStack provides access to 3500+ real device and browser combinations that enables you to test under real user conditions and get more accurate test results. It supports integration for all major test automation frameworks like Cypress, Selenium, Playwright, Puppeteer, etc.
Note: In order to access the most recent steps, refer to the official BrowserStack Documentation.
To run your TestCafe automation tests on BrowserStack real device cloud, follow these steps:
Step 1: Install TestCafe browserstack npm package
npm i testcafe-browser-provider-browserstack
Step 2: Set the Environment Variable
You need to set the environment variable BROWSERSTACK_USERNAME and BROWSERSTACK_ACCESSKEY
Note: Username and Access Key is unique for each account, get the key from the BrowserStack account page.
Set Environment Variable in Powershell/Visual Studio Terminal
$env:BROWSERSTACK_USERNAME="your_username"
$env:BROWSERSTACK_ACCESS_KEY="your_accesskey"
Set Environment Variable in Windows Command Prompt
set BROWSERSTACK_USERNAME=your_username
set BROWSERSTACK_ACCESS_KEY=your_accesskey
Set Environment Variable in MAC/Linux Terminal
export BROWSERSTACK_USERNAME="your_username"
export BROWSERSTACK_ACCESS_KEY="your_accesskey"
After setting the environment variable you are good to execute the TestCafe on BrowserStack.
Step 3: Get the list of supported browser and operating system combinations by using the below command
npx testcafe -b browserstack
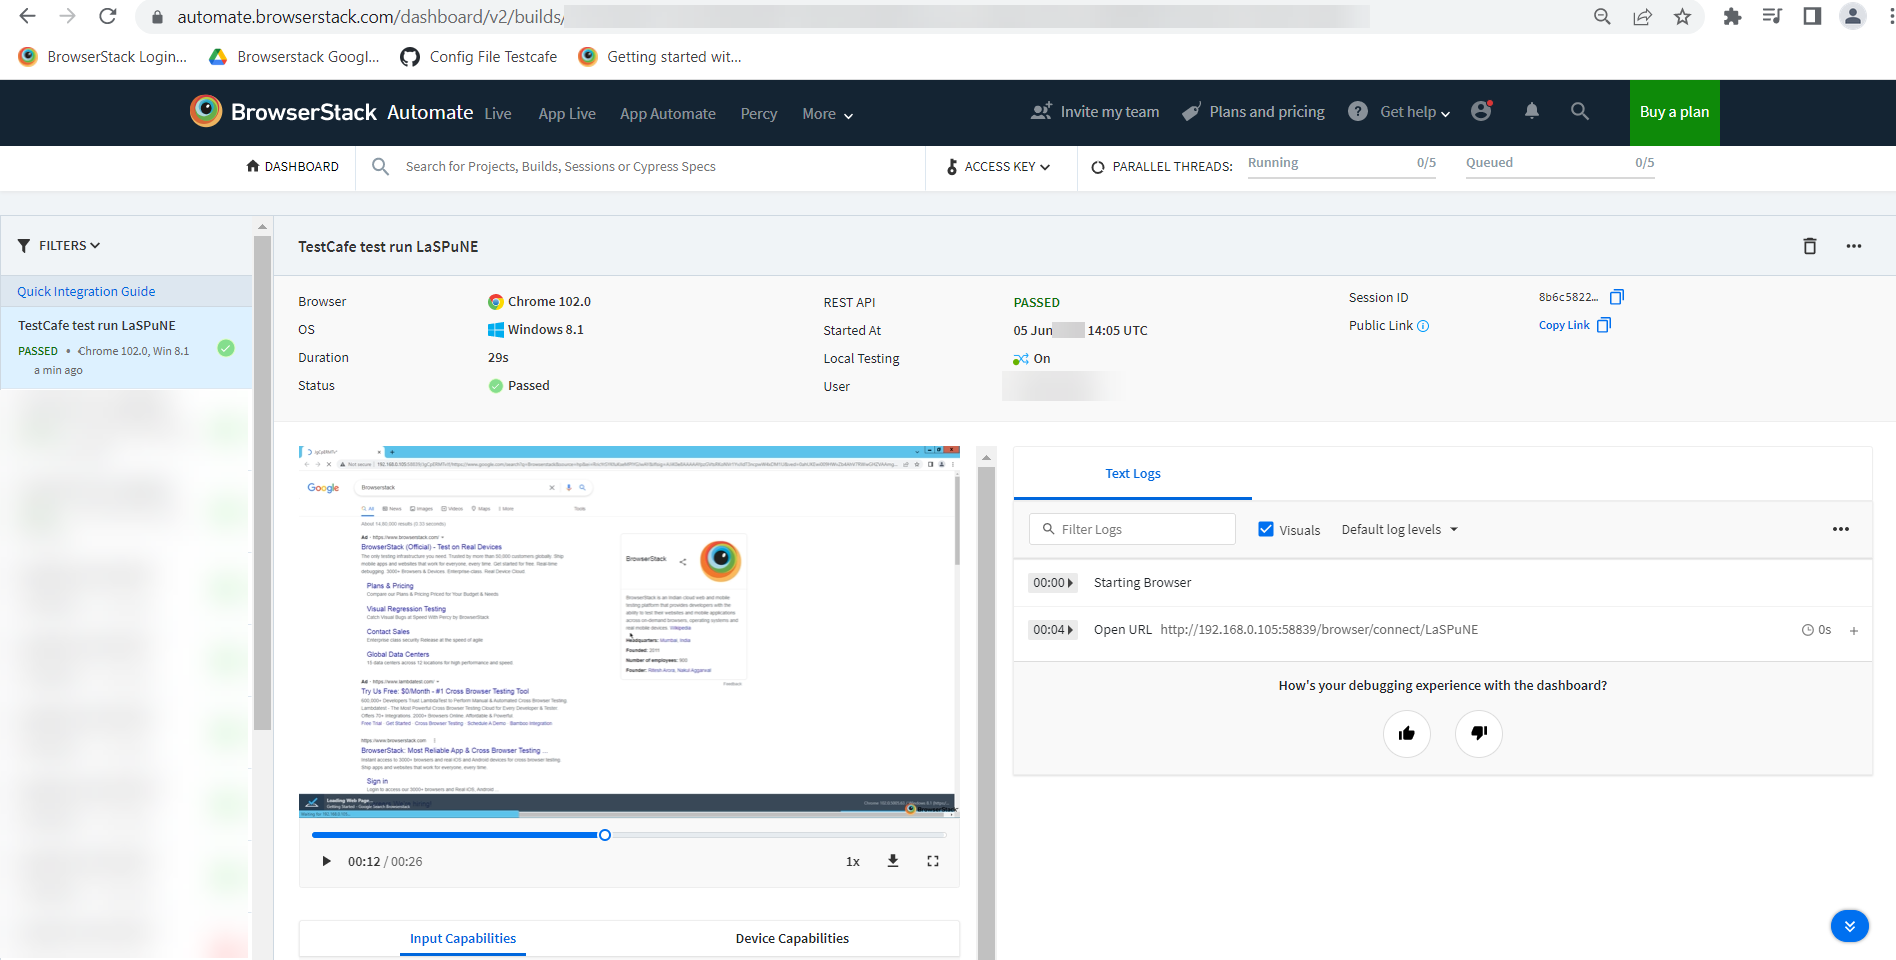
Step 4: Execute Tests on BrowserStack, once you choose a browser device combination from the list of available browser operating system combinations. For example, if you want to execute tests on Chrome 102 on Windows 8.1 enter below command
npx testcafe "browserstack:chrome@102.0:Windows 8.1"
Once the execution is complete, the logs can be shown in the console. And also, you can see the detailed result in the BrowserStack Automate Dashboard as seen below
Conclusion
TestCafe is a robust and developer-friendly automation framework, ideal for fast and reliable web testing using JavaScript or TypeScript. Its easy setup, modern syntax, and built-in parallel test execution make it a strong choice for teams focused on speed and simplicity.
Pairing it with a cloud-based testing platform like BrowserStack ensures greater accuracy and coverage by enabling tests on real devices and browsers, an essential step for delivering high-quality, cross-platform web applications.
