
 Join our Discord
Test Case Maintenance Agent
Keep your test repository aligned with changing requirements using AI that updates existing test cases and fills coverage gaps.
The Test Case Maintenance Agent updates the test cases you already have. You share your latest requirements. It reads them, scans every test case in your project, and finds the ones that no longer match your new spec. Then it drafts the updates and fills the coverage gaps. You review every edit before it lands.
Agentic capabilities
- Requirement-aware updates: The agent compares your new specs against the repository and revises the tests that drifted.
- Coverage-gap detection: The agent spots requirements that have no test and drafts new cases to cover them.
- Reasoned suggestions: Each change arrives with a plain-language reason and a side-by-side comparison.
- Iterative refinement: You steer the output with follow-up prompts, without starting over.
- Background runs: Generation runs in the background and stays tied to your session, so you can keep working in parallel.
- Test case maintenance using BrowserStack AI is only supported in Team Ultimate plans.
- BrowserStack does not train its AI models on the data you provide.
The problem it solves
Test cases drift the moment a requirement changes. The repository keeps describing the old behavior while the product moves on. Someone has to find every affected test, rewrite it, and add coverage for the parts of the flow that are now missing. That work is slow. Teams under deadline pressure often skip it.
Stale test cases cause real damage:
- Tests fail for the wrong reason, because they assert behavior the product no longer has.
- Real regressions hide inside the noise of those false failures.
- New requirements ship with no test coverage at all.
- Testers waste review cycles reconciling old tests against the current spec.
The Test Case Maintenance Agent closes this gap. When your requirements change, it compares them against the test cases already sitting in your project. It then updates whatever no longer matches the new spec. New coverage gaps get filled too. But you review every suggestion before a single test changes.
The maintenance workflow
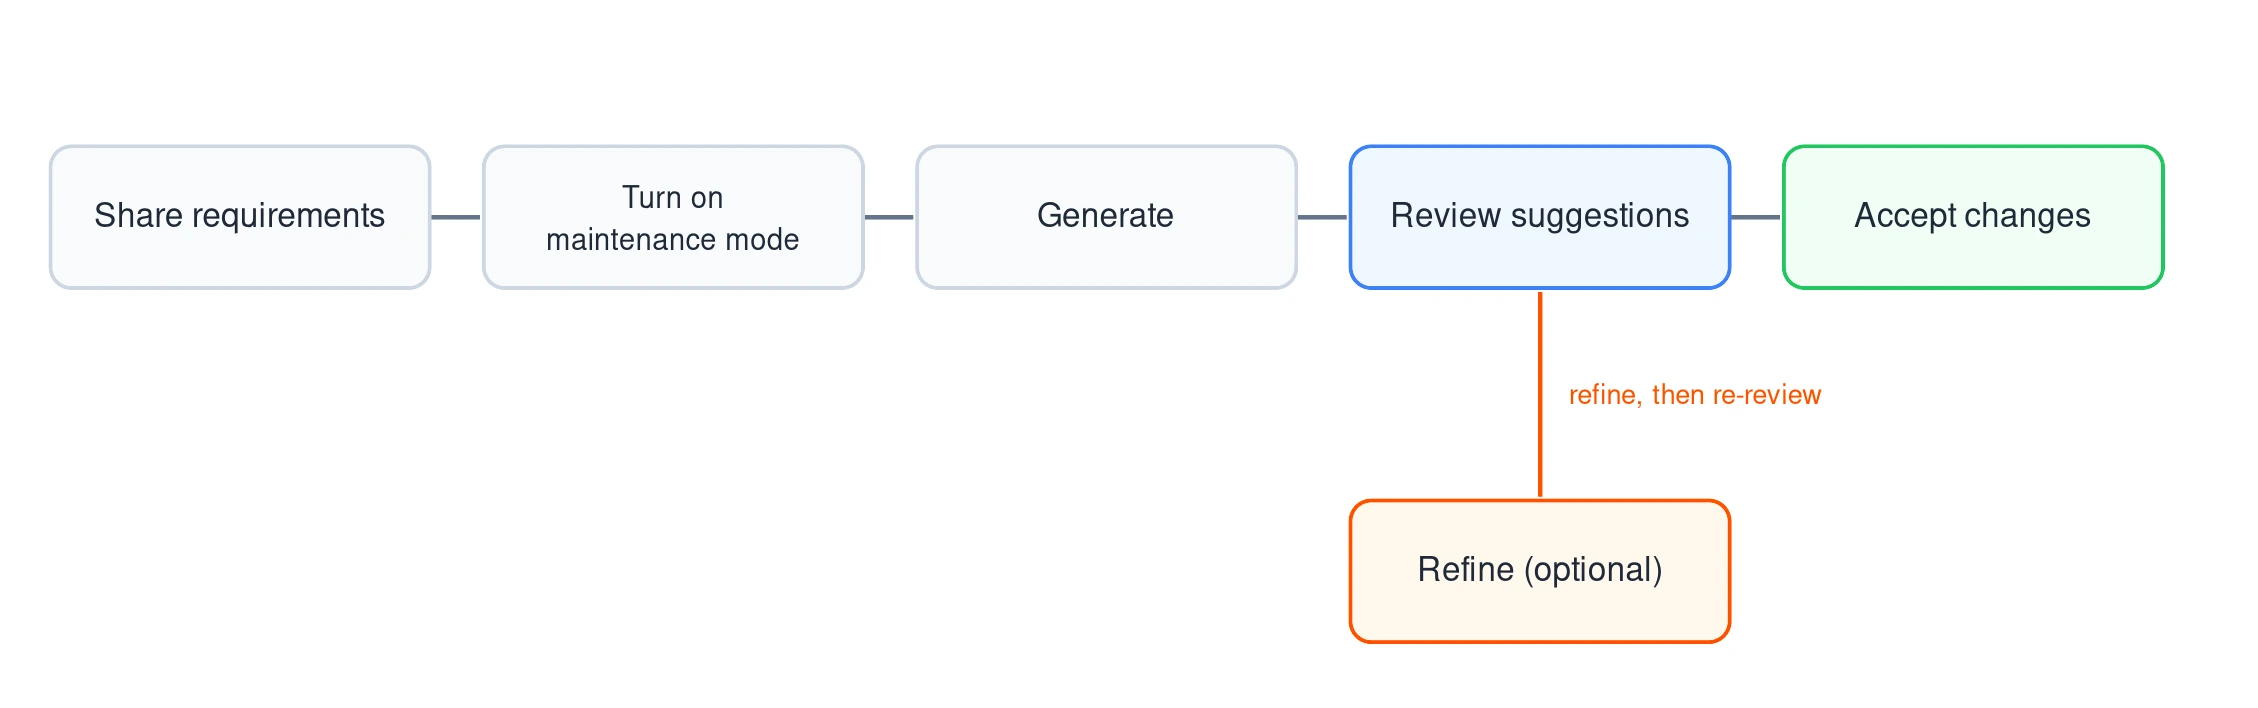
You run the agent on demand, whenever your requirements change. You share the latest spec, scope the folders it can touch, and start the run. The agent then follows four steps.
- Share your latest requirements: Upload a requirement file, such as a PDF or DOCX, or link a Jira issue, Figma frame, or Confluence page. You can also paste requirements or issue links directly.
- The agent scans your repository: It compares your new requirements against your current test cases to find which test cases no longer match.
- The agent suggests updates and fills gaps: It flags the existing tests to update. It also drafts the new tests you are missing.
- You accept the changes: Accepted updates apply to your repository automatically. Nothing changes until you accept it.
You stay in control of scope. The agent updates only the test cases inside the folders you select. It changes nothing until you accept it. Your requirements are never used to train BrowserStack AI models.
The agent suggests updates for system fields only. It does not support custom fields.
Prerequisites
Make sure you have:
- A project on the Team Ultimate plan.
- A set of existing test cases for the agent to update.
- Your latest requirements, ready as a file or as a link from any supported source.
Requirements you can share
The agent works from the requirements you give it. Share one source or several. Combine files with links when a change spans more than one place.
| Source | What you share |
|---|---|
| Requirement file | A document such as a PDF, DOCX, or image that captures the change. |
| Jira | A link to the Jira issue that holds the updated acceptance criteria. |
| Azure DevOps | A link to the Azure work item that tracks the change. |
| Linear | A link to the Linear issue that tracks the change. |
| Figma | A link to the Figma frame that shows the new design. |
| Confluence | A link to the Confluence page that documents the updated spec. |
| SharePoint | A requirement file stored in your SharePoint account. |
| OneDrive | A requirement file stored in your OneDrive account. |
| Free text | Requirements or issue links you paste into the prompt box. |
When you link a tool, the agent opens a short dialog so you can pick the exact item. A tool you have not connected yet shows a connect screen first. Connect it, then pick the item you need. Expand a source for the steps.
Link a Jira issue
- Click Add Requirements and select Jira.
- Select your Host, then the Project that holds the issue.
- Select one or more Issues.
- Click Link to pull the context into the run.
Link an Azure work item
- Click Add Requirements and select Azure.
- Select your Organization, then the Project.
- Select one or more Work Items.
- Click Link to pull the context into the run.
Link a Confluence page
- Click Add Requirements and select Confluence.
- Select your Host, then the Space.
- Select the Page that documents the change.
- Click Link to pull the content into the run.
Link a Figma design
- Click Add Requirements and select Figma.
- Enter the Figma link, then click Import.
- Select the frames you want, then click Save Selection.
File and attachment limits
The maintenance agent reads the same inputs as the rest of BrowserStack’s AI test case generation, so the same limits apply.
Each file you upload must stay within these limits:
| File category | Supported formats | Maximum size | Other limits |
|---|---|---|---|
| Documents |
DOC, DOCX, PDF, RTF
|
25 MB |
25 pages |
| Presentations | PPTX |
10 MB |
25 slides |
| Images |
PNG, JPG, JPEG
|
5 MB |
N/A |
| Data and text |
CSV, JSON, TXT, XLSX
|
500 KB |
N/A |
Each generation also caps how many items you can attach from a linked tool:
| Source | Limit per generation |
|---|---|
| Jira or Azure DevOps | 1 ticket per session. Once a ticket is in the run, you cannot add another in later generations. |
| Confluence | 5 documents per generation. |
| Figma | Any number of Figma links, up to 50 frames in total per generation. |
| Files | 10 files per generation, with one upload per tool. |
If a file is larger than its limit, the upload fails. Split or compress it, then try again.
Run the maintenance agent
The whole run happens inside the Generate Test Cases with AI panel: share the changed spec, turn on maintenance mode, generate, then review and accept. You can refine the suggestions as many times as you need before you accept them.
Share your requirements
To give the agent the spec that changed, follow these steps:
- Open your project and go to Test Cases.
-
Click Work with AI to open the Generate Test Cases with AI panel.

-
Click Add Requirements, then select your source.
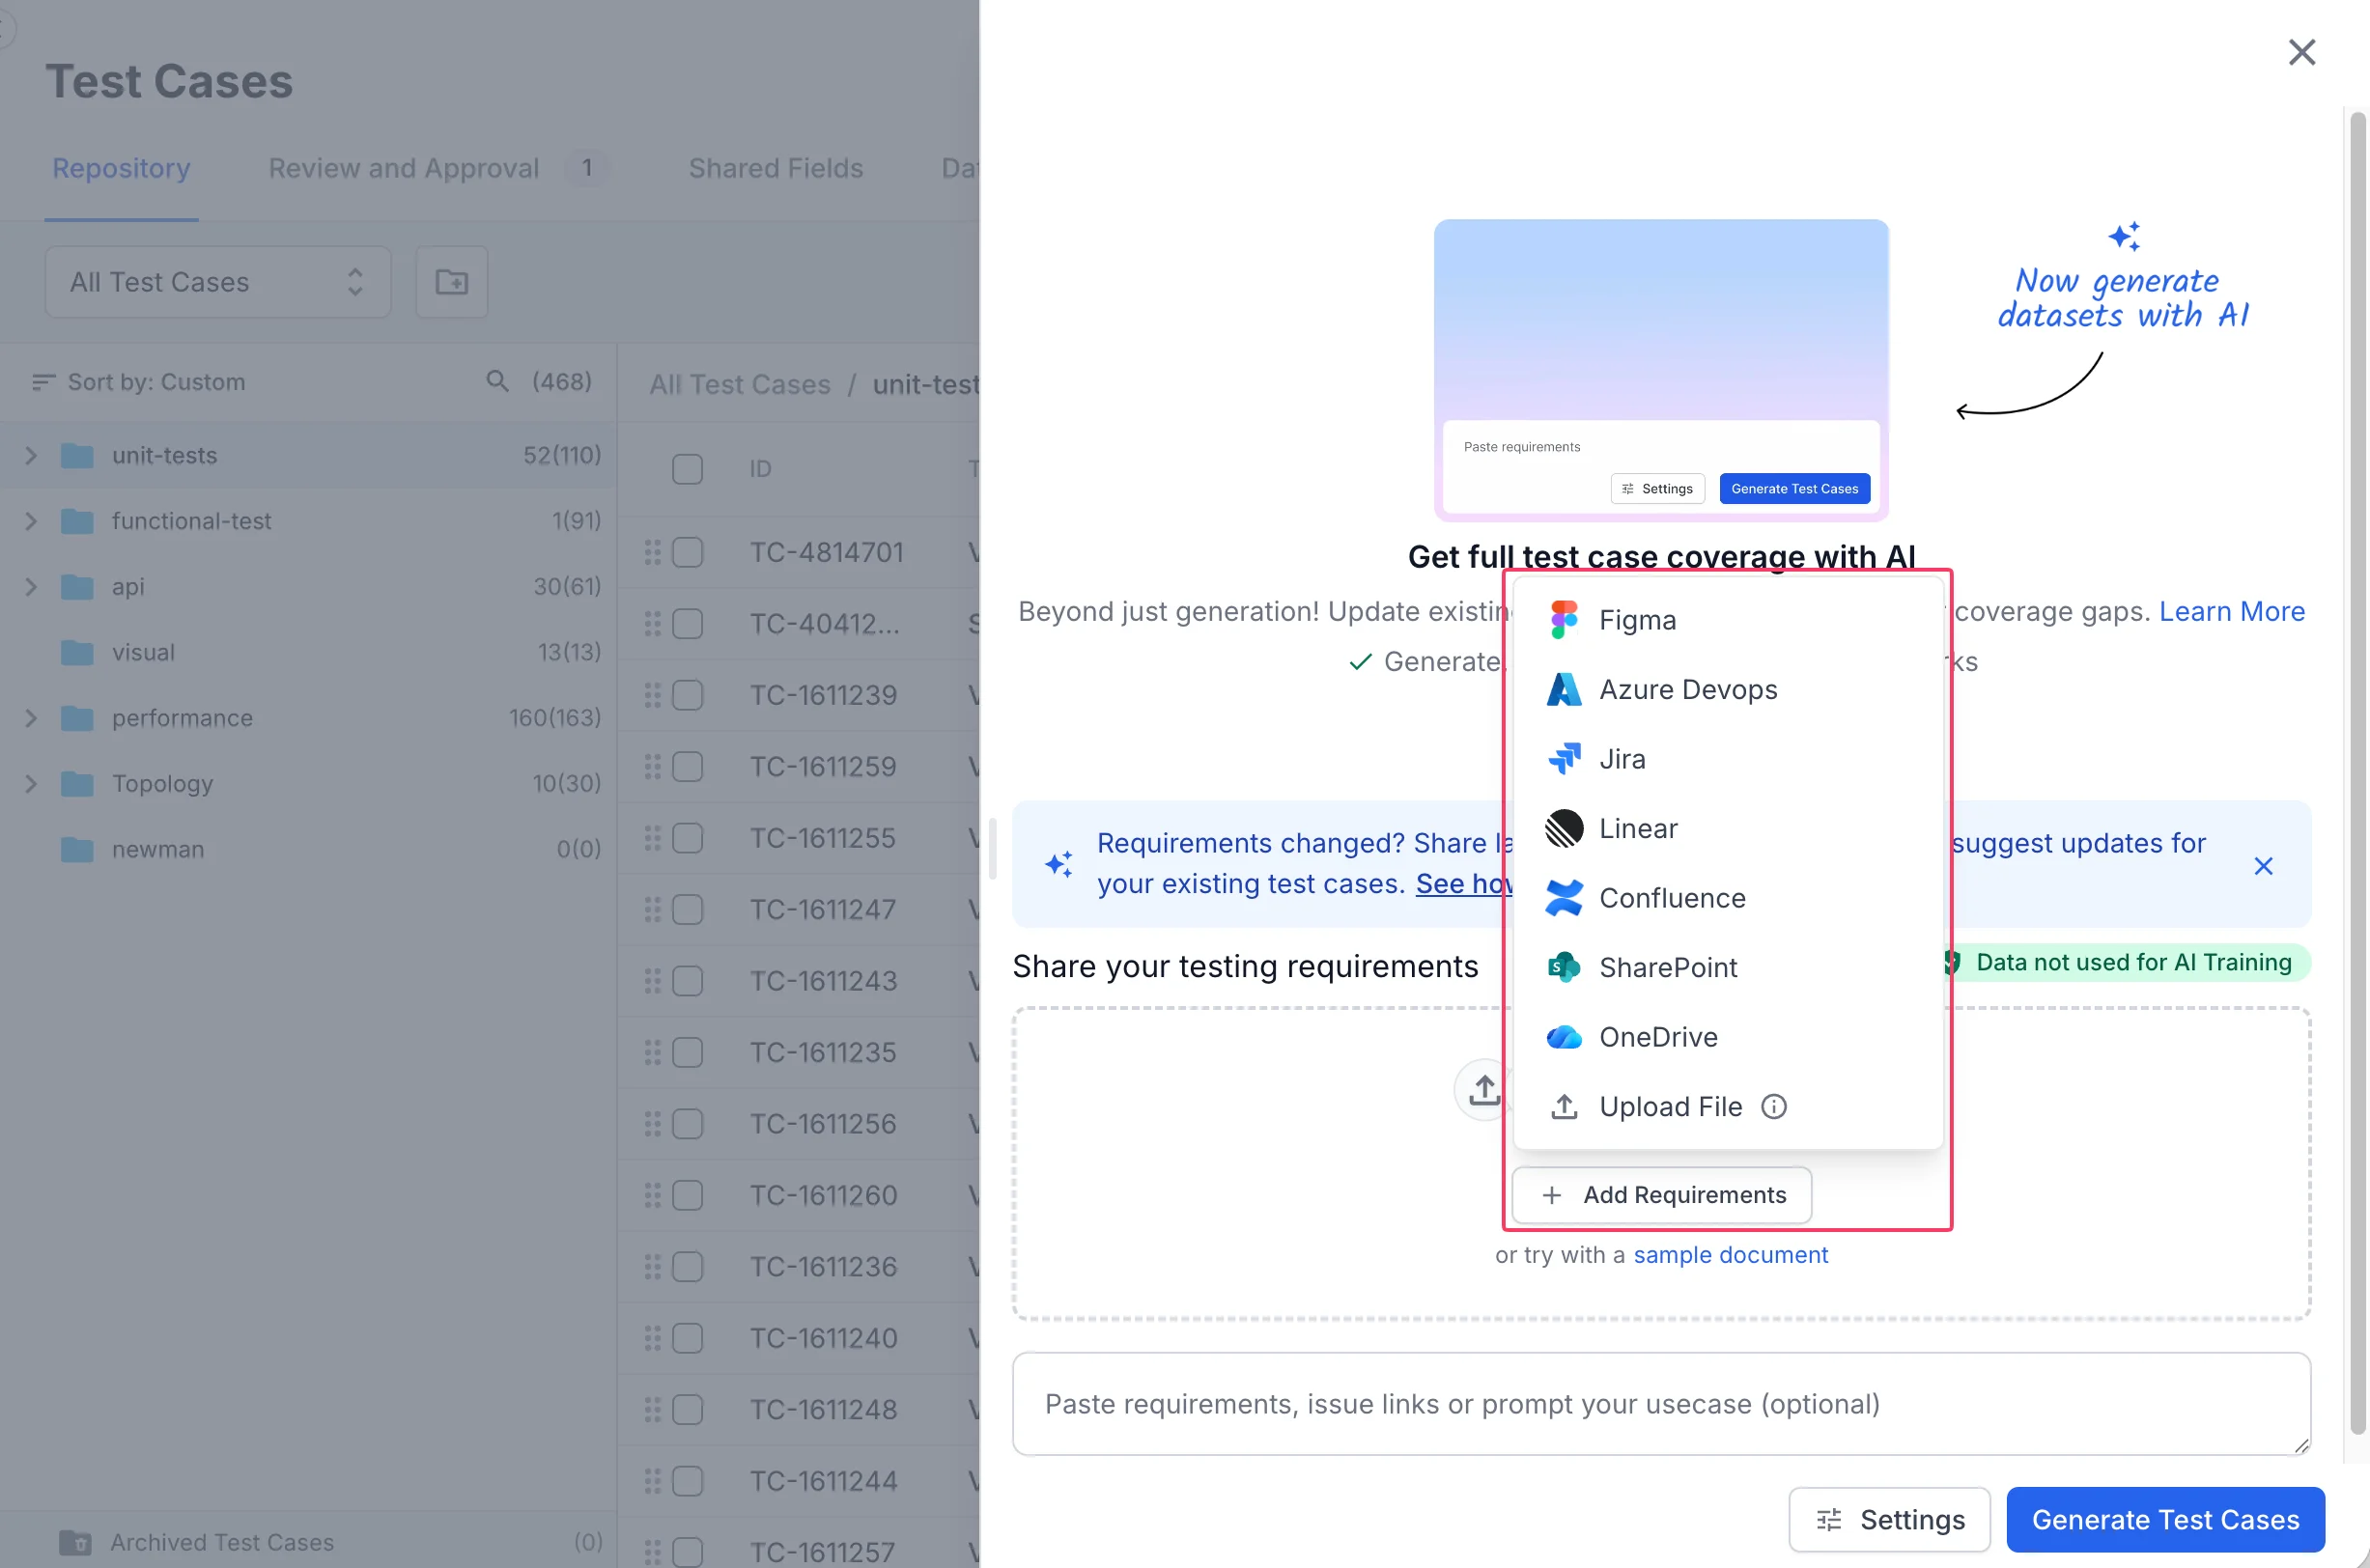
- Optional: Add more sources when the change spans several places.
-
Optional: Paste requirements or issue links into the prompt box.
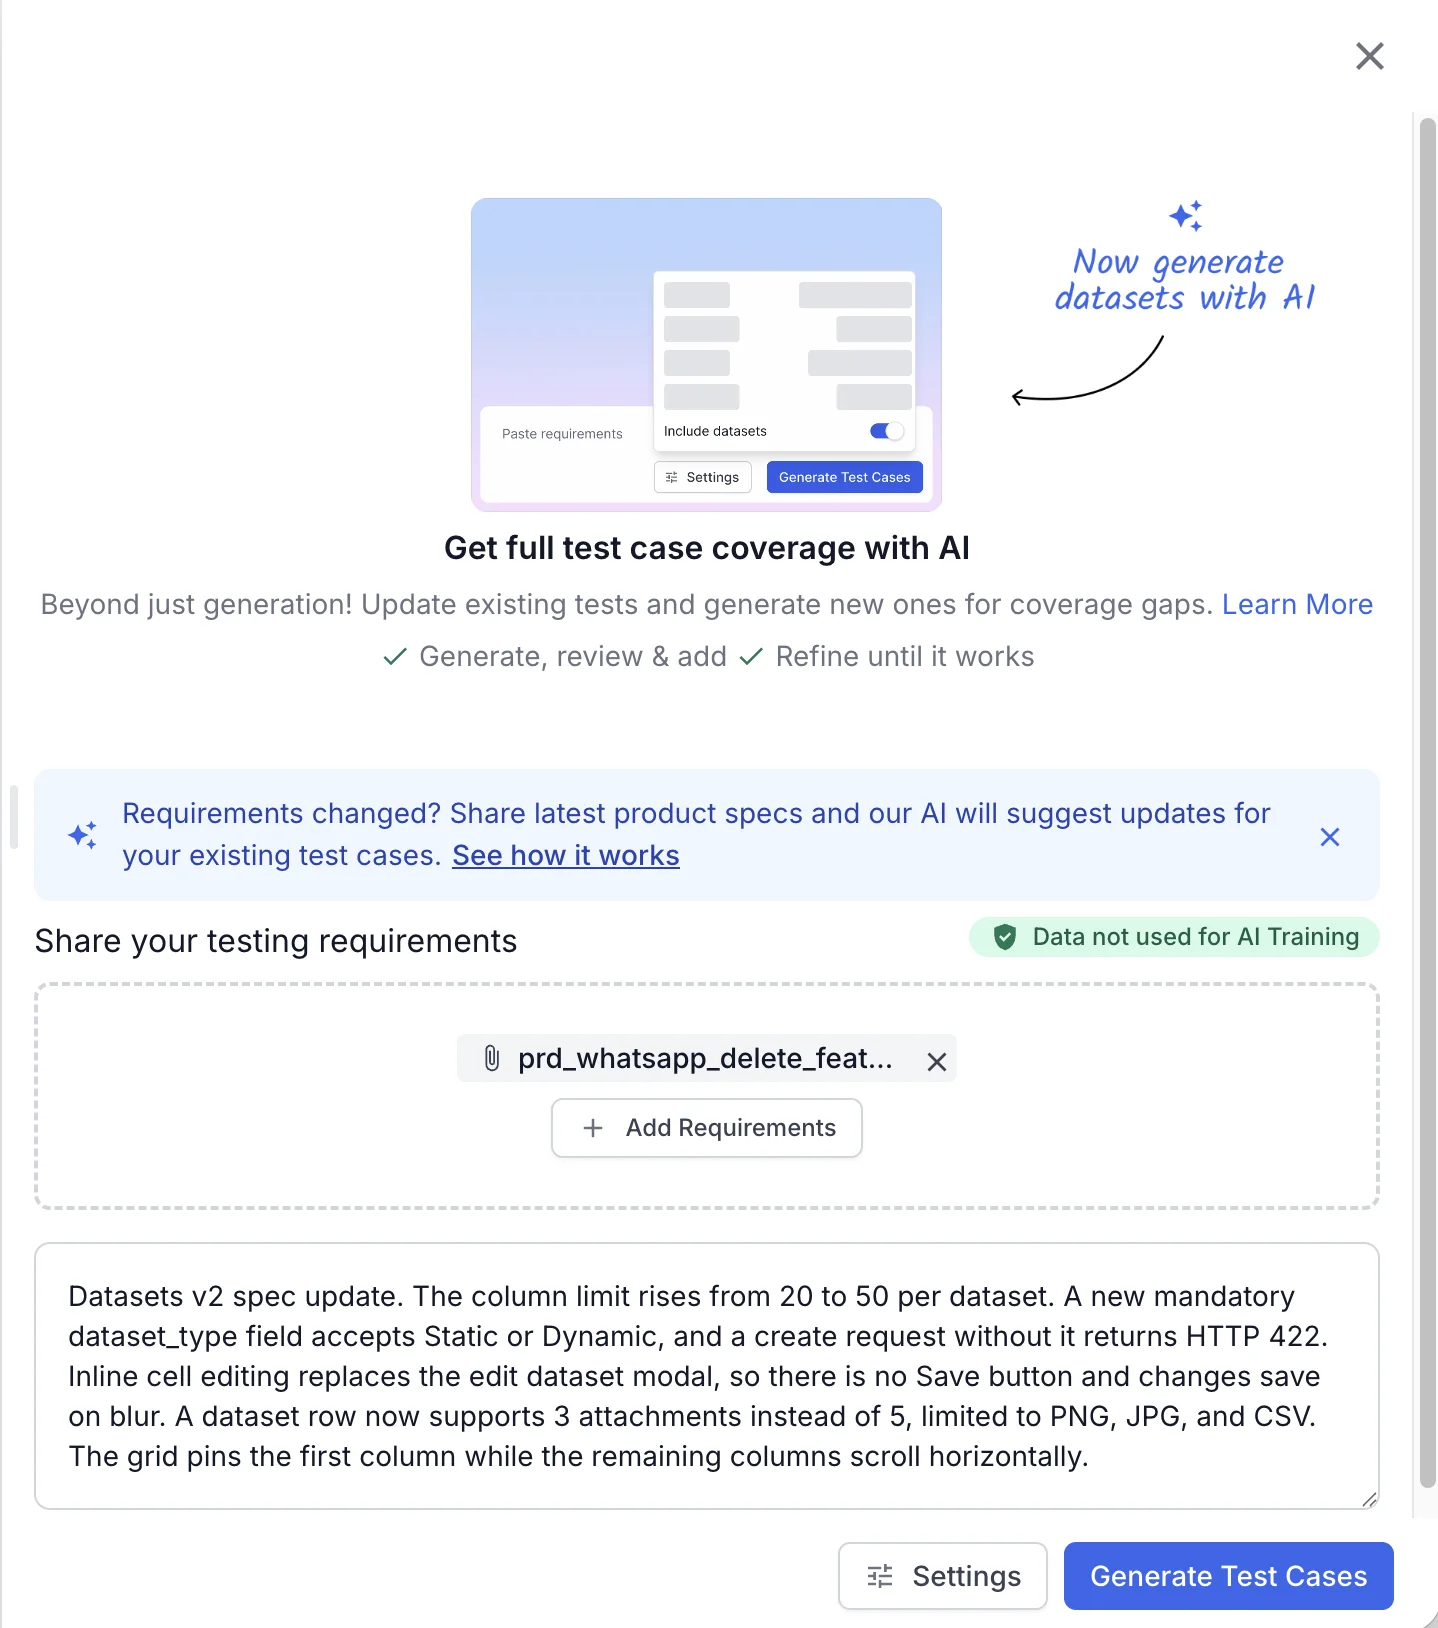
For every source type, see Requirements you can share.
Turn on maintenance mode
To scope the run to the tests you want revised, follow these steps:
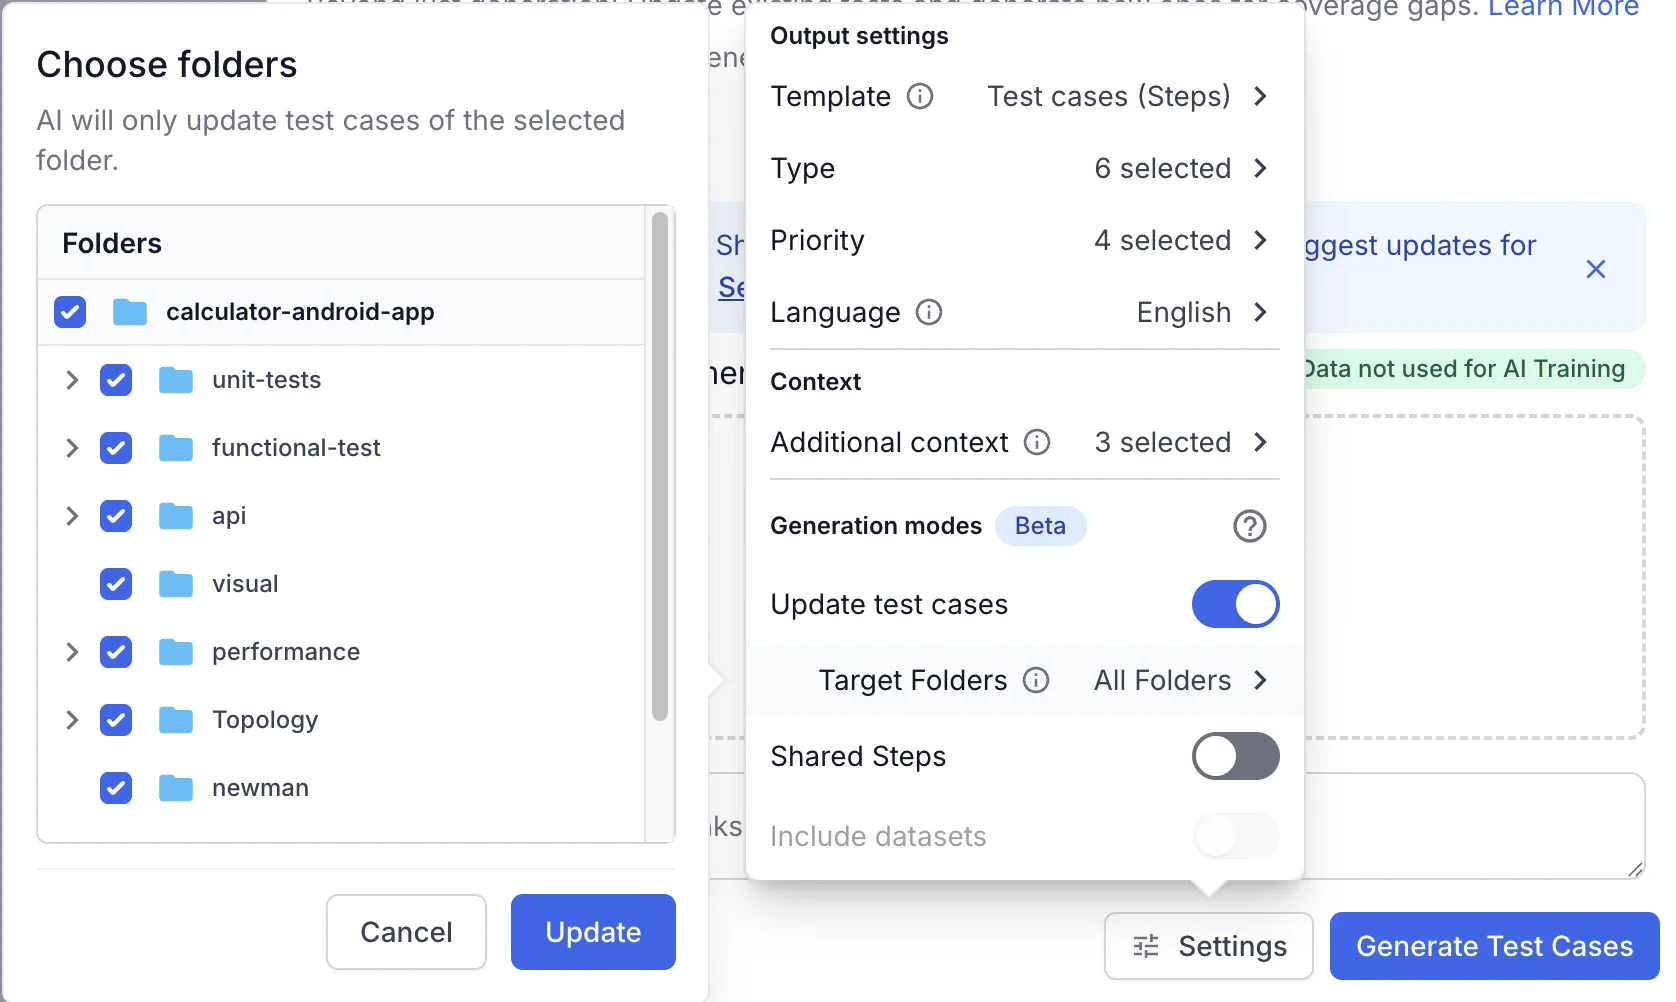
- Click Settings.
- Under Generation modes, turn on Update test cases so the agent revises existing tests.
- Click Target Folders, which is set to All Folders by default.
- In the Choose folders dialog, select the folders the change affects.
-
Click Update.
Tune the output (optional)
Still in Settings, shape how the agent writes each test case:
- Set Template, Type, Priority, and Language.
- Under Context, select the Additional context sources the agent reads.
-
Optional: Turn on Shared Steps to reuse shared steps in the tests it writes.
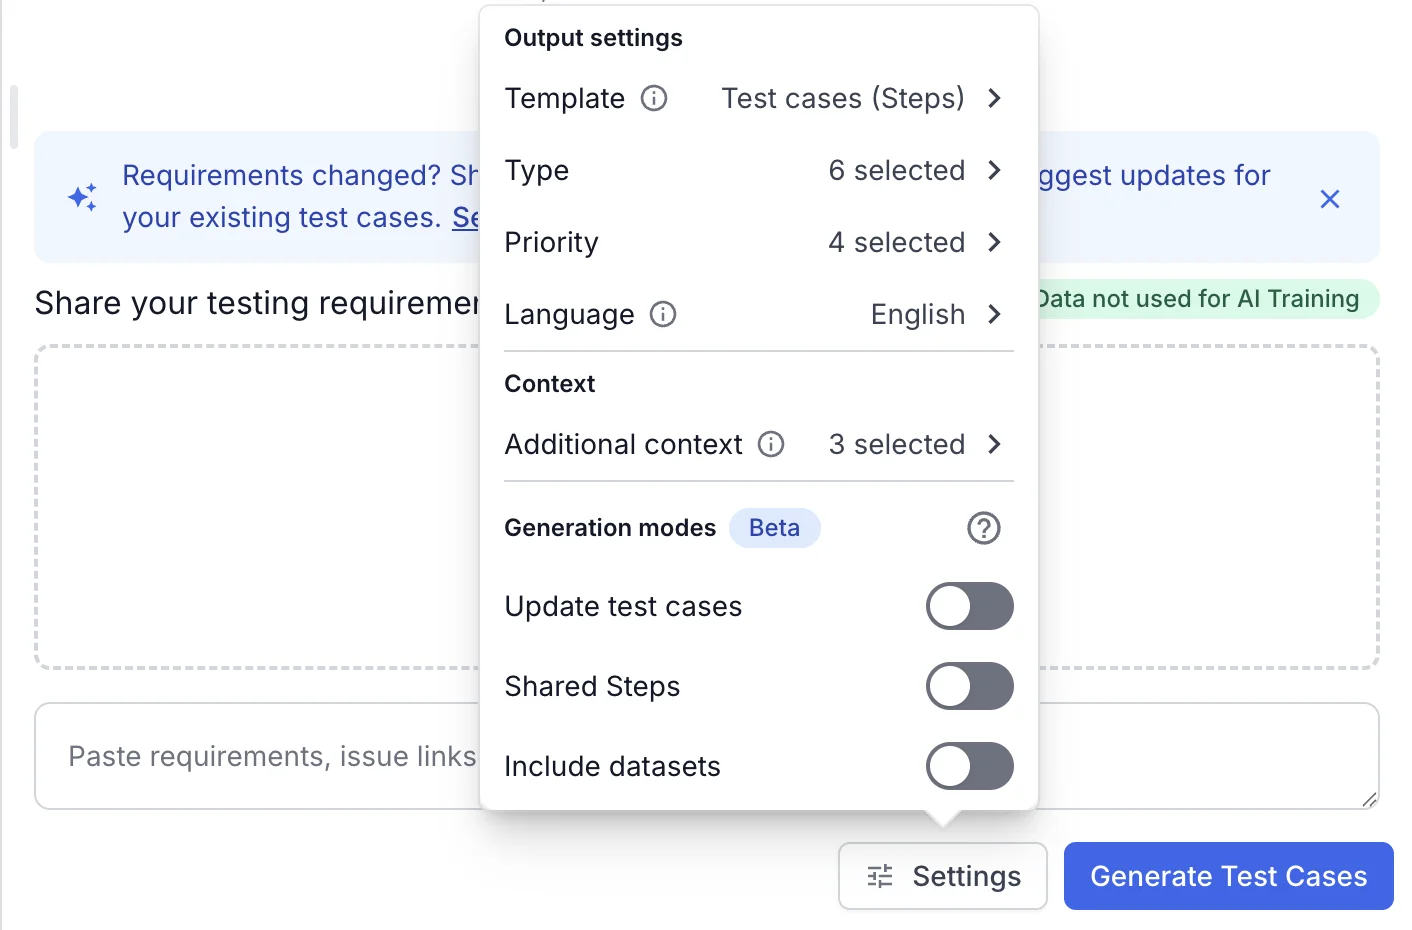
Include datasets stays unavailable while Update test cases is on, because the two generation modes cannot run together.
| Setting | Options | Controls |
|---|---|---|
| Template | Test cases (Text), Test cases (Steps), Test cases (BDD) | The format of each test case: a plain checklist, detailed steps with expected results, or Gherkin (Given/When/Then) scenarios for automation. |
| Type | Functional, UI/UX, Security, Performance, Compatibility, Accessibility | The categories of coverage the agent weighs when it updates and writes tests. |
| Priority | Critical, High, Medium, Low | The priority levels the agent can assign to the tests it updates or adds. |
| Language | English, and other supported languages | The language the agent writes test cases in. |
| Additional context | Azure DevOps, Jira, Linear, Confluence, Folders | Extra sources the agent reads for context while it works, including the existing folders in your project. |
Generate
To start the run and follow its progress, follow these steps:
- Click Generate Test Cases.
-
Optional: Expand Thoughts to watch which test cases the agent reads.
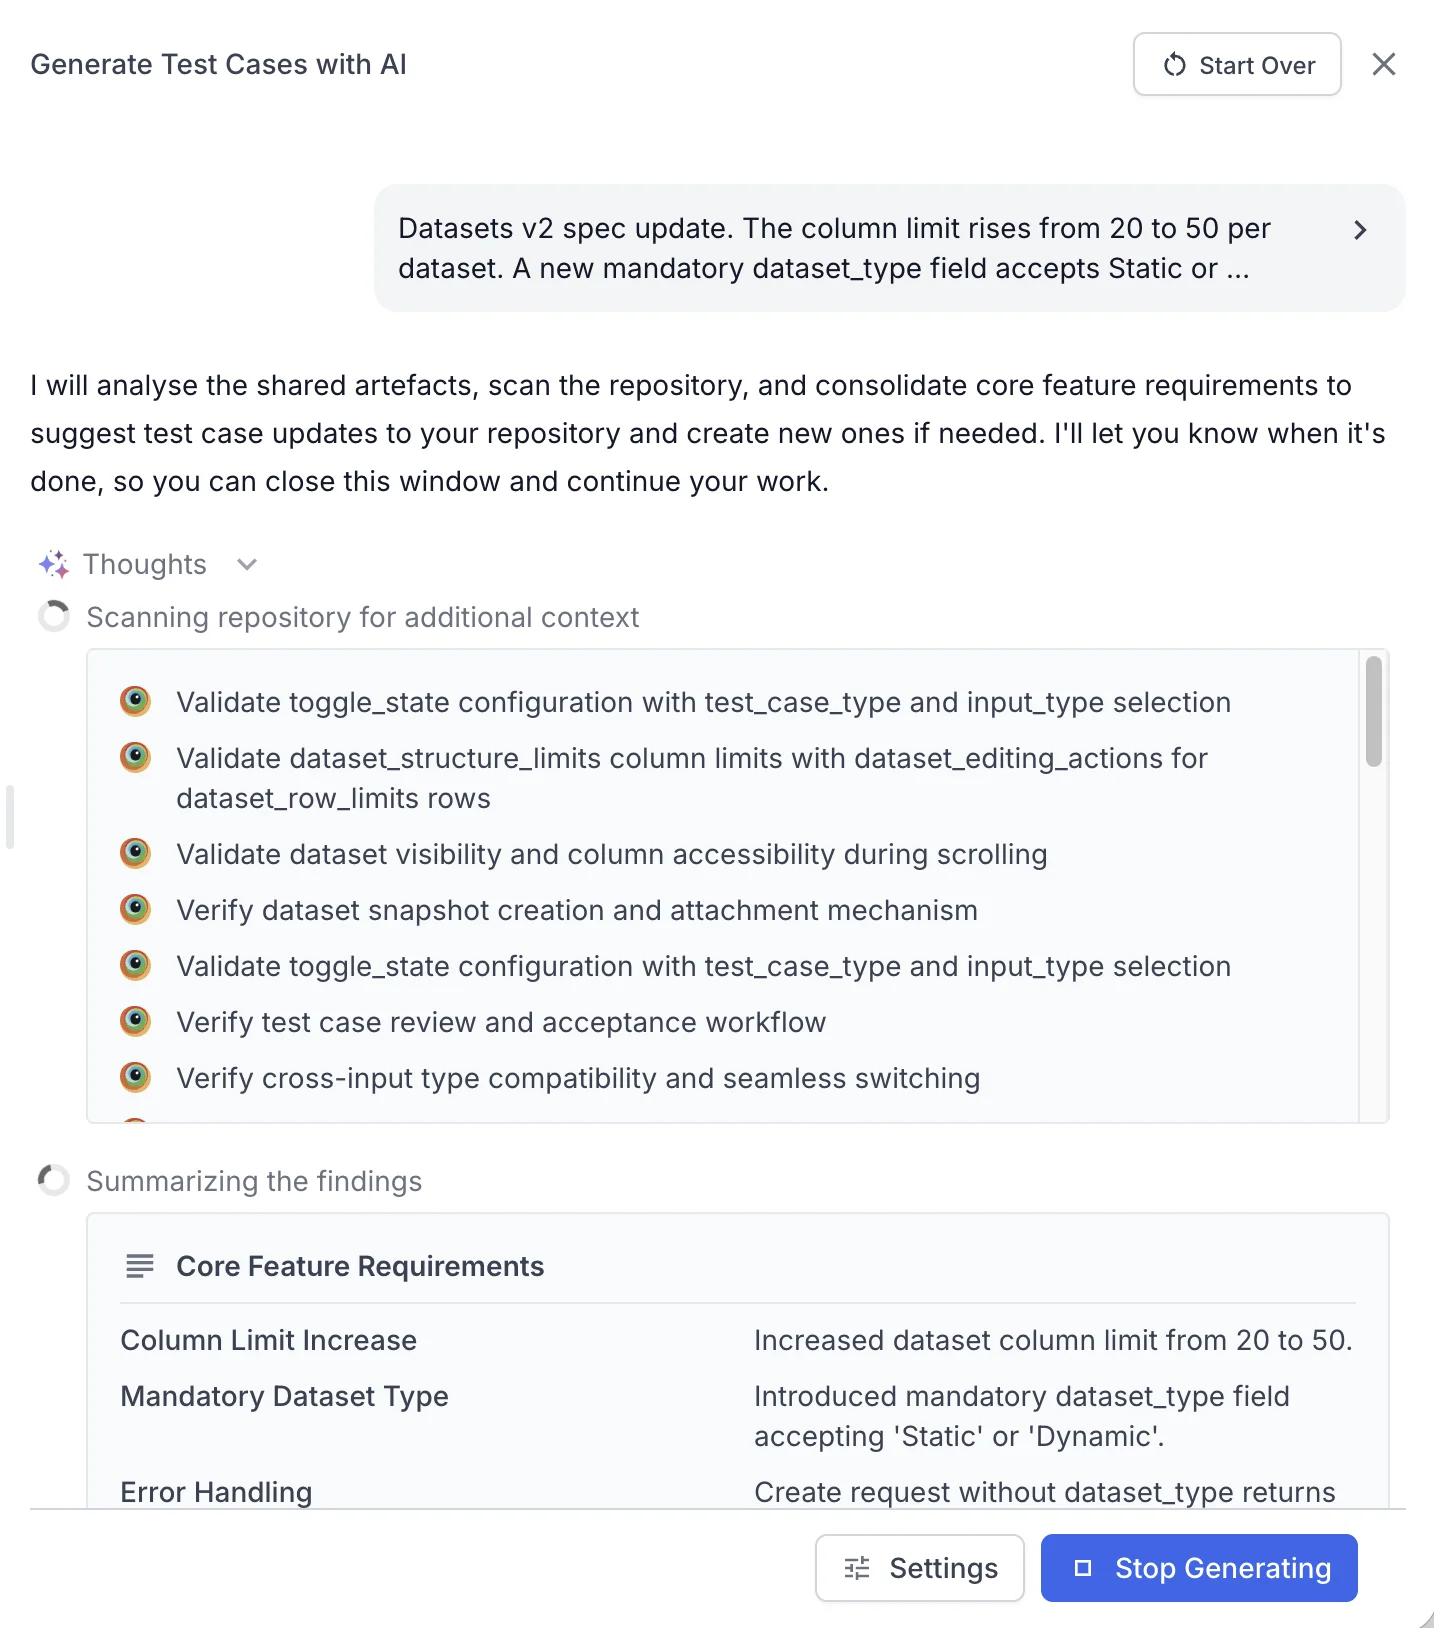
The agent analyzes your files, scans the repository, and consolidates the requirements before it drafts the changes. The run stays tied to your browser session, so you can close the panel and keep working. It notifies you when the results are ready. The run stops only if you refresh the page or log out.
Review the suggestions
The agent groups its suggestions by scenario. A summary line reports the totals. For example: 4 test cases for update, 7 test cases newly generated across 6 scenarios. Generated tests carry a New badge, and each scenario group has an AI Reasoning note that explains the change.
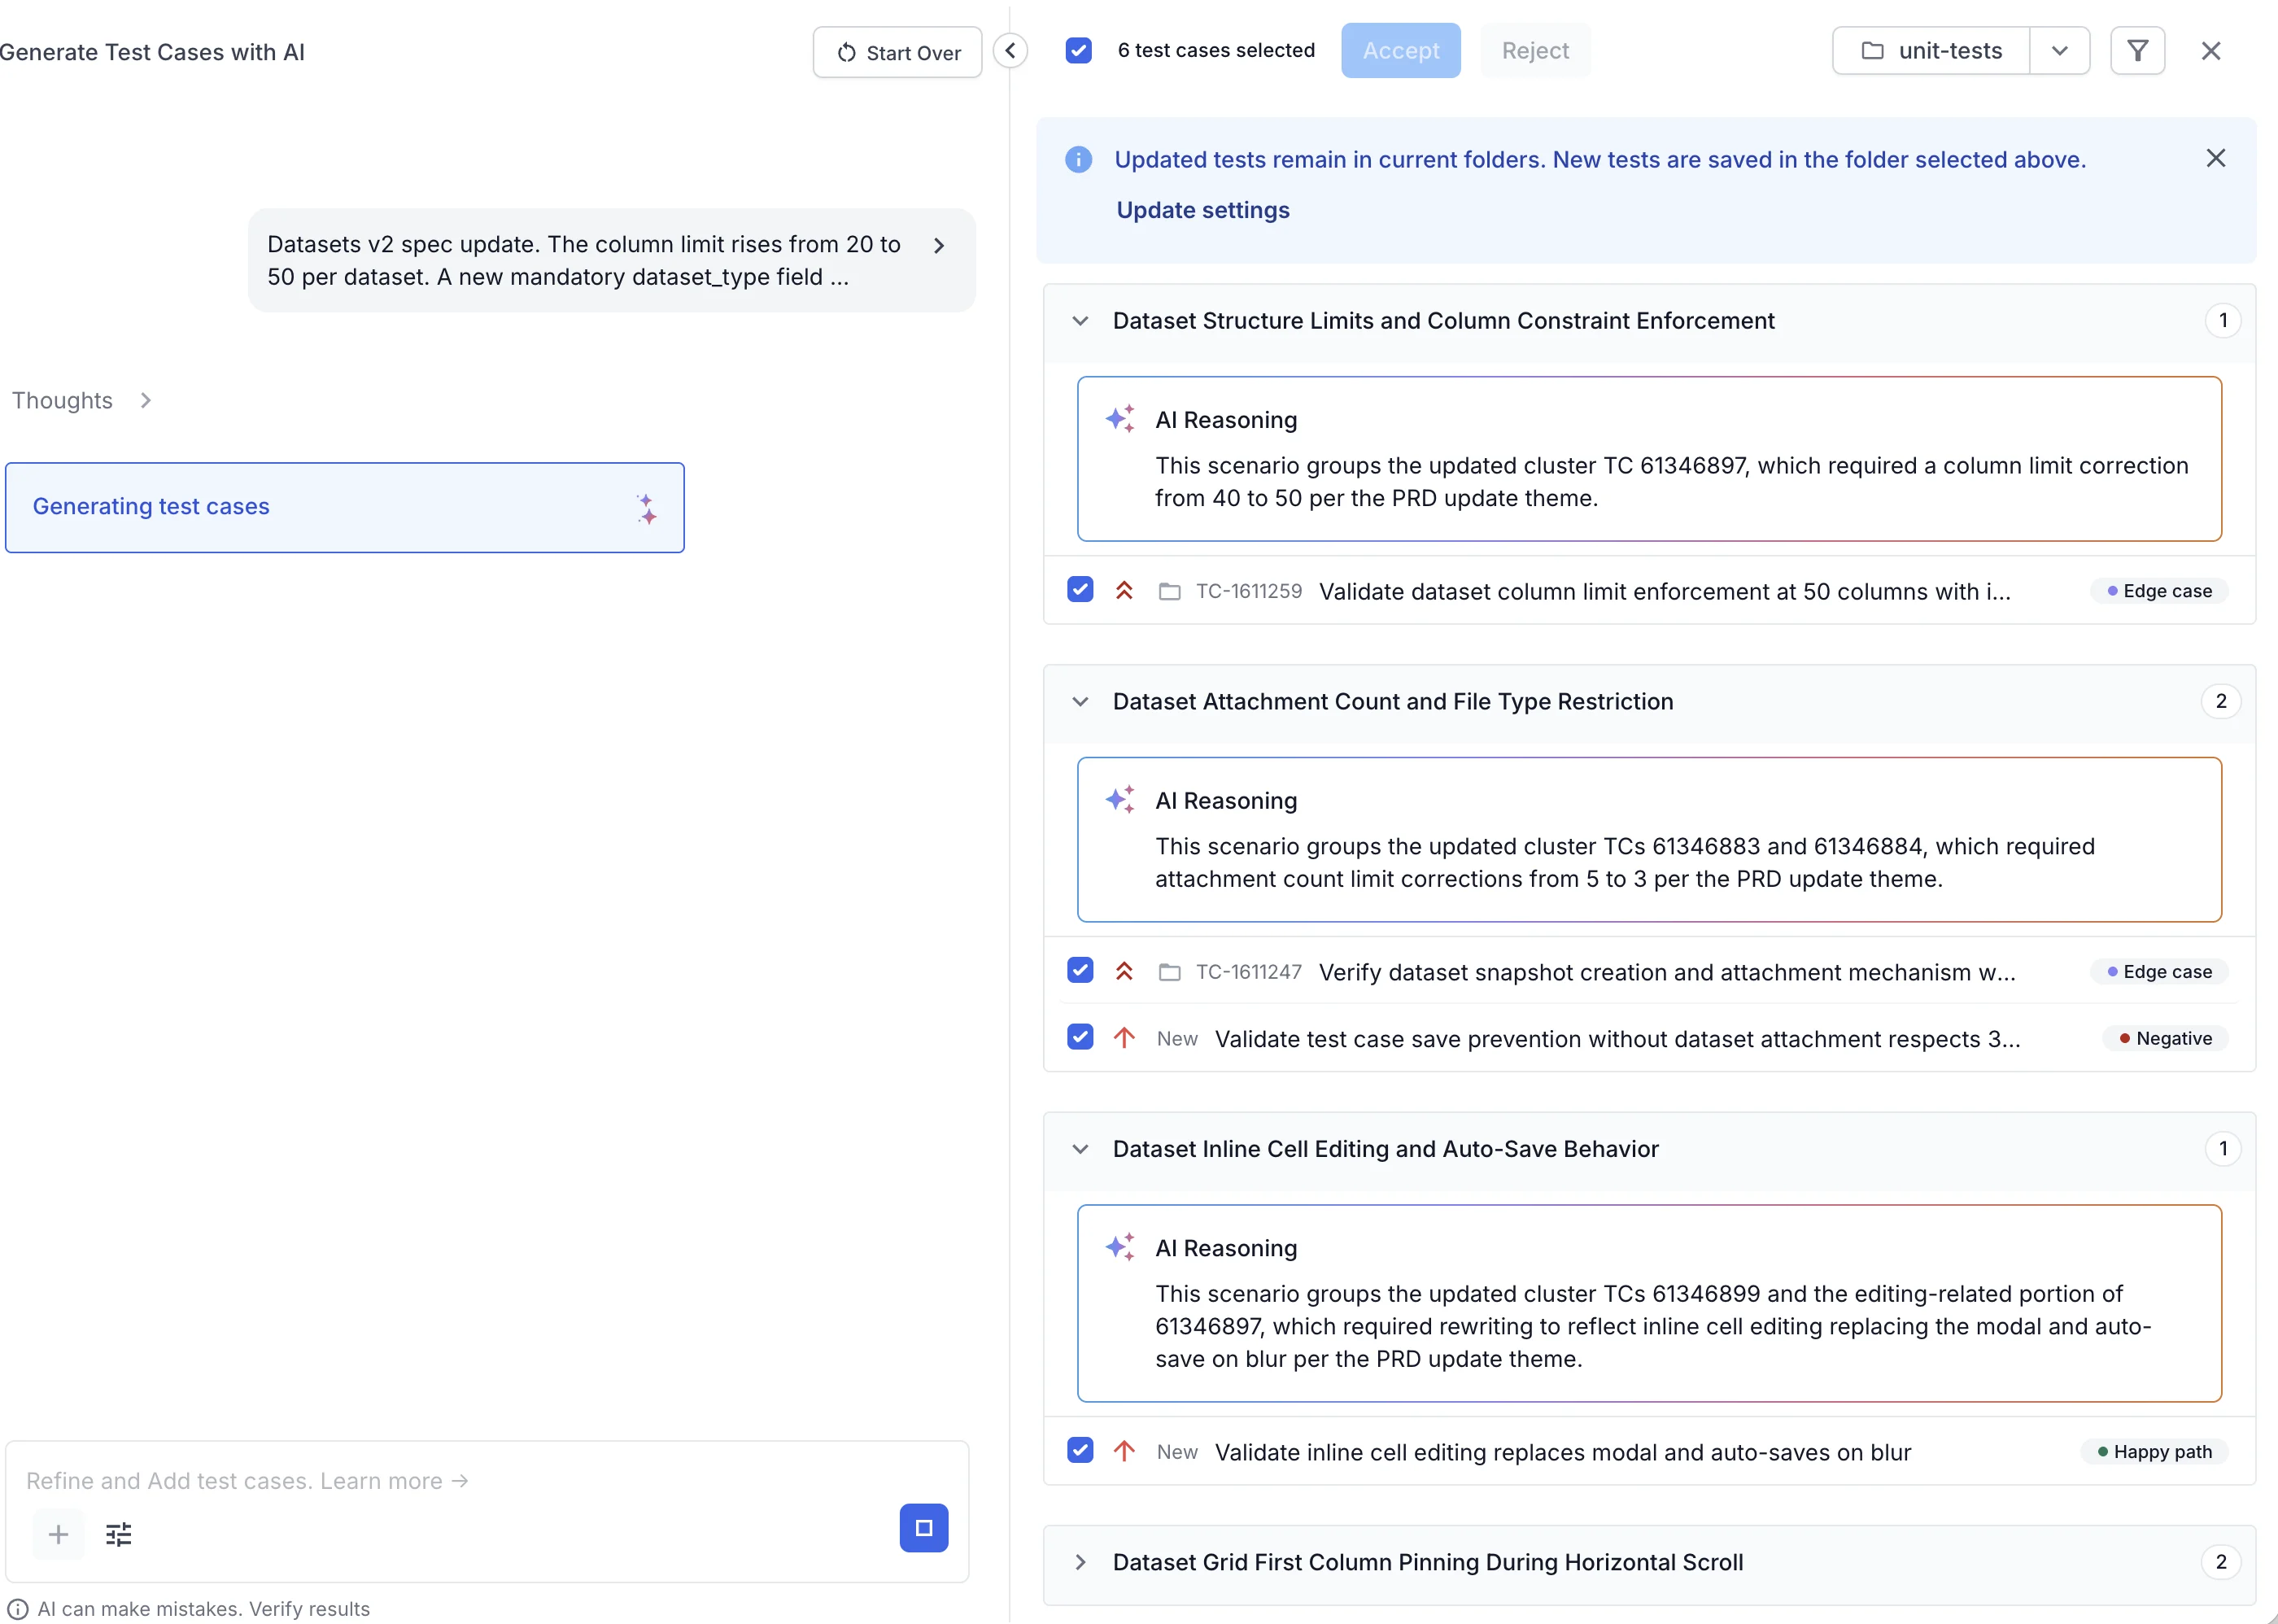
Work through the suggestions with these controls:
- Select: Check a test case or a scenario group. The header checkbox selects everything.
- Accept: Apply the change. The agent updates an existing test in place, or adds a new one to your selected folder.
- Reject: Discard the suggestion. The matching test case stays exactly as it was.
To inspect one change in detail, follow these steps:
- Click the test case title to open its comparison view.
- Compare the Original and Updated columns field by field.
- Read the Reason for update note to see which requirement triggered the change.
-
Use the arrows to move to the next or previous suggestion.
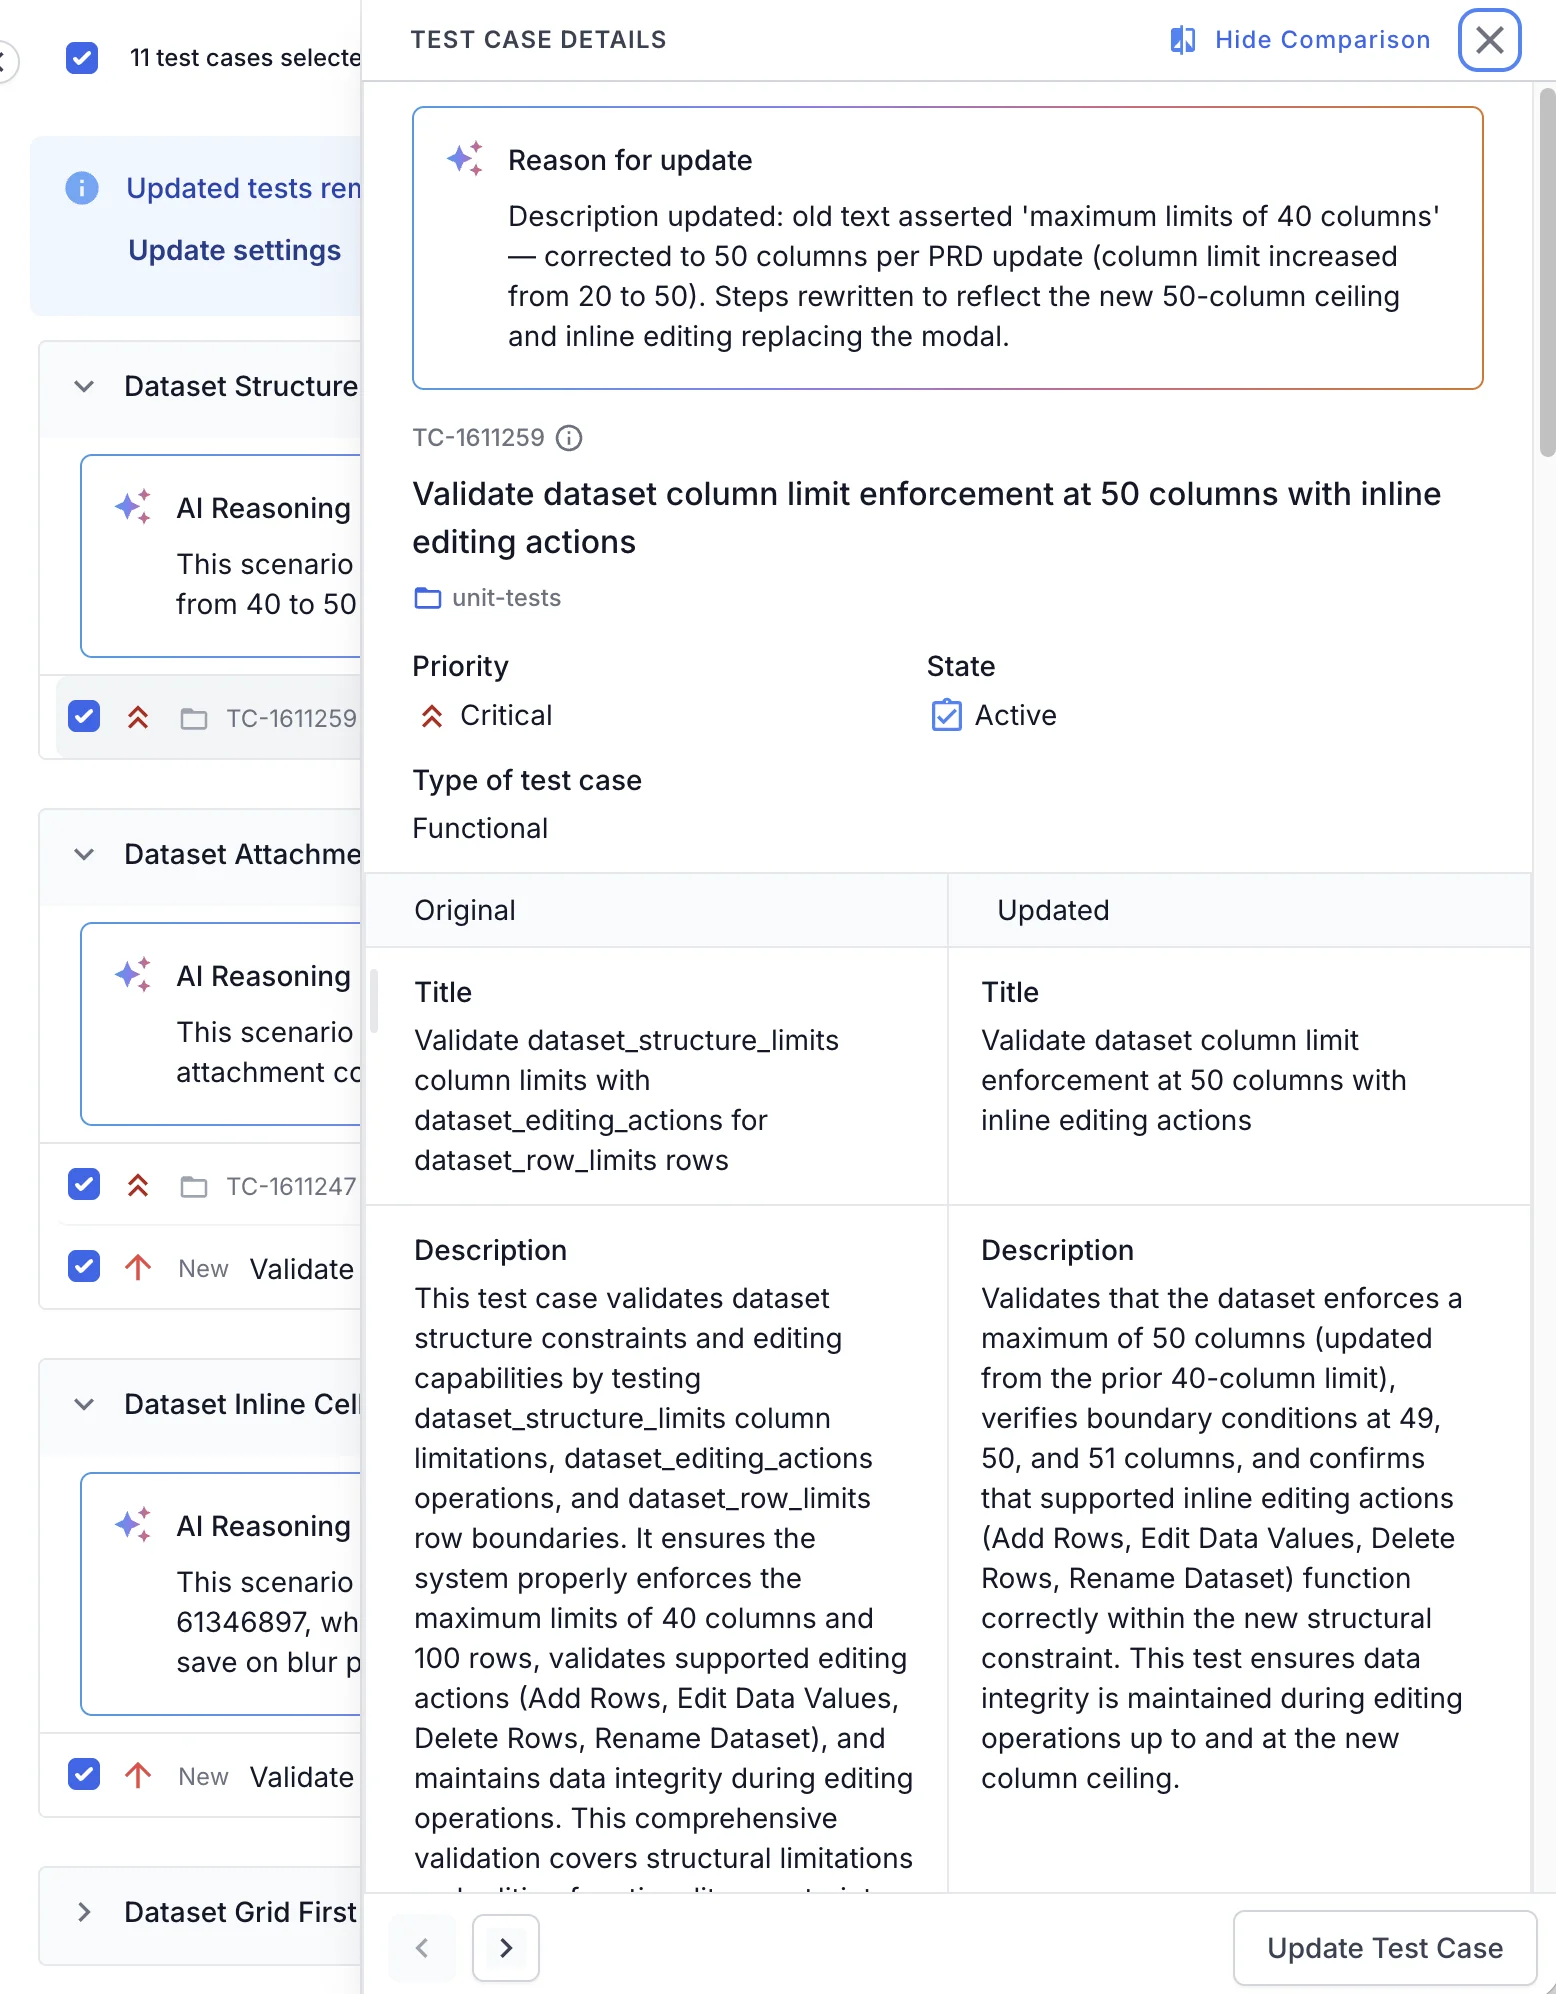
The agent lines the two versions up across title, description, preconditions, and steps. Fields that did not change are marked Same as original.
Refine the suggestions (optional)
The first set is a starting point. Type a follow-up prompt, and the agent reworks the set without starting over.
To steer the output, follow these steps:
- Select the test cases your prompt should act on, or leave everything unselected to apply it broadly.
- Type your instruction, such as “add more negative scenarios”.
- Optional: Attach another file or link when the change needs fresh context.
-
Send the prompt.
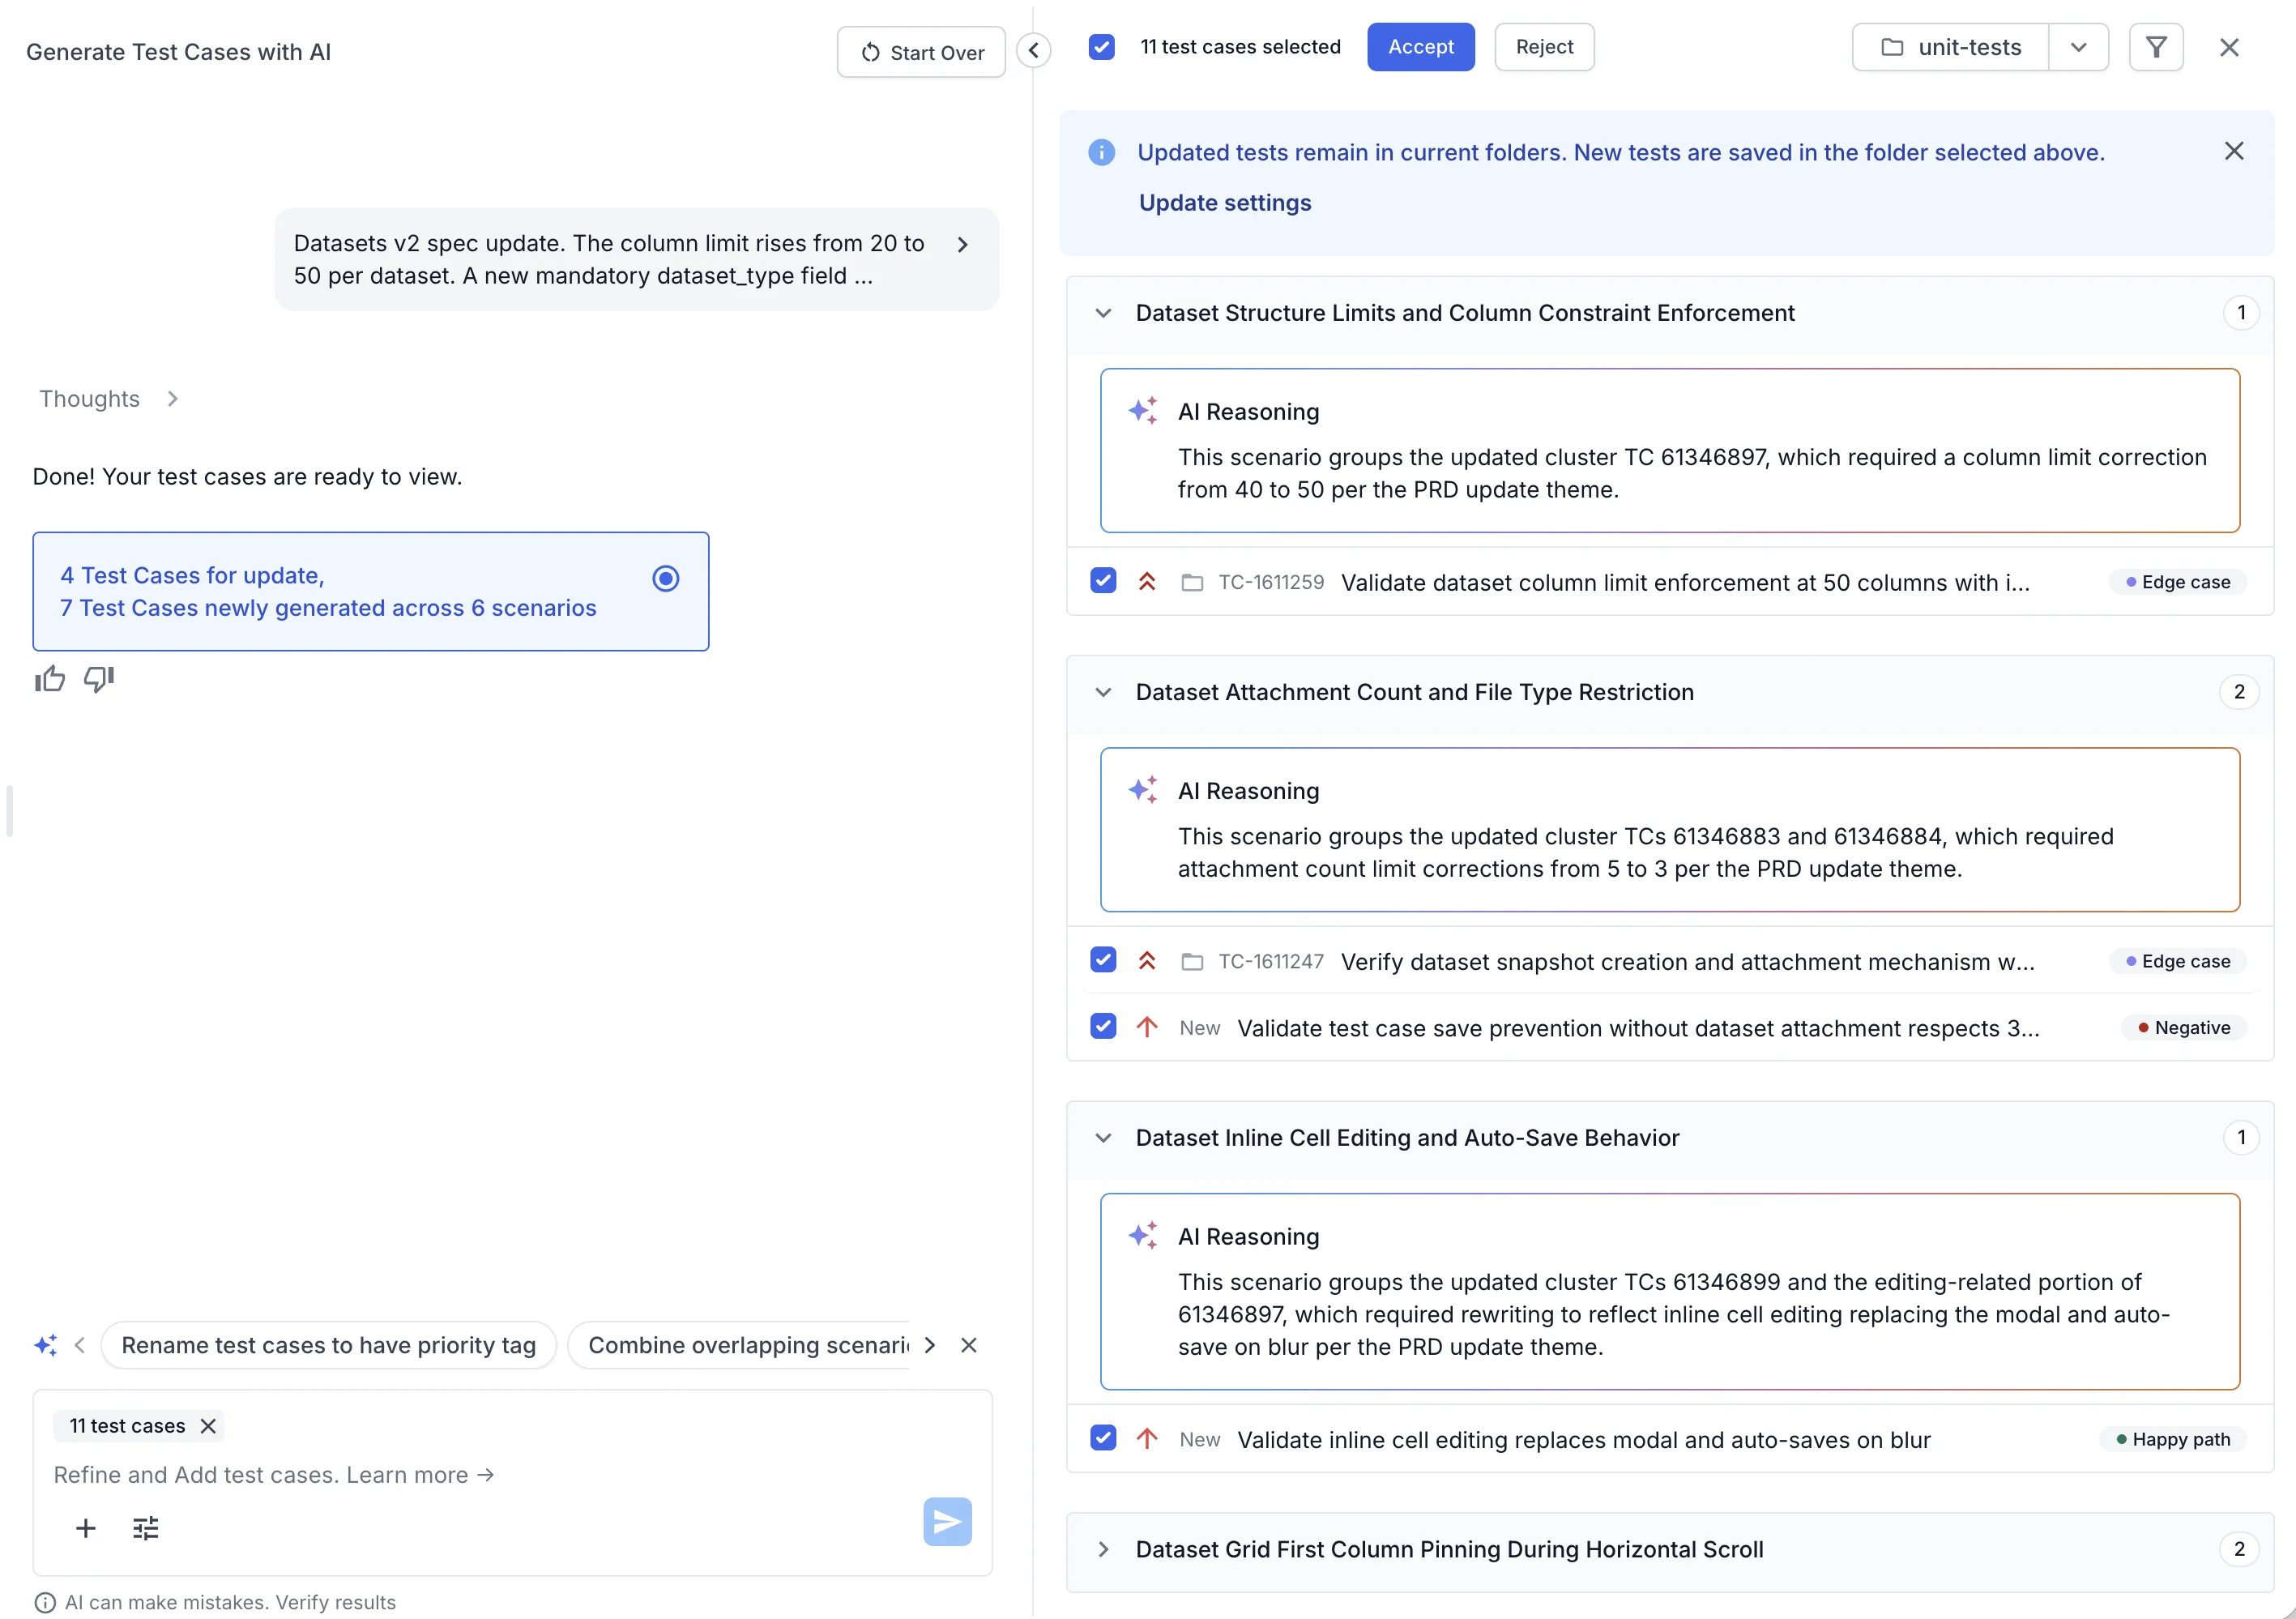
Accept a test to lock it against later prompts. Reject a suggestion to steer the agent away from similar ones. Anything left untouched carries over unchanged. Click Start Over to discard the run and return to your original requirements.
The agent can make mistakes. Review every suggestion against your requirements before you accept it.
Accept the changes
When the suggestions look right, follow these steps:
- Select the test cases you want to act on.
- Choose one of the following actions:
| Action | What happens |
|---|---|
| Accept | Applies the selected suggestions to your repository. Existing tests are updated in place. New tests are added to your selected folder. |
| Reject | Dismisses the selected suggestions. The matching test cases stay exactly as they were. |
| Refine | Sends the agent a follow-up prompt to adjust the suggestions before you accept them. |
Accepted updates stay in their current folders. New tests are saved in the folder you selected when you started the run.
Test Case Maintenance Agent vs. Test Case Generator Agent
Both agents turn requirements into test cases. But they solve different problems.
| Aspect | Test Case Maintenance Agent | Test Case Generator Agent |
|---|---|---|
| Starting point | A repository that needs to catch up to changed requirements | A new testing need with no existing coverage |
| What it does | Updates existing tests and adds only the tests you are missing | Creates new test cases from scratch |
| Best for | Keeping coverage current after a spec changes | Building coverage for a new feature |
Use the Test Case Maintenance Agent when you already have a repository and a requirement changed. Use the Test Case Generator Agent when you are building coverage from scratch.
Best practices
- Scope each run to the folders the change affects. A tighter scope means a faster, cleaner review.
- Share the most specific requirement you have. A precise spec produces precise updates.
- Read the AI Reasoning note before you accept a scenario. It tells you why the agent thinks each test changed.
- Treat semantic rewrites with extra care. Compare the original and updated steps so an edit does not quietly change what a test verifies.
- Re-run the agent whenever the same area changes again. The repository stays current with far less manual effort.
Known limitations
- The agent runs on demand. It does not watch your linked requirements or update tests on its own.
- The agent changes only the test cases inside the Target Folders you select. Test cases in other folders stay untouched.
- Every change waits for your review. The agent does not edit a test case until you accept its suggestion.
- AI suggestions can be wrong. Compare each one against your requirement before you accept it.
Next steps
- Generate new test cases with the Test Case Generator Agent: Build coverage from scratch using prompts, requirement files, or linked issues.
- Remove duplicates with the Test Deduplication Agent: Find and merge exact and semantic duplicates to keep your repository lean.
- Explore all BrowserStack AI Agents: Learn about every agent available in Test Management.
We're sorry to hear that. Please share your feedback so we can do better
Contact our Support team for immediate help while we work on improving our docs.
We're continuously improving our docs. We'd love to know what you liked
We're sorry to hear that. Please share your feedback so we can do better
Contact our Support team for immediate help while we work on improving our docs.
We're continuously improving our docs. We'd love to know what you liked
Thank you for your valuable feedback!