GoCD is an open-source Continuous Delivery (CD) tool designed for automating and streamlining software deployment pipelines.
Overview
Understanding GoCD
A GoCD pipeline is a series of automated stages that manage code integration, testing, and deployment, ensuring smooth and efficient delivery.
Steps to build an Automated GoCD Test Pipeline
Follow the steps below to build an automated test pipeline with the GoCD pipeline:
- Select material type (SCM, pipeline, or package repository) and enter the repository URL.
- Click Test Connection to verify the repository link.
- Name the pipeline (e.g., sample pipeline) and assign a pipeline group.
- Name the stage (e.g., testing stage).
- Name the job (e.g., single-job) and add required commands to execute tests.
- Click Save + Run This Pipeline to execute the pipeline.
Best Use Cases for GoCD
Here are some of its best use cases:
- Complex CI/CD Pipelines: Ideal for teams managing multi-stage deployment workflows.
- Enterprise DevOps: Suitable for large-scale applications requiring granular pipeline control.
- Microservices Testing: Effectively orchestrates tests for distributed applications.
- Infrastructure as Code (IaC): Works well with Terraform, Ansible, and Kubernetes for automated provisioning.
This guide provides a comprehensive overview of the GoCD pipeline, including its key features, best use cases, and step-by-step setup process.
What is GoCD?
GoCD is a free CI/CD tool for DevOps projects. It helps software development teams to automate the testing and release process. It was designed for continuous delivery, and developers can configure pipelines as code. Not only is it a robust and scalable but also an extensible open-source continuous delivery tool.
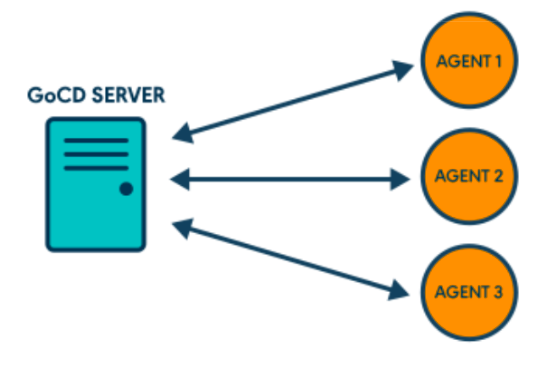
It supports several version control tools, including Git, Mercurial, Subversion, Perforce, and TFVC. Other version control software can be supported by installing additional plugins. It works in a master-slave architecture, i.e. there will be a single machine that controls the other agents.
The GoCD Server acts as a master in the above diagram and delegates the jobs to the agents.
Main Features of GoCD
GoCD offers a robust set of features designed to streamline CI/CD workflows, improve efficiency, and provide greater control over software delivery. Here are its key capabilities:
- Free and Open Source: GoCD is completely free, with an active open-source community ensuring continuous improvements.
- Parallel and Sequential Execution: Supports both parallel and sequential task execution for efficient pipeline management.
- Easily Configure Dependencies: Simplifies dependency management, ensuring seamless execution across multiple stages.
- Configure Pipelines as Code: Allows defining pipelines using code, enabling version control and automation.
- Visualize Workflows: Provides an intuitive dashboard to track pipeline progress, failures, and dependencies.
- Compare Builds: Enables easy comparison of different builds to identify regressions and improvements.
- Eliminate Bottlenecks: Helps optimize pipelines by detecting and addressing performance slowdowns.
- Keep Configuration Tidy: Offers template-based configurations for maintaining clean and reusable setups.
- Supports Auditable Deployment: Maintains a clear audit trail of deployments for compliance and security.
- Supports Plugins: Extensible with plugins to integrate with various tools and services.
- Deploy Any Version, Any Time: Allows rollback and deployment of any application version when needed.
Also Read: GoCD vs Jenkins: Detailed Comparison
Setting Up GoCD Pipeline
Setting up a GoCD pipeline involves configuring the GoCD server, setting up agents, and defining pipeline stages for seamless software delivery.
What is GoCD Server?
The GoCD server is the core component responsible for managing pipelines, orchestrating builds, and coordinating agents. It provides a centralized dashboard where users can configure and monitor their CI/CD workflows. The server fetches source code, triggers builds, and assigns jobs to available GoCD agents.
What is GoCD agent(s)?
GoCD agents are lightweight worker nodes responsible for executing the build, test, and deployment tasks assigned by the server. Multiple agents can be distributed across different machines to parallelize workflows.
How to setup GoCD Pipeline?
Since installation instructions vary per operating system, the installation instruction pages linked below will ask to choose the operating system and then provide instructions for that operating system.
Creating a New Automated Test Pipeline with GoCD
After the installation, run the GoCD server locally on the default port http://localhost:8153/. Click on Admin -> Pipelines, which will take you to the pipelines administration page.
Click on the “Create a new pipeline within this group” button to the “Add pipeline” page.
Part 1: Material
1. Choose the material type. The material can be your Source Control Management (SCM or version control) repository, pipeline, or package repository (e.g. Git). Currently, GoCD supports the following:
- SCMs
- Subversion
- Mercurial
- Git
- Team Foundation Server.
- Perforce
- Package repository
- Material Plugins
2. In the Repository URL, enter the repository URL.
3. Click Test Connection. If GoCD establishes a connection successfully, the Connection OK message appears.
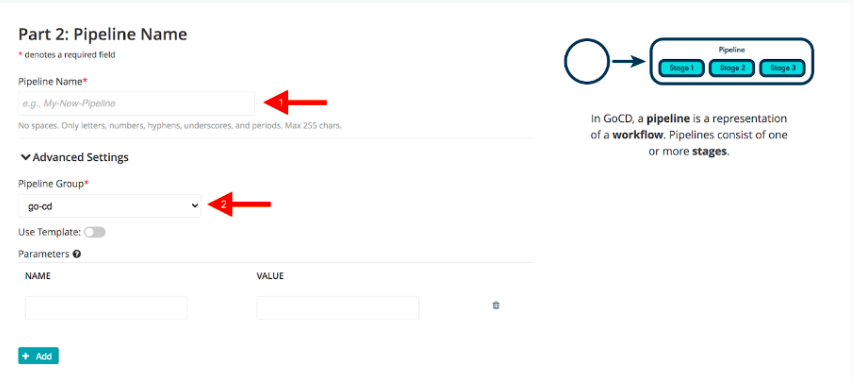
Part 2: Pipeline Name
- Provide the pipeline a name, without spaces, for example, sample-pipeline.
- Select a pipeline group. Also, fill in the parameter if using a template.
Part 3: Stage Details
- Enter a name for the stage, for example, testing-stage.
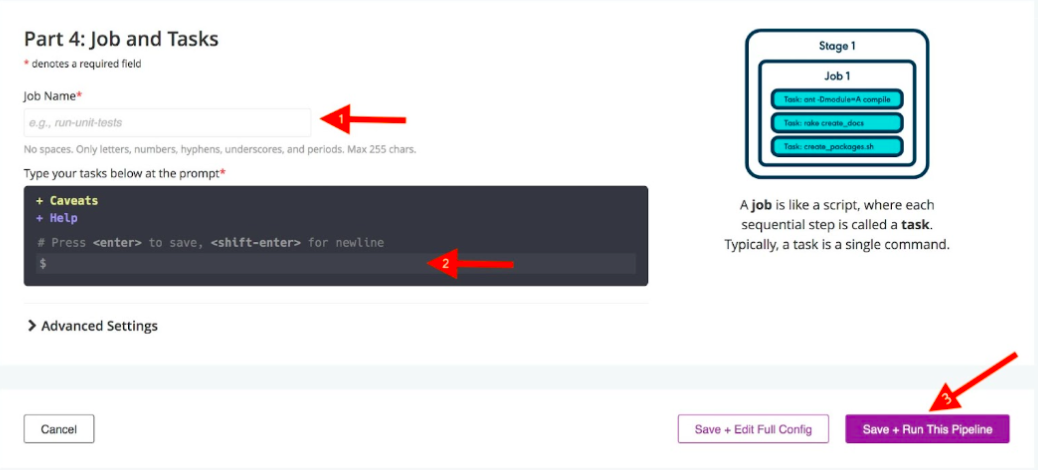
Part 4: Job and Task
1- Enter a name for the job, for example, single-job.
2- In the console, add the commands required to run your project code. For example, if tests are based on Python, you need to add the commands required to set up and run a Python project.
3- Click Save + Run This Pipeline to save and run your pipeline.
The pipeline runs and the test result is displayed on your GoCD Dashboard page.
Configuring Tasks in GoCD Pipeline
In GoCD, tasks define the actions that each job performs within a pipeline. Tasks can include compiling code, running tests, deploying artifacts, or executing custom scripts. Here are the steps to configure tasks in a GoCD pipeline:
Steps to Configure Tasks in GoCD
- Go to the GoCD Admin Panel: Log in to GoCD and navigate to the Admin Panel.
- Navigate to Job Configuration: Open the pipeline, go to the stage, and select the job where you want to add tasks.
- Add a New Task: Click on Add Task and choose the type (e.g., command, script, or custom plugin).
- Define the Command: Specify the command (e.g., mvn test for a Maven build or pytest for Python tests).
- Set Task Execution Order: Arrange tasks sequentially or in parallel based on dependencies.
- Configure Environment Variables: Add necessary variables to ensure the correct execution of tasks.
- Save and Run the Pipeline: Apply changes and trigger the pipeline to verify task execution.
Best Use Cases of GoCD Pipeline
GoCD is designed to handle complex workflows with ease, making it ideal for teams looking to optimize their software delivery process. Here are the top five use cases where GoCD excels:
- Continuous Delivery for Microservices: GoCD is perfect for managing microservices-based applications. With its ability to handle complex dependency management, it allows teams to deliver different services independently while maintaining consistency across the system.
- Multi-Environment Deployment: Seamlessly handles deployments across multiple environments (e.g., staging, production), simplifying the configuration and reducing errors during transitions between environments.
- Automating Complex CI/CD Pipelines: With support for both parallel and sequential execution, GoCD is ideal for automating sophisticated CI/CD workflows that involve multiple stages, including building, testing, deployment, and approval.
- Cross-Platform Testing and Deployment: GoCD supports integration with various platforms and tools, allowing teams to automate testing and deployment across multiple OS environments (e.g., Windows, Linux, macOS).
- Version Control and Rollback Management: Provides easy management of version-controlled pipelines and artifacts, enabling quick rollback to previous versions in case of deployment failures, ensuring reliable releases.
BrowserStack Integration with GoCD
Before you can start integration, ensure that you have access to the BrowserStack account credentials, namely Access Key and Username. For the Integration, you have to follow all the above steps same as before. But in the last step “Job and Task”, under “Advanced Settings”, in the Secure Variables section, You have to add your BrowserStack Username and Access key as the environment variables.
Integrate BrowserStack Automate with GoCD
With existing test cases, integrating BrowserStack involves editing your test cases to add BrowserStack capabilities, credentials, and, remote URLs.
Conclusion
A well-orchestrated pipeline makes the job easier for the team and ensures reliable deployment and delivery. In this GoCD pipeline tutorial, we had a detailed look at configuring the GoCD pipeline. Combined with BrowserStack Automate, you have the flexibility to scale as your testing grows, without having to worry about updating versions, adding devices, managing capacity, and most importantly, maintaining stability.


