Ensuring that React components render consistently can be challenging as the application evolves. Even small changes in code can lead to unexpected UI shifts. Snapshot testing with Jest provides a simple solution by capturing the rendered output of components and allowing you to track any unintended changes.
Overview
Snapshot testing is a method used to capture the rendered output of a component and store it as a reference. It compares future test results to the stored snapshot, highlighting any unintended changes in the UI.
Benefits of Snapshot Testing:
- Quick Detection of UI Changes: Automatically flags unexpected changes in the UI after code modifications.
- Easy to Implement: Simple to set up with Jest and React, requiring minimal configuration.
- Ensures Consistency: Validates that components render the same way over time, maintaining UI stability.
- Helps with Refactoring: Safely refactor code, knowing that snapshot tests will catch any unintended UI changes.
- Supports Continuous Integration: Integrates seamlessly into CI/CD pipelines, providing automated UI validation.
This article explores Snapshot Testing for React components with Jest, covering its importance, setup, best practices, and how to integrate it with BrowserStack Percy for visual testing.
What is Snapshot Testing?
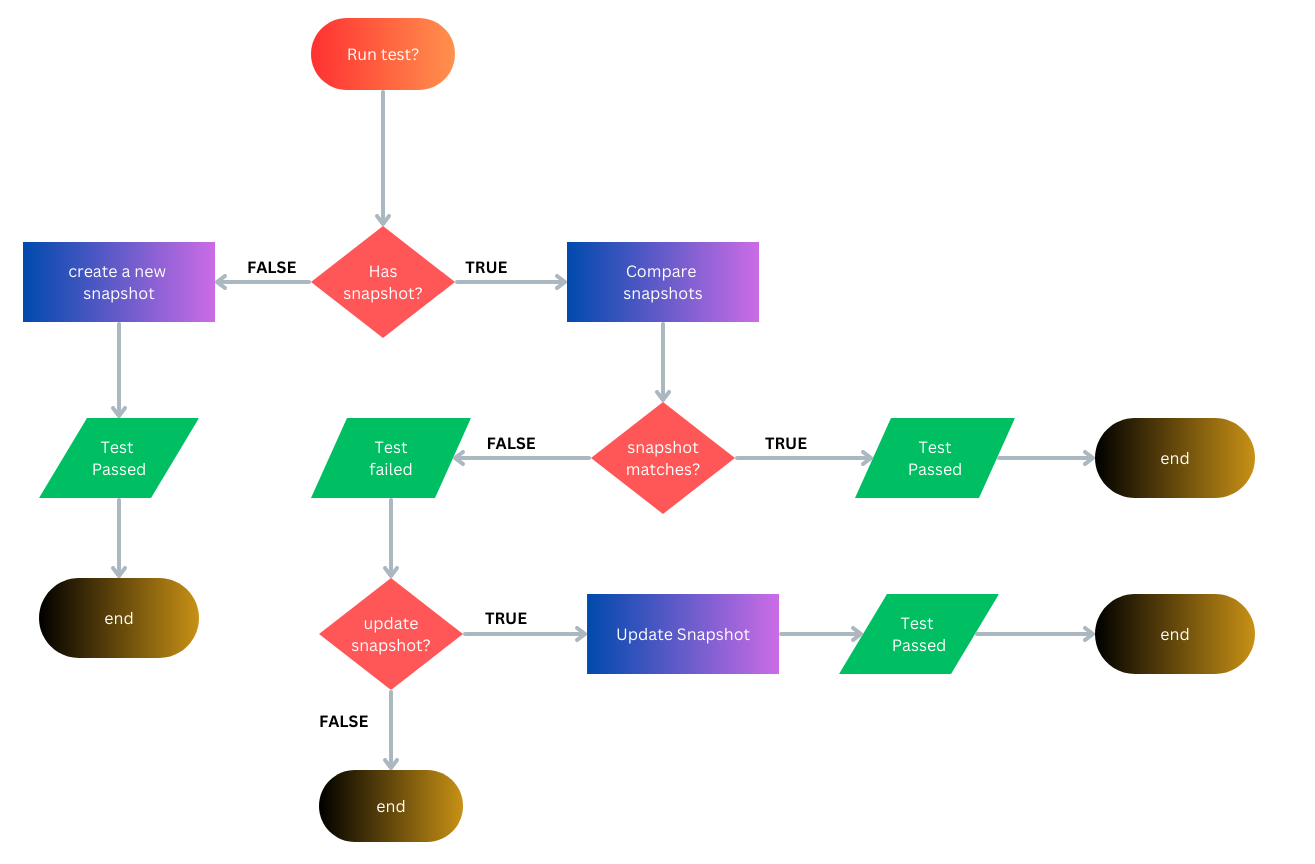
Snapshot testing is an automated testing procedure through which the current state of an application’s UI is captured and compared against the previously saved snapshot. It helps detect unexpected changes in the output and simplifies verifying code changes.
In this kind of testing, the output of a particular code state is compared to find any unintended UI change.
What are Jest Snapshots?
A snapshot in Jest results from the JavaScript or TypeScript code at a particular moment. To find any unexpected code changes, several snapshots are taken and compared. Jest generates a snapshot file when you create a test containing a serialized representation of the code output under test.
This snapshot file acts as a “snapshot” or reference of how the code must function. The test succeeds if the two snapshots are identical; otherwise, it fails. Jest also highlights the changes between the two snapshots that contain the code difference.
Read More: Snapshot Testing with Jest
Importance of Snapshot Testing React Components with Jest
Here are some key reasons why snapshot testing is essential for testing React components in Jest.
- Using Snapshots to simulate UI changes for testing: While developers make every effort to implement changes exactly as a designer intended, snapshot testing helps ensure this occurs. The visual representation of a code is recorded and then compared with a screenshot of a new scenario to validate whether there is a difference.
- Using Snapshot tests to determine whether changes were intentional: When using Jest to provide Snapshot testing for React components, you may quickly determine whether the snapshot displays the output the developer is attempting to bring. If this goes smoothly, snapshots may report it; if not, they show the output the developer did not expect.
Setting Up and Installing Jest
Before diving into writing snapshot tests, it’s important to first understand how to set up and install Jest in your project. This ensures you’re ready to begin testing your React components efficiently.
Prerequisites
Here are the prerequisites you need to have in place before writing snapshot tests for your React components.
- You must have Node.Js installed on your system, at least version 14 or higher.
- Install any IDE of your choice. In this example, Visual Studio Code IDE will be used.
- You must be familiar with the basic concepts of React.Js.
Read More: How to perform UI Testing of ReactJS Apps?
Now, Here’s how to set up your React project, and configure Jest to start snapshot testing of the React components.
Step 1: Install a React application
Create a new react application with the following command. Let’s name this project jest-tutorial.
npx create-react-app basic-app
Next, start the app.
npm start
Step 2: Configure Jest into your project
Install react-test-renderer with the following command to render the JavaScript objects without DOM.
npm install react-test-renderer
Writing Snapshot Tests using React
Once the setup is complete, the next step is to begin writing snapshot tests for your React components. Below are the key steps to effectively implement snapshot testing in your project.
1. Writing React components
Follow the steps to create a React application for which Snapshot tests will be written using Jest.
Write the following code inside the directory:
basic-app/src/components/HelloWorld.js.
import React from 'react'

function HelloWorld() {
return (
<div>
<h1>
Hello World
</h1>
</div>
)
}

export default HelloWorld
Also, update the basic-app/src/App.js file with the following script.
import React, { Component } from 'react';
import Items from './components/HelloWorld';

class App extends Component {
render() {
return (
<Items/>
);
}
}

export default App;
2. Using Jest’s Snapshot Feature
Once you have created the file, write the test for the following component inside the director:
src/components/HelloWorld.test.js.
import React from 'react';
import renderer from 'react-test-renderer';

import HelloWorld from './HelloWorld';

it('performs snapshot testing', () => {
const tree = renderer.create(<HelloWorld />).toJSON();
expect(tree).toMatchSnapshot();
});
After you have written the test file, follow the command to run the test on the root directory of your project ./basic-app.
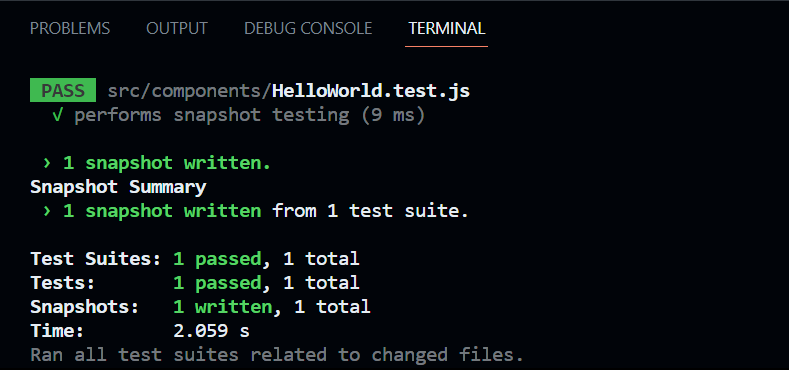
npm test
When you run a test, it will search for all the test files stored in your project directory. To get rid of unnecessary failed tests, delete the App.test.js file. Since you are not creating a test in that file, there’s no use in running a test on that file.
The snapshot is saved inside the directory:
components/__snapshots__/HelloWorld.test.js.snap.
// Jest Snapshot v1, https://goo.gl/fbAQLP

exports[`performs snapshot testing 1`] = `
<div>
<h1>
Hello World
</h1>
</div>
`;
3. Updating Snapshots in Jest
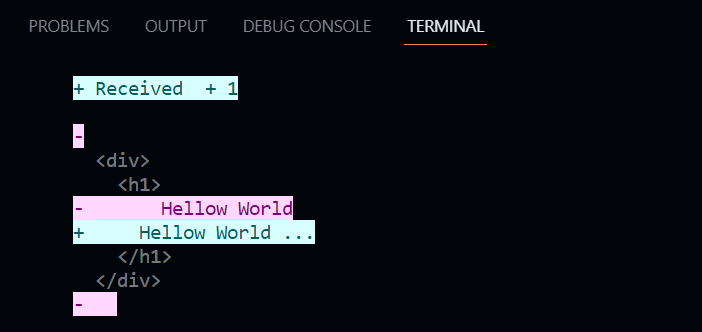
If you change the component’s script slightly and run the test command, the terminal will display the following result highlighting the change.
If the change is intentional, you can update the snapshot by pressing the key ‘u’ in –watch mode or prompting the following command.
jest --updateSnapshot
The jest update snapshot command comes in handy to update the snapshots quickly.
4. Interactive Snapshot Mode in JEST
Inline snapshots are interactive due to the reason that they are saved automatically back into the source code. In simpler words, you can save screenshots automatically without switching to a .snap file.
Let’s see a practical example of how to create inline snapshots in Jest.
it('renders correctly', () => {
const tree = renderer
.create(<HelloWorld/>)
.toJSON();
expect(tree).toMatchInlineSnapshot();
});
How to Perform Snapshot Testing with React in Jest Using BrowserStack Percy
BrowserStack’s visual regression testing tool, Percy, can help you enhance snapshot testing with React in Jest with robust features and seamless integrations.
Using BrowserStack Percy, running your snapshot tests with React in Jest is quite simple. Just follow this documentation to set up Jest on Percy and seamlessly perform snapshot testing.
Why use BrowserStack Percy?
With BrowserStack App Percy:
- Teams can use AI-powered visual engine processes to compare screenshots with a baseline image for any visual inconsistencies, significantly reducing noise.
- Effortlessly integrate visual testing into your existing automation workflows.
- Group visual changes to reduce noise and false positives for faster reviews.
- Integrate with popular SCM and CI/CD tools such as Jenkins, Travis CI, and GitHub.
Best Practices while Writing Snapshot Tests
To ensure effective and maintainable snapshot tests, it’s important to follow certain best practices. Here are some key guidelines to consider while writing snapshot tests for your React components.
1. Consistency in naming conventions
Maintaining enough consistency while naming test files increases the project’s maintainability by clearly describing the purpose of the test files and structuring them accordingly. While documenting a naming convention, ensure your team is aware.
2. Grouping tests logically
Grouping tests logically to simplify your test files is also a good idea. This includes utilizing describe blocks to group relevant tests. This helps make the purpose of tests crystal clear. Moreover, Use ‘before’ and ‘after’ hooks to ensure the preceding test case has no impact on subsequent tests if you have complex nested code.
If your tests are simple and easy to comprehend, it encourages collaboration in your project and increases the maintainability of the code. To do so, you can do the following things: avoid unnecessary code, use helper functions such as test.each to reduce duplication in your code, and even then, if you have complex tests, use comments to describe them.
Conclusion
Although it may be used for any JavaScript code, Jest is a well-known JavaScript testing framework frequently used to test React applications.
Jest enables React testing using snapshots, which is particularly helpful in identifying unintentional UI changes in your React app.
In the example above, a basic React app was built, and the Snapshot test was passed, which showed the output.
The app’s data was modified to discover how a snapshot test sends a fail message. Later, it was updated to pass the snapshot test a second time.
To enhance Snapshot tests on Jest, you can perform them on real devices using tools like BrowserStack Percy. You can access a vast real-device cloud of 3500+ device-browser combinations and maximize test coverage.


