Scrolling is fundamental in mobile apps, enabling users to navigate content beyond the visible screen. In UI testing, replicating this gesture is essential to ensure smooth functionality.
Espresso allows testers to scroll to the bottom or any specific element using Adapter Views and Recycler Views.
This guide explains the steps to efficiently perform scrolling actions in Espresso, ensuring seamless test execution for apps with long lists or complex layouts.
Espresso scroll RecyclerView
RecyclerViewActions.scrollTo() method matches against the ItemView of the ViewHolder, which is inflated in onCreateViewHolder () of the adapter. And so as for the scrollTo () method to figure, you should supply a matcher that uniquely identifies the ItemView.
Also Read: What is Espresso Testing?
It returns a ViewAction which scrolls RecyclerView to the view matched by viewHolderMatcher. This approach is employed by RecyclerView.ViewHolder to seek out the target view. It will create one ViewHolder per item type and bind adapter data to the ViewHolder.
Working with RecyclerView
RecyclerView list ensures when the user scrolls off a screen, it recycles the elements in an efficient and effective manner.
To work with RecyclerView, let us use the espresso-contrib package in our app’s Gradle dependencies.
Androidx.test.espresso:espresso-contrib:3.3.0
The dependency supports the below actions:
Scrolling in an exceedingly RecyclerView
- scrollTo() – Scroll to matched view
- scrollToHolder() – Scroll to matched view holder
- scrollToPosition() – Scroll to the precise position
Performing an action on the element
- actionOnItem() – //Perform view action on matched view
- actionOnHolderItem() – //Perform view action on a matched View holder
- actionOnItemAtPosition() – //Perform a view action on a view at a selected position
How to Scroll to the Bottom of ScrollView
Espresso doesn’t have a direct scrollToBottom() method, because it operates by interacting with view elements. However, you can use the scrollTo() action to scroll a ScrollView until the desired view appears on screen. In most cases, you don’t explicitly scroll to the “bottom” position, but scroll until the target view appears on screen.
If you want to scroll to the very end of the ScrollView, you can locate the last view inside it and call:
onView(withId(R.id.last_view_in_scroll))

    .perform(scrollTo())
Here:
- onView(withId(R.id.last_view_in_scroll)): Finds the view at the end of your scrollable layout.
- .perform(scrollTo()): Scrolls the parent ScrollView until this target view is brought into view.
If you have an element located at the bottom of a ScrollView (such as a button), you can chain scrollTo() with an action like click() to first bring it into view and then interact with it.
For example, if your view has the ID R.id.onBottomOfScrollView, you can write:
onView(withId(R.id.onBottomOfScrollView))

    .perform(scrollTo(), click())
Here:
- onView(withId(R.id.onBottomOfScrollView)): Finds the target view located at the bottom of your scrollable layout.
- .perform(scrollTo(), click()): Scrolls the parent ScrollView until this view is visible, then performs a click on it.
This approach ensures that Espresso scrolls to the target view if it’s not already visible, and then performs the click. It works reliably regardless of the view’s position within the scrollable layout.
How to scroll to an element in Espresso?
This section outlines the steps to scroll to elements in an app using Espresso.
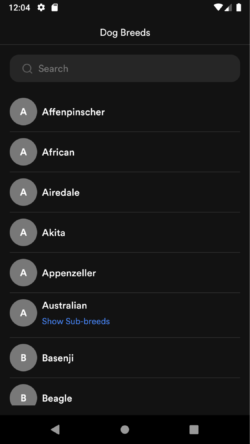
Below the onView method is used to locate the RecyclerView.
onView(withId(R.id.dog_breed_recycler_view))
Then, let’s use scrollTo method in RecyclerViewActions
onView(withId(R.id.dog_breed_recycler_view)).perform(RecyclerViewActions.scrollToPosition(item_position))
Below is what the complete test looks like:
@Rule

public ActivityScenarioRule<MainActivity> activityRule =

new ActivityScenarioRule<>(MainActivity.class);

@Test

public void scroll_to_bottom() throws InterruptedException {

Thread.sleep(5000);

int count = getRecyclerViewCount(withId(R.id.dog_breed_recycler_view)); // No of items in Recycler View

Log.d("Recycler Cnt", String.valueOf(count));

for(int i=0;i<count;i++){

Thread.sleep(2000);

onView(withId(R.id.dog_breed_recycler_view)).perform(RecyclerViewActions.scrollToPosition(i));

//Thread.sleep(2000);

}

}
Now let‘s scroll to a fixed position
@Test

public void scroll_to_specific_position() throws InterruptedException {

Thread.sleep(5000);

// scrolling to position 20

onView(withId(R.id.dog_breed_recycler_view)).perform(RecyclerViewActions.scrollToPosition(20));


Thread.sleep(5000);

}
The below code clicks and scrolls every item of the Recycler View
@Test

public void scroll_nclickItem() throws InterruptedException {

int count = getRecyclerViewCount(withId(R.id.dog_breed_recycler_view)); // No of items in Recycler View

// click and scroll all items of the recycler view

for(int i=0;i<count;i++){

Thread.sleep(2000);

onView(withId(R.id.dog_breed_recycler_view)).perform(RecyclerViewActions.actionOnItemAtPosition(i, click()));

onView(withId(R.id.dog_breed_recycler_view)).perform(RecyclerViewActions.scrollToPosition(i));

Thread.sleep(2000);

Espresso.pressBack();

}

}
Run Scroll To Element Test in Espresso
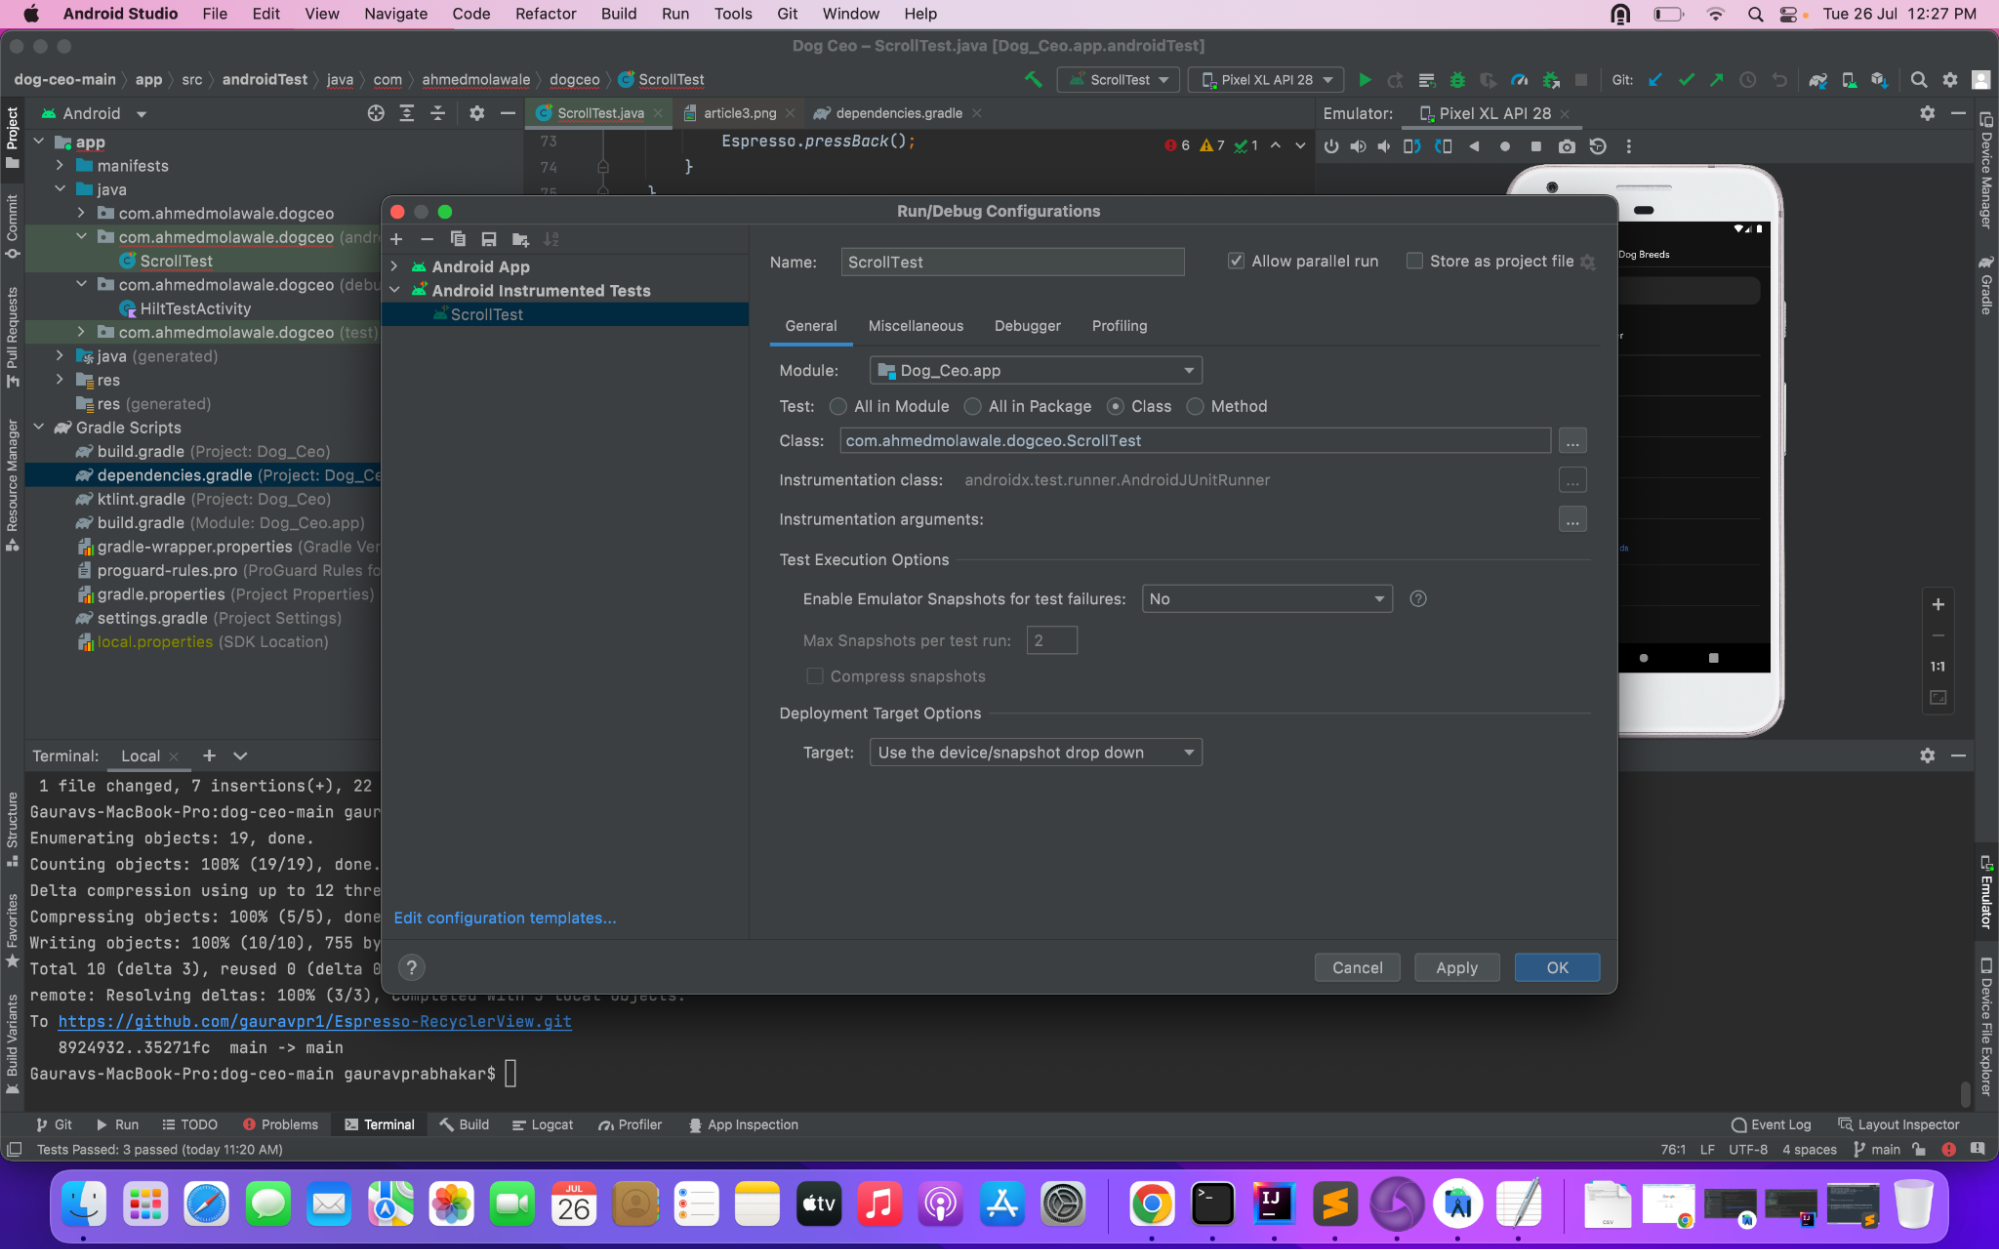
To do this, create a test configuration in Android Studio.
- Open Run menu > Edit Configurations
- Add a new Android Tests configuration
- Choose a module
- Add a specific instrumentation runner:
android.support.test.runner.AndroidJUnitRunner - Add your class name
Once the configuration is set up connect your device or select the emulator and directly run the configuration.
Executing Scroll and Click Test in Espresso with BrowserStack
To execute the test in Espresso, run the following command:
curl -u “<username>:<access-key>” \


-X POST “https://api-cloud.browserstack.com/app-automate/espresso/v2/build” \


-d ‘{“class”: [“Test-Class-Name”], “devices”: [“Samsung Galaxy S8-7.0”], “app”: “bs://<hashed appid from Step 1>”, “testSuite”: “bs://<hashed testID from Step 2>”}’ \


-H “Content-Type: application/json”


//Test-Class-Name for the above github project


 com.ahmedmolawale.dogceo.ScrollTest
The test results are available on the command-line interface, as well as the App Automate dashboard. You have now run your first Espresso test on BrowserStack App Automate.
For more accurate results, it is recommended to test on real devices, taking real user conditions into account.
Run Espresso Tests on Real Devices
With BrowserStack’s real device cloud you can run Espresso Toast Message on real devices by following the steps below:
Step 1: To run your test cases on BrowserStack you need two .apk files.
First one is your main app .apk and another is your androidTest .apk file.
To generate both the apks, run the below command
- To create a .apk file for the app run the following command in the terminal:
./gradlew assembleDebug
- To create a .apk file for the test classes in the terminal run the following command:
./gradlew assembleAndroidTest
Find both .apk files under your project folder: <project-folder>\build\outputs\apk. In the .apk folder you will find two files:
- app-debug.apk
- app-debug-androidTest.apk
These are the files that you will upload to the cloud when you create your execution plan.
Step 2: Get your access key from the BrowserStack using the below command
curl -u "<username>:<access-key>" -X POST "https://api-cloud.browserstack.com/app-automate/upload" -F "file=@/path/to/app/file/Application-debug.apk"
Output
Please note the App URL (bs://<hashed appid>) returned in the response of this call:
{"app_url":"bs://<hashed appid>"}Step 3: Upload the app by running the below command on your terminal
curl -u "<username>:<access-key>" -X POST "https://api-cloud.browserstack.com/app-automate/espresso/test-suite" -F "file=@/path/to/test/file/Application-debug-test.apk"
Output
Please note the Test Suite URL (bs://<hashed testID>) returned in the response of this call:
{"test_url":"bs://<hashed testID>"}The Test ID returned in the response will be used to execute your test.
Conclusion
Scrolling is an integral part of mobile app testing, especially when dealing with long lists or dynamic, scrollable content. Espresso provides robust and reliable methods to locate and interact with elements that aren’t immediately visible, making it a powerful tool for maintaining seamless UI test automation.
Run Espresso tests on real devices with BrowserStack for broader test coverage and more accurate results. BrowserStack allows you to validate behavior across 3,500+ device and OS configurations, replicates real user conditions, and delivers more confident, dependable test outcomes.


