Maintaining a consistent UI in React apps is crucial for a seamless user experience. Visual testing helps detect unintended layout and style changes, preventing UI regressions. It ensures design accuracy, enhances reliability, and maintains brand consistency across devices.
Overview
React Visual Testing ensures that a React application’s UI remains consistent by detecting unintended visual changes. It helps catch design inconsistencies before they reach production.
Types of React Visual Testing:
- End-to-End Testing: Validates the entire UI workflow to catch layout shifts, broken styles, or missing elements across different environments.
- Component Testing: Focuses on individual UI components to ensure they render correctly in isolation and remain visually consistent.
How to Perform Visual Testing for React Apps
- Set up a testing framework: Choose a tool like Percy.
- Capture baseline snapshots: Take initial UI snapshots as a reference for future comparisons.
- Run visual tests: Execute tests across different devices and screen sizes to detect visual changes.
- Analyze and review differences: Compare new snapshots with baselines to identify unintended UI changes.
- Fix and approve changes: Update snapshots for intentional changes or fix regressions in the UI.
- Automate visual testing in CI/CD: Integrate visual tests into CI/CD pipelines to ensure UI consistency before deployment.
This article covers visual testing for react apps, its types, component testing, and end-to-end testing.
Understanding Visual Testing for React Apps
Visual testing for React apps ensures that UI components render correctly and remain visually consistent across updates. Unlike functional testing, which checks logic and interactions, visual testing captures snapshots of the UI and compares them to detect unintended changes.
This helps prevent layout shifts, broken styles, and regressions in design. It offers multiple benefits like:
- Prevents UI Bugs: Detects unexpected changes in design, layout, and responsiveness.
- Ensures Cross-Browser Consistency: Verifies that UI elements appear correctly across different browsers and devices.
- Detects Regression Issues: Helps maintain a stable design by catching unintended UI changes after code updates.
- Improves Developer Efficiency: Automates UI verification, reducing the need for manual visual inspections.
Read More: Strategies to Optimize Visual Testing
Types of React App Testing
In a React application, two levels of testing can be performed:
- End-to-End Testing is usually performed when the application is deployed and running with all its components rendered in the browser.
- Component Testing is performed during the development stage. It allows multiple tests with various combinations for a single component and helps improve application quality at an early stage.
React Component Visual Testing
For this article’s purpose, the Cypress Real World React app is used, which can be found here.
Prerequisite
- Refer to this documentation for Cypress and Percy’s setup
- For this article’s purpose, we are using the Cypress Real World React app, which can be found here.
- Please clone this repository to your local laptop for practice purposes.
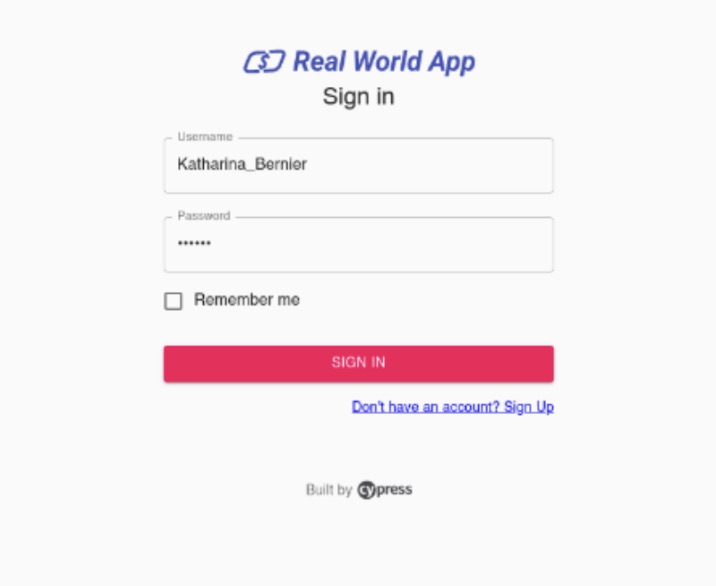
The first step is to write a Cypress component test for the sign-in form, which looks like the following:
The component source code for this can be found here.
The Cypress component test for the Sign-in Form will look like this:
it("submits the username and password to the backend", () => {
mount(
<MemoryRouter>
<SignInForm authService={authService} />
</MemoryRouter>
);
cy.get("[data-test*=signin-username]").type("Katharina_Bernier");
cy.get("[data-test*=signin-password]").type("s3cret");
cy.get("[data-test*=signin-submit]").click();

cy.wait("@loginPost");

cy.get("[data-test*=signin-error]").should("not.exist");
});
Consider an example where the background color of the SIGN IN button needs to be validated.
The Cypress code to get the background color will look like below
cy.get(".MuiButton-containedPrimary").should(
"have.css",
"background-color",
"rgb(63, 81, 181)"
);- But imagine writing this for several elements and covering for color and background color; this would become a time-consuming task.
- To speed up the time-consuming task and better validate, integrate Percy to capture the snapshot of this particular SIGN IN button and validate for any visual changes.
- Now use Percy’s command percySnapshot to capture a snapshot of this Sign in the form component.
The Cypress code appears as shown below, with further configuration details available here.
cy.percySnapshot("sign in form");And the test will be as follows:
it("submits the username and password to the backend", () => {
mount(
<MemoryRouter>
<SignInForm authService={authService} />
</MemoryRouter>
);
cy.get("[data-test*=signin-username]").type("Katharina_Bernier");
cy.get("[data-test*=signin-password]").type("s3cret");
cy.get("[data-test*=signin-submit]").click();
cy.get("[data-test*=signin-error]").should("not.exist");
cy.percySnapshot("sign in form");
});
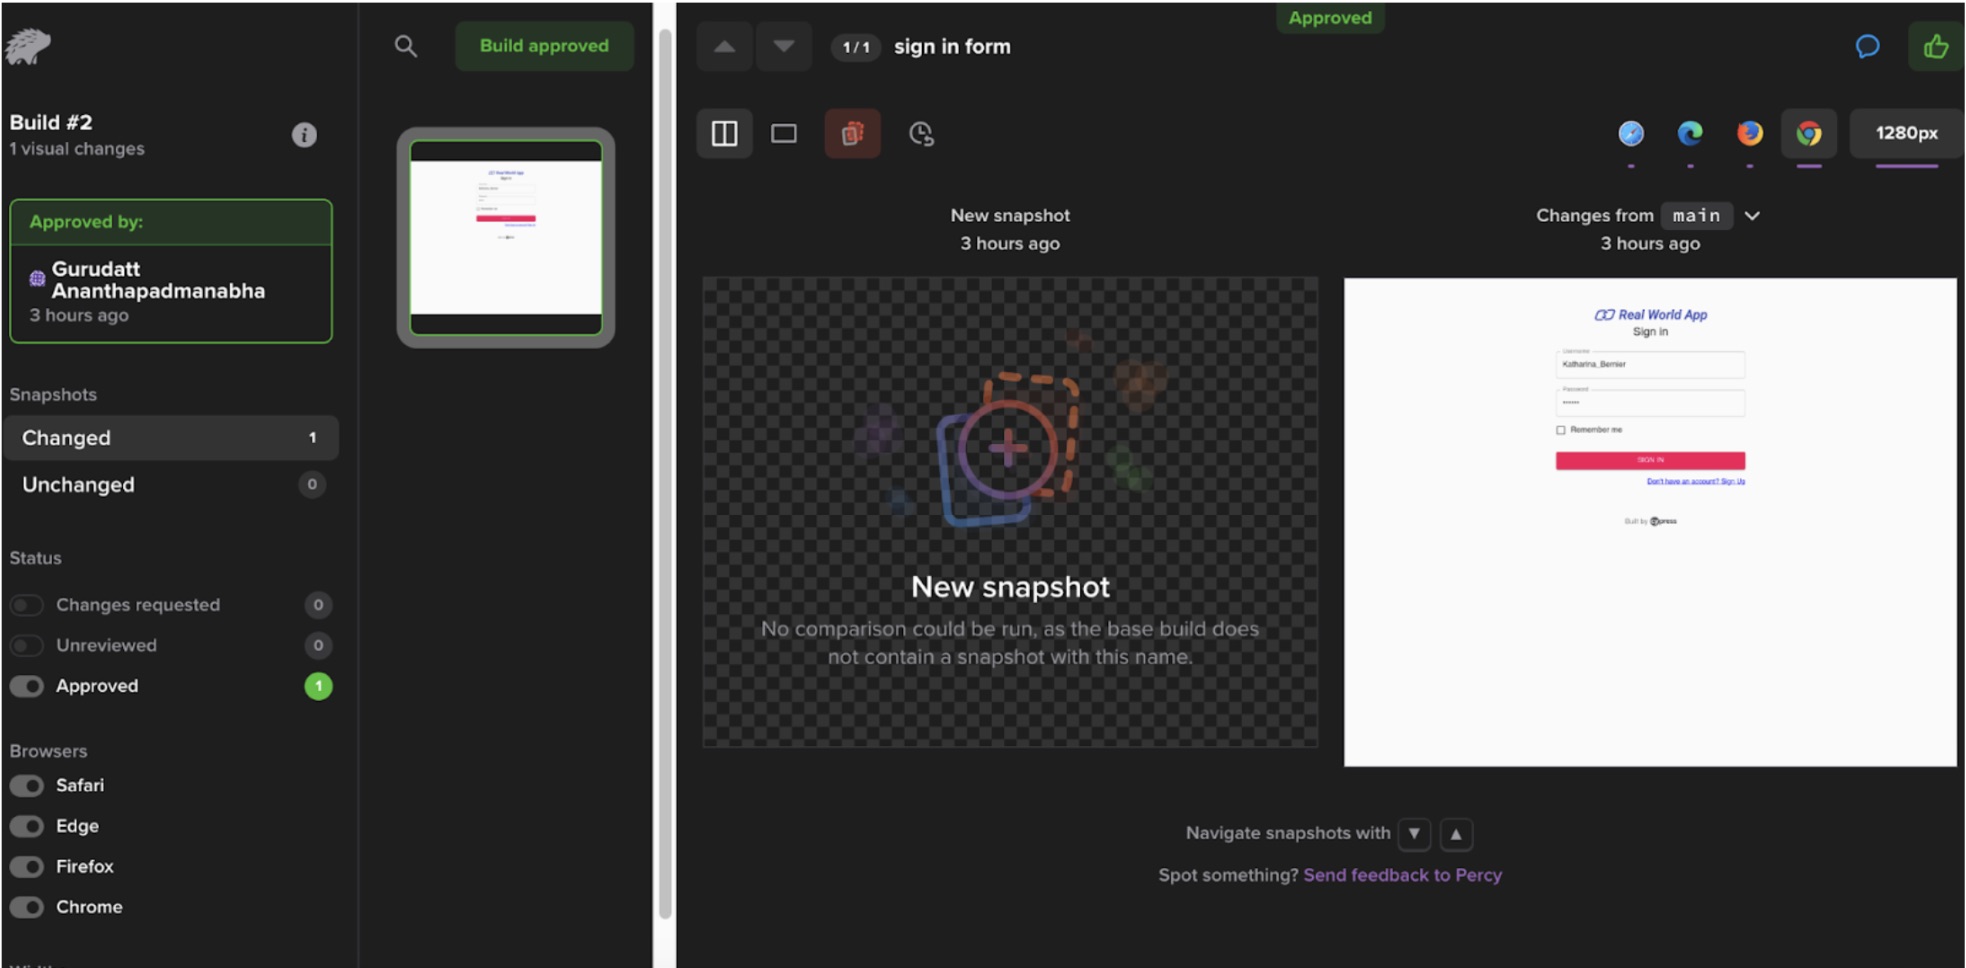
When the test runs, the first snapshot build is sent to Percy for approval. Once approved, it becomes the baseline image for future comparisons.
To see how the Percy Snapshot comparison works, change the background color of the SIGN IN button from secondary to primary and create a pull request.
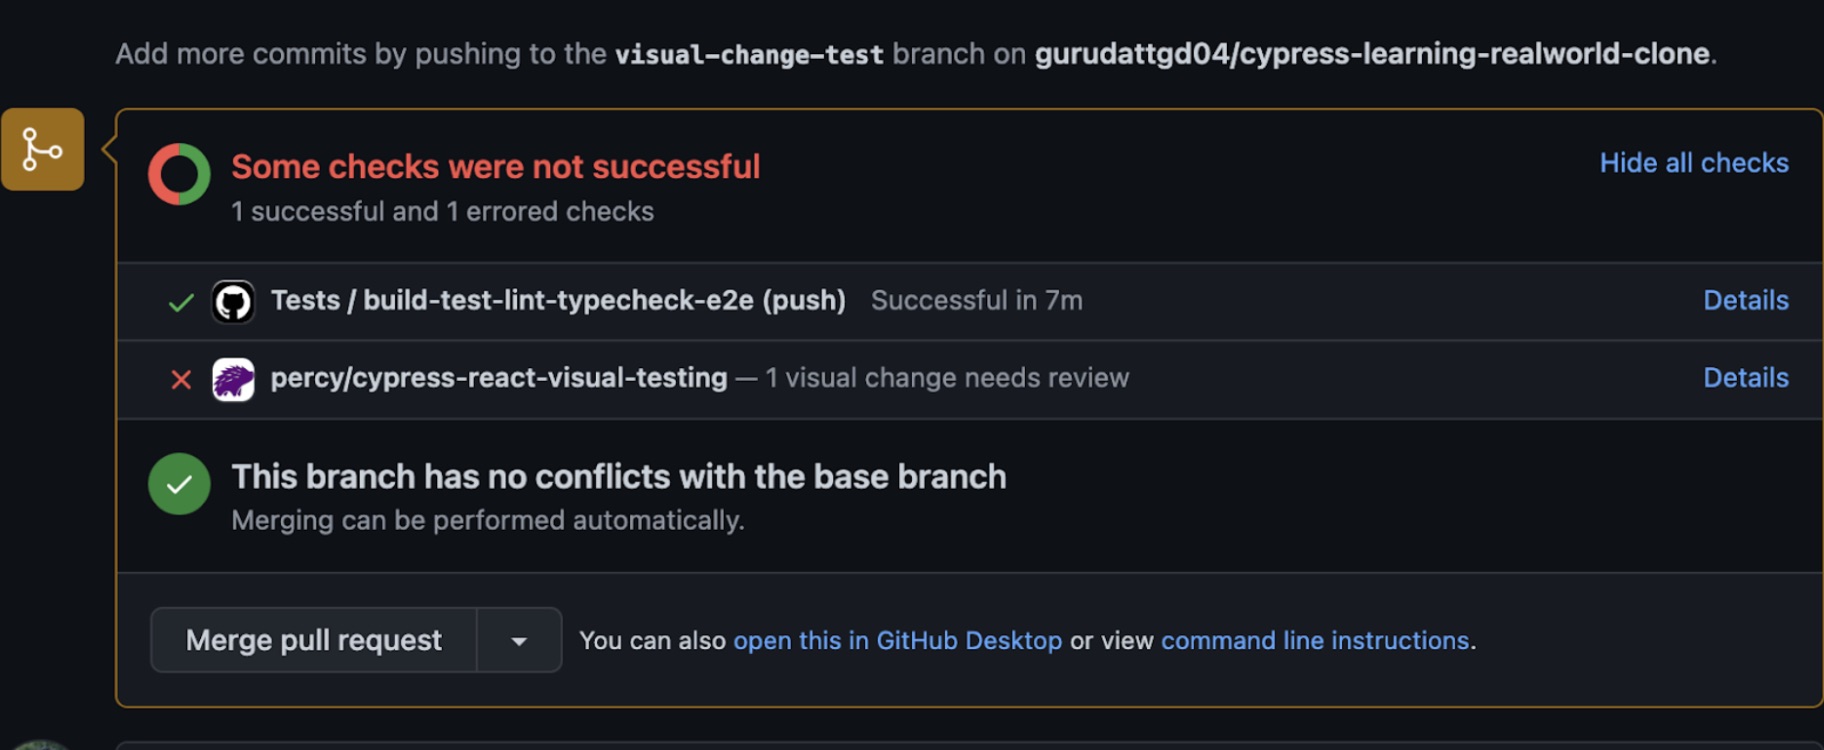
Once the Github actions run the build, you can see the build failed as shown below.
The functional tests have passed, but the visual test performed with Percy in the component test has failed and requires review.
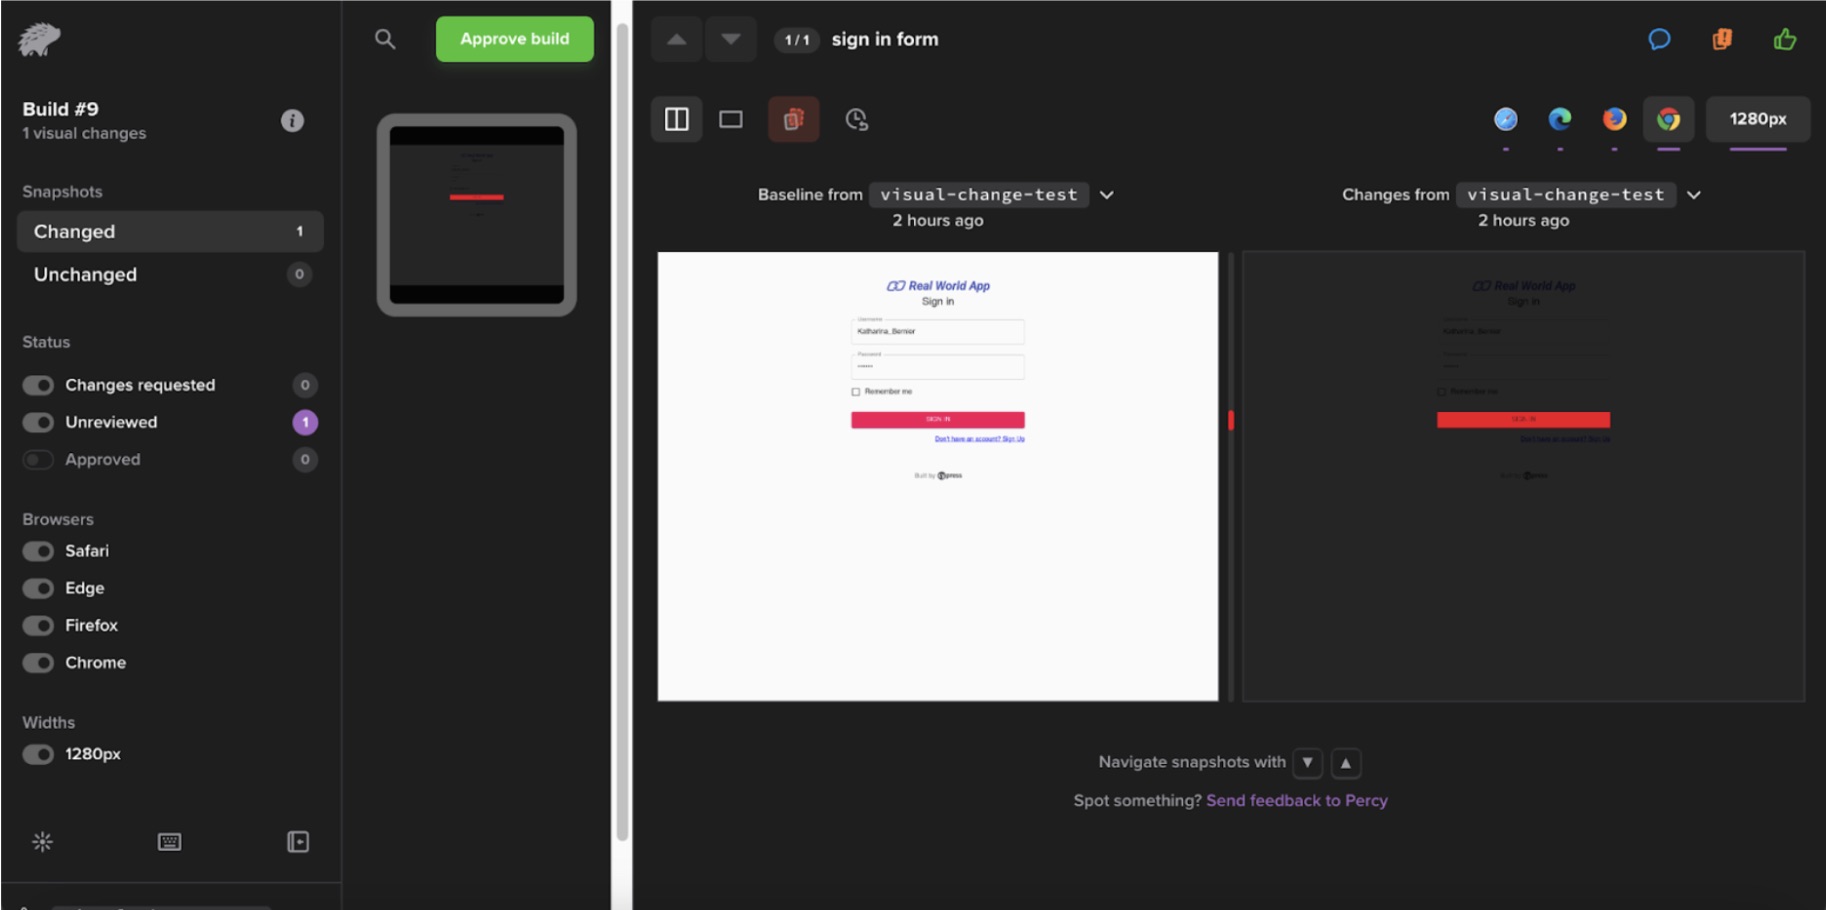
Click on the Details link against the failed Percy check to review.
- As you can see, the changed background color of the SIGN IN button is highlighted by Percy.
- You can now approve or Reject the build based on the requirement.
- The component-level Visual testing in React application consumes less time and gives early feedback on the appropriately used changes.
React End-to-End Visual Testing
End-to-End testing takes time as it covers the entire user journey in the application. While these tests focus on functionality, visual elements can still break. Using Percy for visual testing helps ensure the UI remains consistent throughout the user journey.
The Cypress test for the End-to-End flow will look like the following:
it.only("navigates to the new transaction form, selects a user and submits a transaction payment", function () {
const payment = {
amount: "35",
description: "Sushi dinner 🍣",
};

cy.getBySelLike("new-transaction").click();
cy.wait("@allUsers");

cy.getBySel("user-list-search-input").type(ctx.contact!.firstName, { force: true });
cy.wait("@usersSearch");
cy.visualSnapshot("User Search First Name Input");

cy.getBySelLike("user-list-item").contains(ctx.contact!.firstName).click({ force: true });
cy.visualSnapshot("User Search First Name List Item");

cy.getBySelLike("amount-input").type(payment.amount);
cy.getBySelLike("description-input").type(payment.description);
cy.visualSnapshot("Amount and Description Input");
cy.getBySelLike("submit-payment").click();
cy.wait(["@createTransaction", "@getUserProfile"]);
cy.getBySel("alert-bar-success")
.should("be.visible")
.and("have.text", "Transaction Submitted!");

const updatedAccountBalance = Dinero({
amount: ctx.user!.balance - parseInt(payment.amount) * 100,
}).toFormat();

if (isMobile()) {
cy.getBySel("sidenav-toggle").click();
}

cy.getBySelLike("user-balance").should("contain", updatedAccountBalance);
cy.visualSnapshot("Updated User Balance");

if (isMobile()) {
cy.get(".MuiBackdrop-root").click({ force: true });
}

cy.getBySelLike("create-another-transaction").click();
cy.getBySel("app-name-logo").find("a").click();
cy.getBySelLike("personal-tab").click().should("have.class", "Mui-selected");
cy.wait("@personalTransactions");

   cy.getBySel("transaction-list").first().should("contain", payment.description);

   cy.database("find", "users", { id: ctx.contact!.id })
     .its("balance")
     .should("equal", ctx.contact!.balance + parseInt(payment.amount) * 100);
   cy.getBySel("alert-bar-success").should("not.exist");
   cy.percySnapshot("Personal List Validate Transaction in List");
 });
As you can see first, all functional checks are performed, followed by validation to ensure the visual aspects are correct.
- The above Cypress test can be found on this repo
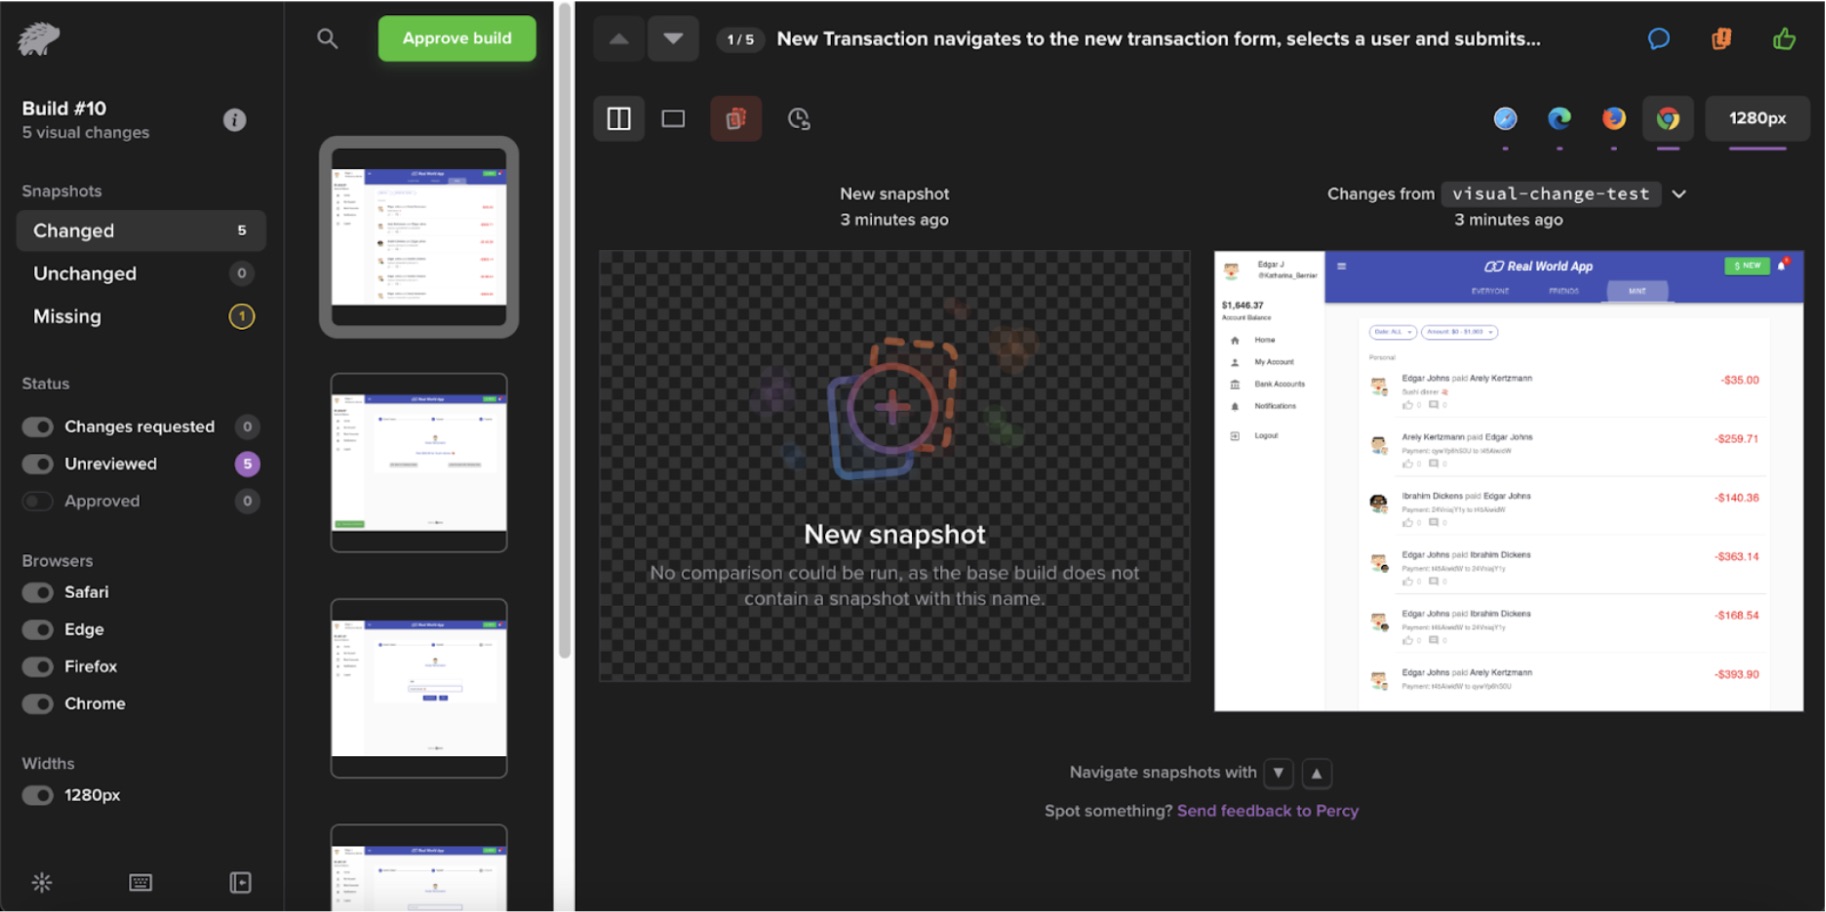
- When you run the above test, you can see snapshots sent to Percy for the first time, and you need to Approve the build for making these images as baseline images.
If any change in the feature branch does not match the baseline image, the Percy test will fail, and Percy will highlight the changes, which you can Approve or Request for change.
Why Choose BrowserStack Percy for Visual Testing?
Percy by BrowserStack is an AI-powered visual testing platform designed to automate visual regression testing for web applications, ensuring flawless user interfaces on every code commit.
Integrated into CI/CD pipelines, Percy detects meaningful layout shifts, styling issues, and content changes with advanced AI, significantly reducing false positives and cutting down review time for fast, confident releases.
- Effortless Visual Regression Testing: Seamlessly integrates into CI/CD pipelines with a single line of code and works with functional test suites, Storybook, and Figma for true shift-left testing.
- Automated Visual Regression: Captures screenshots on every commit, compares them side-by-side against baselines, and instantly flags visual regressions like broken layouts, style shifts, or component bugs.
- Visual AI Engine: The Visual AI Engine uses advanced algorithms and AI Agents to automatically ignore visual noise caused by dynamic banners, animations, anti-aliasing, and other unstable elements. It focuses only on meaningful changes that affect the user experience. Features like “Intelli ignore” and OCR help differentiate important visual shifts from minor pixel-level differences, greatly reducing false positive alerts.
- Visual Review Agent: Highlights impactful changes with bounding boxes, offers human-readable summaries, and accelerates review workflows by up to 3x.
- No-Code Visual Monitoring: Visual Scanner allows rapid no-install setup to scan and monitor thousands of URLs across 3500+ browsers/devices, trigger scans on-demand or by schedule, ignore dynamic content regions as needed, and compare staging/production or other environments instantly.
- Flexible and Comprehensive Monitoring: Schedule scans hourly, daily, weekly, or monthly, analyze historical results, and compare any environment. Supports local testing, authenticated pages, and proactive bug detection before public release.
- Broad Integrations: Supports all major frameworks and CI tools, and offers SDKs for quick onboarding and frictionless scalability.
Pricing
- Free Plan: Available with up to 5,000 screenshots per month, ideal for getting started or for small projects.
- Paid Plan: Starting at $199 for advanced features, with custom pricing available for enterprise plan.
Conclusion
Visual testing is essential for maintaining UI consistency in React applications. Component testing helps catch UI issues early, while end-to-end testing ensures a seamless user experience. Fixing bugs later in development is costly, so incorporating tests early improves product quality and ROI.
Using Percy for visual testing helps detect unintended UI changes efficiently. Adding more tests at the component level speeds up execution and ensures a stable, visually accurate application.
Useful Resources for Visual Testing
- How to capture Lazy Loading Images for Visual Regression Testing in Cypress
- How to Perform Visual Testing for Components in Cypress
- How to run your first Visual Test with Cypress
- How Visual Diff Algorithm improves Visual Testing
- How is Visual Test Automation changing the Software Development Landscape?
- How does Visual Testing help Teams deploy faster?
- How to perform Visual Testing for React Apps
- How to Run Visual Tests with Selenium: Tutorial
- How to reduce False Positives in Visual Testing?
- How to capture Lazy Loading Images for Visual Regression Testing in Puppeteer
- How to migrate your Visual Testing Project to Percy CLI
- Why is Visual Testing Essential for Enterprises?
- Importance of Screenshot Stabilization in Visual Testing
- Strategies to Optimize Visual Testing
- Best Practices for Visual Testing
- Visual Testing Definitions You Should Know
- Visual Testing To Optimize eCommerce Conversions
- Automate Visual Tests on Browsers without Web Drivers
- Appium Visual Testing: The Essential Guide
- Top 17 Visual Testing Tools


