
 Join our Discord
Agentic testing in Low Code Automation
Use AI in Low Code Automation to generate, automate, validate, and heal test cases across the testing lifecycle.
Agentic testing in Low Code Automation is the new AI-native experience where you can describe what to test, AI drafts the test cases, records and validates them, and heals them when your application changes.
Agentic testing in Low Code Automation is currently in Alpha and is available only for a limited trial period on the Pro and Ultimate plans. Access may change in the future. For more details, contact us.
Benefits
Agentic testing is built for manual QA teams and testers who don’t write code. It offers the following benefits:
- Faster automation: AI generates and automates several test cases in parallel, so you build more of your suite in less time.
- Less maintenance: Intent-aware healing repairs test cases when they break, which shortens your testing cycles.
- Conversational iteration: You refine test cases through chat, not through low-level step definitions.
- Self-validating output: Each stage checks its own output before the next one starts, so your review effort drops.
- No new tool to learn: AI-authored tests behave like the tests you record yourself. There’s no separate dashboard or login.
- Wider step coverage: Custom JavaScript, AI validations, API steps, email and OTP workflows, file uploads, and recorded modules.
- Full version history: Every save creates a version, and AI actions are stored as standard Low Code Automation steps.
Prerequisites
Ensure that BrowserStack AI is enabled for your account. For more information, see Activate BrowserStack AI.
How agentic testing works
AI handles every stage of the workflow, and the handoffs between them. The following table describes what AI does at each stage:
| Stage | What AI does |
|---|---|
| Generate | Reads a requirements document or explores a URL, plans coverage across positive, negative, and edge scenarios, then drafts test cases with steps. |
| Refine | Re-plans a test case from your natural language chat input, and places reusable modules into the right steps. |
| Automate | Drives a real cloud browser and records concrete actions under each natural language step, in parallel across the selected test cases. |
| Validate | Re-runs the recorded test and checks its own output before you save the test. |
| Heal | Re-records a failing step from the same intent and validates the test again. |
Step 1: Generate test cases
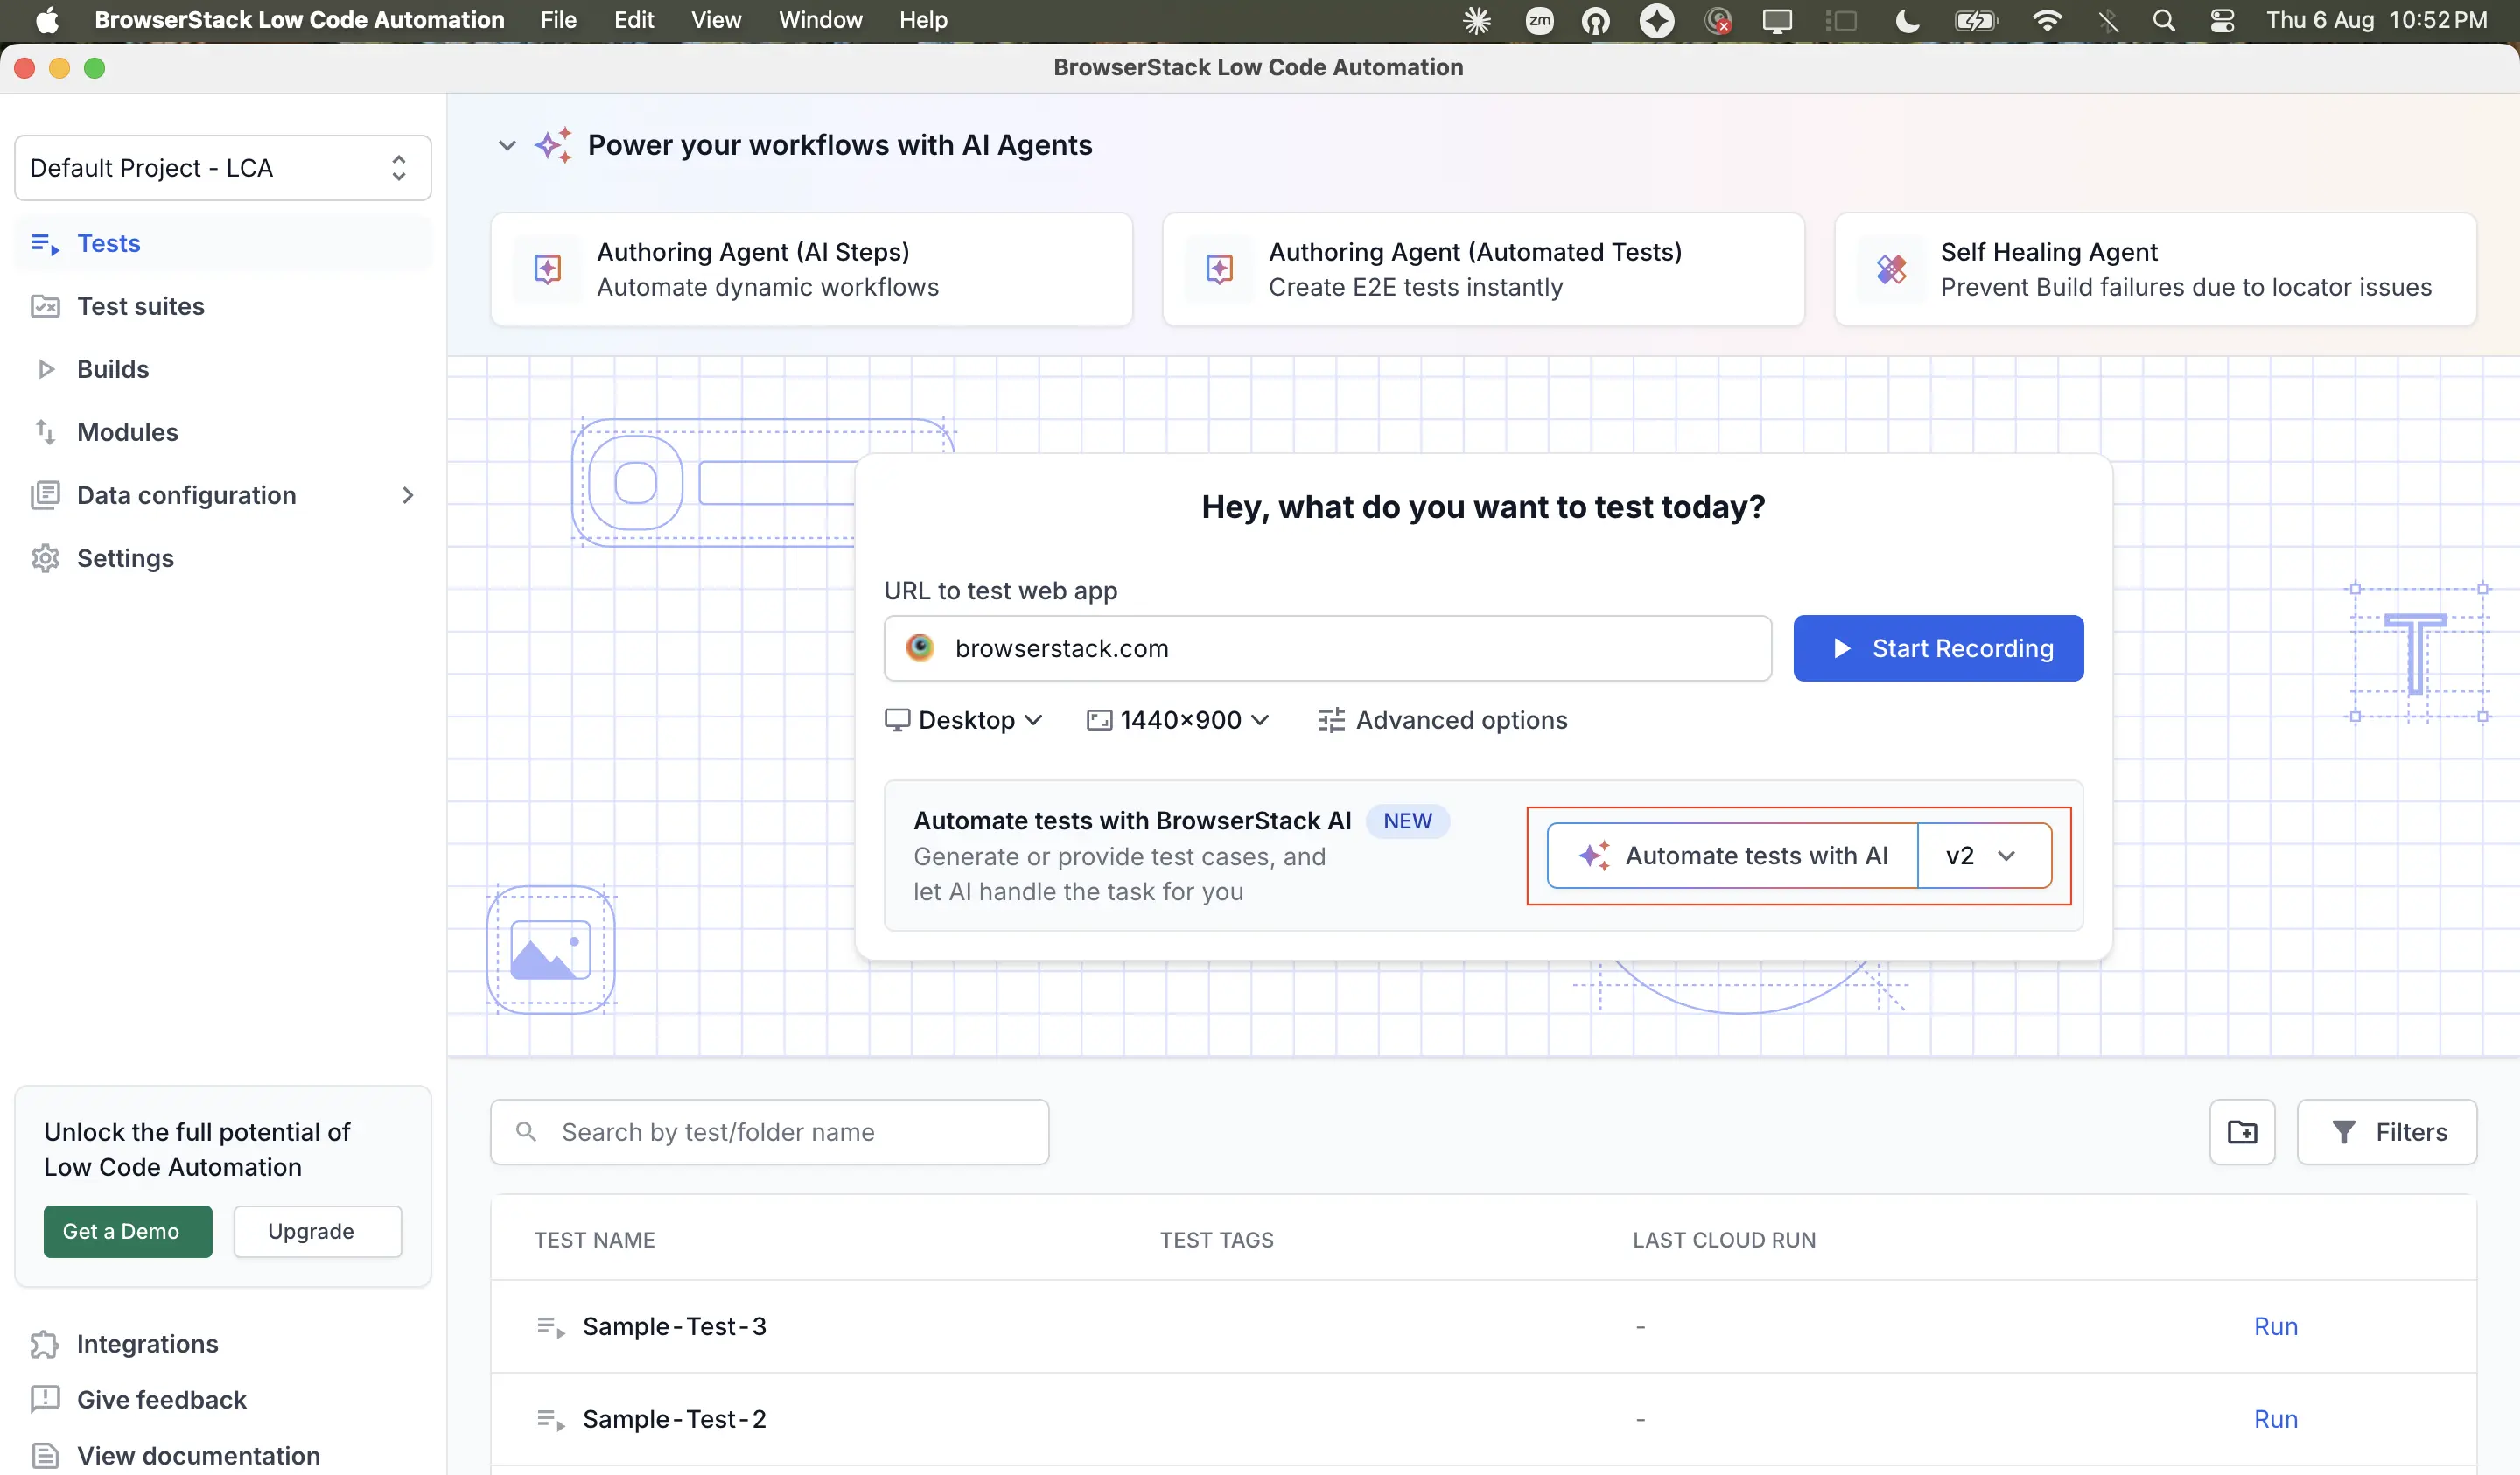
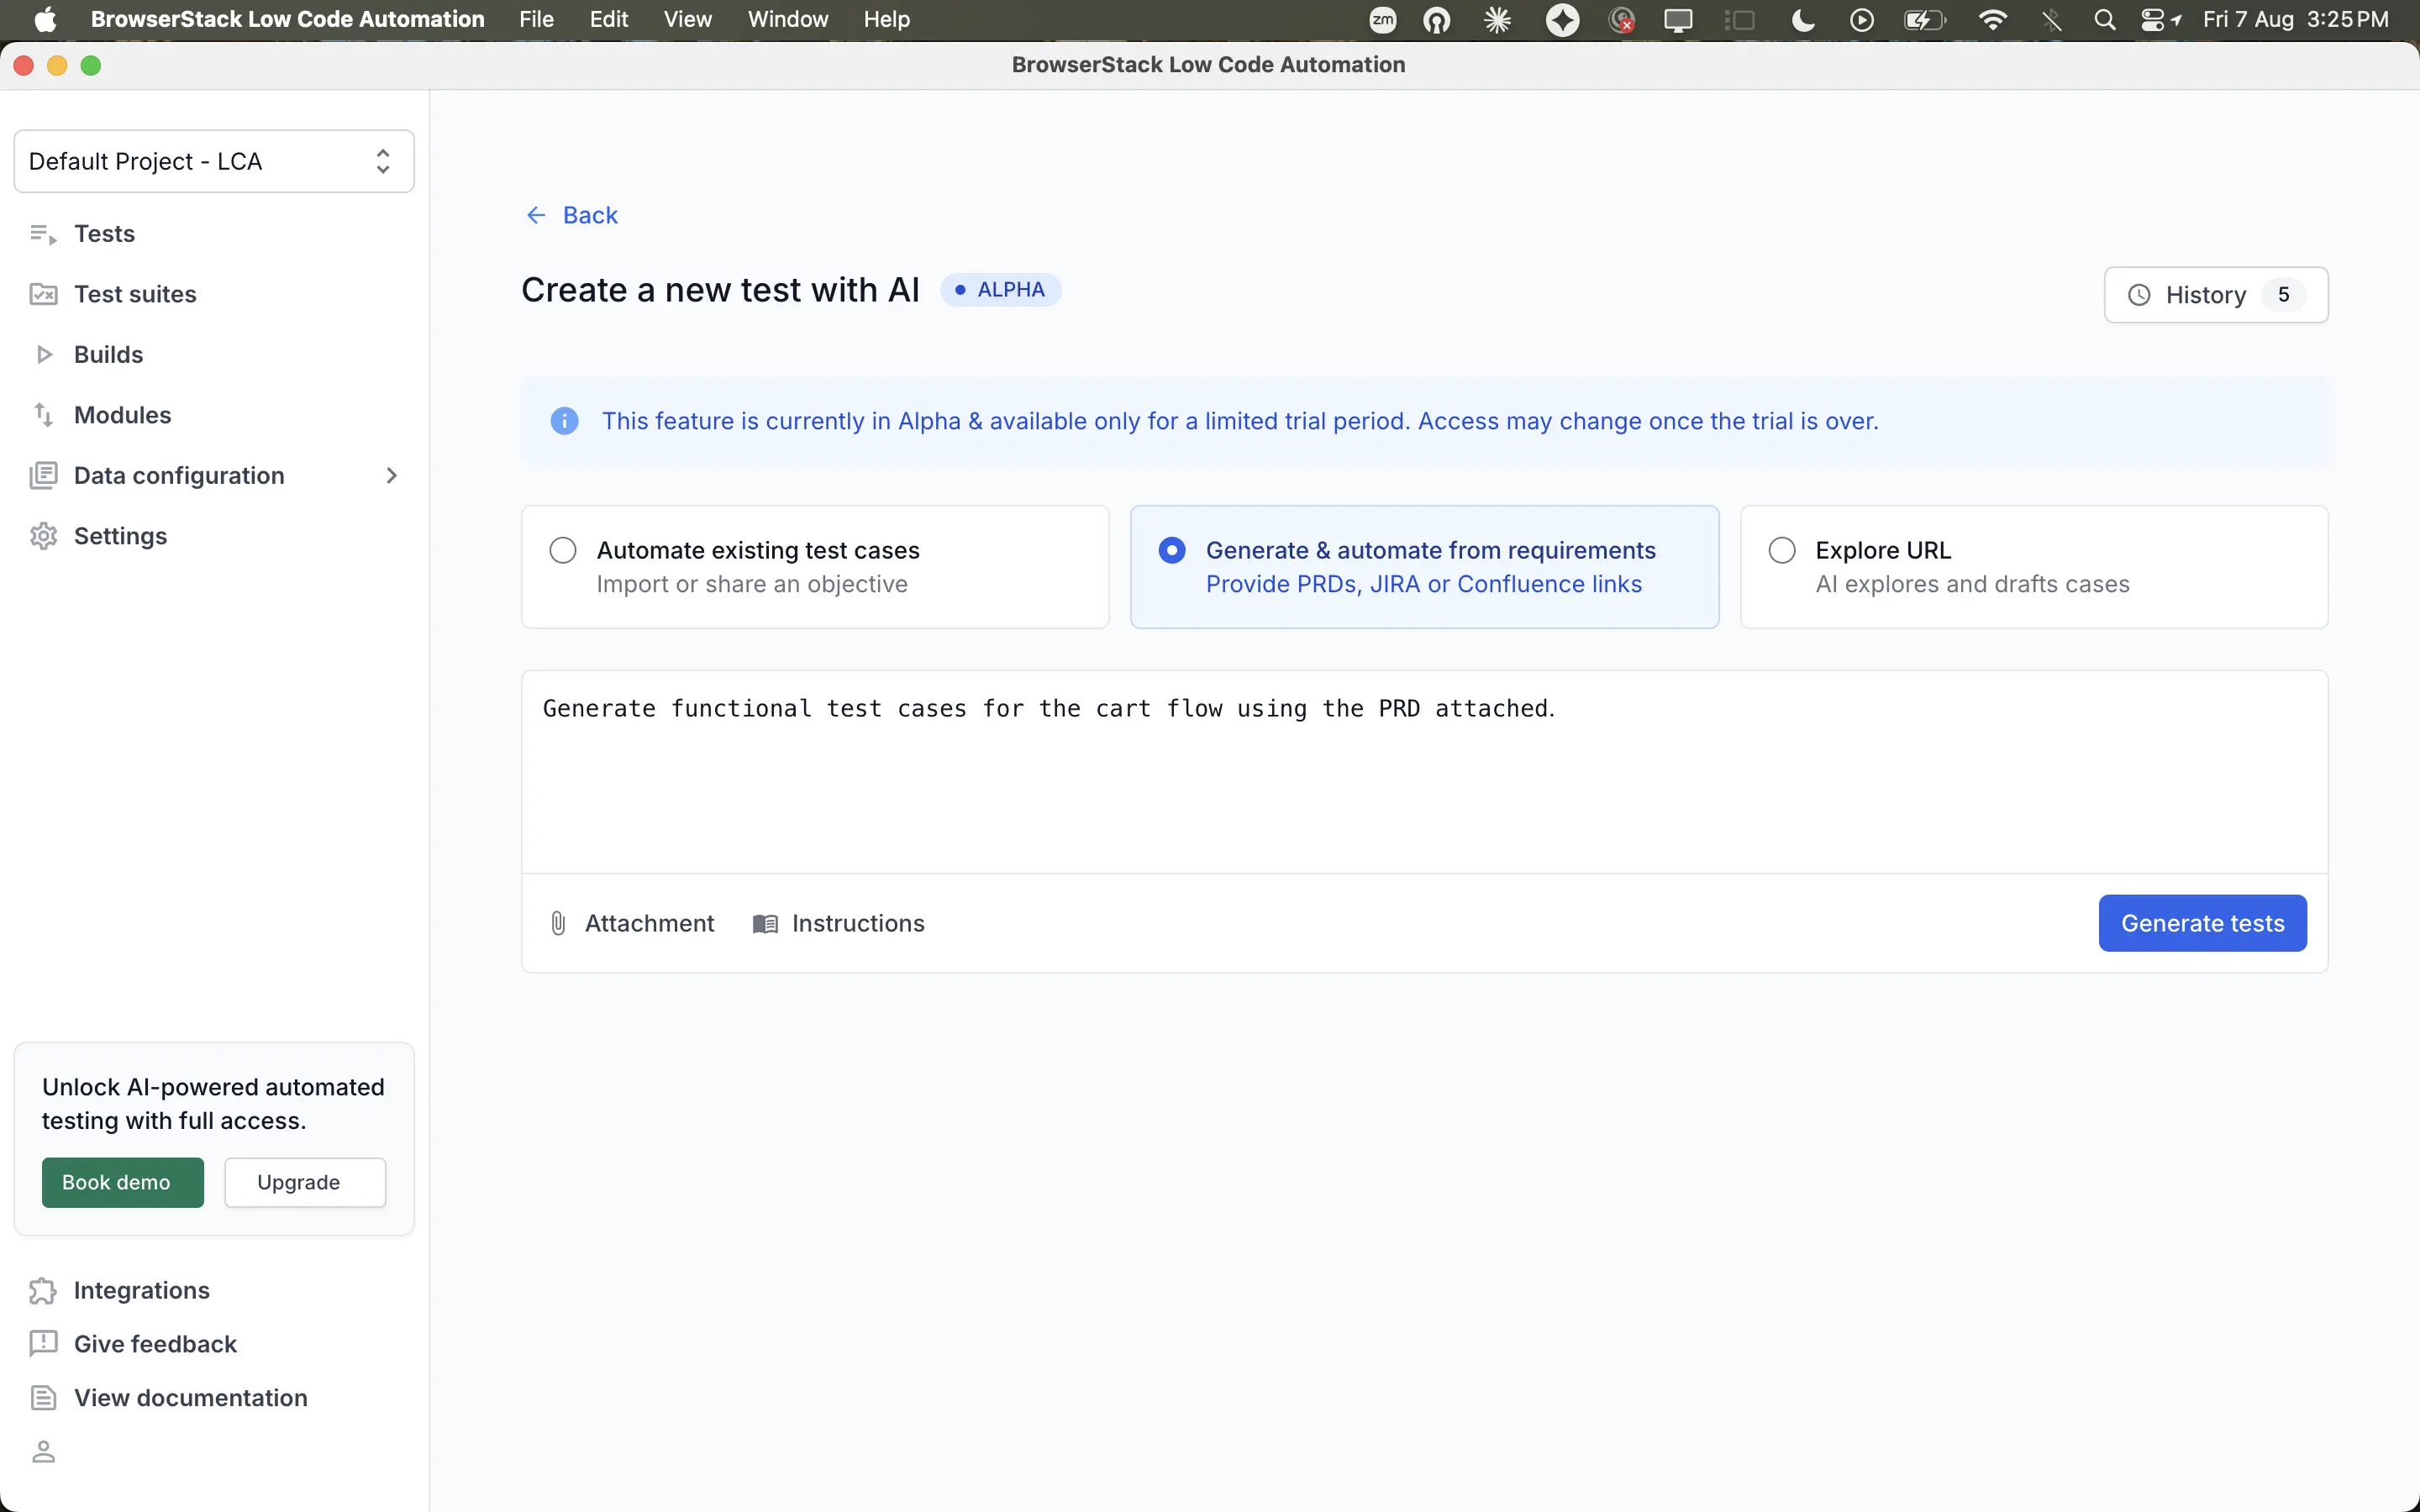
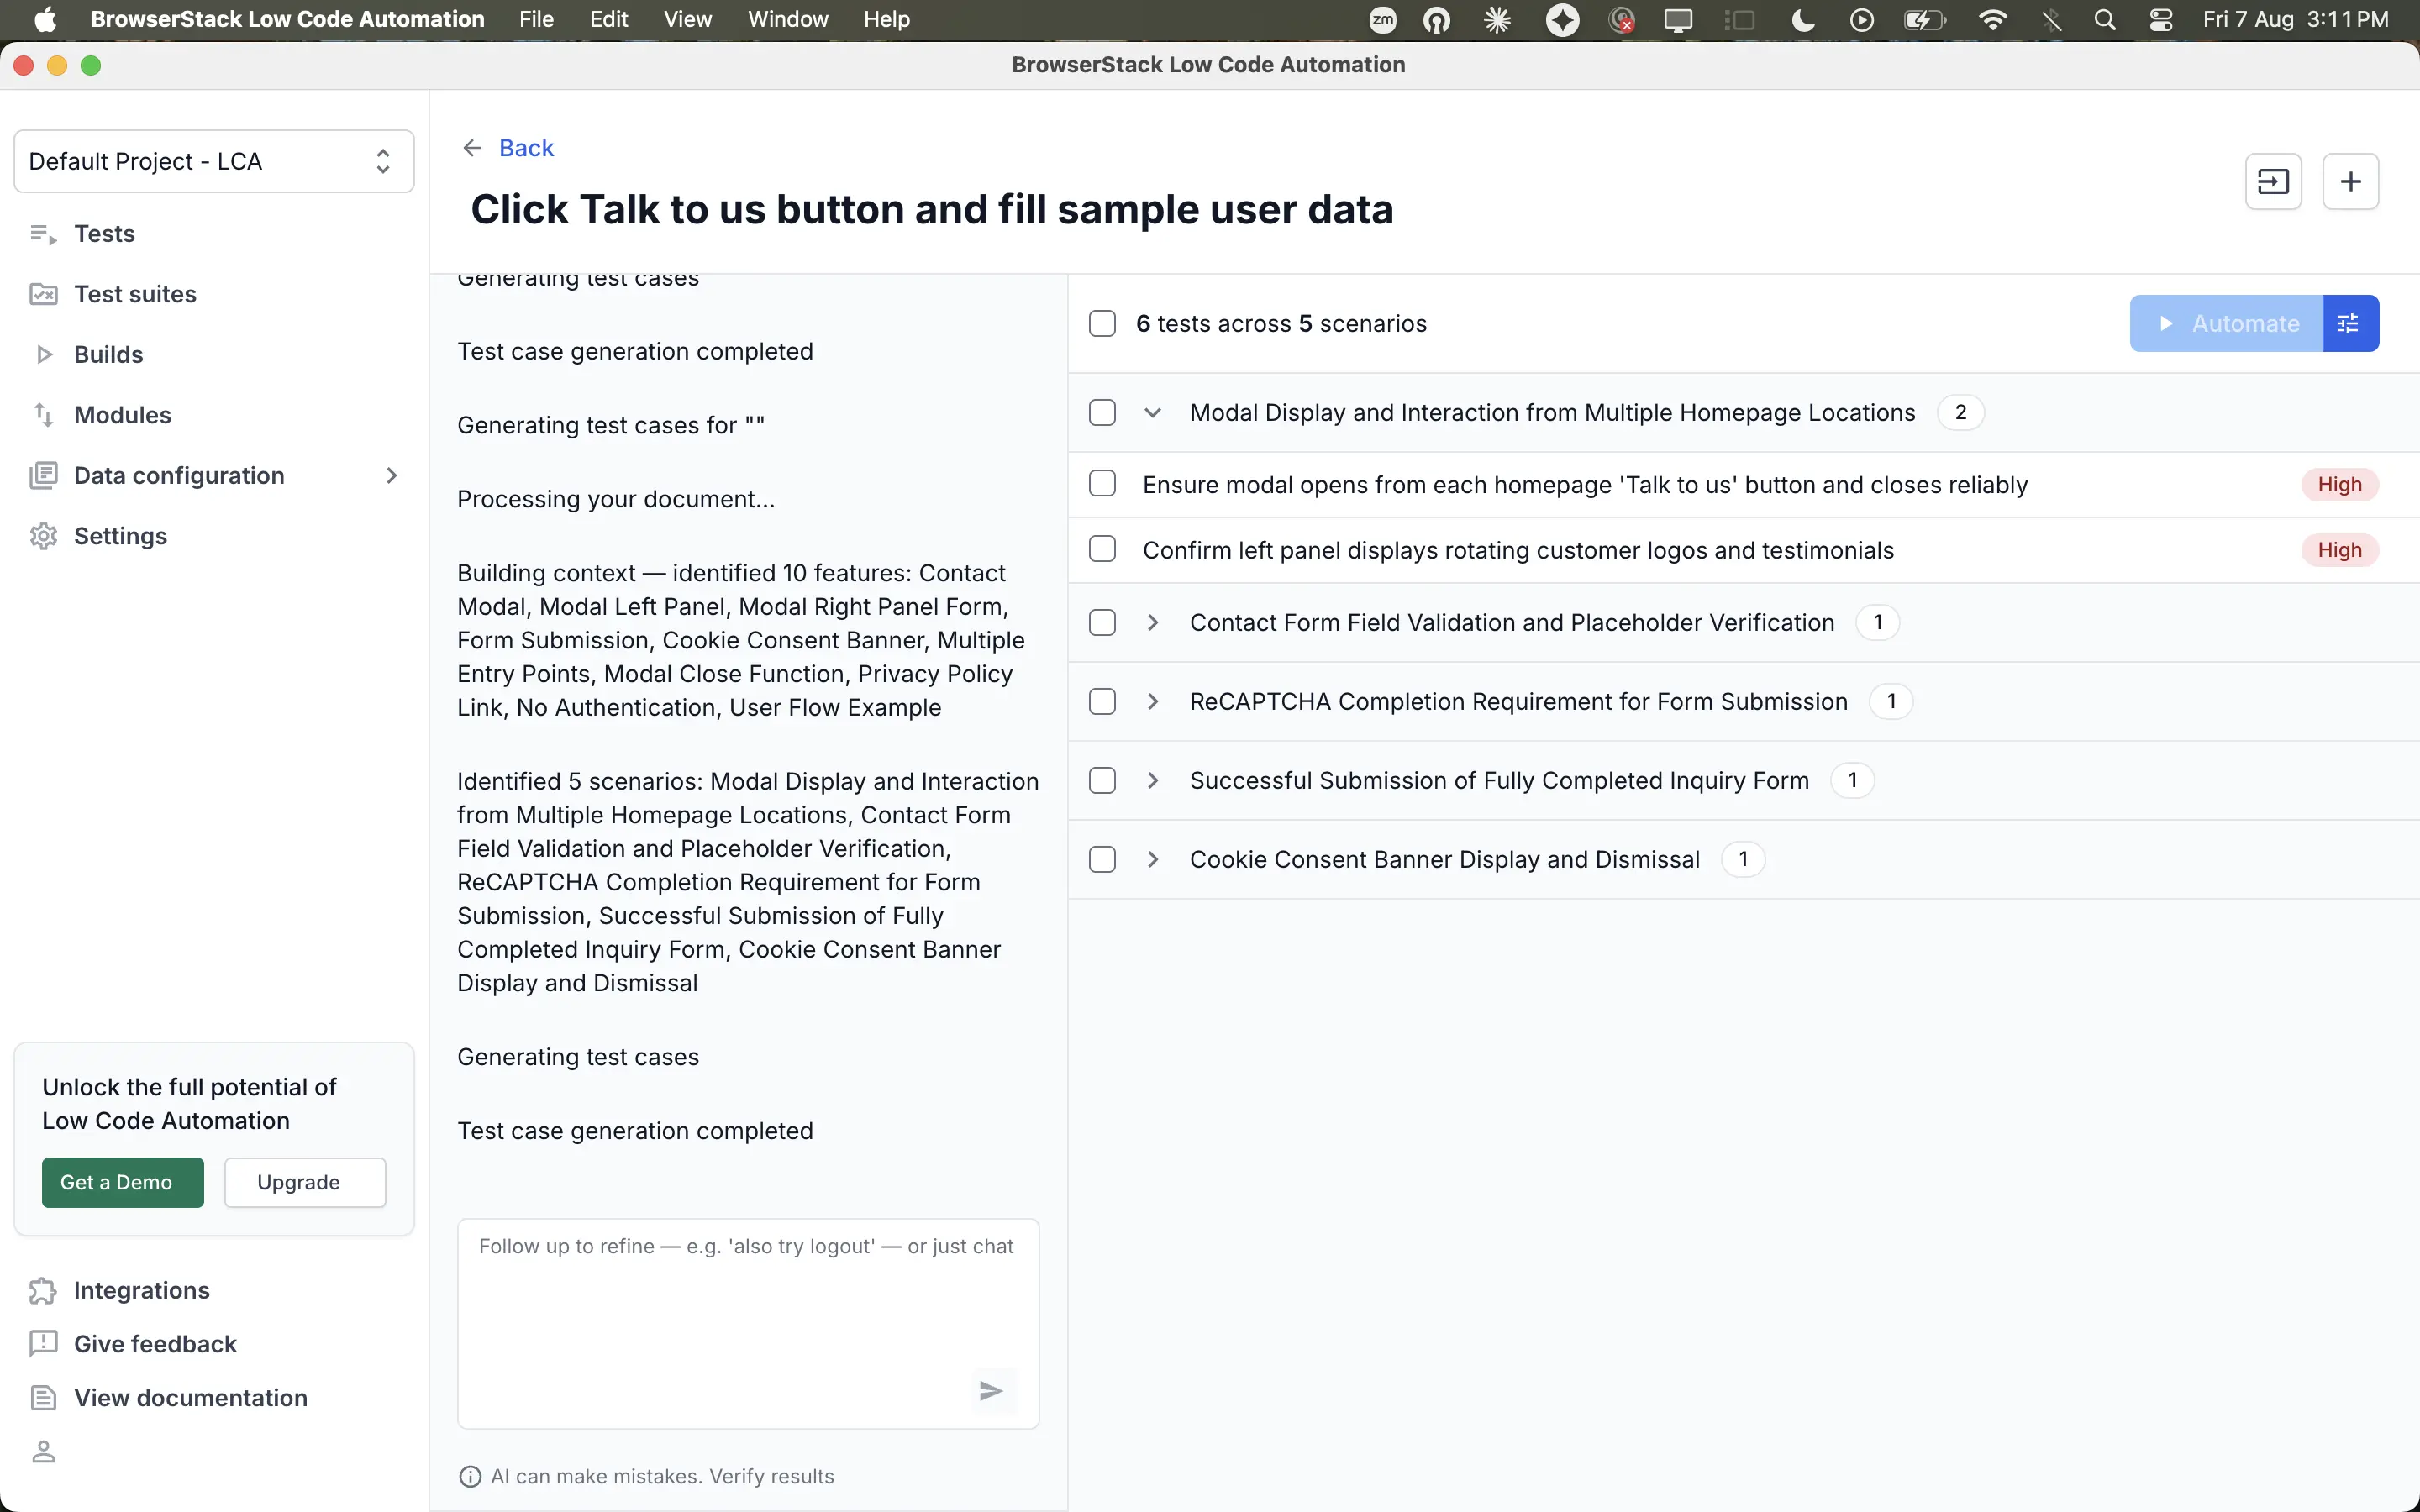
To start, click Automate tests with AI on the Tests page and keep the version selector set to v2.
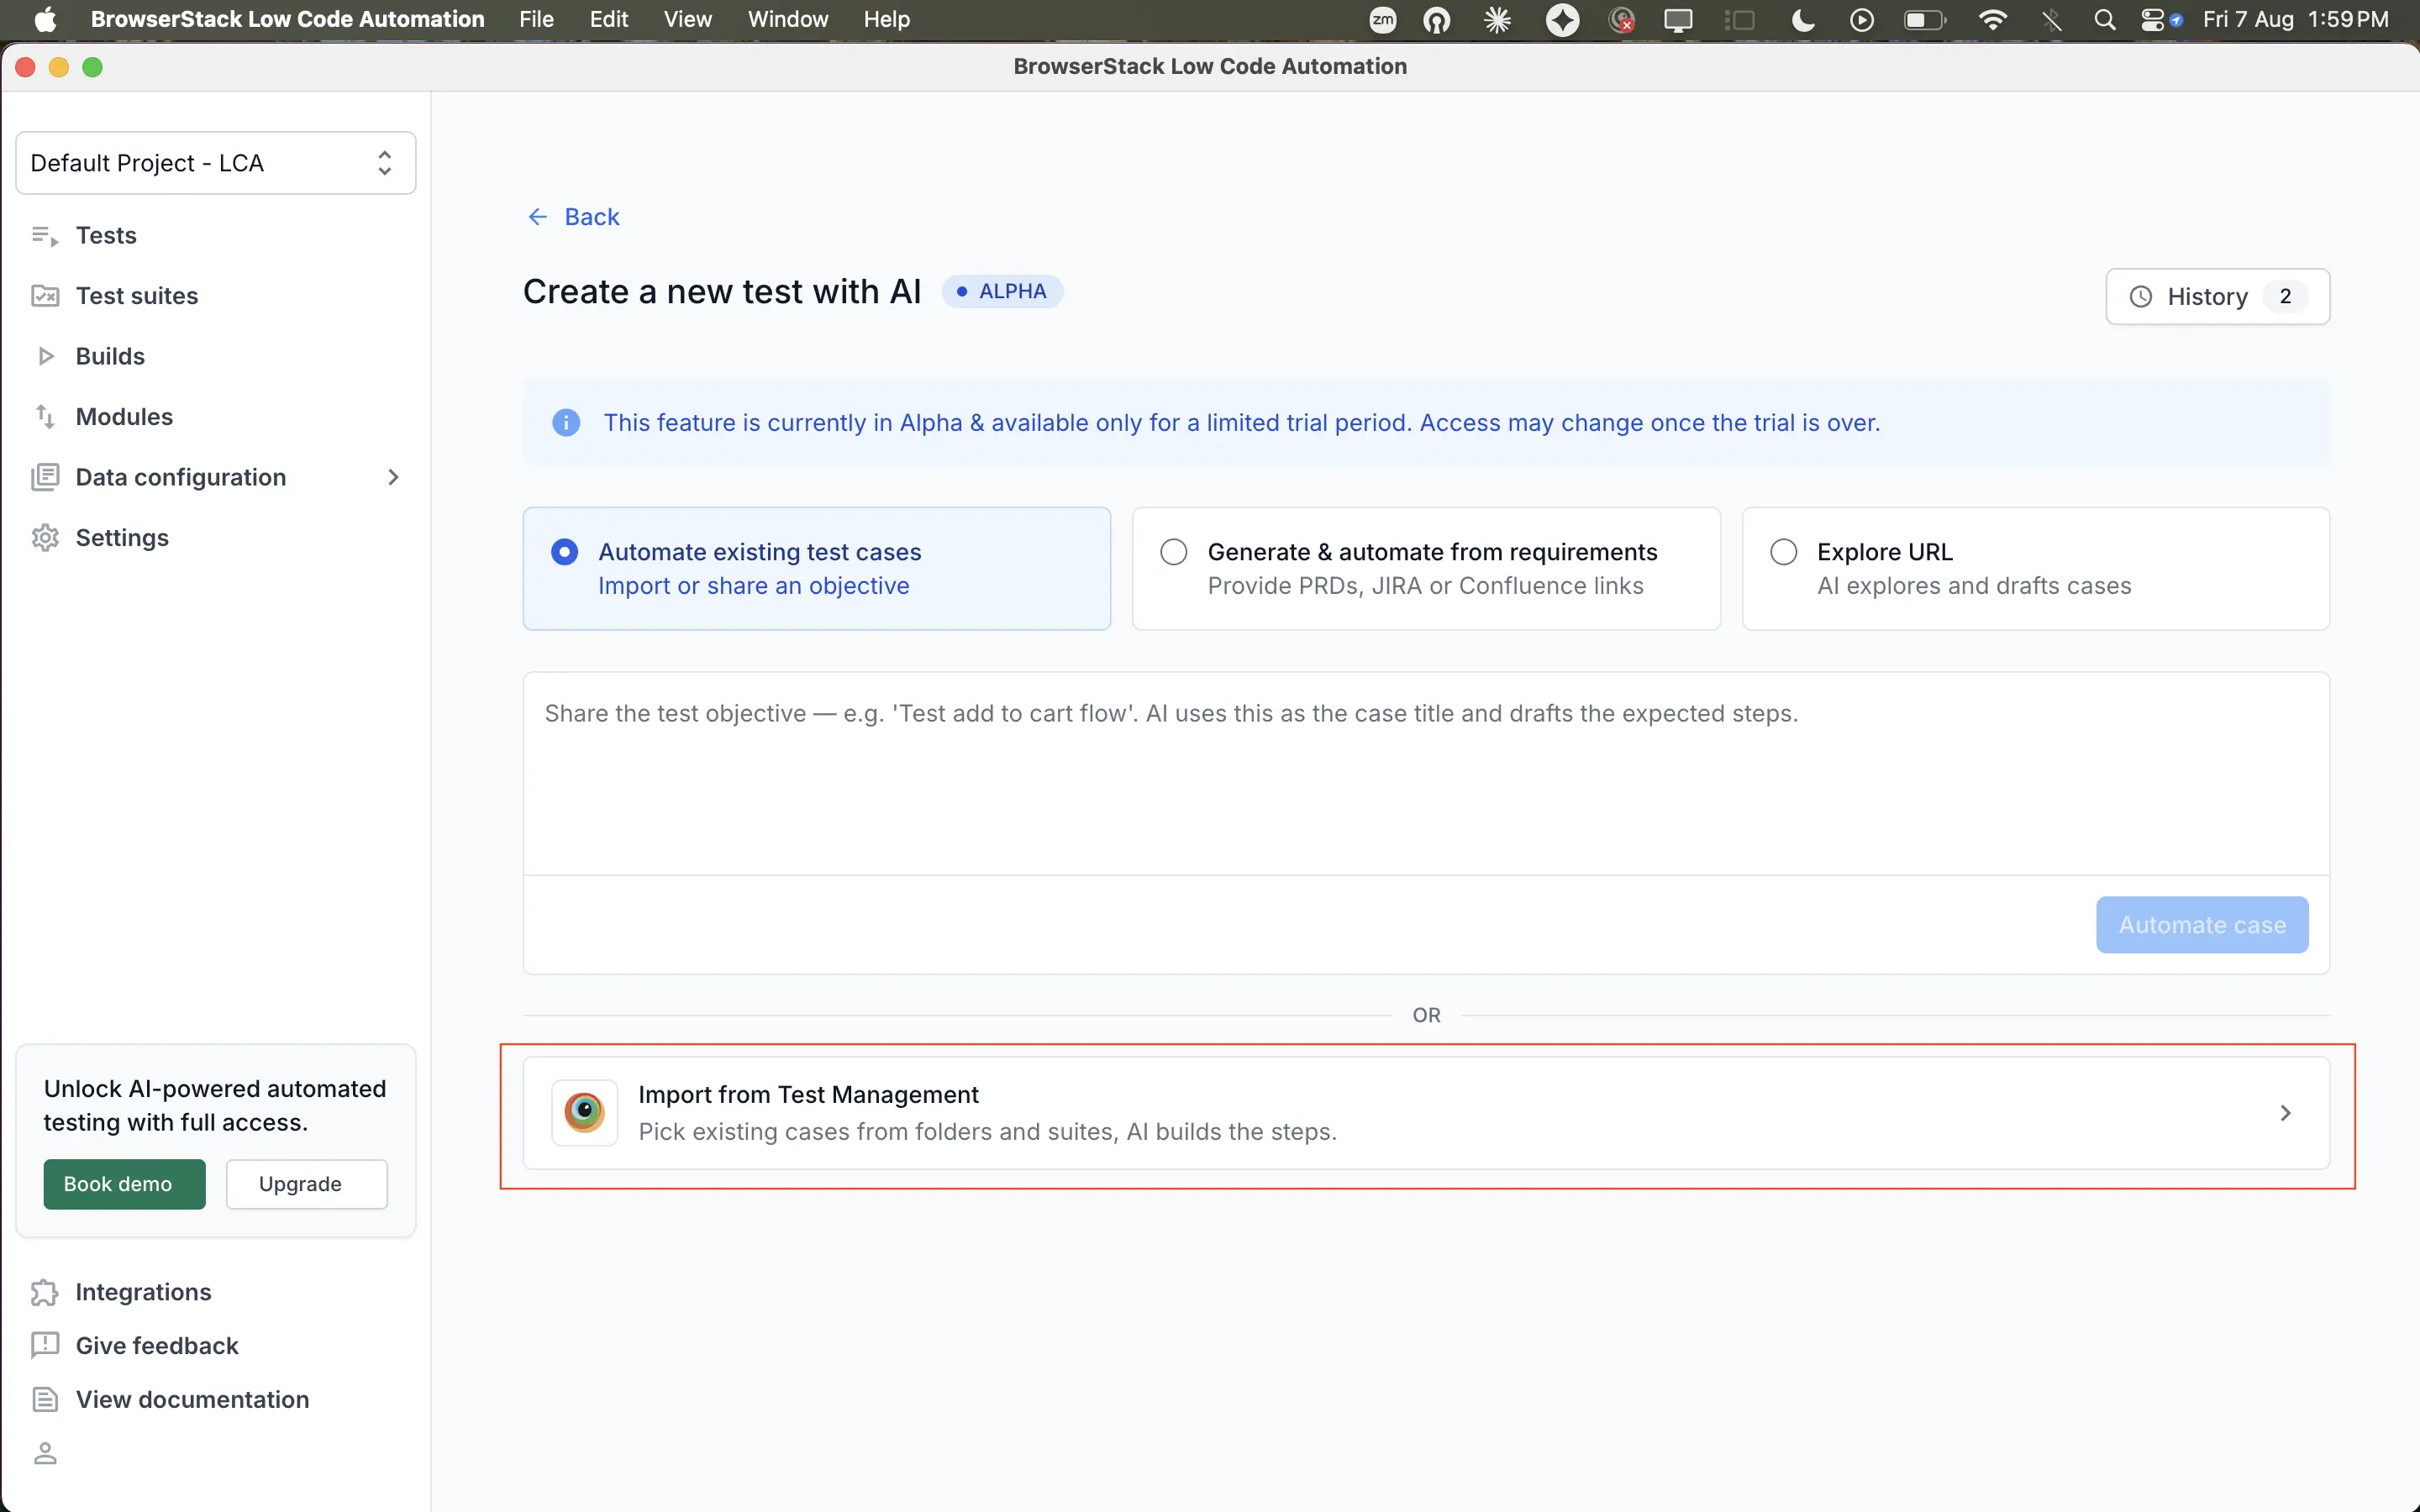
The Create a new test with AI page gives you four ways to bring test cases into Low Code Automation:
Provide a natural-language objective for a single test case.
Select Automate existing test cases and enter your objective. Include the URL, for example Test add to cart flow on bstackdemo.com.
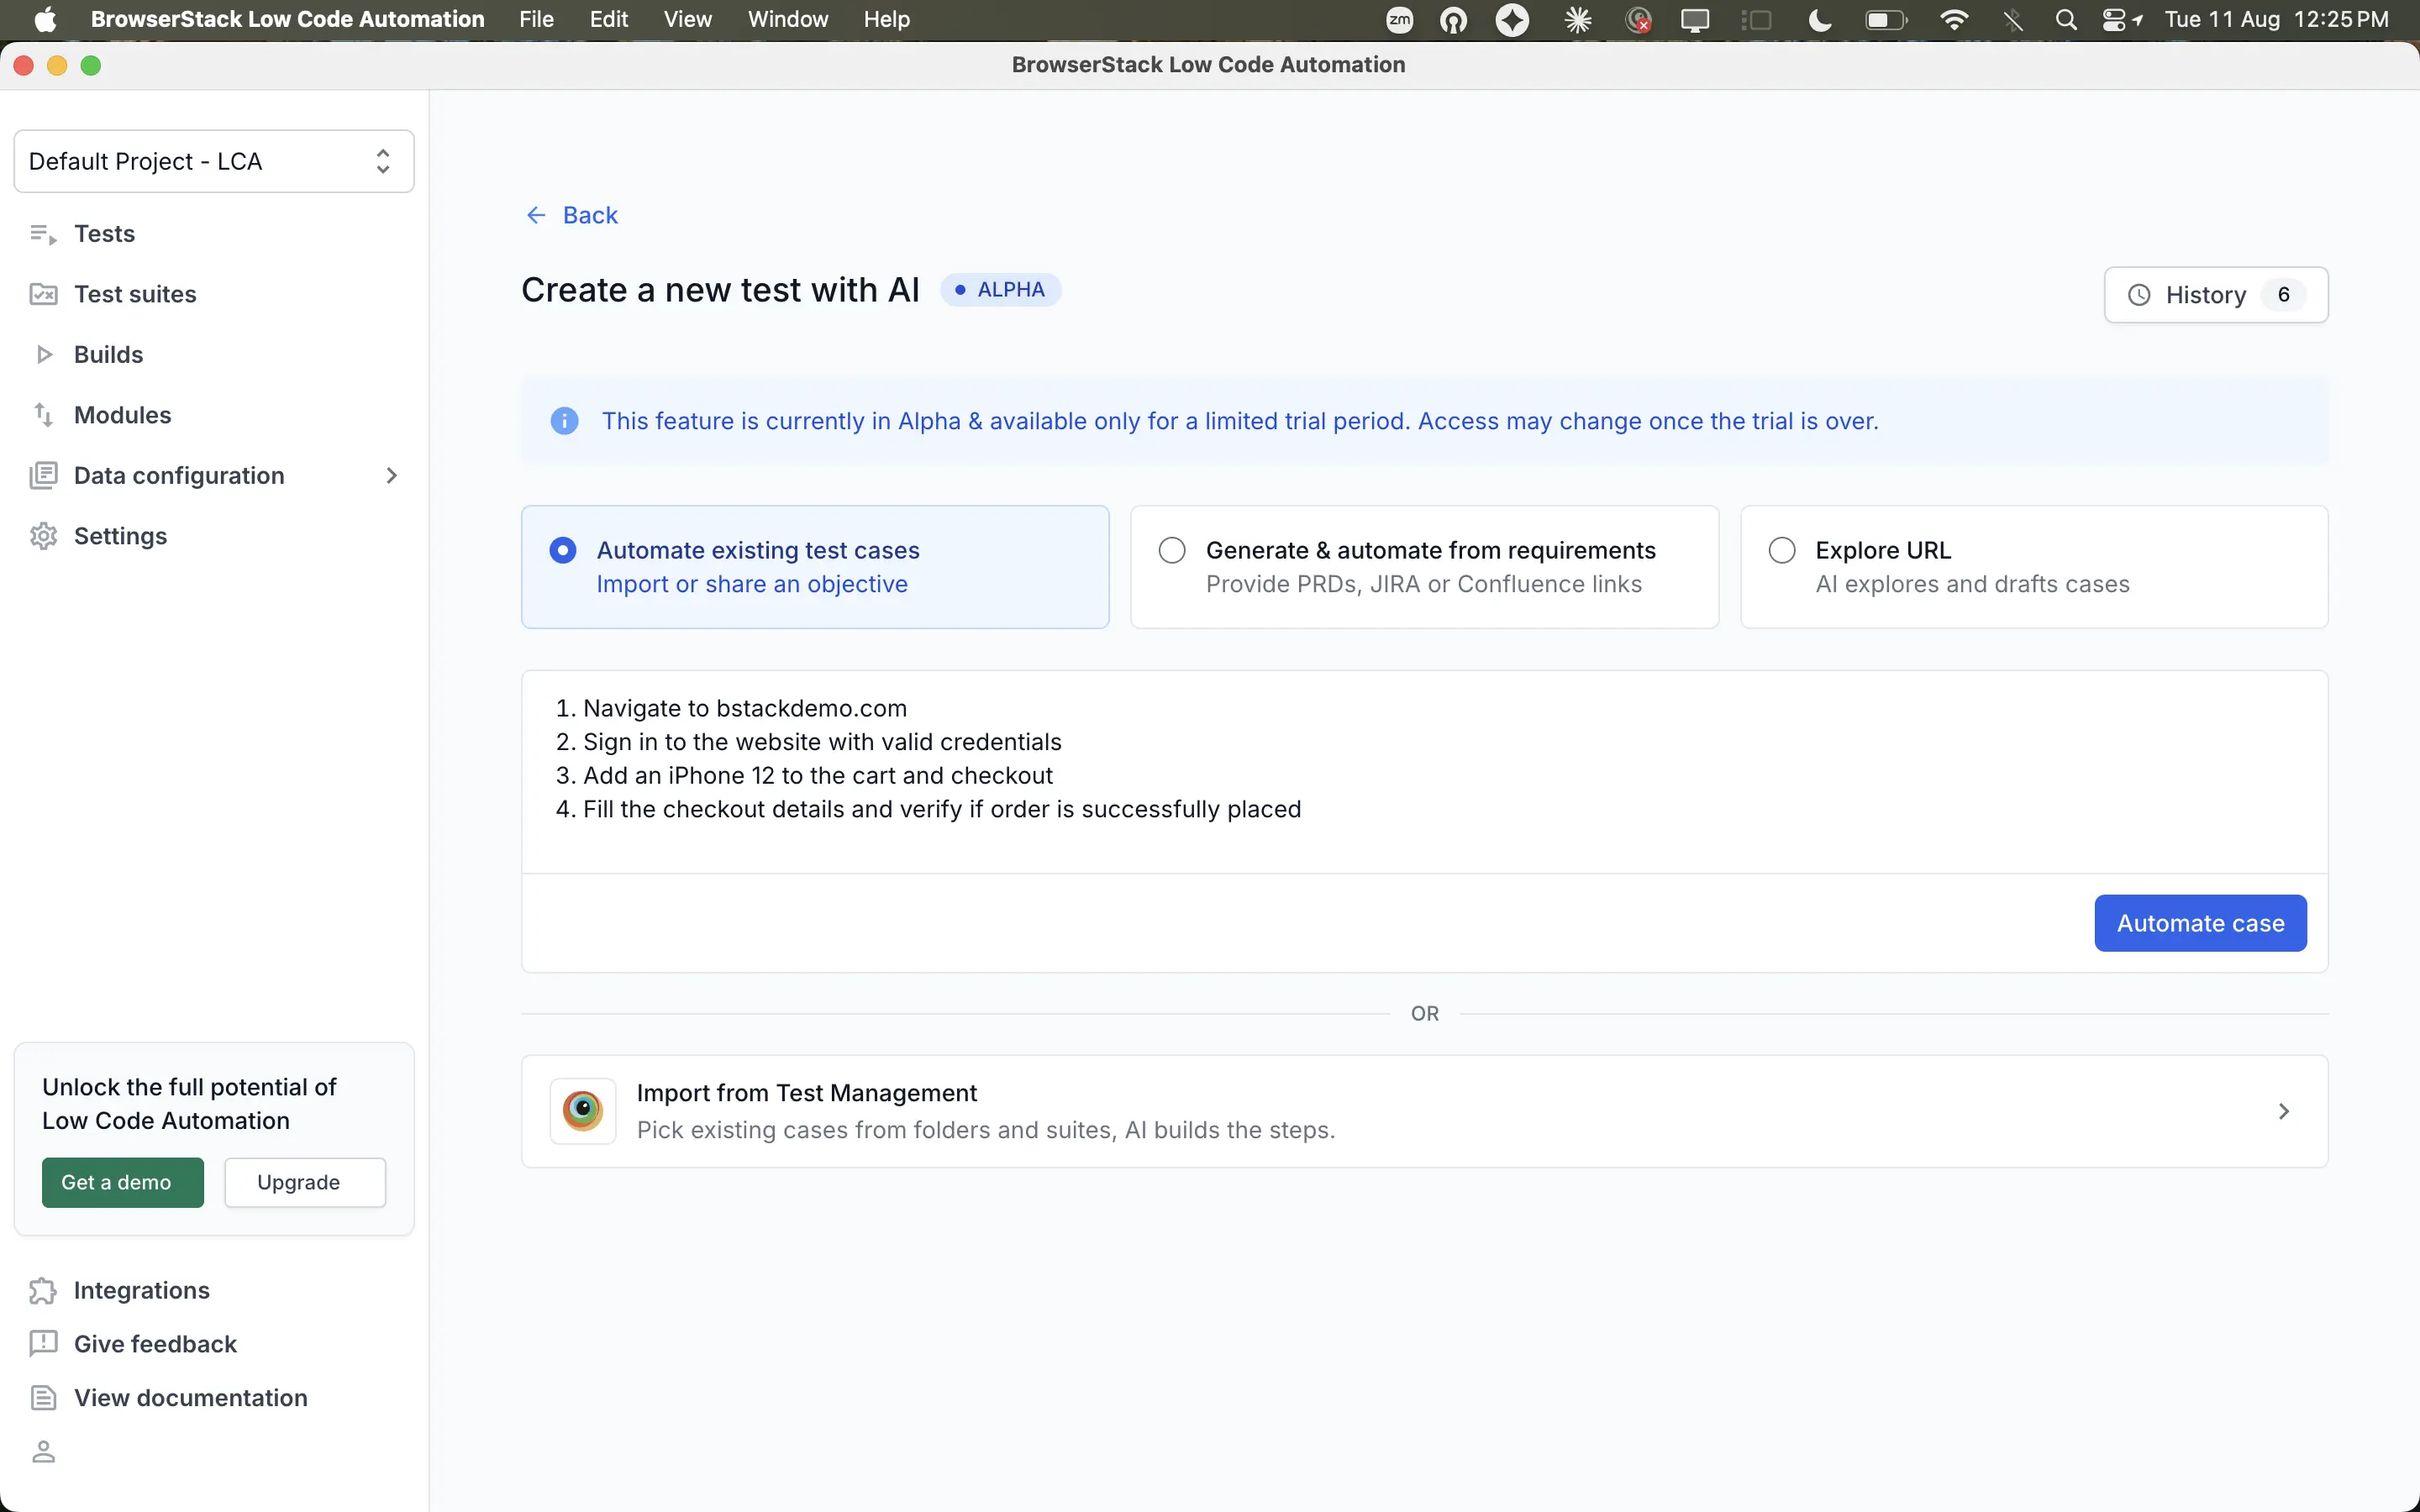
Click Automate case. AI structures the test case into meaningful test steps before automating them.
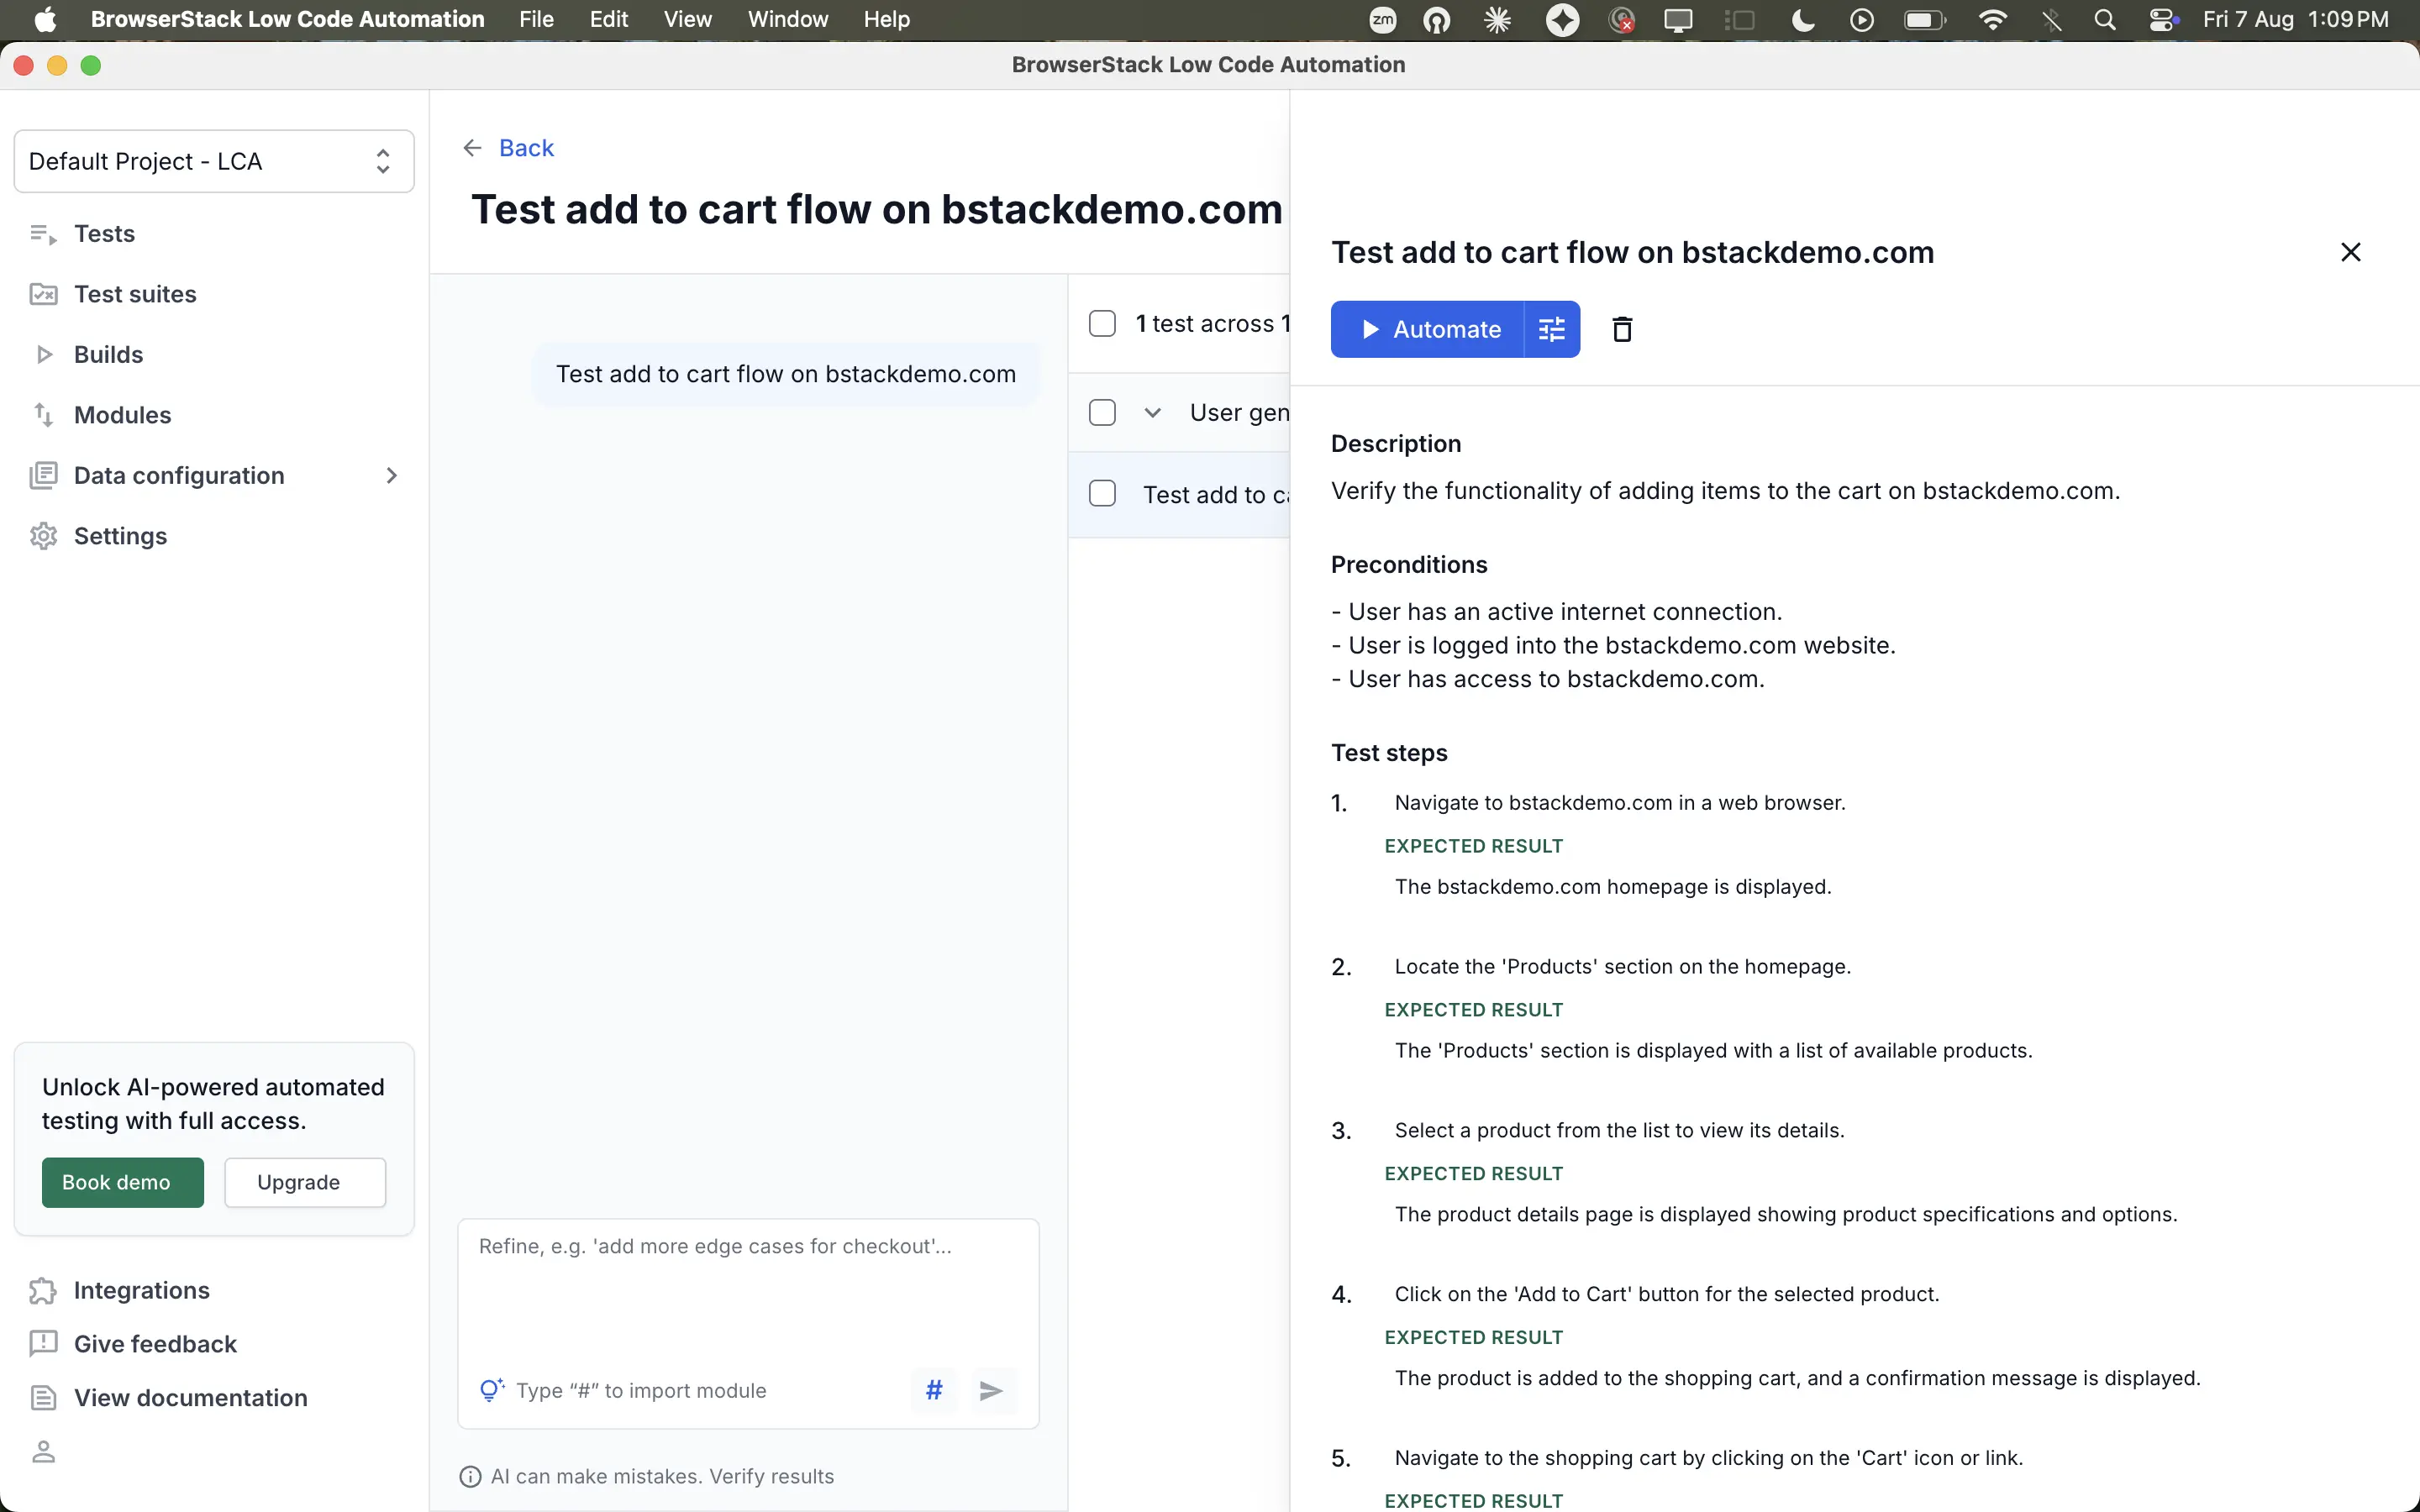
Click the case to review its Description, Preconditions, and Test steps. Each step lists its expected result.
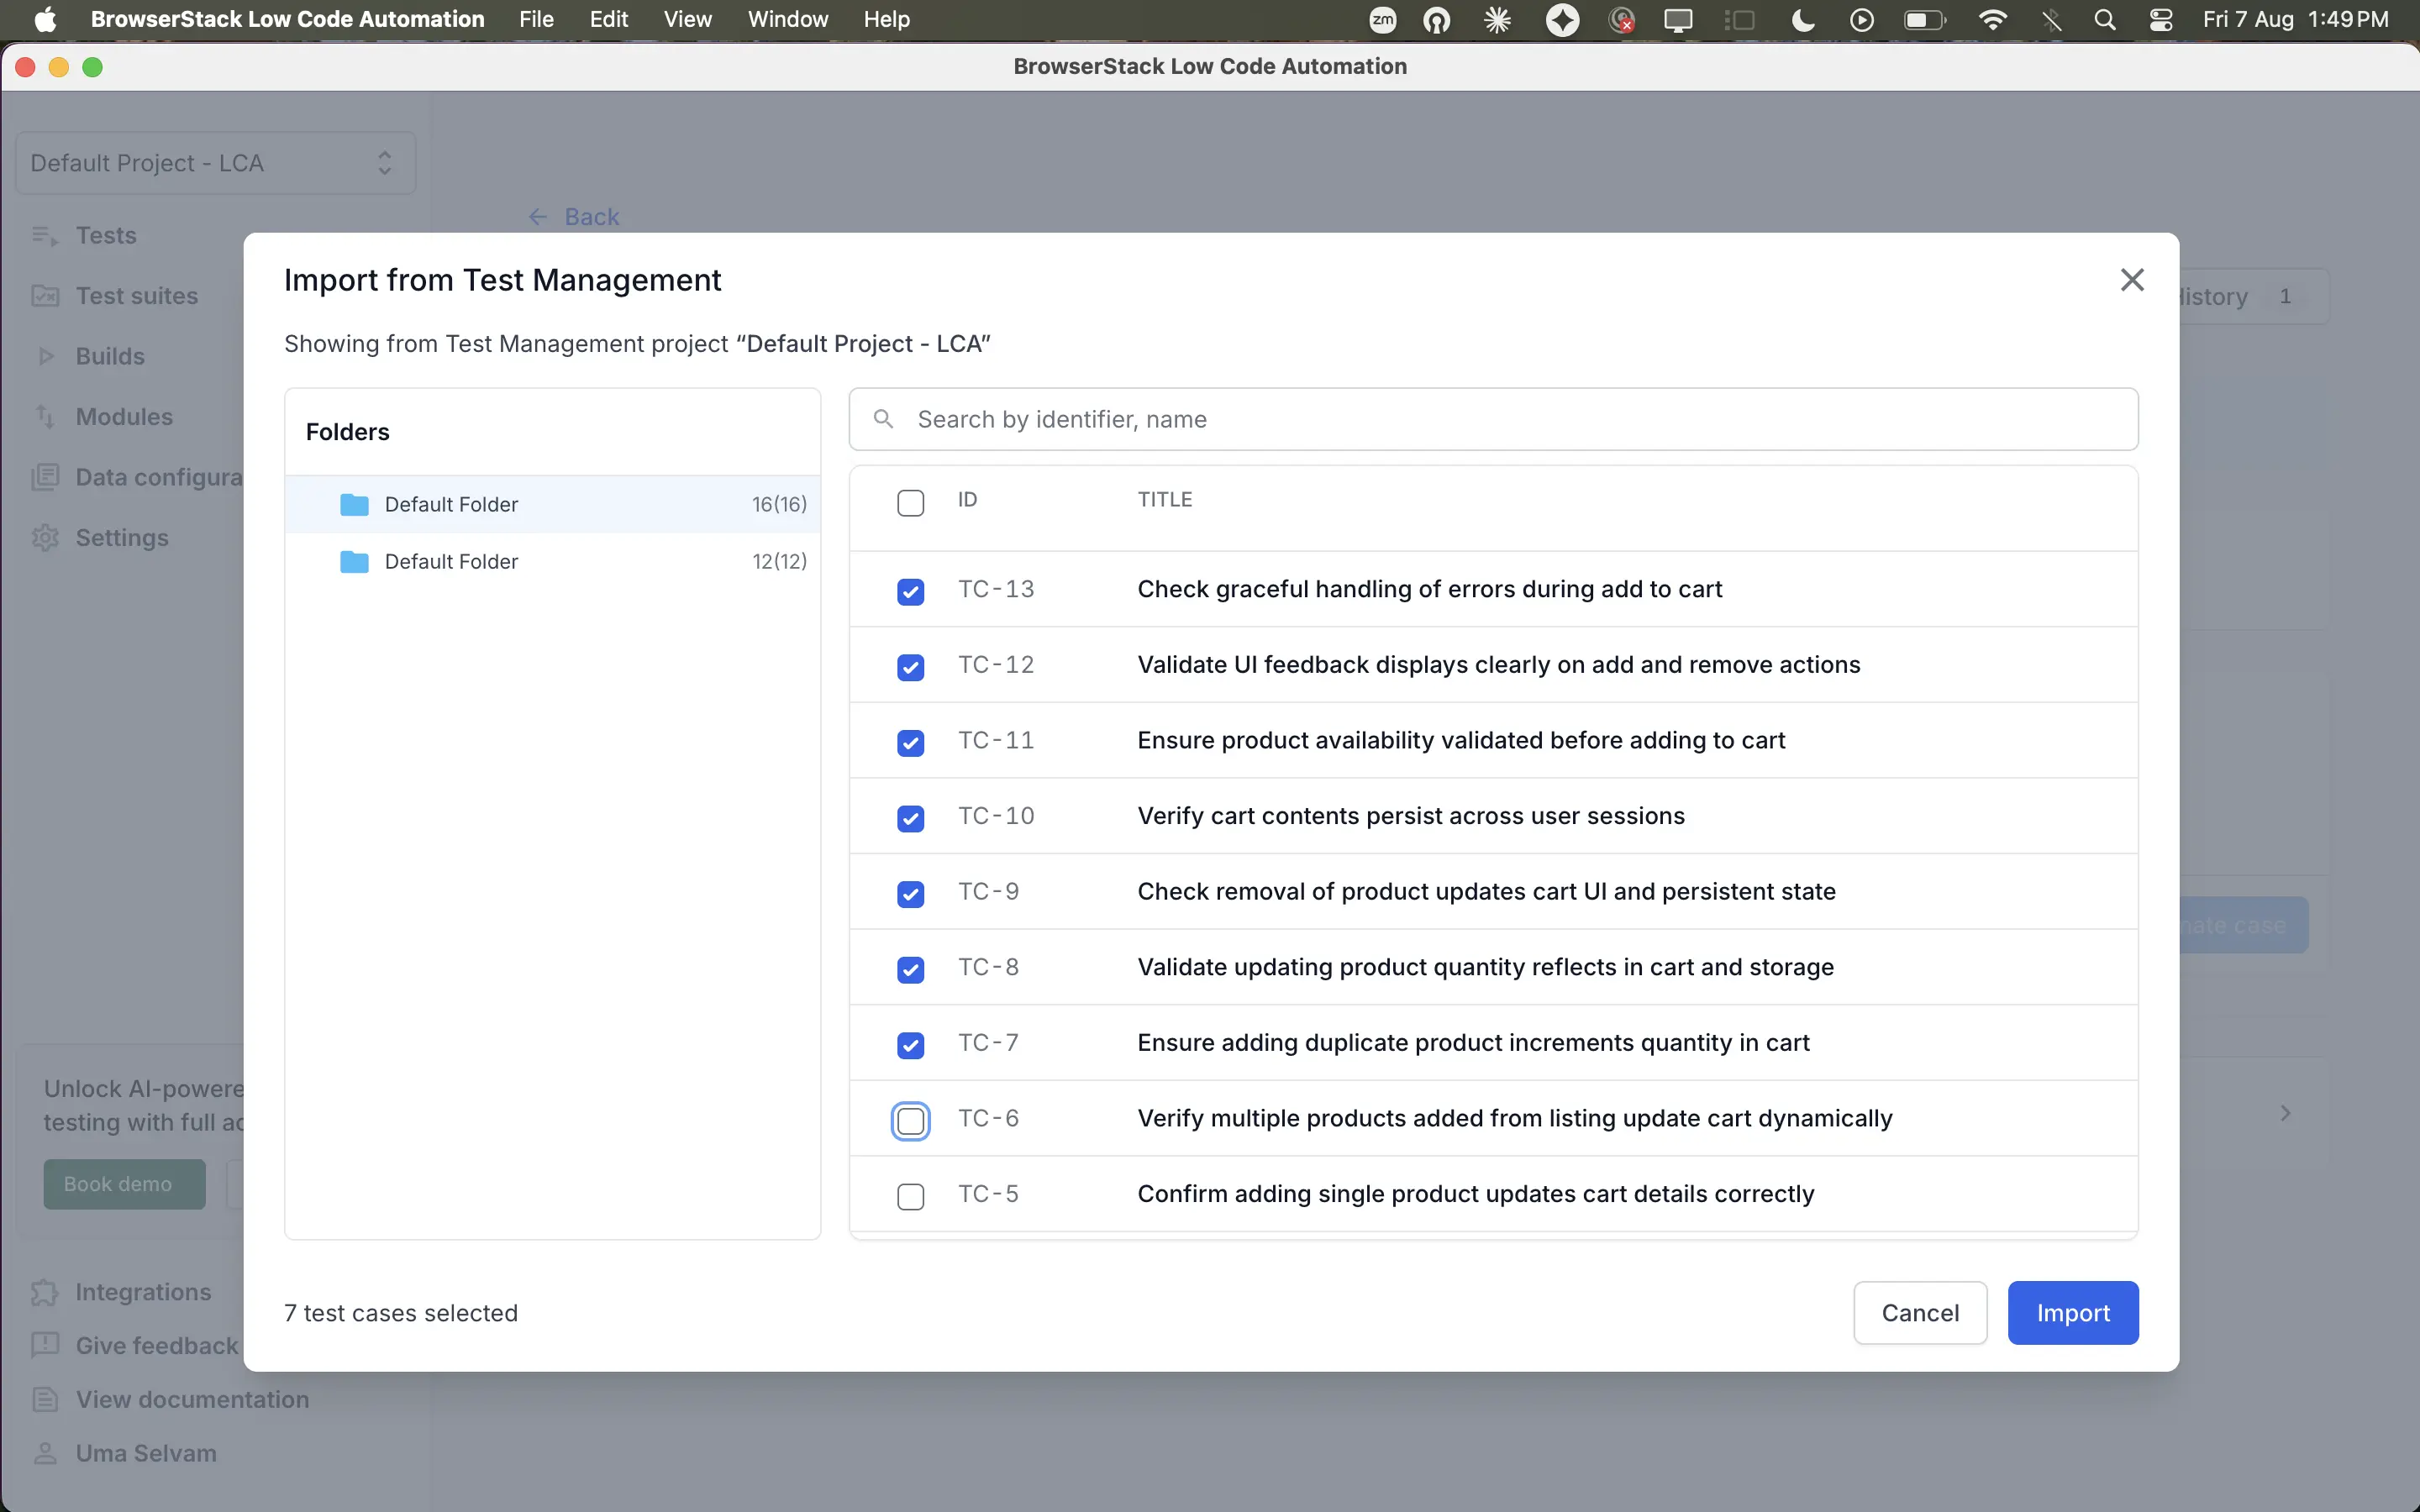
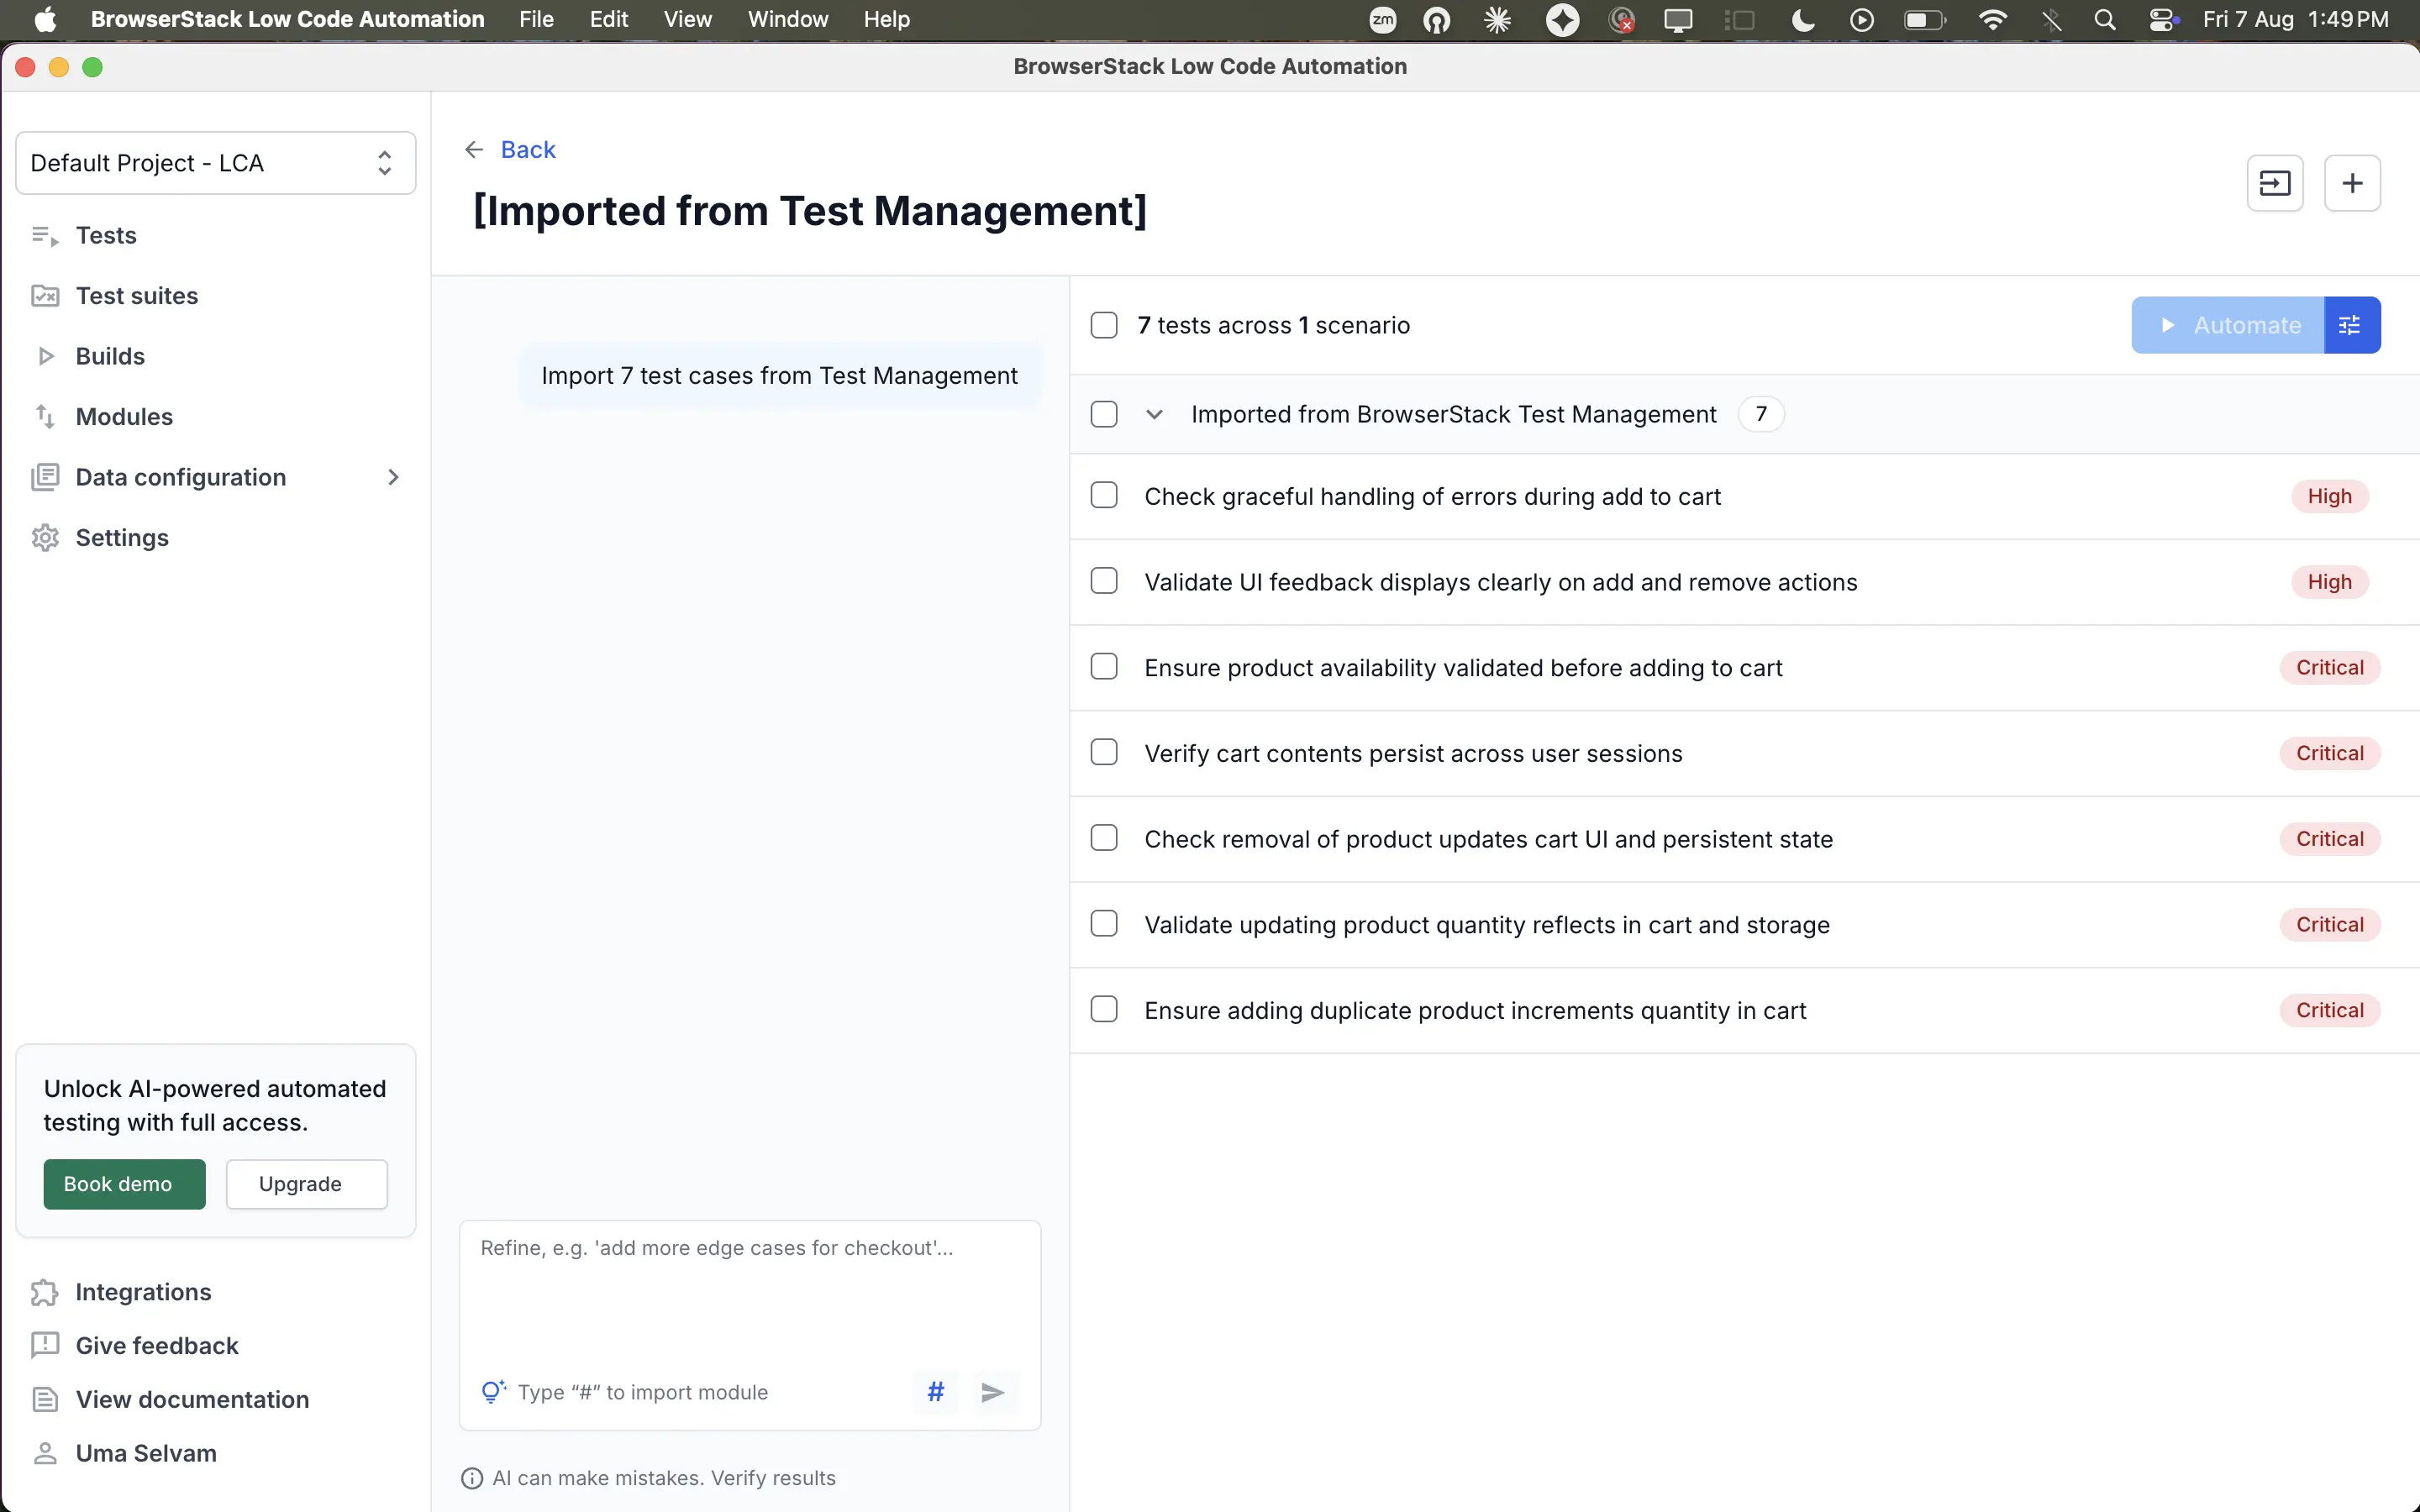
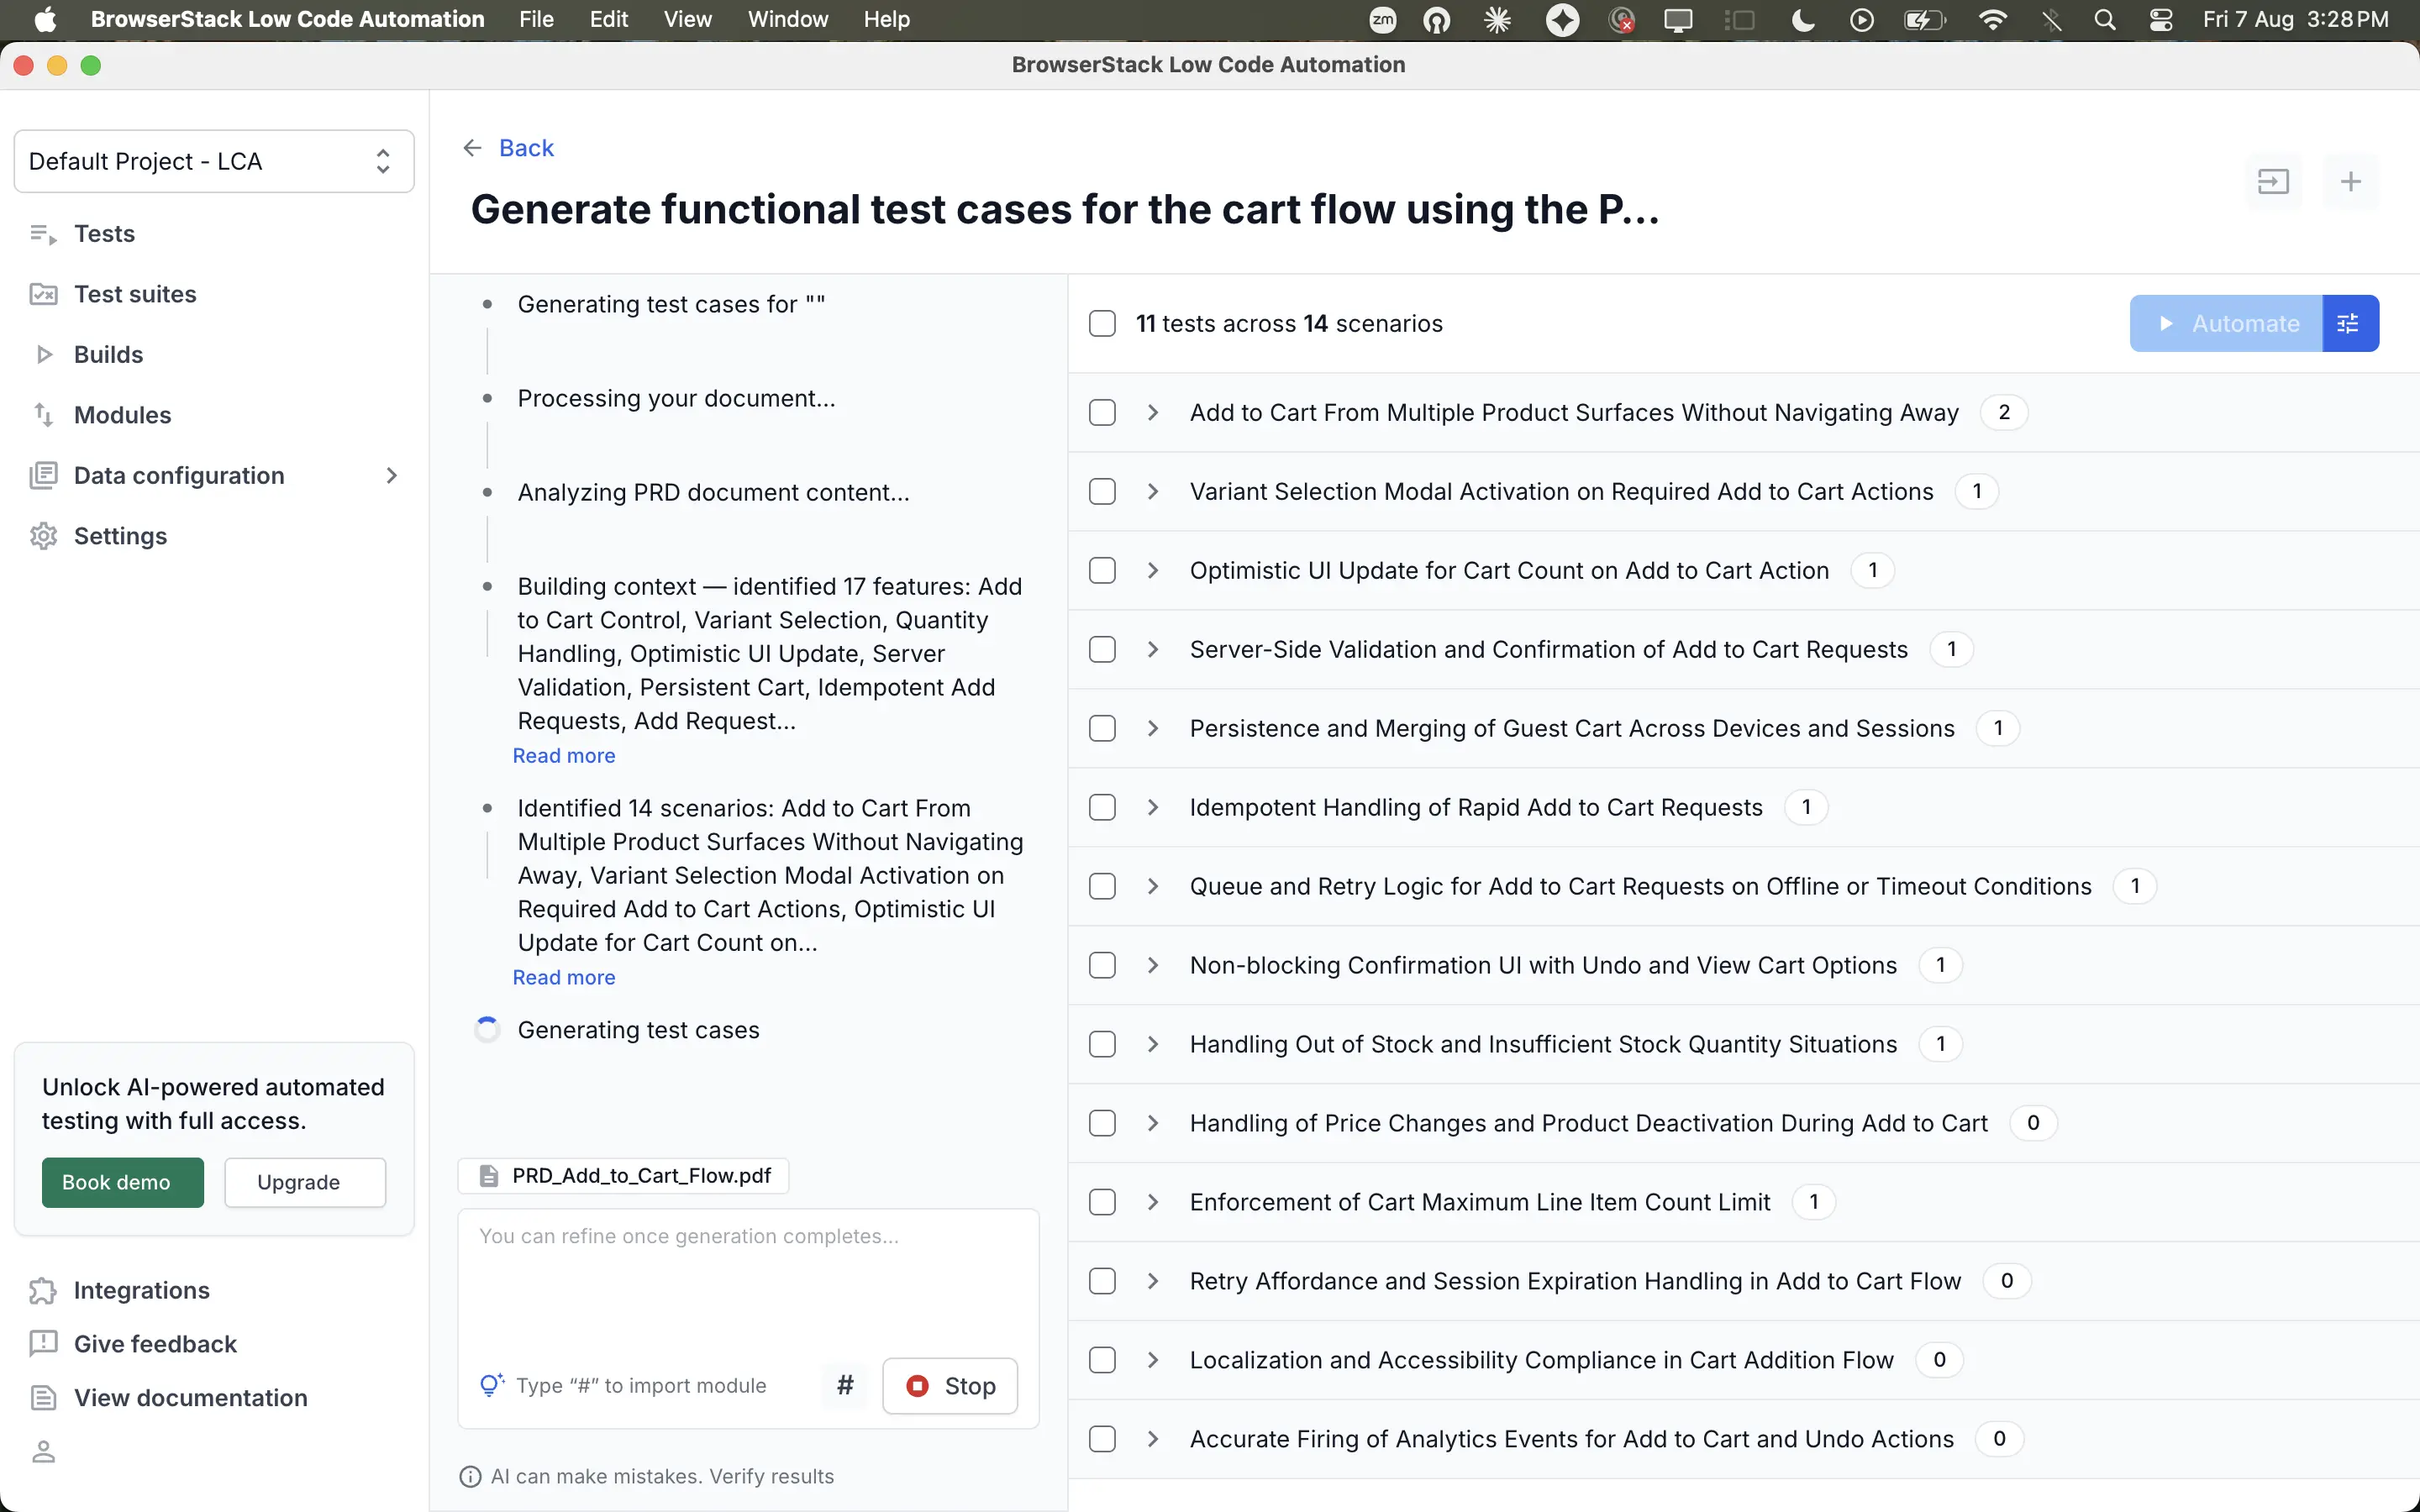
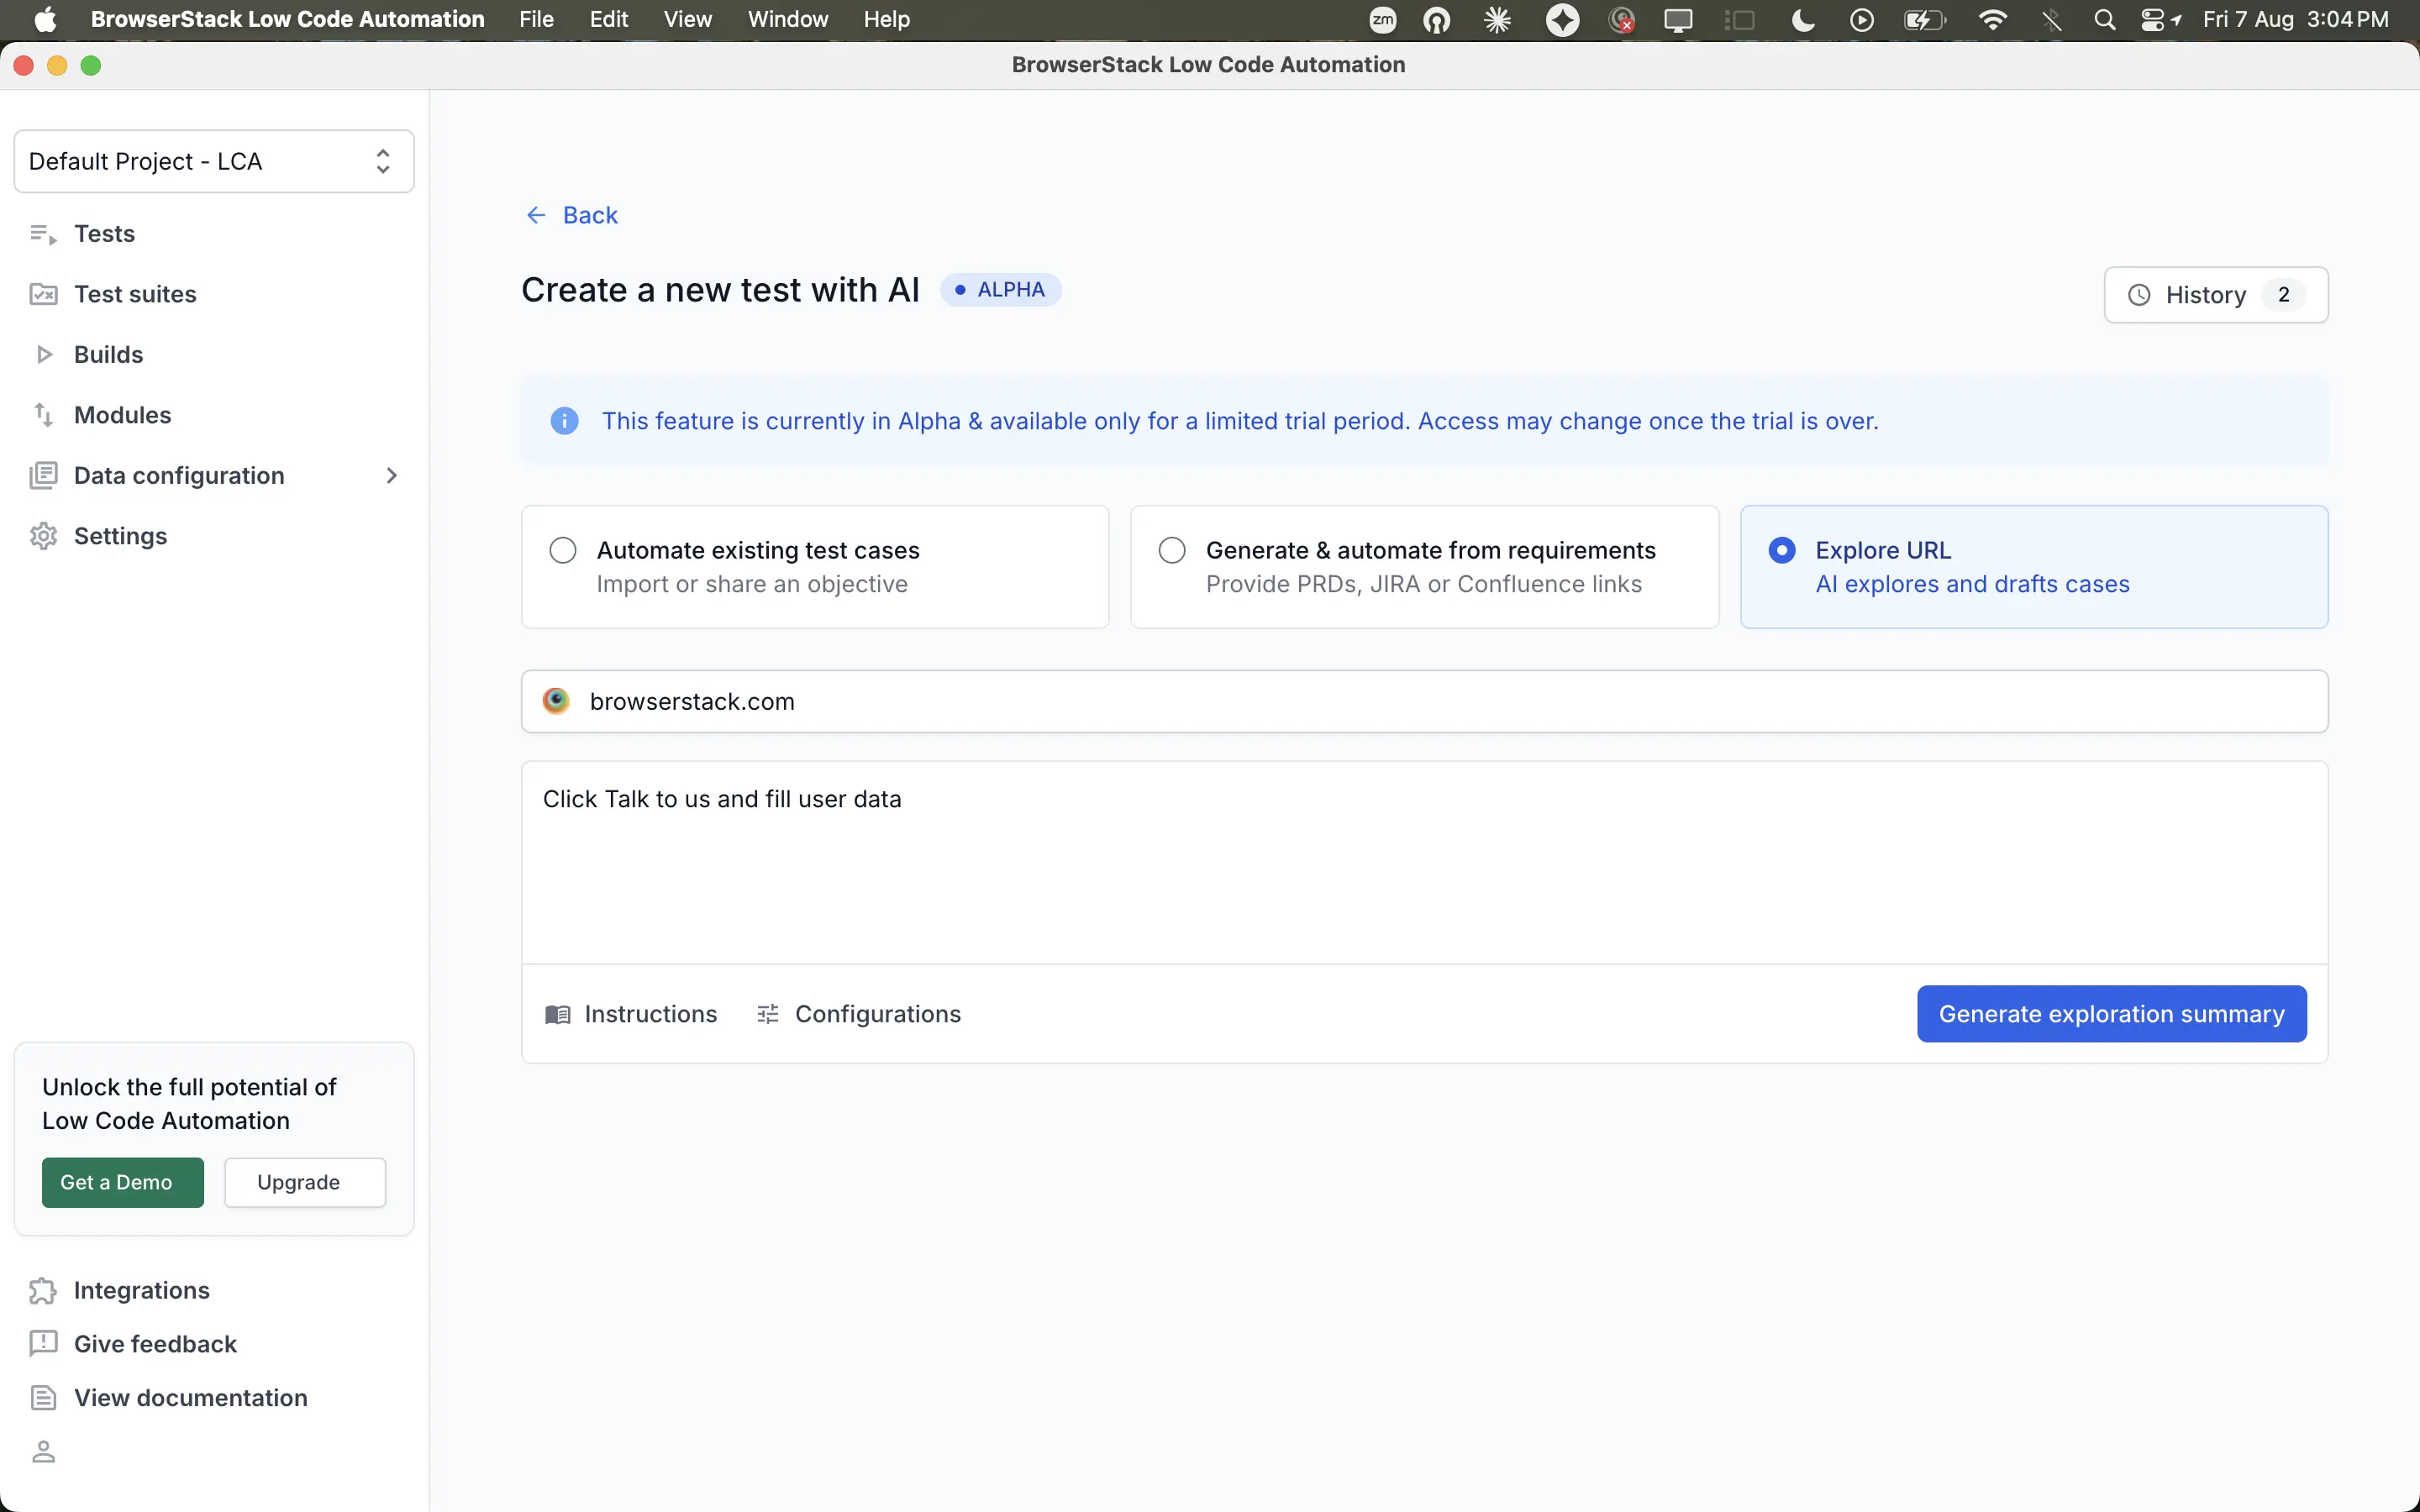
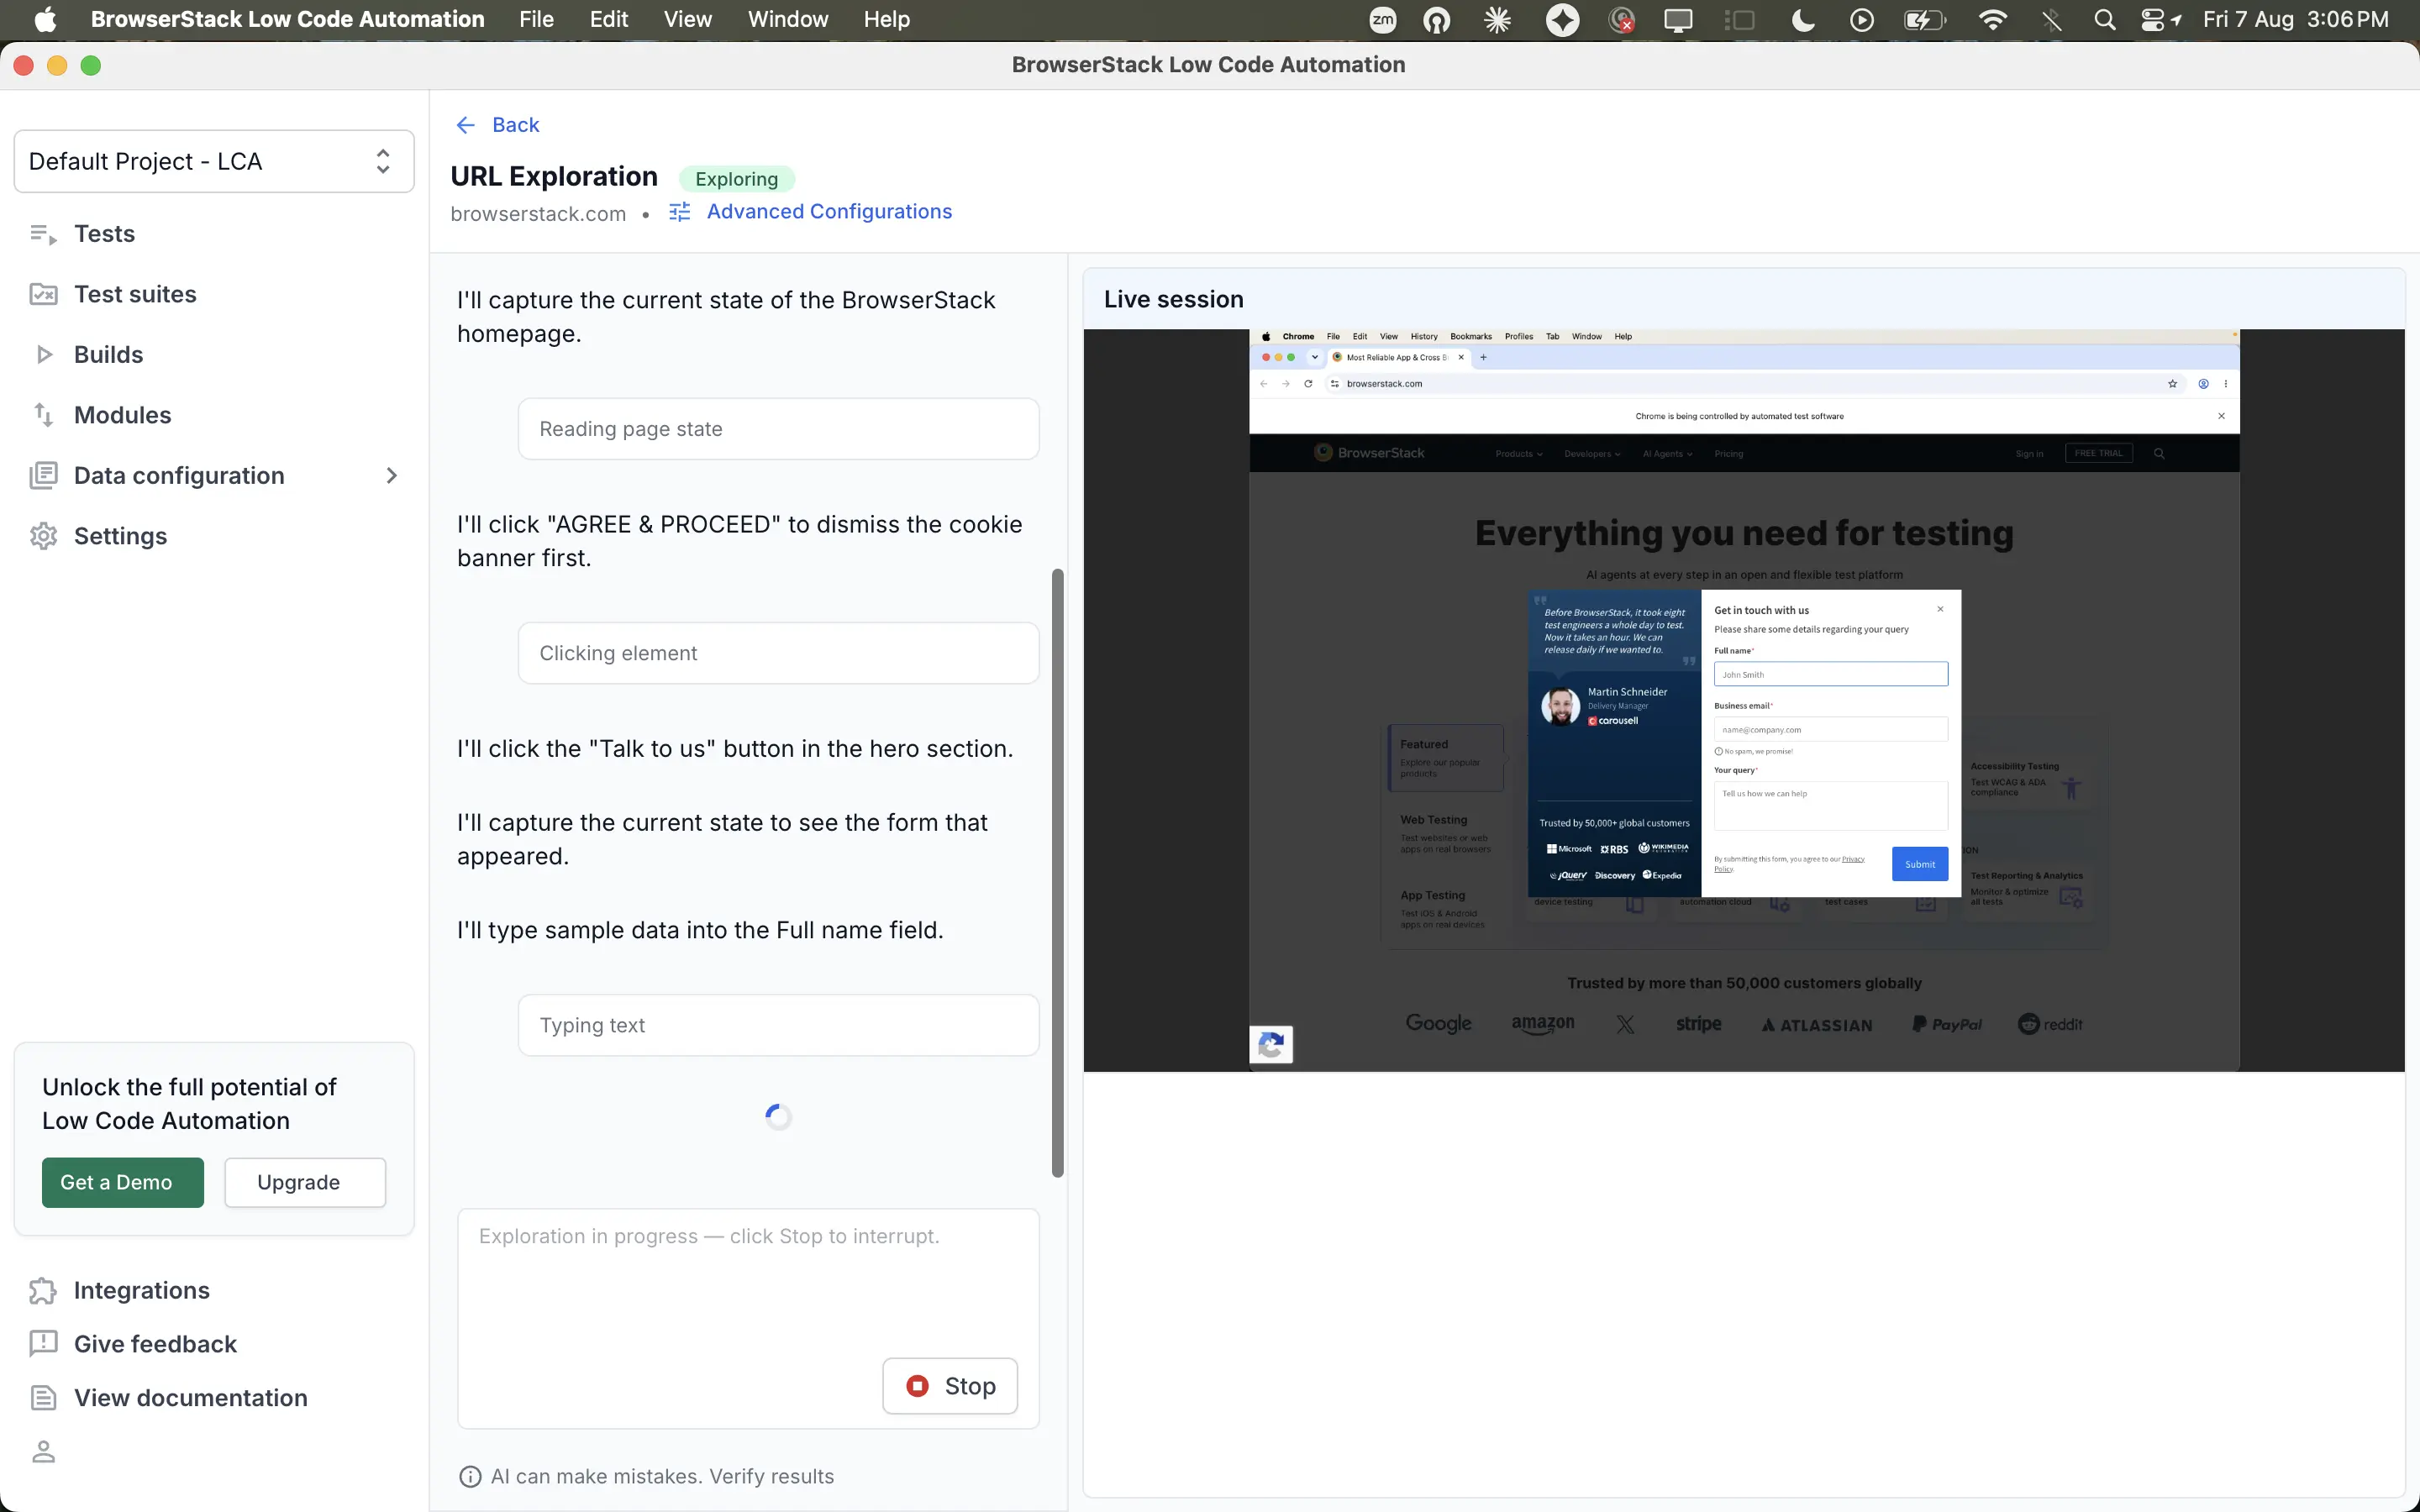
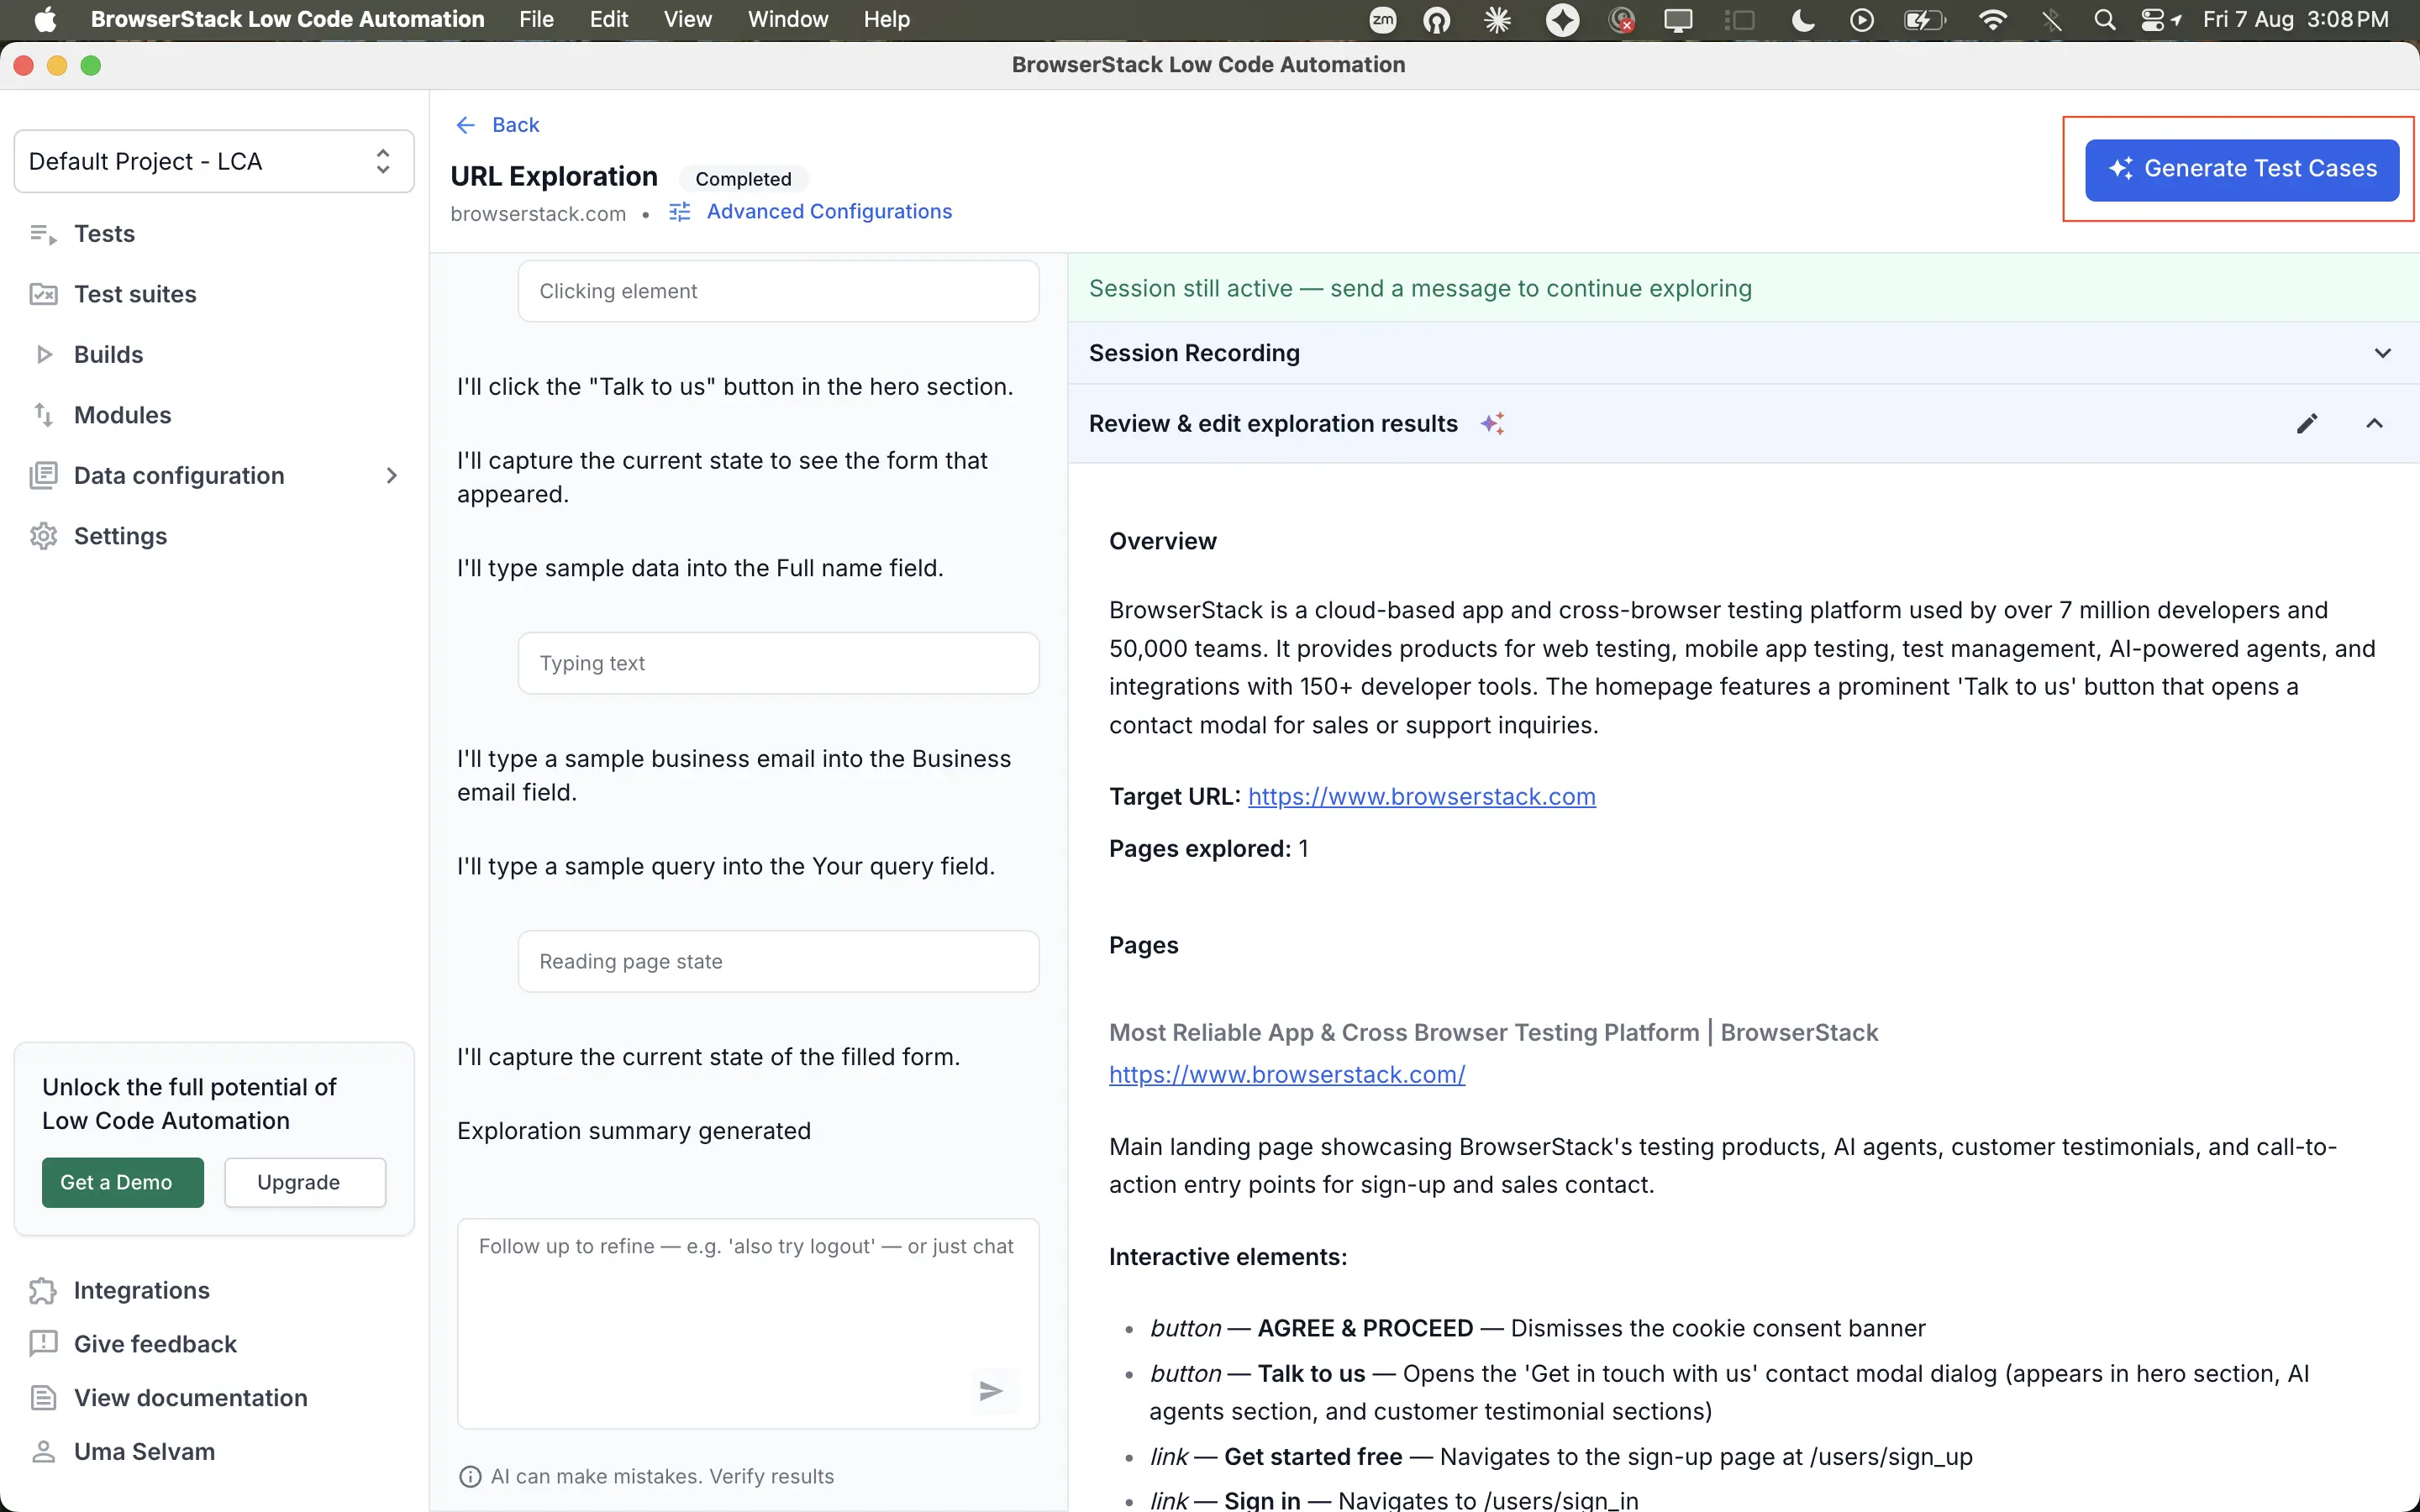
Step 2: Refine test cases before automation
Adjust the drafted test cases before AI automates them:
| Option | How to use it |
|---|---|
| Refine box | Describe the change you want, for example add more edge cases for checkout. AI re-plans the affected cases. |
| Recorded modules | Type # in the refine box and select a module, such as a login module. The module appears as a chip in your message. |
| Variables | Type @ and select a test data variable to use in a step. |
You can refine a test case using a recorded module. AI identifies where the module fits in the flow and adds it at that point:
For more information, see Modules, Variables, Global variables, and Upload files.
Step 3: Automate tests and configuration
AI automates the cases you select in parallel, instead of one at a time. To automate a set of test cases:
Select an entire scenario or individual test cases.
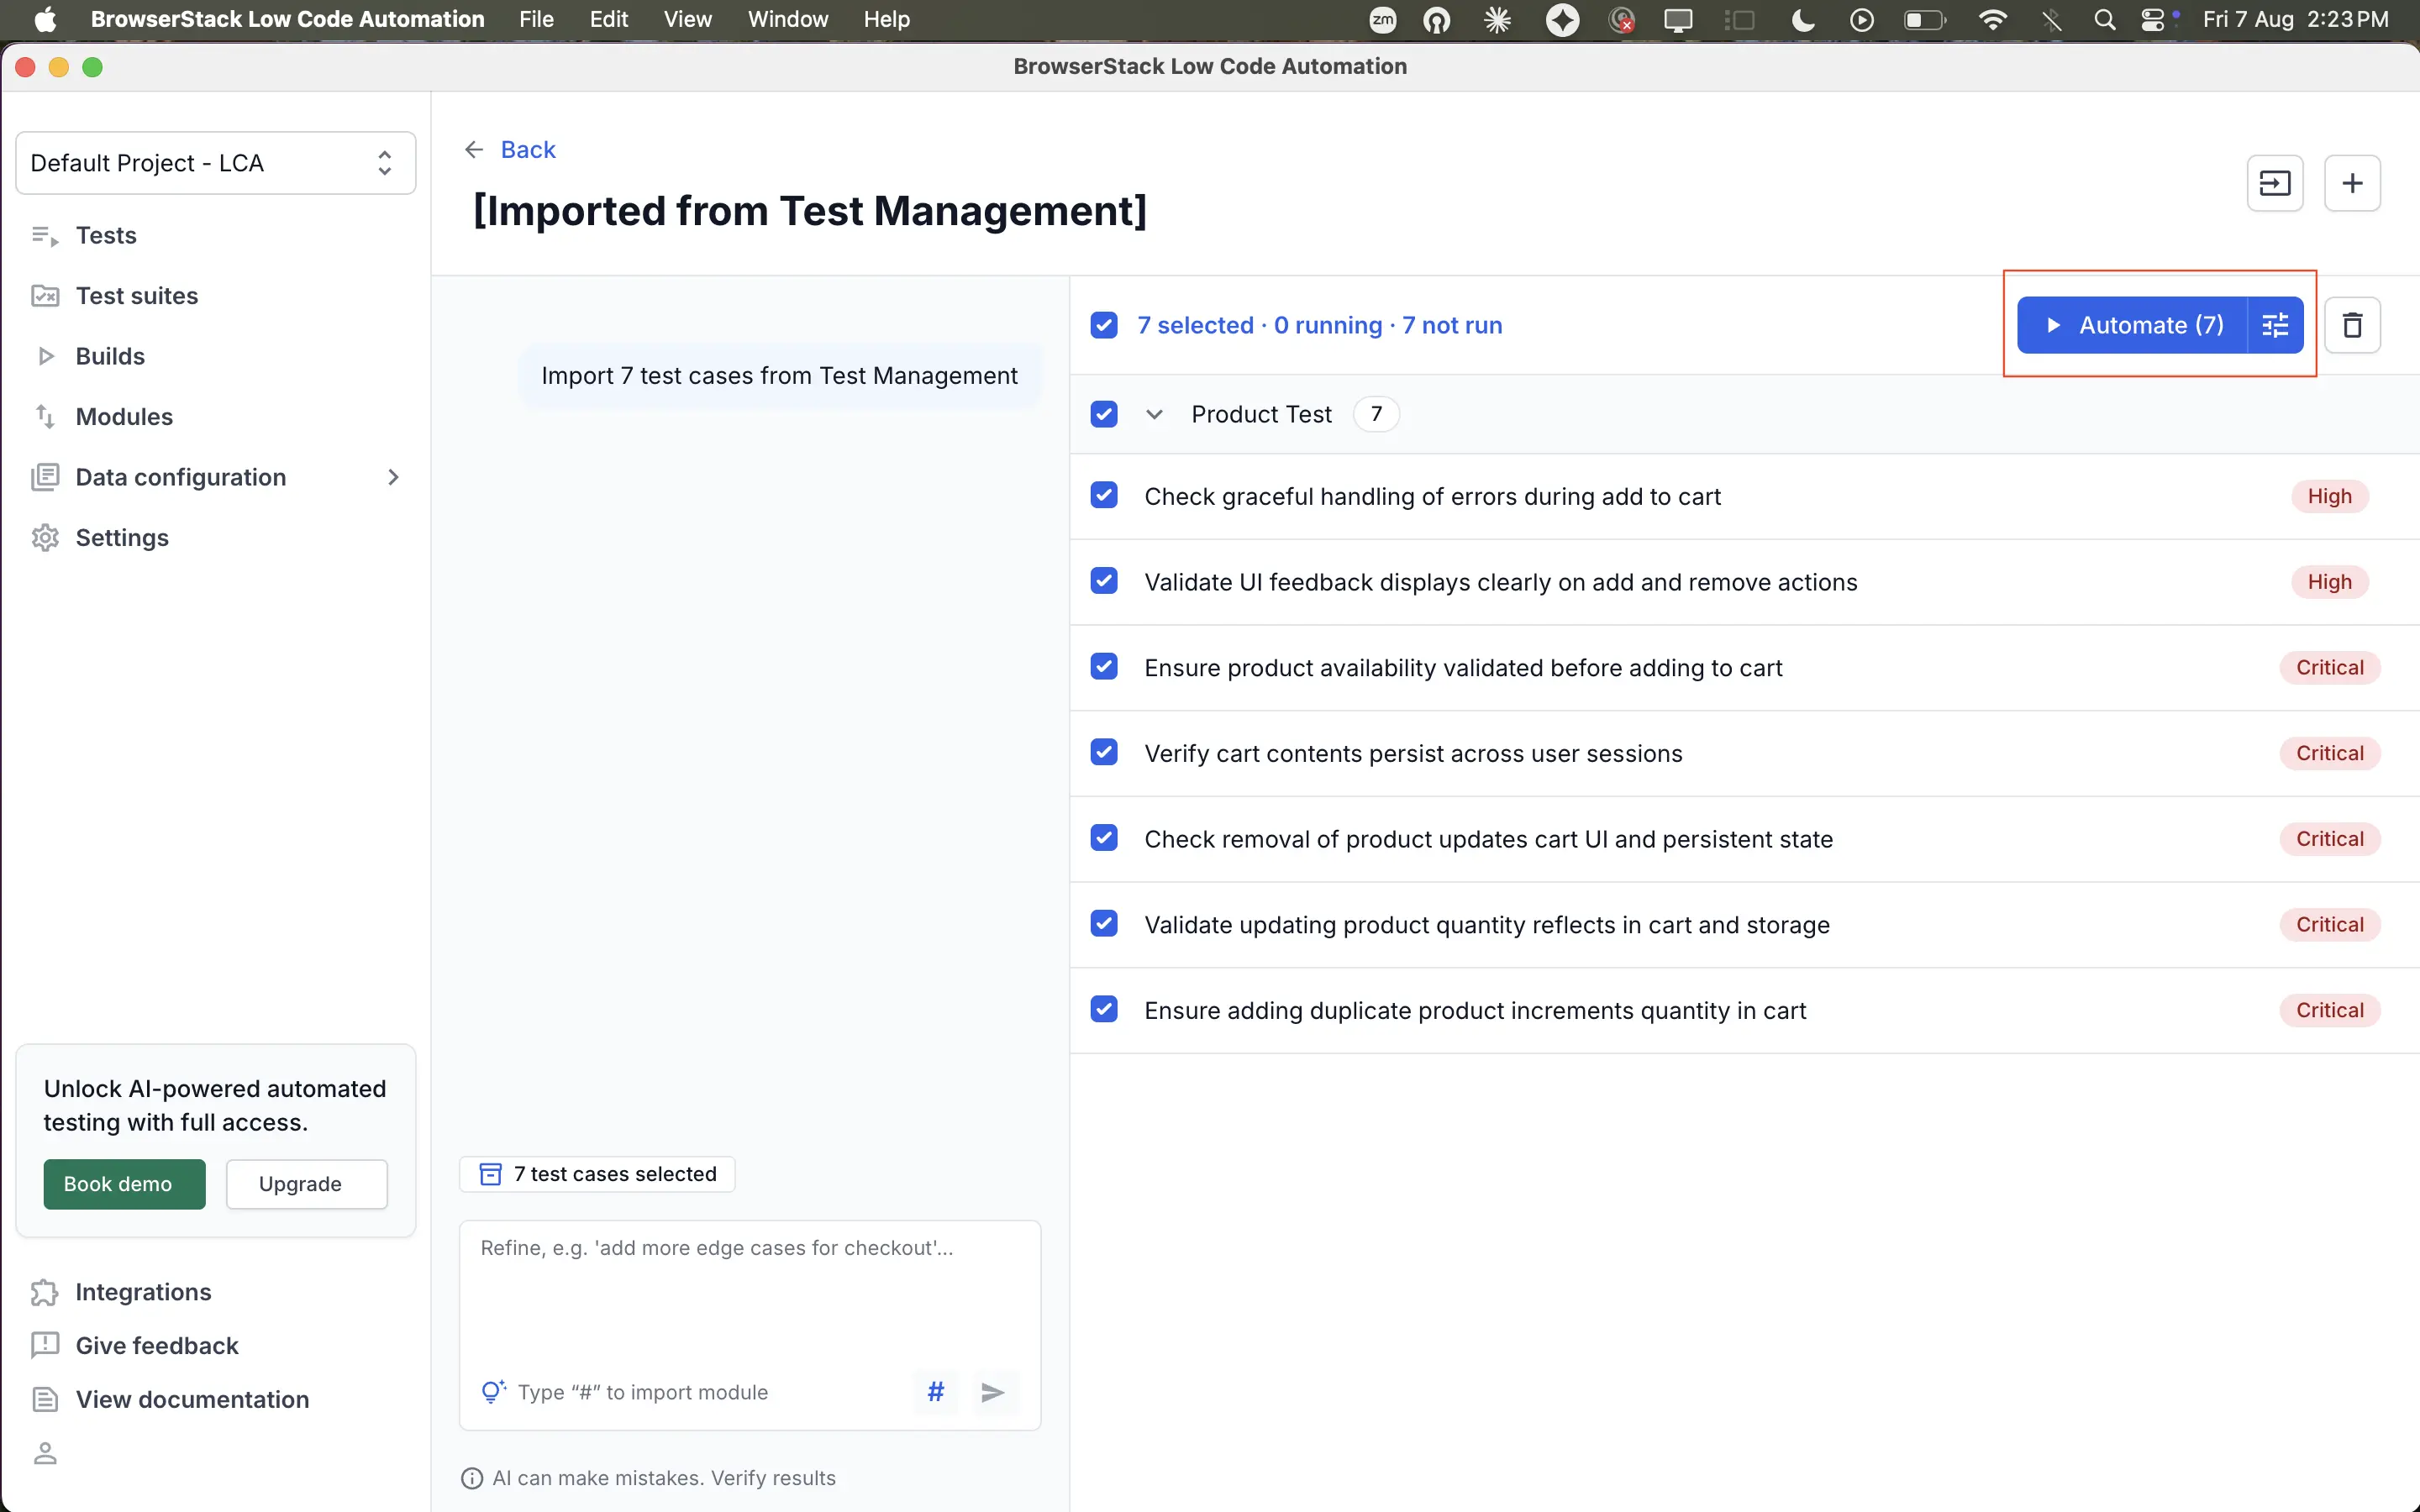
Optional: To change the run settings, click the settings icon beside Automate. The settings apply to the whole bulk run.
| Setting | Use it to | Reference |
|---|---|---|
| Enable local testing | Test a local, privately hosted, or IP-restricted website. | Test on internal network |
| Enable IP geolocation | Run the session from a specific country’s IP pool. | IP geolocation |
| Resolution | Set the device type and screen resolution for the run. | Configure device profile and resolution |
| Additional config | Set basic authentication, headers, cookies, and local storage on their own tabs. | Advanced options |
| Browser flags | Launch the browser with specific flags, on the last Additional config tab. | Browser flags |
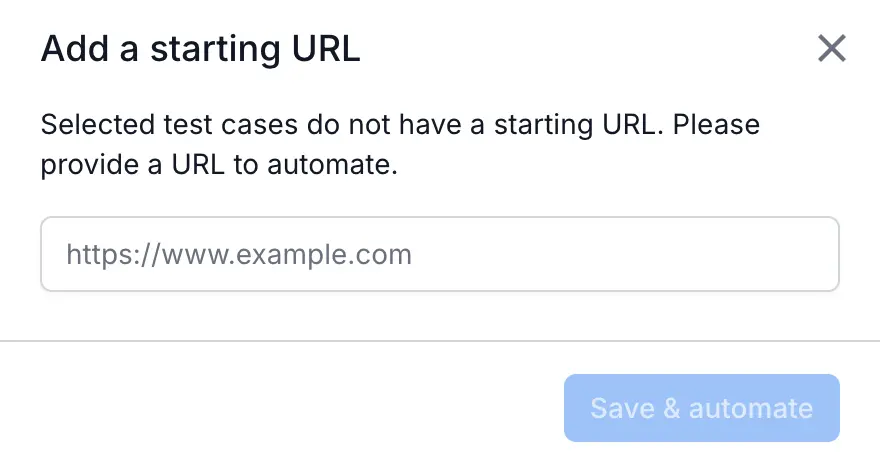
Click Automate. If the selected cases have no starting URL, the Add a starting URL dialog appears. Enter the URL, then click Save & automate. The URL is saved to the test case as a navigate to website step.
Currently, limited parallel automation runs can be triggered at a time per user per account. Anything beyond the limit is queued in the order you triggered it, and starts automatically as capacity frees up. Use the AI agent effectively for meaningful required test cases to avoid misuse.
How AI automates and refines
AI runs the following loop for each test case you automate:
For each natural language step, AI records the corresponding actions to meet the step’s objective.
Once recorded, AI replays the entire test end to end to verify that the automated test works fine in replay.
If the test fails during replay, AI fixes the automation by itself and reruns the test.
After the tests pass, you can save them and add them to your Low Code Automation tests.
To refine the automation further, provide instructions in the chat prompt.
If AI cannot automate a test case, you can take control back and automate it using the recorder.
Adaptive healing
When you automate tests with AI in Low Code Automation, your tests don’t just get created, they also get maintained. Adaptive healing is the capability that keeps your automated tests running even when the website they test keeps changing. Instead of a test breaking the moment a button moves or a label is reworded, the AI recognizes what the step was trying to do and adjusts on its own, so you spend less time fixing tests.
The problem it solves
Automated tests traditionally break for reasons that have nothing to do with a real bug:
- A button’s label changes from
Sign IntoLog In. - An element moves to a different part of the page, or the layout is redesigned.
- The underlying code behind a field changes, even though the field looks the same to a user.
With conventional automation, any of these snaps the test. Someone then has to open it, figure out what changed, and repair it by hand, over and over, across a whole suite. This ongoing test maintenance is one of the biggest hidden costs of test automation.
Adaptive Healing is built to remove that cost.
What it will and won’t do
Adaptive Healing is designed to be helpful without hiding problems:
- It heals when the way to do something changed, such as elements that moved, labels that were reworded, or a layout that was redesigned. These aren’t real defects, they’re just churn, and the test should keep going.
- It does not mask genuine failures. If your application actually behaves incorrectly, for example an expected result doesn’t appear, a value is wrong, or a page doesn’t load, that’s a real signal. The test reports it as a failure rather than healing it away.
This balance is the point: fewer false alarms from cosmetic changes, without losing the true failures you’re testing for.
Sessions and history
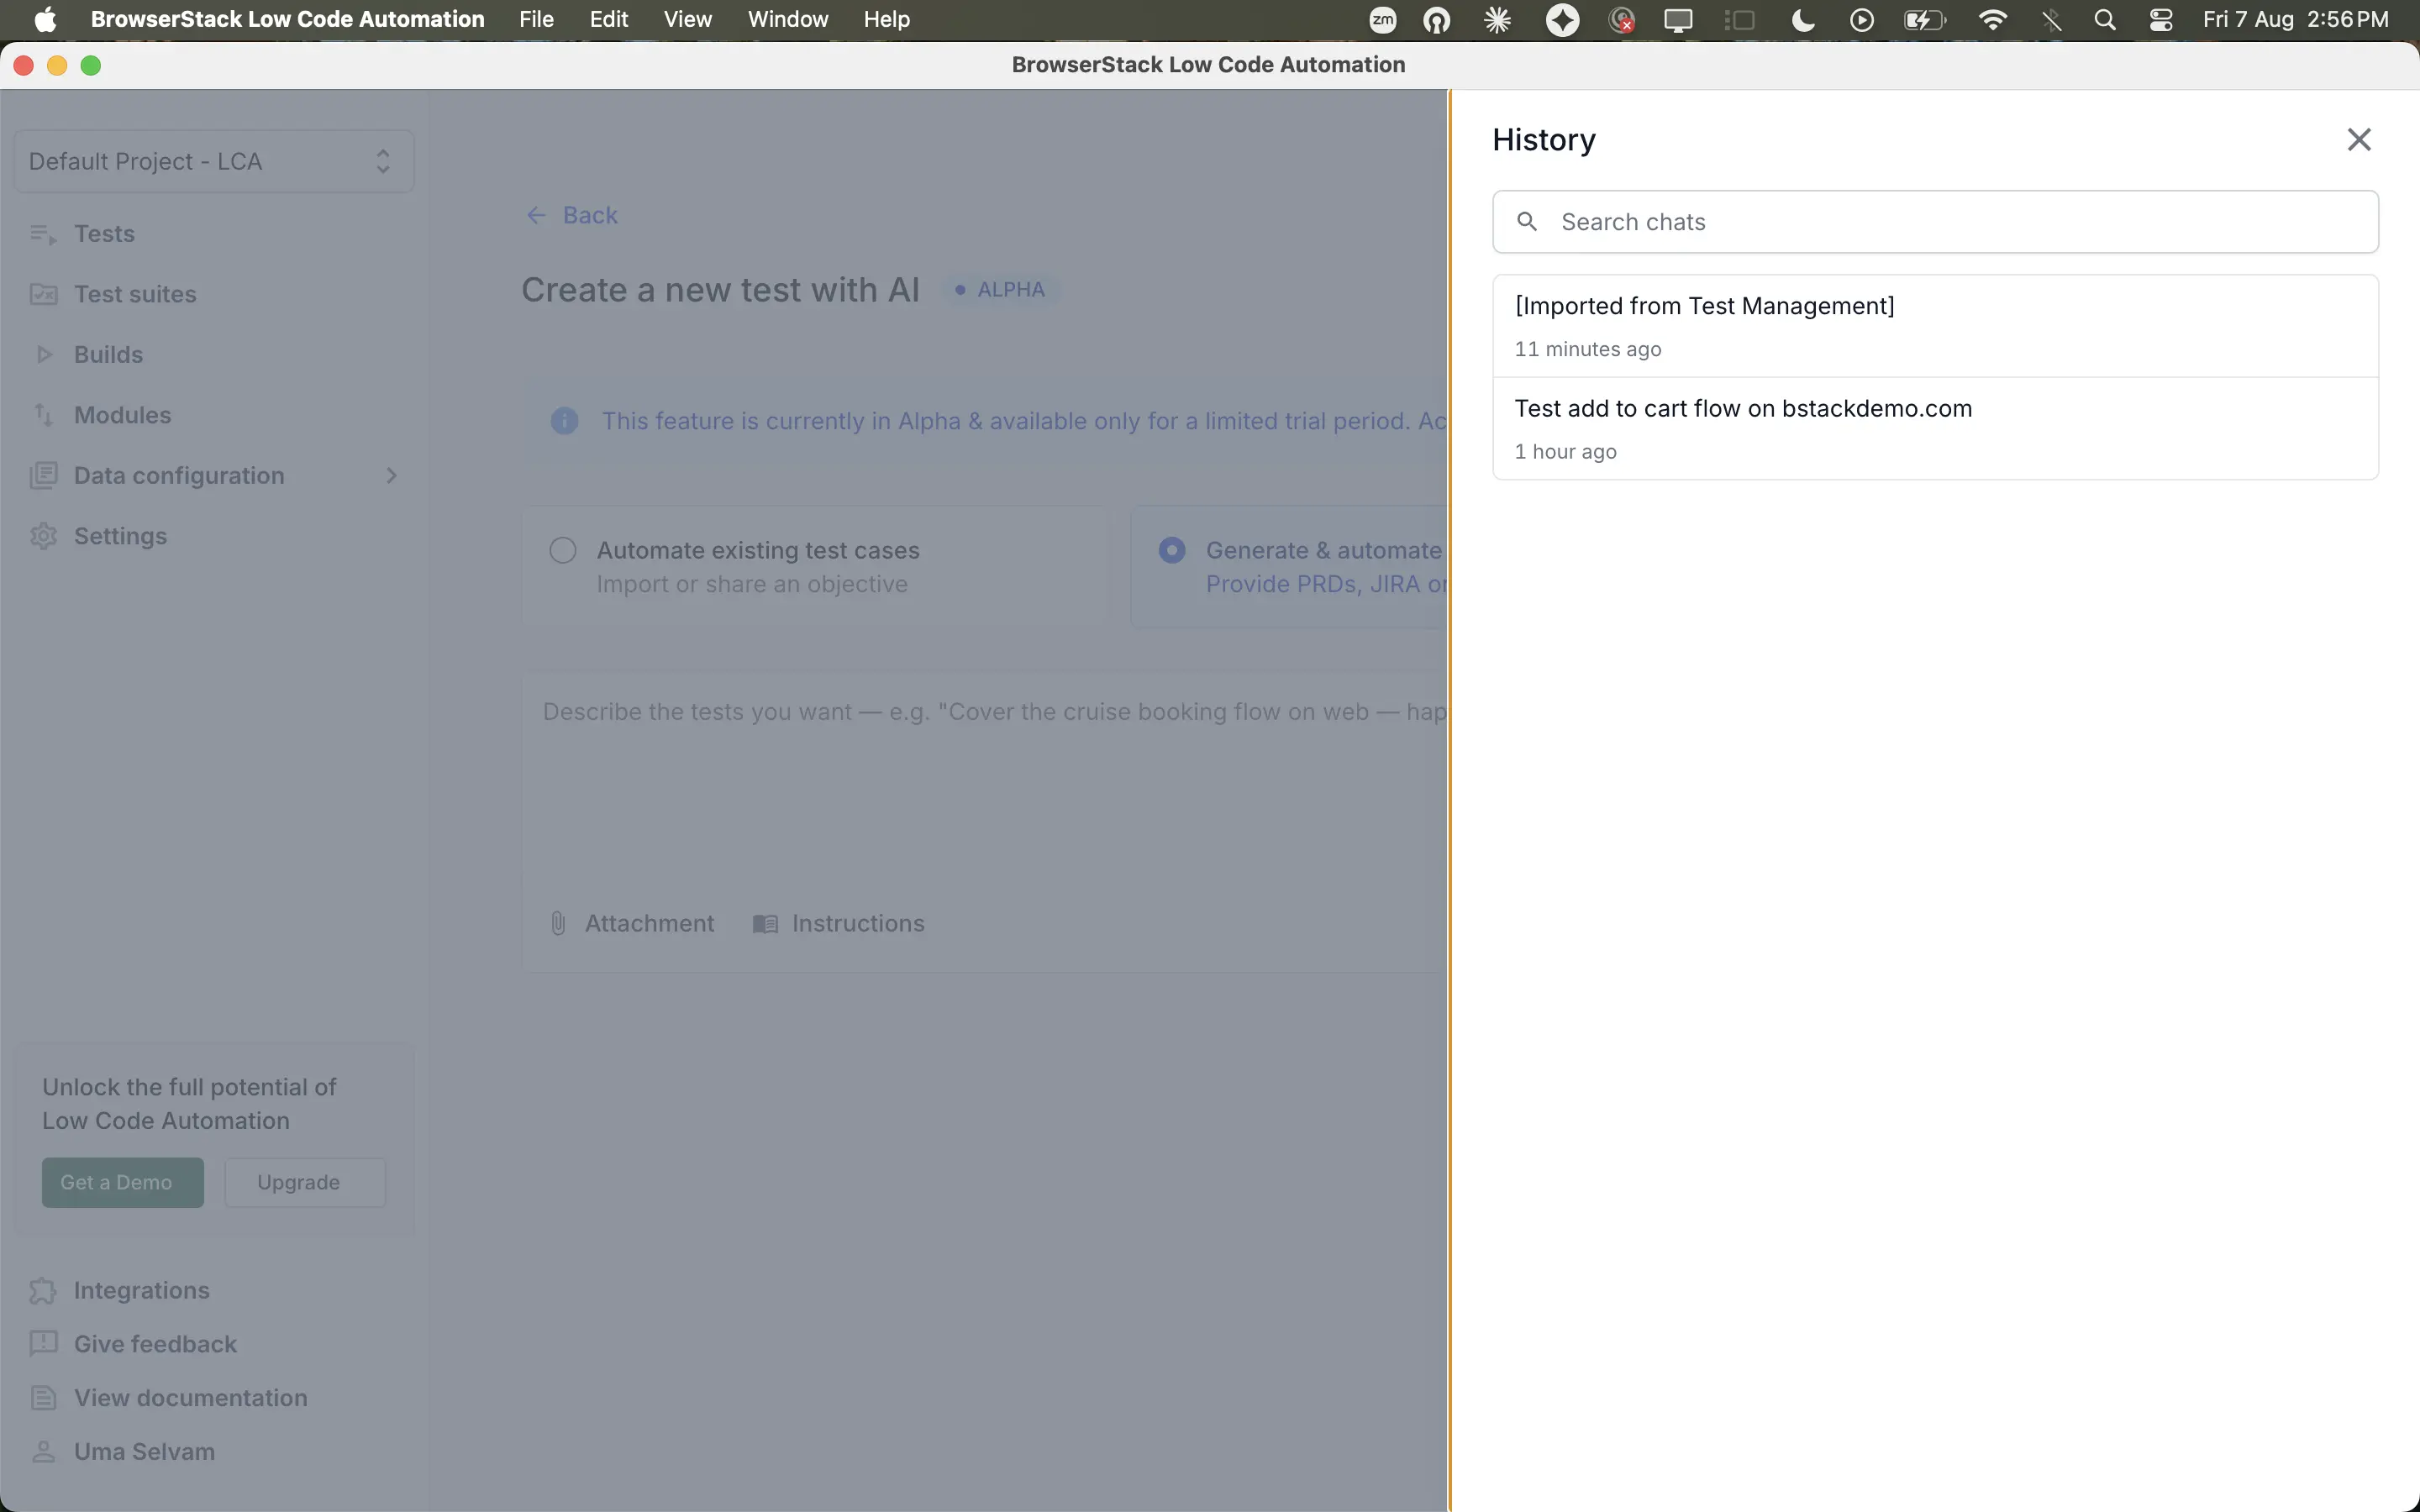
Every session you start is saved, and History shows how many you have. To return to an earlier session and continue where you left off, click History and select the session from the list.
Agentic Low Code Automation is presently in Alpha. You can automate up to 100 test cases per month, shared across all users on the account. The limit resets on the 1st of every month.
Need more help?
If you need any additional help, feel free to contact us.
We're sorry to hear that. Please share your feedback so we can do better
Contact our Support team for immediate help while we work on improving our docs.
We're continuously improving our docs. We'd love to know what you liked
We're sorry to hear that. Please share your feedback so we can do better
Contact our Support team for immediate help while we work on improving our docs.
We're continuously improving our docs. We'd love to know what you liked
Thank you for your valuable feedback!